| БрМЭЦМі: |
БОЮФжївЊНщЩмpythonНчУцПЊЗЂжавЛаЉзюГЃгУЕФИїИіПиМўВМОжЁЂЪєадЕФОпЬхЪЕЯжЙ§ГЬЃЌЯЃЭћЖдДѓМвгаАяжњЁЃ
БОЮФРДздгкМђЪщ ЃЌгЩЛ№СњЙћШэМўAliceБрМЃЌЭЦМіЁЃ |
|
ЯТУцетеХОЭЪЧЪЕЯжЕФећЬхНчУцЕФЪОвтЭМ
ЛљБОЙІФмНщЩмЃК
ЕуЛїАДМќnext videoЛсдкЯТУцЕФНчУцВЅЗХЪгЦЕ
ЪгЦЕВЅЗХЭъГЩКѓдкдЄВтгяОфКѓЕФЮФБОПђжаГіЯжЖдИУЪгЦЕЕФгявхУшЪі
ЕуЛїАДМќБъзЂгяОфПЩвддкЦфКѓЕФЮФБОПђжаеЙЪОЖдИУЪгЦЕЕФБъзЂгяОф
етЦЊЮФеТЩцМАЕФжЊЪЖЕуЛЙЪЧЭІЖрЕФХЖЃК
TkinterЛљБОПиМўЪЕЯж
TKinterПиМўЪєадгХЛЏ
TkinterЪЕЯжЪгЦЕВЅЗХ
ThreadingФЃПщЪЕЯжЖрЯпГЬБрГЬ
1 ОпЬхЪЕЯж
1.0 ЕМШыАќЁЂДДНЈНчУцРр
from Tkinter
import *
class Application(Frame):
def __init__(self, master=None):
Frame.__init__(self, master)
self.pack()
if __name__=='__main__':
app = Application()
# to do
app.mainloop() |
1.1 ЩшжУДАПкБъЬтЁЂНчУцзюДѓЛЏ
ОпЬхЕФКЏЪ§ШчЯТЫљЪОЃЌЯШЛёЕУЕБЧАЦСФЛЕФДѓаЁЃЌШЛКѓЩшжУДАПкДѓаЁЁЃ
def window_init(self):
self.master.title('welcome to video-captioning
system')
width,height=self.master.maxsize()
self.master.geometry("{}x{}".format(width,
height)) |
дк__init__ГѕЪМЛЏжаЕїгУМДПЩЁЃ
1.2 ЪЕЯжИїИіПиМўВМОж
1) ВМОжЗНЪННщЩм
ВМОжОЭЪЧПижЦИїИіПиМўдкећИіНчУцжаЕФЮЛжУЃЌTkinterзмЙВгаЃГжаВМОжЙмРэЦїЃЌЗжБ№ЪЧpack gridКЭplace
етЦЊВЉПЭРяИјСЫКмЯъЯИЕФЫЕУїЃКPython GUIжЎtkinterВМОжЙмРэ
змНсвЛаЉзюживЊЕФЖЋЮїАЩ:
packПЩвдЫуЪЧзюГЃгУЕФвЛжжВМОжЗНЪНЁЃОЭЪЧЯёШнЦїжаДгЩЯЕНЯТЃЈЛђепДгзѓЕНгв...ЃЉвРДЮЬэМгзщМўЁЃ
gridКмаЮЯѓЕигжГЦЮЊЭјИёВМОжЁЃАбОиаЮНчУцЗжГЩвЛИіМИааМИСаЕФЭјИёПщЃЌетбљОЭПЩвдАбзщМўЗХжУгкЭјИёжаЙЬЖЈЕФЮЛжУ.
placeетЪЧШ§жаВМОжжазюСщЛюЕФвЛжжЗНЪНЁЃИљОнзщМўдкНчУцжаЕФзјБъРДжЦЖЈЮЛжУЃЌЫљвдЛсБШНЯСщЛюЃЌЕЋвВвтЮЖзХВЛФЧУДЮШЖЈЁЃ
ЫљгаЕФШ§жжВМОжЖМПЩвдЪЙгУШнЦїжаЗХШнЦїЕФЗНЗЈЃЌетЪЧЗЧГЃЪЙгУЕФвЛИіММЧЩЁЃ
2) ВМОжЩшМЦЭМ
ЮвбЁдёШЋВПгУpackЕФЗНЪНРДЭъГЩвГУцЕФВМОжЙЄзїЁЃ
ОпЬхЕФЩшМЦЭМШчЯТЫљЪОЃК
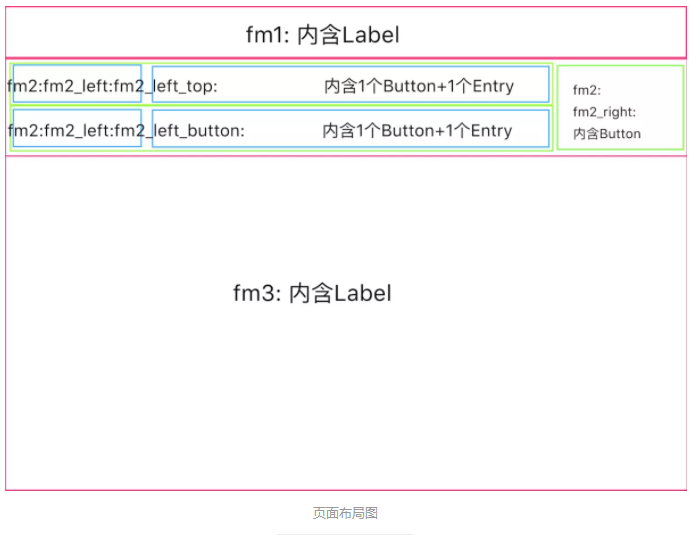
ЮввбООЁСІШЅЛСЫЃЌВЛжЊЕРетбљЪЧВЛЪЧЧхГўЁЋ
змЙВДгЩЯЕНЯТЗжГЩЃГИіFrame: fm1 ЁЁ fm2 ЁЁ fm3
ЕквЛИіFrameРяУцАќКЌвЛИігУРДЯдЪОtitileЕФLabel
ЕкШ§ИіFrameРяУцАќКЌвЛИігУРДЯдЪОЪгЦЕжЁЭМЯёЕФLabel
ЕкЖўИіFrameРяУцгжЗжГЩзѓгвСНИіаЁЕФШнЦїЃКfm2_left ЁЁ fm2_right
гвБпЕФfm2_rightОЭАќКЌвЛИігУРДВЅЗХЪгЦЕЕФButtton
зѓБпЕФfm2_leftгжЗжЮЊЩЯЯТСНИіИќаЁЕФШнЦїЃКfm2 _ left_
top ЁЁ fm2_lef_bottom
fm2_left_top fm2_lef_bottomРяУцЖМИїздАќКЌвЛИіАДХЅButtonКЭвЛИігУРДЯдЪОЮФБОЕФEntry
3) ВМОжЪЕЯжДњТы
ЮвУЧЯШВЛЙмОпЬхЕФЯИНкЃЌжБНгАбИїИіПиМўЕФВМОжЮЛжУИјЖЈЯТРДЃЌНчУцгХЛЏЕФВПЗжЗХЕНКѓУцШЅдйЬэМгЁЃ
АДееЩЯУцЕФВМОжЩшМЦЭМЃЌЪгЦЕЧјгђднЧвгУвЛеХЭМЦЌЬцДњЃЌгУpack()ЪЕЯжЛљБОВМОжШчЯТЃК
def createWidgets(self):
# fm1
self.fm1=Frame(self)
self.titleLabel=Label(self.fm1,text='video
-captioning
system')
self.titleLabel.pack()
self.fm1.pack(side= TOP)
# fm2
self.fm2=Frame(self)
self.fm2_left=Frame(self.fm2)
self.fm2_right=Frame(self.fm2)
self.fm2_left_top=Frame(self.fm2_left)
self.fm2_left_bottom=Frame(self.fm2_left)
self.predictButton=Button(self.fm2_left_top,
text='predict
sentence')
self.predictButton.pack(side=LEFT)
self.predictEntry=Entry(self.fm2_left_top)
self.predictEntry.pack(side=LEFT)
self.fm2_left_top.pack(side=TOP)
self.truthButton=Button(self.fm2_left_bottom,
text='ground
truth')
self.truthButton.pack(side=LEFT)
self.truthEntry=Entry(self.fm2_left_bottom)
self.truthEntry.pack(side=LEFT)
self.fm2_left_bottom.pack(side=TOP)
self.fm2_left.pack(side=LEFT)
self.nextVideoButton=Button(self.fm2_right,text
='next
video')
self.nextVideoButton.pack()
self.fm2_right.pack(side=LEFT)
self.fm2.pack(side=TOP)
# fm3
self.fm3=Frame(self)
load = Image.open('/home/hl/Desktop/lovelyqian/me.jpg')
print (load)
render= ImageTk.PhotoImage(load)
self.img = Label(self.fm3,image=render)
self.img.image = render
self.img.pack()
self.fm3.pack(side=TOP) |
зЂ: ЭМЦЌЕФДІРэвЊМгШыЭЗЮФМў
from PIL import Image, ImageTk
зюжеаЇЙћЭМЃК
ЖдБШЩЯЯТСНеХЭМЃЌПЩФметОЭЪЧРэЯыгыЯжЪЕЕФВюОрАЩЃЌЙўЙўЙўЙў
етРяЛЙжЛЪЧЪЕЯжСЫВМОжЕФЖЈвхКЭЛљБОЮЛжУЕФЗХжУЃЌЫфШЛецЕФКмГѓЃЌЕЋЪЧВЛвЊзХМБЃЌНгЯТРДЮвУЧОЭПЩвддкетИіЛљДЁЩЯзівЛаЉПиМўДѓаЁЕФаоИФвдМАЦфЫћЕФНчУцУРЛЏЙЄзїЁЃ
4) ПиМўЪєадЩшжУМАНчУцгХЛЏ
ЩшжУжїДАПкБГОАЮЊКкЩЋ
РћгУ FrameЕФbgЪєад
вЊМЧЕУpack()ЕФЪБКђЩшжУЮЊШЋРЉГф
вдзюДѓЕФЕзДАПкЮЊР§ЃК
class Application(Frame):
def __init__(self, master=None):
Frame.__init__(self, master,bg='black')
self.pack(expand=YES,fill=BOTH) |
ИїИіПиМўЪєадЩшжУ
БОРДДђЫувЛЕуЕуМЧТМОпЬхЪЕЯжЕФЙ§ГЬЕФЃЌЕЋЗЂЯжЪЕдкЪЧЬЋТщЗГСЫЁЃ
жївЊОЭЪЧБпбЇБфгУЃЌВЮПМзЪСЯЖМдкЯТУцСаГіРДСЫЁЃ
ИФЖЏСЫГЃгУЕФвЛаЉЪєадЃЌБШШчзжЬхДѓаЁЁЂзжЬхЧАОАЩЋЁЂКѓОАЩЋЁЂАДХЅДѓаЁЕШЕШЁЃ
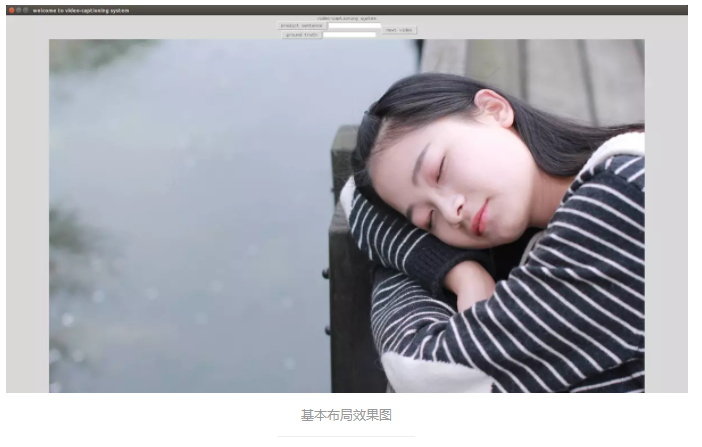
ОпЬхЕФЪЕЯжДњТыЯШгУЭМЦЌЕФЗНЪНЗХдкетРяЃЌдкзюКѓЛсИјГіЭъећЕФДњТыЁЃ
ИааЫШЄЕФЛАИњЩЯУцФЧЖЮДњТыЖдБШвЛЯТОЭПЩвдКмЗНБуЕФжЊЕРИїИіЪєадЕФПижЦЗНЗЈЃЌетРяОЭВЛдйТоСаСЫЁЃ
зюКѓЕФЪЕЯжаЇЙћЃК
ВюВЛЖрЯШетбљАЩЃЌШЅГдИіЮчЗЙЃЌЯТЮчЛиРДМЬајаДЙІФмКЏЪ§ЁЋЁЋЁЋ
1.3 ИїИіКЏЪ§ЙІФм
1) ЯдЪОЮФБО
етРяжЛашвЊбЇЯАвЛЯТEntryетИіПиМўЁЃ
EntryЪЧгУРДНгЪеКЭЯдЪОзжЗћДЎЕФПиМўЁЃ
жївЊСЫНтНгЪмЮФзжЁЂЗЂЫЭЮФзжЁЂЧхГ§ЮФзжетЃГИіЙІФмОЭПЩвдСЫЁЃ
myEntry.get()ЛёШЁФкШн
myEntry.insert(10,"hello")дкЮЛжУ10ДІЃЌЬэМгФкШн
myEntry.delete(first,last=None)ЩОГ§Дг ЁАfirstЁБ ЕН ЁАlastЁБ
жИЖЈЗЖЮЇФкЕФзжЗћ. ЪЙгУ delete(0, END)ПЩвдЩОГ§ Entry ПиМўвбЪфШыЕФШЋВПзжЗћ.
2) АДХЅДЅЗЂ
жЛашвЊдкАДХЅжаЬэМгЪєадcommandМДПЩЁЃ
вдЕуЛїpredictButtonАДХЅЪЕЯжНЋЮФБОЯдЪОЕНКѓУцЕФЮФБОПђжаЮЊР§ЃК
#...
self.predictButton=Button(self.fm2_left_top,text='predict
sentence',bg='#FF4081',fg='white',font=('ЮЂШэбХКк',36),width='16',command=self.output_predict_sentence)
def output_predict_sentence(self):
predicted_sentence_str='hello world.'
self.predictEntry.delete(0,END)
self.predictEntry.insert(0,predicted_sentence_str) |
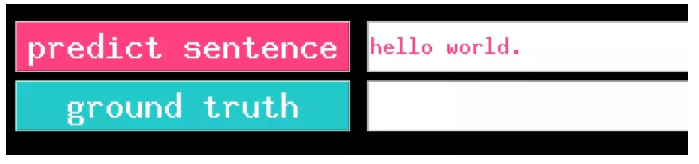
етбљУПДЮЕуЛїАДМќОЭЛсЯШАбПђПђФкЕФЮФзжЧхПеЃЌШЛКѓЪфГіФужИЖЈЕФЮФБОЁЃ
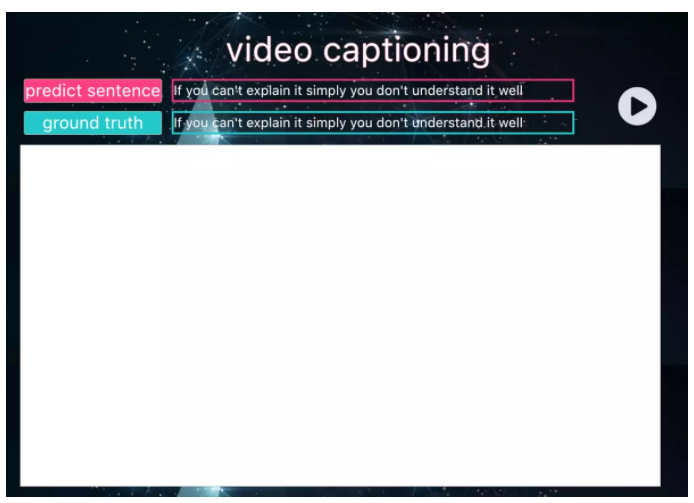
3) ЪгЦЕВЅЗХ
етИіПЩФмЪЧзюФбЕФвЛИіВПЗжСЫФиЁЋ
TkinterЪЧУЛгажЇГжЪгЦЕВЅЗХЕФдЩњПиМўЕФЃЌАйЖШевСЫКУОУЖМУЛгаевЕННтОіЗНАИЃЌИааЛGoogleДѓЗЈЃЌдкетРяевЕНСЫвЛИіЗЧГЃКУЕФР§згЃЌЛЙКУФОгаЗХЦњЁЋЁЋ
етИіР§згЪЕЯжЕФЪЧДгЩуЯёЭЗЛёШЁЪгЦЕСїЃЌШЛКѓЗХдкTkinterЪЕЯжЕФGUIДАПкжаЃЌАДХЅПЩвдЪЕЯжЪгЦЕНиЦСВЂБЃДцЕФаЇЙћЁЃ
ЖдДњТызіСЫМђЛЏжЎКѓЪЕЯжНЋЪгЦЕВЅЗХдкTKinterДАПкжаДњТыШчЯТЫљЪОЃК
from __future__
import print_function
from PIL import Image,ImageTk
import Tkinter as tki
import threading
import imutils
import cv2
import time
import imageio
class videoPlayer():
def __init__(self):
self.frame = None
self.thread = None
self.stopEvent = None
# initialize the root window and image panel
self.root = tki.Tk()
self.panel = None
# start a thread that constantly pools the
video sensor for
# the most recently read frame
self.stopEvent = threading.Event()
self.thread = threading.Thread(target=self.videoLoop,
args=())
self.thread.start()
def videoLoop(self):
# keep looping over frames until we are instructed
to stop
video_path='/home/hl/Desktop/lovelyqian/CV_Learning/
video_to_sequence/video_to_sequence-master/data/
youtube_videos/_0nX-El-ySo_83_93.avi'
video=imageio.get_reader(video_path,'ffmpeg')
for frame in video:
self.frame = imutils.resize(frame, width=300)
image = cv2.cvtColor(self.frame, cv2.COLOR_BGR2RGB)
image = Image.fromarray(image)
image = ImageTk.PhotoImage(image)
# if the panel is not None, we need to initialize
it
if self.panel is None:
self.panel = tki.Label(image=image)
self.panel.image = image
self.panel.pack(side="left", padx=10,
pady=10)
# otherwise, simply update the panel
else:
self.panel.configure(image=image)
self.panel.image = image
time.sleep(0.02)
myVideoPLayer = videoPlayer()
myVideoPLayer.root.mainloop() |
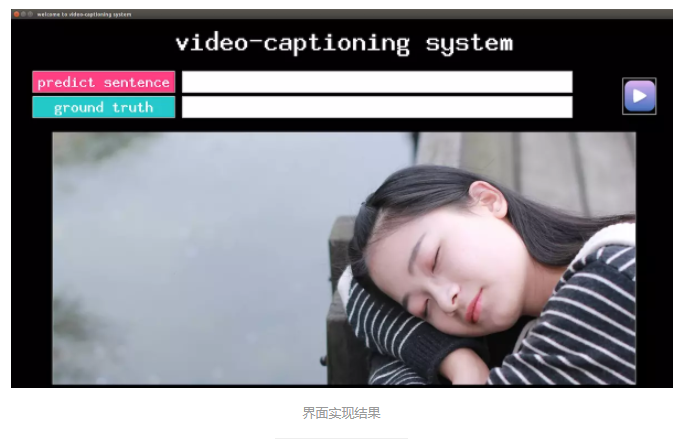
ЖдЩЯУцЕФДњТыдйзівЛИіаоИФећКЯОЭПЩвдСЫЁЃ
4) ЖрЯпГЬЮЪЬт
вђЮЊвЊЪгЦЕЪгЦЕВЅЗХЕФЙІФмЃЌЫљвдЮвУЧЛЙвЊбЇЯАвЛЯТpythonЕФЖрЯпГЬЁЃ
вВВЛЪЧКмФбЃЌЯыОпЬхСЫНтЕФПЩвдЕуЛїЮФФЉЕФВЮПМзЪСЯЁЃ
import threadingЕМШыЯпГЬФЃПщ
self.thread=threading.Thread ( target=self.play
_ next _ video, args = ())ОЭЖЈвхКУСЫЯШЕФЯпГЬЁЃ
targetжИУїИУЯпГЬЦєЖЏКѓЛсЕїгУФФИіКЏЪ§
self.thread.start()ЦєЖЏИУЯпГЬ
ЕБКЏЪ§жДааНсЪјЪБЃЌИУЯпГЬОЭздЖЏНсЪј
ЫљвдУПДЮЯывЊгУЖрЯпГЬжДааЪгЦЕВЅЗХЕФЪБКђЃЌжЛвЊЩњГЩвЛИі target
= self . paly _ next_videoЕФЯпГЬМДПЩЁЃ
ФЧУДФмВЛФмжЛЖЈвхвЛДЮЯпГЬЃЌШЛКѓУПДЮstartЫќФиЃЌД№АИЪЧВЛФмЕФЙўЙўЙўЙўЁЃ
2 ЭъећДњТы
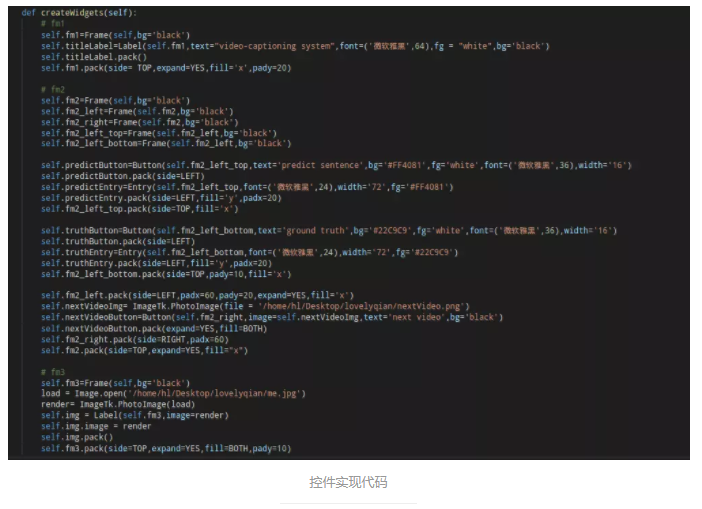
зюКѓвЊЗХДѓеаРВЃЌзМБИКУСЫТ№ЃП
ЭъећЕФДњТыЖМдкЯТУцСЫЃЌгаашвЊздШЁХЖЁЃ
#-*- coding:utf-8
-*-
from Tkinter import *
from PIL import Image, ImageTk
import threading
import imageio
import imutils
import time
import cv2
class Application(Frame):
def __init__(self, master=None):
Frame.__init__(self, master,bg='black')
self.pack(expand=YES,fill=BOTH)
self.window_init()
self.createWidgets()
def window_init(self):
self.master.title('welcome to video-captioning
system')
self.master.bg='black'
width,height=self.master.maxsize()
self.master.geometry("{}x{}".format(width,
height))
def createWidgets(self):
# fm1
self.fm1=Frame(self,bg='black')
self.titleLabel=Label(self.fm1,text="video-captioning
system",font=('ЮЂШэбХКк',64),fg = "white",bg='black')
self.titleLabel.pack()
self.fm1.pack(side= TOP,expand=YES,fill='x',pady=20)
# fm2
self.fm2=Frame(self,bg='black')
self.fm2_left=Frame(self.fm2,bg='black')
self.fm2_right=Frame(self.fm2,bg='black')
self.fm2_left_top=Frame(self.fm2_left,bg='black')
self.fm2_left_bottom=Frame(self.fm2_left,bg='black')
self.predictEntry=Entry(self.fm2_left_top,font=
('ЮЂШэбХКк',24),width='72',fg='#FF4081')
self.predictButton=Button(self.fm2_left_top,text='
predict
sentence',bg='#FF4081',fg='white',font=
('ЮЂШэбХКк',36),width='16',command=self.output_predict_sentence)
self.predictButton.pack(side=LEFT)
self.predictEntry.pack(side=LEFT,fill='y',padx=20)
self.fm2_left_top.pack(side=TOP,fill='x')
self.truthEntry=Entry(self.fm2_left_bottom,font=
('ЮЂШэбХКк',24),width='72',fg='#22C9C9')
self.truthButton=Button(self.fm2_left_bottom,text='
ground
truth',bg='#22C9C9',fg='white',font=
('ЮЂШэбХКк',36),
width='16',command=self.output_ground_truth)
self.truthButton.pack(side=LEFT)
self.truthEntry.pack(side=LEFT,fill='y',padx=20)
self.fm2_left_bottom.pack(side=TOP,pady=10,fill='x')
self.fm2_left.pack(side=LEFT,padx=60,pady=20,
expand=YES,fill='x')
self.nextVideoImg= ImageTk.PhotoImage(file =
'/home/hl/
Desktop/lovelyqian/nextVideo.png')
self.nextVideoButton=Button(self.fm2_right,image=self.
nextVideoImg,text='next
video',bg='black',command=self.
start_play_video_thread)
self.nextVideoButton.pack(expand=YES,fill=BOTH)
self.fm2_right.pack(side=RIGHT,padx=60)
self.fm2.pack(side=TOP,expand=YES,fill="x")
# fm3
self.fm3=Frame(self,bg='black')
load = Image.open('/home/hl/Desktop/lovelyqian/me.jpg')
initIamge= ImageTk.PhotoImage(load)
self.panel = Label(self.fm3,image=initIamge)
self.panel.image = initIamge
self.panel.pack()
self.fm3.pack(side=TOP,expand=YES,fill=BOTH,pady=10)
def output_predict_sentence(self):
predicted_sentence_str='hello world.'
self.predictEntry.delete(0,END)
self.predictEntry.insert(0,predicted_sentence_str)
def output_ground_truth(self):
ground_truth='this is ground truth.'
self.truthEntry.delete(0,END)
self.truthEntry.insert(0,ground_truth)
def start_play_video_thread(self):
self.thread=threading.Thread(target=self
.play_next_video,args=())
self.thread.start()
def play_next_video(self):
self.predictEntry.delete(0,END)
self.truthEntry.delete(0,END)
# to play video
self.video_path='/home/hl/Desktop/lovelyqian
/CV_Learning/video_to_sequence/video_to_sequence-master/data/youtube
_videos/_0nX-El-ySo_83_93.avi'
self.video=imageio.get_reader(self.video_path,
'ffmpeg')
for self.videoFrame in self.video:
self.videoFrame=imutils.resize(self.videoFrame,
width=1760,
height=1080)
# to do
self.image=cv2.cvtColor(self.videoFrame,cv2.
COLOR_BGR2RGB)
self.image=Image.fromarray(self.image)
self.image=ImageTk.PhotoImage(self.image)
self.panel.configure(image=self.image)
self.panel.image=self.image
time.sleep(0.02)
if __name__=='__main__':
app = Application()
# to do
app.mainloop()
|
|