| 编辑推荐: |
| 本文来自于tencent,文章主要以一个反爬比较强的网站新浪微博为例,来实现一下Scrapy的大规模爬取,希望对您能有所帮助。 |
|
一、本节目标
本次爬取的目标是新浪微博用户的公开基本信息,如用户昵称、头像、用户的关注、粉丝列表以及发布的微博等,这些信息抓取之后保存至MongoDB。
二、准备工作
请确保前文所讲的代理池、Cookies池已经实现并可以正常运行,安装Scrapy、PyMongo库。
三、爬取思路
首先我们要实现用户的大规模爬取。这里采用的爬取方式是,以微博的几个大V为起始点,爬取他们各自的粉丝和关注列表,然后获取粉丝和关注列表的粉丝和关注列表,以此类推,这样下去就可以实现递归爬取。如果一个用户与其他用户有社交网络上的关联,那他们的信息就会被爬虫抓取到,这样我们就可以做到对所有用户的爬取。通过这种方式,我们可以得到用户的唯一ID,再根据ID获取每个用户发布的微博即可。
四、爬取分析
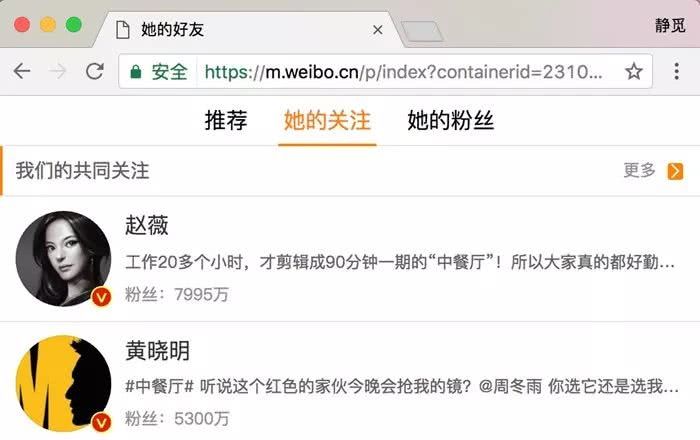
这里我们选取的爬取站点是:https://m.weibo.cn,此站点是微博移动端的站点。打开该站点会跳转到登录页面,这是因为主页做了登录限制。不过我们可以绕过登录限制,直接打开某个用户详情页面,例如打开周冬雨的微博,链接为:https://m.weibo.cn/u/1916655407,即可进入其个人详情页面,如下图所示。

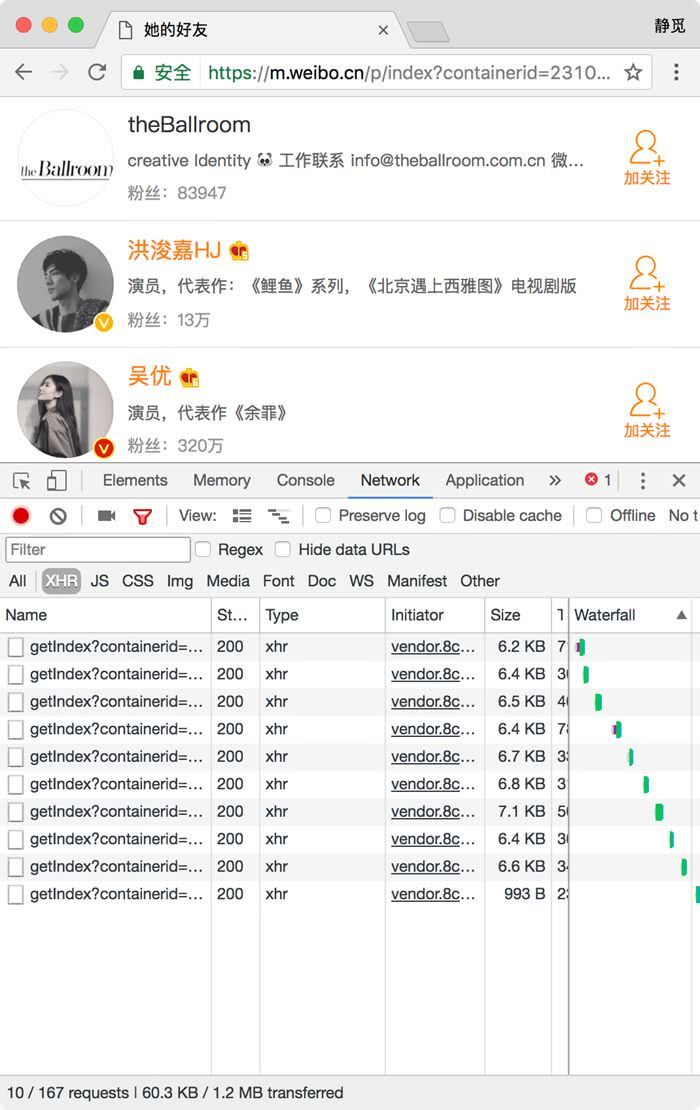
我们打开开发者工具,切换到XHR过滤器,一直下拉关注列表,即可看到下方会出现很多Ajax请求,这些请求就是获取周冬雨的关注列表的Ajax请求,如下图所示。
我们打开第一个Ajax请求,它的链接为:https://m.weibo.cn/api/container
/getIndex?containerid=231051-_followers-_1916655407&luicode=10000011
&lfid=1005051916655407& featurecode=20000320&
type=uid&value=1916655407&page=2,详情如下图所示。
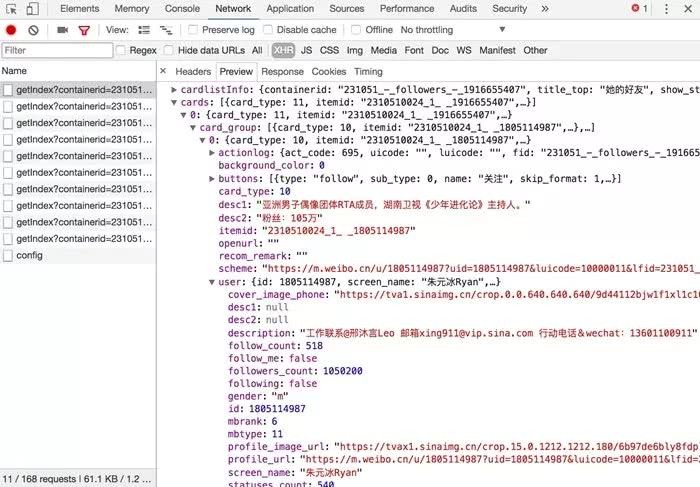
请求类型是GET类型,返回结果是JSON格式,我们将其展开之后即可看到其关注的用户的基本信息。接下来我们只需要构造这个请求的参数。此链接一共有7个参数,如下图所示。
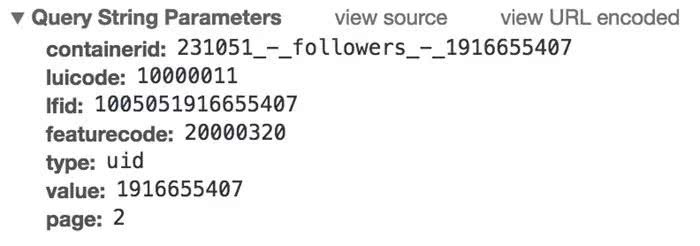
其中最主要的参数就是和。有了这两个参数,我们同样可以获取请求结果。我们可以将接口精简为:https://m.weibo.cn/api/container/getIndex?containerid=231051-_followers-_1916655407&page=2,这里的的前半部分是固定的,后半部分是用户的id。所以这里参数就可以构造出来了,只需要修改最后的和参数即可获取分页形式的关注列表信息。
利用同样的方法,我们也可以分析用户详情的Ajax链接、用户微博列表的Ajax链接,如下所示:
# 用户详情API
user_url ='https://m.weibo.cn/api/container/ getIndex?uid=&type=uid&value=&containerid=100505'
# 关注列表API
follow_url ='https://m.weibo.cn /api/container/getIndex?containerid=231051_-_followers_-_&page='
# 粉丝列表API
fan_url ='https://m.weibo.cn /api/container/getIndex?containerid=231051_-_fans_-_&page='
# 微博列表API
weibo_url ='https://m.weibo.cn/api/container /getIndex?uid=&type=uid&page=&containerid=107603' |
此处的和分别代表用户ID和分页页码。
注意,这个API可能随着时间的变化或者微博的改版而变化,以实测为准。
我们从几个大V开始抓取,抓取他们的粉丝、关注列表、微博信息,然后递归抓取他们的粉丝和关注列表的粉丝、关注列表、微博信息,递归抓取,最后保存微博用户的基本信息、关注和粉丝列表、发布的微博。
我们选择MongoDB作存储的数据库,可以更方便地存储用户的粉丝和关注列表。
五、新建项目
接下来我们用Scrapy来实现这个抓取过程。首先创建一个项目,命令如下所示:
| scrapy startproject
weibo |
进入项目中,新建一个Spider,名为weibocn,命令如下所示:
| scrapy genspider
weibocn m.weibo.cn |
我们首先修改Spider,配置各个Ajax的URL,选取几个大V,将他们的ID赋值成一个列表,实现方法,也就是依次抓取各个大V的个人详情,然后用进行解析,如下所示:
romscrapyimportRequest,
Spider
classWeiboSpider(Spider):
name ='weibocn'
allowed_domains = ['m.weibo.cn']
user_url ='https://m.weibo.cn/api/ container/getIndex?uid=&type=uid&value=&containerid=100505'
follow_url ='https://m.weibo.cn /api/container/getIndex?containerid=231051_-_followers_-_&page='
fan_url ='https://m.weibo.cn /api/container/getIndex?containerid=231051_-_fans_-_&page='
weibo_url ='https://m.weibo.cn/api/containe r/getIndex?uid=&type=uid&page=&containerid=107603'
start_users = ['3217179555','1742566624',' 2282991915','1288739185','3952070245','5878659096']
defstart_requests(self):
foruidinself.start_users:
yieldRequest(self.user_url. format(uid=uid), callback=self.parse_user)
defparse_user(self, response):
self.logger.debug(response) |
六、创建Item
接下来我们解析用户的基本信息并生成Item。这里我们先定义几个Item,如用户、用户关系、微博的Item,如下所示:
fromscrapyimportItem,
Field
classUserItem(Item):
collection ='users'
id = Field()
name = Field()
avatar = Field()
cover = Field()
gender = Field()
description = Field()
fans_count = Field()
follows_count = Field()
weibos_count = Field()
verified = Field()
verified_reason = Field()
verified_type = Field()
follows = Field()
fans = Field()
crawled_at = Field()
classUserRelationItem(Item):
collection ='users'
id = Field()
follows = Field()
fans = Field()
classWeiboItem(Item):
collection ='weibos'
id = Field()
attitudes_count = Field()
comments_count = Field()
reposts_count = Field()
picture = Field()
pictures = Field()
source = Field()
text = Field()
raw_text = Field()
thumbnail = Field()
user = Field()
created_at = Field()
crawled_at = Field() |
这里定义了字段,指明保存的Collection的名称。用户的关注和粉丝列表直接定义为一个单独的,其中就是用户的ID,就是用户关注列表,是粉丝列表,但这并不意味着我们会将关注和粉丝列表存到一个单独的Collection里。后面我们会用Pipeline对各个Item进行处理、合并存储到用户的Collection里,因此Item和Collection并不一定是完全对应的。
七、提取数据
我们开始解析用户的基本信息,实现方法,如下所示:
| defparse_user(self,
response):
"""
解析用户信息
:param response: Response对象
"""
result = json.loads(response.text)
ifresult.get('data').get('userInfo'):
user_info = result.get('data').get('userInfo')
user_item = UserItem()
field_map = {
'id':'id','name':'screen_name','avatar': 'profile_image_url','cover':'cover_image_phone',
'gender':'gender','description':'description',
'fans_count':'followers_count',
'follows_count':'follow_count', 'weibos_count':'statuses_count','verified':
'verified',
'verified_reason':'verified_reason',' verified_type':'verified_type'
}
forfield, attrinfield_map.items():
user_item[field] = user_info.get(attr)
yielduser_item
# 关注
uid = user_info.get('id')
yieldRequest(self.follow_url.format(uid=uid,
page=1), callback=self.parse_follows,
meta={'page':1,'uid': uid})
# 粉丝
yieldRequest(self.fan_url.format(uid=uid, page=1),
callback=self.parse_fans,
meta={'page':1,'uid': uid})
# 微博
yieldRequest(self.weibo_url.format(uid=uid,
page=1), callback=self.parse_weibos,
meta={'page':1,'uid': uid}) |
在这里我们一共完成了两个操作。
解析JSON提取用户信息并生成UserItem返回。我们并没有采用常规的逐个赋值的方法,而是定义了一个字段映射关系。我们定义的字段名称可能和JSON中用户的字段名称不同,所以在这里定义成一个字典,然后遍历字典的每个字段实现逐个字段的赋值。
构造用户的关注、粉丝、微博的第一页的链接,并生成Request,这里需要的参数只有用户的ID。另外,初始分页页码直接设置为1即可。
接下来,我们还需要保存用户的关注和粉丝列表。以关注列表为例,其解析方法为,实现如下所示:
defparse_follows(self,
response):
"""
解析用户关注
:param response: Response对象
"""
result = json.loads(response.text)
ifresult.get('ok')andresult.get('data') .get('cards')
andlen(result.get('data').get('cards')) andresult.get('data').get('cards')[-1].get(
'card_group'):
# 解析用户
follows = result.get('data').get('cards')[-1].get('card_group')
forfollowinfollows:
iffollow.get('user'):
uid = follow.get('user').get('id')
yieldRequest(self.user_url.format(uid=uid), callback=self.parse_user)
# 关注列表
uid = response.meta.get('uid')
user_relation_item = UserRelationItem()
follows = [{'id': follow.get('user').get('id')
,'name': follow.get('user'). get('screen_name')}forfollowin
follows]
user_relation_item['id'] = uid
user_relation_item['follows'] = follows
user_relation_item['fans'] = []
yielduser_relation_item
# 下一页关注
page = response.meta.get('page') +1
yieldRequest(self.follow_url.format(uid=uid, page=page),
callback=self.parse_follows, meta={'page': page,'uid':
uid}) |
那么在这个方法里面我们做了如下三件事。
解析关注列表中的每个用户信息并发起新的解析请求。我们首先解析关注列表的信息,得到用户的ID,然后再利用构造访问用户详情的Request,回调就是刚才所定义的方法。
提取用户关注列表内的关键信息并生成。字段直接设置成用户的ID,JSON返回数据中的用户信息有很多冗余字段。在这里我们只提取了关注用户的ID和用户名,然后把它们赋值给字段,字段设置成空列表。这样我们就建立了一个存有用户ID和用户部分关注列表的,之后合并且保存具有同一个ID的的关注和粉丝列表。
提取下一页关注。只需要将此请求的分页页码加1即可。分页页码通过Request的属性进行传递,Response的来接收。这样我们构造并返回下一页的关注列表的Request。
抓取粉丝列表的原理和抓取关注列表原理相同,在此不再赘述。
接下来我们还差一个方法的实现,即,它用来抓取用户的微博信息,实现如下所示:
defparse_weibos(self,
response):
"""
解析微博列表
:param response: Response对象
"""
result = json.loads(response.text)
ifresult.get('ok')andresult.get('data') .get('cards'):
weibos = result.get('data').get('cards')
forweiboinweibos:
mblog = weibo.get('mblog')
ifmblog:
weibo_item = WeiboItem()
field_map = {
'id':'id','attitudes_count':'attitudes_count'
,'comments_count': 'comments_count','created_at':'
created_at',
'reposts_count':'reposts_count','picture':' original_pic','pictures':'pics',
'source':'source','text':'text','raw_text':' raw_text','thumbnail':'thumbnail_pic'
}
forfield, attrinfield_map.items():
weibo_item[field] = mblog.get(attr)
weibo_item['user'] = response.meta.get('uid')
yieldweibo_item
# 下一页微博
uid = response.meta.get('uid')
page = response.meta.get('page') +1
yieldRequest(self.weibo_url.format(uid=uid, page=page),
callback=self.parse_weibos,
meta={'uid': uid,'page': page}) |
在这里方法完成了两件事。
提取用户的微博信息,并生成WeiboItem。这里同样建立了一个字段映射表,实现批量字段赋值。
提取下一页的微博列表。这里同样需要传入用户ID和分页页码。
目前为止,微博的Spider已经完成。后面还需要对数据进行数据清洗存储,以及对接代理池、Cookies池来防止反爬虫。
八、数据清洗
有些微博的时间可能不是标准的时间,比如它可能显示为刚刚、几分钟前、几小时前、昨天等。这里我们需要统一转化这些时间,实现一个方法,如下所示:
defparse_time(self,
date):
ifre.match('刚刚', date):
date = time.strftime('%Y-%m-%d %H:%M', time.localtime(time.time()))
ifre.match('\d+分钟前', date):
minute = re.match('(\d+)', date).group(1)
date = time.strftime('%Y-%m-%d %H:%M', time.localtime(time.time()
- float(minute) *60))
ifre.match('\d+小时前', date):
hour = re.match('(\d+)', date).group(1)
date = time.strftime('%Y-%m-%d %H:%M', time.localtime(time.time()
- float(hour) *60*60))
ifre.match('昨天.*', date):
date = re.match('昨天(.*)', date). group(1).strip()
date = time.strftime('%Y-%m-%d', time.localtime()
-24*60*60) +' '+ date
ifre.match('\d-\d', date):
date = time.strftime('%Y-', time.localtime())
+ date +' 00:00'
returndate |
我们用正则来提取一些关键数字,用time库来实现标准时间的转换。
以X分钟前的处理为例,爬取的时间会赋值为字段。我们首先用正则匹配这个时间,表达式写作,如果提取到的时间符合这个表达式,那么就提取出其中的数字,这样就可以获取分钟数了。接下来使用模块的方法,第一个参数传入要转换的时间格式,第二个参数就是时间戳。在这里我们用当前的时间戳减去此分钟数乘以60就是当时的时间戳,这样我们就可以得到格式化后的正确时间了。
然后Pipeline可以实现如下处理:
classWeiboPipeline():
defprocess_item(self, item, spider):
ifisinstance(item, WeiboItem):
ifitem.get('created_at'):
item['created_at'] = item['created_at'].strip()
item['created_at'] = self.parse_time (item.get('created_at')) |
我们在Spider里没有对字段赋值,它代表爬取时间,我们可以统一将其赋值为当前时间,实现如下所示:
classTimePipeline():
defprocess_item(self, item, spider):
ifisinstance(item, UserItem) orisinstance(item,
WeiboItem):
now = time.strftime ('%Y-%m-%d %H:%M', time.localtime())
item['crawled_at'] = now
returnitem |
在这里我们判断了Item如果是UserItem或WeiboItem类型,那么就给它的字段赋值为当前时间。
通过上面的两个Pipeline,我们便完成了数据清洗工作,这里主要是时间的转换。
九、数据存储
数据清洗完毕之后,我们就要将数据保存到MongoDB数据库。我们在这里实现MongoPipeline类,如下所示:
importpymongo
classMongoPipeline(object):
def__init__(self, mongo_uri, mongo_db):
self.mongo_uri = mongo_uri
self.mongo_db = mongo_db
@classmethod
deffrom_crawler(cls, crawler):
returncls(
mongo_uri=crawler.settings.get('MONGO_URI'), mongo_db=crawler.settings.get('MONGO_DATABASE')
)
defopen_spider(self, spider):
self.client = pymongo.MongoClient(self.mongo_uri)
self.db = self.client[self.mongo_db]
self.db[UserItem.collection].create_index([('id',
pymongo.ASCENDING)])
self.db[WeiboItem.collection].create_index([('id',
pymongo.ASCENDING)])
defclose_spider(self, spider):
self.client.close()
defprocess_item(self, item, spider):
ifisinstance(item, UserItem)orisinstance(item,
WeiboItem):
self.db[item.collection].update({'id': item.get('id')},
{'$set': item},True)
ifisinstance(item, UserRelationItem):
self.db[item.collection].update(
{'id': item.get('id')},
{'$addToSet':
{
'follows': {'$each': item['follows']},
'fans': {'$each': item['fans']}
}
},True)
returnitem |
当前的MongoPipeline和前面我们所写的有所不同,主要有以下几点。
方法里添加了Collection的索引,在这里为两个Item都添加了索引,索引的字段是。由于我们这次是大规模爬取,爬取过程涉及数据的更新问题,所以我们为每个Collection建立了索引,这样可以大大提高检索效率。
在方法里存储使用的是方法,第一个参数是查询条件,第二个参数是爬取的Item。这里我们使用了操作符,如果爬取到重复的数据即可对数据进行更新,同时不会删除已存在的字段。如果这里不加操作符,那么会直接进行替换,这样可能会导致已存在的字段如关注和粉丝列表清空。第三个参数设置为True,如果数据不存在,则插入数据。这样我们就可以做到数据存在即更新、数据不存在即插入,从而获得去重的效果。
对于用户的关注和粉丝列表,我们使用了一个新的操作符,叫作,这个操作符可以向列表类型的字段插入数据同时去重。它的值就是需要操作的字段名称。这里利用了操作符对需要插入的列表数据进行了遍历,以逐条插入用户的关注或粉丝数据到指定的字段。关于该操作更多解释可以参考MongoDB的官方文档,链接为:https://docs.mongodb.com/manua
l/reference/operator/update/addToSet/。
十、Cookies池对接
新浪微博的反爬能力非常强,我们需要做一些防范反爬虫的措施才可以顺利完成数据爬取。
如果没有登录而直接请求微博的API接口,这非常容易导致403状态码。这个情况我们在Cookies池一节也提过。所以在这里我们实现一个Middleware,为每个Request添加随机的Cookies。
我们先开启Cookies池,使API模块正常运行。例如在本地运行5000端口,访问:http://localhost:5000/weibo/random,即可获取随机的Cookies。当然也可以将Cookies池部署到远程的服务器,这样只需要更改访问的链接。
我们在本地启动Cookies池,实现一个Middleware,如下所示:
classCookiesMiddleware():
def__init__(self, cookies_url):
self.logger = logging.getLogger(__name__)
self.cookies_url = cookies_url
defget_random_cookies(self):
try:
response = requests.get(self.cookies_url)
ifresponse.status_code ==200:
cookies = json.loads(response.text)
returncookies
exceptrequests.ConnectionError:
returnFalse
defprocess_request(self, request, spider):
self.logger.debug('正在获取Cookies')
cookies = self.get_random_cookies()
ifcookies:
request.cookies = cookies
self.logger.debug('使用Cookies '+ json.dumps(cookies))
@classmethod
deffrom_crawler(cls, crawler):
settings = crawler.settings
returncls(
cookies_url=settings.get('COOKIES_URL')
) |
我们首先利用方法获取了变量,它定义在settings.py里,这就是刚才我们所说的接口。接下来实现方法,这个方法主要就是请求此Cookies池接口并获取接口返回的随机Cookies。如果成功获取,则返回Cookies;否则返回。
接下来,在方法里,我们给对象的属性赋值,其值就是获取的随机Cookies,这样我们就成功地为每一次请求赋值Cookies了。
如果启用了该Middleware,每个请求都会被赋值随机的Cookies。这样我们就可以模拟登录之后的请求,403状态码基本就不会出现。
十一、代理池对接
微博还有一个反爬措施就是,检测到同一IP请求量过大时就会出现414状态码。如果遇到这样的情况可以切换代理。例如,在本地5555端口运行,获取随机可用代理的地址为:http://localhost:5555/random,访问这个接口即可获取一个随机可用代理。接下来我们再实现一个Middleware,代码如下所示:
classProxyMiddleware():
def__init__(self, proxy_url):
self.logger = logging.getLogger(__name__)
self.proxy_url = proxy_url
defget_random_proxy(self):
try:
response = requests.get(self.proxy_url)
ifresponse.status_code ==200:
proxy = response.text
returnproxy
exceptrequests.ConnectionError:
returnFalse
defprocess_request(self, request, spider):
ifrequest.meta.get('retry_times'):
proxy = self.get_random_proxy()
ifproxy:
uri ='https://'.format(proxy=proxy)
self.logger.debug('使用代理 '+ proxy)
request.meta['proxy'] = uri
@classmethod
deffrom_crawler(cls, crawler):
settings = crawler.settings
returncls(
proxy_url=settings.get('PROXY_URL')
) |
同样的原理,我们实现了一个方法用于请求代理池的接口获取随机代理。如果获取成功,则返回改代理,否则返回。在方法中,我们给对象的属性赋值一个字段,该字段的值就是代理。
另外,赋值代理的判断条件是当前不为空,也就是说第一次请求失败之后才启用代理,因为使用代理后访问速度会慢一些。所以我们在这里设置了只有重试的时候才启用代理,否则直接请求。这样就可以保证在没有被封禁的情况下直接爬取,保证了爬取速度。
十二、启用Middleware
接下来,我们在配置文件中启用这两个Middleware,修改settings.py如下所示:
DOWNLOADER_MIDDLEWARES
= {
'weibo.middlewares.CookiesMiddleware':554,
'weibo.middlewares.ProxyMiddleware':555,
} |
注意这里的优先级设置,前文提到了Scrapy的默认Downloader
Middleware的设置如下:
{
'scrapy.downloadermiddlewares.robotstxt .RobotsTxtMiddleware':100,
'scrapy.downloadermiddlewares.httpauth .HttpAuthMiddleware':300,
'scrapy.downloadermiddlewares.downloadtimeout.
DownloadTimeoutMiddleware':350,
'scrapy.downloadermiddlewares. defaultheaders.DefaultHeadersMiddleware':400,
'scrapy.downloadermiddlewares. useragent.UserAgentMiddleware':500,
'scrapy.downloadermiddlewares. retry.RetryMiddleware':550,
'scrapy.downloadermiddlewares. ajaxcrawl.AjaxCrawlMiddleware':560,
'scrapy.downloadermiddlewares. redirect.MetaRefreshMiddleware':580,
'scrapy.downloadermiddlewares. httpcompression.HttpCompressionMiddleware':590,
'scrapy.downloadermiddlewares. redirect.RedirectMiddleware':600,
'scrapy.downloadermiddlewares. cookies.CookiesMiddleware':700,
'scrapy.downloadermiddlewares. httpproxy.HttpProxyMiddleware':750,
'scrapy.downloadermiddlewares. stats.DownloaderStats':850,
'scrapy.downloadermiddlewares. httpcache.HttpCacheMiddleware':900,
} |
要使得我们自定义的CookiesMiddleware生效,它在内置的CookiesMiddleware之前调用。内置的CookiesMiddleware的优先级为700,所以这里我们设置一个比700小的数字即可。
要使得我们自定义的ProxyMiddleware生效,它在内置的HttpProxyMiddleware之前调用。内置的HttpProxyMiddleware的优先级为750,所以这里我们设置一个比750小的数字即可。
十三、运行
到此为止,整个微博爬虫就实现完毕了。我们运行如下命令启动爬虫:
输出结果如下所示:
2017-07-11 17:27:34
[urllib3.connectionpool] DEBUG: http://localhost:5000
"GET /weibo/random HTTP/1.1" 200 339
2017-07-11 17:27:34 [weibo.middlewares] DEBUG:
使用Cookies {"SCF": "AhzwTr_DxIGjgri_dt46_DoPzUqq-PSupu545JdozdHYJ7HyEb4pD3pe05VpbIp
VyY1ciKRRWwUgojiO3jYwlBE.", "_T_WM":
"8fe0bc1dad068d09b888d8177f1c1218",
"SSOLoginState": "1501496388",
"M_WEIBOCN_PARAMS": "uicode%3D20000174",
"SUHB": "0tKqV4asxqYl4J",
"SUB": "_2A250e3QUDeRhGeBM6VYX8y7NwjiIHXVXh
BxcrDV6PUJbkdBeLXjckW2fUT8MWloekO4FCWVlIYJGJdGLnA.."}
2017-07-11 17:27:34 [weibocn] DEBUG:
2017-07-11 17:27:34 [scrapy.core.scraper] DEBUG:
Scraped from
{'avatar': 'https://tva4.sinaimg.cn/crop.0.0.180.180.
180/67dd74e0jw1e8qgp5bmzyj2050050aa8.jpg',
'cover': 'https://tva3.sinaimg.cn/crop.0.0.640.640.
640/6ce2240djw1e9oaqhwllzj20hs0hsdir.jpg',
'crawled_at': '2017-07-11 17:27',
'description': '成长,就是一个不断觉得以 前的自己是个傻逼的过程',
'fans_count': 19202906,
'follows_count': 1599,
'gender': 'm',
'id': 1742566624,
'name': '思想聚焦',
'verified': True,
'verified_reason': '微博知名博主,校导网编辑',
'verified_type': 0,
'weibos_count': 58393} |
运行一段时间后,我们便可以到MongoDB数据库查看数据,爬取下来的数据如下图所示。
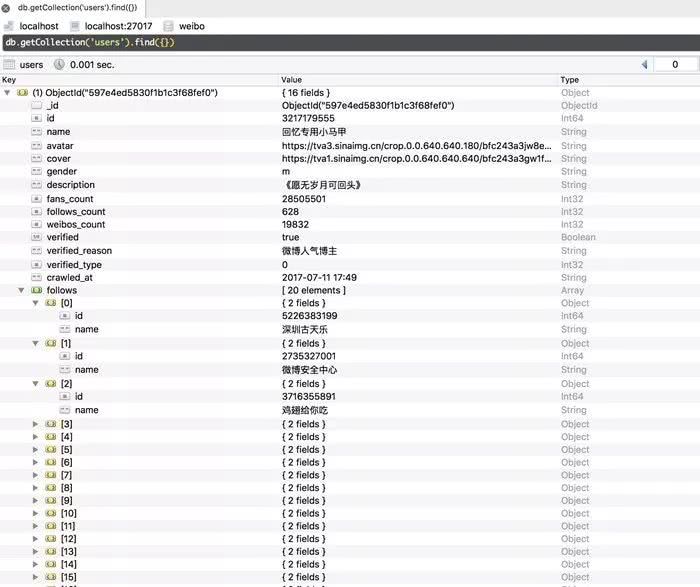
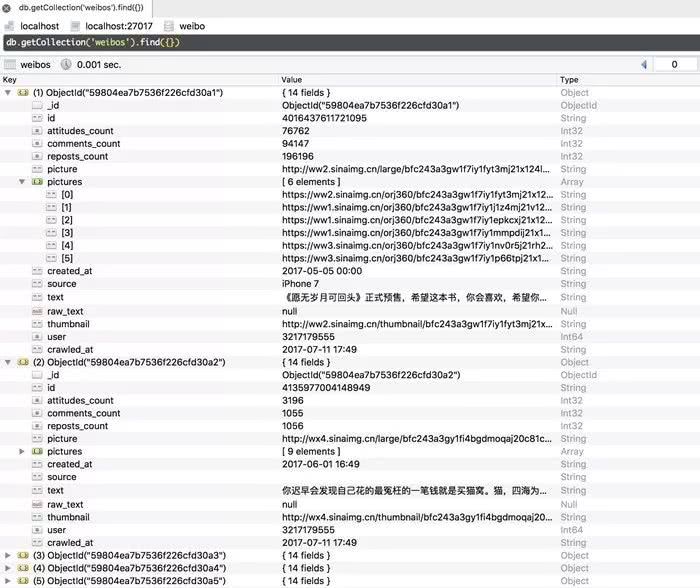
针对用户信息,我们不仅爬取了其基本信息,还把关注和粉丝列表加到了和字段并做了去重操作。针对微博信息,我们成功进行了时间转换处理,同时还保存了微博的图片列表信息。
十四、本节代码
本节代码地址为:https://github.com/Python3WebSpider/Weibo。
十五、结语
本节实现了新浪微博的用户及其粉丝关注列表和微博信息的爬取,还对接了Cookies池和代理池来处理反爬虫。不过现在是针对单机的爬取,后面我们会将此项目修改为分布式爬虫,以进一步提高抓取效率。
|