МђНщ
ansibleЪЧИіЪВУДЖЋЮїФиЃПЙйЗНЕФtitleЪЧЁАAnsible is Simple IT AutomationЁБЁЊЁЊМђЕЅЕФздЖЏЛЏITЙЄОпЁЃетИіЙЄОпЕФФПБъгаетУДМИЯюЃК
- здЖЏЛЏВПЪ№APPЃЛ
- здЖЏЛЏЙмРэХфжУЯюЃЛ
- здЖЏЛЏЕФГжајНЛЛЅЃЛ
- здЖЏЛЏЕФЃЈAWSЃЉдЦЗўЮёЙмРэЃЛ
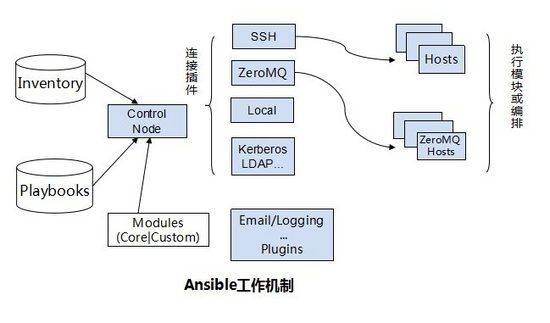
ЫљгаЕФетМИИіФПБъДгБОжЪЩЯРДЫЕЖМЪЧдквЛИіЬЈЛђепМИЬЈЗўЮёЦїЩЯЃЌжДаавЛЯЕСаЕФУќСюЖјвбЁЃЭЈЫзЕФЫЕОЭЪЧХњСПЕФдкдЖГЬЗўЮёЦїЩЯжДааУќСюЁЃЕБШЛЃЌзюжївЊЕФЪЧЫќЪЧЛљгк paramiko ПЊЗЂЕФЁЃетИіparamikoЪЧЪВУДФиЃПЫќЪЧвЛИіДПPythonЪЕЯжЕФsshавщПтЁЃвђДЫfabricКЭansibleЛЙгавЛИіЙВЭЌЕуОЭЪЧВЛашвЊдкдЖГЬжїЛњЩЯАВзАclient/agentsЃЌвђЮЊЫќУЧЪЧЛљгкsshРДКЭдЖГЬжїЛњЭЈбЖЕФЁЃМђЕЅЙщФЩвЛЯТЃК
Ansible
ЁЊЛљгк Python paramiko ПЊЗЂЃЌЗжВМЪНЃЌЮоашПЭЛЇЖЫЃЌЧсСПМЖЃЌХфжУгяЗЈЪЙгУ YMAL МА Jinja2ФЃАхгябдЃЌИќЧПЕФдЖГЬУќСюжДааВйзї
РрЫЦЕФздЖЏЛЏдЫЮЌЙЄОпгаКмЖрГЃгУЕФЛЙгаЃК
Puppet
ЁЊЛљгк Ruby ПЊЗЂЃЌВЩгУ C/S МмЙЙЃЌРЉеЙадЧПЃЌЛљгк SSLЃЌдЖГЬУќСюжДааЯрЖдНЯШѕ
SaltStack
ЁЊЛљгк Python ПЊЗЂЃЌВЩгУ C/S МмЙЙЃЌЯрЖд puppet ИќЧсСПМЖЃЌХфжУгяЗЈЪЙгУ YMALЃЌЪЙЕУХфжУНХБОИќМђЕЅ
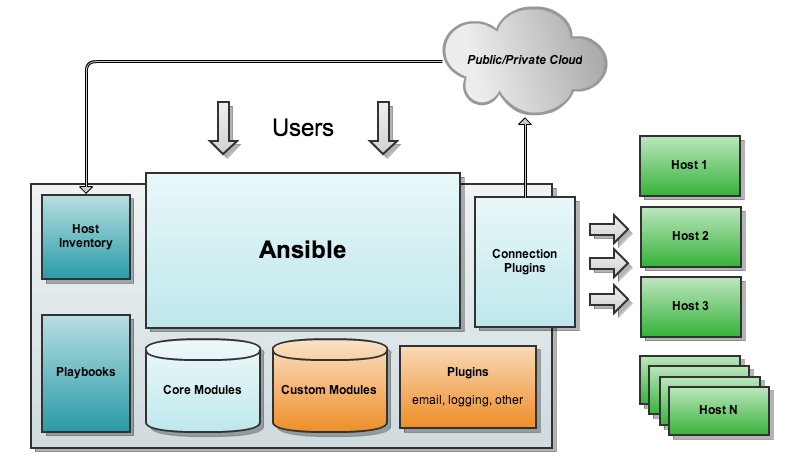
Ansible ЙЄзїЛњжЦ
Ansible дкЙмРэНкЕуНЋ Ansible ФЃПщЭЈЙ§ SSH авщЃЈЛђеп KerberosЁЂLDAPЃЉЭЦЫЭЕНБЛЙмРэЖЫжДааЃЌжДааЭъжЎКѓздЖЏЩОГ§ЃЌПЩвдЪЙгУ SVN ЕШРДЙмРэздЖЈвхФЃПщМАБрХХ
гЩЩЯУцЕФЭМПЩвдПДЕН Ansible ЕФзщГЩгЩ 5 ИіВПЗжзщГЩЃК
- Ansible ЃК КЫаФ
- Modules ЃК АќРЈ Ansible здДјЕФКЫаФФЃПщМАздЖЈвхФЃПщ
- Plugins ЃК ЭъГЩФЃПщЙІФмЕФВЙГфЃЌАќРЈСЌНгВхМўЁЂгЪМўВхМўЕШ
- Playbooks ЃК ОчБОЃЛЖЈвх Ansible ЖрШЮЮёХфжУЮФМўЃЌгЩAnsible здЖЏжДаа
- Inventory ЃК ЖЈвх Ansible ЙмРэжїЛњЕФЧхЕЅ
ansible АВзА
ЃЈ1ЃЉБрвыАВзА
НтОівРРЕЃК
| #yum -y install python-jinja2 PyYAML python-paramiko python-babel python-crypto |
АВзА
#tar xf ansible-1.5.4.tar.gz
#cd ansible-1.5.4
#python setup.py build
#python setup.py install
#mkdir /etc/ansible
#cp -r examples/* /etc/ansible |
ЃЈ2ЃЉYUM АВзАЃЌвЊгаepelдД
ansibleУќСюВЮЪ§
гяЗЈ: ansible<host-pattern> [-f forks] [-m module_name] [-a args] ЁЃЁЃЁЃ
ЯъЯИФЃЪНЃЌШчЙћУќСюжДааГЩЙІЃЌЪфГіЯъЯИЕФНсЙћ (-vv ЈCvvv -vvvv)
жИЖЈ host ЮФМўЕФТЗОЖЃЌФЌШЯЪЧдк /etc/ansible/hosts
NUM ЪЧжИЖЈвЛИіећЪ§ЃЌФЌШЯЪЧ 5 ЃЌжИЖЈ fork ПЊЦєЭЌВННјГЬЕФИіЪ§ЁЃ
- -m NAME,ЈCmodule-name=NAME
жИЖЈЪЙгУЕФ module УћГЦЃЌФЌШЯЪЧ command
- -m DIRECTORY,ЈCmodule-path=DIRECTORY
жИЖЈ module ЕФФПТМРДМгди module ЃЌФЌШЯЪЧ/usr/share/ansible,
жИЖЈ module ФЃПщЕФВЮЪ§
ЬсЪОЪфШы ssh ЕФУмТыЃЌЖјВЛЪЧЪЙгУЛљгк ssh ЕФУмдПШЯжЄ
жИЖЈЪЙгУ sudo ЛёЕУ root ШЈЯо
ЬсЪОЪфШы sudo УмТыЃЌгы ЈCsudo вЛЦ№ЪЙгУ
- -u USERNAME,ЈCuser=USERNAME
жИЖЈвЦЖЏЖЫЕФжДаагУЛЇ
ВтЪдДЫУќСюжДааЛсИФБфЪВУДФкШнЃЌВЛЛсеце§ЕФШЅжДаа
YAMLЛљБОгяЗЈ
YAMLЕФгяЗЈКЭЦфЫћИпНзгябдРрЫЦЃЌВЂЧвПЩвдМђЕЅБэДяЧхЕЅЁЂЩЂСаБэЁЂБъСПЕШЪ§ОнНсЙЙЁЃЦфНсЙЙЃЈStructureЃЉЭЈЙ§ПеИёРДеЙЪОЃЌађСаЃЈSequenceЃЉРяЕФЯюгУ"-"РДДњБэЃЌMapРяЕФМќжЕЖдгУ":"ЗжИєЁЃЯТУцЪЧвЛИіЪОР§ЁЃ
name: John Smith
age: 41
gender: Male
spouse:
-name: Jane Smith
age:37
gender: Female
children:
-name: Jimmy Smith
age: 17
gender: Male
-name: Jenny Smith
age 13
gender: Female |
YAMLЮФМўРЉеЙУћЭЈГЃЮЊ.yamlЃЌШчexample.yamlЁЃ
зЂвтЃЌДњТыЕФХХАцгабЯИёвЊЧѓЃЌЫѕНјЮЊ2ИізжЗћЃЁађСаЯюЕФ - КѓБиаыИњвЛИіПеИёЃЁЃККѓвВвЊИњвЛИіПеИёЃЁ
- listСаБэЕФЫљгадЊЫиОљЪЙгУЁА-ЁБДђЭЗЃЌР§ШчЃК
#A list of tasty fruits
-Apple
-Orange
-Strawberry
-Mango |
- dictionaryзжЕфЭЈЙ§keyгыvaluefНјааБъЪЖЃЌР§ШчЃК
---
#An employee record
name:Example Developer
job:Developer
skill:Elite
|
вВПЩвдНЋkey:valueЗХжУгк{}жаНјааБэЪОЃЌР§ШчЃК
---
#An employee record
{name:Example Developer, job: Developer, skill: Elite}
|
AnsibleЛљДЁдЊЫи
ЃЈ1ЃЉБфСП
БфСПУќУћ
БфСПУћНіФмгЩзжФИЁЂЪ§зжКЭЯТЛЎЯпзщГЩЃЌЧвжЛФмвдзжФИПЊЭЗЁЃ
ЃЈ2ЃЉfacts
factsЪЧгЩе§дкЭЈаХЕФдЖГЬФПБъжїЛњЗЂЛиЕФаХЯЂЃЌетаЉаХЯЂБЛБЃДцдкansibleБфСПжаЁЃвЊЛёШЁжИЖЈЕФдЖГЬжїЛњЫљжЇГжЕФЫљгаfactsЃЌ
ПЩЪЙгУШчЯТУќСюНјааЃК
| # ansible hostname -m setup |
Лђ
| ansible all -m setup ЯдЪОЫљгаНкЕуЕФаХЯЂ |
ЃЈ3ЃЉregister
АбШЮЮёЕФЪфГіЖЈвхЮЊБфСПЃЌШЛКѓгУгкЦфЫћШЮЮёЃЌЪОР§ШчЯТ:
tasks:
- shell: /usr/bin/foo
register: foo_result
ignore_errors: True |
ЃЈ4ЃЉБфСПДЋЕн
дкдЫааplaybookЕФЪБКђвВПЩвдДЋЕнвЛаЉБфСПЙЉplaybookЪЙгУЃЌЪОР§ШчЯТЃК
| ansible-playbook test.yml --extra-vars "hosts=wwwuser=mageedu" |
ЕБИјвЛИіжїЛњгІгУНЧЩЋЕФЪБКђПЩвдДЋЕнБфСПЃЌШЛКѓдкНЧЩЋФкЪЙгУетаЉБфСПЃЌЪОР§ШчЯТЃК
-hosts: webservers
roles:
- common
- { role: foo_app_instance, dir:'/web/htdocs/a.com', port: 8080 } |
ЃЈ5ЃЉInventory
ansibleЕФжївЊЙІгУдкгкХњСПжїЛњВйзїЃЌЮЊСЫБуНнЕиЪЙгУЦфжаЕФВПЗжжїЛњЃЌПЩвддкinventory fileжаНЋЦфЗжзщУќУћЁЃФЌШЯЕФ
inventoryfileЮЊ/etc/ansible/hostsЃЌПЩЭЈЙ§/etc/ansible/ansible.cfgЖЈвхЁЃ
inventory fileПЩвдгаЖрИіЃЌЧввВПЩвдЭЈЙ§Dynamic InventoryРДЖЏЬЌЩњГЩЁЃ
inventoryЮФМўИёЪН
inventoryЮФМўзёбINIЮФМўЗчИёЃЌжаРЈКХжаЕФзжЗћЮЊзщУћЁЃПЩвдНЋЭЌвЛИіжїЛњЭЌЪБЙщВЂЕНЖрИіВЛЭЌЕФзщжаЃЛДЫЭтЃЌЕБШчШєФПБъжїЛњЪЙгУСЫЗЧФЌШЯЕФSSHЖЫПкЃЌЛЙПЩвддкжїЛњУћГЦжЎКѓЪЙгУУАКХМгЖЫПкКХРДБъУїЁЃ
ntp.magedu.com
[webservers]
www1.magedu.com:2222
www2.magedu.com
[dbservers]
db1.magedu.com
db2.magedu.com
db3.magedu.com
|
ШчЙћжїЛњУћГЦзёбЯрЫЦЕФУќУћФЃЪНЃЌЛЙПЩвдЪЙгУСаБэЕФЗНЪНБъЪЖИїжїЛњЃЌР§ШчЃК
[webservers]
www[01:50].example.com
[databases]
db-[a:f].example.com |
ЃЈ6ЃЉжїЛњБфСП
ПЩвддкinventoryжаЖЈвхжїЛњЪБЮЊЦфЬэМгжїЛњБфСПвдБугкдкplaybookжаЪЙгУЁЃР§ШчЃК
[webservers]
www1.magedu.com http_port=80maxRequestsPerChild=808
www2.magedu.com http_port=8080maxRequestsPerChild=909
|
ЃЈ7ЃЉзщБфСП
зщБфСПЪЧжИИГгшИјжИЖЈзщФкЫљгажїЛњЩЯЕФдкplaybookжаПЩгУЕФБфСПЁЃР§ШчЃК
[webservers]
www1.magedu.com
www2.magedu.com
[webservers:vars]
ntp_server=ntp.magedu.com
nfs_server=nfs.magedu.com
|
зЂвтЃКЩЯУцvarsЮЊЙЬЖЈЕФИёЪН
ЃЈ8ЃЉзщЧЖЬз
inventoryжаЃЌзщЛЙПЩвдАќКЌЦфЫќЕФзщЃЌВЂЧввВПЩвдЯђзщжаЕФжїЛњжИЖЈБфСПЁЃВЛЙ§ЃЌетаЉБфСПжЛФмдкansible-playbookжаЪЙгУЃЌЖјansibleВЛжЇГжЁЃР§ШчЃК
[apache]
httpd1.magedu.com
httpd2.magedu.com
[nginx]
ngx1.magedu.com
ngx2.magedu.com |
[webservers:children] childrenЪЧЙЬЖЈИёЪНЃЌБиаывЊаДЩЯЕФ
apache
nginx
[webservers:vars]
ntp_server=ntp.magedu.com
|
ЃЈ9ЃЉ inventory ВЮЪ§
ansibleЛљгкsshСЌНгinventoryжажИЖЈЕФдЖГЬжїЛњЪБЃЌЛЙПЩвдЭЈЙ§ВЮЪ§жИЖЈЦфНЛЛЅЗНЪНЃЛетаЉВЮЪ§ШчЯТЫљЪОЃК
ЃЈПЩвдЪЕЯждкinventoryжажИЖЈеЫКХУмТыгУгкssh СЌНгЃЉ
ansible_ssh_host
Thename of the host to connect to, if different from the alias you wish to give toit.
ansible_ssh_port
Thessh port number, if not 22
ansible_ssh_user
Thedefault ssh user name to use.
ansible_ssh_pass
Thessh password to use (this is insecure, we strongly recommend using --ask-passor SSH keys)
ansible_sudo_pass
Thesudo password to use (this is insecure, we strongly recommend using--ask-sudo-pass)
ansible_connection
Connection type of the host. Candidates are local, ssh or paramiko. The default is paramiko before Ansible
1.2,and 'smart' afterwards which detects whether usage of 'ssh' would be feasiblebased on whether ControlPersist is supported.
ansible_ssh_private_key_file
Private key file used by ssh.Useful if using multiple keys and you don't want to use SSH agent.
ansible_shell_type
Theshell type of the target system. By default commands are formatted using'sh'-style syntax by default. Setting this to 'csh' or 'fish' will causecommands executed on target systems to follow those shell's syntax instead.
ansible_python_interpreter
Thetarget host python path. This is useful for systems with morethan one Python or not located at
"/usr/bin/python" such as\*BSD, or where /usr/bin/pythonis not a 2.X series Python. We do not use the
"/usr/bin/env" mechanism as that requires the remote user'spath to be set right and also assumes the "python"
executableis named python, where the executable mightbe named something like "python26".
ansible\_\*\_interpreter
Works for anything such as ruby or perl and works just like ansible_python_interpreter.
This replaces shebang of modules which will run on that host.
|
ЃЈ10ЃЉЬѕМўВтЪд
ШчЙћашвЊИљОнБфСПЁЂfactsЛђДЫЧАШЮЮёЕФжДааНсЙћРДзіЮЊФГtaskжДаагыЗёЕФЧАЬсЪБвЊгУЕНЬѕМўВтЪдЁЃ
whenгяОф
дкtaskКѓЬэМгwhenзгОфМДПЩЪЙгУЬѕМўВтЪдЃЛwhenгяОфжЇГжJinja2БэДяЪНгяЗЈЁЃР§ШчЃК
tasks:
-name: "shutdown Debian flavored systems"
command: /sbin/shutdown -h now
when: ansible_os_family == "Debian"
|
whenгяОфжаЛЙПЩвдЪЙгУJinja2ЕФДѓЖрЁАfilterЁБЃЌР§ШчвЊКіТдДЫЧАФГгяОфЕФДэЮѓВЂЛљгкЦфНсЙћЃЈfailedЛђепsucessЃЉдЫааКѓУцжИЖЈЕФгяОфЃЌПЩЪЙгУРрЫЦШчЯТаЮЪНЃК
tasks:
-command: /bin/false
register: result
ignore_errors: True
-command: /bin/something
when: result|failed
-command: /bin/something_else
when: result|success
-command: /bin/still/something_else
when: result|skipped
|
ДЫЭтЃЌwhenгяОфжаЛЙПЩвдЪЙгУfactsЛђplaybookжаЖЈвхЕФБфСПЁЃ
ЃЈ11ЃЉЕќДњ
ЕБгаашвЊжиИДаджДааЕФШЮЮёЪБЃЌПЩвдЪЙгУЕќДњЛњжЦЁЃЦфЪЙгУИёЪНЮЊНЋашвЊЕќДњЕФФкШнЖЈвхЮЊitemБфСПв§гУЃЌВЂЭЈЙ§with_itemsгяОфРДжИУїЕќДњЕФдЊЫиСаБэМДПЩЁЃР§ШчЃК
| - name: add several users |
user: name={{ item }} state=present groups=wheel етаажаЕФitemЪЧЙЬЖЈБфСПУћЃЌвЛЖЈвЊетбљаДЃЌЫќЛсбЛЗЪЙ
гУwith_itemsЖЈвхЕФСаБэ
with_items:
- testuser1
- testuser2
|
ЩЯУцгяОфЕФЙІФмЕШЭЌгкЯТУцЕФгяОфЃК
- name: add user testuser1
user: name=testuser1 state=present groups=wheel
- name: add user testuser2
user: name=testuser2 state=present groups=wheel
|
ЪТЪЕЩЯЃЌwith_itemsжаПЩвдЪЙгУдЊЫиЛЙПЩЮЊhashesЃЈЃЉЃЌР§ШчЃК
- name: add several users
user: name={{ item.name }} state=present groups={{ item.groups }}
with_items:
-{ name: 'testuser1', groups: 'wheel' }
-{ name: 'testuser2', groups: 'root' }
|
ansibleЕФбЛЗЛњжЦЛЙгаИќЖрЕФИпМЖЙІФмЃЌОпЬхЧыВЮМћЙйЗНЮФЕЕЃЈhttp://docs.ansible.com/playbooks_loops.htmlЃЉЁЃ
playbook ЕФзщГЩНсЙЙ
Inventory
Modules
AdHoc Commands
Playbooks
TasksЃКШЮЮёЃЌМДЕїгУФЃПщЭъГЩЕФФГВйзї
VariablesЃКБфСП
TemplatesЃКФЃАх
HandlersЃКДІРэЦїЃЌгЩФГЪТМўДЅЗЂжДааЕФВйзї
RolesЃКНЧЩЋ
playbook ЛљДЁзщМўМђНщ
ЃЈ1ЃЉHosts КЭUsers
playbookжаЕФУПвЛИіplayЕФФПЕФЖМЪЧЮЊСЫШУФГИіЛђФГаЉжїЛњвдФГИіжИЖЈЕФгУЛЇЩэЗнжДааШЮЮёЁЃhostsгУгкжИЖЈвЊжДаажИЖЈШЮЮёЕФжїЛњЃЌЦфПЩвдЪЧвЛИіЛђЖрИігЩУАКХЗжИєжїЛњзщЃЛremote_userдђгУгкжИЖЈдЖГЬжїЛњЩЯЕФжДааШЮЮёЕФгУЛЇЁЃШчЩЯУцЪОР§жаЕФ
-hosts:webnodes
remote_user: root
|
ВЛЙ§ЃЌremote_userвВПЩгУгкИїtaskжаЁЃвВПЩвдЭЈЙ§жИЖЈЦфЭЈЙ§sudoЕФЗНЪНдкдЖГЬжїЛњЩЯжДааШЮЮёЃЌЦфПЩгУгкplayШЋОжЛђФГШЮЮёЃЛДЫЭтЃЌЩѕжСПЩвддкsudoЪБЪЙгУsudo_userжИЖЈsudoЪБЧаЛЛЕФгУЛЇЁЃ
-hosts: webnodes
remote_user: mageedu
tasks:
- name: test connection
ping:
remote_user: mageedu
sudo: yes |
ЃЈ2ЃЉШЮЮёСаБэКЭaction
playЕФжїЬхВПЗжЪЧtask listЁЃtask listжаЕФИїШЮЮёАДДЮађж№ИідкhostsжажИЖЈЕФЫљгажїЛњЩЯжДааЃЌМДдкЫљгажїЛњЩЯЭъГЩЕквЛИіШЮЮёКѓдйПЊЪМЕкЖўИіЁЃдкдЫааздЩЯЖјЯТФГplaybookЪБЃЌШчЙћжаЭОЗЂЩњДэЮѓЃЌЫљгавбжДааШЮЮёЖМПЩФмЛиЙіЃЌвђДЫЃЌдкИќе§playbookКѓжиаТжДаавЛДЮМДПЩЁЃ
taskЕФФПЕФЪЧЪЙгУжИЖЈЕФВЮЪ§жДааФЃПщЃЌЖјдкФЃПщВЮЪ§жаПЩвдЪЙгУБфСПЁЃФЃПщжДааЪЧУнЕШЕФЃЌетвтЮЖзХЖрДЮжДааЪЧАВШЋЕФЃЌвђЮЊЦфНсЙћОљвЛжТЁЃ
УПИіtaskЖМгІИУгаЦфnameЃЌгУгкplaybookЕФжДааНсЙћЪфГіЃЌНЈвщЦфФкШнОЁПЩФмЧхЮњЕиУшЪіШЮЮёжДааВНжшЁЃШчЙћЮДЬсЙЉnameЃЌдђactionЕФНсЙћНЋгУгкЪфГіЁЃ
ЖЈвхtaskЕФПЩвдЪЙгУЁАaction: moduleoptionsЁБЛђЁАmodule: optionsЁБЕФИёЪНЃЌЭЦМіЪЙгУКѓепвдЪЕЯжЯђКѓМцШнЁЃШчЙћactionвЛааЕФФкШнЙ§ЖрЃЌвВжаЪЙгУдкааЪзЪЙгУМИИіПеАззжЗћНјааЛЛааЁЃ
tasks:
- name: make sure apache is running
service: name=httpd state=running |
дкжкЖрФЃПщжаЃЌжЛгаcommandКЭshellФЃПщНіашвЊИјЖЈвЛИіСаБэЖјЮоашЪЙгУЁАkey=valueЁБИёЪНЃЌР§ШчЃК
tasks:
- name: disable selinux
command: /sbin/setenforce 0 |
ШчЙћУќСюЛђНХБОЕФЭЫГіТыВЛЮЊСуЃЌПЩвдЪЙгУШчЯТЗНЪНЬцДњЃК
tasks:
- name: run this command and ignore the result
shell: /usr/bin/somecommand || /bin/true |
ЛђепЪЙгУignore_errorsРДКіТдДэЮѓаХЯЂЃК
tasks:
- name: run this command and ignore theresult
shell: /usr/bin/somecommand
ignore_errors: True |
ЃЈ3ЃЉ handlers
гУгкЕБЙизЂЕФзЪдДЗЂЩњБфЛЏЪБВЩШЁвЛЖЈЕФВйзїЁЃ
ЁАnotifyЁБетИіactionПЩгУгкдкУПИіplayЕФзюКѓБЛДЅЗЂЃЌетбљПЩвдБмУтЖрДЮгаИФБфЗЂЩњЪБУПДЮЖМжДаажИЖЈЕФВйзїЃЌШЁЖјДњжЎЃЌНідкЫљгаЕФБфЛЏЗЂЩњЭъГЩКѓвЛДЮадЕижДаажИЖЈВйзїЁЃдкnotifyжаСаГіЕФВйзїГЦЮЊhandlerЃЌвВМДnotifyжаЕїгУhandlerжаЖЈвхЕФВйзїЁЃ
-name: template configuration file
template: src=template.j2 dest=/etc/foo.conf
notify:
- restart memcached
- restart apache |
handlerЪЧtaskСаБэЃЌетаЉtaskгыЧАЪіЕФtaskВЂУЛгаБОжЪЩЯЕФВЛЭЌЁЃ
handlers:
- name: restart memcached
service:name=memcached state=restarted
- name: restart apache
service: name=apache state=restarted |
Р§ЃК
heartbeat.yaml
-hosts: hbhosts
remote_user: root
tasks:
- name: ensure heartbeat latest version
yum: name=heartbeat state=present
- name: authkeys configure file
copy: src=/root/hb_conf/authkeysdest=/etc/ha.d/authkeys
- name: authkeys mode 600
file: path=/etc/ha.d/authkeys mode=600
notify:
- restart heartbeat
- name: ha.cf configure file
copy: src=/root/hb_conf/ha.cfdest=/etc/ha.d/ha.cf
notify:
-restart heartbeat
handlers:
- name:restart heartbeat
service: name=heartbeat state=restarted |
ЃЈ4ЃЉroles
ansilbeзд1.2АцБОв§ШыЕФаТЬиадЃЌгУгкВуДЮадЁЂНсЙЙЛЏЕизщжЏplaybookЁЃrolesФмЙЛИљОнВуДЮаЭНсЙЙздЖЏзАдиБфСПЮФМўЁЂtasksвдМА
handlersЕШЁЃвЊЪЙгУrolesжЛашвЊдкplaybookжаЪЙгУincludeжИСюМДПЩЁЃМђЕЅРДНВЃЌrolesОЭЪЧЭЈЙ§ЗжБ№НЋБфСПЁЂЮФМўЁЂШЮЮёЁЂФЃПщ
МАДІРэЦїЗХжУгкЕЅЖРЕФФПТМжаЃЌВЂПЩвдБуНнЕиincludeЫќУЧЕФвЛжжЛњжЦЁЃНЧЩЋвЛАугУгкЛљгкжїЛњЙЙНЈЗўЮёЕФГЁОАжаЃЌЕЋвВПЩвдЪЧгУгкЙЙНЈЪиЛЄНјГЬЕШГЁОАжаЁЃ
вЛИіrolesЕФАИР§ШчЯТЫљЪОЃК
site.yml
webservers.yml
fooservers.yml
roles/
common/
files/
templates/
tasks/
handlers/
vars/
meta/
webservers/
files/
templates/
tasks/
handlers/
vars/
meta/ |
ЖјдкplaybookжаЃЌПЩвдетбљЪЙгУrolesЃЈЕїгУcommonКЭwebserversНЧЩЋСЫЃЉЃК
---
-hosts: webservers
roles:
- common
- webservers |
вВПЩвдЯђrolesДЋЕнВЮЪ§ЃЌР§ШчЃК
---
-hosts: webservers
roles:
- common
- { role: foo_app_instance, dir:'/opt/a', port: 5000 }
- { role: foo_app_instance, dir:'/opt/b', port: 5001 } |
ЩѕжСвВПЩвдЬѕМўЪНЕиЪЙгУrolesЃЌР§ШчЃК
---
-hosts: webservers
roles:
- { role: some_role, when:"ansible_os_family == 'RedHat'" } |
aЃЉДДНЈroleЕФВНжш
(1)ДДНЈвдrolesУќУћЕФФПТМЃЛ
(2)дкrolesФПТМжаЗжБ№ДДНЈвдИїНЧЩЋУћГЦУќУћЕФФПТМЃЌШчwebserversЕШЃЛ
(3)дкУПИіНЧЩЋУќУћЕФФПТМжаЗжБ№ДДНЈfilesЁЂhandlersЁЂmetaЁЂtasksЁЂtemplatesКЭvarsФПТМЃЛгУВЛЕНЕФФПТМПЩвдДДНЈЮЊПеФПТМЃЌвВПЩвдВЛДДНЈЃЛ
(4)дкplaybookЮФМўжаЃЌЕїгУИїНЧЩЋЃЛ
bЃЉ roleФкИїФПТМжаПЩгУЕФЮФМў
- tasksФПТМЃКжСЩйгІИУАќКЌвЛИіУћЮЊmain.ymlЕФЮФМўЃЌЦфЖЈвхСЫДЫНЧЩЋЕФШЮЮёСаБэЃЛДЫЮФМўПЩвдЪЙгУincludeАќКЌЦфЫќЕФЮЛгкДЫФПТМжаЕФtaskЮФМўЃЛ
- filesФПТМЃКДцЗХгЩcopyЛђscriptЕШФЃПщЕїгУЕФЮФМўЃЛ
- templatesФПТМЃКtemplateФЃПщЛсздЖЏдкДЫФПТМжабАевJinja2ФЃАхЮФМўЃЛ
- handlersФПТМЃКДЫФПТМжагІЕБАќКЌвЛИіmain.ymlЮФМўЃЌгУгкЖЈвхДЫНЧЩЋгУЕНЕФИїhandlerЃЛдкhandlerжаЪЙгУincludeАќКЌЕФЦфЫќЕФhandlerЮФМўвВгІИУЮЛгкДЫФПТМжаЃЛ
- varsФПТМЃКгІЕБАќКЌвЛИіmain.ymlЮФМўЃЌгУгкЖЈвхДЫНЧЩЋгУЕНЕФБфСПЃЛ
- metaФПТМЃКгІЕБАќКЌвЛИіmain.ymlЮФМўЃЌгУгкЖЈвхДЫНЧЩЋЕФЬиЪтЩшЖЈМАЦфвРРЕЙиЯЕЃЛansible 1.3МАЦфвдКѓЕФАцБОВХжЇГжЃЛ
- defaultФПТМЃКЮЊЕБЧАНЧЩЋЩшЖЈФЌШЯБфСПЪБЪЙгУДЫФПТМЃЛгІЕБАќКЌвЛИіmain.ymlЮФМўЃЛ
cЃЉ rolesЪЙгУАИР§
1.НЈСЂЯргІФПТМ
ansible_playbooks/roles/ {websrvs,dbsrvs}/ {tasks,files,templates,meta, handlers,vars}
2.НтОіЕквЛИіНЧЩЋwebsrvs
ЯШАбвЊгУЕНЕФХфжУЮФМўПНЙ§РДЃЈД§ЛсвЊИДжЦИјИїИіЗўЮёЦїЪЙгУЕФЃЉ
cp/etc/httpd/conf/httpd.conf /ansible_playbooks/roles/websrvs/files
3.ЖЈвхШЮЮёtasks vim/ansible_playbooks /roles/websrvs/tasks/main.yml
ФкШнЃК
-name: install httpd package
yum: name=httpd
-name:install configuration file
copy: src=httpd.conf dest= /etc/httpd/conf/httpd.conf зЂвтТЗОЖЃЌЖМПЩвдЪЙгУЯрЖдТЗОЖжБНгЕїгУ
tags:
- conf
notify:
- restart httpd
-name: start httpd
service: name=httpd state=started |
4.гЩгкtasksжаЪЙгУСЫnotify,МДашвЊСэЭтЖЈвхhandlerЃЌЫљвдБиаыдк/ansible_playbooks /roles/websrvs/handlersБраД
ЬэМгmain.ymlЮФМў
vim/ansible_playbooks/roles/ websrvs/handlers/main.yml
ФкШнШчЯТЃК
-name: restart httpd
service: name=httpd state=restarted |
5.ШчЙћУЛгаЦфЫћФкШнСЫОЭПЩвдСЫЃЌгаЕФЛАМЬајдкЯргІЕФФПТМЯТНЈСЂmain.ymlЖЈвх
МйШчгжЪЙгУСЫБфСПЃЌОЭвЊдкvarsЯТЖЈвхвЛИіmain.ymlжИЖЈБфСП
- httpd_port: 80
- maxClients: 180 |
6.ДДНЈ/ansible_playbooks/site.yml жИЖЈДДНЈСЫЕФНЧЩЋ
- hosts: websrvs
remote_user: root
roles:
- websrvs |
жСДЫrolesДДНЈЭъГЩЃЌвЊЯыАбЯргІЕФНЧЩЋгУдкФГИіжїЛњЩЯЕФЛАЃЌжБНгдкsite.ymlЩЯ- hosts:websrvs жИЖЈЃЌrolesЯТЩшжУ
ЖдгІНЧЩЋМДПЩЁЃ
етбљЃК
-hosts: websrvs
remote_user: root
roles:
- websrvs
-hosts: websrvs2
remote_user: root
roles:
- websrvs2
- dbsrvs |
зюКѓжДааansible-playbooks site.yml
зЂвтЃКИДжЦЕНЯргІФПТМЕФЮФМўЃЌЖМПЩвджБНгаДЮФМўУћЕїгУ
dЃЉTags
tagsгУгкШУгУЛЇбЁдёдЫааЛђТдЙ§playbookжаЕФВПЗжДњТыЁЃansibleОпгаУнЕШадЃЌвђДЫЛсздЖЏЬјЙ§УЛгаБфЛЏЕФВПЗжЃЌМДБуШчДЫЃЌгааЉ
ДњТыЮЊВтЪдЦфШЗЪЕУЛгаЗЂЩњБфЛЏЕФЪБМфвРШЛЛсЗЧГЃЕиГЄЁЃДЫЪБЃЌШчЙћШЗаХЦфУЛгаБфЛЏЃЌОЭПЩвдЭЈЙ§tagsЬјЙ§ДЫаЉДњТыЦЌЖЯЁЃ
apache.ymlФкШнЃК
- hosts: websrvs
remote_user: root
vars:
-package: httpd
-service: httpd
tasks:
-name: install httpd package
yum: name={{ package }} state=latest
-name: install configuration file for httpd
template: src= /root/templates/httpd.conf.j2dest =/etc/httpd/conf/httpd.conf
tags:
-conf
notify:
-restart httpd
-name: start httpd service
service: enabled=true name={{ service }} state=started
handlers:
-name:restart httpd
service: name=httpd state=restarted |
ЕїгУЃК
| ansible-playbook apache.yml--tags="conf"ЃЌ |
етбљжЛжДааСЫ
-name: install configuration file for httpd
template: src= /root/templates/httpd.conf.j2dest =/etc/httpd/conf/httpd.conf
tags:
-conf |
eЃЉJinja2ЯрЙи
1.1 зжУцСП
БэДяЪНзюМђЕЅЕФаЮЪНОЭЪЧзжУцСПЁЃзжУцСПБэЪОжюШчзжЗћДЎКЭЪ§жЕЕФ Python ЖдЯѓЁЃЯТУц ЕФзжУцСПЪЧПЩгУЕФ:
ЁАHelloWorldЁБ:
ЫЋв§КХЛђЕЅв§КХжаМфЕФвЛЧаЖМЪЧзжЗћДЎЁЃЮоТлКЮЪБФуашвЊдкФЃАхжаЪЙгУвЛИізжЗћДЎЃЈБШШчКЏЪ§ЕїгУЁЂЙ§ТЫЦїЛђжЛЪЧАќКЌЛђМЬГавЛИіФЃАхЕФВЮЪ§ЃЉЃЌЫќУЧЖМЪЧ гагУЕФЁЃ
42/ 42.23:
жБНгаДЯТЪ§жЕОЭПЩвдДДНЈећЪ§КЭИЁЕуЪ§ЁЃШчЙћгааЁЪ§ЕуЃЌдђЮЊИЁЕуЪ§ЃЌЗёдђЮЊећЪ§ЁЃМЧзЁдк Python РяЃЌ 42 КЭ 42.0
ЪЧВЛвЛбљЕФЁЃ
| [ЁЎlistЁЏ,ЁЎofЁЏ, ЁЎobjectsЁЏ]: |
вЛЖджаРЈКХРЈЦ№РДЕФЖЋЮїЪЧвЛИіСаБэЁЃСаБэгУгкДцДЂКЭЕќДњађСаЛЏЕФЪ§ОнЁЃР§ШчФуПЩвдШнвзЕидк for бЛЗжагУСаБэКЭдЊзщДДНЈвЛИіСДНгЕФСаБэ:
<ul>
{%for href, caption in [('index.html', 'Index'), ('about.html', 'About'),
('downloads.html','Downloads')] %}
<li><a href="{{ href}}">{{ caption }}</a></li>
{%endfor %}
</ul>
(ЁЎtupleЁЏ,ЁЎofЁЏ, ЁЎvaluesЁЏ): |
дЊзщгыСаБэРрЫЦЃЌжЛЪЧФуВЛФмаоИФдЊзщЁЃШчЙћдЊзщжажЛгавЛИіЯюЃЌФуашвЊвдЖККХНсЮВЫќЁЃдЊзщЭЈГЃгУгкБэЪОСНИіЛђИќЖрдЊЫиЕФЯюЁЃИќЖрЯИНкМћЩЯУцЕФР§згЁЃ
| {ЁЎdictЁЏ:ЁЎofЁЏ, ЁЎkeyЁЏ: ЁЎandЁЏ, ЁЎvalueЁЏ: ЁЎpairsЁЏ}: |
PythonжаЕФзжЕфЪЧвЛжжЙиСЊМќКЭжЕЕФНсЙЙЁЃМќБиаыЪЧЮЈвЛЕФЃЌВЂЧвМќБиаыжЛгавЛИі жЕЁЃзжЕфдкФЃАхжаКмЩйЪЙгУЃЌКБгУгкжюШч xmlattr() Й§ТЫЦїжЎРрЁЃ
true/ false:
trueгРдЖЪЧ true ЃЌЖј false ЪМжеЪЧ false ЁЃ
2.2 ЫуЪѕдЫЫу
Jinja дЪаэФугУМЦЫужЕЁЃетдкФЃАхжаКмЩйгУЕНЃЌЕЋЪЧЮЊСЫЭъећаддЪаэЦфДцдкЁЃжЇГжЯТУцЕФдЫЫуЗћ:
+ АбСНИіЖдЯѓМгЕНвЛЦ№ЁЃЭЈГЃЖдЯѓЪЧЫижЪЃЌЕЋЪЧШчЙћСНепЪЧзжЗћДЎЛђСаБэЃЌФуПЩвдгУетжжЗНЪНРДЯЮНгЫќУЧЁЃЮоТлШчКЮетВЛЪЧЪзбЁЕФСЌНгзжЗћДЎЕФЗНЪНЃЁСЌНгзжЗћДЎМћ ~ дЫЫуЗћЁЃ {{ 1 + 1 }} ЕШ
гк 2 ЁЃ
- гУЕквЛИіЪ§МѕШЅЕкЖўИіЪ§ЁЃ {{ 3 - 2 }} ЕШгк 1 ЁЃ
/ ЖдСНИіЪ§зіГ§ЗЈЁЃЗЕЛижЕЛсЪЧвЛИіИЁЕуЪ§ЁЃ {{ 1 / 2 }} ЕШгк {{ 0.5 }} ЁЃ
// ЖдСНИіЪ§зіГ§ЗЈЃЌЗЕЛиећЪ§ЩЬЁЃ {{ 20 // 7 }} ЕШгк 2 ЁЃ
% МЦЫуећЪ§Г§ЗЈЕФгрЪ§ЁЃ {{ 11 % 7 }} ЕШгк 4 ЁЃ
* гУгвБпЕФЪ§ГЫзѓБпЕФВйзїЪ§ЁЃ {{ 2 * 2 }} ЛсЗЕЛи 4 ЁЃвВПЩвдгУгкжиИДвЛИізжЗћДЎЖрДЮЁЃ {{
ЁЎ=ЁЏ * 80 }} ЛсДђгЁ 80 ИіЕШКХЕФКсЬѕЁЃ
** ШЁзѓВйзїЪ§ЕФгвВйзїЪ§ДЮУнЁЃ {{ 2**3 }} ЛсЗЕЛи 8 ЁЃ
3.3 БШНЯВйзїЗћ
== БШНЯСНИіЖдЯѓЪЧЗёЯрЕШЁЃ
!= БШНЯСНИіЖдЯѓЪЧЗёВЛЕШЁЃ
> ШчЙћзѓБпДѓгкгвБпЃЌЗЕЛи true ЁЃ
>= ШчЙћзѓБпДѓгкЕШгкгвБпЃЌЗЕЛи true ЁЃ
< ШчЙћзѓБпаЁгкгвБпЃЌЗЕЛи true ЁЃ
<= ШчЙћзѓБпаЁгкЕШгкгвБпЃЌЗЕЛи true ЁЃ
4.4 ТпМдЫЫуЗћ
Ждгк if гяОфЃЌдк for Й§ТЫЛђ if БэДяЪНжаЃЌЫќПЩвдгУгкСЊКЯЖрИіБэДяЪН:
and ШчЙћзѓВйзїЪ§КЭгвВйзїЪ§ЭЌЮЊецЃЌЗЕЛи true ЁЃ
or ШчЙћзѓВйзїЪ§КЭгвВйзїЪ§гавЛИіЮЊецЃЌЗЕЛи true ЁЃ
not ЖдвЛИіБэДяЪНШЁЗДЃЈМћЯТЃЉЁЃ
(expr)
БэДяЪНзщЁЃ
yaml ЮФМўжДааЗНЗЈ
КмМђЕЅЃКansible-play ЮФМўУћ
ansible ГЃгУФЃПщМАЪОР§
вЊВщПДЯъЯИаХЯЂ ansible-doc -s ФЃПщУћГЦ
ЃЈ1ЃЉcommand: УќСюФЃПщЃЌФЌШЯФЃПщЃЌгУгкдкдЖГЬжДааУќСюЃЛ
Р§ ansible all -a 'date' Лђ ansible a2 -a 'date' ВщПДa2жїЛњЩЯЕФШеЦк
ЃЈ2ЃЉcron:МЦЛЎШЮЮёФЃПщ
ВЮЪ§
state:
present: АВзА
absent: вЦГ§
Р§ЃК
ansible websrvs -m cron -a 'minute="*/10" job="/bin/echo hell" name="test cronjob"'
ansible a2 -m cron -a 'hour="*/10" job="/bin/echo 11" name="test"'
ЬэМгУїЮЊtestЕФЖЈЪБШЮЮёЃЌетИіnameЦфЪЕЪЧзЂЪЭЃЌПДcrontabФкШнОЭжЊЕР
ansible a2 -m corn -a 'state=absent name="test"'
ЩОГ§a2ЩЯУћЮЊtestЕФЖЈЪБШЮЮё
ЃЈ3ЃЉuserЃКгУЛЇФЃПщ
name=: жИУїДДНЈЕФгУЛЇЕФУћзжЃЛ
Р§ЃК
ansible websrvs -m user -a 'name=mysqluid=306 system=yes group=mysql'
ansible a2 -m user -a 'name=mytest password=123456 createhome=false shell=/bin/tcsh'
ЬэМгУмТыЮЊ123456ЕФгУЛЇmytestЃЌВЛНЈМвФПТМЃЌгУtcsh shell
ЃЈ4ЃЉgroup: зщФЃПщ
Р§ЃК
ansible websrvs -m group -a 'name=mysql gid=306 system=yes'
ЃЈ5ЃЉcopyЃКИДжЦЮФМў
src=:ЖЈвхБОЕидДЮФМўТЗОЖ
dest=:ЖЈвхдЖГЬФПБъЮФМўТЗОЖ
content=:ШЁДњsrc=ЃЌБэЪОжБНггУДЫДІжИЖЈЕФаХЯЂЩњГЩЮЊФПБъЮФМўФкШнЃЛ
Р§ЃК
ansible all -m copy -a 'src=/etc/fstabdest= /tmp/fstab.ansbile owner=root mode=640'
ansible all -m copy -a 'content= "HelloAnsible\nHi MageEdu" dest=/tmp/test.ansible'
ansible a2 -m copy -a 'src=/root/a1-filedest =/root/file.ansible owner= mytest group=mytest mode=640'
ЃЈ6ЃЉfile: ЩшЖЈЮФМўЪєад
path=:жИЖЈЮФМўТЗОЖЃЌПЩвдЪЙгУnameЛђdestРДЬцЛЛЃЛ
ДДНЈЮФМўЕФЗћКХСДНгЃК
src=:жИУїдДЮФМў
path=:жИУїЗћКХСДНгЮФМўТЗОЖ
Р§
ansible all -m file -a 'path =/tmp/fstab.link src =/tmp/fstab.ansbile state=link'
ДДНЈЗћКХСДНгЮФМўfstab.link
ЃЈ7ЃЉpingЃКВтЪджИЖЈжїЛњЪЧЗёФмСЌНгЃЛ
Р§ЃК
ansible a2 -m ping
ansible all -m ping
ЃЈ8ЃЉserviceЃКжИЖЈдЫаазДЬЌЃЛ
enabled=:ЪЧЗёПЊЛњздЖЏЦєЖЏЃЌШЁжЕЮЊtrueЛђепfalseЃЛ
name=:ЗўЮёУћГЦ
state=:зДЬЌЃЌШЁжЕгаstarted, stopped, restarted;
Р§ЃК
ansiblea2 -m service -a 'name=mysqld state=started'
ansiblea2 -m service -a 'name=mysqld enabled=true'
ЃЈ9ЃЉshellЃКдкдЖГЬжїЛњЩЯдЫааУќСю
гШЦфЪЧгУЕНЙмЕРЕШЙІФмЕФИДдгУќСюОЭвЊгУshellЖјВЛФмгУcommandСЫЃЛ
Р§ЃК
ansibleall -m command -a 'echo 123456 | passwd --stin user1' етбљжДааЪЧЪЇАмЕФ
ansibleall -m shell -a 'echo 123456 | passwd --stin user1'етбљВХЪЧе§ШЗЕФ
ЃЈ10ЃЉscriptЃКНЋБОЕиНХБОИДжЦЕНдЖГЬжїЛњВЂдЫаажЎЃЛ
зЂвтЃКвЊЪЙгУЯрЖдТЗОЖжИЖЈНХБО
Р§ЃК
ansiblea2 -m script -a 'test.sh'
ЃЈ11ЃЉyumЃКАВзАГЬађАќ
name=:жИУївЊАВзАЕФГЬађАќЃЌПЩвдДјЩЯАцБОКХЃЛ
state=:presentЃЈФЌШЯЃЉ, latestБэЪОАВзАЃЌabsentБэЪОаЖдиЃЛ
Р§ЃК
ansible a2 -m yum -a 'name=zsh'
ЃЈ12ЃЉsetup: ЪеМЏдЖГЬжїЛњЕФfacts
УПИіБЛЙмРэНкЕудкНгЪеВЂдЫааЙмРэУќСюжЎЧАЃЌЛсНЋздМКжїЛњЯрЙиаХЯЂЃЌШчВйзїЯЕЭГАцБОЁЂIPЕижЗЕШБЈИцИјдЖГЬЕФansbile
жїЛњЃЛ
Р§ЃК
ansible all -m setup ЯдЪОЫљгаНкЕуЕФаХЯЂ |


