| 编辑推荐: |
本文主要介绍循环神经网络-基础篇知识Basic-RNN。希望对你的学习有帮助。
本文来自于CSDN,由火龙果软件Linda编辑,推荐。 |
|
我们把全连接网络也叫做稠密网络DNN,其中X1到X8是不同样本的特征
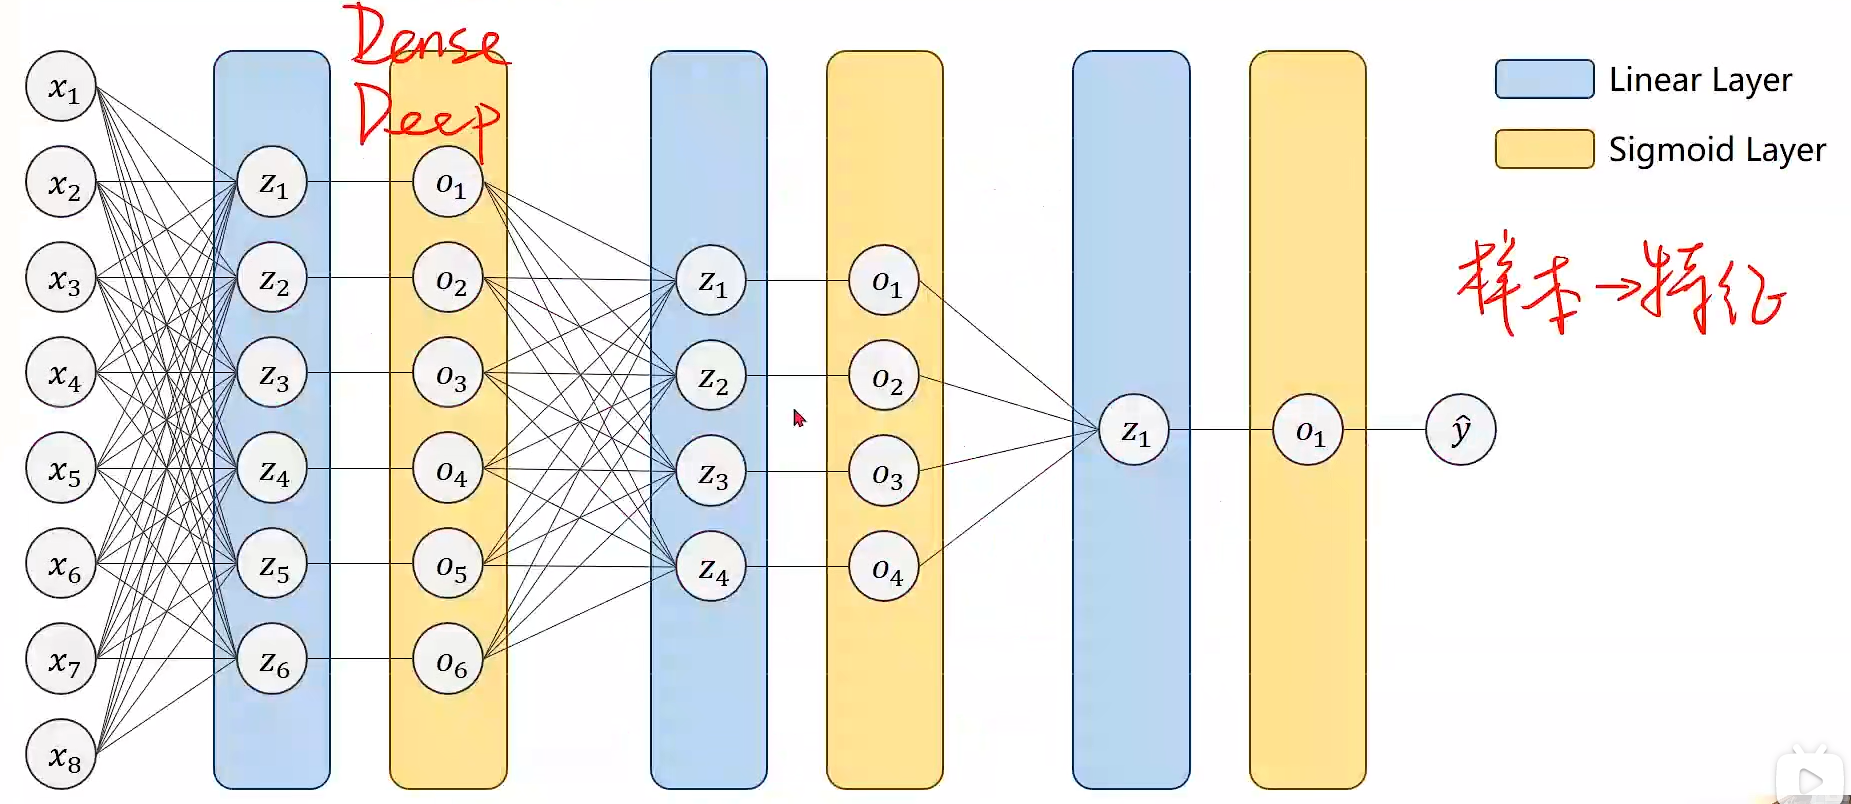
而本文介绍的循环神经网络RNN主要处理的是具有序列关系的输入数据,即前面的输入和后面的输入是有关系的。例如天气,股市,金融数据和自然语言等
什么是RNN
首先来看一个简单的循环神经网络结构
将序列x 1 − x 4作为输入到R N N C e l l RNN
CellRNNCell,它是一个线型层(Linear),可以得到隐层输出h ,其中x 2不仅包含自己的信息,也包含x
1 的信息。
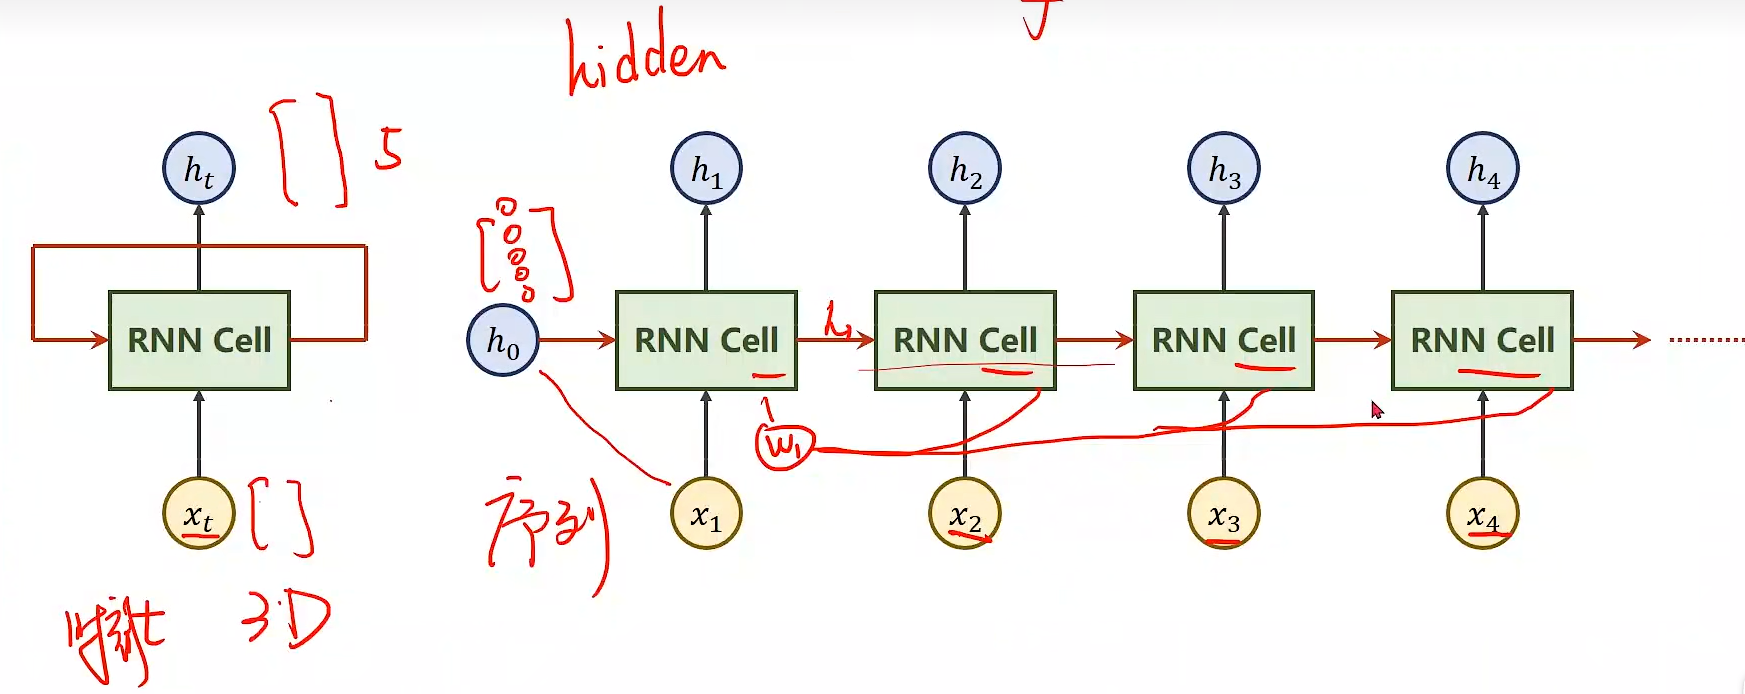
h 0 是一个先验,例如,我们想要从图像到文本的转换时,我们可以选择用CNN+FC作为h
0 输入,结合RNN如果我们没有先验,则把h 0的维度设置和其余h 相同,其值为全0。
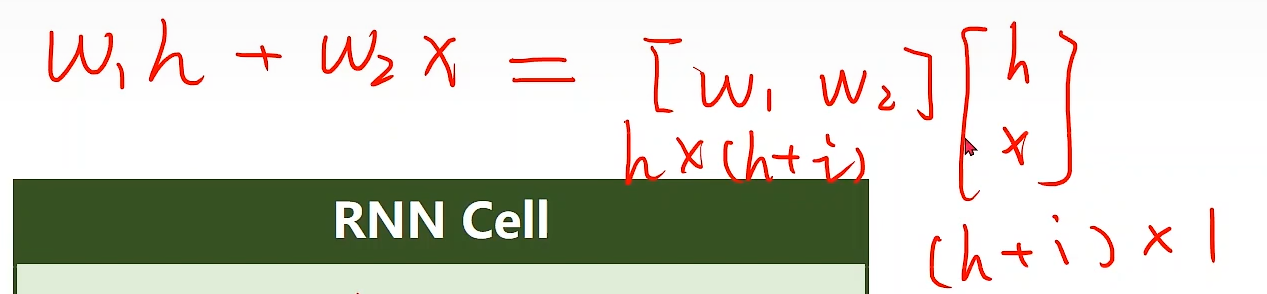
我们来具体看一下计算过程。
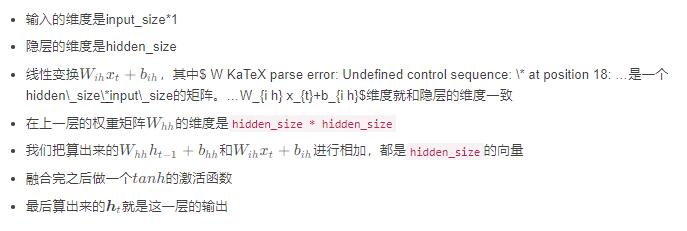
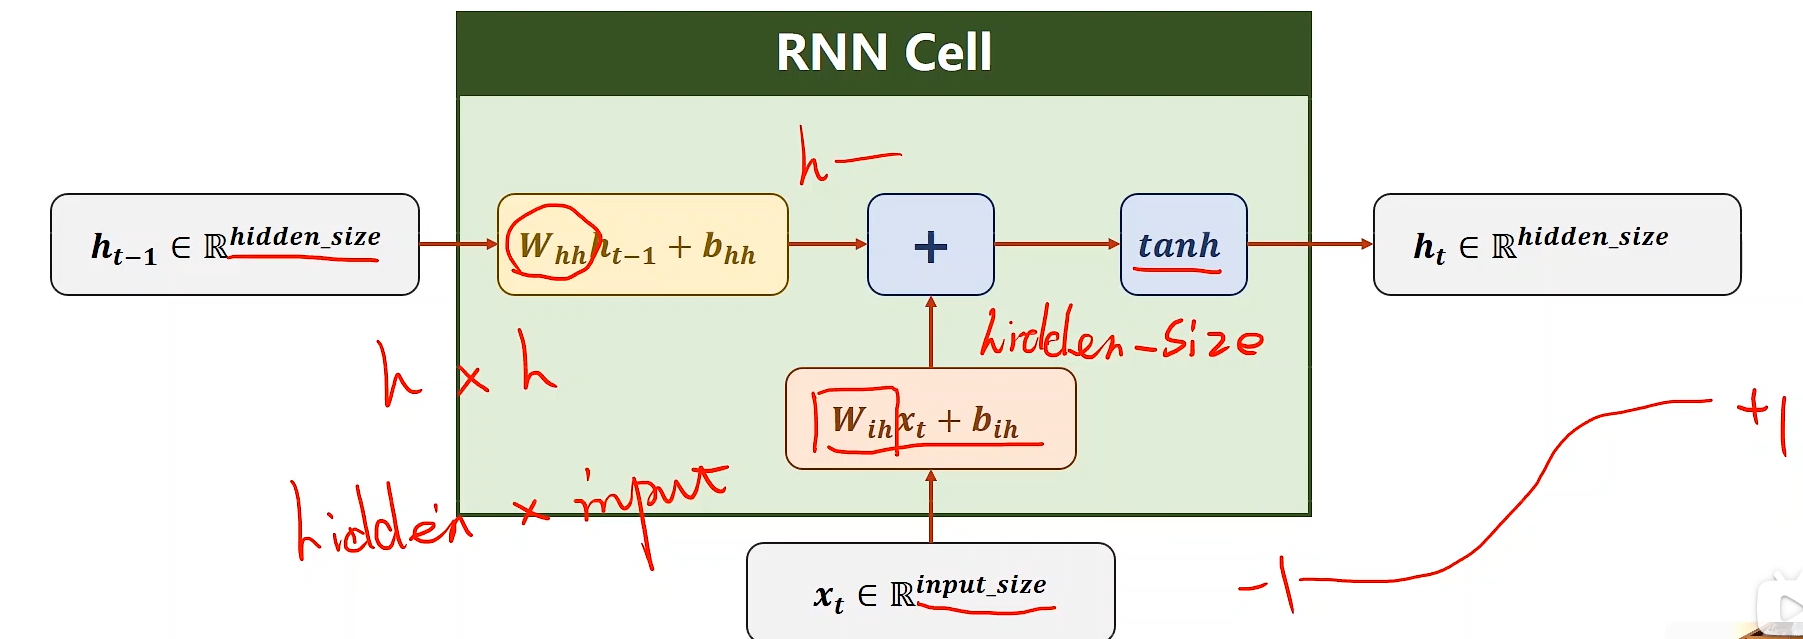
其实本质上可以变成一个线型层
RNN构造
RNN构造在pytorch中有两种构造方式
做自己的RNN Cell,自己写处理序列的循环
直接使用RNN
第一种方式:RNN Cell
我们先来看一下RNN Cell是怎么用的
在设计RNN Cell 时,要确定输入维度input_size和输出维度hidden_size
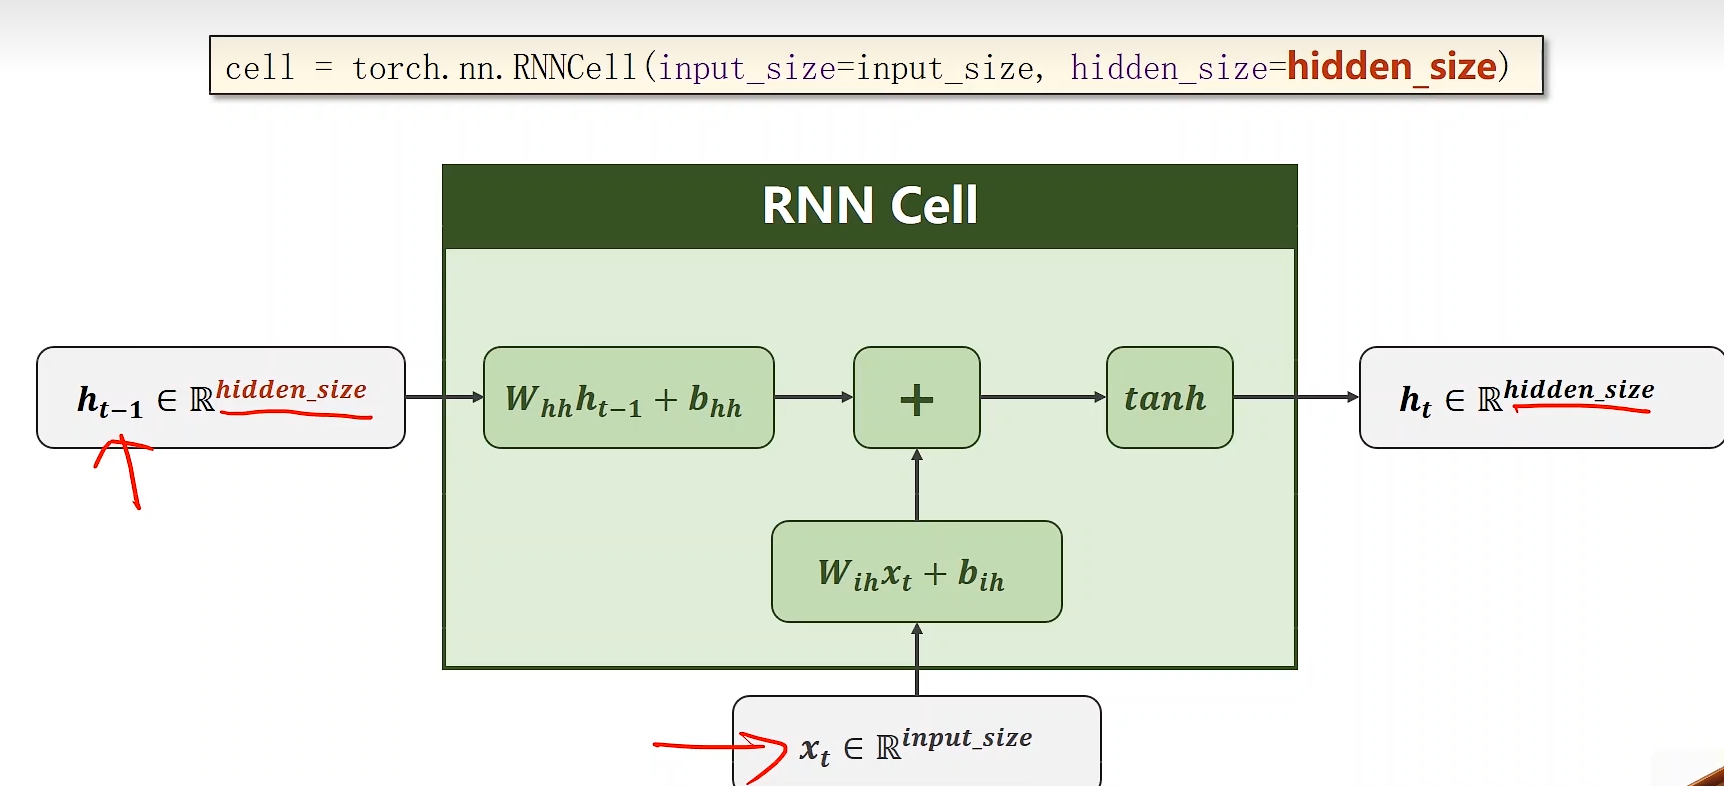
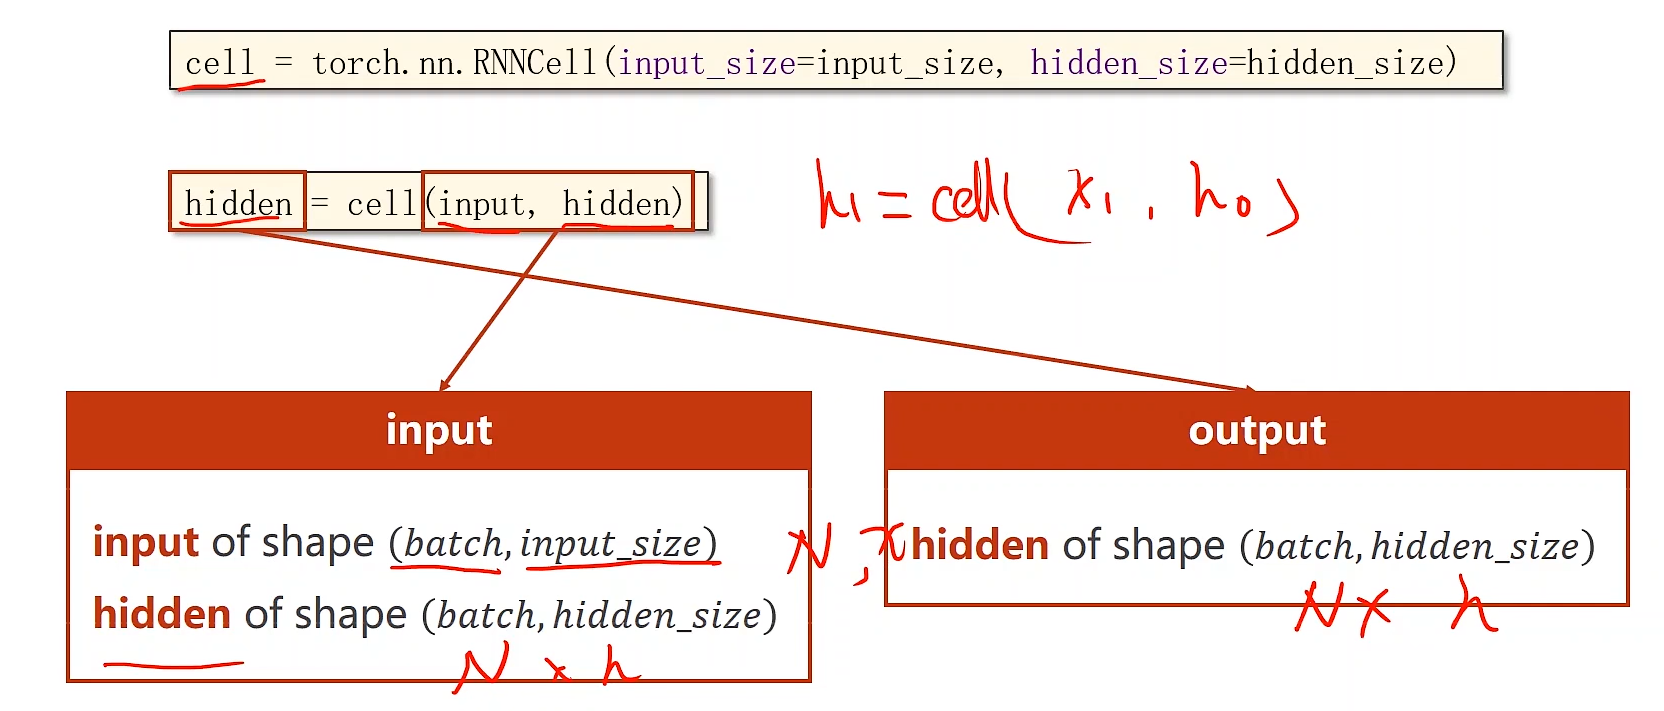
在进行调用的时候要加上当前时刻的输入input加上当前的hidden
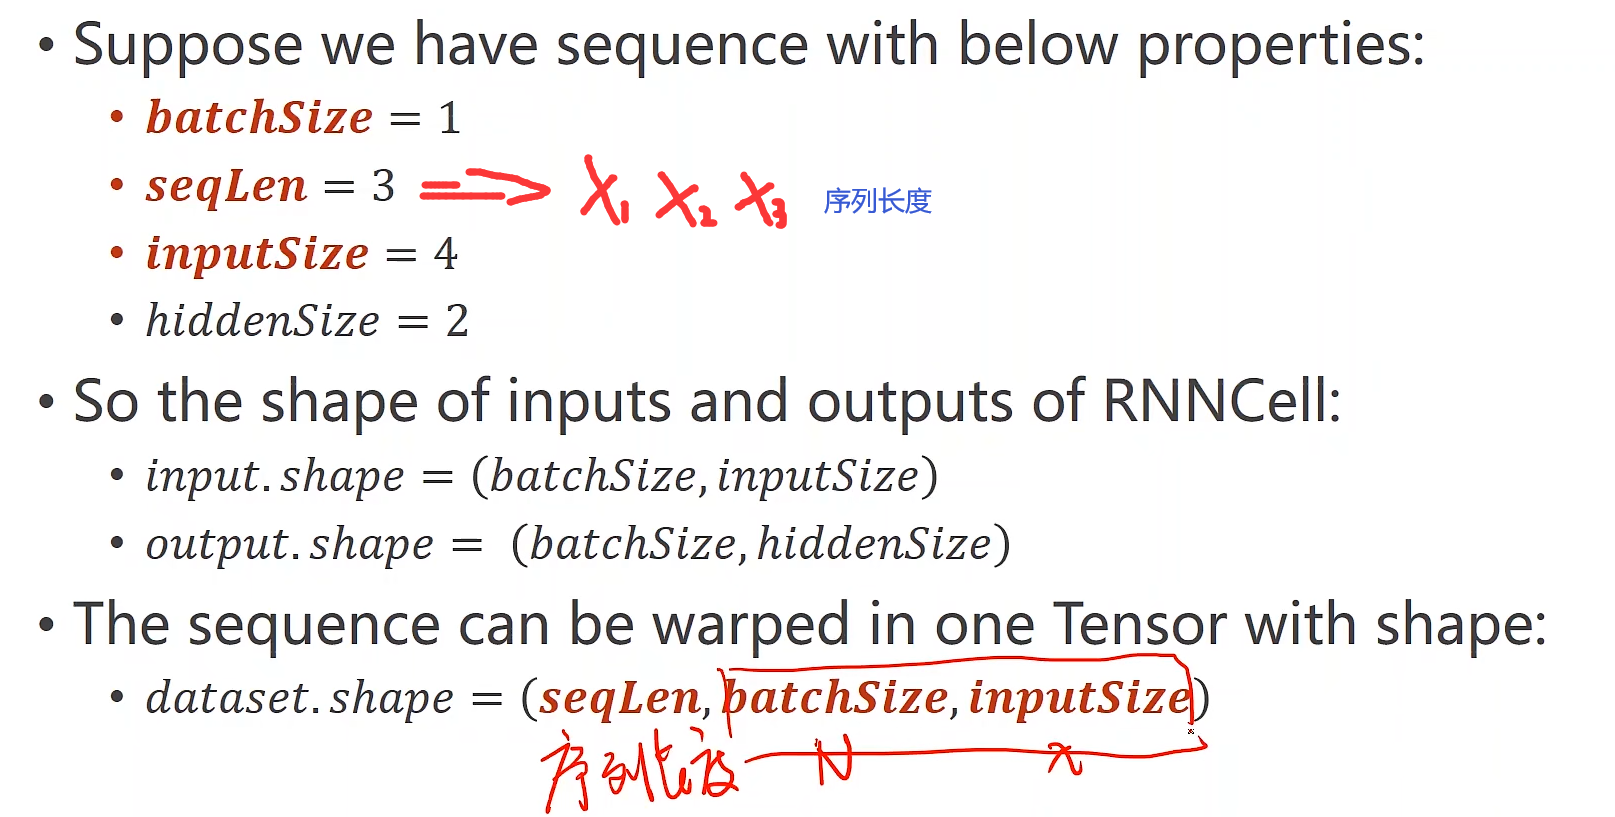
下面我们看一个实例
| import torch
# Parameters
batch_size = 1
seq_len = 3
input_size = 4
hidden_size = 2
# Construction of RNNCell
cell = torch.nn.RNNCell(input_size=input_size,
hidden_size
=hidden_size)
# (seq,batch,features)
dataset = torch.randn(seq_len,batch_size,input_size)
# Initializing the hidden to zero
hidden = torch.zeros(batch_size,hidden_size)
for idx,input in enumerate(dataset):
print('=' * 20, idx, '='*20)
print('Input size:', input.shape) # the shape
of input is
(batchsize,inputsize)
hidden = cell(input,hidden)
print('hidden size:', hidden.shape)
print(hidden)
# ================输出结果=========
==========
==================== 0 ===========
=========
Input size: torch.Size([1, 4])
hidden size: torch.Size([1, 2])
tensor([[0.2663, 0.8438]], grad_fn=<TanhBackward0>)
==================== 1 ====================
Input size: torch.Size([1, 4])
hidden size: torch.Size([1, 2])
tensor([[-0.2387, -0.4385]], grad_fn=<TanhBackward0>)
==================== 2 ====================
Input size: torch.Size([1, 4])
hidden size: torch.Size([1, 2])
tensor([[0.8720, 0.5714]], grad_fn=<TanhBackward0>)
|
第二种方式:RNN
需要确定输入维度input_size和输出维度hidden_size和RNN的层数num_layers
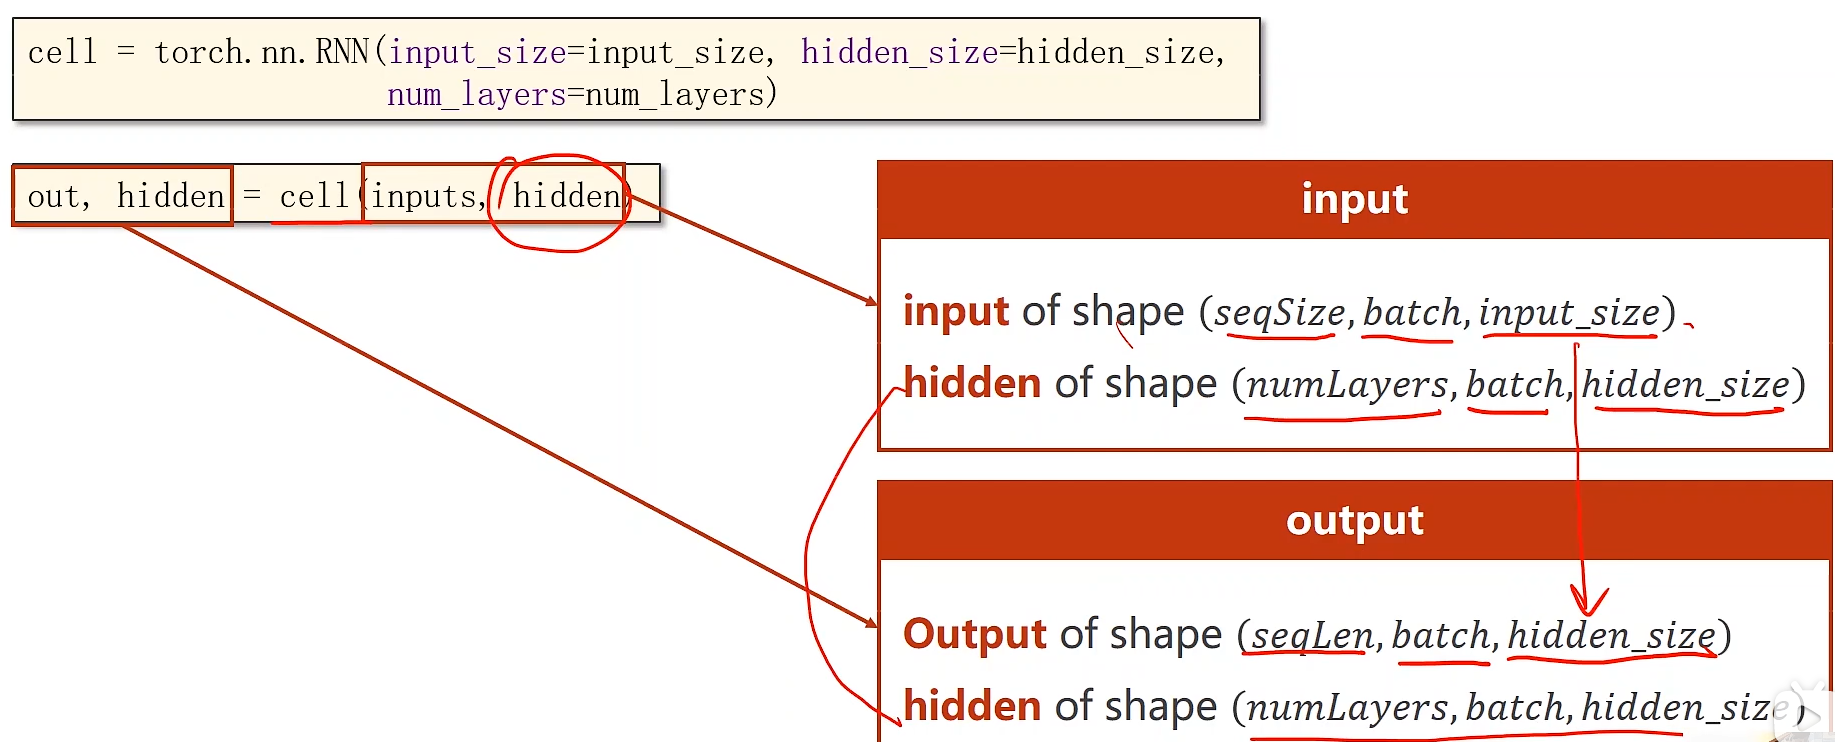
其中inputs代表整个输入序列x xx,hidden代表h 0,out代表隐层序列h
hh,hidden代表最后的输出h N
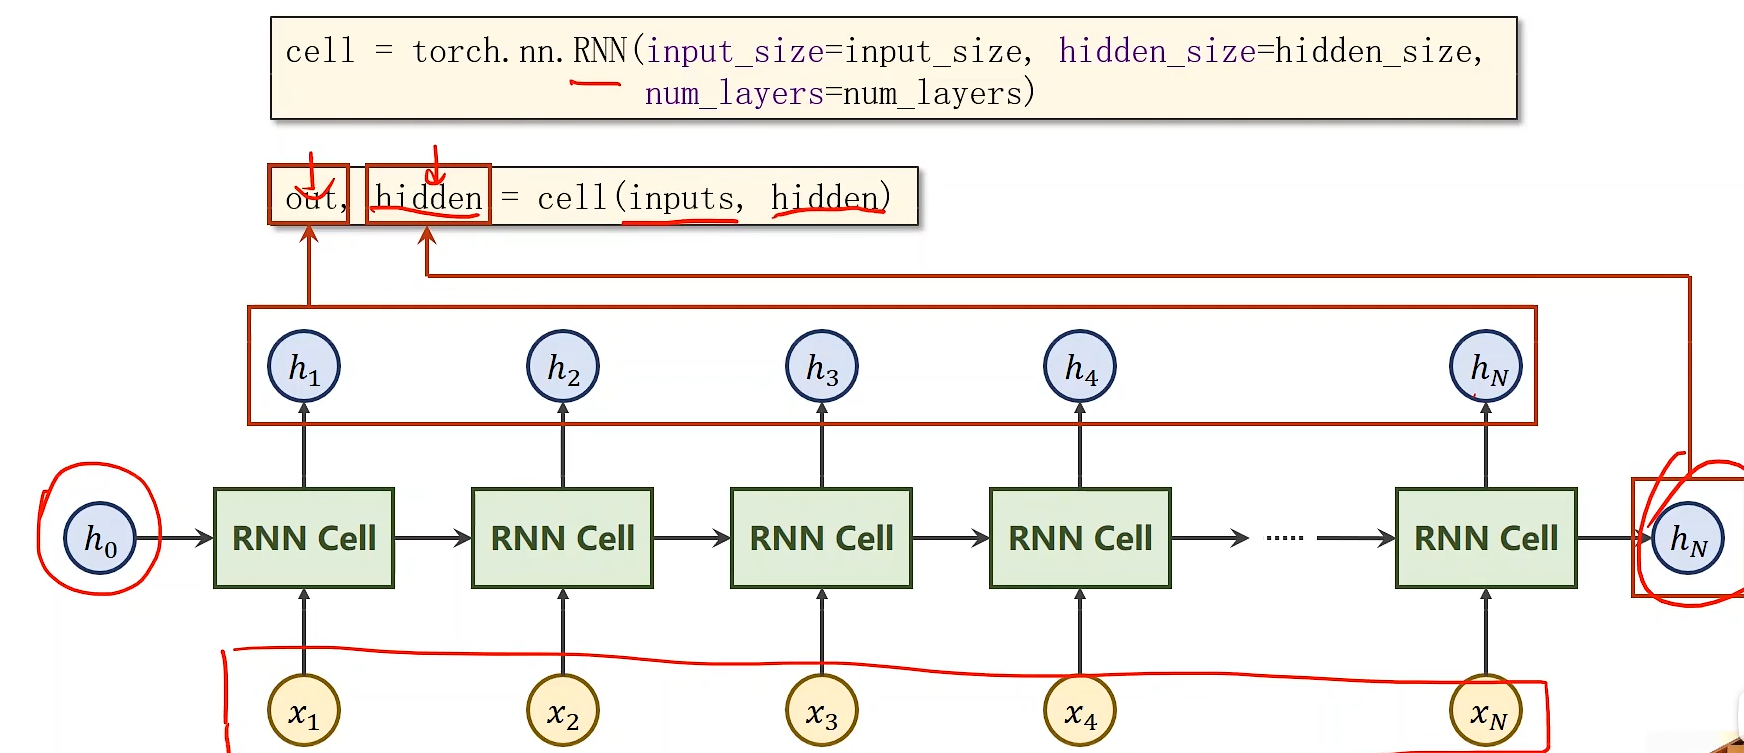
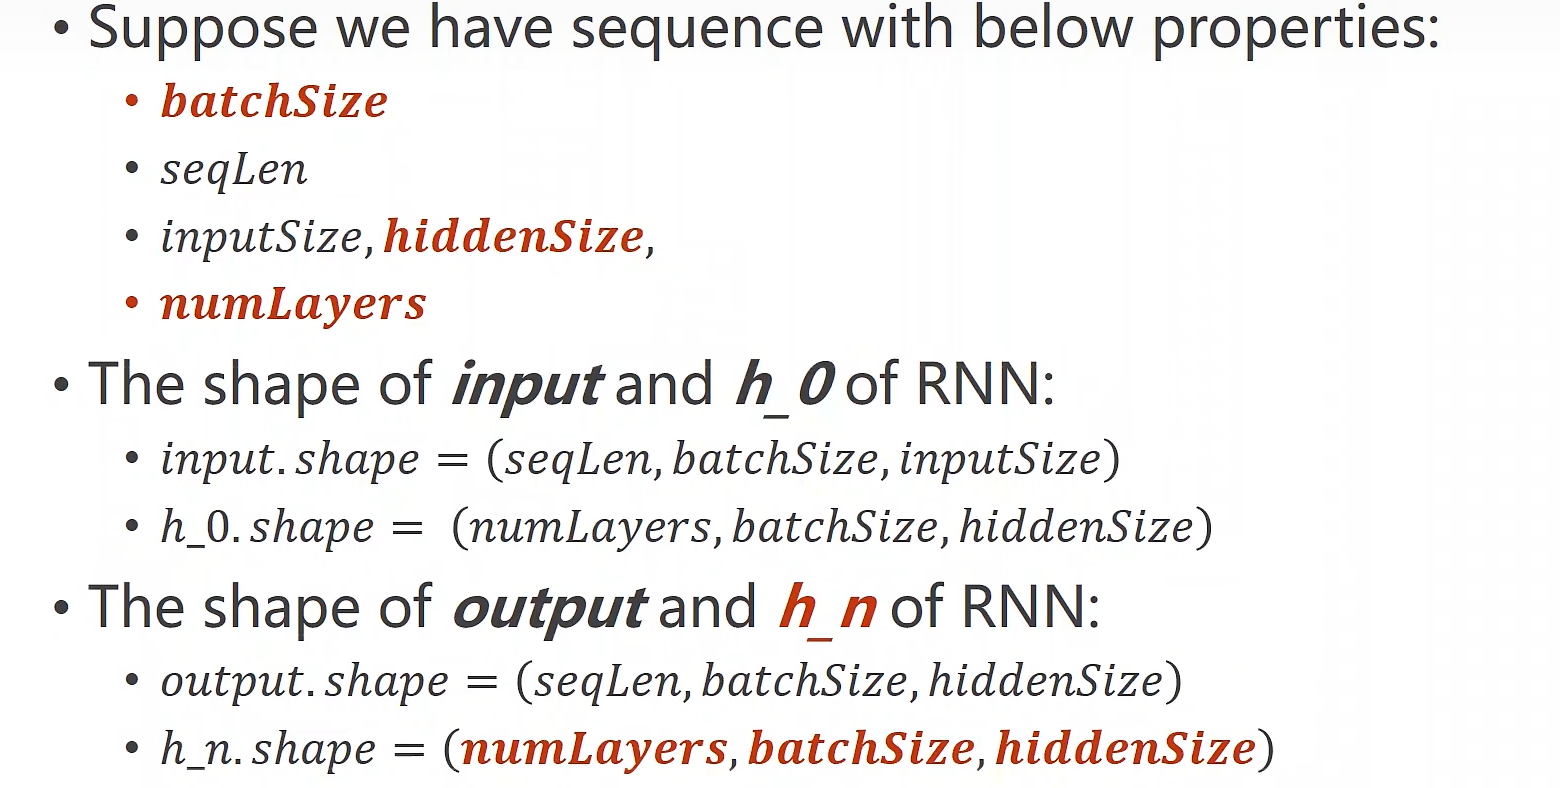
我们需要确定他们的维度
下面我们看一个实例
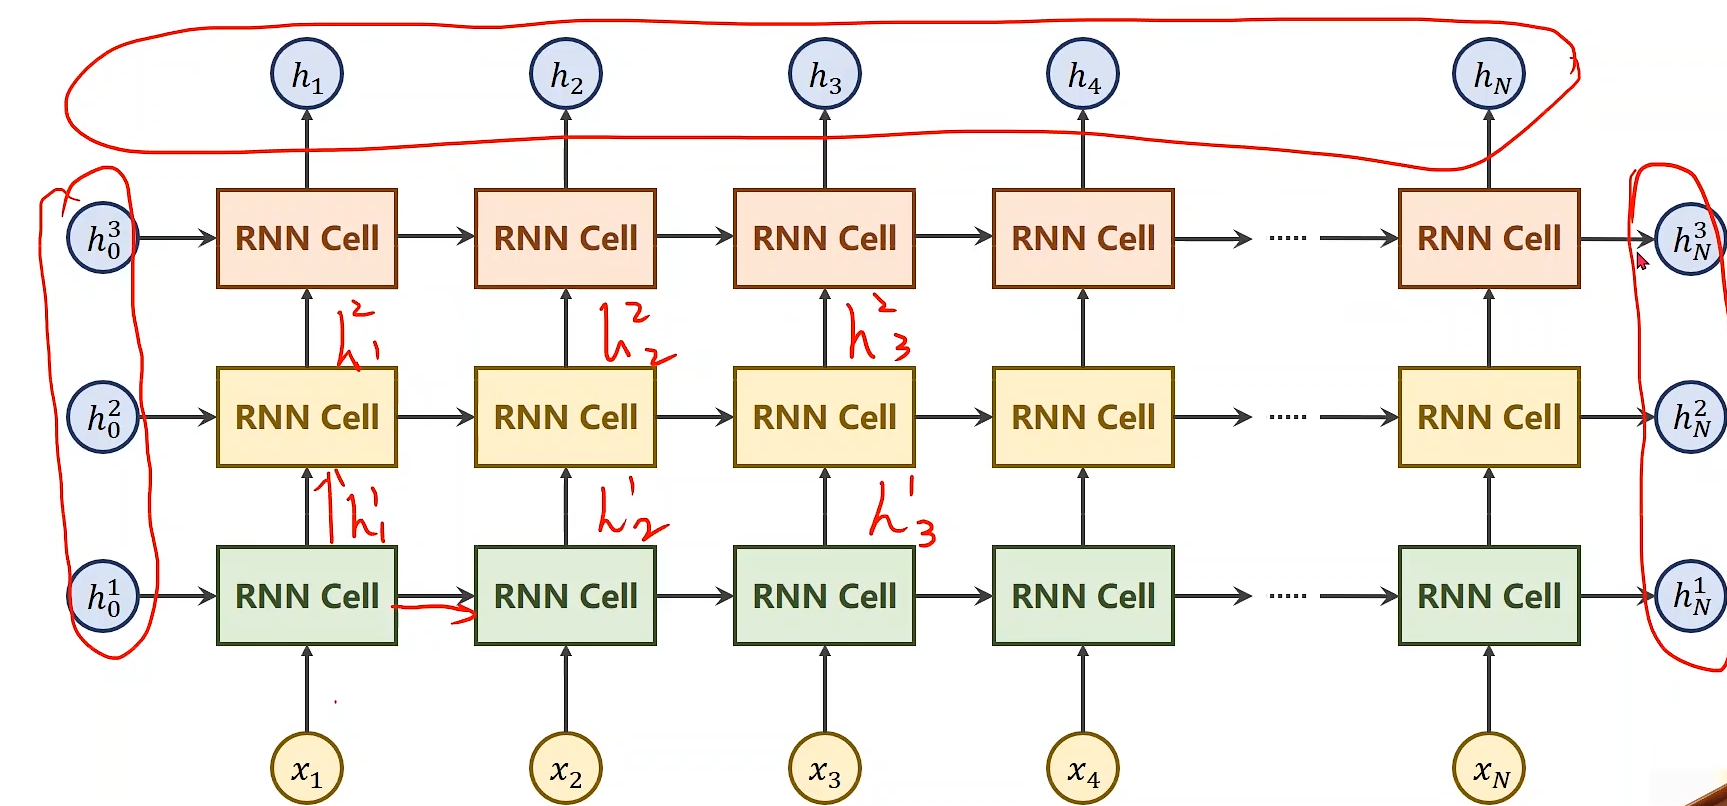
什么是numLayers,例如下方有三个numLayers
| import torch
batch_size = 1
seq_len = 3
input_size = 4
hidden_size = 2
num_layers = 1
cell = torch.nn.RNN(input_size=input_size,
hidden_size
=hidden_size, num_layers=num_layers)
inputs = torch.randn(seq_len,batch_size,input_size)
hidden = torch.zeros(num_layers,batch_size,hidden_size)
out, hidden = cell(inputs,hidden)
print('Output size:', out.shape)
print('Output:',out)
print('Hidden size:', hidden.shape)
print('Hidden', hidden)
# ================输出结果===========
========
Output size: torch.Size([3, 1, 2])
Output: tensor([[[-0.1512, 0.2489]],
[[-0.3888, -0.3375]],
[[-0.1606, 0.4324]]], grad_fn=<StackBackward0>)
Hidden size: torch.Size([1, 1, 2])
Hidden tensor([[[-0.1606, 0.4324]]], grad_fn=
<StackBackward0>)
|
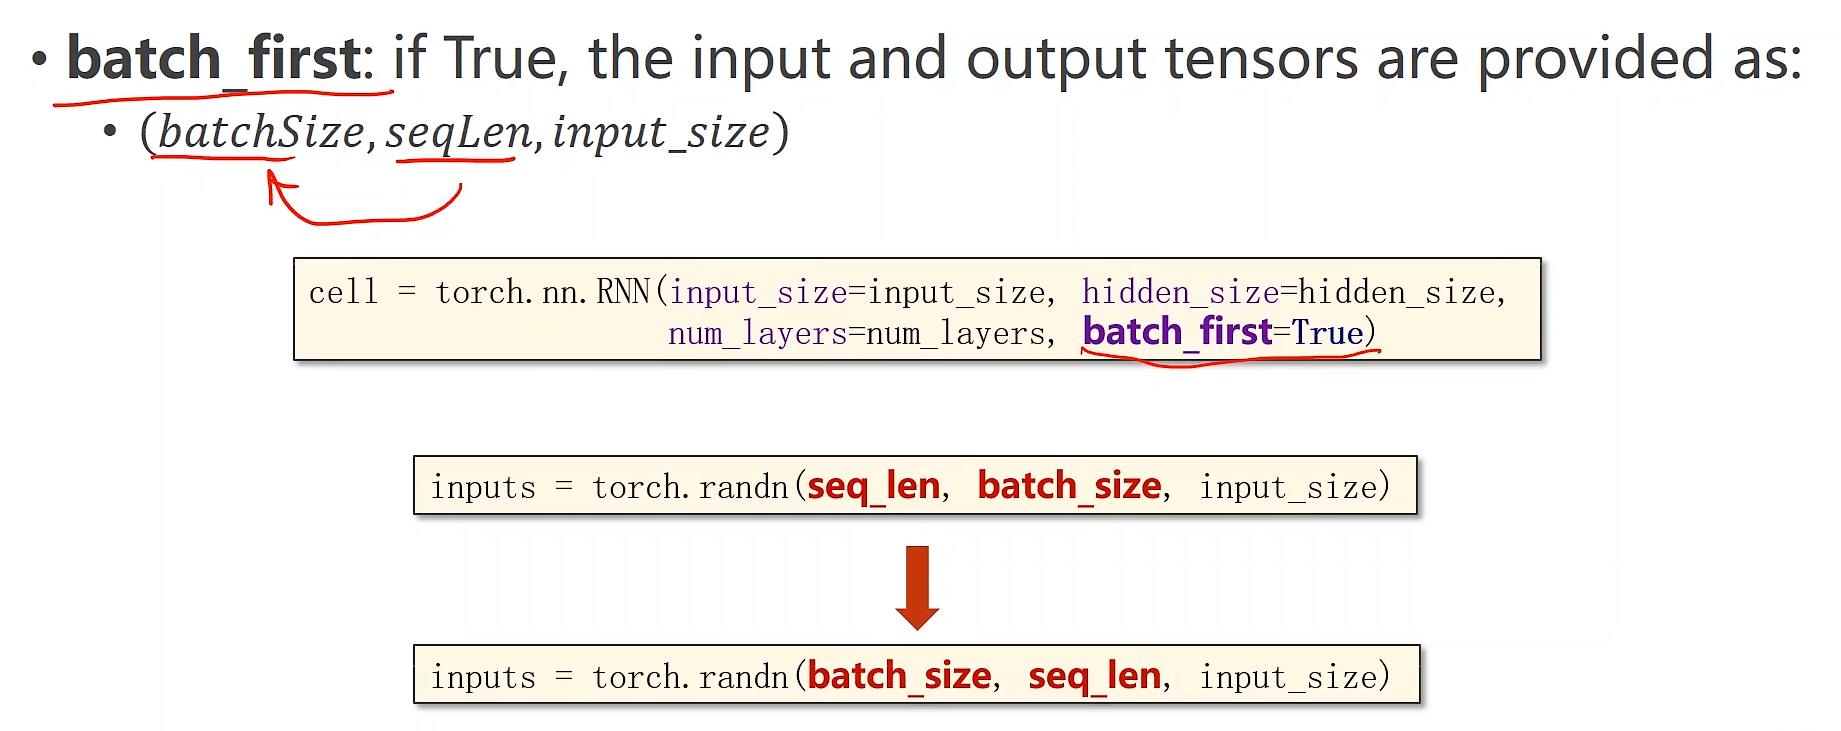
另外还有一个参数是batch_first
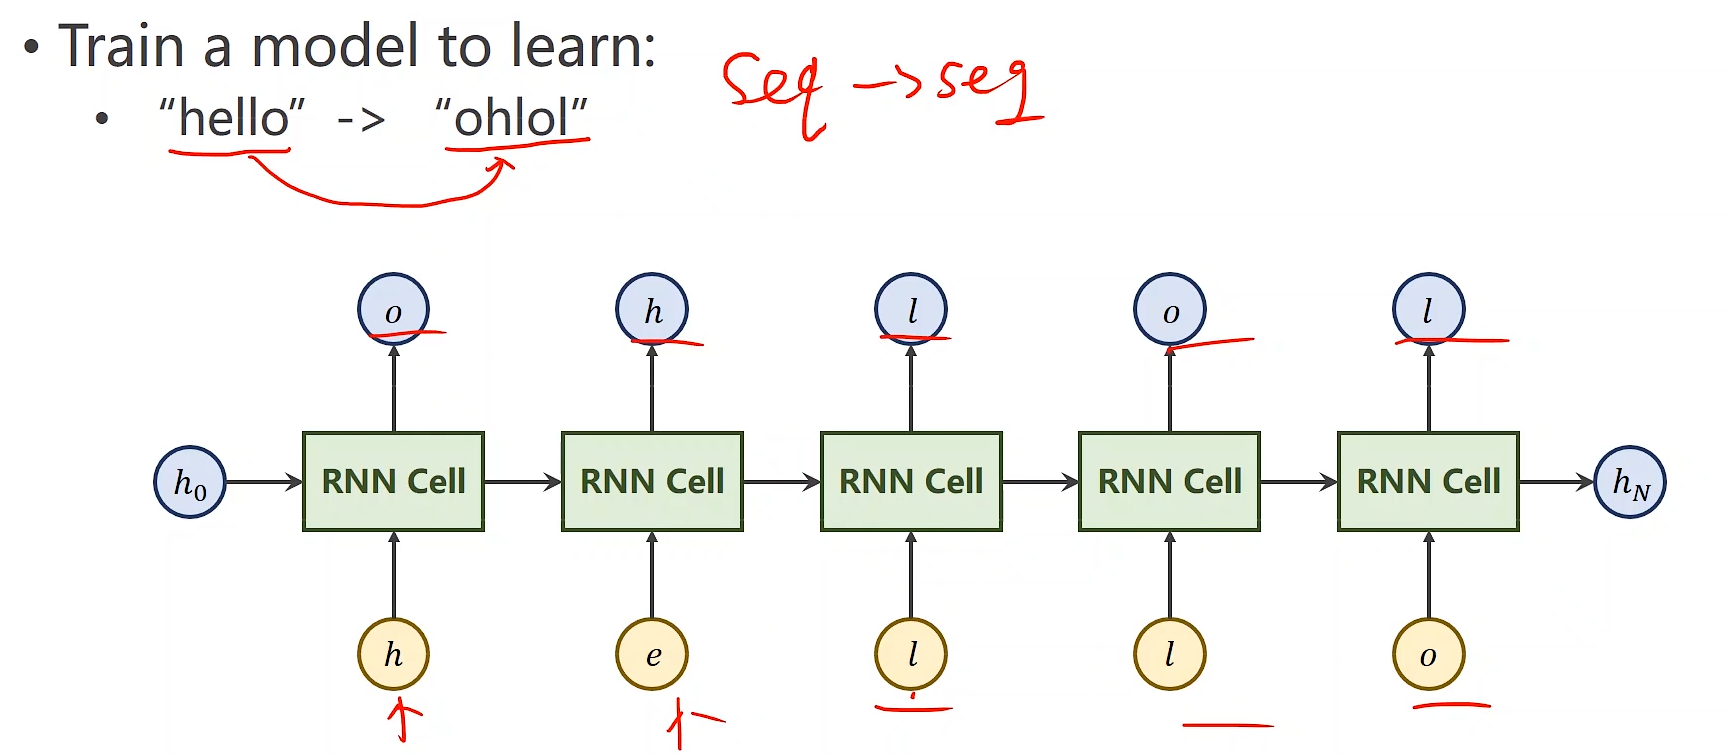
序列到序列的例子
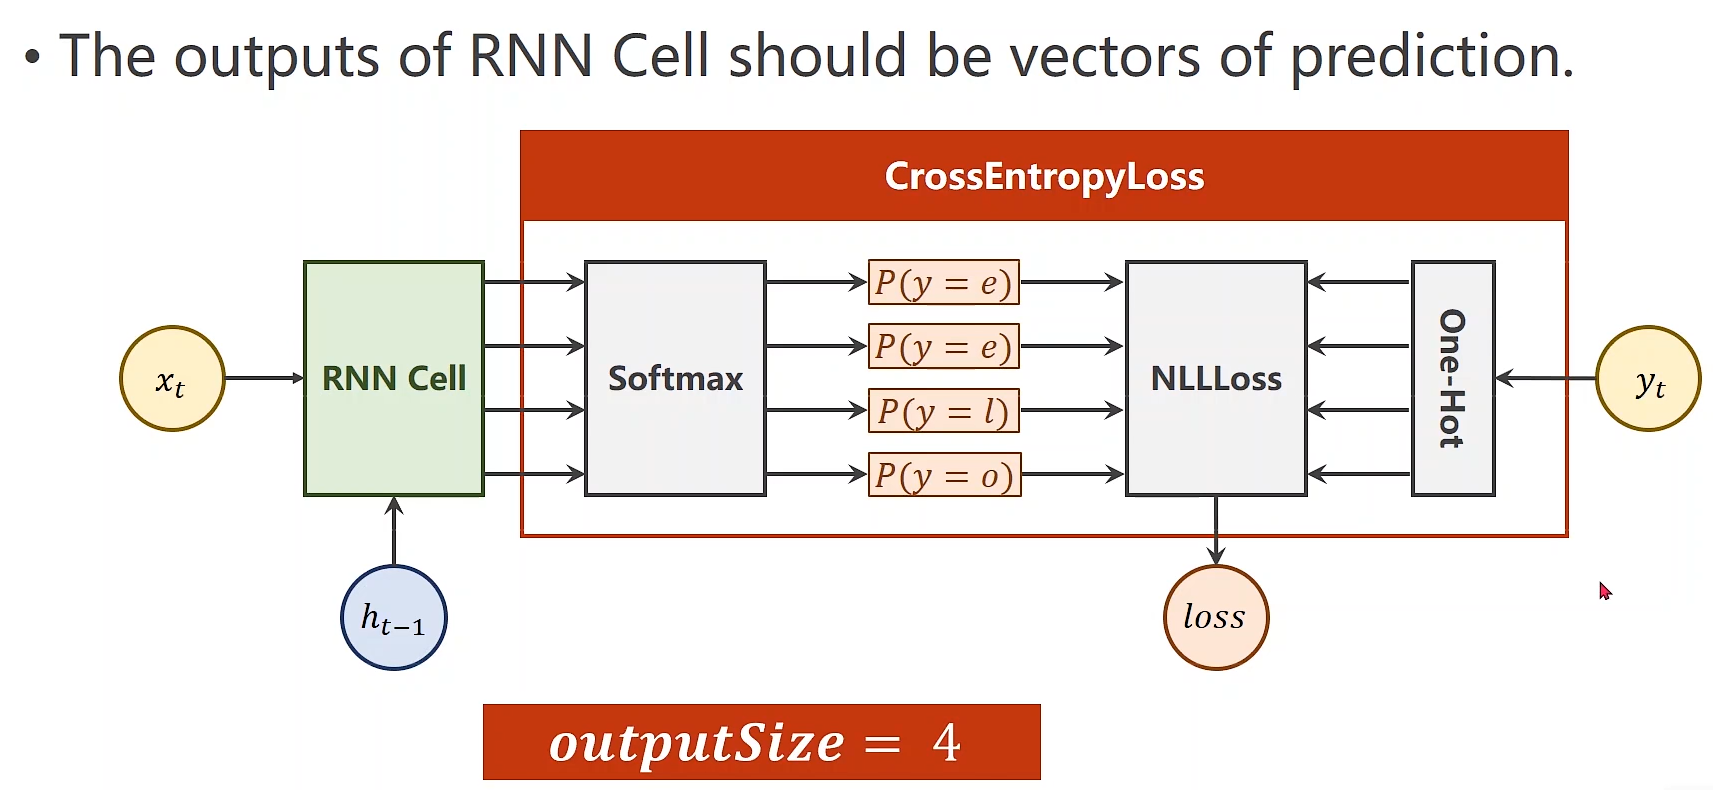
现在想要训练一个模型,把文本从hello 输出到 ohlol
这些文本字母并不是一个向量,我们第一步要把字母向量化表示
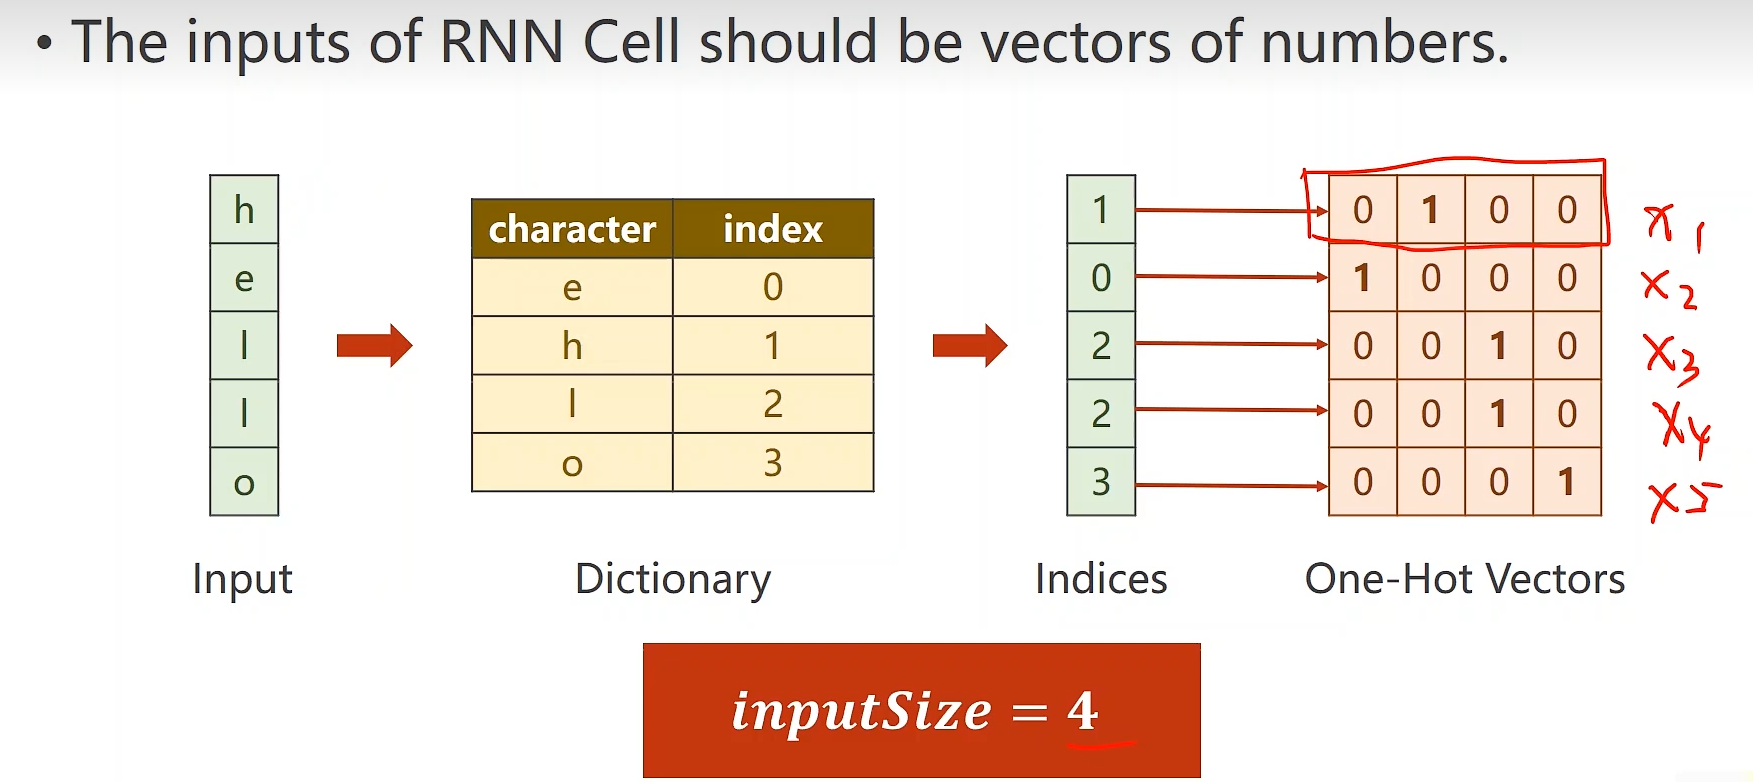
把输入的字母映射成一个词典,然后通过索引值,转化称为独热向量
最后的输出对应的也是长度为4的向量
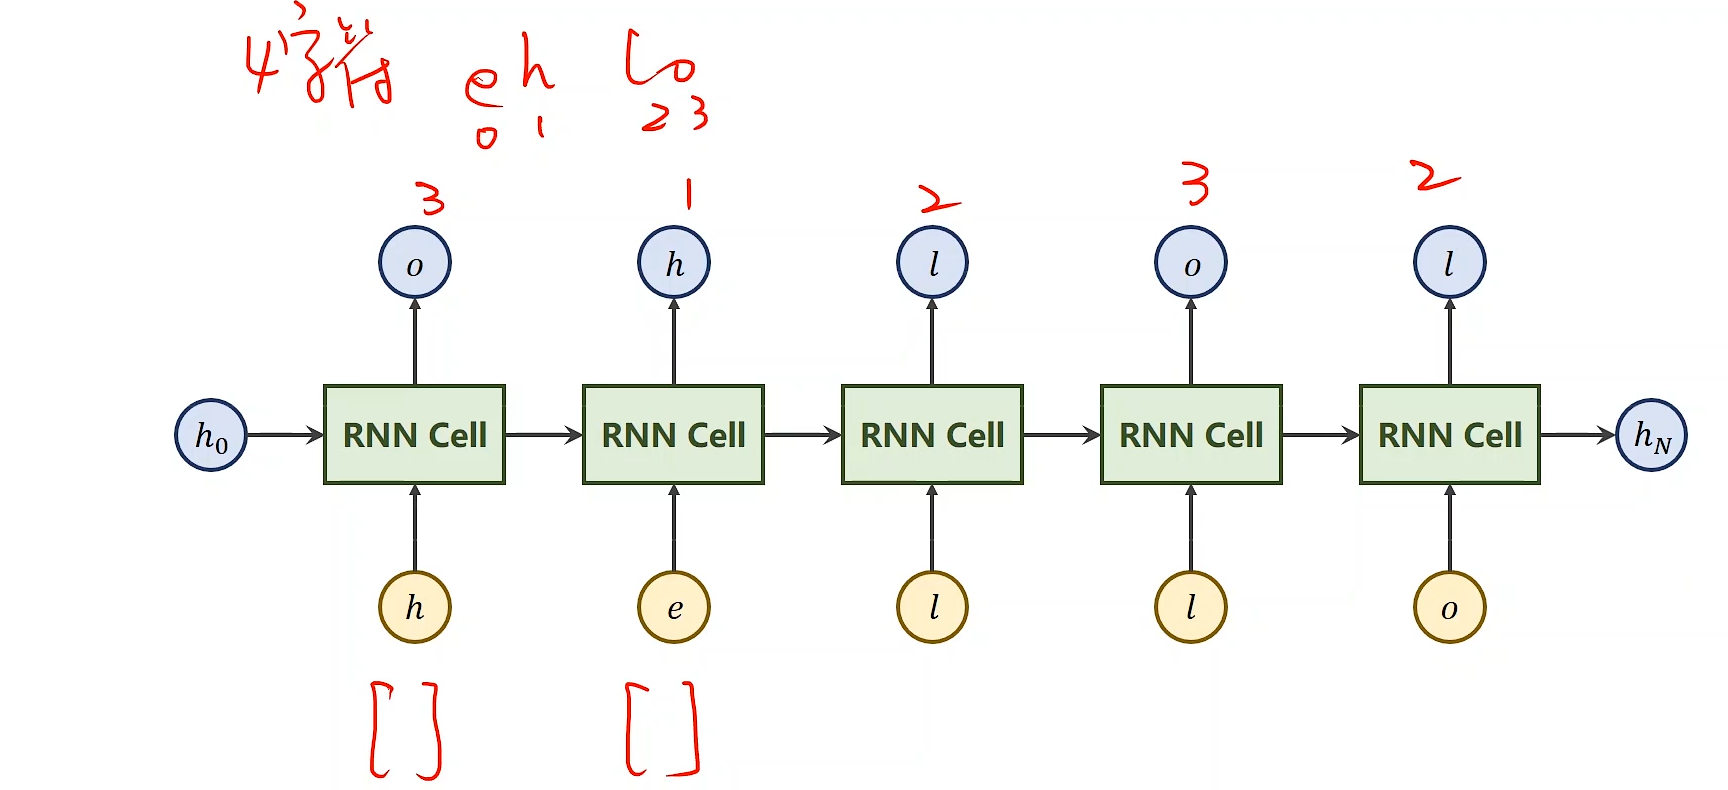
下面就是整个进行训练的结构
使用RNN Cell代码演示
| import torch
# ===============准备数据===========
=========
input_size = 4
hidden_size = 4
batch_size = 1
# dictionary
idx2char = ['e', 'h', 'l', 'o']
x_data = [1, 0, 2, 2, 3] # hello
y_data = [3, 1, 2, 3, 2] # ohlol
# 独热向量
one_hot_lookup = [[1, 0, 0, 0],
[0, 1, 0, 0],
[0, 0, 1, 0],
[0, 0, 0, 1]]
x_one_hot = [one_hot_lookup[x] for x in x_data]
#
维度是seq * input_size
# reshape the inputs to (seqLen,batchSize,inputSize)
inputs = torch.Tensor(x_one_hot).view(-1, batch_size,
input_size)
# reshape the labels to (seqLen,1)
labels = torch.LongTensor(y_data).view(-1, 1)
# ===============构造模型============
========
class Model(torch.nn.Module):
def __init__(self, input_size, hidden_size,
batch_size):
super(Model, self).__init__()
# initial the parameters
self.batch_size = batch_size
self.input_size = input_size
self.hidden_size = hidden_size
# shape of inputs: (batchSize,inputSize)
# shape of hidden: (batchSize,hiddenSize)
self.rnncell = torch.nn.RNNCell(input_size=input_size,
hidden_size=hidden_size)
def forward(self, input, hidden):
hidden = self.rnncell(input, hidden)
return hidden
# 生成默认的h0
def init_hidden(self):
return torch.zeros(self.batch_size, self.hidden_size)
net = Model(input_size, hidden_size, batch_size)
# ===============损失和优化器========
============
criterion = torch.nn.CrossEntropyLoss()
optimizer = torch.optim.Adam(net.parameters(),lr=0.1)
# ===============训练模型==============
======
for epoch in range(15):
loss = 0
# 梯度归0
optimizer.zero_grad()
# h0
hidden = net.init_hidden()
print('Predicted string:',end='')
# inputs 的维度是(seqLen,batchSize,inputSize) 按
seqLen进行循环
# input 的维度是(batchSize,inputSize)
# labels 的维度是(seqSize,1)
# label 的维度是(1)
for input, label in zip(inputs,labels):
hidden = net(input,hidden)
loss += criterion(hidden, label) # 整个计算的loss和
才是最终的loss
# 把hidden中最大值的下标找到
_, idx = hidden.max(dim=1)
print(idx2char[idx.item()],end='')
loss.backward()
optimizer.step()
print(', Epoch[%d/15] loss=%.4f' %(epoch+1,
loss.item()))
|
输出结果
Predicted string:eoooe,
Epoch[1/15] loss=7.5483
Predicted string:ooooo, Epoch[2/15] loss=6.0676
Predicted string:ooool, Epoch[3/15] loss=5.2073
Predicted string:ohlol, Epoch[4/15] loss=4.7479
Predicted string:ohlol, Epoch[5/15] loss=4.4771
Predicted string:ohlol, Epoch[6/15] loss=4.2829
Predicted string:ohlol, Epoch[7/15] loss=4.0976
Predicted string:ohlol, Epoch[8/15] loss=3.8791
Predicted string:ohlol, Epoch[9/15] loss=3.6212
Predicted string:ohlol, Epoch[10/15] loss=3.3628
Predicted string:ohlol, Epoch[11/15] loss=3.1412
Predicted string:ohlol, Epoch[12/15] loss=2.9649
Predicted string:ohlol, Epoch[13/15] loss=2.8203
Predicted string:ohlol, Epoch[14/15] loss=2.6825
Predicted string:ohlol, Epoch[15/15] loss=2.5410
|
使用RNN代码演示
| import torch
# ===============准备数据========
============
input_size = 4
hidden_size = 4
batch_size = 1
num_layers = 1
seq_len = 5
# dictionary
idx2char = ['e', 'h', 'l', 'o']
x_data = [1, 0, 2, 2, 3] # hello
y_data = [3, 1, 2, 3, 2] # ohlol
# 独热向量
one_hot_lookup = [[1, 0, 0, 0],
[0, 1, 0, 0],
[0, 0, 1, 0],
[0, 0, 0, 1]]
x_one_hot = [one_hot_lookup[x] for x in x_data]
#
维度是seq * input_size
# reshape the inputs to (seqLen,batchSize,inputSize)
inputs = torch.Tensor(x_one_hot).view(seq_len,
batch
_size, input_size)
# reshape the labels to (seqLen*batchSize,1)
labels = torch.LongTensor(y_data)
# ===============构造模型============
========
class Model(torch.nn.Module):
def __init__(self, input_size, hidden_size,
batch_size,
num_layers =1):
super(Model, self).__init__()
# initial the parameters
self.num_layers = num_layers
self.batch_size = batch_size
self.input_size = input_size
self.hidden_size = hidden_size
# shape of inputs: (batchSize,inputSize)
# shape of hidden: (batchSize,hiddenSize)
self.rnn = torch.nn.RNN(input_size=self.input_size,hidden
_size=self.hidden_size,num_layers=self.num_layers)
def forward(self, input):
# shape of hidden:(numLayers,batchSize,hiddenSize)
hidden = torch.zeros(self.num_layers,self.batch_size,self.
hidden_size)
out,_ =self.rnn(input,hidden)
# reshape out to: (seqLen*batchSize,hiddenSize)
return out.view(-1,self.hidden_size)
# 生成默认的h0
def init_hidden(self):
return torch.zeros(self.batch_size, self.hidden_size)
net = Model(input_size, hidden_size, batch_size,num_
layers)
# ===============损失和优化器=========
===========
criterion = torch.nn.CrossEntropyLoss()
optimizer = torch.optim.Adam(net.parameters(),lr=0.1)
# ===============训练模型==============
======
# inputs 的维度是(seqLen,batchSize,inputSize) 按
seqLen进行循环
# input 的维度是(batchSize,inputSize)
# labels 的维度是(seqSize,1)
# label 的维度是(1)
for epoch in range(15):
optimizer.zero_grad()
outputs = net(inputs)
loss = criterion(outputs,labels)
loss.backward()
optimizer.step()
# 把hidden中最大值的下标找到
_, idx = outputs.max(dim=1)
idx = idx.data.numpy()
print('Predicted;',''.join([idx2char[x] for
x in idx]), end='')
print(', Epoch[%d/15] loss=%.4f' %(epoch+1,
loss.item()))
|
输出结果
Predicted; lllll,
Epoch[1/15] loss=1.3361
Predicted; lllll, Epoch[2/15] loss=1.1672
Predicted; ohlll, Epoch[3/15] loss=1.0181
Predicted; ohlll, Epoch[4/15] loss=0.8844
Predicted; ohlol, Epoch[5/15] loss=0.7967
Predicted; ohloo, Epoch[6/15] loss=0.7348
Predicted; ohloo, Epoch[7/15] loss=0.6838
Predicted; ohloo, Epoch[8/15] loss=0.6443
Predicted; ohloo, Epoch[9/15] loss=0.6131
Predicted; ohlol, Epoch[10/15] loss=0.5868
Predicted; ohlol, Epoch[11/15] loss=0.5629
Predicted; ohlol, Epoch[12/15] loss=0.5373
Predicted; ohlol, Epoch[13/15] loss=0.5034
Predicted; ohlol, Epoch[14/15] loss=0.4587
Predicted; ohlol, Epoch[15/15] loss=0.4225
|
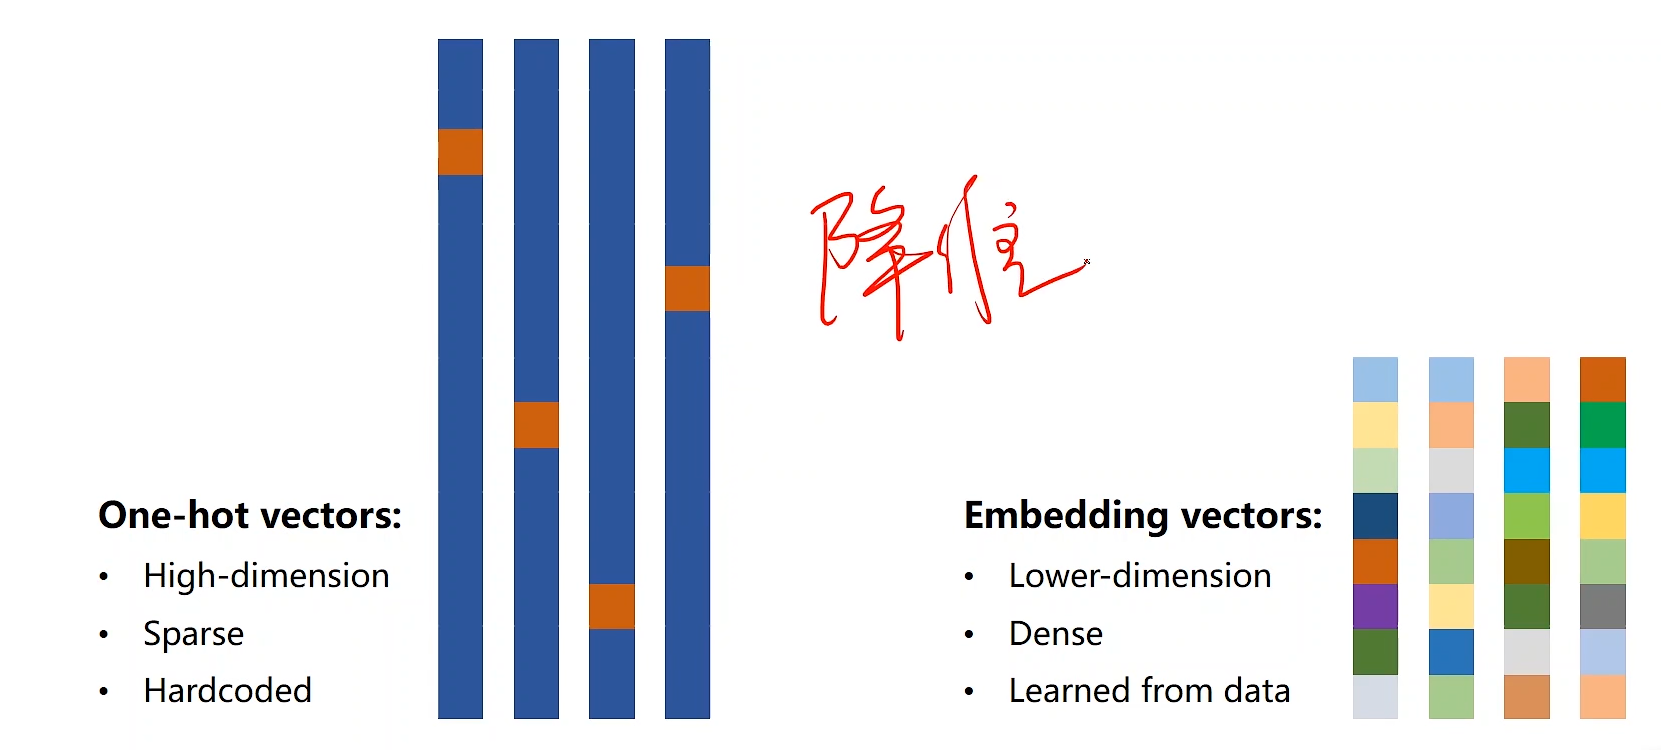
embedding嵌入层
独热编码的缺点:
高纬度
向量稀疏
硬编码
由此引出了Embedding嵌入层,把高维的稀疏的样本映射到稀疏的稠密的空间里
接下来看一下数据降维的方式
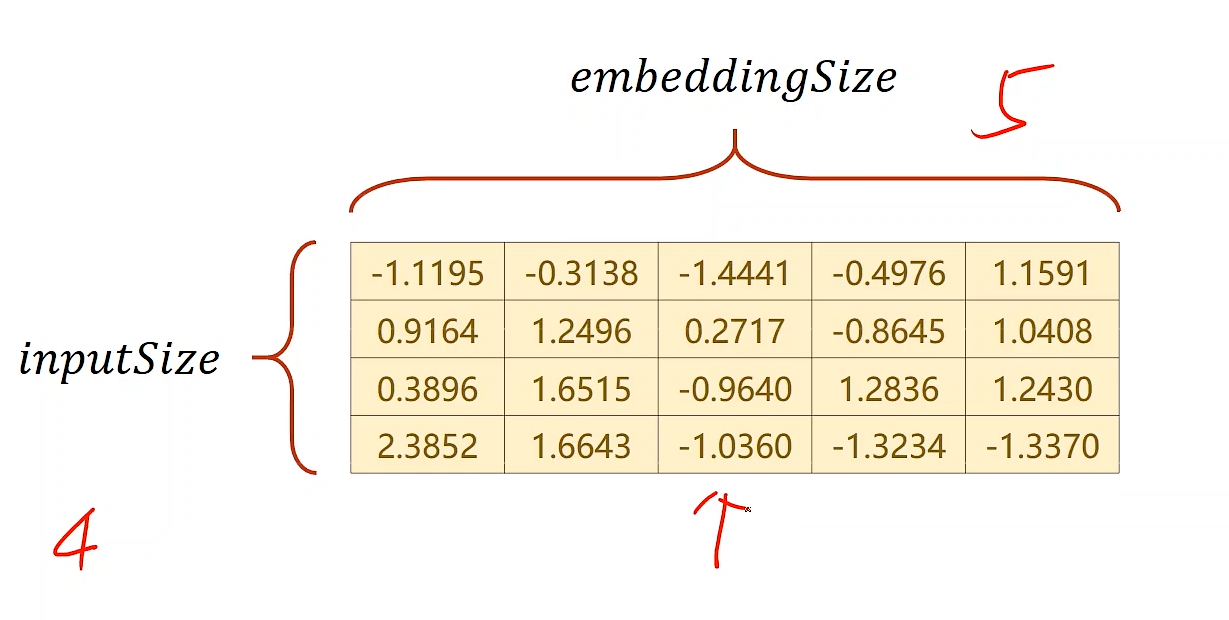
embedding的原理是使用矩阵乘法来进行降维,从而达到节约存储空间的目的。
假设i n p u t S i z e inputSizeinputSize是4维的,e
m b e d d i n g S i z e embeddingSizeembeddingSize是5维的,我们想要4维转换成5维,就构建一个矩阵
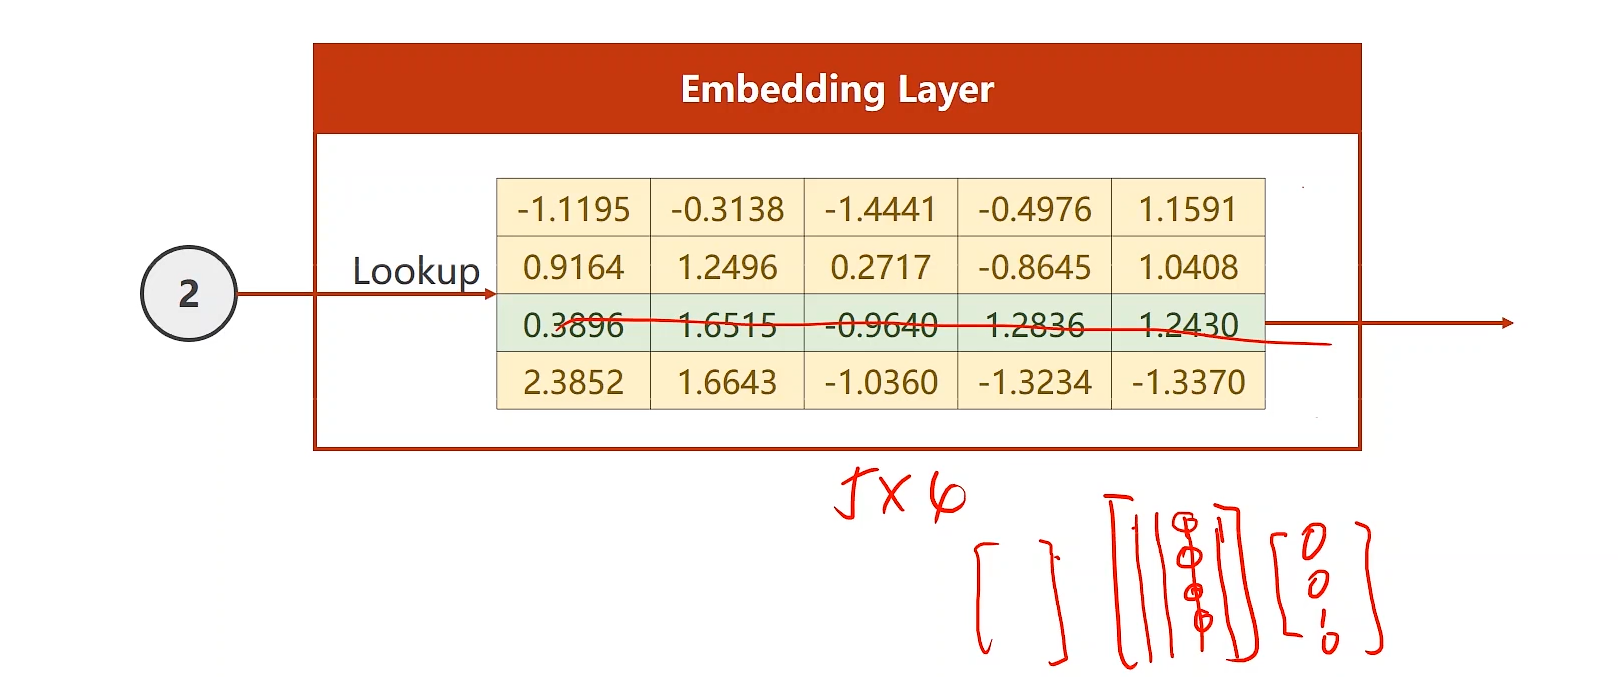
在这个矩阵中我们可以做出查询,比如查询索引为2,Embedding
Layer就把一整行的向量输出
下面我们使用embedding嵌入层和linear layer线型层来优化RNN
在embedding参数中,有以下的内容
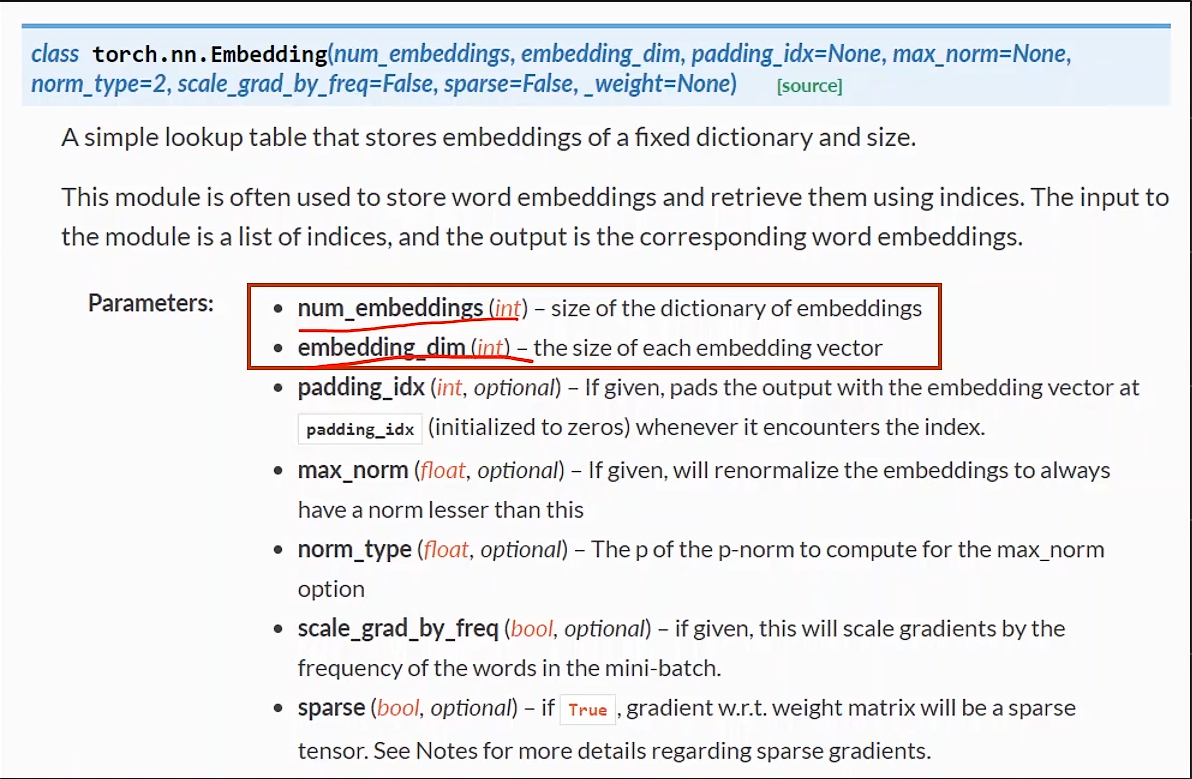
前两个参数是指输入的维度和embedding维度,构成了矩阵的维度

输入是(seg*batch)的向量,输出就是((seg*batch)embedding_dim)
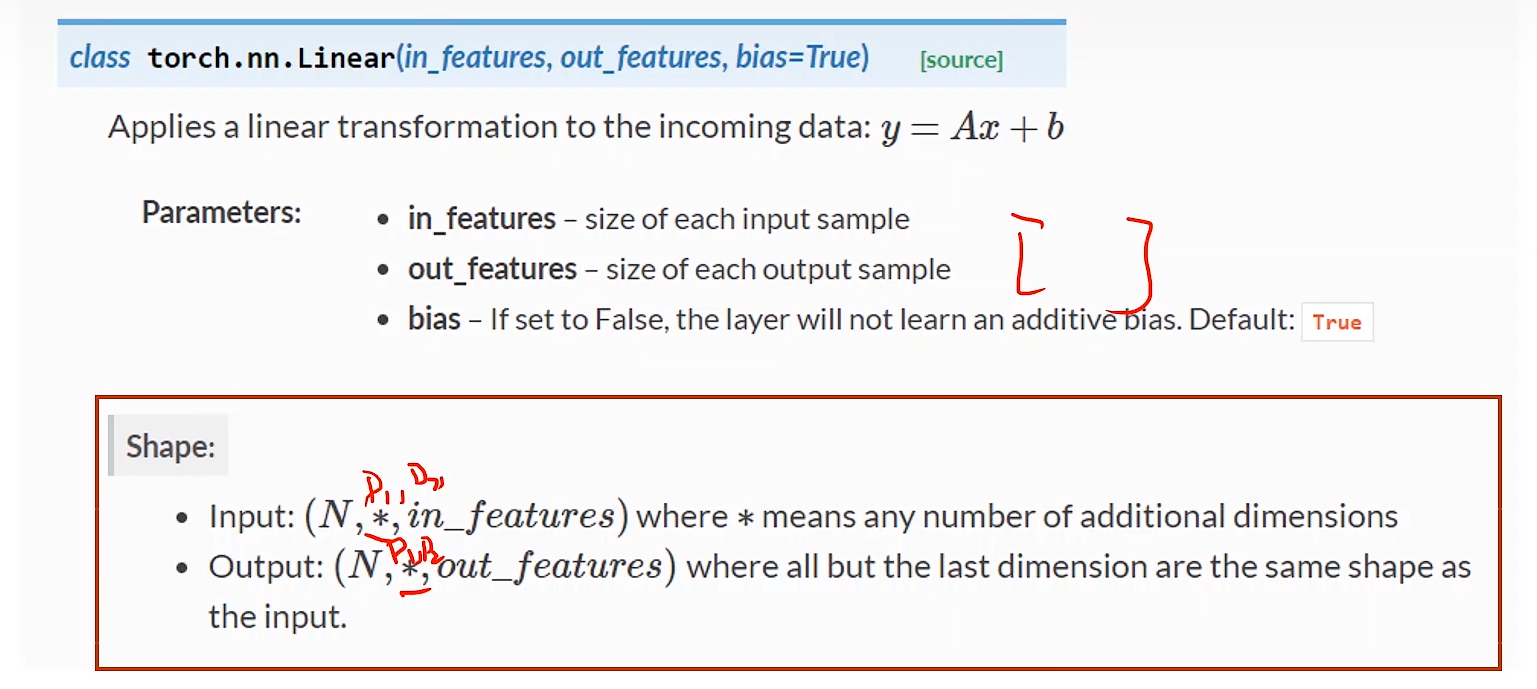
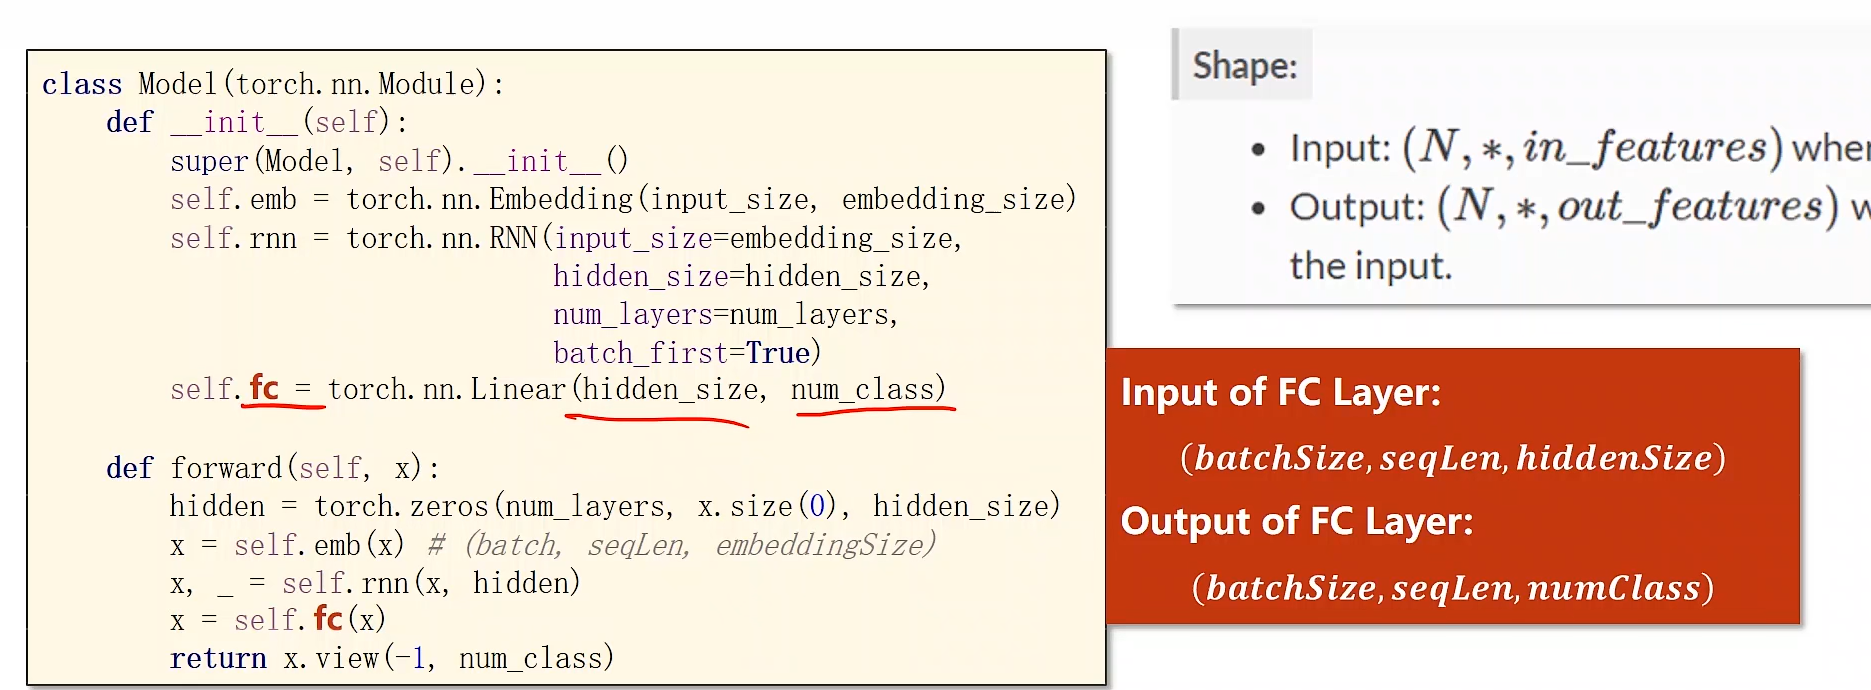
线型层参数如下
交叉熵参数

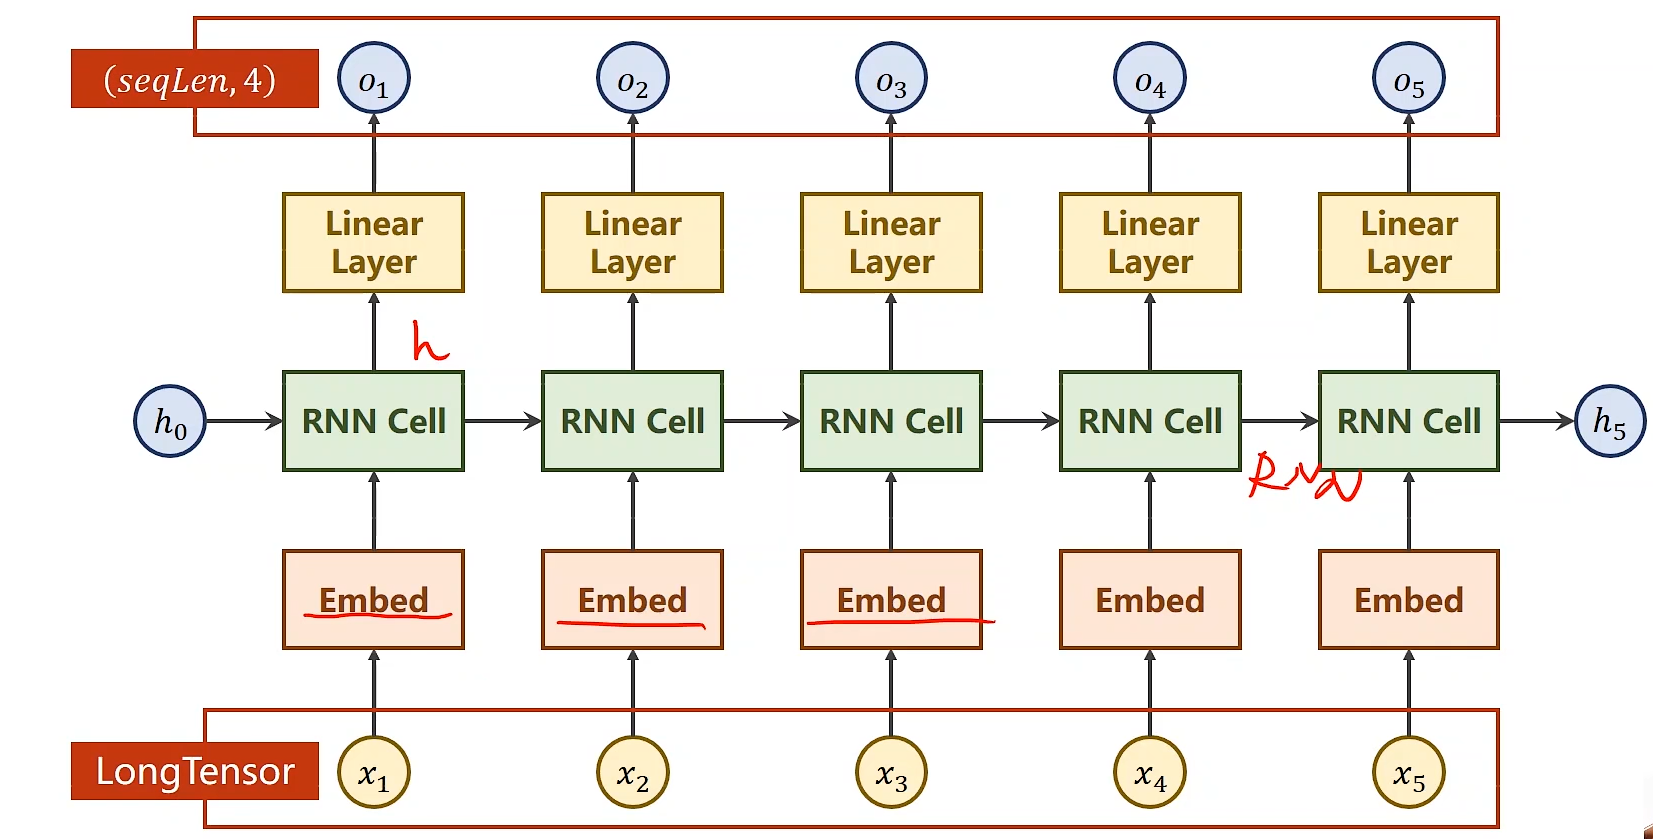
网络结构如下

在这个例子中我们使用了batch_first=True
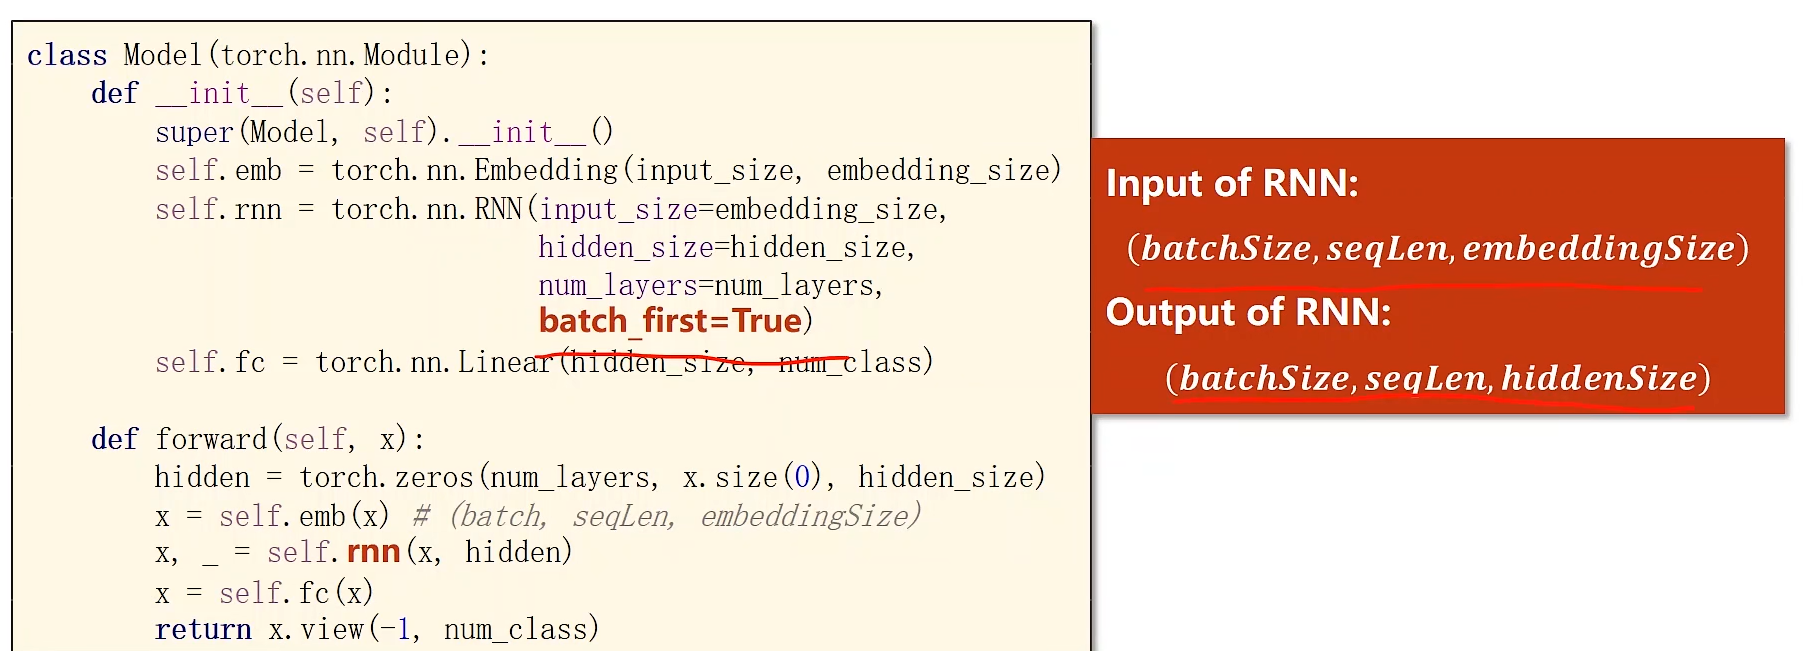
全连接层中
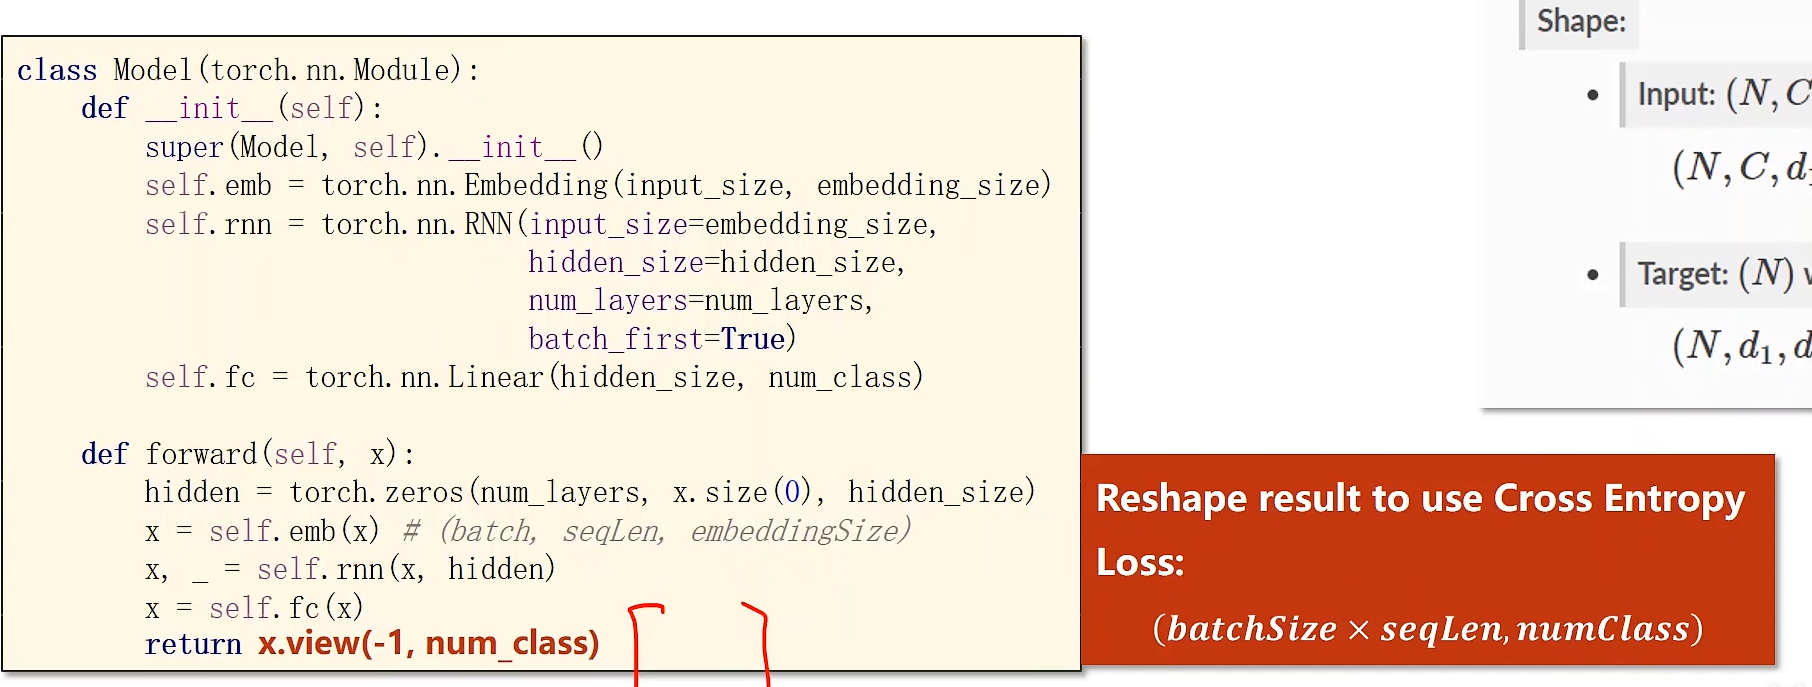
最后把输出变成矩阵形式
代码演示
| import torch
# ===============准备数据===========
=========
num_class = 4 # 类别
input_size = 4 # 输入
hidden_size = 8 # 输出
embedding_size = 10 # 嵌入层
num_layers = 2 # 2层RNN
batch_size = 1
seq_len = 5 # 序列长度
# dictionary
idx2char = ['e', 'h', 'l', 'o']
x_data = [[1, 0, 2, 2, 3]] # hello (batch,seqLen)
y_data = [3, 1, 2, 3, 2] # ohlol (batch*seqLen)
inputs = torch.LongTensor(x_data)
labels = torch.LongTensor(y_data)
# ===============构造模型==========
==========
class Model(torch.nn.Module):
def __init__(self):
super(Model, self).__init__()
# matrix of Embedding: (inputSize,embeddingSize)
self.emb = torch.nn.Embedding(input_size,
embedding_size)
# batch_First=True input of RNN:(batch,seqLen,
embeddingSize) output of RNN:(batchSize,seqLen,
hiddenSize)
self.rnn = torch.nn.RNN(input_size=embedding_size,
hidden_size=hidden_size, num_layers=num_layers,
batch_first=True)
# input of FC layer:(batchSize,seqLen,hiddenSize)
output of FC layer:(batchSize,seqLen,numClass)
self.fc = torch.nn.Linear(hidden_size, num_class)
def forward(self, x):
hidden = torch.zeros(num_layers, x.size(0),
hidden
_size)
# input should be LongTensor:(batchSize,seqLen)
x = self.emb(x) # output of shape :(batch,seqLen,
embeddingSize)
x, _ = self.rnn(x, hidden)
x = self.fc(x)
# reshape result to use Cross Entropy Loss:
(batchSize*seqLen,numClass)
return x.view(-1, num_class)
# 生成默认的h0
def init_hidden(self):
return torch.zeros(self.batch_size, self.hidden_size)
net = Model()
# ===============损失和优化器====
================
criterion = torch.nn.CrossEntropyLoss()
optimizer = torch.optim.Adam(net.parameters(),
lr=0.05)
# ===============训练模型==========
==========
for epoch in range(15):
optimizer.zero_grad()
outputs = net(inputs)
loss = criterion(outputs, labels)
loss.backward()
optimizer.step()
# 把hidden中最大值的下标找到
_, idx = outputs.max(dim=1)
idx = idx.data.numpy()
print('Predicted;', ''.join([idx2char[x] for
x in idx]),
end='')
print(', Epoch[%d/15] loss=%.4f' % (epoch +
1,
loss.item()))
|
输出结果
Predicted; lleel,
Epoch[1/15] loss=1.4850
Predicted; lllll, Epoch[2/15] loss=1.1580
Predicted; lllll, Epoch[3/15] loss=0.9671
Predicted; lhlll, Epoch[4/15] loss=0.7869
Predicted; ohlol, Epoch[5/15] loss=0.6619
Predicted; ohlol, Epoch[6/15] loss=0.5250
Predicted; ohlol, Epoch[7/15] loss=0.4078
Predicted; ohlol, Epoch[8/15] loss=0.3297
Predicted; ohlol, Epoch[9/15] loss=0.2575
Predicted; ohlol, Epoch[10/15] loss=0.2005
Predicted; ohlol, Epoch[11/15] loss=0.1565
Predicted; ohlol, Epoch[12/15] loss=0.1194
Predicted; ohlol, Epoch[13/15] loss=0.0863
Predicted; ohlol, Epoch[14/15] loss=0.0588
Predicted; ohlol, Epoch[15/15] loss=0.0423
|
|


 订阅
订阅