| БрМЭЦМі: |
БОЮФДгжївЊЖдAndroidзщМўЛЏПђМмЯюФПНјааЯъНтЃЌВЂИНгаДњТыКЭЪОР§ЃЌЯЃЭћЖдФњЕФбЇЯАгаЫљАяжњЁЃ
БОЮФРДздгкcsdnЃЌгЩЛ№СњЙћШэМўAliceБрМЁЂЭЦМіЁЃ |
|
МђНщ
ЪВУДЪЧзщМўЛЏЃП
ЯюФПЗЂеЙЕНвЛЖЈНзЖЮЪБЃЌЫцзХашЧѓЕФдіМгвдМАЦЕЗБЕиБфИќЃЌЯюФПЛсдНРДдНДѓЃЌДњТыБфЕУдНРДдНгЗжзЃЌёюКЯЛсдНРДдНЖрЃЌПЊЗЂаЇТЪвВЛсНЕЕЭЃЌетИіЪБКђЮвУЧОЭашвЊЖдОЩЯюФПНјаажиЙЙМДФЃПщЕФВ№ЗжЃЌЙйЗНЕФЫЕЗЈОЭЪЧзщМўЛЏЁЃ
зщМўЛЏДјРДЕФКУДІ
ФЧУДЃЌВЩгУзщМўЛЏФмДјРДЪВУДКУДІФиЃПжївЊгавдЯТСНЕуЃК
1ЁЂЯждкAndroidЯюФПжаДњТыСПДяЕНвЛЖЈГЬЖШЃЌБрвыНЋЪЧвЛМўЗЧГЃЭДПрЕФЪТЧщЃЌвЛАуЖМашвЊБрвы5ЕН6ЗжжгЁЃAndroid
Studio ЭЦГі instant run гЩгкИїжжШБЯнКЭЯожЦЬѕМўЃЈБШШчВЩгУШШаоИДtinkerЃЉвЛАуЧщПіЯТЪЧБЛЙиБеЕФЁЃЖјзщМўЛЏПђМмПЩвдЪЙФЃПщЕЅЖРБрвыЕїЪдЃЌПЩвдгааЇЕиМѕЩйБрвыЕФЪБМфЁЃ
2ЁЂЭЈЙ§зщМўЛЏПЩвдИќКУЕФНјааВЂааПЊЗЂЃЌвђЮЊЮвУЧПЩвдЮЊУПвЛИіФЃПщНјааЕЅЖРЕФАцБОПижЦЃЌЩѕжСУПвЛИіФЃПщЕФИКд№ШЫПЩвдбЁдёздМКЕФЩшМЦМмЙЙЖјВЛгАЯьЦфЫћФЃПщЕФПЊЗЂЃЌгыДЫЭЌЪБзщМўЛЏЛЙПЩвдБмУтФЃПщжЎМфЕФНЛВцвРРЕЃЌУПвЛИіФЃПщЕФПЊЗЂШЫдБПЩвдЖдздМКЕФФЃПщНјааЖРСЂВтЪдЃЌЖРСЂБрвыКЭдЫааЃЌЩѕжСПЩвдЪЕЯжЕЅЖРЕФВПЪ№ЁЃДгЖјМЋДѓЕФЬсИпСЫВЂааПЊЗЂаЇТЪЁЃ
зщМўЛЏПђМм
РДПДзщМўЛЏвЛИіМђЕЅЕФР§згЃЌЭМР§ШчЯТЃК
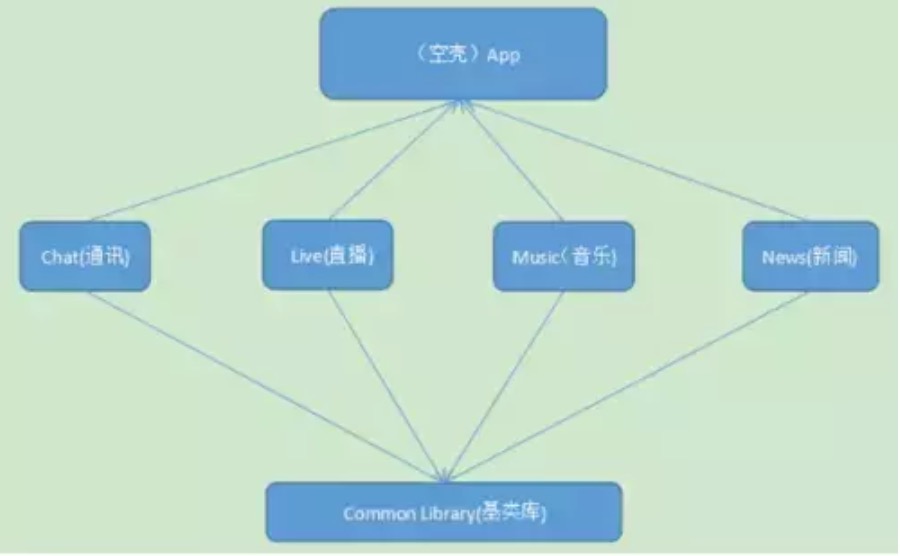

ЛљРрПтЕФЗтзА
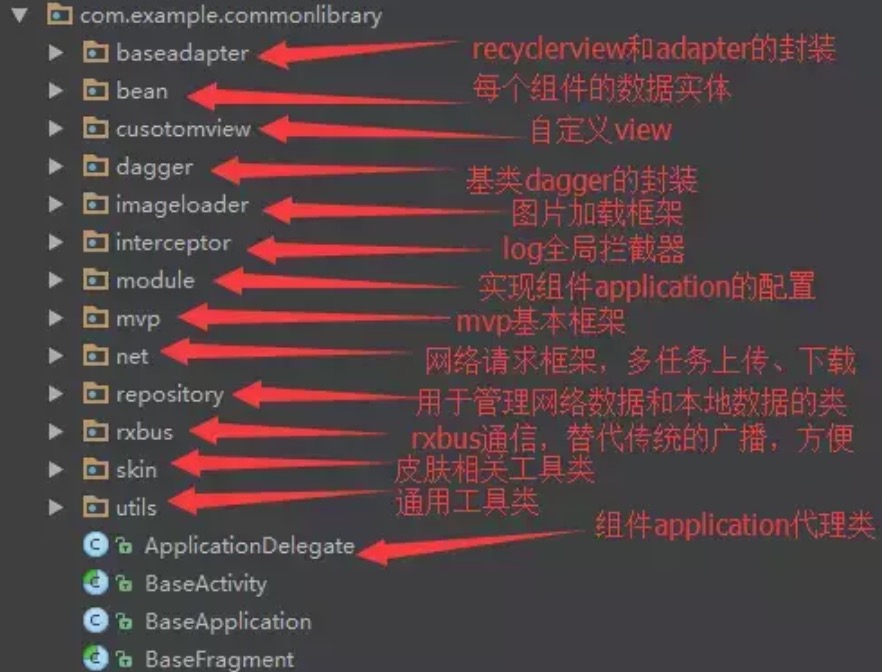
ЖдгкAndroidжаГЃгУЕФЛљРрПтЃЌжївЊАќРЈПЊЗЂГЃгУЕФвЛаЉПђМмЁЃ
1ЁЂЭјТчЧыЧѓ(ЖрШЮЮёЯТдиКЭЩЯДЋЃЌВЩгУ Retrofit+RxJava ПђМм)
2ЁЂЭМЦЌМгди(ВпТдФЃЪНЃЌGlide гы Picasso жЎМфПЩвдЧаЛЛ)
3ЁЂЭЈаХЛњжЦЃЈRxBusЃЉ
4ЁЂЛљРр adapter ЕФЗтзАЃЈжЇГж itemЖЏЛЁЂЖрВМОжitemЁЂЯТРКЭМгдиИќЖрЁЂitemЕуЛїЪТМўЃЉ
5ЁЂЛљРр RecyclerView ЕФЗтзАЃЈжЇГждЩњЗчИёЕФЯТРМгдиЃЌitemВрЛЌЕШЃЉ
6ЁЂmvp ПђМм
7ЁЂИїзщМўЕФЪ§ОнПтЪЕЬхРр
8ЁЂЭЈгУЕФЙЄОпРр
9ЁЂздЖЈвхview(АќРЈЖдЛАПђЃЌToolBarВМОжЃЌдВаЮЭМЦЌЕШviewЕФздЖЈвх)
10ЁЂdagger ЕФЗтзАЃЈгУгкГѕЪМЛЏШЋОжЕФБфСПКЭЭјТчЧыЧѓЕШХфжУЃЉ
11ЁЂЦфЫћЕШЕШ
зщМўФЃЪНКЭМЏГЩФЃЪНЧаЛЛЕФЪЕЯж
musicзщМў ЯТЕФ build.gradle ЮФМўЃЌЦфЫћзщМўРрЫЦЁЃ
//ПижЦзщМўФЃЪНКЭМЏГЩФЃЪН
if (rootProject.ext.isAlone) {
apply plugin: 'com.android.application'
} else {
apply plugin: 'com.android.library' }
apply plugin: 'com.neenbedankt.android-apt'
android {
compileSdkVersion rootProject.ext.android.
compileSdkVersion
buildToolsVersion rootProject.ext.android.
buildToolsVersion
defaultConfig {
if (rootProject.ext.isAlone) {
//зщМўФЃЪНЯТЩшжУapplicationId
applicationId "com.example.cootek.music"
}
minSdkVersion rootProject.
ext.android.minSdkVersion
targetSdkVersion rootProject.ext.android.
targetSdkVersion
versionCode rootProject.
ext.android.versionCode
versionName rootProject.ext.android.versionName
testInstrumentationRunner "android.
support.test.runner.AndroidJUnitRunner"
if (!rootProject.ext.isAlone) {
//МЏГЩФЃЪНЯТArouterЕФХфжУЃЌгУгкзщМўМфЭЈаХЕФЪЕЯж
javaCompileOptions {
annotationProcessorOptions {
arguments = [moduleName: project.getName()]
}
}
}
}
buildTypes {
release {
minifyEnabled false
proguardFiles getDefaultProguardFile
('proguard-android.txt'),
'proguard-rules.pro'
}
}
compileOptions {
sourceCompatibility JavaVersion.VERSION_1_7
targetCompatibility JavaVersion.VERSION_1_7
}
sourceSets {
main {
//ПижЦСНжжФЃЪНЯТЕФзЪдДКЭДњТыХфжУЧщПі
if (rootProject.ext.isAlone) {
manifest.srcFile 'src/main/module/AndroidManifest.xml'
java.srcDirs = ['src/main/java', 'src/main/module/java']
res.srcDirs = ['src/main/res', 'src/main/module/res']
} else {
manifest.srcFile 'src/main/AndroidManifest.xml'
}
}
}
}
dependencies {
compile fileTree(dir: 'libs', include: ['*.jar'])
androidTestCompile('com.android.support<br>.
test.espresso:espresso-core:2.2.2',
{
exclude group: 'com.android.support', module:
'support-annotations'
})
//вРРЕЛљРрПт
compile project(':commonlibrary')
//гУзїбеЩЋбЁдёЦї
compile 'com.afollestad.material-dialogs:
commons:0.9.1.0'
apt rootProject.ext.dependencies.dagger2_compiler
if (!rootProject.ext.isAlone) {
//МЏГЩФЃЪНЯТашвЊБрвыЦїЩњГЩТЗгЩЭЈаХЕФДњТы
apt rootProject.ext.dependencies.arouter_compiler
}
testCompile 'junit:junit:4.12'
}
|
ЮЊСЫЧјЗжМЏГЩФЃЪНКЭзщМўФЃЪНЃЌЮвУЧЪЙгУisAloneБфСПРДПижЦЁЃ
МЏГЩФЃЪН
1ЁЂЪзЯШашвЊдк config.gradle ЮФМўжаЩшжУ isAlone = falseЁЃаЮШчЃК
ext {
isAlone = false; //false:зїЮЊLibзщМўДцдкЃЌ
true:зїЮЊapplicationДцдк |
2ЁЂШЛКѓ Sync ЯТЁЃ
3ЁЂзюКѓбЁдё app дЫааМДПЩЁЃ
зщМўФЃЪН
1ЁЂЪзЯШашвЊдк config.gradle ЮФМўжаЩшжУ isAlone = true
2ЁЂШЛКѓ Sync ЯТЁЃ
3ЁЂзюКѓЯргІЕФФЃПщЃЈnewЁЂchatЁЂliveЁЂmusicЁЂappЃЉНјаадЫааМДПЩЁЃ
config.gradle ЮФМўЕФХфжУЧщПіШчЯТЃК
ext {
isAlone = false;//false:зїЮЊМЏГЩФЃЪНДцдкЃЌ
true:зїЮЊзщМўФЃЪНДцдк
// ИїИізщМўАцБОКХЕФЭГвЛЙмРэ
android = [
compileSdkVersion: 24,
buildToolsVersion: "25.0.2",
minSdkVersion : 16,
targetSdkVersion : 22,
versionCode : 1,
versionName : '1.0.0',
]
libsVersion = [
// ЕкШ§ЗНПтАцБОКХЕФЙмРэ
supportLibraryVersion = "25.3.0",
retrofitVersion = "2.1.0",
glideVersion = "3.7.0",
loggerVersion = "1.15",
// eventbusVersion = "3.0.0",
gsonVersion = "2.8.0",
butterknife = "8.8.0",
retrofit = "2.3.0",
rxjava = "2.1.1",
rxjava_android = "2.0.1",
rxlifecycle = "2.1.0",
rxlifecycle_components = "2.1.0",
dagger_compiler = "2.11",
dagger = "2.11",
greenDao = "3.2.2",
arouter_api = "1.2.2",
arouter_compiler = "1.1.3",
transformations = "2.0.2",
rxjava_adapter = "2.3.0",
gson_converter = "2.3.0",
scalars_converter = "2.3.0",
rxpermission = "0.9.4",
eventbus="3.0.0",
support_v4="25.4.0",
okhttp3="3.8.1"
]
// вРРЕПтЙмРэ
dependencies = [
appcompatV7 : "com.android.support:appcompat-v7:$rootProject.supportLibraryVersion",
design : "com.android.support:design:$rootProject.
supportLibraryVersion",
cardview : "com.android.support:cardview-v7:
$rootProject.supportLibraryVersion",
palette : "com.android.support:palette-v7:
$rootProject.supportLibraryVersion",
recycleview : "com.android.support:recyclerview-v7:
$rootProject.supportLibraryVersion",
support_v4 : "com.android.support:support-v4:
$rootProject.support_v4",
annotations : "com.android.support:
support-annotations:$rootProject.supportLibraryVersion",
eventBus : "org.greenrobot:eventbus:
$rootProject.eventbus",
glide : "com.github.bumptech.glide:glide:$rootProject.
glideVersion",
gson : "com.google.code.gson:gson:$rootProject.
gsonVersion",
logger : "com.orhanobut:logger:
$rootProject.loggerVersion",
butterknife :
"com.jakewharton:butterknife:
$rootProject.butterknife",
butterknife_compiler : "com.jakewharton:
butterknife-compiler:$rootProject.butterknife",
retrofit : "com.squareup.retrofit2:retrofit:
$rootProject.retrofit",
okhttp3 : "com.squareup.okhttp3:okhttp:$rootProject.retrofit",
retrofit_adapter_rxjava2 : "com.squareup.
retrofit2:adapter-rxjava2:$rootProject.rxjava_adapter",
retrofit_converter_gson : "com.squareup.
retrofit2:converter-gson:$rootProject.gson_converter",
retrofit_converter_scalars: "com.squareup.
retrofit2:converter-scalars:$rootProject.scalars_converter",
rxpermission : "com.tbruyelle.rxpermissions2:
rxpermissions:$rootProject.rxpermission@aar",
rxjava2 : "io.reactivex.rxjava2:rxjava:$rootProject.rxjava",
rxjava2_android : "io.reactivex.rxjava2:
rxandroid:$rootProject.rxjava_android",
rxlifecycle2 : "com.trello.rxlifecycle2:
rxlifecycle:$rootProject.rxlifecycle",
rxlifecycle2_components : "com.trello.
rxlifecycle2:rxlifecycle-components:
$rootProject.rxlifecycle_components",
dagger2_compiler : "com.google.dagger:
dagger-compiler:$rootProject.dagger_compiler",
dagger2 : "com.google.dagger:dagger:
$rootProject.dagger",
greenDao : "org.greenrobot:greendao:$rootProject.greenDao",
transformations : "jp.wasabeef:glide-transformations:
$rootProject.transformations",
//ТЗгЩЭЈбЖ
arouter_api : "com.alibaba:arouter-api:
$rootProject.arouter_api",
arouter_compiler :
"com.alibaba:arouter-compiler:
$rootProject.arouter_compiler"
]
}
|
зщМўМфЭЈаХЪЕЯж
зщМўМфЭЈаХЕФЪЕЯжПЩвдЪЙгУАЂРяПЊдДЕФ Arouter ТЗгЩЭЈаХЁЃЯрЙиФкШнПЩвдВщПДЃКhttps://github.com/alibaba/ARouterЁЃ
ЪзЯШЃЌГѕЪМЛЏЫљгаЕФЪ§ОнаХЯЂЁЃ
private List<MainItemBean>
getDefaultData() {
List<MainItemBean> result = new ArrayList<>();
MainItemBean mainItemBean = new MainItemBean();
mainItemBean.setName("аЃдА");
mainItemBean.setPath("/news/main");
mainItemBean.setResId(R.mipmap.ic_launcher);
MainItemBean music=new MainItemBean();
music.setName("вєРж");
music.setResId(R.mipmap.ic_launcher);
music.setPath("/music/main");
MainItemBean live = new MainItemBean();
live.setName("жБВЅ");
live.setResId(R.mipmap.ic_launcher);
live.setPath("/live/main");
MainItemBean chat = new MainItemBean();
chat.setName("СФЬь");
chat.setPath("/chat/splash");
chat.setResId(R.mipmap.ic_launcher);
result.add(mainItemBean);
result.add(music);
result.add(live);
result.add(chat);
return result;
}
|
ШЛКѓдкЩшжУУПИі item ЕФЕуЛїЪТМўЪБ,ЦєЖЏзщМўНчУцЬјзЊЁЃ
@Override
public void onItemClick(int position, View view)
{
MainItemBean item=mainAdapter.getData(position);
ARouter.getInstance().build(item.getPath()).navigation();
}
|
УПИізщМўШыПкНчУцЕФЩшжУЃЈБШШчжБВЅ Live зщМўЃЌЦфЫќзщМўРрЫЦЃЉЁЃ
@Route(path =
"/live/main")
public class MainActivity extends BaseActivity<
List<CategoryLiveBean>,
MainPresenter>
implements View.OnClickListener
{
//
}
|
resзЪдДКЭAndroidManifestХфжУ
ЮвУЧЭЈЙ§ХаЖЯзщМўДІгкФФжжФЃЪНРДЖЏЬЌЩшжУЯюФПresзЪдДКЭManifestЁЂвдМАДњТыЕФЮЛжУЁЃвджБВЅзщМўЮЊР§ЃЌЦфЫќзщМўРрЫЦЁЃ

зїЮЊвЛИізщМўФЃПщКѓЃЌдйРДПДвЛЯТжБВЅзщМўЕФ build.gradle ЮФМўЖдДњТызЪдДЕШЮЛжУЕФХфжУЁЃ
sourceSets {
main {
if (rootProject.ext.isAlone) {
manifest.srcFile 'src/main/module/AndroidManifest.xml'
java.srcDirs = ['src/main/java', 'src/main/module/java']
res.srcDirs = ['src/main/res', 'src/main/module/res']
} else {
manifest.srcFile 'src/main/AndroidManifest.xml'
}
}
}
|
ШЋОжapplicationЕФЪЕЯжКЭЪ§ОнЕФГѕЪМЛЏ
ВЩгУРрЫЦгк Glide дк Manifest ГѕЪМЛЏХфжУЕФЗНЪНРДГѕЪМЛЏИїИізщМўЕФ ApplicationЃЌЯТУцвджБВЅзщМўЮЊР§РДЭъГЩГѕЪМЛЏЃЌЦфЫќРрЫЦЁЃ
дк BaseApplication жаЃЌГѕЪМЛЏ ApplicationDelegate ДњРэРрЁЃ
@Override
protected void attachBaseContext(Context base)
{
super.attachBaseContext(base);
applicationDelegate = new ApplicationDelegate();
applicationDelegate.attachBaseContext(base);
MultiDex.install(this);
}
|
ApplicationDelegate ФкВПЪЧдѕбљЕФФиЃЌПДвЛЖЮдДТыЁЃ
public class
ApplicationDelegate implements IAppLife {
private List<IModuleConfig> list;
private List<IAppLife> appLifes;
private List<Application.ActivityLifecycleCallbacks>
liferecycleCallbacks;
public ApplicationDelegate() {
appLifes = new ArrayList<>();
liferecycleCallbacks = new ArrayList<>();
}
@Override
public void attachBaseContext(Context base)
{
//ГѕЪМЛЏManifestЮФМўНтЮіЦїЃЌгУгкНтЮізщМў
дкздМКЕФManifestЮФМўХфжУЕФApplication
ManifestParser manifestParser = new ManifestParser(base);
list = manifestParser.parse();
//НтЮіЕУЕНЕФзщМўApplicationСаБэжЎКѓЃЌ
ИјУПИізщМўApplicationзЂШы
//contextЃЌКЭApplicationЕФЩњУќжмЦкЕФЛиЕїЃЌ
гУгкЪЕЯжapplicationЕФЭЌВН
if (list != null && list.size() >
0) {
for (IModuleConfig configModule :
list) {
configModule.injectAppLifecycle(base, appLifes);
configModule.injectActivityLifecycle(base,
liferecycleCallbacks);
}
}
if (appLifes != null && appLifes.size()
> 0) {
for (IAppLife life :
appLifes) {
life.attachBaseContext(base);
}
}
}
@Override
public void onCreate(Application application)
{
//ЯргІЕїгУзщМўApplicationДњРэРрЕФonCreateЗНЗЈ
if (appLifes != null && appLifes.size()
> 0) {
for (IAppLife life :
appLifes) {
life.onCreate(application);
}
}
if (liferecycleCallbacks != null &&
liferecycleCallbacks.size() > 0) {
for (Application.ActivityLifecycleCallbacks
life :
liferecycleCallbacks) {
application.registerActivityLifecycleCallbacks(life);
}
}
}
@Override
public void onTerminate(Application application)
{
//ЯргІЕїгУзщМўApplicationДњРэРрЕФonTerminateЗНЗЈ
if (appLifes != null && appLifes.size()
> 0) {
for (IAppLife life :
appLifes) {
life.onTerminate(application);
}
}
if (liferecycleCallbacks != null &&
liferecycleCallbacks.size() > 0) {
for (Application.ActivityLifecycleCallbacks
life :
liferecycleCallbacks) {
application.unregisterActivityLifecycleCallbacks(life);
}
}
}
}
|
зщМў Manifest жа application ЕФШЋОжХфжУШчЯТЃК
<meta-data
android:name="com.example.live.LiveApplication"
android:value="IModuleConfig" />
|
ManifestParser ЛсЖдЦфжа value ЮЊ IModuleConfig ЕФ meta-data
НјааНтЮіЃЌВЂЭЈЙ§ЗДЩфЩњГЩЪЕР§ЁЃ
public final
class ManifestParser {
private static final String MODULE_VALUE
= "IModuleConfig";
private final Context context;
public ManifestParser(Context context) {
this.context = context;
}
public List<IModuleConfig> parse() {
List<IModuleConfig> modules = new ArrayList<>();
try {
ApplicationInfo appInfo = context.getPackageManager().getApplicationInfo(
context.getPackageName(), PackageManager.GET_META_DATA);
if (appInfo.metaData != null) {
for (String key : appInfo.metaData.keySet()) {
//ЛсЖдЦфжаvalueЮЊIModuleConfigЕФmeta-dataНјааНтЮіЃЌ
ВЂЭЈЙ§ЗДЩфЩњГЩЪЕР§
if (MODULE_VALUE.equals(appInfo.metaData.get(key)))
{
modules.add(parseModule(key));
}
}
}
} catch (PackageManager.NameNotFoundException
e) {
throw new RuntimeException("Unable to find
metadata to parse IModuleConfig", e);
}
return modules;
}
//ЭЈЙ§РрУћЩњГЩЪЕР§
private static IModuleConfig parseModule(String
className) {
Class<?> clazz;
try {
clazz = Class.forName(className);
} catch (ClassNotFoundException e) {
throw new IllegalArgumentException("Unable
to find
IModuleConfig implementation",
e);
}
Object module;
try {
module = clazz.newInstance();
} catch (InstantiationException e) {
throw new RuntimeException("Unable to
instantiate
IModuleConfig implementation for " + clazz,
e);
} catch (IllegalAccessException e) {
throw new RuntimeException("Unable to instantiate
IModuleConfig implementation for " + clazz,
e);
}
if (!(module instanceof IModuleConfig)) {
throw new RuntimeException("Expected instanceof
IModuleConfig, but found: " + module);
}
return (IModuleConfig) module;
}
}
|
етбљЭЈЙ§вдЩЯВНжшОЭПЩвддк Manifest ЮФМўжаХфжУздМКзщМўЕФ ApplicationЃЌгУгкГѕЪМЛЏзщМўФкЕФЪ§ОнЃЌБШШчдкжБВЅзщМўжаГѕЪМЛЏ
DaggerзЂНт ЕФШЋОжХфжУЁЃ
public class
LiveApplication implements IModuleConfig,
IAppLife
{
private static MainComponent mainComponent;
@Override
public void injectAppLifecycle(Context context,
List<IAppLife> iAppLifes) {
//етРяашвЊАбБОв§гУЬэМгЕНApplicationЕФЩњУќжмЦкЕФЛиЕїжаЃЌ
вдБуЪЕЯжЛиЕї
iAppLifes.add(this);
}
@Override
public void injectActivityLifecycle(Context
context, List<Application.ActivityLifecycleCallbacks>
lifecycleCallbackses) {
}
@Override
public void attachBaseContext(Context base)
{
}
@Override
public void onCreate(Application application)
{
//дкonCreateЗНЗЈжаЖдDaggerНјааГѕЪМЛЏ
mainComponent = DaggerMainComponent.builder().
mainModule(new
MainModule())
.appComponent(BaseApplication.getAppComponent()).build();
}
@Override
public void onTerminate(Application application)
{
if (mainComponent != null) {
mainComponent = null;
}
}
public static MainComponent getMainComponent()
{
return mainComponent;
}
}
|
зщМўФкЭјТчЧыЧѓКЭРЙНиЦї
гЩгкУПИізщМўЕФ BaseUrl КЭЭјТчХфжУЕШПЩФмВЛвЛбљЃЌЫљвдУПИізщМўПЩвддкздМКХфжУЕФ dagger
жаЕФ MainConponent ЪЕЯжздМКЕФЭјТчЧыЧѓКЭРЙНиЦїЁЃвджБВЅЮЊР§ЃЌВПЗжДњТыФкШнШчЯТЃК
@PerApplication
@Component(dependencies = AppComponent.class,
modules = MainModule.class)
public interface MainComponent {
public DaoSession getDaoSession();
public MainRepositoryManager getMainRepositoryManager();
}
|
MainModuleВПЗжДњТыЃК
public class
MainModule {
@Provides
@PerApplication
public MainRepositoryManager provideRepositoryManager
(@Named("live")
Retrofit retrofit, DaoSession daoSession) {
return new MainRepositoryManager
(retrofit, daoSession);
}
@Provides
@Named("live")
@PerApplication
public Retrofit provideRetrofit(@Named("live")
OkHttpClient okHttpClient,@Nullable Gson gson){
Retrofit.Builder builder=new Retrofit.Builder().
baseUrl(LiveUtil.BASE_URL).
addCallAdapterFactory(RxJava2CallAdapterFactory.create())
.addConverterFactory(GsonConverterFactory.create(gson)).
client(okHttpClient);
return builder.build();
}
@Provides
@Named("live")
@PerApplication
public OkHttpClient provideOkHttpClient(@Named("live")
LiveInterceptor
interceptor){
OkHttpClient.Builder builder=new OkHttpClient.Builder();
builder.connectTimeout(10, TimeUnit.SECONDS).readTimeout
(10,TimeUnit.SECONDS);
builder.addInterceptor(interceptor);
return builder.build();
}
@Provides
@Named("live")
@PerApplication
public LiveInterceptor provideNewsInterceptor(){
return new LiveInterceptor();
}
}
|
ФбЕу
дкЯюФПжаЪЙгУзщМўЛЏЃЌПЩФмЛсгіЕНКмЖрЮЪЬтЃЌЯТУцНЋЮЪЬтТоСаШчЯТЃК
зЪдДУќУћГхЭЛ
ЙйЗНЫЕЗЈЪЧдкУПИі module ЕФ build.gradle ЮФМўжаХфжУзЪдДЮФМўУћЧАзКЁЃ
етжжЗНЗЈШБЕуОЭЪЧЃЌЫљгаЕФзЪдДУћБиаывЊвджИЖЈЕФзжЗћДЎ(moudle_prefix)зіЧАзКЃЌЗёдђЛсвьГЃБЈДэЃЌЖјЧветЗНЗЈжЛЯоЖЈxmlРяУцЕФзЪдДЃЌЖдЭМЦЌзЪдДВЂВЛЦ№зїгУЃЌЫљвдЭМЦЌзЪдДШдШЛашвЊЪжЖЏШЅаоИФзЪдДУћЁЃЫљвдВЛЪЧКмЭЦМіЪЙгУетжжЗНЗЈРДНтОізЪдДУћГхЭЛЁЃЫљвджЛФмздМКзЂвтЕуЃЌдкДДНЈзЪдДЕФЪБКђЃЌОЁСПВЛШУЦфжиИДЁЃР§Шч:
| resourcePrefix
"moudle_prefix" |
butterKnifeЪЙгУЮЪЬт
ЫфШЛ Butterknife жЇГждк lib жаЪЙгУЃЌЕЋЪЧЬѕМўЪЧгУ R2 ДњЬц R ЃЌдкзщМўФЃЪНКЭМЏГЩФЃЪНЕФЧаЛЛжаЃЌR2<->R
жЎМфЕФЧаЛЛЪЧЮоЗЈЭъГЩзЊЛЛЕФЃЌЧаЛЛвЛДЮвЊИФЖЏШЋЩэЃЌЪЧЗЧГЃТщЗГЕФЃЁЫљвдВЛЭЦМідкзщМўЛЏжаЪЙгУ ButterknifeЁЃ
libraryжиИДвРРЕЮЪЬт
ЯраХетИіЮЪЬтЃЌДѓМвдкЦНЪБЕФПЊЗЂжаЖМЛсгіЕНЃЌЫљвдЮвУЧашвЊНЋЖргрЕФАќИјХХçóؽЁЃПЩвдВЮПМШчЯТЕФХфжУЃК
dependencies
{
compile fileTree(dir: 'libs', include: ['*.jar'])
testCompile 'junit:junit:4.12'
androidTestCompile('com.android.support.test.
espresso:espresso-core:2.2.2',
{
exclude group: 'com.android.support', module:
'support-annotations'
})
compile(rootProject.ext.dependencies.appcompatV7)
{
exclude module: "support-v4"
exclude module: "support-annotations"
}
compile rootProject.ext.dependencies.recycleview
compile rootProject.ext.dependencies.design
compile(rootProject.ext.dependencies.support_v4)
{
exclude module: "support-annotations"
}
compile rootProject.ext.dependencies.annotations
compile(rootProject.ext.dependencies.butterknife)
{
exclude module: 'support-annotations'
}
compile rootProject.ext.dependencies.rxjava2
compile(rootProject.ext.dependencies.rxjava2_android)
{
exclude module: "rxjava"
}
compile(rootProject.ext.dependencies.rxlifecycle2)
{
exclude module: 'rxjava'
exclude module: 'jsr305'
}
compile(rootProject.ext.dependencies.rxlifecycle2
_components)
{
exclude module: 'support-v4'
exclude module: 'appcompat-v7'
exclude module: 'support-annotations'
exclude module: 'rxjava'
exclude module: 'rxandroid'
exclude module: 'rxlifecycle'
}
compile(rootProject.ext.dependencies.retrofit)
{
exclude module: 'okhttp'
exclude module: 'okio'
}
compile(rootProject.ext.dependencies.
retrofit_converter_gson) {
exclude module: 'gson'
exclude module: 'okhttp'
exclude module: 'okio'
exclude module: 'retrofit'
}
compile(rootProject.ext.dependencies.
retrofit_adapter_rxjava2) {
exclude module: 'rxjava'
exclude module: 'okhttp'
exclude module: 'retrofit'
exclude module: 'okio'
}
compile rootProject.ext.dependencies.greenDao
compile rootProject.ext.dependencies.okhttp3
compile rootProject.ext.dependencies.gson
compile rootProject.ext.dependencies.glide
compile rootProject.ext.dependencies.eventBus
compile rootProject.ext.dependencies.dagger2
compile(rootProject.ext.dependencies.rxpermission)
{
exclude module: 'rxjava'
}
compile rootProject.ext.dependencies.retrofit_
;converter_scalars
annotationProcessor rootProject.ext.
dependencies.dagger2_compiler
annotationProcessor rootProject.ext.
dependencies.butterknife_compiler
compile rootProject.ext.dependencies.butterknife
compile rootProject.ext.dependencies.transformations
compile rootProject.ext.dependencies.arouter_api
}
|
ИНЃКЯюФПЪЕР§
СФЬьФЃПщ
гХауЯюФПВЮПМЃК
MVPArms
https://github.com/JessYanCoding/MVPArms
ШЋУёжБВЅ
https://github.com/jenly1314/KingTV
вєРжЯюФП
https://github.com/hefuyicoder/ListenerMusicPlayer
https://github.com/aa112901/remusic
ДѓЯѓЃКPHPHubПЭЛЇЖЫ
https://github.com/Freelander/Elephant
MvpApp
https://github.com/Rukey7/MvpApp
CloudReader
https://github.com/youlookwhat/CloudReader
|