| 编辑推荐: |
| 本文来自于个人博客,本文简单描述了iOS平台上PhoneGap与平台本地的互操作性的实现。
|
|
一:关于Cordoval理论知识
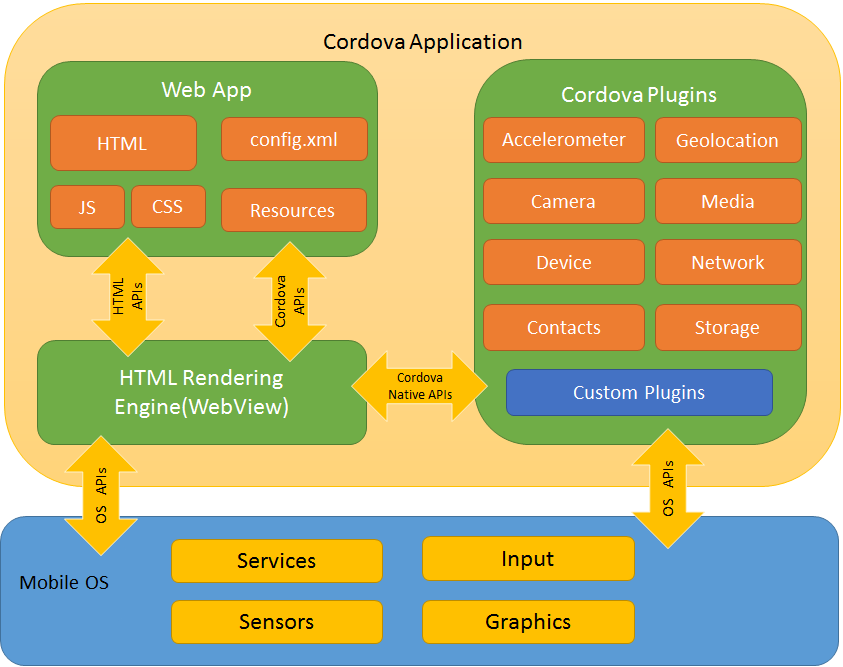
1:PhoneGap是手机平台上流行的一款中间件。它构建在各种手机平台所提供的WebView(浏览器内核)组件的基础之上,使用javascript语言对应用开发者提供统一的接口(如调用相机、调用其他本地组件),从而屏蔽了各手机平台上OS的异构。在无线小组的调研任务中,我的任务主要是负责iOS平台上的调研。
2:PhoneGap因为被捐赠给了Apache而改名为Cordova,所以PhoneGap里的类名都以CDV作为前缀。在iOS平台上,最重要的一个核心类是CDVViewController。该类直接继承自UIViewController,因而具备了所有UIViewController所具备的特性。同时,该类还实现了两个Protocol(即接口):UIWebViewDelegate和CDVCommandDelegate。因此它也负责UIWebView的一些callback,以及CDVInvokedUrlCommand的执行。
3:CDVViewController类的主要对象成员是CDVCordovaView *webView,在源代码中可以看出,这个webView对象是CDVViewController的self.view上的唯一被add进来的子对象,即负责了整个CDVViewController类的显示。而CDVCordovaView类则没什么特别的,它直接继承自UIWebView。
4:当CDVViewController在构建时,它有两个很重要的属性:NSString*wwwFolderName和NSString
*startPage。这两个属性值使得CDVViewController在load之后直接加载wwwFolderName下的startPage作为初始显示的页面。
以上是对CDVViewController的一个简单介绍。容易明白的是,在iOS应用中使用了CDVViewController之后,界面实际上就完全交给了CDVCordovaView*webView,即一个UIWebView。
二:使用Cordoval常碰到的问题
config.xml 是一个用来配置应用的全局属性的文件, 在此文件中配置的属性应该是能适应所有平台的.
在编译的时候配置文件将会被编译到对应的平台中.
1:如何在Cordoval加载远程的URL网址
在Config.xml配置文件时增加下面两个,便可以打开URL的HTML页面
|
<allow-navigation href="http://*/*"
/>
<allow-navigation href="https://*/*"
/> |
2:在Cordoval中加载同一个域的URL是在APP打开,跳转到其它却是用safari浏览器打开
同样是在Config.xml配置中把下面两个删除,这样它便会一直在APP里面进行跳转
| <!--
<allow-intent href="http://*/*"
/>-->
<!-- <allow-intent href="https://*/*"
/>--> |
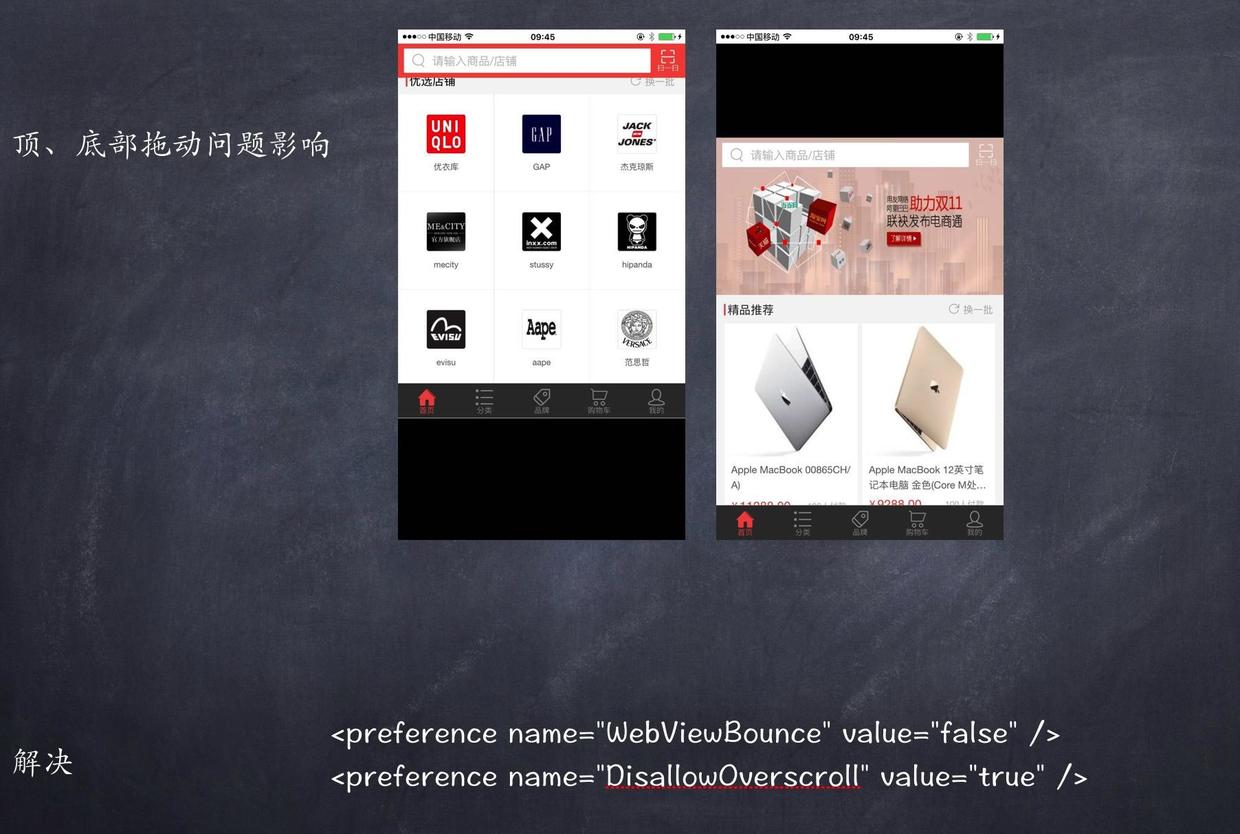
2.1:禁用 WebViewBounce
UIWebView是iOS SDK中一个最常用的控件, 在Cordova中, 默认也是使用UIWebView作为默认视图显示我们的HTML应用的.
在使用Cordova的项目中, 默认WebViewBounce这个选项是打开的, 所以使用手指向下或者向上滑动屏幕时,
经常会看到页面底部和屏幕底部会出现一大片空白, 然后松开手指后, 再弹回去的特效.
| <preference
name="WebViewBounce" value="false"
/>
<preference name="DisallowOverscroll"
value="true" /> |
2.2:config.xml access配置
| <access
origin="http://google.com" /> |
只允许google.com的https协议 Access to the secure google.com
( https : // ) :
| <access
origin="https://google.com" /> |
二级域名(maps) Access to the subdomain maps .google .
com:
| <access
origin="http://maps.google.com" /> |
所有二级域名 Access to all the subdomains on google.com,
for example mail . google . com and docs.google.com:
| <access
origin="http://*.google.com" /> |
所有域名 Access to all domains , for example , google
. com and developer . mozilla . org :
2.3:config.xml Navigation Whitelist
说明:webview可以跳转至的URL
| <!--
允许所有到example.com的链接 -->
<!-- Allow links to example.com -->
<allow-navigation href="http://example.com/*"
/>
<!-- 通配符 -->
<!-- Wildcards are allowed for the protocol,
as a prefix
to the host, or as a suffix to the path -->
<allow-navigation href="*://*.example.com/*"
/>
<!-- 通配符(全) *不推荐* -->
<!-- A wildcard can be used to whitelist
the entire network,
over HTTP and HTTPS.
*NOT RECOMMENDED* -->
<allow-navigation href="*" />
<!-- 上面的写法与下面3句等价 -->
<!-- The above is equivalent to these three
declarations -->
<allow-navigation href="http://*/*"
/>
<allow-navigation href="https://*/*"
/>
<allow-navigation href="data:*"
/> |
2.4:config.xml Intent Whitelist
说明:系统可以打开的链接
| <!--
Allow links to web pages to open in a browser
-->
<allow-intent href="http://*/*"
/>
<allow-intent href="https://*/*"
/>
<!-- Allow links to example.com to open
in a browser -->
<allow-intent href="http://example.com/*"
/>
<!-- Wildcards are allowed for the protocol,
as a prefix
to the host, or as a suffix to the path -->
<allow-intent href="*://*.example.com/*"
/>
<!-- Allow SMS links to open messaging app
-->
<allow-intent href="sms:*" />
<!-- Allow tel: links to open the dialer
-->
<allow-intent href="tel:*" />
<!-- Allow geo: links to open maps -->
<allow-intent href="geo:*" />
<!-- Allow all unrecognized URLs to open
installed apps
*NOT RECOMMENDED* -->
<allow-intent href="*" /> |
2.5:config.xml Network Request Whitelist
说明:网络请求(如XHR等)白名单
| <!--
Allow images, xhrs, etc. to google.com -->
<access origin="http://google.com"
/>
<access origin="https://google.com"
/>
<!-- Access to the subdomain maps.google.com
-->
<access origin="http://maps.google.com"
/>
<!-- Access to all the subdomains on google.com
-->
<access origin="http://*.google.com"
/>
<!-- Enable requests to content: URLs -->
<access origin="content:///*" />
<!-- Don't block any requests -->
<access origin="*" /> |
2.6:index.html Content Security Policy
说明:页面上的资源白名单
主要分这几类: default-src , style-src ,
script-src , img-src , font-src , media-src 等
参数值可以是:*,'self','unsafe-inline',data: 等
我使用的是非常宽松的策略:
允许所有域名的数据,允许不安全的内联,允许data:(主要用于BASE64形式的图片,字体等)
| <meta
http-equiv="Content-Security-Policy"
content="default-src * 'self' 'unsafe-inline';img-src
* 'self' data:;font-src 'self' data:">
|
3:如何加载不同的启动页URL地址
在配置Config.xml文件中有个content的节点,里面默认是有一个打开本地的地址index.html(比如:<
content src = " index . html " />); 这个就是跳转到本地包里面的html页面,也可以修改成(比如:<
content src = " https : // www . baidu .com /
" / > );
上面这种只是修改默认的地址,可能不符合对于项目实际用法,项目中要加载Cordova都会有一个viewController的控制器继承于CDVViewController,它时就有一个属性startPage用于设置跳到webView加载的html页面;其中使用CDVViewController通常需要设置wwwFolderName的目录名称,和startPage首页的名称即可。默认wwwFolderName为www,startPage默认为index.html;这个也是模板直接生成时文件的名称;
self .viewController . startPage =
@ " http : // www . cnblogs .com " ;
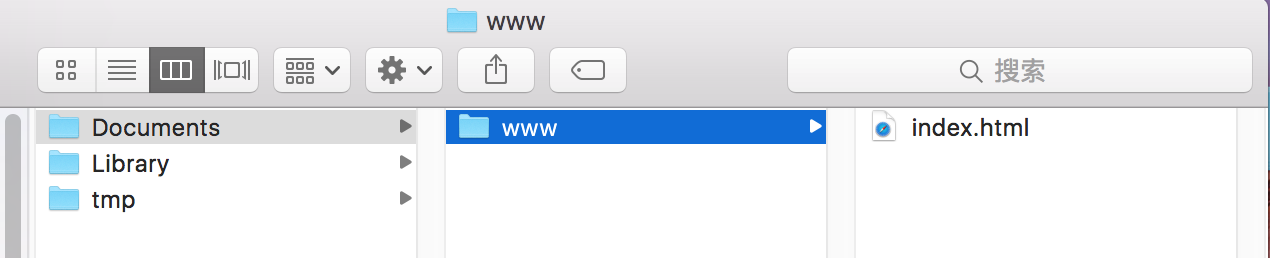
4:如何加载HTML页面存放在盒沙中
|
self.viewController = [[MainViewController alloc]
init];
NSString *curFilePath=[NSString stringWithFormat:@"file://%@/www",[NSSearch
PathForDirectoriesInDomains(NSDocumentDirectory,
NSUserDomainMask, YES)
objectAtIndex:0]];
NSLog(@"路径为:%@",curFilePath);
if ([[NSFileManager defaultManager] fileExistsAtPath:curFilePath])
{
self.viewController.wwwFolderName = curFilePath;
}
self.viewController.startPage=@"index.html"; |
同样是在wwwFolderName上做文章,因为它是前缀文件夹的路径,这边要注意是关于路径要运用file://方式进行读取;
因为可以读取沙盒里面的HTML页面,这样我们就可以更加灵活运用,比如HTML通过服务端去下载到沙盒解压,这样就可以做到动态修改;
5:加载页面跟结束加载页面的监听,有两个通知可以监听,用来处理等待效果展现
| -
(void)viewDidLoad
{
[super viewDidLoad];
// Do any additional setup after loading the
view from its nib.
NSNotificationCenter *center = [NSNotificationCenter
defaultCenter];
[center addObserver:self
selector:@selector(onNotification:)
name:CDVPluginResetNotification // 开始加载
object:nil];
[center addObserver:self
selector:@selector(onNotificationed:)
name:CDVPageDidLoadNotification // 加载完成
object:nil];
}
- (void)onNotification:(NSNotification *)text{
NSLog(@"-----开始等待------");
}
- (void)onNotificationed:(NSNotification *)text{
NSLog(@"-----结束等待------");
}
|
6:刷新UIWebView,UIWebView直接更改url并reload是没有用的。必须声明一个NSURLRequest,并重新loadRequest。刷新时的url必须是符合Cordova规则的url。在Cordova源码中有一个appUrl的方法,通过这个方法转出的url才能被CDVViewController正常加载;
| localWebVC.wwwFolderName
= @"www";
localWebVC.startPage = @"local.html";
NSURL *url = [self.localWebVC performSelector:@selector(appUrl)];
if (url)
{
NSURLRequest *request = [[NSURLRequest alloc]
initWithURL:url];
[self.localWebVC.webView loadRequest:request];
} |
7:使用pod管理Cordoval及其插件(IOS8以上才可以使用到最新版本)
pod 'Cordova'
如果需要引入一些相关的插件,可以加入如下配置,下面的这些插件可以通过pod搜索到:
|
pod 'CordovaPlugin-console'
pod 'cordova-plugin-camera'
pod 'cordova-plugin-contacts'
pod 'cordova-plugin-device'
pod 'cordova-plugin-device-orientation'
pod 'cordova-plugin-device-motion'
pod 'cordova-plugin-globalization'
pod 'cordova-plugin-geolocation'
pod 'cordova-plugin-file'
pod 'cordova-plugin-media-capture'
pod 'cordova-plugin-network-information'
pod 'cordova-plugin-splashscreen'
pod 'cordova-plugin-inappbrowser'
pod 'cordova-plugin-file-transfer'
pod 'cordova-plugin-statusbar'
pod 'cordova-plugin-vibration' |
注意:如果没有用pod来管理Cordova,默认工程都会有一个CordovaLib.xcodeproj来把Cordova的类引入,所以建议Cordova用pod引入,就可以调用,而关于html、JS等静态模板还是在工程中;可以查看下面两个网址
iOS中Cordova开发初探 地址:http : // blog
. devzeng . com / blog / hello - cordova -ios . html
Cordova使用Pod实例 地址:https : // github
.com / phonegap / phonegap - webview - ios 【POD引入的模块都存在】
三:插件内容
对于Cordova在插件上面还是比较多,也可以自定义插件的开发,对于插件下面已经有列出一些,其它插件可以上Cordova或者gitHub进行查找;扫描二维码和条形码插件:
| 支付宝支付插件:
iOS/Android 地址:https://github.com/fami2u/cordova-plugin-alipay.git
微信支付插件:
iOS/Android 地址:https://github.com/fami2u/cordova-plugin-weipay.git
ping++支付插件:
iOS 地址:https://github.com/fami2u/cordova-ping-fami.git
扫描二维码和条形码插件:
iOS/Android 地址:https://github.com/fami2u/cordova-barcodescanner-fami.git
拍照插件:
iOS/Android 地址:https://github.com/fami2u/cordova-plugin-camera.git
极光推送插件:
iOS/Android 地址:https://github.com/fami2u/jpush-phonegap-plugin.git
iOS 地址:https://github.com/fami2u/cordova-Jpush-fami.git
第三方登录插件:
iOS 地址:https://github.com/fami2u/cordova-UMLogin-fami.git
JS 地址:https://github.com/fami2u/cordova-plugin-wechat.git
第三方分享插件:
iOS 地址:https://github.com/fami2u/cordova-UMShare-fami.git
跳转地图插件:
iOS 地址:https://github.com/fami2u/cordova-plugin-map.git
视频播放插件:
iOS 地址:https://github.com/fami2u/cordova-player-fami.git |
四:有可能出现的问题
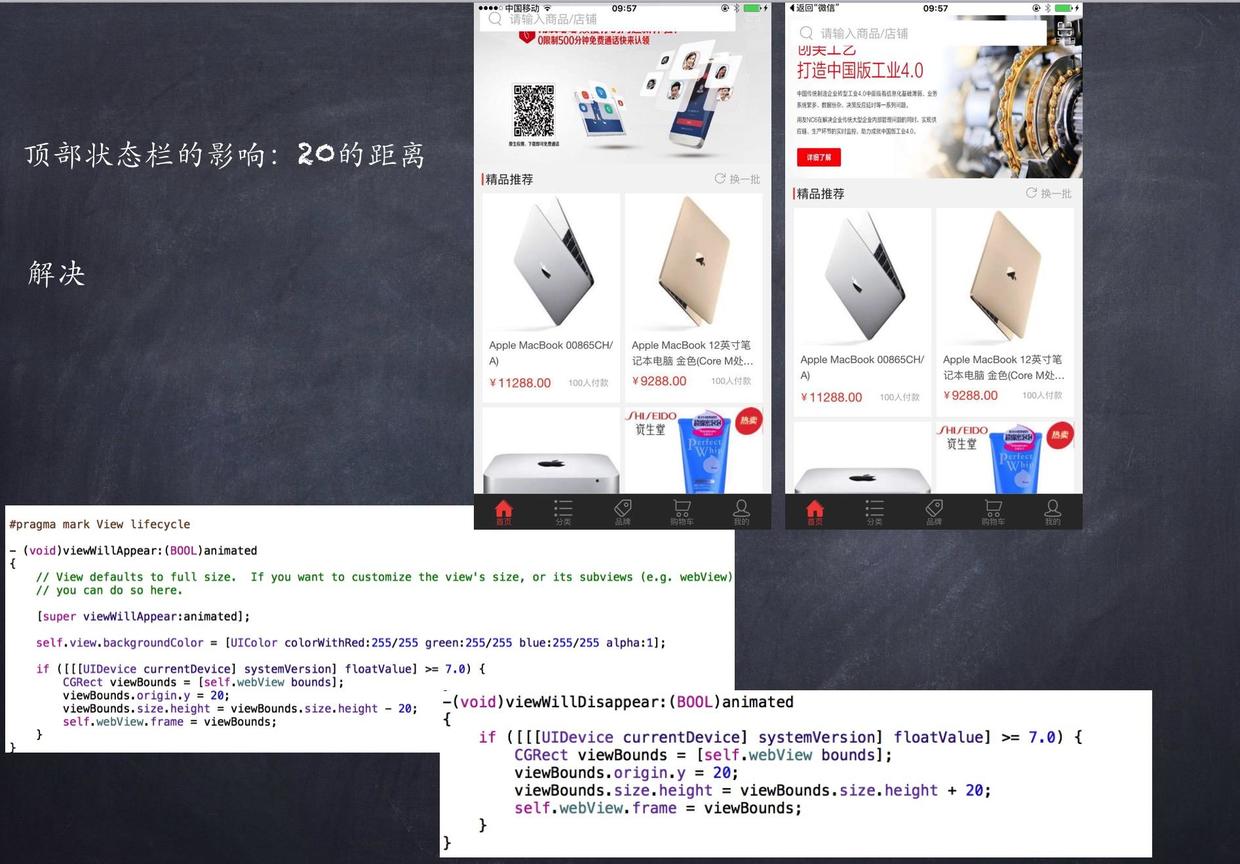
1:在使用cordova6.0的过程中,编译好的APP运行在IOS7+系统上默认是与状态栏重叠的,而运行在IOS6及老版本中时是于状态栏分离的。
解决办法:把文件MainViewController.m中的方法viewWillAppear进行相关修改如下。
作用是更改view的边界,使其下移20px,刚好是状态栏的高度。
| {
if([[[UIDevice currentDevice]systemVersion ]
floatValue]>=7)
{
CGRect viewBounds=[self.webView bounds];
viewBounds.origin.y=20;
viewBounds.size.height=viewBounds.size.height-20;
self.webView.frame=viewBounds;
}
[super viewWillAppear:animated];
} |
2:在html页面内调用系统相机以后再返回,整个页面底部会有白色的空白控件,用调试工具查看后空白区域的高度是20px.该如何解决?
解决办法:由于整个cordova项目相当于一个页面的应用,不同的模块聚集在一起,所以当当前屏幕消失后(比如进入系统相机拍照页面)再出现的时候,还是会执行上面的代码,所以界面高度再次减少20px.
| -(void)viewWillDisappear:(BOOL)animated
{
if([[[UIDevice currentDevice]systemVersion ]
floatValue]>=7)
{
CGRect viewBounds=[self.webView bounds];
viewBounds.origin.y=20;
viewBounds.size.height=viewBounds.size.height+20;
self.webView.frame=viewBounds;
}
[super viewWillDisappear:animated];
} |
五:不错的使用总结:


六:JS跟OC交互实例
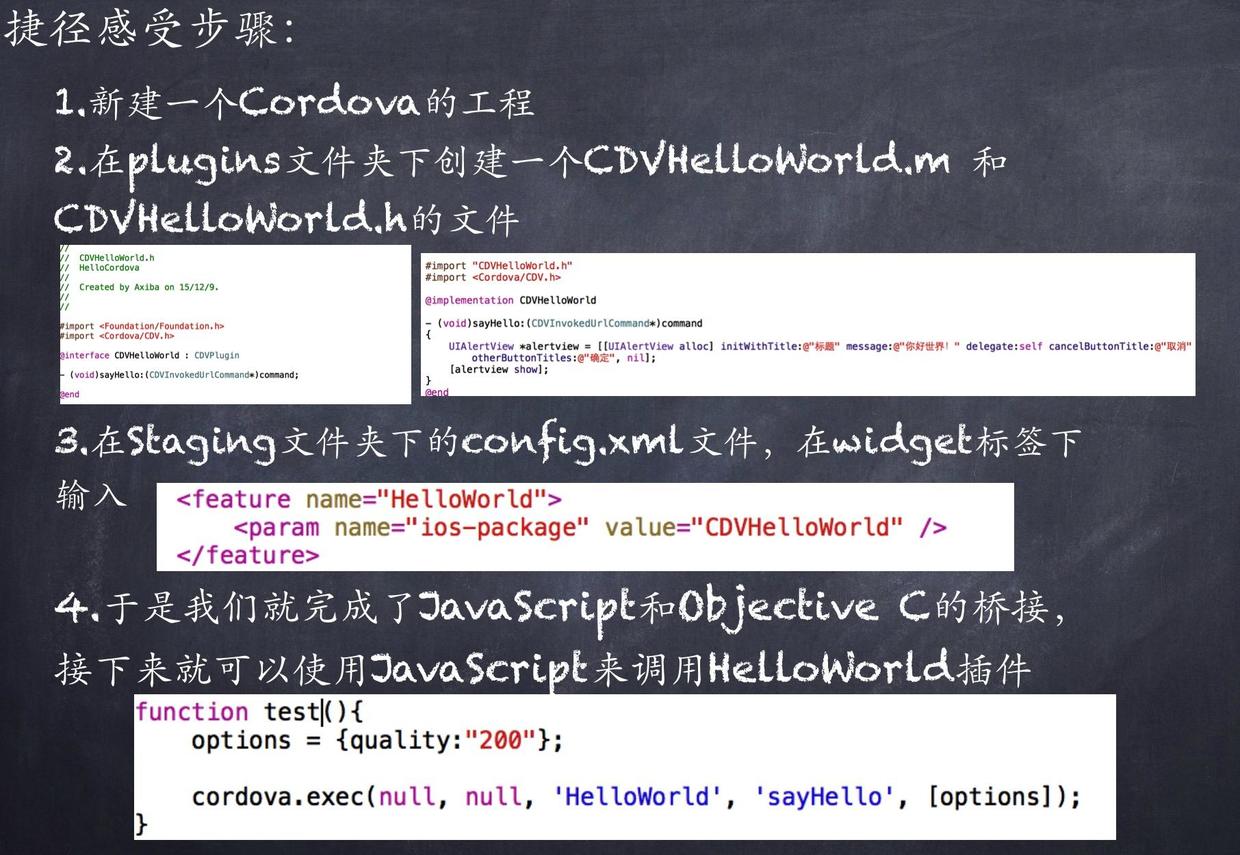
1:因为Cordoval要跟JS交互都是要利用CDVPlugin进行
| #import
<Foundation/Foundation.h>
#import <Cordova/CDVPlugin.h>
@interface CDVHelloWorld : CDVPlugin
-(void)sayHello:(CDVInvokedUrlCommand *)command;
@end |
所以我们创建一个插件类,继承于CDVPlugin类,其中CDVInvokedUrlCommand就是用于交互的类;
| #import
"CDVHelloWorld.h"
@implementation CDVHelloWorld
-(void)sayHello:(CDVInvokedUrlCommand *)command
{
//接收JS传过来的值
NSDictionary *options=[command argumentAtIndex:0
withDefault:nil];
//对应键名
NSString *curValue=options[@"quality"];
UIAlertView *myAlertView=[[UIAlertView alloc]initWithTitle:@"我是小实例"
message:[NSString stringWithFormat:@"当前的内容从JS传过来的值为:%@",curValue]
delegate:self cancelButtonTitle:@"取消"
otherButtonTitles:@"确定", nil];
[myAlertView show];
//数据回调
if ([curValue isEqualToString:@"200"])
{
curValue=@"201";
}
CDVPluginResult *pluginResult=[CDVPluginResult
resultWithStatus:CDVCommandStatus_OK messageAsString:@"OC回调过来的值"];
[self.commandDelegate sendPluginResult:pluginResult
callbackId:command.callbackId];
}
@end |
上面的实例有接收JS传过来的值,也有再回调给JS的值,回调时要利用self.commandDelegate;其中CDVPluginResult里面包括很多状态,上面只是把正确的状态赋值传回去,而messageAsString只是会字符串,还有其它类型的,比较字典、数组等;
2:config.xml修改配置,注册刚才我们注册的这个插件,给它定义一个HelloWorld的名字,value则是我们刚才创建的类名
|
<feature name="HelloWorld">
<param name="ios-package" value="CDVHelloWorld"
/>
</feature> |
3:Html跟JS的代码,sayHello则是我们类中的一个方法名,HelloWorld则是我们在配置中的那个名字,可以对它进行传参;
|
<!DOCTYPE html>
<html>
<head>
<title>Capture Photo</title>
<script type="text/javascript"
charset="utf-8" src="cordova.js"></script>
<script type="text/javascript"
charset="utf-8">
//简单跟OC交互,没有回调
//function test()
//{
// options={quality:"200"};
// cordova.exec(null,null,'HelloWorld','sayHello',[options]);
//}
function test()
{
options={quality:"200"};
cordova.exec(
function(result){
var s=result;
alert(s);
},
function(error)
{
alert("error",error);
}
,'HelloWorld','sayHello',[options]);
}
</script>
</head>
<body>
<button onclick="test();">交互OC</button>
<br>
</body>
</html> |
|