| 编辑推荐: |
| 本文来自于csdn,介绍了Android五大UI布局中的框架结构,属性,特点,使用样例,效果图等知识。 |
|
Android五大UI布局
1. LinearLayout 线性布局
2. RelativeLayout 相对布局
3. FrameLayout 帧布局,空白布局
4. GridLayout 网格布局
5. AbsoluteLayout 绝对布局
一、线性布局LinearLayout
框架结构如下:
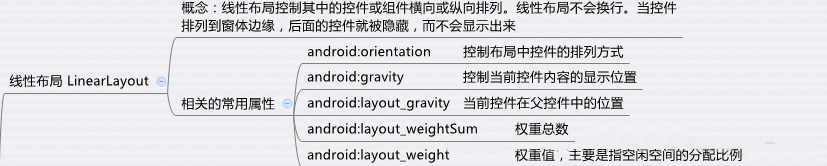
独有属性:
1、排列方向:vertical 竖向,horizontal 横向 如:android:orientation="vertical"
2、 设置当前控件在父控件范围内所处的位置(如居中,右下角等特殊位置) 如 :android:layout_gravity
此属性存在一个bug:
(1)当orientation为vertical时,那么所有跟高度相关的属性值都会失效.
(2)当orientation为Horizontal时,那么所有跟宽度相关的属性值都会失效.
原因:(以vertical方向为例)支持无限摆放子控件,顶多超出指定宽高区域范围的不显示,但是也不会报错。因此,依据此特点,无法确定线性的高具体是多少。bottom以及center_vertical等有关高度的属性都需要根据高度进行计算。
高度无法确定,因此,所有跟高度相关的属性值均会失效。(Horizontal方向原因与上面的原因类似)。
使用样例
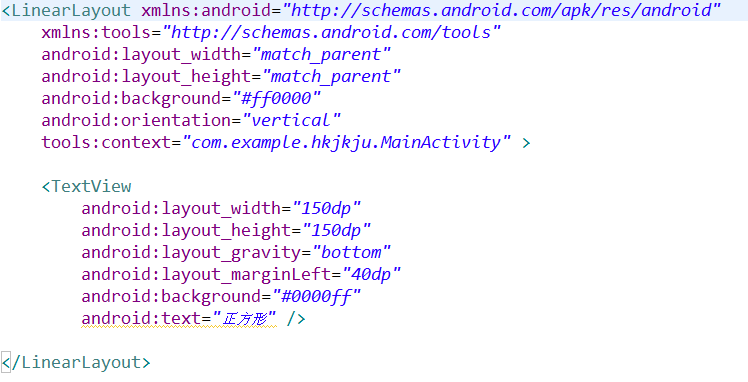
使用效果如下:
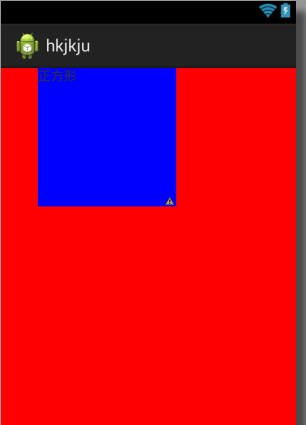
由以上效果可知:LinearLayout 为垂直方向 (android:orientation=”vertical”)
所以代码 android: layout_ gravity = ”bottom ”并没有起到将文本放到底部的作用,即垂直方向上不起作用。而水平方向上却向左移动了40
dp 的距离
3、设置权重,即设置兄弟控件之间宽或高的比例关系。当使用此属性值,如果是给宽度设置比例关系,那么将layout
_ width 的属性值设置为0dp或 wrap _ content。如果是给高度设置比例关系,那么layout
_ weight的属性值设置为0dp或 wrap _ content。
使用时注意:如果是 horizontal方向的线性布局,那么使用
weight属性控制宽度的比例关系,如果是 vertical方向的线性布局,那么使用 weight属性控制高度的比例关系.
android :weightSum 此属性只能写在Linearlayout标签中,用于设置比例关系几分之几中的分母可省略不写,如果不写的话,那么分母由所有
layout _ weight 属性的和决定
使用样例:
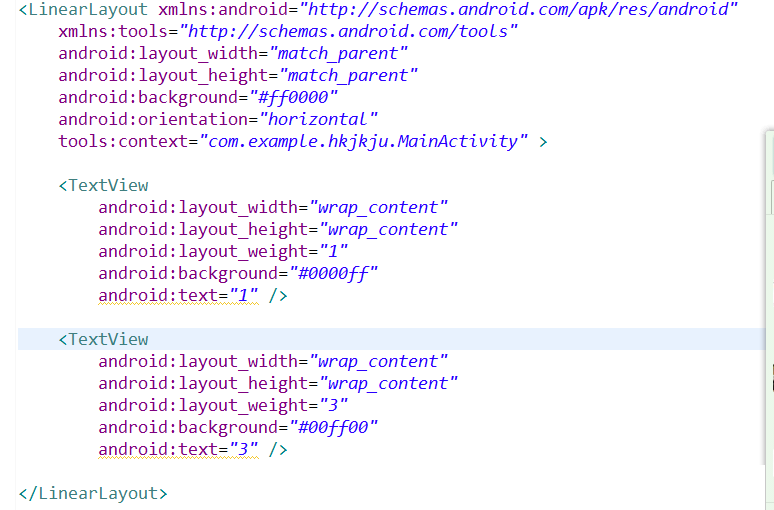
使用效果:

由效果图可知两个文本框的比例在水平方向上为1:3
二、相对布局RelativeLayout
框架结构如下:
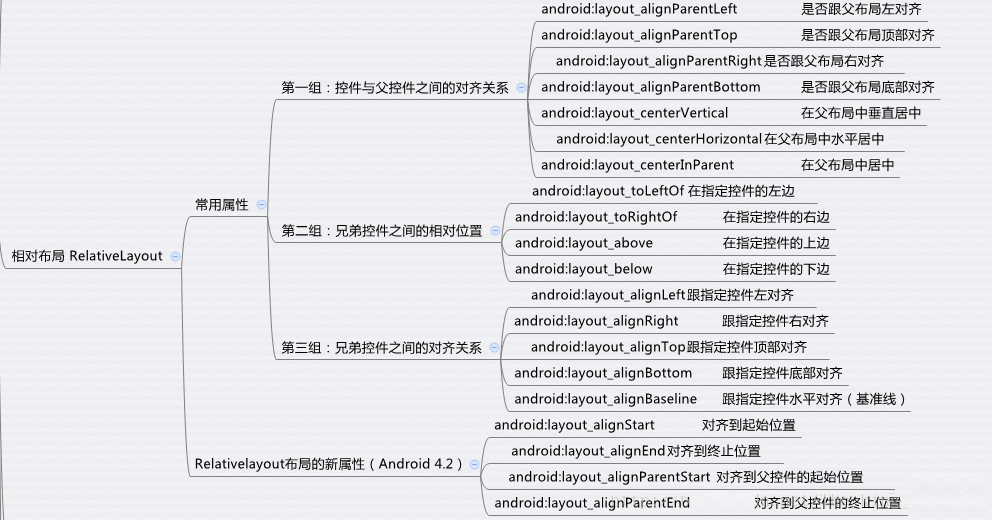
特点 :
1. 每一个控件默认位置是位于左上角
2. 当想要给控件设置位置时,此位置必然是参照父控件区域或者兄弟控件调整位置的
相对于父控件的属性:
以下所有属性的属性值设置的均为:true
或者false 写false 与没写此属性效果相同
控制居中的:
android :layout_ centerInParent 水平,垂直同时居中
android :layout_ centerHorizontal 水平居中
android :layout_ centerVertical 垂直居中
控制贴边的:
android :layout_ alignParentLeft 让当前控件的左边缘紧贴父控件的左边缘
android :layout_ alignParentTop 让当前控件的顶边缘紧贴父控件的顶边缘
android :layout_ alignParentRight 让当前控件的右边缘紧贴父控件的右边缘
android :layout_ alignParentBottom让当前控件的底边缘紧贴父控件的底边缘 |
三、帧布局 FrameLayout
特点:
1. 所有控件的默认位置都是左上角,想要控制控件的显示位置,只能用layout_gravity属性控制
2. 通常配合Fragment使用
四、绝对布局 AbsoluteLayout
绝对布局(目前此布局基本被废弃)
特点:
在设置控件的显示位置时,只需通过属性设置控件左上角的坐标点即可
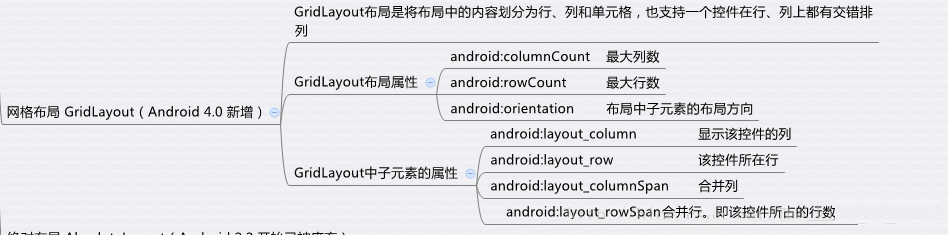
五、网格布局GridLayout
框架结构如下:
网格布局 4.0以后出的, 4.0以前的网格布局使用TableLayout
特点:
1. 整体的页面会按要求分为n行n列的网格,可以将控件直接放置在指定的行和列中
2. 网格也可以实现跨行或跨列显示,如一个网格的高度可以直接占据两行的高度
3. 可以省略layout_width和layout_height属性
独有属性:
android:rowCount
= "4" 指定总行数
android:columnCount = "4" 指定总列数
指定控件位于网格的第几行第几列中
android :layout _row = "0"
android :layout _column = "0"
android :layout _rowSpan = "2" 将控件的高度拉伸为2行的高度
android :layout_columnSpan="2" 将控件的宽度拉伸为2列的宽度
注意: 以上两个拉伸的属性必须配合android: layout_ gravity= "
fill " 才能生效 |
<GridLayout
xmlns: android="http: //schemas .android.
com /apk /res / android"
android :layout_width="match_parent"
android :layout_height="match_parent"
android :rowCount="4"
android :columnCount="4"
>
<TextView
android: layout_width="50dp"
android: layout_height="50dp"
android: text="1"
android: background="#ff0000"
android: layout_row="0"
android: layout_column="0"
/>
<TextView
android :layout_width="50dp"
android :layout_height="50dp"
android :text="1"
android :background="#ff0000"
android :layout_row="0"
android :layout_column="1"
/>
<TextView
android :layout_width="50dp"
android :layout_height="50dp"
android :text="2"
android :background="#00ff00"
android :layout_row="1"
android :layout_column="0"
android :layout_columnSpan="2"
android :layout_gravity="fill"
/>
<TextView
android :layout_width="50dp"
android :layout_height="wrap_content"
android :text="3"
android :background="#0000ff"
android :layout_row="0"
android :layout_column="2"
android :layout_rowSpan="2"
android :layout_gravity="fill"
/>
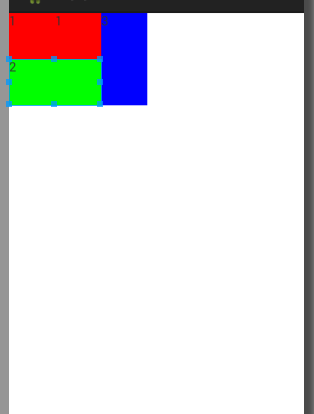
</ GridLayout > |
效果如下:
|