| БрМЭЦМі: |
| БОЮФРДздгкМђЪщ,БОЮФЫљНВЕФздЖЏЛЏВтЪдUI
AutomatorзюЯджјЕФЬиЕуОЭЪЧЃЌПЩвдгыЖрИіappНјааНЛЛЅЁЃ |
|
ЪЙгУ
ЪзЯШЮвУЧдкAndroid StudioжааТНЈвЛИіЯюФПЃЌШЁУћЮЊUIAutomatorTestsЁЃЭЌЪБЩОГ§здЖЏЩњГЩЕФвЛаЉЮФМўЃЌзюжеФПТМНсЙЙШчЯТЃК
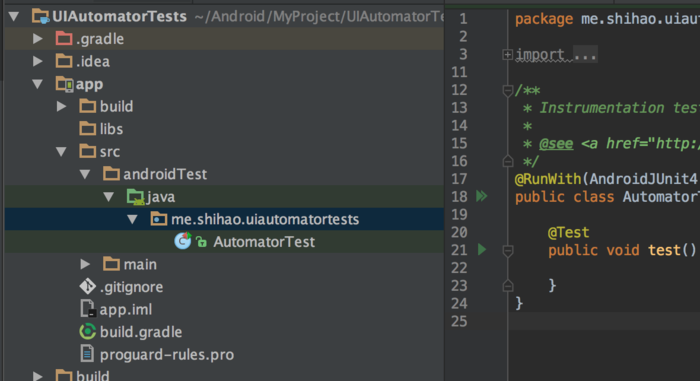
Paste_Image.png
НгЯТРДЮвУЧПДПДШчКЮвЛВНвЛВНЕФЪЙгУEspressoЃЌЪзЯШдкИљФПТМЕФ build.gradle ЮФМўжаЬэМгЯТУцЕФв§ШыЁЃ
ext {
buildToolsVersion = "24.0.1"
supportLibVersion = "24.2.0"
uiautomatorVersion = "2.1.1"
runnerVersion = "0.5"
rulesVersion = "0.5"
}
|
дкappФПТМжаЕФbuild.gradle ЮФМўжаЬэМгЯТУцЕФв§ШыЃЌИљОнЬсЪОЕуЛїSync NowЁЃ
dependencies
{
compile fileTree (dir: 'libs', include: ['*.jar'])
// App dependencies
compile 'com.android.support:appcompat-v7:' +
rootProject .supportLibVersion;
compile 'com.android .support:support-annotations
:' + rootProject .supportLibVersion;
androidTestCompile 'com .android.support :support-annotations
:' + rootProject .supportLibVersion;
androidTestCompile 'com .android .support .test
: runner :' + rootProject.runnerVersion ;
// UiA utomator Testing
androidTestCompile 'com .android .support .test
.uiautomator :uiautomator-v18:' + rootProject
.uiautomatorVersion ;
androidTestCompile 'org .hamcrest:hamcrest-integration
:1.3'
}
|
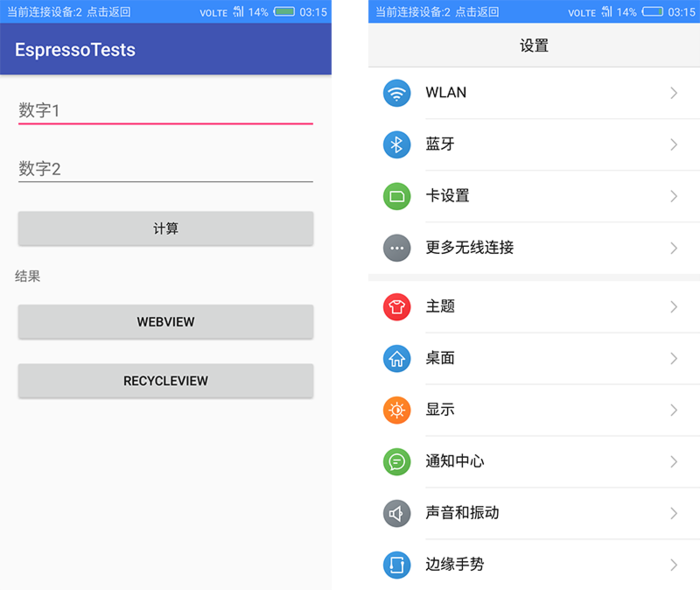
НгЯТРДЮвУЧдкAutomatorTest.classжаБраДВтЪдДњТыЃЌЮЊСЫВтЪдЖрИіappЃЌетРяЮвУЧбЁдёЩЯЦЊЮФеТжаЕФEspressoTestsКЭЪжЛњжаЕФЩшжУappЁЃ
Paste_Image.png
дкEspressoTestsжаЮвУЧЪфШыЪ§ОнЕуЛїМЦЫуЃЌШЛКѓЭЈЙ§ЩшжУappЮЊЪжЛњИќЛЛвЛИівЛИіСхЩљЁЃЯъЯИЕФВтЪдДњТыШчЯТЃК
package me.shihao
.uiautomatortests;
import android .content.Context;
import android .content.Intent;
import android .support.test.InstrumentationRegistry;
import android .support.test.filters.SdkSuppress;
import android .support.test.runner.AndroidJUnit4;
import android .support.test.uiautomator.By;
import android .support.test.uiautomator.UiDevice;
import android .support.test.uiautomator.UiObject;
import android .support.test.uiautomator.UiScrollable;
import android .support.test.uiautomator.UiSelector;
import android .support.test.uiautomator.Until;
import android .support.v7.widget.RecyclerView;
import android .widget.Button;
import android .widget.EditText;
import android .widget.ImageButton;
import android .widget.ListView;
import android .widget.ScrollView;
import android .widget.TextView;
import org.junit.Test;
import org.junit .runner.RunWith;
import static org .hamcrest.Matchers.notNullValue;
import static org .junit.Assert.*;
@RunWith (AndroidJUnit4.class)
@SdkSuppress (minSdkVersion = 18)
public class AutomatorTest {
private static final String PACKAGE_ESPRESSOTESTS
= "me .shihao .espressotests ";
private static final String PACKAGE_ SETTING =
"com.android.settings";
@Test
public void testEspressoTestsApp () throws Exception
{
// ГѕЪМЛЏвЛИіUiDeviceЖдЯѓ
UiDevice mDevice = UiDevice.getInstance (InstrumentationRegistry
.getInstrumentation ());
// ЕуЛїhomeМќЃЌЛиЕНhomeНчУц
mDevice.pressHome();
String launcherPackage = mDevice .getLauncherPackageName
();
assertThat (launcherPackage, notNullValue());
mDevice .wait (Until.hasObject(By.pkg(launcherPackage).depth(0)),
3);
// ЦєЖЏespressotests App
Context context = InstrumentationRegistry .getContext();
Intent intent = context .getPackageManager ()
.getLaunchIntentForPackage (PACKAGE_ESPRESSOTESTS)
;
// ЧхГ§вдЧАЕФЪЕР§
intent.addFlags (Intent.FLAG_ACTIVITY_CLEAR_TASK);
context .startActivity (intent);
// ЕШД§гІгУГЬађЦєЖЏ
mDevice.wait (Until.hasObject(By.pkg(PACKAGE_ESPRESSOTESTS).depth(0)),
3);
//ЭЈЙ§idевЕНЪфШыПђвЛ
UiObject edt1 = mDevice.findObject (new UiSelector
() .resourceId ("me.shihao .espressotests
:id/editText")
.className (EditText.class));
//ЭљРяУцЪфШызжЗћ2
edt1.setText("2");
//ЭЈЙ§idевЕНЪфШыПђЖў
UiObject edt2 = mDevice .findObject(new UiSelector
() .resourceId ("me.shihao .espressotests
:id/editText2")
.className ( EditText.class));
//ЭљРяУцЪфШы5
edt2.setText("5");
//ЭЈЙ§ЮФБО"МЦЫу"евЕНАДХЅ
UiObject btn = mDevice.findObject(new UiSelector().text("МЦЫу")
.className ( Button .class ) );
//жДааЕуЛїЪТМўЃЌМЦЫуНсЙћ
btn.click ();
//ЭЈЙ§idевЕНЯдЪОНсЙћЕФ textview
UiObject tvResult = mDevice.findObject (new UiSelector()
.resourceId ( "me.shihao .espressotests:id/textView")
. className(TextView.class) );
//ХаЖЯНсЙћгыдЄЦкЪЧЗёЦЅХф
assertEquals (tvResult.getText(), "МЦЫуНсЙћЃК7");
//ЭЈЙ§ЮФБО"RecycleView"евЕНАДХЅ
UiObject btnRecycleView = mDevice .findObject
(new UiSelector() .text ("RecycleView")
.className(Button.class));
//жДааЕуЛїЪТМўЬјзЊЕНСэвЛИіНчУц
btnRecycleView.click ();
//ЭЈЙ§idевЕНrecycleview
UiScrollable recycleview = new UiScrollable(new
UiSelector()
. className (RecyclerView.class)
. resourceId ("me.shihao.espressotests:id/recycleview"));
//ЛЌЖЏЕНЕзВП
recycleview.flingForward();
//ЛЌЖЏЕНЖЅВП
recycleview.flingBackward();
UiObject item5 = recycleview.getChild (new UiSelector().text("Item
5"));
//ЕуЛїItem 5ЃЌШЛКѓЛсЕЏГівЛИіЖдЛАПђ
item5.click();
//ЭЈЙ§ЮФБО"ШЗЖЈ"евЕНЖдЛАПђжаЕФШЗЖЈАДХЅ
UiObject btnConfirm = mDevice.findObject (new
UiSelector().text("ШЗЖЈ") . className
(Button.class));
//ЕуЛїШЗЖЈЙиБеЖдЛАПђ
btnConfirm.click();
//СэЭтвЛжжЗНЪНевЕНItem 2
UiObject item = mDevice.findObject(new UiSelector()
. className (RecyclerView.class)
.resourceId ("me.shihao.espressotests:id/recycleview")
.childSelector (new UiSelector().text("Item
2") ) );
//ЕуЛїЕЏГіЖдЛАПђ
item.click();
//ЕуЛїЗЕЛиЙиБеЖдЛАПђ
mDevice.pressBack();
} @Test
public void testSettingApp() throws Exception
{
//ГѕЪМЛЏвЛИіUiDeviceЖдЯѓ
Context context = InstrumentationRegistry.getContext();
UiDevice mDevice = UiDevice.getInstance (InstrumentationRegistry
.getInstrumentation ());
//ЛиЕНhomeНчУц
mDevice.pressHome();
// ЦєЖЏЩшжУ
Intent intent = context.getPackageManager ().
getLaunchIntentForPackage ( PACKAGE_SETTING );
// ЧхГ§вдЧАЕФЪЕР§
intent.addFlags(Intent.FLAG_ACTIVITY_CLEAR_TASK);
context. startActivity (intent);
//ЭЈЙ§idевЕНscrollview
UiScrollable scrollview = new UiScrollable (new
UiSelector(). className (ScrollView.class) .resourceId("com"
+
".android .settings : id/dashboard")
);
//ЛЌЖЏЕНЕзВП
scrollview.flingForward();
//ЭЈЙ§ЮФБОевЕНЙигкЪжЛњ
UiObject aboutPhone = scrollview.getChild (new
UiSelector().text("ЙигкЪжЛњ"));
//ЕуЛїЬјзЊЕНЪжЛњаХЯЂНчУц
aboutPhone.click();
//ЭЈЙ§descriptionевЕНЯђЩЯЗЕЛиЕФ ImageButton
UiObject ibtnBack = mDevice.findObject(new UiSelector().className
(ImageButton.class) .description("ЯђЩЯЕМКН"));
//ЕуЛїЗЕЛи
ibtnBack.click();
//ЛЌЖЏЕНАќКЌ"ЬсЪОвєКЭЭЈжЊ"ЕФЕиЗН
scrollview.scrollTextIntoView("ЬсЪОвєКЭЭЈжЊ");
//ЭЈЙ§ЯдЪОЕФЮФБОевЕНПиМў
UiObject notify = scrollview.getChild (new UiSelector().text("ЬсЪОвєКЭЭЈжЊ"));
//ЕуЛїЬјзЊЕНЯТвЛИіНчУц
notify.click();
//ЭЈЙ§ЯдЪОЕФЮФБО"ЪжЛњСхЩљ"евЕНПиМў
UiObject sound = mDevice.findObject (new UiSelector().text("ЪжЛњСхЩљ"));
//ЕуЛїЬјзЊЕНСхЩљЖдЛАПђ
sound.click();
//ЭЈЙ§idевЕНСхЩљСаБэ
UiScrollable listview = new UiScrollable(new UiSelector().className
(ListView .class) .resourceId
(" android:id /select_dialog_listview")
);
//ЛюЖЏЕНАќКЌ"Beat Plucker"ДІ
listview.scrollTextIntoView ( "Beat Plucker");
//ЭЈЙ§ЯдЪОЕФЮФБОевЕНИУЯю
UiObject beat = listview.getChild(new UiSelector().text("Beat
Plucker") );
//жДааЕуЛїбЁжаСхЩљ
beat.click();
//ЭЈЙ§ЮФБО"ШЗЖЈ"евЕНЖдЛАПђжаЕФШЗЖЈАДХЅ
UiObject btnConfirm = mDevice.findObject(new UiSelector().text("ШЗЖЈ")
. className (Button.class));
//ЕуЛїШЗЖЈЙиБеЖдЛАПђ
btnConfirm.click();
//ЭЈЙ§idевЕНЯдЪОНсЙћЕФTextView
UiObject tvSound = mDevice.findObject (new UiSelector()
.resourceId ("android : id/ summary"
).className(TextView
. class) );
//БШНЯгыдЄЦкНсЙћЪЧЗёвЛжТ
assertEquals(tvSound.getText(), "Beat Plucker");
//ЕуЛїhomeМќ
mDevice.pressHome();
//ЕуЛїзюНќгІгУМќ
mDevice.pressRecentApps();
//ЭЈЙ§РрУћевЕНЯдЪОзюНќappЕФПиМў TaskStackView
UiScrollable taskStackView = new UiScrollable
(new UiSelector(). className (" com.android
.systemui.recents.views" +
".TaskStackView") );
//ЛЌЖЏЕНАќКЌ"EspressoTests"ДІ
taskStackView.scrollTextIntoView ("EspressoTests");
//ЭЈЙ§ЯдЪОЕФЮФБОевЕНitem
UiObject espressoTestsApp = taskStackView.getChild(new
UiSelector() .text (" EspressoTests")
);
//ЕуЛїЧаЛЛЕНЧАУцЕФespressoTestsApp
espressoTestsApp .click();
}
}
|
дЫаааЇЙћШчЯТЃК

дЫаааЇЙћ.gif
дЫаааЇЙћ.gif
UI Automator ViewerЪЙгУ
ДгЩЯУцЕФВтЪдДњТыПЩвдПДЕНЃЌЮвУЧашвЊЪзЯШжЊЕРФПБъПиМўЕФвЛаЉЪєаджЕЃЌШЛКѓдйЮЇШЦЮвУЧЕФФПБъЪєадЙЙНЈвЛИіЦЅХфЙцдђЁЃЖјЪЕМЪжаЮвУЧВЂВЛжЊЕРappЕФЪЕЯжЃЌПиМўЕФЪєадВЂВЛЪЧФЧУДУїЯдЃЌЛђепВЂУЛгаФЧУДШнвзЛёШЁЕНЃЌетЪБЃЌЮвУЧПЩвдЪЙгУAndroidЬсЙЉЕФuiautomatorviewerЙЄОпАяжњЮвУЧНјааЗжЮіЁЃ
НгЯТРДЮвУЧОЭНВвЛЯТШчКЮЪЙгУЃЌAndroid StudioжаЕуЛїTools
>> Android >> Android Device Monitor
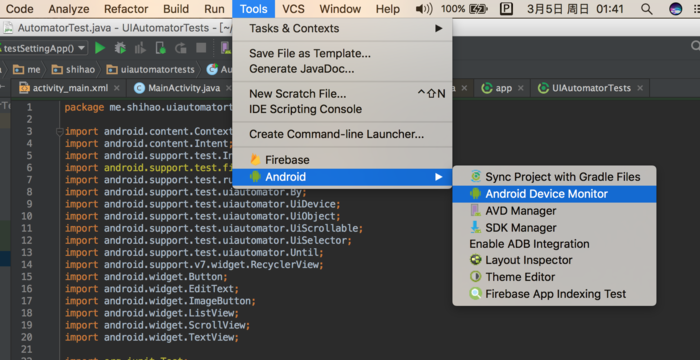
Paste_Image.png
ЯТУцЯдЪОЕФОЭЪЧНчУцЃЌзюзѓБпЛсЯдЪОСЌНгЕФЩшБИ
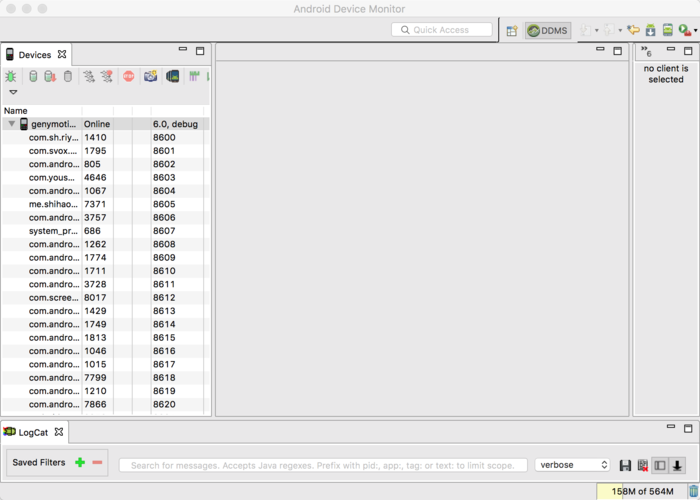
Paste_Image.png
ЕуЛїЛсНиЭМЗжЮіЩшБИЕБЧАЯдЪОНчУцВМОж
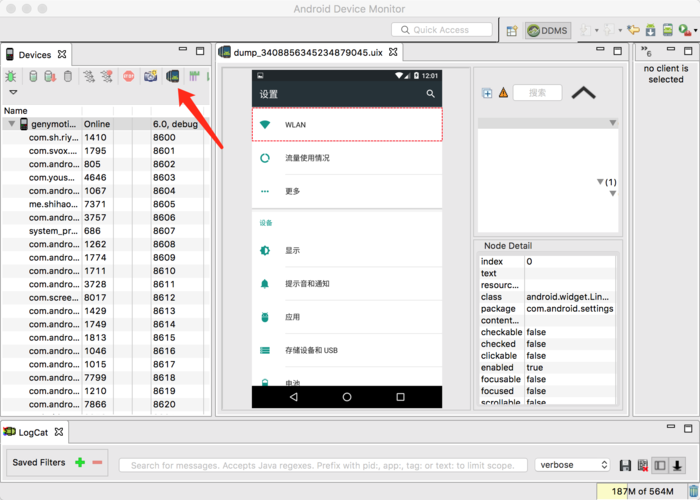
Paste_Image.png
ШЛКѓгвБпЛсЯдЪОВМОжНсЙЙвдМАviewЯъЯИЕФаХЯЂЁЃ
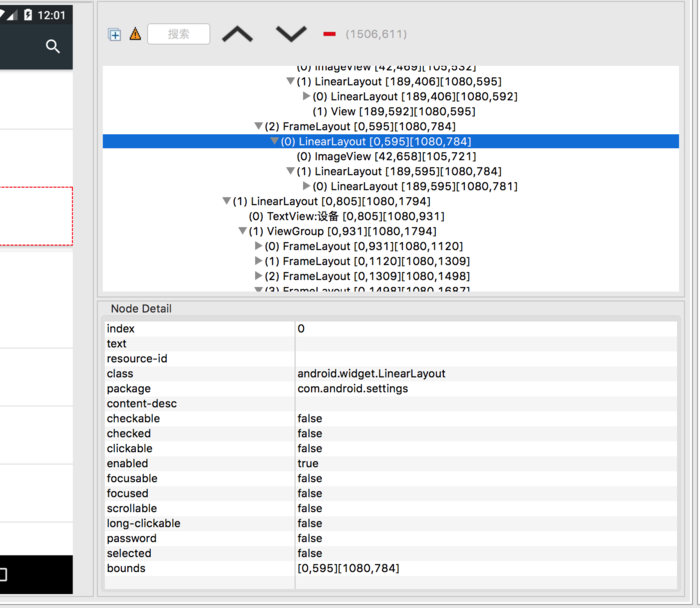
Paste_Image.png
|