| дкБОЮФжаЃЌЮвУЧРДЯъЯИСЫНтвЛЯТAndroidЩЯЕФNitificationЪЕЯжЁЃ
NotificationЪЧздAndroidЗЂВМвдРДОЭгаЕФAPIЃЌвВЪЧгІгУГЬађжазюГЃгУЕФЙІФмЕФжЎвЛЃЌПЊЗЂепЖдЦфгІЕБЪЧЯрЕБЕФЪьЯЄСЫЁЃ
дкAndroidНќМИФъЕФАцБОИќаТжаЃЌМИКѕУПИіАцБОЖМЛсЖдЯЕЭГЭЈжЊНчУцЃЌвдМАЯрЙиAPIзівЛаЉЕФИФБфЁЃетаЉИФБфЪЙЕУПЊЗЂепПЩвдИќКУЕФПижЦгІгУГЬађЕФЭЈжЊбљЪНЃЌЭЌЪБвВЪЙЕУЭЈжЊЙІФмИќвзгкгУЛЇЪЙгУЁЃ
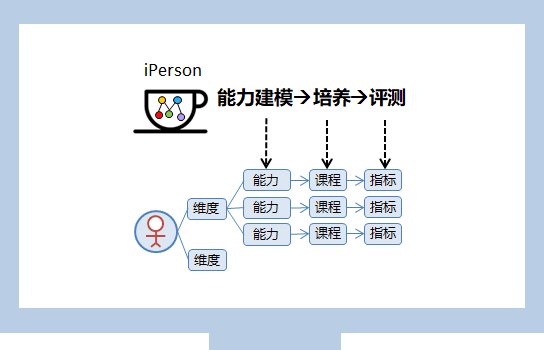
БОЮФЮвУЧРДЯъЯИПДвЛЯТNotificationЗНУцЕФжЊЪЖЁЃ
ПЊЗЂепAPI
етРяВЛДђЫуЖдNotificationЛљБОЕФЪЙгУЗНЪНзіЙ§ЖрНВНтЃЌетЗНУцФкШнЖдгкКмЖрПЊЗЂепРДЫЕЖМвбОЪЧЗЧГЃЪьЯЄЕФСЫЃЌВЂЧвЭјТчЩЯвВКмШнвзЫбЫїЕНЯрЙиФкШнЁЃ
ЯТУцжЛЛсЫЕУїNotificationздAndroid 5.0вдРДЕФаТдіМгЙІФмЁЃ
Heads-up Notification
Heads-up Notification ЪЧAndroid 5.0ЩЯЕФаТдіЙІФмЁЃ
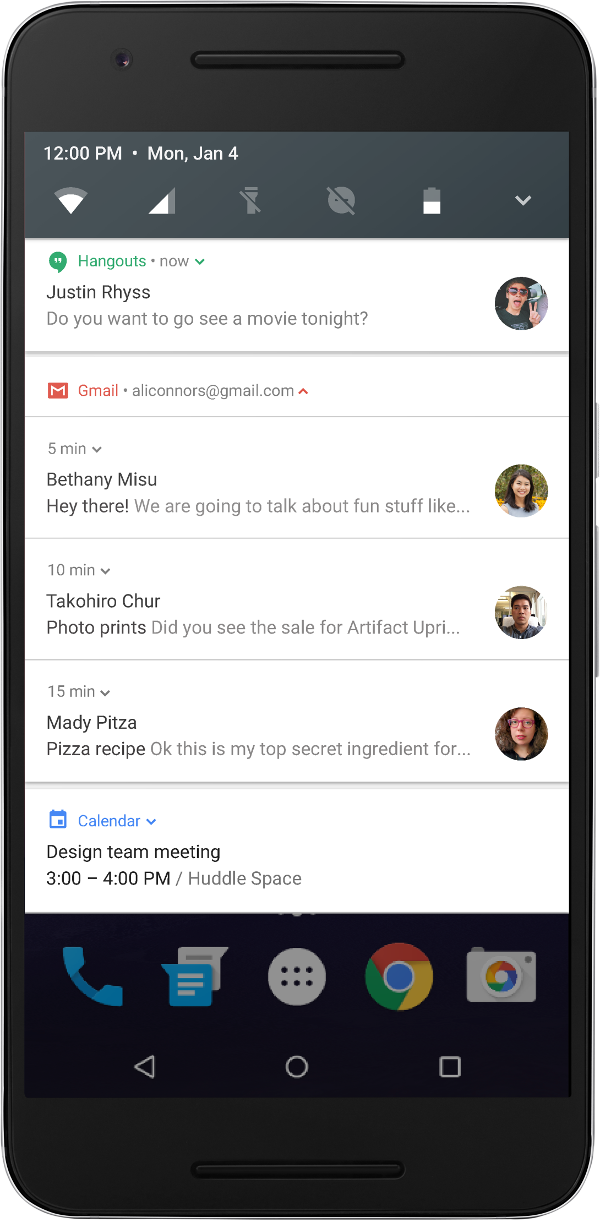
ЕБЩшБИДІгкЪЙгУзДЬЌЯТЃЈвбОНтЫјВЂЧвЦСФЛССзХЃЉЪБЃЌетжжЭЈжЊвдвЛИіаЁЕФИЁЖЏДАПкЕФаЮЪНГЪЯжГіРДЃЌОЭЯёЯТУцетбљЃК
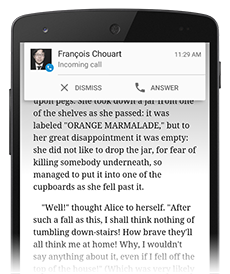
етИібљЪНПДЦ№РДЯёЪЧЖдЭЈжЊЕФвЛжжбЙЫѕЃЌЕЋЪЧHeads-up NotificationПЩвдАќКЌAction
ButtonЁЃгУЛЇПЩвдЕуЛїAction ButtonНјааЯргІЕФВйзїЃЌвВПЩвдНЋетИіЭЈжЊНчУцвЦГ§ЕєЕЋЪЧВЛРыПЊЕБЧАгІгУЁЃ
етЖдгкгУЛЇЬхбщРДЫЕЪЧвЛЯюЗЧГЃКУЕФИФНјЃЌЯЕЭГЕФРДЕчЭЈжЊОЭЪЧетжжаЮЪНЕФЭЈжЊЁЃдкЩшБИДІгкЪЙгУзДЬЌЯТЪБЃЌетжжЭЈжЊМШВЛЛсИЩШХгУЛЇЕБЧАЕФааЮЊЃЈПЩвджБНгНЋЭЈжЊНчУцвЦГ§ЕєЃЉЃЌгжЗНБуСЫгУЛЇЖдгкЭЈжЊЕФДІРэЃЈПЩвджБНгЕуЛїAction
ButtonРДДІРэЭЈжЊЃЉЁЃ
жЛвЊNotificationТњзуЯТУцЕФСНжжЧщПіЯТШЮКЮвЛжжЃЌОЭЛсВњЩњHeads-up NotificationЃК
NotificationЩшжУСЫfullScreenIntent
NotificationЪЧвЛИіHighгХЯШМЖЕФЭЈжЊВЂЧвЪЙгУСЫСхЩљЛђе№ЖЏ
ЫјЦСЩЯЕФNotification
ДгAndroid 5.0ПЊЪМЃЌЭЈжЊПЩвддкЫјЦСЩЯЯдЪОЁЃПЊЗЂепПЩвдРћгУетИіЬиадРДЪЕЯжУНЬхВЅЗХАДХЅЛђепЦфЫћГЃгУЕФВйзїЁЃЕЋЭЌЪБЃЌгУЛЇвВПЩвдЭЈЙ§ЩшжУРДОіЖЈЪЧЗёдкЫјЦСНчУцЩЯЯдЪОФГИігІгУЕФЭЈжЊЁЃ
ПЊЗЂепПЩвдЭЈЙ§Notification.Builder.setVisibility(int)ЗНЗЈРДПижЦЭЈжЊЯдЪОЕФЯъЯИМЖБ№ЁЃетИіЗНЗЈНгЪеШ§ИіМЖБ№ЕФПижЦЃК
VISIBILITY_PUBLIC ЯдЪОЭЈжЊЕФШЋВПФкШн
VISIBILITY_PRIVATE ЯдЪОЭЈжЊЕФЛљБОаХЯЂЃЌР§ШчЭЈжЊЕФiconКЭtitleЃЌЕЋЪЧВЛЯдЪОЯъЯИФкШн
VISIBILITY_SECRET ВЛЯдЪОЭЈжЊЕФШЮКЮФкШн
NotificationжБНгЛиИД
ДгAndroid 7.0ПЊЪМЃЌгУЛЇПЩвддкЭЈжЊНчУцЩЯНјаажБНгЛиИДЁЃжБНгЛиИДАДХЅИНМгдкЭЈжЊЕФЯТУцЁЃ
ЕБгУЛЇЭЈЙ§МќХЬЛиИДЪБЃЌЯЕЭГНЋгУЛЇЪфШыЕФЮФзжИНдкПЊЗЂепжИЖЈЕФIntentЩЯЃЌШЛКѓЗЂЫЭИјЖдгІЕФгІгУЁЃ
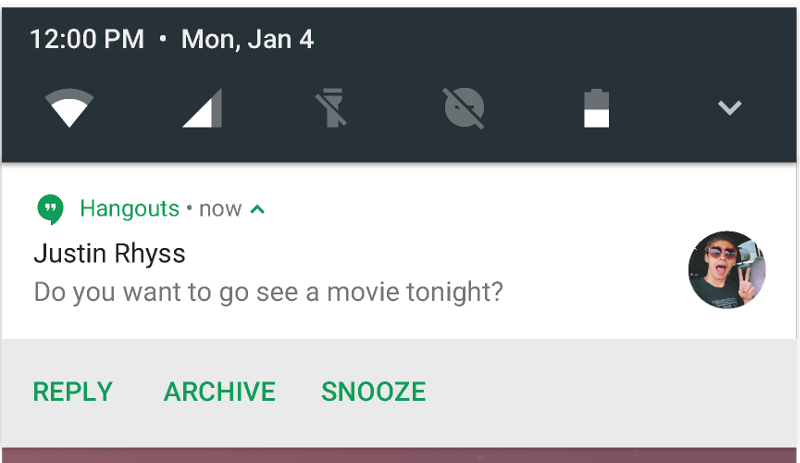
ДДНЈвЛИіАќКЌжБНгЛиИДАДХЅЕФЭЈжЊЗжЮЊЯТУцМИИіВНжшЃК
ДДНЈвЛИіPendingIntentЃЌетИіPendingIntentНЋдкгУЛЇЪфШыЭъГЩЕуЛїЗЂЫЭАДХЅжЎКѓДЅЗЂЁЃвђДЫЮвУЧашвЊЮЊетИіPendingIntentЩшжУвЛИіНгЪмепЃЌЮвУЧПЩвдЪЙгУвЛИіBroadcastReceiverРДНјааНгЪе
ДДНЈвЛИіRemoteInput.BuilderЖдЯѓЪЕР§ЃЌетИіРрЕФЙЙдьКЏЪ§НгЪевЛИізжЗћДЎзїЮЊKeyРДШУЯЕЭГЗХШыгУЛЇЪфШыЕФЮФзжЁЃдкНгЪеЗНЭЈЙ§етИіkeyРДЛёШЁЪфШы
ЭЈЙ§Notification.Action.Builder.addRemoteInput()ЗНЗЈНЋЕк1ВНДДНЈЕФRemoteInputЖдЯѓЬэМгЕНNotification.ActionЩЯ
ДДНЈвЛИіЭЈжЊАќКЌЧАУцДДНЈЕФNotification.ActionЃЌШЛКѓЗЂЫЭ
ЯрЙиДњТыЪОР§ШчЯТЃК
intent = new Intent(context,
NotificationBroadcastReceiver.class);
intent.setAction(REPLY_ACTION);
intent.putExtra(KEY_NOTIFICATION_ID, notificationId);
intent.putExtra(KEY_MESSAGE_ID, messageId);
PendingIntent replyPendingIntent = PendingIntent.getBroadcast(
getApplicationContext(), 100, intent,
PendingIntent.FLAG_UPDATE_CURRENT);
// Key for the string that's delivered in the
action's intent.
private static final String KEY_TEXT_REPLY =
"key_text_reply";
String replyLabel = getResources().getString(R.string.reply_label);
RemoteInput remoteInput = new RemoteInput.Builder(KEY_TEXT_REPLY)
.setLabel(replyLabel)
.build();
// Create the reply action and add the remote
input.
Notification.Action action =
new Notification.Action.Builder(R.drawable.ic_reply_icon,
getString(R.string.label), replyPendingIntent)
.addRemoteInput(remoteInput)
.build();
// Build the notification and add the action.
Notification newMessageNotification =
new Notification.Builder(mContext)
.setSmallIcon(R.drawable.ic_message)
.setContentTitle(getString(R.string.title))
.setContentText(getString(R.string.content))
.addAction(action)
.build();
// Issue the notification.
NotificationManager notificationManager =
(NotificationManager) this.getSystemService(NOTIFICATION_SERVICE);
notificationManager.notify(notificationId, newMessageNotification); |
ЕБгУЛЇЕуЛїЛиИДАДХЅЪБЃЌЯЕЭГЛсЬсЪОгУЛЇЪфШыЃК
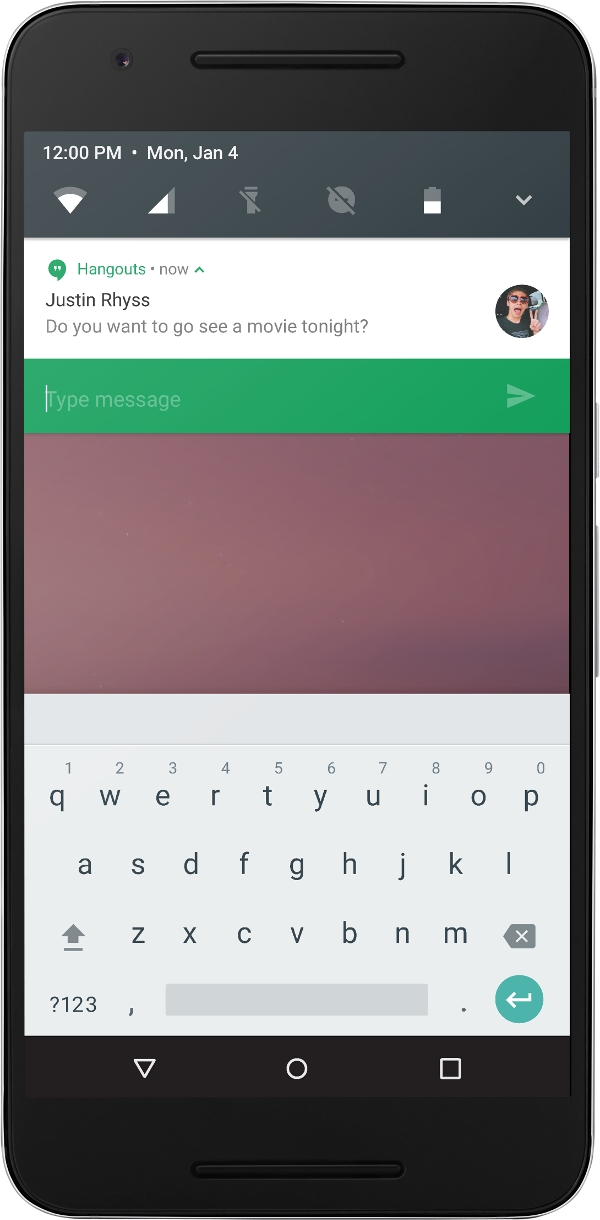
ЕБгУЛЇЪфШыЭъГЩВЂЕуЛїЗЂЫЭАДХЅжЎКѓЃЌЮвУЧЩшжУЕФreplyPendingIntentБЛЛсДЅЗЂЁЃЧАУцЮвУЧЩшжУСЫвЛИіBroadcastReceiverРДДІРэетИіIntentЃЌгкЪЧдкBroadcastReceiverжаПЩвдЭЈЙ§ЯТУцетбљЕФЗНЪНРДЛёШЁгУЛЇЪфШыЕФЮФБОЃК
private CharSequence
getReplyMessage(Intent intent) {
Bundle remoteInput = RemoteInput.getResultsFromIntent(intent);
if (remoteInput != null) {
return remoteInput.getCharSequence(KEY_REPLY);
}
return null;
}
public void onReceive(Context context, Intent
intent) {
if (REPLY_ACTION.equals(intent.getAction()))
{
CharSequence message = getReplyMessage(intent);
int messageId = intent.getIntExtra(KEY_MESSAGE_ID,
0);
Toast.makeText(context, "Message ID:
" + messageId + "\nMessage: "
+ message,
Toast.LENGTH_SHORT).show();
}
} |
етРяЛЙгаСНЕуашвЊПЊЗЂепзЂвтЕФЃК
гУЛЇЕуЛїЭъЗЂЫЭАДХЅжЎКѓЃЌИУАДХЅЛсБфГЩвЛИіа§зЊЕФбљЪНБэЪОетИіЖЏзїЛЙдкНјаажаЁЃПЊЗЂепашвЊжиаТЗЂЫЭвЛЬѕаТЕФЭЈжЊРДИќаТетИізДЬЌ
ЭЈЙ§BroadcastReceiverРДДІРэетИіЗЂЫЭЪТМўЕФЭЌЪБЃЌЧызЂвтНЋBroadcastReceiverдкAndroidManifest.xmlжаЕФХфжУЩшЮЊЃКandroid:exported=ЁБfalseЁБЁЃЗёдђШЮКЮгІгУЖМПЩвдЗЂЫЭвЛЬѕIntentРДДЅЗЂФуЕФBroadcastReceiverЃЌетПЩФмЖдФугІгУдьГЩЮЃКІЁЃ
Bundling Notifications
ДгAndroid 7.0ПЊЪМЃЌЯЕЭГЬсЙЉвЛИіаТЕФЗНЪНРДеЙЪОСЌајЕФЭЈжЊЃКBundling notificationsЁЃ
етжжеЙЪОЗНЪНЬиБ№ЪЪгУгкМДЪБЭЈбЖРргІгУЃЌвђЮЊетРргІгУЛсГжајВЛЖЯЕФЪеЕНаТЕФЯћЯЂВЂЗЂЫЭЭЈжЊЁЃетжжеЙЪОЗНЪНЪЧвдвЛжжВуДЮадЕФНсЙЙРДзщжЏЭЈжЊЁЃЖЅВПЪЧЯдЪОзщФкИХРРаХЯЂЕФЯћЯЂЃЌЕБгУЛЇНјвЛВНеЙПЊзщЕФЪБКђЃЌЯЕЭГЯдЪОзщФкЕФИќЖраХЯЂЁЃШчЯТЭМЫљЪОЃК
Notification.BuildРржаЬсЙЉСЫЯргІЕФAPIРДНјааетжжЭЈжЊбљЪНЕФЙмРэЃК
Notification.Builder.setGroup (String
groupKey) ЭЈЙ§groupKeyНЋЭЈжЊЙщЮЊвЛИізщ
Notification.Builder.set GroupSummary(boolean
isGroupSummary) ЕБisGroupSummary = trueЪББэЪОНЋИУЬѕЭЈжЊЩшЮЊзщФкЕФSummaryЭЈжЊ
Notification.Builder.setSortKey (String
sortKey) ЯЕЭГНЋИљОнетРяЩшжУЕФsortKeyНјааХХађ
Notification ЯћЯЂбљЪН
ДгAndroid 7.0ПЊЪМЃЌЯЕЭГЬсЙЉСЫMessagingStyle APIРДздЖЈвхЭЈжЊЕФбљЪНЁЃПЊЗЂепПЩвдздЖЈвхЭЈжЊЕФИїжжLabelЃЌАќРЈЃКЖдЛАTitleЃЌИНМгЯћЯЂвдМАЭЈжЊЕФContent
viewЕШЁЃЯТУцЪЧвЛЖЮДњТыЪОР§ЃК
Notification notification
= new Notification.Builder()
.setSmallIcon(R.drawable.ic_menu_camera)
.setStyle(new Notification.MessagingStyle("Me")
.setConversationTitle("Team lunch")
.addMessage("Hi", timestamp1, null)
// Pass in null for user.
.addMessage("What's up?", timestamp2,
"Coworker")
.addMessage("Not much", timestamp3,
null)
.addMessage("How about lunch?", timestamp4,
"Coworker"))
.build(); |
етЬѕЭЈжЊЯдЪОГіРДЪЧЯТУцетИібљзгЃК
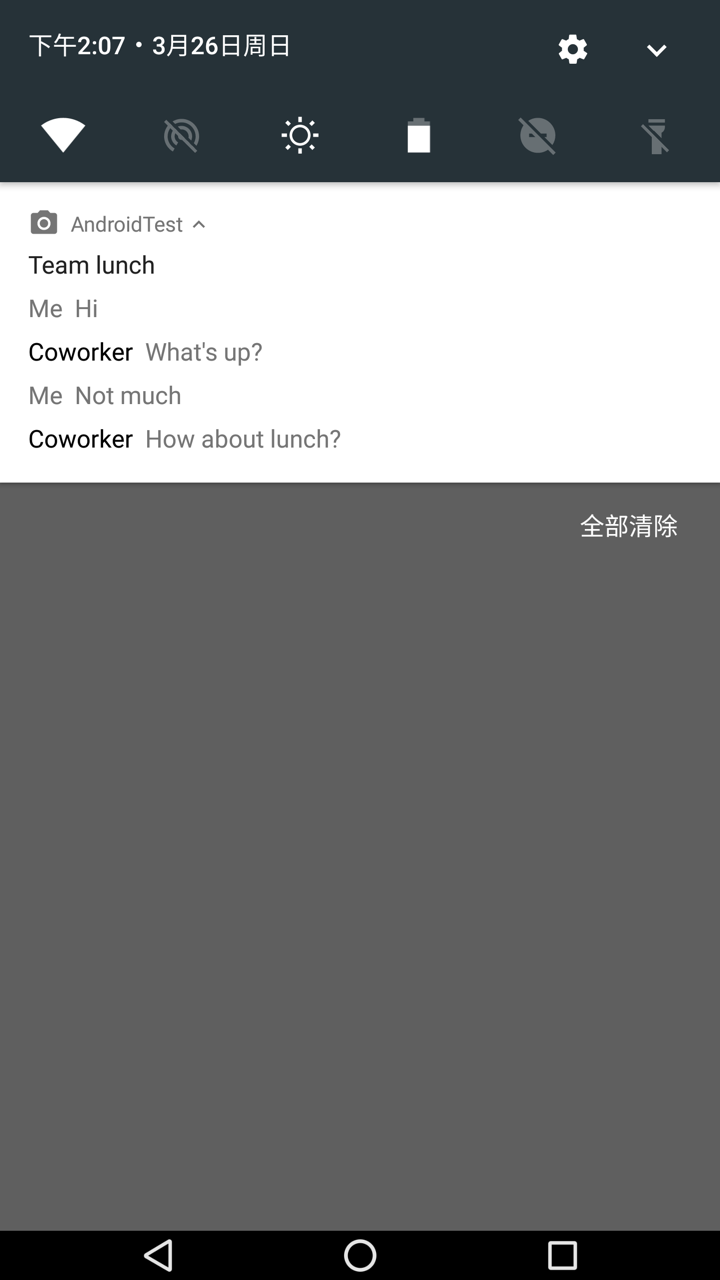
ЭЈжЊРИгыЭЈжЊДАПк
ЭтВПНчУц
ЭЈжЊРИЮЛгкзДЬЌРИжаЃЌдкзДЬЌРИЕФзѓВрЭЈЙ§вЛЯЕСагІгУЕФIconРДЯдЪОЭЈжЊЃК
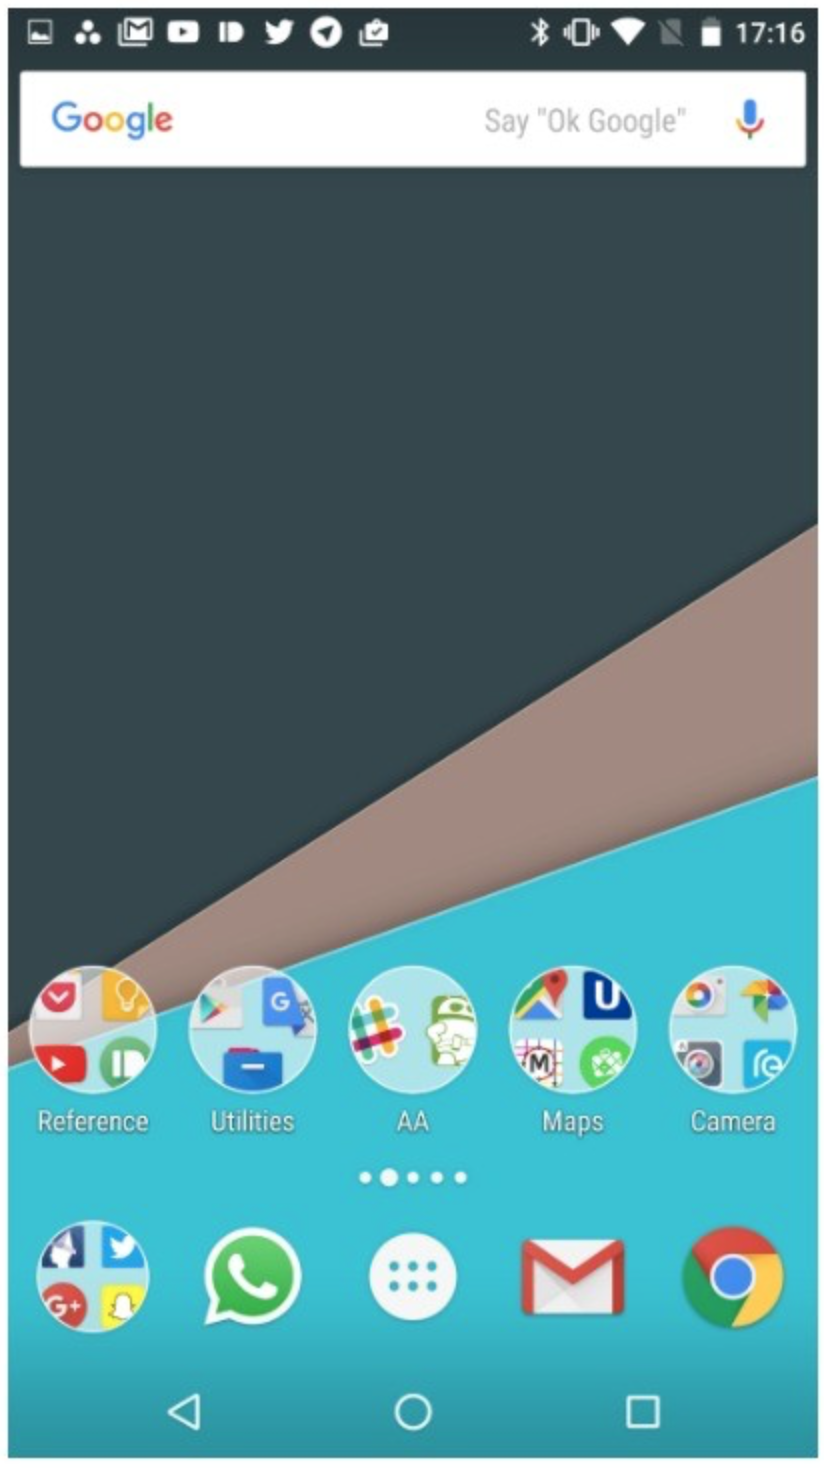
гУЛЇПЩвдЭЈЙ§ДгЦСФЛЩЯВрЯТЛЌЕФЗНЗЈеЙПЊЭЈжЊДАПкЃЌЭЈжЊДАПкЕФЩЯЗНЪЧQuick SettingsЧјгђЃЌЯТЗНЪЧЭЈжЊСаБэЁЃгУЛЇПЩвдеЙПЊQuick
SettingsЧјгђЁЃ
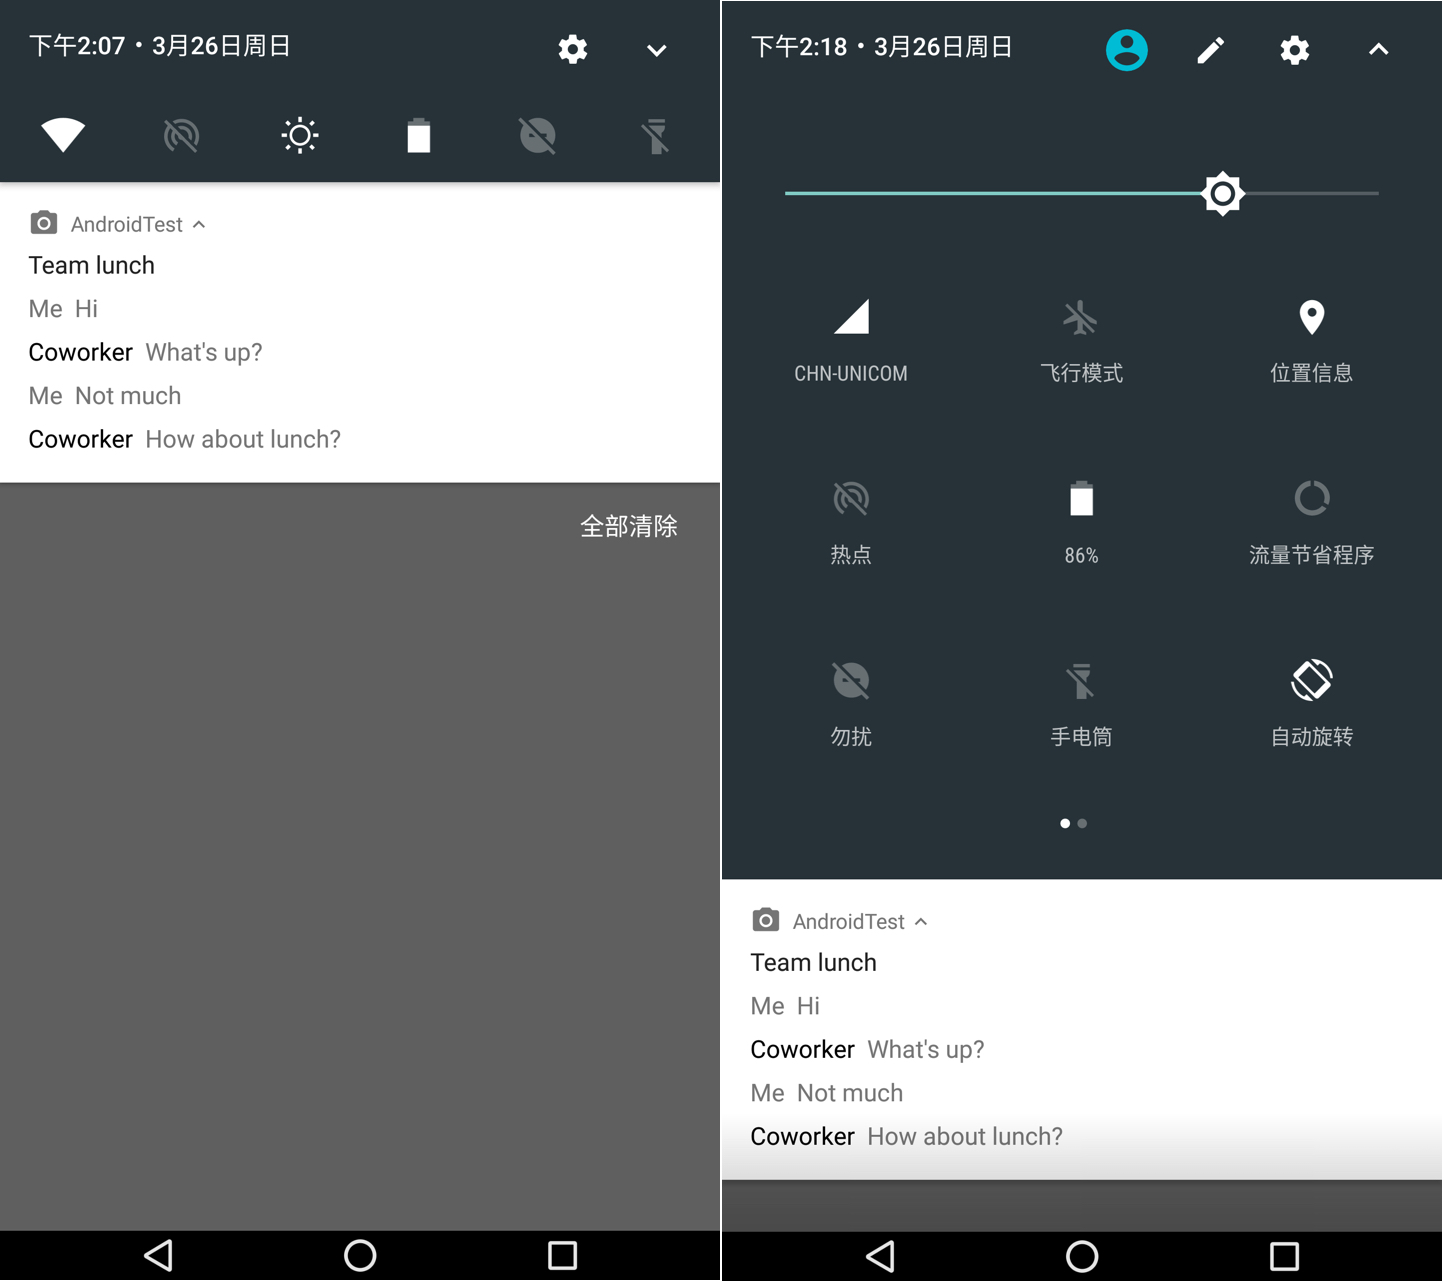
ФкВПЪЕЯж
дкСЫНтСЫЭЈжЊНчУцЕФЭтЙлжЎКѓЃЌЮвУЧОЭРДПДвЛЯТЯЕЭГЪЧШчКЮЪЕЯжетИіНчУцЕФЁЃ
дкSystemUIЕФЪЕЯжжаЃЌЭЈЙ§XMLВМОжЮФМўвдМАвЛЯЕСаздЖЈвхLayoutРрРДЙмРэЭЈжЊНчУцЁЃ
ећИіStatus BarЭЈЙ§super_status_bar.xmlЮФМўРДНјааВМОжЃЌетИіВМОжЮФМўЕФИљдЊЫиЪЧвЛИіздЖЈвхЕФFrameLayoutЃЌРрУћЪЧStatusBarWindowViewЁЃетИіВМОжЮФМўЕФНсЙЙШчЯТЭМЫљЪОЃК
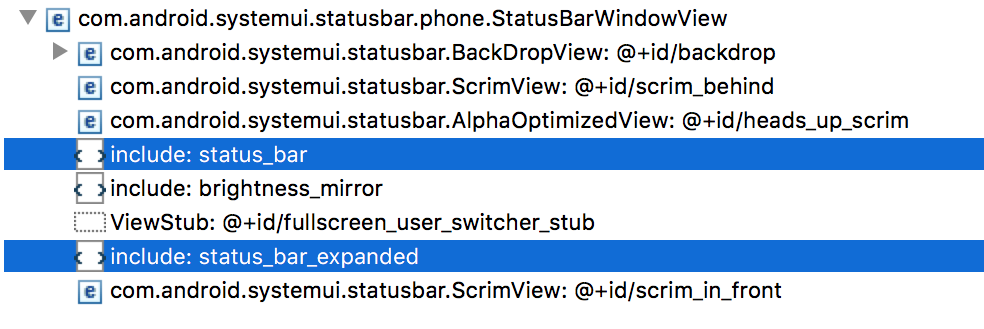
дкетРяЃЌЮвУЧжиЕувЊЙизЂЕФОЭЪЧбЁжаЕФСНааЃК
super_status_bar.xmlжаincludeСЫвЛИіУћГЦЮЊstatus_barЕФВМОжЮФМў
super_status_bar.xmlжаincludeСЫвЛИіУћГЦЮЊstatus_bar_expandedЕФВМОжЮФМў
етРяЕФstatus_barБуЪЧЯЕЭГзДЬЌРИЕФВМОжЮФМўЃЌstatus_bar_expandedБуЪЧЯТРЕФЭЈжЊДАПкЕФВМОжЮФМўЁЃ
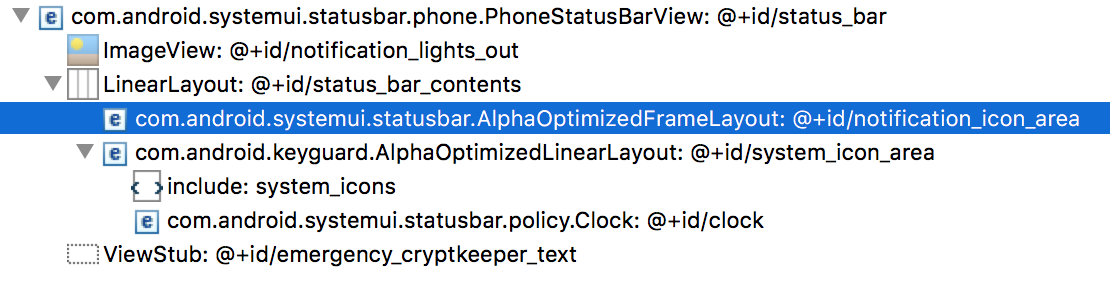
status_bar.xmlВМОжЮФМўНсЙЙШчЯТЭМЫљЪОЁЃетИіВМОжЮФМўЕФИљдЊЫиЪЧУћГЦЮЊPhoneStatusBarViewЕФздЖЈвхFrameLayoutРрЁЃ
ЖдееетИіВМОжЮФМўКЭЪжЛњЩЯЕФзДЬЌРИЃЌЮвЯраХЖСепгІИУКмШнвзРэНтСЫЃК
notification_icon_area е§ЪЧЯЕЭГЯдЪОЭЈжЊiconЕФЧјгђ
system_icon_area ЪЧЯдЪОЯЕЭГЭМБъЕФЧјгђЃЌР§ШчЃКWifiЃЌЕчЛАаХЯЂвдМАЕчГиЕШ
clock ЪЧзДЬЌРИЩЯЯдЪОЪБМфЕФЧјгђ
ЯТУцЮвУЧдйРДПДвЛЯТstatus_bar_expanded.xmlетИіВМОжЮФМўЕФНсЙЙЃЌетИіВМОжЮФМўЕФИљдЊЫиЪЧвЛИіУћГЦЮЊNotificationPanelViewЕФРрЃЌетИіРрЭЌбљЪЧвЛИіздЖЈвхЕФFrameLayoutЁЃ
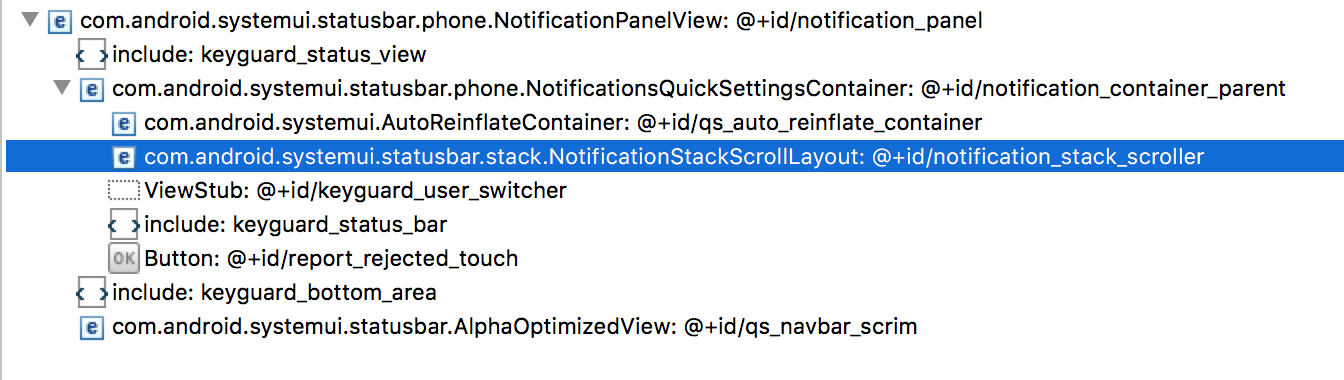
дкетИіВМОжЮФМўжаЃК
ЖЅВПЪЧвЛИіУћГЦЮЊkeyguard_status_viewЕФдЊЫиЁЃетИіБуЪЧИУНчУцЩЯЕФзДЬЌРИВМОжЁЃетИізДЬЌРИЯдЪОЕФФкШнКЭЭЈГЃЕФзДЬЌРИЕФФкШнЪЧгаЫљЧјБ№ЕФЃЌЖСепПЩвдЛиЕНЩЯУцЯргІЕФНиЭМЖдБШвЛЯТВЛЭЌГЁОАЯТзДЬЌРИЯдЪОЕФФкШн
qs_auto_reinflate_container ЪЧЯдЪОQuick SettingsЕФЧјгђЁЃетИіЧјгђЦфЪЕЪЧincludeСЫвЛИіСэЭтВМОжЮФМўЃКqs_panel.xml
notification_stack_scroller БуЪЧеце§ЯдЪОЭЈжЊСаБэЕФЕиЗНЃЌетЪЧвЛИіNotificationStackScrollLayoutРраЭЕФдЊЫиЁЃДгУћГЦЩЯЮвУЧОЭПЩвдПДГіЃЌетИідЊЫиЪЧПЩвдЙіЖЏЕФЃЌвђЮЊЭЈжЊЕФСаБэПЩФмЪЧКмГЄЕФЁЃ
ЩЯУцЮвжЛДѓИХНВНтСЫетаЉНчУцжазюжївЊЕФдЊЫиЃЌЖјЪЕМЪЩЯВМОжжаЛЙгаЗЧГЃЖрЕФЦфЫћдЊЫиЁЃетРяЮвУЧОЭВЛвЛвЛНВНтСЫЁЃЖСепПЩвдНшжњAndroid
StudioЩЯЕФLayout InspectorЙЄОпбЁдёcom.android.systemuiНјГЬЃЌШЛКѓбЁдёStatusBarРДЯъЯИЗжЮіИУНчУцЩЯЕФУПвЛИідЊЫиЃЌLayout
InspectorНчУцПДЦ№РДЯёЯТУцетбљЃК
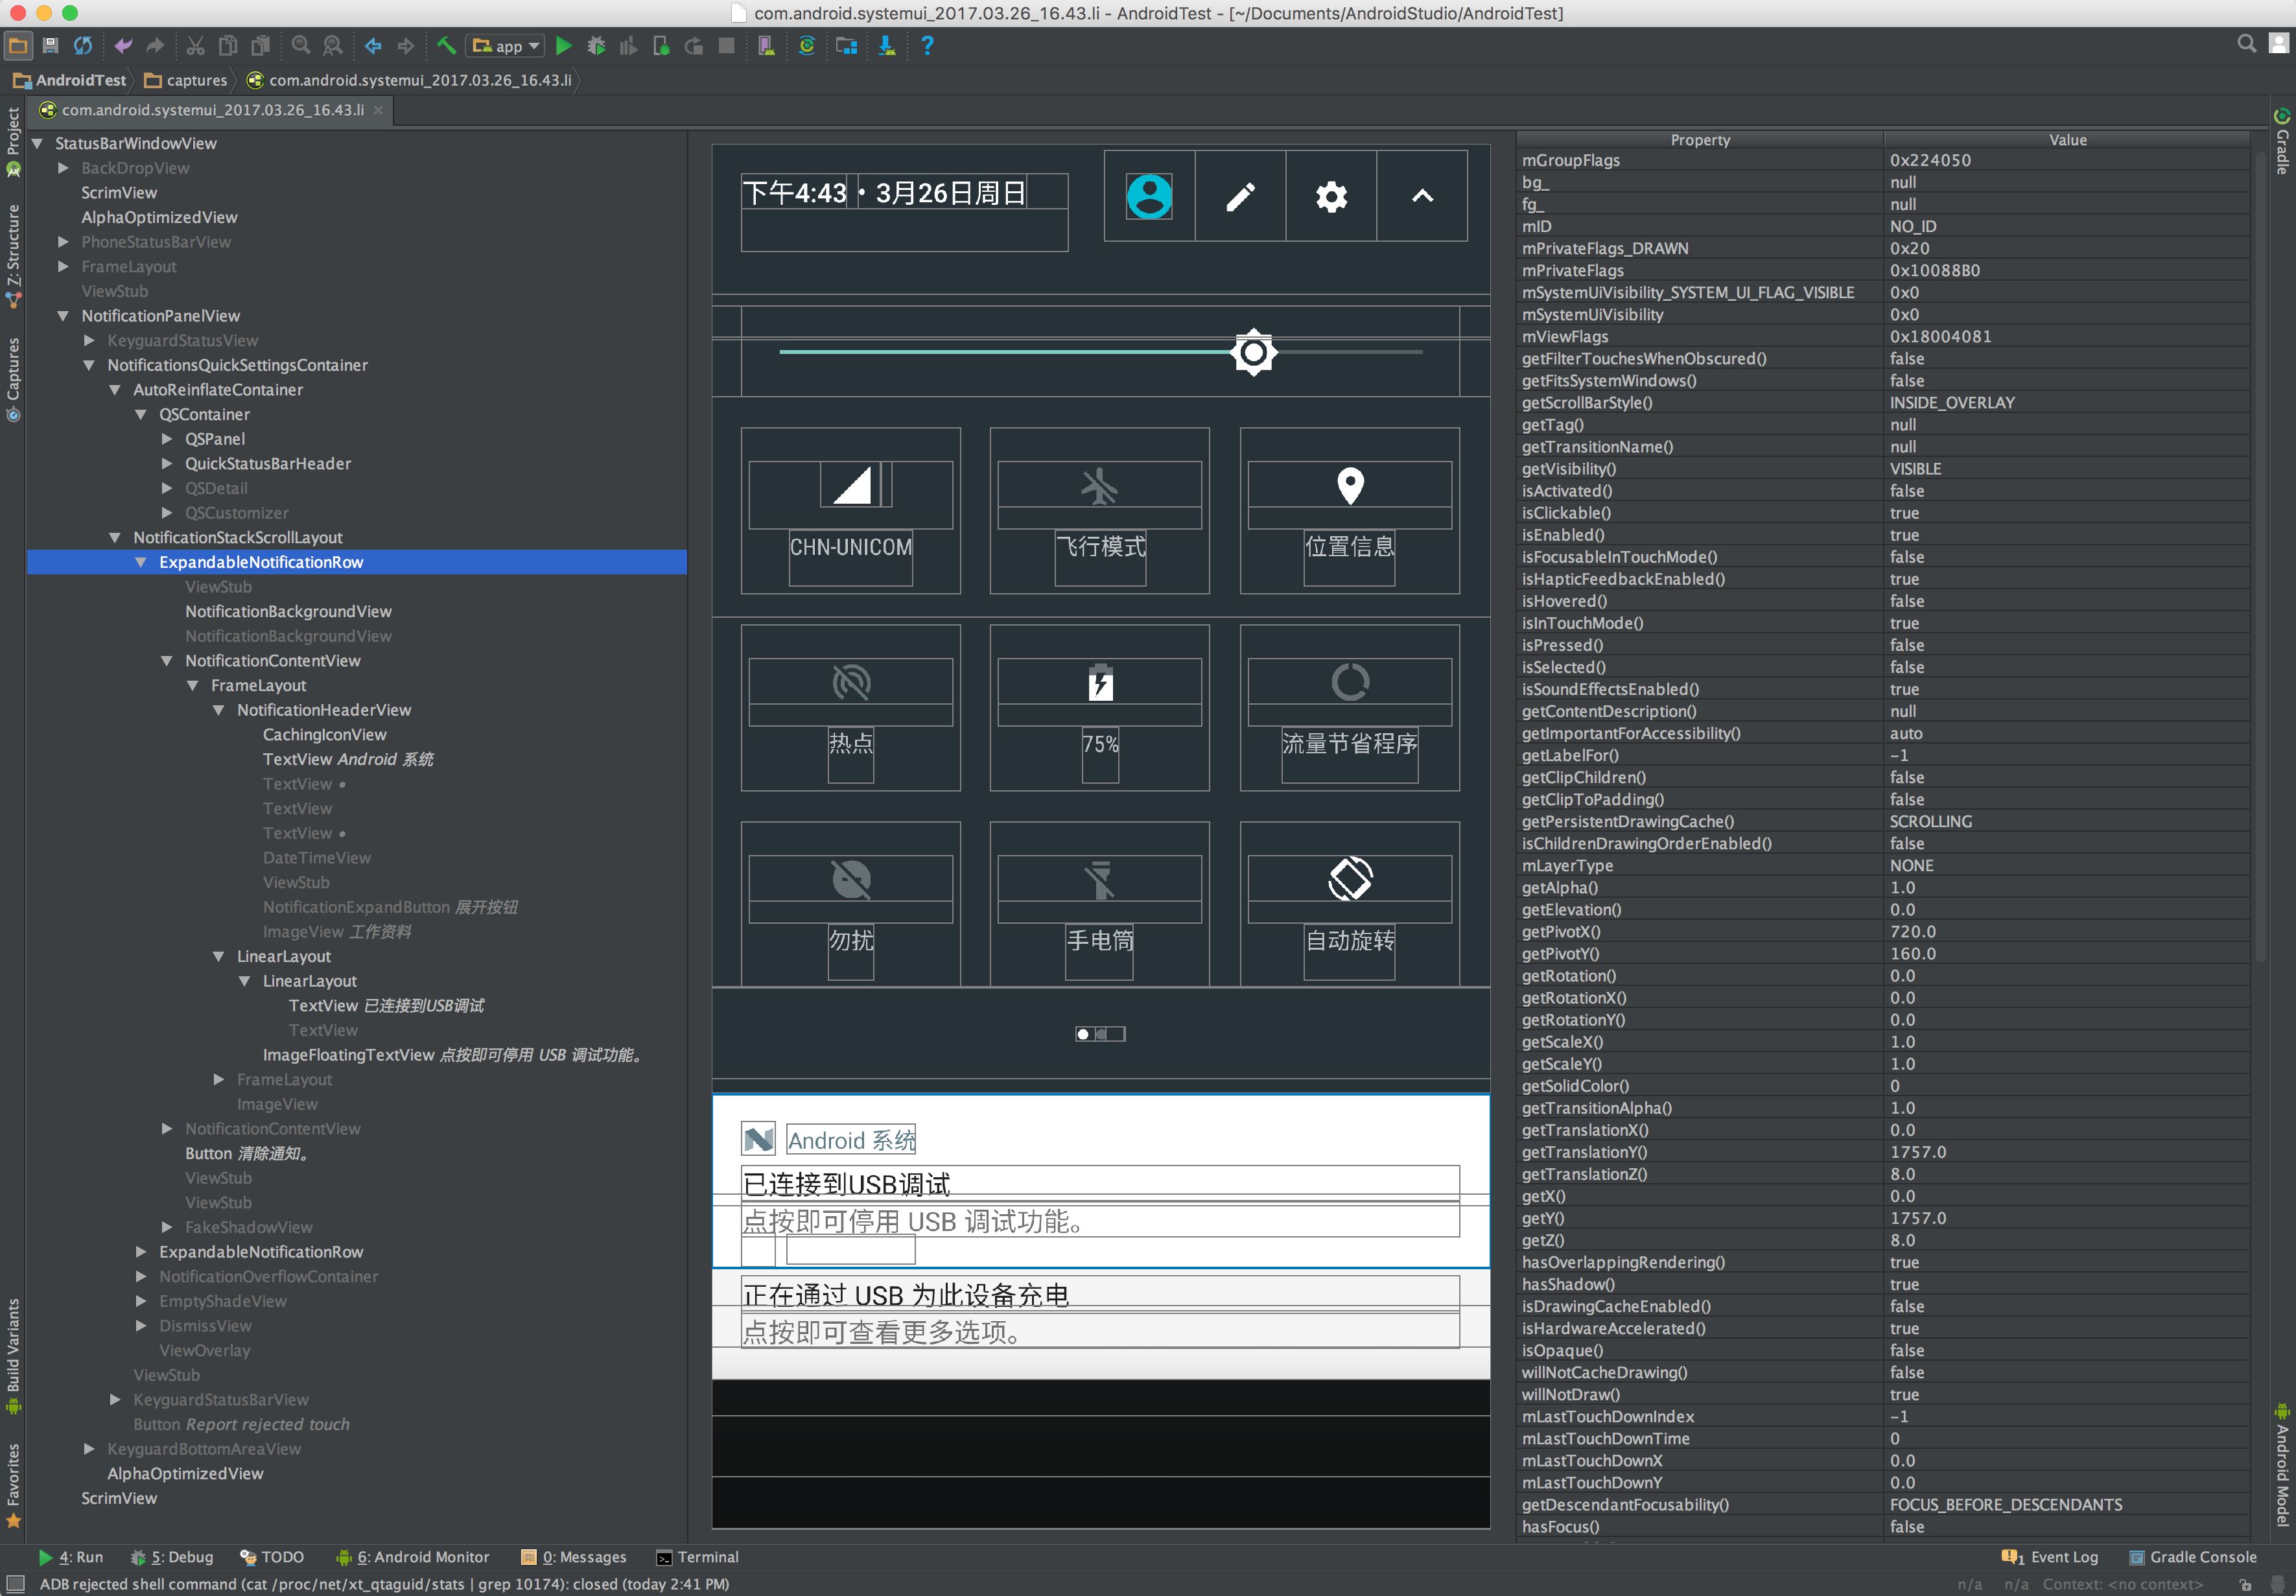
NotificationДгЗЂЫЭЕНЯдЪО
NotificationЕФЗЂЫЭ
гаСЫЩЯУцЭЈжЊНчУцВМОжЕФжЊЪЖжЎКѓЃЌЮвУЧдйПДвЛЯТЃЌгІгУГЬађжаЗЂЫЭЕФЭЈжЊЪЧШчКЮзюжеЯдЪОЕНЯЕЭГЕФЭЈжЊНчУцЩЯЕФЁЃ
ПЊЗЂепЭЈЙ§ДДНЈNotificationЖдЯѓРДЗЂЫЭЭЈжЊЁЃИУЖдЯѓжаМЧТМСЫвЛЬѕЭЈжЊЕФЫљгаЯъЯИаХЯЂЃЌNotificationРрЭМШчЯТЫљЪОЃК
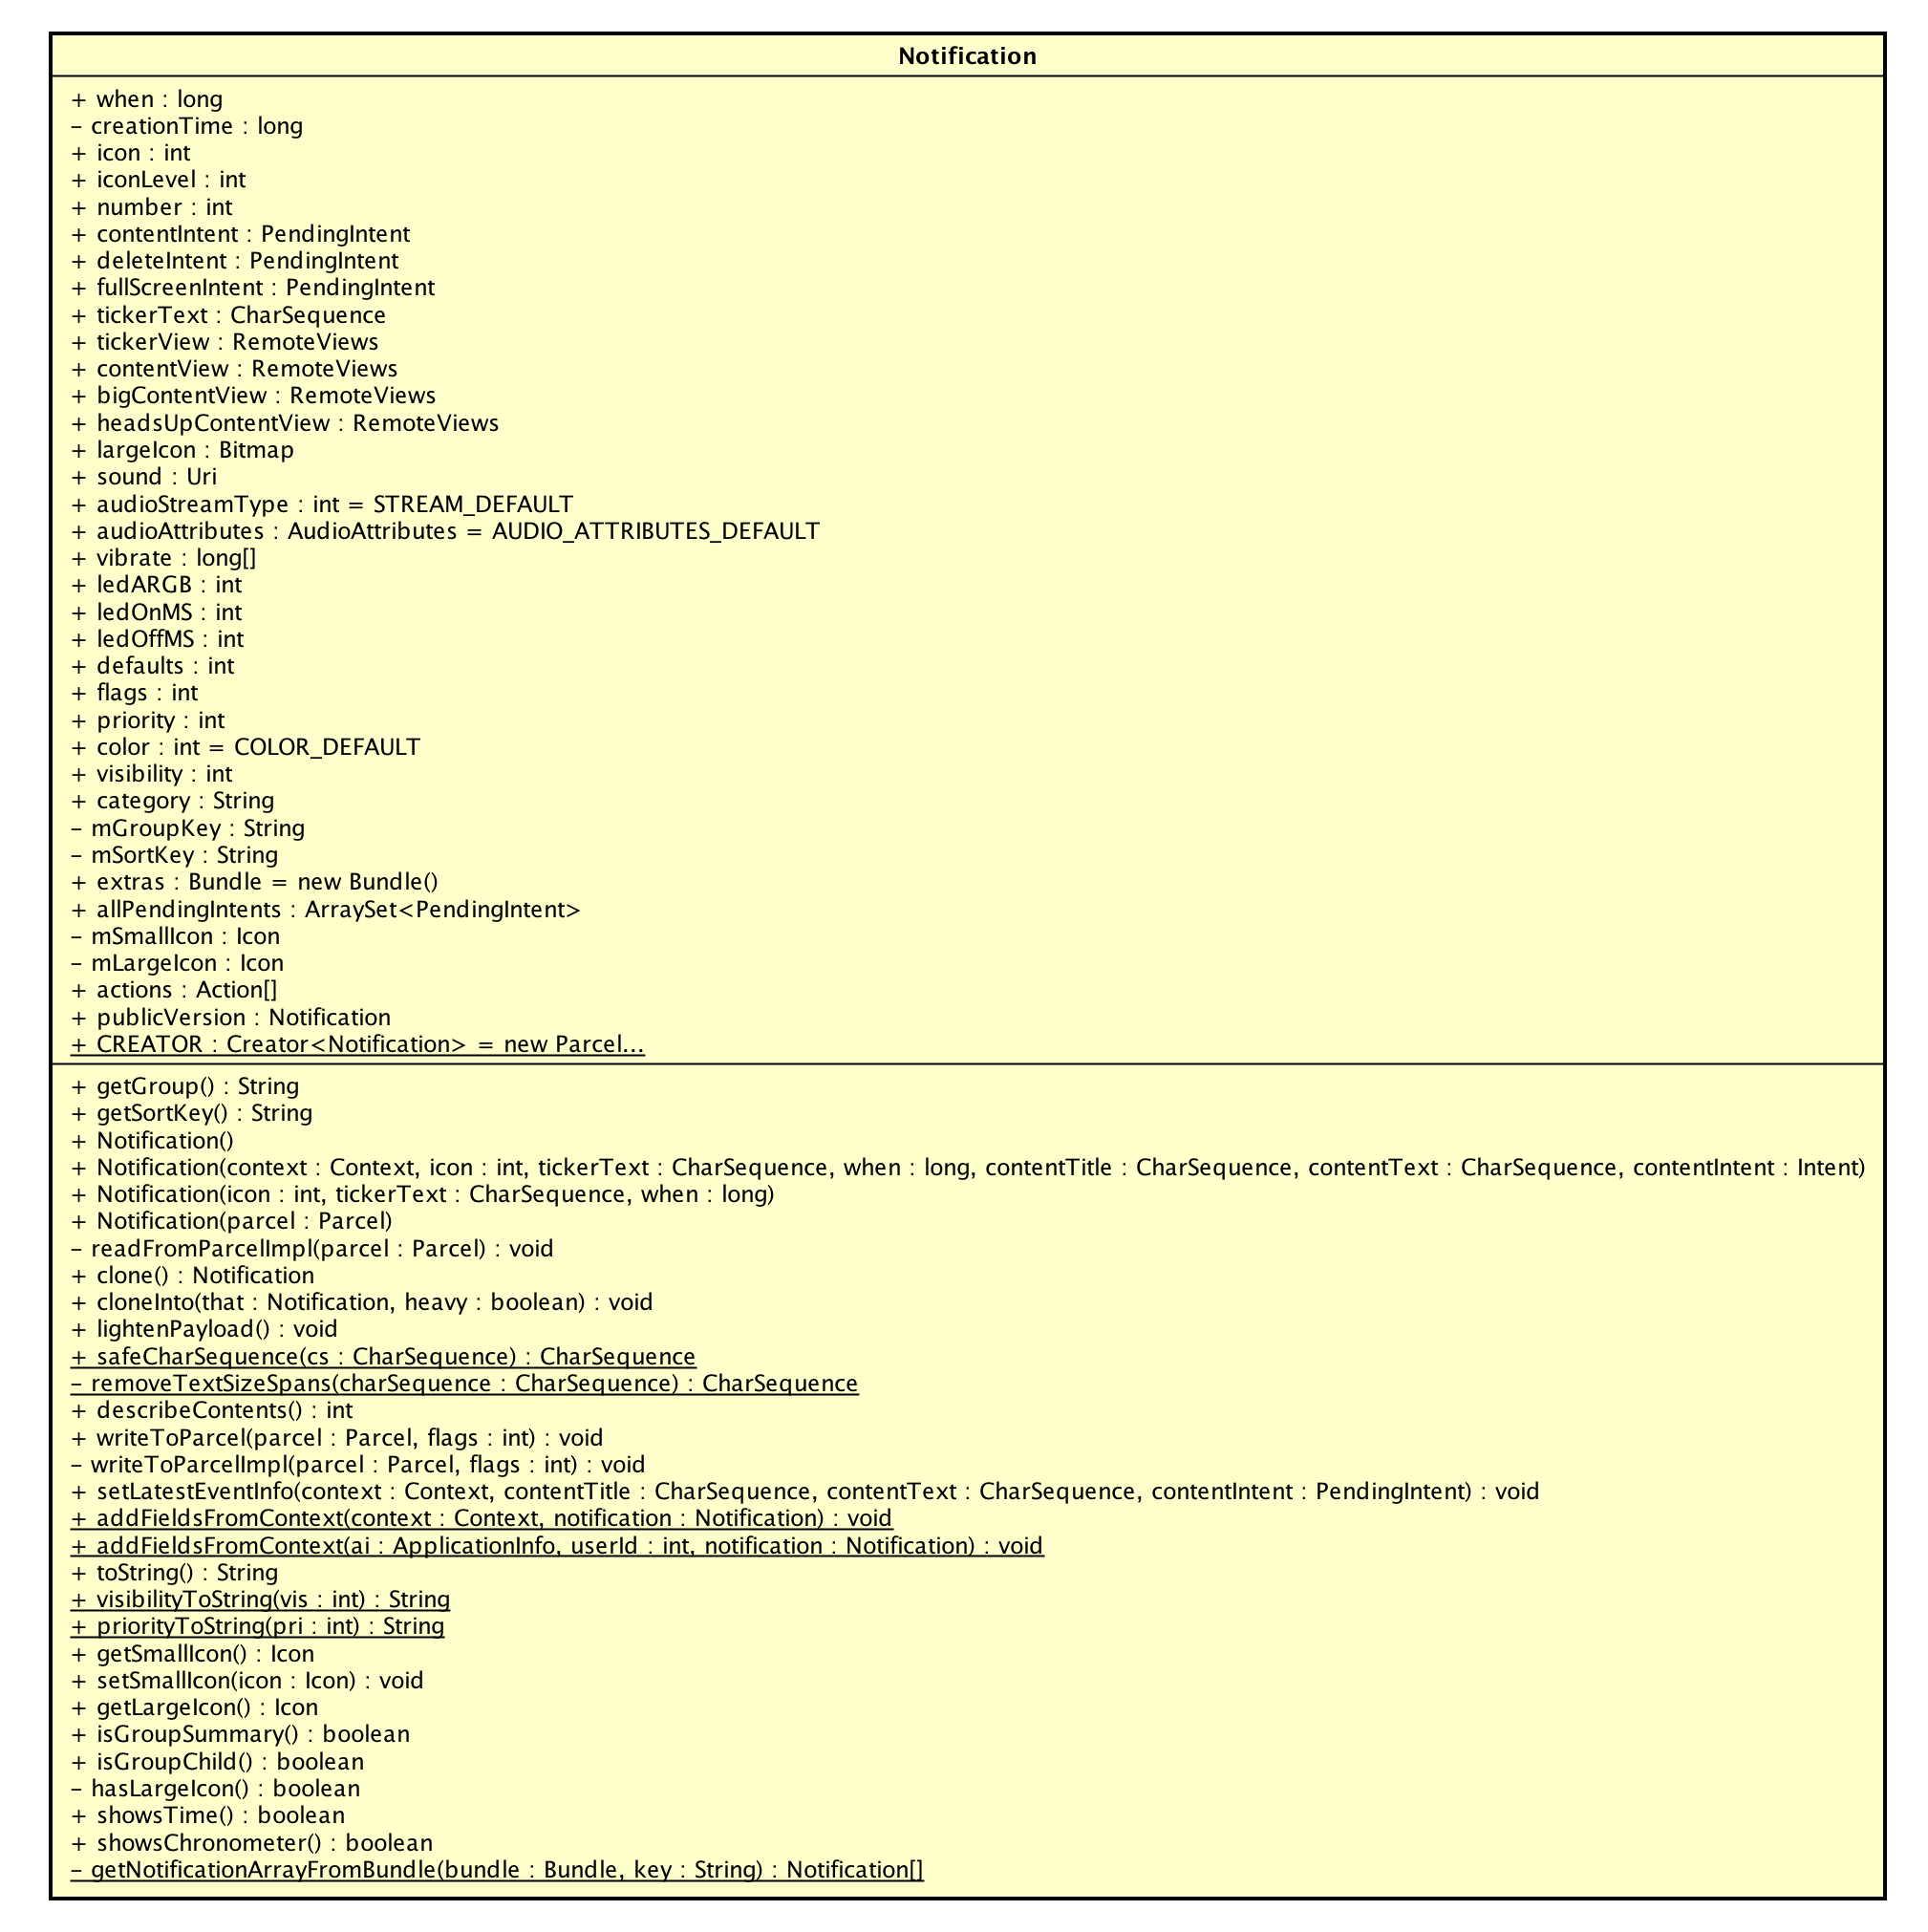
етРяЕФКмЖрзжЖЮЯраХПЊЗЂепЖМКмЪьЯЄЃЌвђЮЊетаЉзжЖЮЖМЪЧЮвУЧЗЂЫЭЭЈжЊЪБвЊЩшжУЕФЁЃетРяашвЊЫЕУїЕФЪЧBundle
extrasетИізжЖЮЁЃBundleвдМќжЕЖдЕФаЮЪНДцДЂСЫПЩвдЭЈЙ§IPCДЋЕнЕФвЛЯЕСаЪ§ОнЁЃЕБЮвУЧЭЈЙ§Notification.buidlerЙЙНЈNotificationЖдЯѓЪБЃЌгавЛаЉздЖЈвхбљЪНЕФжЕЖМЪЧДцдкетИіextrasзжЖЮжаЕФЃЌР§ШчЯТУцетаЉЃК
public Builder
setShowWhen(boolean show) {
mN.extras.putBoolean(EXTRA_SHOW_WHEN, show);
return this;
}
public Builder setSmallIcon(Icon icon) {
mN.setSmallIcon(icon);
if (icon != null && icon.getType() ==
Icon.TYPE_RESOURCE) {
mN.icon = icon.getResId();
}
return this;
}
public Builder setContentTitle(CharSequence
title) {
mN.extras.putCharSequence(EXTRA_TITLE, safeCharSequence(title));
return this;
}
public Builder setContentText(CharSequence text)
{
mN.extras.putCharSequence(EXTRA_TEXT, safeCharSequence(text));
return this;
}
public Builder setContentInfo(CharSequence info)
{
mN.extras.putCharSequence(EXTRA_INFO_TEXT, safeCharSequence(info));
return this;
}
public Builder setProgress(int max, int progress,
boolean indeterminate) {
mN.extras.putInt(EXTRA_PROGRESS, progress);
mN.extras.putInt(EXTRA_PROGRESS_MAX, max);
mN.extras.putBoolean(EXTRA_PROGRESS_INDETERMINATE,
indeterminate);
return this;
}
public Builder setStyle(Style style) {
if (mStyle != style) {
mStyle = style;
if (mStyle != null) {
mStyle.setBuilder(this);
mN.extras.putString(EXTRA_TEMPLATE, style.getClass().getName());
} else {
mN.extras.remove(EXTRA_TEMPLATE);
}
}
return this;
} |
NotificationРрЪЧвЛИіParcelableРрЃЌетвтЮЖзХЫќПЩвдЭЈЙ§BinderБЛПчНјГЬДЋЕнЁЃ
ЮвУЧЭЈГЃВЛЛсЪжЖЏДДНЈNotificationЃЌЖјЪЧЭЈЙ§Notification.BuilderРржаЕФsetXXXЗНЗЈЃЈЩЯУцвбОСаГіСЫвЛаЉЃЉРДДДНЈNotificationЁЃКмЯдШЛЃЌетИіNotification.BuilderРрЪЙгУЕФЪЧЕфаЭЕФBuilderЩшМЦФЃЪНЃЌЭЈЙ§етИіРрЃЌМђЛЏСЫЮвУЧДДНЈNotificationЕФЙ§ГЬЃЌЯТЭМЪЧNotification.BuilderРрЕФРрЭМЃК
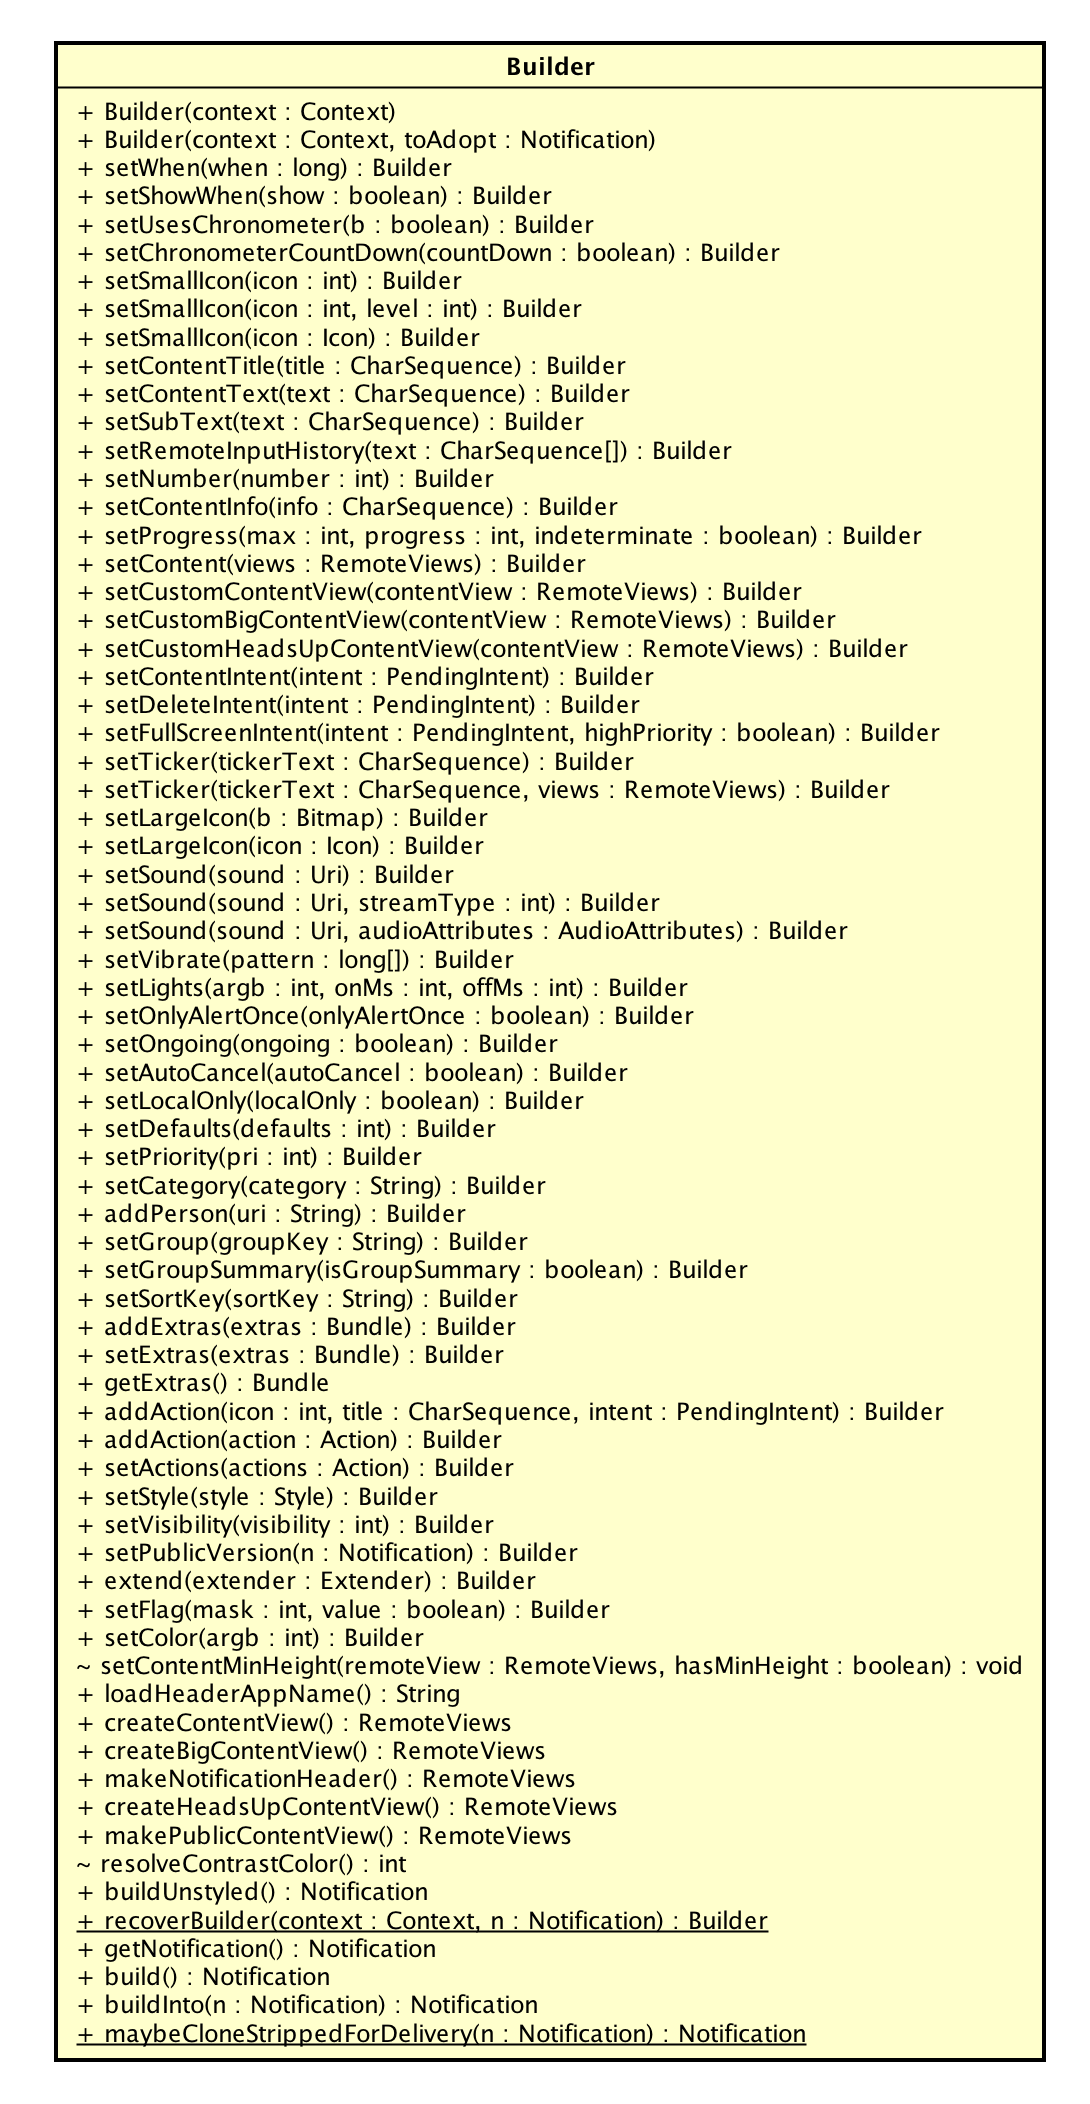
етИіРрЬсЙЉСЫЗЧГЃЖрЕФsetXXXЗНЗЈШУЮвУЧЩшжУNotificationЕФЪєадЃЌВЂЧветаЉЗНЗЈЛсЗЕЛиBuilderЖдЯѓБОЩэвдБуЮвУЧПЩвдСЌајЕїгУЁЃзюжеЃЌЮвУЧЭЈЙ§вЛИіbuildЗНЗЈЛёШЁЕНЙЙдьКУЕФNotificationЖдЯѓЁЃ
NotificationManagerService
дкЙЙдьКУСЫNotificationЖдЯѓжЎКѓЃЌЮвУЧЭЈЙ§NotificationManagerЕФpublic
void notify (int id, Notification notification)ЃЈМАЦфжидиЃЉЗНЗЈеце§НЋЭЈжЊЗЂЫЭГіШЅЁЃ
ЮвЯраХЖСепздШЛФмЯыЕНЃЌетИіNotificationManagerвЛЖЈвВЪЧЭЈЙ§BinderЪЕЯжЕФЁЃ
ШЗЪЕУЛДэЃЌеце§ЪЕЯжЭЈжЊЗЂЫЭЕФЗўЮёНазіNotificationManagerServiceЃЌетИіServiceЭЌбљЮЛгкsystem_serverНјГЬжаЁЃ
NotificationManagerДњБэСЫЗўЮёЕФПЭЛЇЖЫБЛгІгУГЬађЫљЪЙгУЃЌЖј
NotificationManagerServiceЮЛгкЯЕЭГНјГЬжаНгЪеКЭДІРэЧыЧѓЁЃ AndroidЯЕЭГжаДѓСПЕФЯЕЭГЗўЮёЖМЪЧетбљЕФЪЕЯжЬзТЗЁЃ
notifyНгПкзюжеЛсЕїгУЕНNotificationManagerжаЕФСэвЛИіНазіnotifyAsUserЕФНгПкРДЗЂЫЭЭЈжЊЃЌЦфЪЕЯжШчЯТЃК
public void
notifyAsUser (String tag, int id, Notification
notification, UserHandle user)
{
int[] idOut = new int[1];
INotificationManager service = getService(); Ђй
String pkg = mContext.getPackageName();
// Fix the notification as best we can.
Notification.addFieldsFromContext (mContext, notification);
Ђк
if (notification.sound != null) {
notification.sound = notification.sound.getCanonicalUri();
if (StrictMode.vmFileUriExposureEnabled()) {
notification.sound.checkFileUriExposed ("Notification.sound");
}
}
fixLegacySmallIcon(notification, pkg);
if (mContext.getApplicationInfo() .targetSdkVersion
> Build.VERSION_CODES.LOLLIPOP_MR1) {
if (notification.getSmallIcon() == null) {
throw new IllegalArgumentException ("Invalid
notification (no valid small icon): "
+ notification); Ђл
}
}
if (localLOGV) Log.v(TAG, pkg + ": notify("
+ id + ", " + notification + ")");
final Notification copy = Builder.maybeCloneStrippedForDelivery (notification);
try {
service.enqueueNotificationWithTag (pkg, mContext.getOpPackageName(),
tag, id,
copy, idOut, user.getIdentifier()); Ђм
if (localLOGV && id != idOut[0]) {
Log.v(TAG, "notify: id corrupted: sent "
+ id + ", got back " + idOut[0]);
}
} catch (RemoteException e) {
throw e.rethrowFromSystemServer();
}
} |
етЖЮДњТыЫЕУїШчЯТЃК
ЭЈЙ§getServiceЗНЗЈЛёШЁNotificationManagerServiceЕФдЖГЬЗўЮёНгПкЃЌgetServiceЗНЗЈЕФЪЕЯжЦфЪЕОЭЪЧЭЈЙ§ServiceManagerФУЕНNotificationManagerServiceЕФBinderЖдЯѓ
ЭЈЙ§mContextЮЊNotificationЬэМгвЛаЉИНМгЪєадЃЌетРяЕФmContextДњБэСЫЕїгУЗЂЫЭЭЈжЊНгПкЕФContextЃЌЯЕЭГЗўЮёжаЛсЭЈЙ§етИіContextРДШЗЖЈЪЧЫдкЪЙгУЗўЮё
дкLOLLIPOP_MR1жЎЩЯЕФАцБОЃЈAPI Level 22ЃЉЩЯЃЌЗЂЫЭЭЈжЊБиаыЩшжУSmall IconЃЌЗёдђжБНгХзГівьГЃ
ЕїгУNotificationManagerServiceЕФдЖГЬНгПкРДеце§НјааЭЈжЊЕФЗЂЫЭ
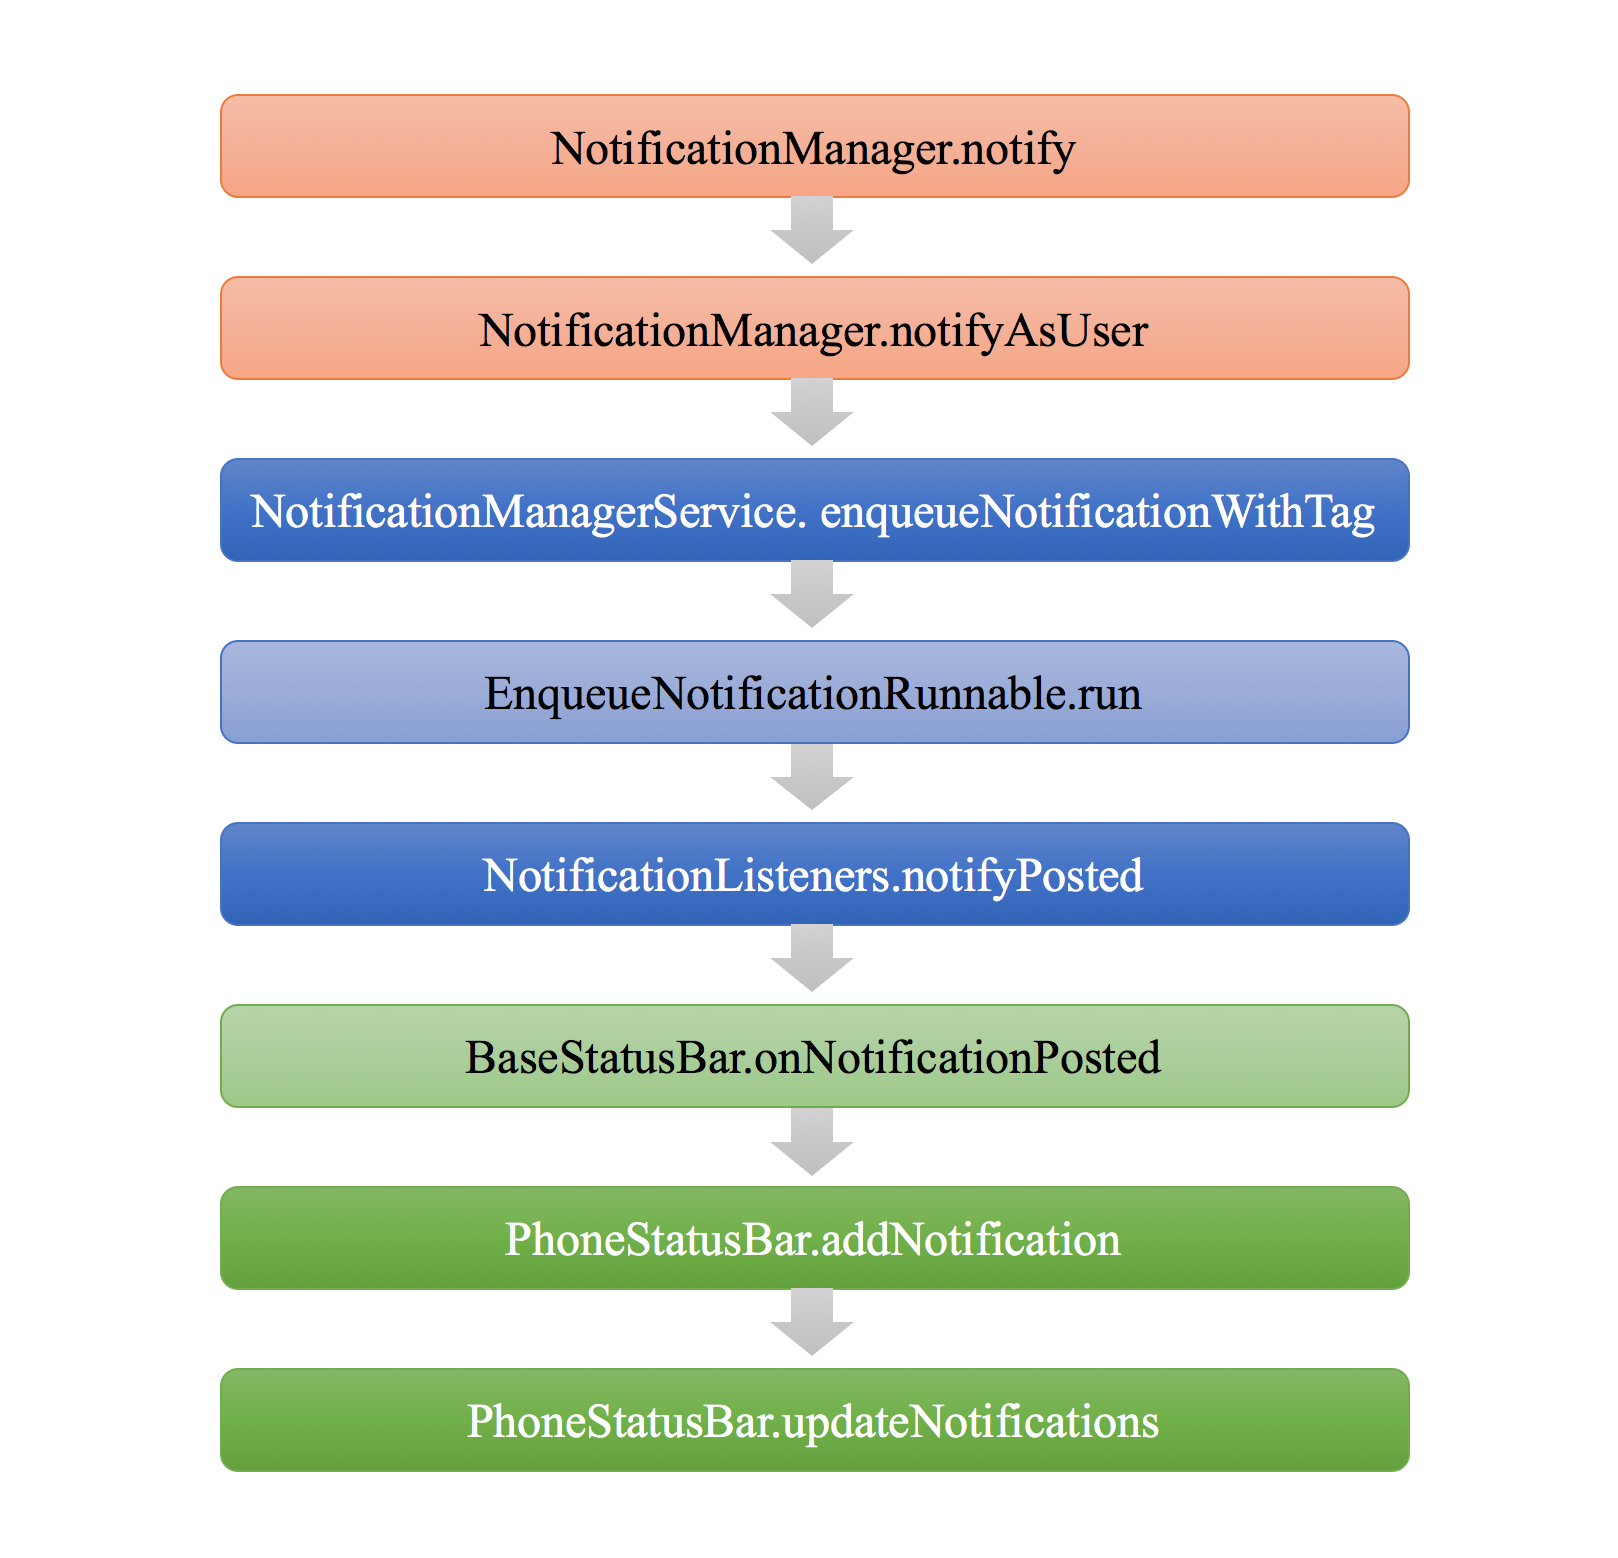
НгЯТРДЮвУЧвЊЙизЂЕФздШЛЪЧNotificationManagerService. enqueueNotificationWithTagЗНЗЈЕФЪЕЯжЁЃ
NotificationManagerServiceЯрЙиДњТыЮЛгквдЯТТЗОЖЃК/frameworks/ base/services/core/java/com/android/server/notification/
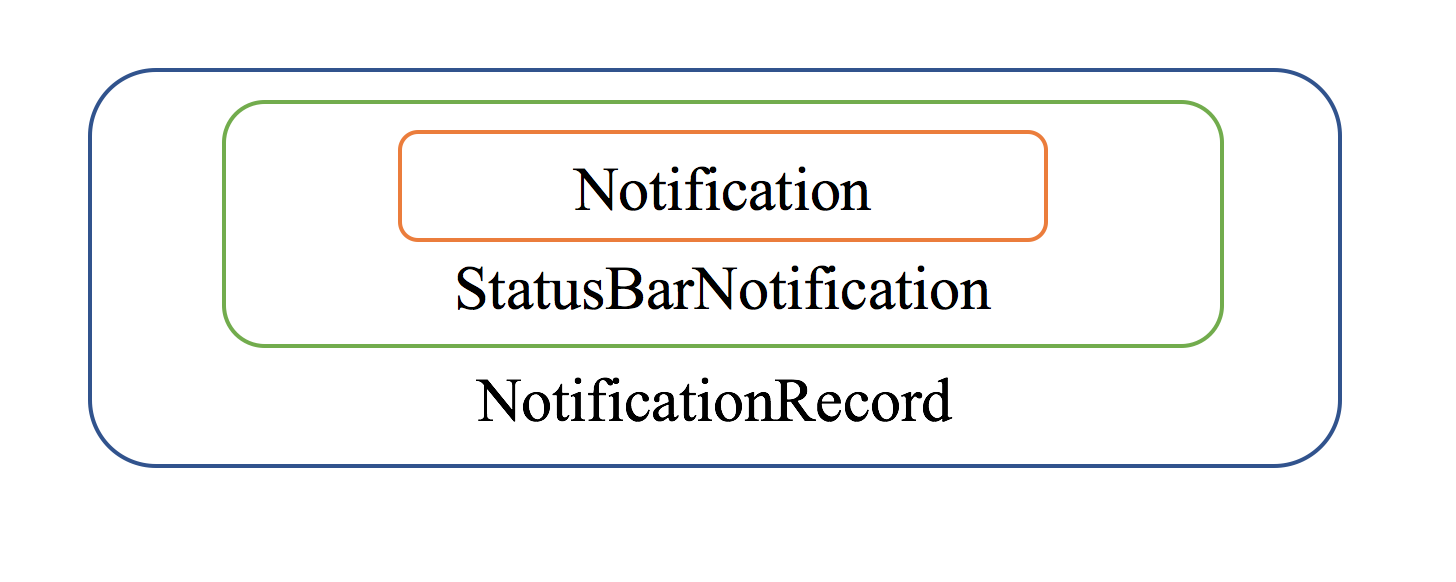
дкNotificationManagerService. enqueueNotificationWithTagЗНЗЈжаЃЌЛсНЋгУЛЇЗЂЫЭЙ§РДЕФNotificationЖдЯѓАќзАдквЛИіStatusBarNotificationЖдЯѓжаЃК
final StatusBarNotification
n = new StatusBarNotification(
pkg, opPkg, id, tag, callingUid, callingPid, 0,
notification,
user); |
ШЛКѓгжНЋStatusBarNotificationАќзАдкNotificationRecordЖдЯѓжаЃК
| final NotificationRecord
r = new NotificationRecord(getContext(), n); |
StatusBarNotificationЙЙдьКЏЪ§жаЕФЦфЫћВЮЪ§ЃЌУшЪіСЫЗЂЫЭЭЈжЊЕФЕїгУепЕФЩэЗнЃЌАќРЈЃКАќУћЃЌЕїгУепЕФuidЃЌpidЕШЕШЁЃетИіЩэЗнЕФзїгУЪЧЃКЯЕЭГПЩвдеыЖдЕїгУепЩэЗнЕФВЛЭЌзіВЛЭЌЕФДІРэЁЃР§ШчЃКгУЛЇПЩФмЙиБеСЫФГаЉгІгУЕФЭЈжЊЯдЪОЃЌЯЕЭГЭЈЙ§ЕїгУепЕФЩэЗнБуПЩвдШЗЖЈетИігІгУЕФЭЈжЊЪЧЗёашвЊЯдЪОдкЭЈжЊНчУцЩЯЁЃ
ЖјПДЕНNotificationRecordЃЌЖСепгІИУКмздШЛФмЯыЕНActivityManagerServiceжаЕФActivityRecordЃЌProcessRecordЕШНсЙЙЁЃетаЉЖМЪЧЯЕЭГЗўЮёжагУРДУшЪігІгУГЬађжаЖдЯѓЕФЖдгІНсЙЙЁЃ
ЯТЭМУшЪіСЫЩЯУцШ§жжНсЙЙЕФАќКЌЙиЯЕЃК
ЯЕЭГдкДДНЈNotificationRecordЖдЯѓжЎКѓЃЌЛсPostвЛИіRunnableЕФTaskНјааЭЈжЊЕФЗЂЫЭЃК
final NotificationRecord
r = new NotificationRecord(getContext(), n);
mHandler.post(new EnqueueNotificationRunnable(userId,
r)); |
дкEnqueueNotificationRunnableжаЃЌашвЊзіЯТУцМИМўЪТЧщЃК
ДІРэЭЈжЊЕФЗжзщ
МьВщИУЭЈжЊЪЧЗёвбОБЛзшжЙЃЈЭЈЙ§ЕїгУепЕФЩэЗнЃКАќУћМАuidЃЉ
ЖдЭЈжЊНјааХХађ
ХаЖЯЖдвбгаЭЈжЊИќаТЃЌЛЙЪЧЗЂЫЭвЛЬѕаТЕФЭЈжЊ
ЕїгУNotificationListeners.notifyPostedLocked
ШчЙћашвЊЃКДІРэЩљвєКЭе№ЖЏ
етРяжЛгаNotificationListeners.notifyPostedLockedашвЊЫЕУївЛЯТЁЃ
вЛЬѕЭЈжЊЗЂЫЭЕНЯЕЭГжЎКѓЃЌЯЕЭГжаПЩФмЛсгаКмЖрФЃПщЛсЖдЦфИааЫШЄЃЈзюЛљБОЕФЃЌЛсгаФЃПщвЊНЋетИіЭЈжЊЯдЪОдкЭЈжЊНчУцЩЯЃЉЁЃЗЂЫЭЭЈжЊЪЧвЛИіЪТМўЃЌДІРэЭЈжЊЪЧвЛИіЯьгІЃЌЕБЪТМўЕФЯьгІепПЩФмВЛжЙвЛИіЕФЪБКђЃЌЮЊСЫДяЕННтёюетСНепжЎМфЕФЙиЯЕЃЌКмздШЛЕФЛсЪЙгУЮвУЧГЃМћЕФМрЬ§ЦїФЃаЭЃЈЛђепНазіЃКObserverЩшМЦФЃЪНЃЉЁЃ
ЯЕЭГжаЃЌЖдгкЭЈжЊИааЫШЄЕФМрЬ§ЦїЭЈЙ§NotificationListenerServiceРрРДБэДяЁЃЖјетРяЕФNotificationListeners.notifyPostedLockedБуЪЧЖдЫљгаЕФNotificationListenerServiceНјааЛиЕїЭЈжЊЁЃ
етЦфжагавЛИізюживЊЕФNotificationListenerServiceОЭЪЧBaseStatusBarЁЃвђЮЊЫќОЭЪЧИКд№НЋЭЈжЊЯдЪОдкЭЈжЊНчУцЩЯЕФМрЬ§ЦїЁЃ
NotificationЕФЯдЪО
BaseStatusBarжаЖдгкЭЈжЊЗЂЫЭЕФЛиЕїТпМШчЯТЃК
public void
onNotificationPosted(final StatusBarNotification
sbn,
final RankingMap rankingMap) {
if (DEBUG) Log.d(TAG, "onNotificationPosted:
" + sbn);
if (sbn != null) {
mHandler.post(new Runnable() {
@Override
public void run() {
processForRemoteInput(sbn.getNotification());
String key = sbn.getKey(); Ђй
mKeysKeptForRemoteInput.remove(key);
boolean isUpdate = mNotificationData.get(key)
!= null; Ђк
if (!ENABLE_CHILD_NOTIFICATIONS
&&
mGroupManager.isChildInGroupWithSummary(sbn))
{
if (DEBUG) {
Log.d(TAG, "Ignoring group child due to existing
summary: " + sbn);
}
// Remove existing notification to avoid stale
data.
if (isUpdate) {
removeNotification(key, rankingMap); Ђл
} else {
mNotificationData.updateRanking(rankingMap);
}
return;
}
if (isUpdate) {
updateNotification(sbn, rankingMap);
} else {
addNotification(sbn, rankingMap, null /* oldEntry
*/); Ђм
}
}
});
}
} |
етЖЮДњТыЕФЫЕУїШчЯТЃК
УПИіStatusBarNotificationЖдЯѓЖМгавЛИіKeyжЕЃЌетИіжЕИљОнЕїгУепЕФЩэЗнвдМАЕїгУепЩшжУЕФЭЈжЊidЩњГЩЁЃЕБгІгУГЬађЭЈЙ§ЭЌвЛИіЭЈжЊidЗЂЫЭСЫЖрДЮЭЈжЊЃЌетаЉЭЈжЊЕФKeyжЕЪЧвЛбљЕФЃЌгЩДЫПЩвдЖдЭЈжЊНјааИќаТ
mNotificationDataЃЈРраЭЮЊNotificationDataЃЉжаМЧТМСЫЯЕЭГЫљгаЕФЭЈжЊСаБэ
ШчЙћЪЧвЛИівбОДцдкЕФЭЈжЊашвЊИќаТЃЌдђЯШНЋДцдкЕФЭЈжЊЩОГ§
addNotificationЪЧвЛИіГщЯѓЗНЗЈЃЌгЩзгРрЪЕЯж
дкЪжЛњЩшБИЩЯЃЌaddNotificationетИіЗНЗЈздШЛЪЧгЩPhoneStatusBarРДЪЕЯжЁЃдкaddNotificationЗНЗЈжаЃЌЛсЕїгУupdateNotificationsЗНЗЈРДзюжеНЋЭЈжЊЯдЪОдкЭЈжЊНчУцЩЯЃЌЦфДњТыШчЯТЫљЪОЃК
protected void
updateNotifications() {
mNotificationData.filterAndSort();
updateNotificationShade();
mIconController.updateNotificationIcons(mNotificationData);
} |
етРяЕФupdateNotificationShadeЗНЗЈБуЪЧНЋЭЈжЊЕФЯдЪОФкШнЬэМгЕНЭЈжЊУцАхЕФЯдЪОЧјгђЃКNotificationStackScrollLayoutжаЁЃЖјmIconController.updateNotificationIcons
(mNotificationData)дђЪЧдкnotification_icon_areaЧјгђЬэМгЭЈжЊIconЁЃ
updateNotificationShadeДњТыБШНЯГЄЃЌЕЋЪЧТпМЪЧБШНЯКУРэНтЕФЁЃжїЬхТпМОЭЪЧЖдУПвЛИіашвЊЯдЪОЕФЭЈжЊДДНЈвЛИіExpandableNotificationRowЃЌШЛКѓЩшжУЖдгІЕФФкШнВЂЬэМгЕНNotificationStackScrollLayout(mStackScrollerЖдЯѓ)жаЁЃ
фЏРРвЛЯТетЖЮДњТыБуПЩвдПДЕНЮвУЧдкAPIВПЗжНВНтЕФвЛаЉAPIдкЯЕЭГЗўЮёжаЕФЪЕЯжЃКетРяСЫДІРэЭЈжЊЕФЗжзщЃЌvisibilityЕШЯрЙиаХЯЂЁЃ
private void updateNotificationShade()
{
if (mStackScroller == null) return;
// Do not modify the notifications during
collapse.
if (isCollapsing()) {
addPostCollapseAction(new Runnable() {
@Override
public void run() {
updateNotificationShade();
}
});
return;
}
ArrayList<Entry> activeNotifications
= mNotificationData.getActiveNotifications();
ArrayList<ExpandableNotificationRow> toShow
= new ArrayList<>(activeNotifications.size());
final int N = activeNotifications.size();
for (int i=0; i<N; i++) {
Entry ent = activeNotifications.get(i);
int vis = ent.notification.getNotification().visibility;
// Display public version of the notification
if we need to redact.
final boolean hideSensitive =
!userAllowsPrivateNotificationsInPublic (ent.notification.getUserId());
boolean sensitiveNote = vis == Notification.VISIBILITY_PRIVATE;
boolean sensitivePackage = packageHasVisibilityOverride (ent.notification.getKey());
boolean sensitive = (sensitiveNote &&
hideSensitive) || sensitivePackage;
boolean showingPublic = sensitive &&
isLockscreenPublicMode();
if (showingPublic) {
updatePublicContentView(ent, ent.notification);
}
ent.row.setSensitive (sensitive, hideSensitive);
if (ent.autoRedacted && ent.legacy)
{
// TODO: Also fade this? Or, maybe easier (and
better), provide a dark redacted form
// for legacy auto redacted notifications.
if (showingPublic) {
ent.row.setShowingLegacyBackground(false);
} else {
ent.row.setShowingLegacyBackground(true);
}
}
if (mGroupManager.isChildInGroupWithSummary (ent.row.getStatusBarNotification()))
{
ExpandableNotificationRow summary = mGroupManager.getGroupSummary(
ent.row.getStatusBarNotification());
List<ExpandableNotificationRow> orderedChildren
=
mTmpChildOrderMap.get(summary);
if (orderedChildren == null) {
orderedChildren = new ArrayList<>();
mTmpChildOrderMap.put (summary, orderedChildren);
}
orderedChildren.add(ent.row);
} else {
toShow.add(ent.row);
}
}
ArrayList< ExpandableNotificationRow>
toRemove = new ArrayList<>();
for (int i=0; i< mStackScroller.getChildCount();
i++) {
View child = mStackScroller.getChildAt(i);
if (!toShow.contains(child) && child
instanceof ExpandableNotificationRow) {
toRemove.add ((ExpandableNotificationRow) child);
}
}
for (ExpandableNotificationRow remove : toRemove)
{
if (mGroupManager.isChildInGroupWithSummary (remove.getStatusBarNotification()))
{
// we are only transfering this notification
to its parent, don't generate an animation
mStackScroller.setChildTransferInProgress(true);
}
if (remove.isSummaryWithChildren()) {
remove.removeAllChildren();
}
mStackScroller.removeView(remove);
mStackScroller .setChildTransferInProgress(false);
}
removeNotificationChildren();
for (int i=0; i<toShow.size(); i++) {
View v = toShow.get(i);
if (v.getParent() == null) {
mStackScroller.addView(v);
}
}
addNotificationChildrenAndSort();
// So after all this work notifications still
aren't sorted correctly.
// Let's do that now by advancing through toShow
and mStackScroller in
// lock-step, making sure mStackScroller matches
what we see in toShow.
int j = 0;
for (int i = 0; i < mStackScroller.getChildCount();
i++) {
View child = mStackScroller.getChildAt(i);
if (!(child instanceof ExpandableNotificationRow))
{
// We don't care about non-notification views.
continue;
}
ExpandableNotificationRow targetChild = toShow.get(j);
if (child != targetChild) {
// Oops, wrong notification at this position.
Put the right one
// here and advance both lists.
mStackScroller.changeViewPosition(targetChild,
i);
}
j++;
}
// clear the map again for the next usage
mTmpChildOrderMap.clear();
updateRowStates();
updateSpeedbump();
updateClearAll();
updateEmptyShadeView();
updateQsExpansionEnabled();
mShadeUpdates.check();
} |
жСДЫЃЌвЛЬѕаТЗЂЫЭЕФЭЈжЊОЭеце§ЯдЪОГіРДСЫЁЃ
ЯТУцетЗљЭМУшЪіСЫвЛЬѕNotificationДгЗЂЫЭЕНЯдЪОГіРДЕФСїГЬЃК
|