|
动态加载技术(插件化)系列已经坑了有一段时间了,不过UP主我并没有放弃治疗哈,相信在不就的未来就可以看到“系统Api
Hook模式”和插件化框架Frontia的更新了。今天要讲的是动态加载技术的亲戚 ―― MultiDex。他们的核心原理之一都是dex文件的加载。
MultiDex是Google为了解决“65535方法数超标”以及“INSTALL_FAILED_DEXOPT”问题而开发的一个Support库,具体如何使用MultiDex现在市面已经有一大堆教程(可以参考给
App 启用 MultiDex 功能),这里不再赘述。这篇日志主要是配合源码分析MultiDex的工作原理,以及提供一些MultiDex优化的方案。
Dex的工作机制
等等,这个章节讲的不是MultiDex吗,怎么变成Dex了?没错哈,没有Dex,哪来的MultiDex。在Android中,对Dex文件操作对应的类叫做DexFile。在CLASSLOADER
的工作机制中,我们说到:
对于 Java 程序来说,编写程序就是编写类,运行程序也就是运行类(编译得到的class文件),其中起到关键作用的就是类加载器
ClassLoader。
Android程序的每一个Class都是由ClassLoader#loadClass方法加载进内存的,更准确来说,一个ClassLoader实例会有一个或者多个DexFile实例,调用了ClassLoader#loadClass之后,ClassLoader会通过类名,在自己的DexFile数组里面查找有没有那个DexFile对象里面存在这个类,如果都没有就抛ClassNotFound异常。ClassLoader通过调用DexFile的一个叫defineClass的Native方法去加载指定的类,这点与JVM略有不同,后者是直接调用ClassLoader#defineCLass方法,反正最后实际加载类的方法都叫defineClass就没错了。
创建DexFile对象
首先来看看造DexFile对象的构方法。
public final class DexFile {
    private int mCookie;
    private final String mFileName;
    ...

    public DexFile(File file) throws IOException {
        this(file.getPath());
    }

    public DexFile(String fileName) throws IOException {
        mCookie = openDexFile(fileName, null, 0);
        mFileName = fileName;
        guard.open("close");
    }

    private DexFile(String sourceName, String outputName, int flags) throws IOException {
        mCookie = openDexFile(sourceName, outputName, flags);
        mFileName = sourceName;
        guard.open("close");
    }

    static public DexFile loadDex(String sourcePathName, String outputPathName,
        int flags) throws IOException {
        return new DexFile(sourcePathName, outputPathName, flags);
    }

    public Class loadClass(String name, ClassLoader loader) {
        String slashName = name.replace('.', '/');
        return loadClassBinaryName(slashName, loader);
    }

    public Class loadClassBinaryName(String name, ClassLoader loader) {
        return defineClass(name, loader, mCookie);
    }
    private native static Class defineClass(String name, ClassLoader loader, int cookie);

    native private static int openDexFile(String sourceName, String outputName,
        int flags) throws IOException;

    native private static int openDexFile(byte[] fileContents)
    ...
} |
通过以前分析过的源码,我们知道ClassLoader主要是通过DexFile.loadDex这个静态方法来创建它需要的DexFile实例的,这里创建DexFile的时候,保存了Dex文件的文件路径mFileName,同时调用了openDexFile的Native方法打开Dex文件并返回了一个mCookie的整型变量(我不知道这个干啥用的,我猜它是一个C++用的资源句柄,用于Native层访问具体的Dex文件)。在Native层的openDexFile方法里,主要做了检查当前创建来的Dex文件是否是有效的Dex文件,还是是一个带有Dex文件的压缩包,还是一个无效的Dex文件。
加载Dex文件里的类
加载类的时候,ClassLoader又是通过DexFile#loadClass这个方法来完成的,这个方法里调用了defineClass这个Native方法,看来DexFile才是加载Class的具体API,加载Dex文件和加载具体Class都是通过Native方法完成,ClassLoader有点名不副实啊。
MultiDex的工作机制 当一个Dex文件太肥的时候(方法数目太多、文件太大),在打包Apk文件的时候就会出问题,就算打包的时候不出问题,在Android
5.0以下设备上安装或运行Apk也会出问题(具体原因可以参考给 App 启用 MultiDex 功能)。既然一个Dex文件不行的话,那就把这个硕大的Dex文件拆分成若干个小的Dex文件,刚好一个ClassLoader可以有多个DexFile,这就是MultiDex的基本设计思路。
工作流程
MultiDex的工作流程具体分为两个部分,一个部分是打包构建Apk的时候,将Dex文件拆分成若干个小的Dex文件,这个Android
Studio已经帮我们做了(设置 “multiDexEnabled true”),另一部分就是在启动Apk的时候,同时加载多个Dex文件(具体是加载Dex文件优化后的Odex文件,不过文件名还是.dex),这一部分工作从Android
5.0开始系统已经帮我们做了,但是在Android 5.0以前还是需要通过MultiDex Support库来支持(MultiDex.install(Context))。
所以我们需要关心的是第二部分,这个过程的简单示意流程图如下。
(图中红色部分为耗时比较大的地方) 源码分析 现在官方已经部署的MultiDex Support版本是com.android.support:multidex:1.0.1,但是现在仓库的master分支已经有了许多新的提交(其中最明显的区别是加入了FileLock来控制多进程同步问题),所以这里分析的源码都是最新的master分支上的。
MultiDex Support的入口是MultiDex.install(Context),先从这里入手吧。(这次我把具体的分析都写在代码的注释了,这样看是不是更简洁明了些?)
public static void install(Context context) {
        Log.i(TAG, "install");

        // 1. 判读是否需要执行MultiDex。
        if (IS_VM_MULTIDEX_CAPABLE) {
            Log.i(TAG, "VM has multidex support, MultiDex support library is disabled.");
            return;
        }
        if (Build.VERSION.SDK_INT < MIN_SDK_VERSION) {
            throw new RuntimeException("Multi dex installation failed. SDK " + Build.VERSION.SDK_INT
                    + " is unsupported. Min SDK version is " + MIN_SDK_VERSION + ".");
        }
        try {
            ApplicationInfo applicationInfo = getApplicationInfo(context);
            if (applicationInfo == null) {
                // Looks like running on a test Context, so just return without patching.
                return;
            }

            // 2. 如果这个方法已经调用过一次,就不能再调用了。
            synchronized (installedApk) {
                String apkPath = applicationInfo.sourceDir;
                if (installedApk.contains(apkPath)) {
                    return;
                }
                installedApk.add(apkPath);

                // 3. 如果当前Android版本已经自身支持了MultiDex,依然可以执行MultiDex操作,
                // 但是会有警告。
                if (Build.VERSION.SDK_INT > MAX_SUPPORTED_SDK_VERSION) {
                    Log.w(TAG, "MultiDex is not guaranteed to work in SDK version "
                            + Build.VERSION.SDK_INT + ": SDK version higher than "
                            + MAX_SUPPORTED_SDK_VERSION + " should be backed by "
                            + "runtime with built-in multidex capabilty but it's not the "
                            + "case here: java.vm.version=\""
                            + System.getProperty("java.vm.version") + "\"");
                }

                // 4. 获取当前的ClassLoader实例,后面要做的工作,就是把其他dex文件加载后,
                // 把其DexFile对象添加到这个ClassLoader实例里就完事了。
                ClassLoader loader;
                try {
                    loader = context.getClassLoader();
                } catch (RuntimeException e) {
                    Log.w(TAG, "Failure while trying to obtain Context class loader. " +
                            "Must be running in test mode. Skip patching.", e);
                    return;
                }
                if (loader == null) {
                    Log.e(TAG,
                            "Context class loader is null. Must be running in test mode. "
                            + "Skip patching.");
                    return;
                }
                try {
                  // 5. 清除旧的dex文件,注意这里不是清除上次加载的dex文件缓存。
                  // 获取dex缓存目录是,会优先获取/data/data/<package>/code-cache作为缓存目录。
                  // 如果获取失败,则使用/data/data/<package>/files/code-cache目录。
                  // 这里清除的是第二个目录。
                  clearOldDexDir(context);
                } catch (Throwable t) {
                  Log.w(TAG, "Something went wrong when trying to clear old MultiDex extraction, "
                      + "continuing without cleaning.", t);
                }

                // 6. 获取缓存目录(/data/data/<package>/code-cache)。
                File dexDir = getDexDir(context, applicationInfo);

                // 7. 加载缓存文件(如果有)。
                List<File> files = MultiDexExtractor.load(context, applicationInfo, dexDir, false);

                // 8. 检查缓存的dex是否安全
                if (checkValidZipFiles(files)) {
                    // 9. 安装缓存的dex
                    installSecondaryDexes(loader, dexDir, files);
                } else {
                    // 9. 从apk压缩包里面提取dex文件
                    Log.w(TAG, "Files were not valid zip files.  Forcing a reload.");
                    files = MultiDexExtractor.load(context, applicationInfo, dexDir, true);
                    if (checkValidZipFiles(files)) {
                        // 10. 安装提取的dex
                        installSecondaryDexes(loader, dexDir, files);
                    } else {
                        throw new RuntimeException("Zip files were not valid.");
                    }
                }
            }
        } catch (Exception e) {
            Log.e(TAG, "Multidex installation failure", e);
            throw new RuntimeException("Multi dex installation failed (" + e.getMessage() + ").");
        }
        Log.i(TAG, "install done");
} |
具体代码的分析已经在上面代码的注释里给出了,从这里我们也可以看出,整个MultiDex.install(Context)的过程中,关键的步骤就是MultiDexExtractor#load方法和MultiDex#installSecondaryDexes方法。
(这部分是题外话)其中有个MultiDex#clearOldDexDir(Context)方法,这个方法的作用是删除/data/data/<package>/files/code-cache,一开始我以为这个方法是删除上一次执行MultiDex后的缓存文件,不过这明显不对,不可能每次MultiDex都重新解压dex文件一边,这样每次启动会很耗时,只有第一次冷启动的时候才需要解压dex文件。后来我又想是不是以前旧版的MultiDex曾经把缓存文件放在这个目录里,现在新版本只是清除以前旧版的遗留文件?但是我找遍了整个MultiDex
Repo的提交也没有见过类似的旧版本代码。后面我仔细看MultiDex#getDexDir这个方法才发现,原来MultiDex在获取dex缓存目录是,会优先获取/data/data/<package>/code-cache作为缓存目录,如果获取失败,则使用/data/data/<package>/files/code-cache目录,而后者的缓存文件会在每次App重新启动的时候被清除。感觉MultiDex获取缓存目录的逻辑不是很严谨,而获取缓存目录失败也是MultiDex工作工程中少数有重试机制的地方,看来MultiDex真的是一个临时的兼容方案,Google也许并不打算认真处理这些历史的黑锅。
接下来再看看MultiDexExtractor#load这个方法。
static List<File> load(Context context, ApplicationInfo applicationInfo, File dexDir,
            boolean forceReload) throws IOException {
        Log.i(TAG, "MultiDexExtractor.load(" + applicationInfo.sourceDir + ", " + forceReload + ")");
        final File sourceApk = new File(applicationInfo.sourceDir);

        // 1. 获取当前Apk文件的crc值。
        long currentCrc = getZipCrc(sourceApk);
        // Validity check and extraction must be done only while the lock file has been taken.
        File lockFile = new File(dexDir, LOCK_FILENAME);
        RandomAccessFile lockRaf = new RandomAccessFile(lockFile, "rw");
        FileChannel lockChannel = null;
        FileLock cacheLock = null;
        List<File> files;
        IOException releaseLockException = null;
        try {
            lockChannel = lockRaf.getChannel();
            Log.i(TAG, "Blocking on lock " + lockFile.getPath());

            // 2. 加上文件锁,防止多进程冲突。
            cacheLock = lockChannel.lock();
            Log.i(TAG, lockFile.getPath() + " locked");

            // 3. 先判断是否强制重新解压,这里第一次会优先使用已解压过的dex文件,如果加载失败就强制重新解压。
            // 此外,通过crc和文件修改时间,判断如果Apk文件已经被修改(覆盖安装),就会跳过缓存重新解压dex文件。
            if (!forceReload && !isModified(context, sourceApk, currentCrc)) {
                try {

                    // 4. 加载缓存的dex文件
                    files = loadExistingExtractions(context, sourceApk, dexDir);
                } catch (IOException ioe) {
                    Log.w(TAG, "Failed to reload existing extracted secondary dex files,"
                            + " falling back to fresh extraction", ioe);

                    // 5. 加载失败的话重新解压,并保存解压出来的dex文件的信息。
                    files = performExtractions(sourceApk, dexDir);
                    putStoredApkInfo(context,
                            getTimeStamp(sourceApk), currentCrc, files.size() + 1);
                }
            } else {
                // 4. 重新解压,并保存解压出来的dex文件的信息。
                Log.i(TAG, "Detected that extraction must be performed.");
                files = performExtractions(sourceApk, dexDir);
                putStoredApkInfo(context, getTimeStamp(sourceApk), currentCrc, files.size() + 1);
            }
        } finally {
            if (cacheLock != null) {
                try {
                    cacheLock.release();
                } catch (IOException e) {
                    Log.e(TAG, "Failed to release lock on " + lockFile.getPath());
                    // Exception while releasing the lock is bad, we want to report it, but not at
                    // the price of overriding any already pending exception.
                    releaseLockException = e;
                }
            }
            if (lockChannel != null) {
                closeQuietly(lockChannel);
            }
            closeQuietly(lockRaf);
        }
        if (releaseLockException != null) {
            throw releaseLockException;
        }
        Log.i(TAG, "load found " + files.size() + " secondary dex files");
        return files;
} |
这个过程主要是获取可以安装的dex文件列表,可以是上次解压出来的缓存文件,也可以是重新从Apk包里面提取出来的。需要注意的时,如果是重新解压,这里会有明显的耗时,而且解压出来的dex文件,会被压缩成.zip压缩包,压缩的过程也会有明显的耗时(这里压缩dex文件可能是问了节省空间)。
如果dex文件是重新解压出来的,则会保存dex文件的信息,包括解压的apk文件的crc值、修改时间以及dex文件的数目,以便下一次启动直接使用已经解压过的dex缓存文件,而不是每一次都重新解压。
需要特别提到的是,里面的FileLock是最新的master分支里面新加进去的功能,现在最新的1.0.1版本里面是没有的。
无论是通过使用缓存的dex文件,还是重新从apk中解压dex文件,获取dex文件列表后,下一步就是安装(或者说加载)这些dex文件了。最后的工作在MultiDex#installSecondaryDexes这个方法里面。
private static void installSecondaryDexes(ClassLoader loader, File dexDir, List<File> files)
            throws IllegalArgumentException, IllegalAccessException, NoSuchFieldException,
            InvocationTargetException, NoSuchMethodException, IOException {
        if (!files.isEmpty()) {
            if (Build.VERSION.SDK_INT >= 19) {
                V19.install(loader, files, dexDir);
            } else if (Build.VERSION.SDK_INT >= 14) {
                V14.install(loader, files, dexDir);
            } else {
                V4.install(loader, files);
            }
        }
} |
因为在不同的SDK版本上,ClassLoader(更准确来说是DexClassLoader)加载dex文件的方式有所不同,所以这里做了V4/V14/V19的兼容(Magic
Code)。
Build.VERSION.SDK_INT < 14
/**
     * Installer for platform versions 4 to 13.
     */
    private static final class V4 {
        private static void install(ClassLoader loader, List<File> additionalClassPathEntries)
                        throws IllegalArgumentException, IllegalAccessException,
                        NoSuchFieldException, IOException {

            int extraSize = additionalClassPathEntries.size();
            Field pathField = findField(loader, "path");
            StringBuilder path = new StringBuilder((String) pathField.get(loader));
            String[] extraPaths = new String[extraSize];
            File[] extraFiles = new File[extraSize];
            ZipFile[] extraZips = new ZipFile[extraSize];
            DexFile[] extraDexs = new DexFile[extraSize];
            for (ListIterator<File> iterator = additionalClassPathEntries.listIterator();
                    iterator.hasNext();) {
                File additionalEntry = iterator.next();
                String entryPath = additionalEntry.getAbsolutePath();
                path.append(':').append(entryPath);
                int index = iterator.previousIndex();
                extraPaths[index] = entryPath;
                extraFiles[index] = additionalEntry;
                extraZips[index] = new ZipFile(additionalEntry);
                extraDexs[index] = DexFile.loadDex(entryPath, entryPath + ".dex", 0);
            }

            // 这个版本是最简单的。
            // 只需要创建DexFile对象后,使用反射的方法分别扩展ClassLoader实例的以下字段即可。
            pathField.set(loader, path.toString());
            expandFieldArray(loader, "mPaths", extraPaths);
            expandFieldArray(loader, "mFiles", extraFiles);
            expandFieldArray(loader, "mZips", extraZips);
            expandFieldArray(loader, "mDexs", extraDexs);
        }
} |
14 <= Build.VERSION.SDK_INT < 19
/**
     * Installer for platform versions 14, 15, 16, 17 and 18.
     */
    private static final class V14 {
        private static void install(ClassLoader loader, List<File> additionalClassPathEntries,
                File optimizedDirectory)
                        throws IllegalArgumentException, IllegalAccessException,
                        NoSuchFieldException, InvocationTargetException, NoSuchMethodException {

            // 扩展ClassLoader实例的"pathList"字段。
            Field pathListField = findField(loader, "pathList");
            Object dexPathList = pathListField.get(loader);
            expandFieldArray(dexPathList, "dexElements", makeDexElements(dexPathList,
                    new ArrayList<File>(additionalClassPathEntries), optimizedDirectory));
        }

        private static Object[] makeDexElements(
                Object dexPathList, ArrayList<File> files, File optimizedDirectory)
                        throws IllegalAccessException, InvocationTargetException,
                        NoSuchMethodException {
            Method makeDexElements =
                    findMethod(dexPathList, "makeDexElements", ArrayList.class, File.class);
            return (Object[]) makeDexElements.invoke(dexPathList, files, optimizedDirectory);
        }
} |
从API14开始,DexClassLoader会使用一个DexpDexPathList类来封装DexFile数组。
final class DexPathList {
    private static final String DEX_SUFFIX = ".dex";
    private static final String JAR_SUFFIX = ".jar";
    private static final String ZIP_SUFFIX = ".zip";
    private static final String APK_SUFFIX = ".apk";

    private static Element[] makeDexElements(ArrayList<File> files,
            File optimizedDirectory) {
        ArrayList<Element> elements = new ArrayList<Element>();
        for (File file : files) {
            ZipFile zip = null;
            DexFile dex = null;
            String name = file.getName();
            if (name.endsWith(DEX_SUFFIX)) {
                // Raw dex file (not inside a zip/jar).
                try {
                    dex = loadDexFile(file, optimizedDirectory);
                } catch (IOException ex) {
                    System.logE("Unable to load dex file: " + file, ex);
                }
            } else if (name.endsWith(APK_SUFFIX) || name.endsWith(JAR_SUFFIX)
                    || name.endsWith(ZIP_SUFFIX)) {
                try {
                    zip = new ZipFile(file);
                } catch (IOException ex) {
                    System.logE("Unable to open zip file: " + file, ex);
                }
                try {
                    dex = loadDexFile(file, optimizedDirectory);
                } catch (IOException ignored) {

                }
            } else {
                System.logW("Unknown file type for: " + file);
            }
            if ((zip != null) || (dex != null)) {
                elements.add(new Element(file, zip, dex));
            }
        }
        return elements.toArray(new Element[elements.size()]);
    }

    private static DexFile loadDexFile(File file, File optimizedDirectory)
            throws IOException {
        if (optimizedDirectory == null) {
            return new DexFile(file);
        } else {
            String optimizedPath = optimizedPathFor(file, optimizedDirectory);
            return DexFile.loadDex(file.getPath(), optimizedPath, 0);
        }
    }
} |
通过调用DexPathList#makeDexElements方法,可以加载我们上面解压得到的dex文件,从代码也可以看出,DexPathList#makeDexElements其实也是通过调用DexFile#loadDex来加载dex文件并创建DexFile对象的。V14中,通过反射调用DexPathList#makeDexElements方法加载我们需要的dex文件,在把加载得到的数组扩展到ClassLoader实例的"pathList"字段,从而完成dex文件的安装
从DexPathList的代码中我们也可以看出,ClassLoader是支持直接加载.dex/.zip/.jar/.apk的dex文件包的(我记得以前在哪篇日志中好像提到过类似的问题…)。
19 <= Build.VERSION.SDK_INT
/**
    * Installer for platform versions 19.
    */
   private static final class V19 {
       private static void install(ClassLoader loader, List<File> additionalClassPathEntries,
               File optimizedDirectory)
                       throws IllegalArgumentException, IllegalAccessException,
                       NoSuchFieldException, InvocationTargetException, NoSuchMethodException {

           Field pathListField = findField(loader, "pathList");
           Object dexPathList = pathListField.get(loader);
           ArrayList<IOException> suppressedExceptions = new ArrayList<IOException>();
           expandFieldArray(dexPathList, "dexElements", makeDexElements(dexPathList,
                   new ArrayList<File>(additionalClassPathEntries), optimizedDirectory,
                   suppressedExceptions));

           if (suppressedExceptions.size() > 0) {
               for (IOException e : suppressedExceptions) {
                   Log.w(TAG, "Exception in makeDexElement", e);
               }
               Field suppressedExceptionsField =
                       findField(dexPathList, "dexElementsSuppressedExceptions");
               IOException[] dexElementsSuppressedExceptions =
                       (IOException[]) suppressedExceptionsField.get(dexPathList);
               if (dexElementsSuppressedExceptions == null) {
                   dexElementsSuppressedExceptions =
                           suppressedExceptions.toArray(
                                   new IOException[suppressedExceptions.size()]);
               } else {
                   IOException[] combined =
                           new IOException[suppressedExceptions.size() +
                                           dexElementsSuppressedExceptions.length];
                   suppressedExceptions.toArray(combined);
                   System.arraycopy(dexElementsSuppressedExceptions, 0, combined,
                           suppressedExceptions.size(), dexElementsSuppressedExceptions.length);
                   dexElementsSuppressedExceptions = combined;
               }
               suppressedExceptionsField.set(dexPathList, dexElementsSuppressedExceptions);
           }
       }

       private static Object[] makeDexElements(
               Object dexPathList, ArrayList<File> files, File optimizedDirectory,
               ArrayList<IOException> suppressedExceptions)
                       throws IllegalAccessException, InvocationTargetException,
                       NoSuchMethodException {
           Method makeDexElements =
                   findMethod(dexPathList, "makeDexElements", ArrayList.class, File.class,
                           ArrayList.class);
           return (Object[]) makeDexElements.invoke(dexPathList, files, optimizedDirectory,
                   suppressedExceptions);
       }
} |
V19与V14差别不大,只不过DexPathList#makeDexElements方法多了一个ArrayList<IOException>参数,如果在执行DexPathList#makeDexElements方法的过程中出现异常,后面使用反射的方式把这些异常记录进DexPathList的dexElementsSuppressedExceptions字段里面。
无论是V4/V14还是V19,在创建DexFile对象的时候,都需要通过DexFile的Native方法openDexFile来打开dex文件,其具体细节暂不讨论(涉及到dex的文件结构,很烦,有兴趣请阅读dalvik_system_DexFile.cpp),这个过程的主要目的是给当前的dex文件做Optimize优化处理并生成相同文件名的odex文件,App实际加载类的时候,都是通过odex文件进行的。因为每个设备对odex格式的要求都不一样,所以这个优化的操作只能放在安装Apk的时候处理,主dex的优化我们已经在安装apk的时候搞定了,其余的dex就是在MultiDex#installSecondaryDexes里面优化的,而后者也是MultiDex过程中,另外一个耗时比较多的操作。(在MultiDex中,提取出来的dex文件被压缩成.zip文件,又优化后的odex文件则被保存为.dex文件。)
到这里,MultiDex的工作流程就结束了。怎么样,是不是觉得和以前谈到动态加载技术(插件化)的时候说的很像?没错,谁叫它们的核心都是dex文件呢。Java老师第一节课就说“类就是编程”,搞定类你就能搞定整个世界啊!
优化方案
MultiDex有个比较蛋疼的问题,就是会产生明显的卡顿现象,通过上面的分析,我们知道具体的卡顿产生在解压dex文件以及优化dex两个步骤。不过好在,在Application#attachBaseContext(Context)中,UI线程的阻塞是不会引发ANR的,只不过这段长时间的卡顿(白屏)还是会影响用户体验。
目前,优化方案能想到的有两种。
PreMultiDex方案
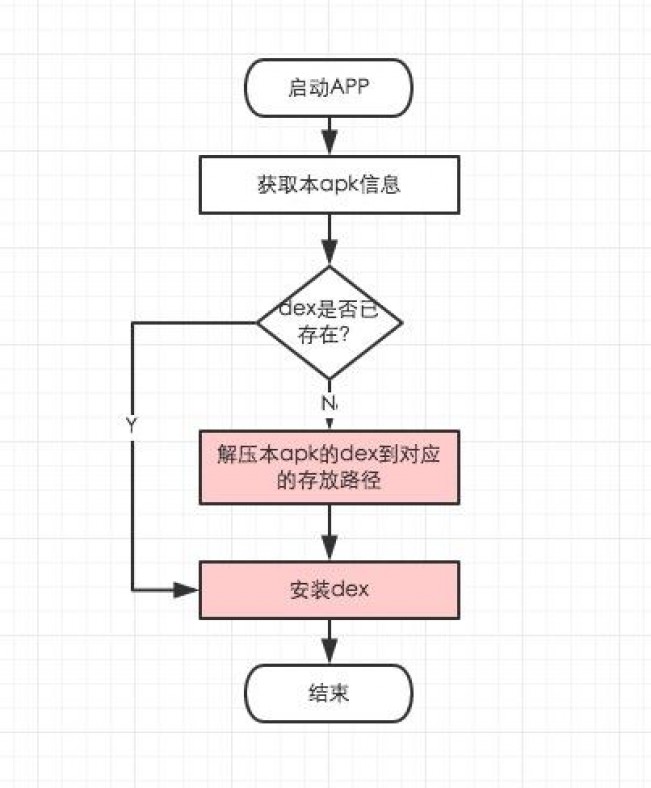
大致思路是,在安装一个新的apk的时候,先在Worker线程里做好MultiDex的解压和Optimize工作,安装apk并启动后,直接使用之前Optimize产生的odex文件,这样就可以避免第一次启动时候的Optimize工作。
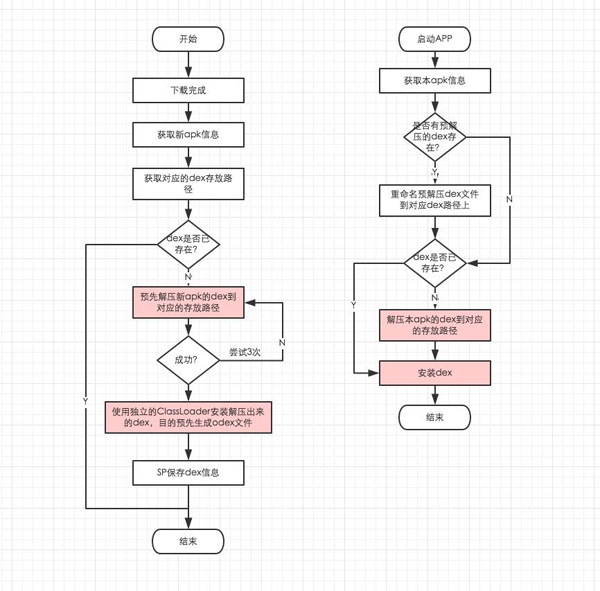
安装dex的时候,核心是创建DexFile对象并使用其Native方法对dex文件进行opt处理,同时生产一个与dex文件(.zip)同名的已经opt过的dex文件(.dex)。如果安装dex的时候,这个opt过的dex文件已经存在,则跳过这个过程,这会节省许多耗时。所以优化的思路就是,下载Apk完成的时候,预先解压dex文件,并预先触发安装dex文件以生产opt过的dex文件。这样覆盖安装Apk并启动的时候,如果MultiDex能命中解压好的dex和odex文件,则能避开耗时最大的两个操作。
不过这个方案的缺点也是明显的,第一次安装的apk没有作用,而且事先需要使用内置的apk更新功能把新版本的apk文件下载下来后,才能做PreMultiDex工作。
异步MultiDex方案
这种方案也是目前比较流行的Dex手动分包方案,启动App的时候,先显示一个简单的Splash闪屏界面,然后启动Worker线程执行MultiDex#install(Context)工作,就可以避免UI线程阻塞。不过要确保启动以及启动MultiDex#install(Context)所需要的类都在主dex里面(手动分包),而且需要处理好进程同步问题。 |


