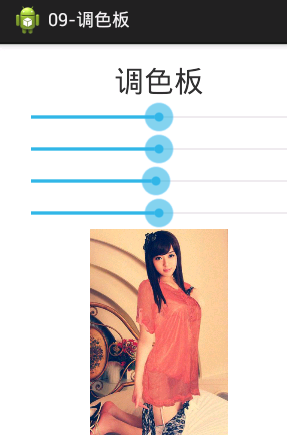
您可以捐助,支持我们的公益事业。

1元 10元 50元


认证码:  验证码,看不清楚?请点击刷新验证码 必填


  求知 文章 文库 Lib 视频 iPerson 课程 认证 咨询 工具 讲座 Modeler   Code  
会员   


 订阅
  捐助
安卓第十五天笔记-图形图像一些简单处理
 
作者:森林森 来自于:博客园 发布于 2016-3-31
  2172  次浏览      15
 

1.计算机中图形计算的大小

一般白色就是0,黑色就是1

单色位图:

8位表示一个字节,

大小:长*宽/8,表示大小,还有一些文件信息如创建时间,什么工具创建之类的

24位位图

一个像素表示24位

大小:长*宽*24/8

256色

1个像素可以表示256种颜色 一个字节它的长度刚好是256 ,那么一个像素点就是一个字节

大小:长*宽

安卓中默认使用32位的

位图的缺陷 ?放大到一定的比例会出会出现失真与锯齿形状

占用很大的存储空间

2.加载一个图片文件到存中

将一个图片放在SD卡上,使用BitmapFactory.decodeFile解析得Bitmap设置ImageView显示

ImageView iv = (ImageView) findViewById(R.id.iv);
//加载图片
//Bitmap bitmap =BitmapFactory.decodeFile("/mnt/sdcard/img7.jpg");

Bitmap bitmap =BitmapFactory.decodeFile(Environment.getExternalStorageDirectory()+"/img7.jpg");
//设置图片
iv.setImageBitmap(bitmap);

以上的图片可以正常加载

异常现象---加载 的图片过大,如2560*1520之类的,加载 时就会报OutMemoryError内存溢出

 java.lang.OutOfMemoryError

3.设置图片的缩放

1.获取图片的大小宽和高

获取图片的宽高

1.jpg

ExifInterface exif = new ExifInterface("/mnt/sdcard/biger.jpg");
String width = exif.getAttribute(ExifInterface.TAG_IMAGE_WIDTH);
String height = exif.getAttribute(ExifInterface.TAG_IMAGE_LENGTH);

2.png

Options opt = new Options();

//不会有bitmap返回,但是out的字段有输出
opt.inJustDecodeBounds = true;

BitmapFactory.decodeFile("", opt);

//得到图片宽高
opt.outHeight;
opt.outWidth ;

2.获取屏幕的大小宽和高

//1. 获取到屏幕分辨率
WindowManager manager = (WindowManager) getSystemService(WINDOW_SERVICE);

Display display = manager.getDefaultDisplay();

Point outSize = new Point();
display.getSize(outSize);
int x = outSize.x;

3.使用图片的大小宽和屏幕的宽相除,图片的高与屏幕的高相除,比大小,取最大值,或者取中间值

4.

 /**
图片设置缩放比例

@author 刘楠 *

2016-3-3下午1:20:28 */ @SuppressLint("NewApi") public class MainActivity extends Activity {

private static final String TAG = "MainActivity";
/*
* 源图片
*/
private ImageView src;

@Override
protected void onCreate(Bundle savedInstanceState) {
super.onCreate(savedInstanceState);
setContentView(R.layout.activity_main);
// 源图片
src = (ImageView) findViewById(R.id.src);
/*Options options = new Options();
options.inJustDecodeBounds=true;
BitmapFactory.decodeFile(Environment.getExternalStorageDirectory() + "/2.jpg",options);*/

/**
* 得到屏幕的宽高
*/
WindowManager manager = (WindowManager) getSystemService(WINDOW_SERVICE);

Display defaultDisplay = manager.getDefaultDisplay();
Point point = new Point();
defaultDisplay.getRealSize(point);

int screenWidth = point.x;
int screenHeight = point.y;

Log.d(TAG, "屏幕宽:"+screenWidth);
Log.d(TAG, "屏幕高:"+screenHeight);
/*
* jpg图片解析
*/
try {
ExifInterface jpgExifInterface = new ExifInterface(
Environment.getExternalStorageDirectory() + "/2.jpg");
/*
* 图片的宽度
*/
String width = jpgExifInterface
.getAttribute(ExifInterface.TAG_IMAGE_WIDTH);
/*
* 得到图片的高度
*/
String height = jpgExifInterface
.getAttribute(ExifInterface.TAG_IMAGE_LENGTH);

Log.d(TAG, "图片宽:"+width);
Log.d(TAG, "图片高:"+height);
//计算比例
int scale=Integer.parseInt(width)/screenWidth>Integer.parseInt(height)/screenHeight?Integer

.parseInt(width)/screenWidth:Integer.parseInt(height)/screenHeight;

//设置显示
Log.d(TAG,"比例:"+scale);
//调置采样率,比例
Options opts = new Options();
opts.inSampleSize=scale;
//使用工厂再次解析
Bitmap decodeFile = BitmapFactory.decodeFile(Environment.getExternalStorageDirectory() + "/2.jpg", opts);

//设置图片显示
src.setImageBitmap(decodeFile);
} catch (IOException e) {
e.printStackTrace();
}
}

4.图片的一些常用操作

1.图片的平移

protected void onCreate(Bundle savedInstanceState) {
super.onCreate(savedInstanceState);
setContentView(R.layout.activity_main);
/*
* 源图片显示
*/
srcImage = (ImageView) findViewById(R.id.ivsrc);
/*
* 目标图片
*/
desImage = (ImageView) findViewById(R.id.ivdesc);
/*
* 获取图片资源
*/
Bitmap bitmap = BitmapFactory.decodeFile(Environment.getExternalStorageDirectory()+"/bg.png");
//设置源图片显示
srcImage.setImageBitmap(bitmap);
//创建一张内存中的图片
Bitmap buffereImage = Bitmap.createBitmap(bitmap.getWidth(), bitmap.getHeight(), bitmap.getConfig());

Canvas canvas = new Canvas(buffereImage);
Paint paint = new Paint();
Matrix matrix = new Matrix();
//移动第一个参数x 水平, 第二个参数y高度,可以是负值
matrix.setTranslate(-20, -10);
/*
* 新图
* 第一个参数:参照物
* 第二个matrix:矩阵
* 第三个参数:画笔
*/
canvas.drawBitmap(bitmap, matrix, paint);
desImage.setImageBitmap(buffereImage);
}

2.图片的图像旋转 /* * degrees角度: * px:开始旋转的水平坐标 * py:开始旋转的垂直坐标 */ matrix.setRotate(45, bitmap.getWidth()/2, bitmap.getHeight()/2);

只需要更改Matrix

Matrix matrix = new Matrix();

//移动第一个参数x 水平, 第二个参数y高度,可以是负值

* degrees角度:

* px:开始旋转的水平坐标

* py:开始旋转的垂直坐标

matrix.setRotate(90, bitmap.getWidth()/2, bitmap.getHeight()/2);

1.图片的镜子效果

Matrix matrix = new Matrix();
//移动第一个参数x 水平, 第二个参数y高度,可以是负值
/*
* 先把图片水平翻转
*/
matrix.setScale(-1, 1);
/*
* 在再现在的效果上,水平移动图片的宽度
*/
matrix.postTranslate(bitmap.getWidth(), 0);

2.. 图片的倒影效果

Matrix matrix = new Matrix();
//移动第一个参数x 水平, 第二个参数y高度,可以是负值
/*
* 先把图片垂直翻转
*/
matrix.setScale(1, -1);
/*
* 在再现在的效果上,垂直移动图片的高度
*/
matrix.postTranslate(0, bitmap.getHeight());

3.setXXX和 postXXX区别

前者是在原图基础上做变化,后者是在目前的效果基础上做变化

5.自定义画板涂鸦

布局文件 <LinearLayout xmlns:android="http://schemas.android.com/apk/res/android"
 android:layoutwidth="matchparent" android:layoutheight="matchparent" android:orientation="vertical" >

<LinearLayout
android:layout_width="match_parent"
android:layout_height="wrap_content"
android:layout_margin="15dp"
android:orientation="horizontal" >
<!-- 画笔颜色 -->
<View
android:id="@+id/red"
android:layout_width="50dp"
android:layout_height="50dp"
android:background="#ff0000" />

<View
android:id="@+id/green"
android:layout_width="50dp"
android:layout_height="50dp"
android:background="#00ff00" />

<View
android:id="@+id/blue"
android:layout_width="50dp"
android:layout_height="50dp"
android:background="#0000ff" />

<View
android:id="@+id/yellow"
android:layout_width="50dp"
android:layout_height="50dp"
android:background="#ffff00" />

<View
android:id="@+id/purple"
android:layout_width="50dp"
android:layout_height="50dp"
android:background="#ff00ff" />
</LinearLayout>
<!-- 画笔粗细 -->
<SeekBar
android:id="@+id/seekbar"
android:layout_width="match_parent"
android:layout_height="wrap_content"
android:max="20"
android:progress="5"
android:thumb="@drawable/ok" />
<!-- 涂鸦的地方 -->
<ImageView
android:id="@+id/iv_result"
android:layout_width="match_parent"
android:layout_height="match_parent"/>
</LinearLayout>

菜单R.menu.main

<menu xmlns:android="http://schemas.android.com/apk/res/android" >

<item
android:id="@+id/save"
android:orderInCategory="100"
android:showAsAction="never"
android:title="保存涂鸦"/>
<item
android:id="@+id/clear"
android:orderInCategory="100"
android:showAsAction="never"
android:title="清除数据"/>
</menu>

Activity

/**
* 画板涂鸦
* 1.在内存中生成一张图片
* 2.为ImageView设置这张图片
* 3.设置画布,画笔
* 4.为ImageView设置监听事件

* @author 刘楠
*
* 2016-3-3下午7:28:20
*/
public class MainActivity extends Activity implements OnClickListener, OnSeekBarChangeListener, OnTouchListener{
private static final String TAG = "MainActivity";
/*
* 进度条,用来改变画笔粗细
*/
private SeekBar seekBar;
/*
* 画笔的颜色
*/
private View red;
private View green;
private View blue;
private View yellow;
private View purple;
/*
* 画板
*/
Canvas canvas ;
/*
* 画笔
*/
Paint paint;

private ImageView ivResult;
@Override
protected void onCreate(Bundle savedInstanceState) {
super.onCreate(savedInstanceState);
setContentView(R.layout.activity_main);
/*
* 画板要画的地方
*/
ivResult = (ImageView) findViewById(R.id.iv_result);
/*
* 进度条,用来改变画笔粗细
*/
seekBar = (SeekBar) findViewById(R.id.seekbar);
/*
* 画笔的颜色
*/
red = findViewById(R.id.red);
green = findViewById(R.id.green);
blue = findViewById(R.id.blue);
yellow = findViewById(R.id.yellow);
purple = findViewById(R.id.purple);
/*
* 设置监听事件
*/
red.setOnClickListener(this);
green.setOnClickListener(this);
blue.setOnClickListener(this);
yellow.setOnClickListener(this);
purple.setOnClickListener(this);
seekBar.setOnSeekBarChangeListener(this);
/*
* 内存中的图
*/
buffImage = Bitmap.createBitmap(300, 300, Config.ARGB_8888);
/*
* 画板
*/
canvas = new Canvas(buffImage);
canvas.drawColor(Color.WHITE);
/*
* 画布
*/
paint = new Paint();

paint.setStrokeCap(Cap.ROUND);


ivResult.setImageBitmap(buffImage);

ivResult.setOnTouchListener(this);
}

/**
* 进度条改变时
*/
@Override
public void onProgressChanged(SeekBar seekBar, int progress,
boolean fromUser) {

}
/**
* 进度条触摸时
*/
@Override
public void onStartTrackingTouch(SeekBar seekBar) {

}
/**
* 进度条停止
*/
@Override
public void onStopTrackingTouch(SeekBar seekBar) {
int progress = seekBar.getProgress();
paint.setStrokeWidth(progress);
Toast.makeText(this, "当前画笔粗细是:"+progress, Toast.LENGTH_SHORT).show();
}

/**
* 单击事件监听器
*/
@Override
public void onClick(View v) {
switch (v.getId()) {
case R.id.red:
paint.setColor(Color.RED);
Log.d(TAG,"画笔颜色:红色");
break;
case R.id.green:
paint.setColor(Color.GREEN);
Log.d(TAG,"画笔颜色:绿色");
break;
case R.id.blue:
paint.setColor(Color.BLUE);
Log.d(TAG,"画笔颜色:蓝色");
break;
case R.id.yellow:
paint.setColor(Color.YELLOW);
Log.d(TAG,"画笔颜色:黄色");
break;
case R.id.purple:
paint.setColor(0xffff00ff);
Log.d(TAG,"画笔颜色:祡色");
break;


}
}
float startX ;
float startY;
/*
* 内存中的图
*/
private Bitmap buffImage;
/**
* ImageView触摸事件
*/
@Override
public boolean onTouch(View v, MotionEvent event) {
switch (event.getAction()) {
case MotionEvent.ACTION_DOWN:
Log.d(TAG, "down---"+event.getX()+" ::: "+event.getY());
startX = event.getX();
startY = event.getY();
canvas.drawLine(startX, startY, startX, startY, paint);
ivResult.setImageBitmap(buffImage);
break;
case MotionEvent.ACTION_MOVE:
Log.d(TAG, "move---"+event.getX()+" ::: "+event.getY());

float stopX = event.getX();
float stopY = event.getY();

canvas.drawLine(startX, startY, stopX, stopY, paint);
ivResult.setImageBitmap(buffImage);
startX = event.getX();
startY = event.getY();
break;
case MotionEvent.ACTION_UP:
Log.d(TAG, "up---"+event.getX()+" ::: "+event.getY());
break;
}
return true;
}

/**
* 添加菜单
*/
@Override
public boolean onCreateOptionsMenu(Menu menu) {
getMenuInflater().inflate(R.menu.main, menu);
return true;
}

/**
* 菜单被选择时的事件保存图片与清除图片
*/
@Override
public boolean onMenuItemSelected(int featureId, MenuItem item) {
switch (item.getItemId()) {
case R.id.save:
File file = new File(Environment.getExternalStorageDirectory(), System.currentTimeMillis()+".jpg");
try {
OutputStream out = new FileOutputStream(file);
buffImage.compress(CompressFormat.JPEG, 100, out);
Toast.makeText(this, "保存成功", Toast.LENGTH_SHORT).show();
} catch (FileNotFoundException e) {

e.printStackTrace();
}
/*
* 发送通知告诉系统新增加了一张图片
*/
Intent intent =new Intent();
intent.setAction(Intent.ACTION_MEDIA_SCANNER_SCAN_FILE);
//发送数据
intent.setData(Uri.fromFile(file));
//发送广播
sendBroadcast(intent);

break;
case R.id.clear:
/*
* 清除画板
*/
canvas.drawColor(Color.WHITE);
ivResult.setImageBitmap(buffImage);
break;


}
return super.onMenuItemSelected(featureId, item);
}
}

保存在SD卡上的权限

 <uses-permission android:name="android.permission.WRITE_EXTERNAL_STORAGE"/>

getX和getRawX的区别

getX

当前的触摸位置到控件的左边间距

getRawX

当前的触摸位置到屏幕的左边间距

6.简单撕衣服

原理:

1.准备两张一样的图片,一张是穿有衣服的,另一张是没有穿衣服的。

2.通过FrameLayout进行布局,穿衣服的放上面,没穿衣服的图片放下面。

3.通过触摸事件进行判断,手指划过的地方,让穿衣服的图片变成透明,就显示到了下面没穿衣服的图片。这样效果就形成了。

布局

<RelativeLayout xmlns:android="http://schemas.android.com/apk/res/android"
xmlns:tools="http://schemas.android.com/tools"
android:layout_width="match_parent"
android:layout_height="match_parent"
android:paddingBottom="@dimen/activity_vertical_margin"
android:paddingLeft="@dimen/activity_horizontal_margin"
android:paddingRight="@dimen/activity_horizontal_margin"
android:paddingTop="@dimen/activity_vertical_margin"
tools:context=".MainActivity" >

<ImageView

android:layout_width="wrap_content"
android:layout_height="wrap_content"
android:src="@drawable/after" />
<ImageView
android:id="@+id/pre"
android:layout_width="wrap_content"
android:layout_height="wrap_content"/>
</RelativeLayout>

Activty实现

/**
* 撕衣服
* 1.准备两张一样的图片,一张是穿有衣服的,另一张是没有穿衣服的。
2.通过FrameLayout进行布局或者相对布局这里使用相对,穿衣服的放上面,没穿衣服的图片放下面。
3.通过触摸事件进行判断,手指划过的地方,让穿衣服的图片变成透明,就显示到了下面没穿衣服的图片。
public class MainActivity extends Activity implements OnTouchListener {

private static final String TAG = "MainActivity";

/*
* 前面的一张图片
*/
private ImageView pre;

private Canvas canvas;

private Bitmap buffImage;

private static final int RADIUS = 10;

@Override
protected void onCreate(Bundle savedInstanceState) {
super.onCreate(savedInstanceState);
setContentView(R.layout.activity_main);

pre = (ImageView) findViewById(R.id.pre);
/*
* 通过这种方法读取的bitmap是只读的,不可修改
*/
Bitmap bitmap = BitmapFactory.decodeResource(getResources(),
R.drawable.pre);
/*
* 内存中的生成一张同样大小与配置的图片
*/
buffImage = Bitmap.createBitmap(bitmap.getWidth(), bitmap.getHeight(),
bitmap.getConfig());

canvas = new Canvas(buffImage);

Paint paint = new Paint();

Matrix matrix = new Matrix();
/*
* 画图
*/
canvas.drawBitmap(bitmap, matrix, paint);
pre.setImageBitmap(buffImage);

/*
* 设置监听事件
*/
pre.setOnTouchListener(this);
}

@Override
public boolean onTouch(View v, MotionEvent event) {
switch (event.getAction()) {
case MotionEvent.ACTION_MOVE:
Log.d(TAG, "move" + event.getX() + "------->" + event.getY());
int stopX = (int) event.getX();
int stopY = (int) event.getY();
// 这个判断是计算边界,因为超过了边界为负值时会报错
if (stopX >= RADIUS && stopX <= pre.getWidth() - RADIUS
&& stopY >= RADIUS && stopY <= pre.getHeight() - RADIUS) {
/**
* 计算圆,挖空一个半径为RADIUS的实心圆
*/
for (int radius = 0; radius <= RADIUS; radius++) {
for (double angle = 0; angle <= 360; angle++) {

int newX = (int) (stopX + radius * Math.cos(angle));
int newY = (int) (stopY + radius * Math.sin(angle));
buffImage.setPixel(newX, newY, Color.TRANSPARENT);

}
}
pre.setImageBitmap(buffImage);
}
break;

}
return true;
}

}

7.简易调色板的使用

布局

<LinearLayout xmlns:android="http://schemas.android.com/apk/res/android"
xmlns:tools="http://schemas.android.com/tools"
android:layout_width="match_parent"
android:layout_height="match_parent"
android:gravity="center_horizontal"
android:orientation="vertical"
android:paddingBottom="@dimen/activity_vertical_margin"
android:paddingLeft="@dimen/activity_horizontal_margin"
android:paddingRight="@dimen/activity_horizontal_margin"
android:paddingTop="@dimen/activity_vertical_margin"
tools:context=".MainActivity" >

<TextView
android:layout_width="wrap_content"
android:layout_height="wrap_content"
android:textSize="30sp"
android:text="调色板" />

<SeekBar
android:id="@+id/seekbar_red"
android:layout_width="match_parent"
android:layout_height="wrap_content"
android:progress="50"
android:max="100"/>
<SeekBar
android:id="@+id/seekbar_green"
android:layout_width="match_parent"
android:layout_height="wrap_content"
android:progress="50"
android:max="100"/>
<SeekBar
android:id="@+id/seekbar_blue"
android:layout_width="match_parent"
android:layout_height="wrap_content"
android:progress="50"
android:max="100"/>
<SeekBar
android:id="@+id/seekbar_alpha"
android:layout_width="match_parent"
android:layout_height="wrap_content"
android:progress="50"
android:max="100"/>

<ImageView
android:id="@+id/iv"
android:layout_width="wrap_content"
android:layout_height="wrap_content" />

</LinearLayout>

Activity

/**
* 简易调色板 步骤: 1.使用SeekBar来控制颜色的显示比例
*
*
* @author 刘楠
*
* 2016-3-3下午10:58:24
*/
public class MainActivity extends Activity {

private SeekBar seekbarRed;
private ImageView iv;
private Paint paint;
private Matrix matrix;
private Canvas canvas;
private SeekBar seekbarGreen;
private SeekBar seekbarBlue;
private SeekBar seekbarAlpha;

@Override
protected void onCreate(Bundle savedInstanceState) {
super.onCreate(savedInstanceState);
setContentView(R.layout.activity_main);
seekbarRed = (SeekBar) findViewById(R.id.seekbar_red);
seekbarGreen = (SeekBar) findViewById(R.id.seekbar_green);
seekbarBlue = (SeekBar) findViewById(R.id.seekbar_blue);
seekbarAlpha = (SeekBar) findViewById(R.id.seekbar_alpha);
iv = (ImageView) findViewById(R.id.iv);
// 通过这种方法读取的bitmap是只读的,不可修改
final Bitmap bitmap = BitmapFactory.decodeResource(getResources(),
R.drawable.pre14);

final Bitmap buffImage = Bitmap.createBitmap(bitmap.getWidth(),
bitmap.getHeight(), bitmap.getConfig());

canvas = new Canvas(buffImage);

paint = new Paint();
matrix = new Matrix();

canvas.drawBitmap(bitmap, matrix, paint);

iv.setImageBitmap(buffImage);

seekbarRed.setOnSeekBarChangeListener(new OnSeekBarChangeListener() {

@Override
public void onStopTrackingTouch(SeekBar seekBar) {
int progress = seekBar.getProgress();
float value = progress / 50.0f;
ColorMatrix cm = new ColorMatrix();
/*
*
* 颜色矩阵
*/
cm.set(new float[] { 1 * value, 0, 0, 0, 0,// 红色
0, 1, 0, 0, 0,// 绿色
0, 0, 1, 0, 0,// 蓝色
0, 0, 0, 1, 0,// 透明度
});
// 给画笔添加过滤器
// 给画笔添加颜色过滤器

paint.setColorFilter(new ColorMatrixColorFilter(cm));

canvas.drawBitmap(bitmap, matrix, paint);
iv.setImageBitmap(buffImage);

}

@Override
public void onStartTrackingTouch(SeekBar seekBar) {

}

@Override
public void onProgressChanged(SeekBar seekBar, int progress,
boolean fromUser) {

float value = progress / 50.0f;
ColorMatrix cm = new ColorMatrix();
/*
*
* 颜色矩阵
*/
cm.set(new float[] { 1 * value, 0, 0, 0, 0,// 红色
0, 1, 0, 0, 0,// 绿色
0, 0, 1, 0, 0,// 蓝色
0, 0, 0, 1, 0,// 透明度
});
// 给画笔添加过滤器
// 给画笔添加颜色过滤器

paint.setColorFilter(new ColorMatrixColorFilter(cm));

canvas.drawBitmap(bitmap, matrix, paint);
iv.setImageBitmap(buffImage);

}
});
seekbarGreen.setOnSeekBarChangeListener(new OnSeekBarChangeListener() {

@Override
public void onStopTrackingTouch(SeekBar seekBar) {
int progress = seekBar.getProgress();
float value = progress / 50.0f;
ColorMatrix cm = new ColorMatrix();
/*
*
* 颜色矩阵
*/
cm.set(new float[] { 1, 0, 0, 0, 0,// 红色
0, 1 * value, 0, 0, 0,// 绿色
0, 0, 1, 0, 0,// 蓝色
0, 0, 0, 1, 0,// 透明度
});
// 给画笔添加过滤器
// 给画笔添加颜色过滤器

paint.setColorFilter(new ColorMatrixColorFilter(cm));

canvas.drawBitmap(bitmap, matrix, paint);
iv.setImageBitmap(buffImage);

}

@Override
public void onStartTrackingTouch(SeekBar seekBar) {

}

@Override
public void onProgressChanged(SeekBar seekBar, int progress,
boolean fromUser) {

float value = progress / 50.0f;
ColorMatrix cm = new ColorMatrix();
/*
*
* 颜色矩阵
*/
cm.set(new float[] { 1, 0, 0, 0, 0,// 红色
0, 1 * value, 0, 0, 0,// 绿色
0, 0, 1, 0, 0,// 蓝色
0, 0, 0, 1, 0,// 透明度
});
// 给画笔添加过滤器
// 给画笔添加颜色过滤器

paint.setColorFilter(new ColorMatrixColorFilter(cm));

canvas.drawBitmap(bitmap, matrix, paint);
iv.setImageBitmap(buffImage);

}
});
seekbarBlue.setOnSeekBarChangeListener(new OnSeekBarChangeListener() {

@Override
public void onStopTrackingTouch(SeekBar seekBar) {
int progress = seekBar.getProgress();
float value = progress / 50.0f;
ColorMatrix cm = new ColorMatrix();
/*
*
* 颜色矩阵
*/
cm.set(new float[] { 1, 0, 0, 0, 0,// 红色
0, 1, 0, 0, 0,// 绿色
0, 0, 1 * value, 0, 0,// 蓝色
0, 0, 0, 1, 0,// 透明度
});
// 给画笔添加过滤器
// 给画笔添加颜色过滤器

paint.setColorFilter(new ColorMatrixColorFilter(cm));

canvas.drawBitmap(bitmap, matrix, paint);
iv.setImageBitmap(buffImage);

}

@Override
public void onStartTrackingTouch(SeekBar seekBar) {

}

@Override
public void onProgressChanged(SeekBar seekBar, int progress,
boolean fromUser) {

float value = progress / 50.0f;
ColorMatrix cm = new ColorMatrix();
cm.set(new float[] { 1, 0, 0, 0, 0,// 红色
0, 1, 0, 0, 0,// 绿色
0, 0, 1 * value, 0, 0,// 蓝色
0, 0, 0, 1, 0,// 透明度
});
// 给画笔添加过滤器
// 给画笔添加颜色过滤器

paint.setColorFilter(new ColorMatrixColorFilter(cm));

canvas.drawBitmap(bitmap, matrix, paint);
iv.setImageBitmap(buffImage);

}
});
seekbarAlpha.setOnSeekBarChangeListener(new OnSeekBarChangeListener() {

@Override
public void onStopTrackingTouch(SeekBar seekBar) {
int progress = seekBar.getProgress();
float value = progress / 50.0f;
ColorMatrix cm = new ColorMatrix();
cm.set(new float[] { 1, 0, 0, 0, 0,// 红色
0, 1, 0, 0, 0,// 绿色
0, 0, 1, 0, 0,// 蓝色
0, 0, 0, 1 * value, 0,// 透明度
});
// 给画笔添加过滤器
// 给画笔添加颜色过滤器

paint.setColorFilter(new ColorMatrixColorFilter(cm));

canvas.drawBitmap(bitmap, matrix, paint);
iv.setImageBitmap(buffImage);

}

@Override
public void onStartTrackingTouch(SeekBar seekBar) {

}

@Override
public void onProgressChanged(SeekBar seekBar, int progress,
boolean fromUser) {

float value = progress / 50.0f;
ColorMatrix cm = new ColorMatrix();
cm.set(new float[] { 1, 0, 0, 0, 0,// 红色
0, 1, 0, 0, 0,// 绿色
0, 0, 1, 0, 0,// 蓝色
0, 0, 0, 1 * value, 0,// 透明度
});
// 给画笔添加过滤器
// 给画笔添加颜色过滤器

paint.setColorFilter(new ColorMatrixColorFilter(cm));

canvas.drawBitmap(bitmap, matrix, paint);
iv.setImageBitmap(buffImage);

}
});
}

}

   
2172 次浏览       15
 
相关文章

手机软件测试用例设计实践
手机客户端UI测试分析
iPhone消息推送机制实现与探讨
Android手机开发(一)
 
相关文档

Android_UI官方设计教程
手机开发平台介绍
android拍照及上传功能
Android讲义智能手机开发
相关课程

Android高级移动应用程序
Android系统开发
Android应用开发
手机软件测试
最新课程计划
信息架构建模(基于UML+EA)3-21[北京]
软件架构设计师 3-21[北京]
图数据库与知识图谱 3-25[北京]
业务架构设计 4-11[北京]
SysML和EA系统设计与建模 4-22[北京]
DoDAF规范、模型与实例 5-23[北京]

android人机界面指南
Android手机开发(一)
Android手机开发(二)
Android手机开发(三)
Android手机开发(四)
iPhone消息推送机制实现探讨
手机软件测试用例设计实践
手机客户端UI测试分析
手机软件自动化测试研究报告
更多...   

Android高级移动应用程序
Android应用开发
Android系统开发
手机软件测试
嵌入式软件测试
Android软、硬、云整合

领先IT公司 android开发平台最佳实践
北京 Android开发技术进阶
某新能源领域企业 Android开发技术
某航天公司 Android、IOS应用软件开发
阿尔卡特 Linux内核驱动
艾默生 嵌入式软件架构设计
西门子 嵌入式架构设计
更多...