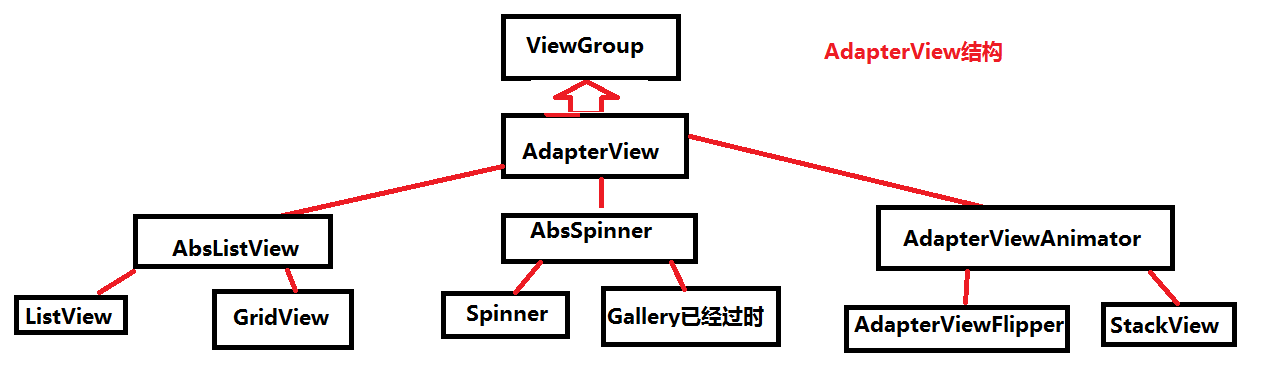
| 1.AdapteView
AdapteView 继承ViewGroup它的本质是容器
AdapterView派生了3个子类:
AbsListView
AbsSpinner
AdapterViewAnimation
这3个类是抽象类
实际使用中采用的是它们的子类
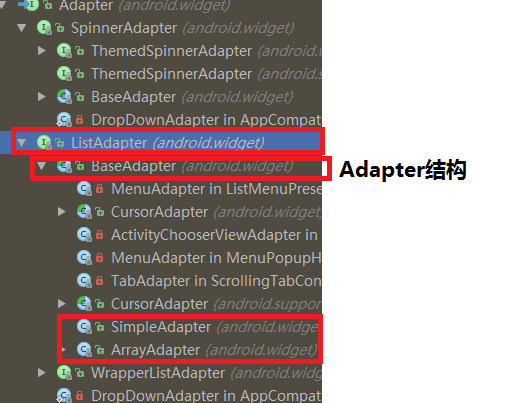
2.Adpate结构
3.使用ArrayAdapter完成ListView显示
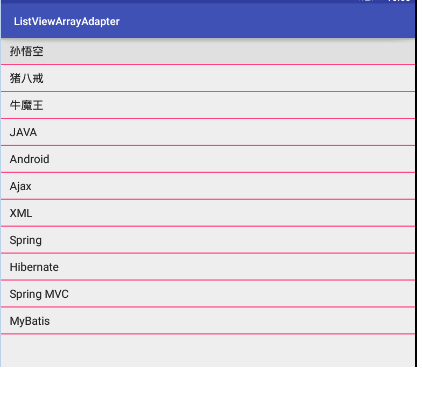
ListView使用的是ListAdapter类型的适配器
由于只显示文字,所有使用ArrayAdapter
ArrayAdapter 是ListAdapter的子类
布局文件
<?xml version="1.0" encoding="utf-8"?>
<LinearLayout
xmlns:android="http://schemas.android.com/apk/res/android"
android:layout_width="match_parent"
android:layout_height="match_parent"
android:orientation="vertical">
<!--
divider:分隔线颜色
dividerHeight:分隔线高度
ListView
建议 layout_width:与 layout_height 都设置为match_parent
要预览的话要有ID属性
-->
<ListView
android:id="@+id/lv"
android:layout_width="match_parent"
android:layout_height="match_parent"
android:divider="@color/colorAccent"
android:dividerHeight="2dp">
</ListView>
</LinearLayout> |
Activity
/**
* ListView使用
* ArrayAdapter适配器
public class MainActivity extends AppCompatActivity
{
ListView
private ListView lv;
private String [] items={
"孙悟空",
"猪八戒",
"牛魔王",
"JAVA",
"Android",
"Ajax",
"XML",
"Spring",
"Hibernate",
"Spring MVC",
"MyBatis"
};
@Override
protected void onCreate(Bundle savedInstanceState)
{
super.onCreate(savedInstanceState);
setContentView(R.layout.activity_main);
lv = (ListView) findViewById(R.id.lv);
public ArrayAdapter(Context context, @LayoutRes
int resource, @NonNull T[] objects)
context:上下文
//为ListView设置适配器
lv.setAdapter(new ArrayAdapter<String>(MainActivity.this,android.R.layout.simple_list_item_1,items));
}
} |
android.R.layout.simple_list_item_1
内部就是一个TextView
<TextView xmlns:android="http://schemas.android.com/apk/res/android"
android:id="@android:id/text1"
android:layout_width="match_parent"
android:layout_height="wrap_content"
android:textAppearance="?android:attr/textAppearanceListItemSmall"
android:gravity="center_vertical"
android:paddingStart="?android:attr/listPreferredItemPaddingStart"
android:paddingEnd="?android:attr/listPreferredItemPaddingEnd"
android:minHeight="?android:attr/listPreferredItemHeightSmall"
/> |
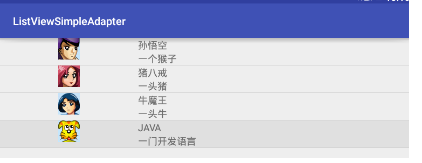
4.使用SimpleAdapter
public SimpleAdapter(Context context, List<? extends Map<String, ?>> data,
@LayoutRes int resource, String[] from, @IdRes int[] to) |
context:上下文
LIst<? extends Map<String,/.>> data: 集合类型的对象,每个元素都是一个Map<String,?>对象
resource:提定一个界面布局的ID,布局文件
from:该参数提取Map<String,?>的key
to:int[]类型的参数决定填充哪些控件
布局文件:
<?xml version="1.0" encoding="utf-8"?>
<RelativeLayout
xmlns:android="http://schemas.android.com/apk/res/android"
xmlns:tools="http://schemas.android.com/tools"
android:layout_width="match_parent"
android:layout_height="match_parent"
tools:context="com.itheima.listviewsimpleadapter.MainActivity">
<!--
ListView
-->
<ListView
android:id="@+id/lv"
android:layout_width="match_parent"
android:layout_height="match_parent">
</ListView>
</RelativeLayout>
|
listview填充的布局文件
<?xml version="1.0" encoding="utf-8"?>
<LinearLayout xmlns:android="http://schemas.android.com/apk/res/android"
android:layout_width="match_parent"
android:layout_height="match_parent"
android:orientation="horizontal">
<!--
头像显示
-->
<ImageView
android:id="@+id/iv_icon"
android:layout_width="0dp"
android:layout_weight="1"
android:layout_height="wrap_content"
android:src="@drawable/libai"/>
<!--
右边显示 姓名与描述
-->
<LinearLayout
android:layout_width="0dp"
android:layout_weight="2"
android:layout_height="wrap_content"
android:orientation="vertical">
<TextView
android:id="@+id/tv_name"
android:layout_width="match_parent"
android:layout_height="wrap_content"
android:text="这里显示姓名"/>
<TextView
android:id="@+id/tv_desc"
android:layout_width="match_parent"
android:layout_height="wrap_content"
android:text="这里显示描述"/>
</LinearLayout>
</LinearLayout> |
Activity中SimpleAdapter
/**
* ListView
* SimpleAdapter实现
public class MainActivity extends AppCompatActivity
{
private ListView lv;
姓名
private String[] names = {
"孙悟空",
"猪八戒",
"牛魔王",
"JAVA"
};
* 图片资源ID*/
private int[] resourceID = {
R.drawable.libai,
R.drawable.nongyu,
R.drawable.qingzhao,
R.drawable.tiger
};
private String[] desc = {
"一个猴子",
"一头猪",
"一头牛",
"一门开发语言"
};
@Override
protected void onCreate(Bundle savedInstanceState)
{
super.onCreate(savedInstanceState);
setContentView(R.layout.activity_main);
lv = (ListView) findViewById(R.id.lv);
//创建一个List集合
List<Map<String, Object>> listItems
= new ArrayList<Map<String, Object>>();
//为List添加元素
for (int i = 0; i < names.length; i++) {
//声明一个Map
Map<String, Object> map = new HashMap<String,
Object>();
map.put("name", names[i]);
map.put("icon", resourceID[i]);
map.put("desc", desc[i]);
//添加到集合
listItems.add(map);
}
//创建一个SimpleAdapter
public SimpleAdapter(Context context, List<?
extends Map<String, ?>> data,
@LayoutRes int resource, String[] from, @IdRes
int[] to) {
context:上下文
LIst<? extends Map<String,/.>> data:
集合类型的对象,每个元素都是一个Map<String,?>对象
resource:提定一个界面布局的ID,布局文件
from:该参数提取Map<String,?>的key
to:int[]类型的参数决定填充哪些控件
SimpleAdapter simpleAdapter =
new SimpleAdapter(this, listItems, R.layout.simple_item,
new String[]{"name", "icon",
"desc"},new int[]{R.id.tv_name,R.id.iv_icon,R.id.tv_desc});
//为listview设置适配器
lv.setAdapter(simpleAdapter);
}
} |
5.使用BaseAdapter
BaseAdapter要实现 以下方法:
getCount():方法返回控制该Adapter将会包含多少个列表项
getItem(int position): 该方法的返回值决定第Position处的列表项的内容
getItemId(int position): 该方法的返回值决定第Position处的列表项的内容的ID
getView(int position,View conerView
,ViewGroup parent)
这个方法绝决返回值第posistion处的列表项
5.1.创建一个学生信息录入,使用ListView展示信息baseAdapter
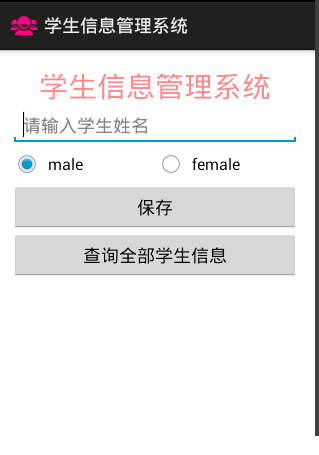 
布局
<LinearLayout xmlns:android="http://schemas.android.com/apk/res/android"
xmlns:tools="http://schemas.android.com/tools"
android:layout_width="match_parent"
android:layout_height="match_parent"
android:orientation="vertical"
android:paddingBottom="@dimen/activity_vertical_margin"
android:paddingLeft="@dimen/activity_horizontal_margin"
android:paddingRight="@dimen/activity_horizontal_margin"
android:paddingTop="@dimen/activity_vertical_margin"
tools:context=".MainActivity" >
<TextView
android:layout_width="match_parent"
android:layout_height="wrap_content"
android:gravity="center_horizontal"
android:text="学生信息管理系统"
android:textColor="#77ff0000"
android:textSize="29sp" />
<EditText
android:id="@+id/et_name"
android:layout_width="match_parent"
android:layout_height="wrap_content"
android:hint="请输入学生姓名" />
<!-- 性别 -->
<RadioGroup
android:id="@+id/rgp"
android:layout_width="match_parent"
android:layout_height="wrap_content"
android:orientation="horizontal" >
<!-- 性别男 -->
<RadioButton
android:id="@+id/rb_male"
android:layout_width="0dp"
android:layout_height="wrap_content"
android:layout_weight="1"
android:checked="true"
android:text="male" />
<!-- 性别女 -->
<RadioButton
android:id="@+id/rb_female"
android:layout_width="0dp"
android:layout_height="wrap_content"
android:layout_weight="1"
android:text="female" />
</RadioGroup>
<!-- 保存 -->
<Button
android:id="@+id/btn_save"
android:layout_width="match_parent"
android:layout_height="wrap_content"
android:text="保存" />
<!-- 查询 -->
<Button
android:id="@+id/btn_querty"
android:layout_width="match_parent"
android:layout_height="wrap_content"
android:text="查询全部学生信息" />
<ListView
android:id="@+id/lv_item"
android:layout_width="match_parent"
android:layout_height="match_parent"
android:divider="#ff0000"
android:dividerHeight="2dp">
</ListView>
</LinearLayout> |
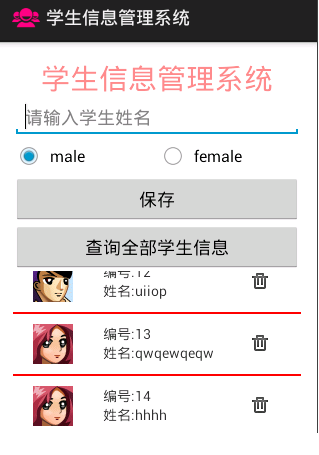
ListView要使用的布局
<?xml version="1.0" encoding="utf-8"?>
<RelativeLayout xmlns:android="http://schemas.android.com/apk/res/android"
android:layout_width="match_parent"
android:layout_height="wrap_content"
>
<ImageView
android:id="@+id/iv_sex"
android:layout_width="wrap_content"
android:layout_height="wrap_content"
android:layout_centerVertical="true"
android:layout_margin="20dp"
android:src="@drawable/mr" />
<RelativeLayout
android:layout_width="match_parent"
android:layout_height="wrap_content"
android:layout_margin="10dp"
android:layout_toRightOf="@id/iv_sex"
>
<TextView
android:id="@+id/tv_no"
android:layout_width="wrap_content"
android:layout_height="wrap_content"
android:text="学号" />
<TextView
android:id="@+id/tv_name"
android:layout_width="wrap_content"
android:layout_height="wrap_content"
android:layout_below="@id/tv_no"
android:text="姓名" />
<ImageView
android:id="@+id/iv_delete"
android:layout_width="wrap_content"
android:layout_height="wrap_content"
android:layout_alignParentRight="true"
android:layout_centerVertical="true"
android:layout_margin="20dp"
android:src="@drawable/delete" />
</RelativeLayout>
</RelativeLayout>
|
数据库创建类
/**
* 数据库创建类,与维护的类 继承SQLiteOpenHelper
public class StudentSqliteOpenHelper extends
SQLiteOpenHelper {
private static final String TAG = "StudentSqliteOpenHelper";
public StudentSqliteOpenHelper(Context context)
{
super(context, "student.db", null,
2);
}
* 创建数据库时,执行一次,只执行一次
* 用来创建数据表
@Override
public void onCreate(SQLiteDatabase db) {
Log.i(TAG, "onCreate执行了");
//获取原来的版本,获取不到为0
int version = db.getVersion();
if(version==0){
//创建表
String sql= "create table students ( _id
integer primary key autoincrement, name varchar(30),gender
varchar(10))";
db.execSQL(sql);
}else{
//创建表
String sql= "create table students ( _id
integer primary key autoincrement, name varchar(30))";
db.execSQL(sql);
}
}
* 当数据库版本发生变化时执行
@Override
public void onUpgrade(SQLiteDatabase db, int
oldVersion, int newVersion) {
Log.i(TAG, "onUpgrade执行了");
switch (oldVersion) {
case 1:
String sql= "alter table students add gender
varchar(10)";
db.execSQL(sql);
break;
case 2:
break;
default:
break;
}
}
} |
实体类
/**
* 学生的封装类
public class Student {
* ID
private int id;
* 姓名
private String name;
* 性别
private String gender;
public Student() {
super();
}
public Student(int id, String name, String gender)
{
super();
this.id = id;
this.name = name;
this.gender = gender;
}
public String getGender() {
return gender;
}
public int getId() {
return id;
}
public String getName() {
return name;
}
public void setGender(String gender) {
this.gender = gender;
}
public void setId(int id) {
this.id = id;
}
public void setName(String name) {
this.name = name;
}
}
|
数据库工具类
/**
* 学生数据库访问工具类
public class StudentDao {
* 数据库创建更新类
private StudentSqliteOpenHelper helper;
public StudentDao(Context context) {
helper = new StudentSqliteOpenHelper(context);
}
* 插入一条记录
* @param name
* 姓名
* @param gender
* 性别
* @return 返回插入后的_id
public long insert(String name, String gender)
{
// 获取数据库
SQLiteDatabase db = helper.getWritableDatabase();
// 插入的列
String nullColumnHack = "values(null,?,?)";
// 占位符
ContentValues values = new ContentValues();
values.put("name", name);
values.put("gender", gender);
// 执行
long insert = db.insert("students",
nullColumnHack, values);
// 关闭连接
db.close();
return insert;
}
* 修改一条记录
* @param name
* 姓名
* @param gender
* 性别
* @return 返回插入后的_id
public long update(String name, String gender)
{
// 获取数据库
SQLiteDatabase db = helper.getWritableDatabase();
// 插入的列
// 占位符
ContentValues values = new ContentValues();
values.put("gender", gender);
// 执行
int update = db.update("students",
values, "name = ?",
new String[] { name });
// 关闭连接
db.close();
return update;
}
* 删除一条记录
* @param name
* 姓名
* @return 返回删除后的_id
public int delete(String name) {
// 获取数据库
SQLiteDatabase db = helper.getWritableDatabase();
// 执行
int delete = db.delete("students",
"name = ?", new String[] { name });
// 关闭连接
db.close();
return delete;
}
* 查询全部学生信息
* @return
public List<Student> getAll() {
// 容器
List<Student> list = new ArrayList<Student>();
// 获取数据库
SQLiteDatabase db = helper.getReadableDatabase();
String[] columns = { "_id", "name",
"gender" };
Cursor cursor = db.query("students",
columns, null, null, null, null,
null);
while (cursor.moveToNext()) {
int id = cursor.getInt(cursor.getColumnIndex("_id"));
String name = cursor.getString(cursor.getColumnIndex("name"));
String gender = cursor.getString(cursor.getColumnIndex("gender"));
// 添加到集合中
list.add(new Student(id, name, gender));
}
// 关闭游标
cursor.close();
// 关闭
db.close();
return list;
}
}
|
Activity
学生管理信息系统Activity
* 步骤
* 1.获取用户输入姓名与选择的性别
* 2.判断是否为空,为空就提示,不为空
* 3.保存数据
* 4.点击查询,在下方的ListView中显示所有的学生信息
* 5.为ListView设置BaseAdapter
* 6.实现getCount与getView方法
* 7.返回view
* 8.点击删除,弹出提示对话框,
* 9.取消什么也不做,确定就删除当前记录
public class MainActivity extends Activity implements
OnClickListener {
* 姓名
private EditText et_name;
* 性别
private RadioGroup rgp;
* 保存
private Button btn_save;
* 查询
private Button btn_querty;
* 学生列表
private ListView lv_item;
* 学生表数据库操作类
private StudentDao studentDao;
* 学生列表
private List<Student> list;
* 学生列表适配器
private StuBaseAdapter stuBaseAdapter;
@Override
protected void onCreate(Bundle savedInstanceState)
{
super.onCreate(savedInstanceState);
setContentView(R.layout.activity_main);
et_name = (EditText) findViewById(R.id.et_name);
rgp = (RadioGroup) findViewById(R.id.rgp);
btn_save = (Button) findViewById(R.id.btn_save);
btn_querty = (Button) findViewById(R.id.btn_querty);
lv_item = (ListView) findViewById(R.id.lv_item);
* 初始化数据库学生表的工具类
studentDao = new StudentDao(this);
* 设置监听事件
btn_save.setOnClickListener(this);
btn_querty.setOnClickListener(this);
}
* 单击事件监听器
@Override
public void onClick(View v) {
switch (v.getId()) {
case R.id.btn_save:
// 保存
save();
break;
case R.id.btn_querty:
// 查询
query();
break;
}
}
* 查询学生列表
private void query() {
refresh();
}
private void refresh() {
* 查询全部学生信息
list = studentDao.getAll();
if (stuBaseAdapter == null) {
// 判断 为空就new ,为ListView设置适配器
stuBaseAdapter = new StuBaseAdapter();
lv_item.setAdapter(stuBaseAdapter);
} else {
// 通知ListView列表改变
stuBaseAdapter.notifyDataSetChanged();
}
}
* 保存学生信息
private void save() {
// 获取学生输入的信息
String name = et_name.getText().toString().trim();
// 判断
if (TextUtils.isEmpty(name)) {
Toast.makeText(this, "学生姓名不能为空", Toast.LENGTH_SHORT).show();
return;
}
// 获取性别
String gender = "male";
switch (rgp.getCheckedRadioButtonId()) {
case R.id.rb_male:
gender = "male";
break;
case R.id.rb_female:
gender = "female";
break;
}
// 开始保存
long insert = studentDao.insert(name, gender);
if (insert > 0) {
Toast.makeText(this, "保存成功", Toast.LENGTH_SHORT).show();
et_name.setText("");
} else {
Toast.makeText(this, "保存失败", Toast.LENGTH_SHORT).show();
}
}
* 学生列表适配器
private class StuBaseAdapter extends BaseAdapter
{
private static final String TAG = "StuBaseAdapter";
@Override
public int getCount() {
return list.size();
}
@Override
public View getView(int position, View convertView,
ViewGroup parent) {
Log.i(TAG, position + "");
View view;
if (convertView == null) {
view = View.inflate(MainActivity.this, R.layout.stu_item,
null);
} else {
view = convertView;
}
// 得到学生对象
final Student student = list.get(position);
ImageView iv_sex = (ImageView) view.findViewById(R.id.iv_sex);
if ("male".equals(student.getGender()))
{
iv_sex.setImageResource(R.drawable.mr);
} else if ("female".equals(student.getGender()))
{
iv_sex.setImageResource(R.drawable.miss);
}
TextView tv_no = (TextView) view.findViewById(R.id.tv_no);
tv_no.setText("编号:" + student.getId());
TextView tv_name = (TextView) view.findViewById(R.id.tv_name);
tv_name.setText("姓名:" + student.getName());
ImageView iv_delete = (ImageView) view.findViewById(R.id.iv_delete);
iv_delete.setOnClickListener(new OnClickListener()
{
@Override
public void onClick(View v) {
// 对话框来提示用户是否删除
AlertDialog.Builder builder = new AlertDialog.Builder(
MainActivity.this);
builder.setTitle("删除").setIcon(R.drawable.tools)
.setMessage("确定要删除这条记录吗");
builder.setPositiveButton("确定",
new DialogInterface.OnClickListener() {
@Override
public void onClick(DialogInterface dialog,int
which) {
* 删除方法
int delete = studentDao.delete(student.getName());
if (delete > 0) {
Toast.makeText(MainActivity.this, "删除成功",
Toast.LENGTH_SHORT).show();
// 刷新列表
refresh();
} else {
Toast.makeText(MainActivity.this, "删除失败",
Toast.LENGTH_SHORT).show();
}
}
});
builder.setNegativeButton("取消", null);
builder.create().show();
}
});
return view;
}
@Override
public Object getItem(int position) {
return position;
}
@Override
public long getItemId(int position) {
return position;
}
}
} |
6.GridView与ExpandableListView
GridView:和ListView有共同的父类,都是AbsListView,与ListView很相似
区别:ListView只显示一列
GridView可以显示多列
numcolumns:属性可以设置显示列数
其它用法与ListView一样
7.Spinner
Spinner其实就是一个列表选择框,弹出一个菜单提供用户选择,
也需要设置Adapter
entries:使用XML资源文件数据设置下拉菜单
pupupBackground:列表 选择框的背景色
prompt:提示信息
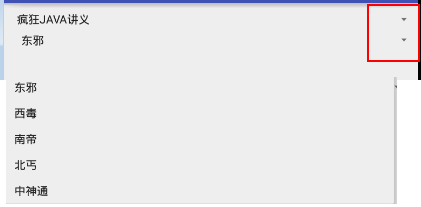
7.1 xml
<?xml version="1.0" encoding="utf-8"?>
<resources>
<string-array name="books">
<item>疯狂JAVA讲义</item>
<item>Android</item>
<item>JAVA EE企业应用</item>
<item>Android 第一行代码</item>
</string-array>
</resources> |
7.2 Avtivity
|
* Spinner实现
* 设置适配器
public class MainActivity extends AppCompatActivity
{
//Spinner
private Spinner spinner;
private String [] names={"东邪","西毒","南帝","北丐","中神通"};
@Override
protected void onCreate(Bundle savedInstanceState)
{
super.onCreate(savedInstanceState);
setContentView(R.layout.activity_main);
spinner = (Spinner) findViewById(R.id.spinner);
//设置适配器
ArrayAdapter<String> arrayAdapter
= new ArrayAdapter<String>(this,android.R.layout.simple_list_item_1,names);
spinner.setAdapter(arrayAdapter);
}
} |
<?xml version="1.0" encoding="utf-8"?>
<LinearLayout
xmlns:android="http://schemas.android.com/apk/res/android"
xmlns:tools="http://schemas.android.com/tools"
android:layout_width="match_parent"
android:layout_height="match_parent"
android:orientation="vertical"
android:paddingBottom="@dimen/activity_vertical_margin"
android:paddingLeft="@dimen/activity_horizontal_margin"
android:paddingRight="@dimen/activity_horizontal_margin"
android:paddingTop="@dimen/activity_vertical_margin"
tools:context="com.itheima.spinner.MainActivity">
<!--
第一个Spinner使用entries配置XML资源
-->
<Spinner
android:layout_width="match_parent"
android:layout_height="wrap_content"
android:entries="@array/books">
</Spinner>
<!--
第二个没有配置,
在Activity中设置Adapter
-->
<Spinner
android:id="@+id/spinner"
android:layout_width="match_parent"
android:layout_height="wrap_content">
</Spinner>
</LinearLayout>
|
8.AdapterViewFlipper的功能与用法
AdapterViewFlipper继承了AdapterViewAnimator,它也会显示Adapter提供的多个级件,但它每次只能显示一个View组件,程序可以通过showPrevious()和showNext()方法控制显示上一个,下一个,
使用startFlipper()控件自动播放
stopFlipper()停止播放
8.1属性:
animateFirstView:第一个View是否使用动画
inAnimation:显示时使用动画
loopViews:循环到最后一个时,是否自动转头到第一个
outAanimation:设置组件隐藏时使用的动画
autoStrat()是否自动播放
flipInterval():设置自动播放的时间
8.2自动播放图片

布局文件
<?xml version="1.0" encoding="utf-8"?>
<RelativeLayout
xmlns:android="http://schemas.android.com/apk/res/android"
xmlns:tools="http://schemas.android.com/tools"
android:layout_width="match_parent"
android:layout_height="match_parent"
android:paddingBottom="@dimen/activity_vertical_margin"
android:paddingLeft="@dimen/activity_horizontal_margin"
android:paddingRight="@dimen/activity_horizontal_margin"
android:paddingTop="@dimen/activity_vertical_margin"
tools:context="com.itheima.adapterviewflipper.MainActivity">
<!--
flipInterval 5秒显示时间
layout_alignParentTop与父窗体顶部对齐
-->
<AdapterViewFlipper
android:id="@+id/flipper"
android:layout_width="match_parent"
android:layout_height="match_parent"
android:layout_alignParentTop="true"
android:flipInterval="5000"/>
<Button
android:layout_alignParentBottom="true"
android:layout_width="wrap_content"
android:layout_height="wrap_content"
android:onClick="prev"
android:text="上一个"/>
<Button
android:layout_alignParentBottom="true"
android:layout_centerHorizontal="true"
android:layout_width="wrap_content"
android:layout_height="wrap_content"
android:onClick="auto"
android:text="自动播放"/>
<Button
android:layout_alignParentRight="true"
android:layout_alignParentBottom="true"
android:layout_width="wrap_content"
android:layout_height="wrap_content"
android:onClick="next"
android:text="下一个"/>
</RelativeLayout>
Adapter填充的XML布局文件
<?xml version="1.0" encoding="utf-8"?>
<LinearLayout
xmlns:android="http://schemas.android.com/apk/res/android"
android:layout_width="match_parent"
android:layout_height="match_parent">
<ImageView
android:id="@+id/iv_display"
android:layout_width="match_parent"
android:layout_height="match_parent">
</ImageView>
</LinearLayout> |
Activity实现
|
* AdapterViewFlipper
* 步骤1.获取flipper
* 2.创建资源与适配器
* 3.为flipper设置适配器
public class MainActivity extends AppCompatActivity
{
flipper
private AdapterViewFlipper flipper;
资源图片
private int[] imageIds = new int[]
{
R.drawable.shuangzi, R.drawable.shuangyu,
R.drawable.chunv, R.drawable.tiancheng, R.drawable.tianxie,
R.drawable.sheshou, R.drawable.juxie, R.drawable.shuiping,
R.drawable.shizi, R.drawable.baiyang, R.drawable.jinniu,
R.drawable.mojie};
@Override
protected void onCreate(Bundle savedInstanceState)
{
super.onCreate(savedInstanceState);
setContentView(R.layout.activity_main);
flipper = (AdapterViewFlipper) findViewById(R.id.flipper);
//声明适配器
BaseAdapter baseAdapter = new BaseAdapter()
{
@Override
public int getCount() {
return imageIds.length;
}
@Override
public Object getItem(int position) {
return position;
}
@Override
public long getItemId(int position) {
return position;
}
@Override
public View getView(int position, View convertView,
ViewGroup parent) {
View view;
if (convertView == null) {
view = View.inflate(MainActivity.this, R.layout.images,
null);
} else {
view = convertView;
}
ImageView display = (ImageView) view.findViewById(R.id.iv_display);
//设置图片资源
display.setImageResource(imageIds[position]);
//设置ImageView的缩放类型
display.setScaleType(ImageView.ScaleType.FIT_XY);
return view;
}
};
//设置适配器
flipper.setAdapter(baseAdapter);
}
* 上一张
public void prev(View v) {
flipper.showPrevious();
flipper.stopFlipping();
}
* 自动播放
* @param v
*/
public void auto(View v) {
flipper.startFlipping();
}
* 下一张
* @param v
public void next(View v) {
flipper.showNext();
flipper.stopFlipping();
}
} |
9.StackView功能与用法

StackView也是AdapterViewAnimator的子类
它也是用于显示Adapter提供的一系列View的.StackView将会心堆叠Stack的方式来显示多个列表项
拖走StackView中处于顶端的View,下一View将会显示出来,将上一个View拖进StackView,将进显示
出来
showNext(),show()Previous()控制显示下一个与上一个
9.1布局
<?xml version="1.0" encoding="utf-8"?>
<LinearLayout
xmlns:android="http://schemas.android.com/apk/res/android"
xmlns:tools="http://schemas.android.com/tools"
android:layout_width="match_parent"
android:layout_height="match_parent"
android:orientation="horizontal"
tools:context="com.itheima.stackview.MainActivity">
<StackView
android:id="@+id/stackView"
android:layout_width="match_parent"
android:layout_height="wrap_content"
android:loopViews="true">
</StackView>
<LinearLayout
android:layout_width="match_parent"
android:layout_height="wrap_content"
android:orientation="horizontal">
<Button
android:onClick="prev"
android:text="上一个"
android:layout_width="wrap_content"
android:layout_height="wrap_content"/>
<Button
android:onClick="next"
android:text="下一个"
android:layout_width="wrap_content"
android:layout_height="wrap_content"/>
</LinearLayout>
</LinearLayout> |
填充XML
<?xml version="1.0" encoding="utf-8"?>
<LinearLayout xmlns:android="http://schemas.android.com/apk/res/android"
android:layout_width="match_parent"
android:layout_height="match_parent">
<ImageView
android:id="@+id/iv_display"
android:layout_width="wrap_content"
android:layout_height="wrap_content"/>
</LinearLayout> |
9.2 实现
|
* StackView
* 步骤
* 1.获取stackview
* 2.建立适配器与资源
* 3.设置适配器
public class MainActivity extends AppCompatActivity
{
private StackView stackView;
private int[] imageIds = new int[]
{
R.drawable.bomb5, R.drawable.bomb6, R.drawable.bomb7
, R.drawable.bomb8, R.drawable.bomb9, R.drawable.bomb10
, R.drawable.bomb11, R.drawable.bomb12, R.drawable.bomb13
, R.drawable.bomb14, R.drawable.bomb15, R.drawable.bomb16
};
@Override
protected void onCreate(Bundle savedInstanceState)
{
super.onCreate(savedInstanceState);
setContentView(R.layout.activity_main);
stackView = (StackView) findViewById(R.id.stackView);
数据集合
List<Map<String, Object>> listItem
= new ArrayList<Map<String, Object>>();
for (int i = 0; i < imageIds.length; i++)
{
Map<String, Object> map = new HashMap<String,
Object>();
map.put("image", imageIds[i]);
listItem.add(map);
}
SimpleAdapter simpleAdapter =
new SimpleAdapter(this, listItem, R.layout.images,
new String[]{"image"}, new int[]{R.id.iv_display});
//设置适配器
stackView.setAdapter(simpleAdapter);
}
* 上一个
public void prev(View v){
stackView.showPrevious();
}
* 下一个
public void next(View v){
stackView.showNext();
}
} |
|


