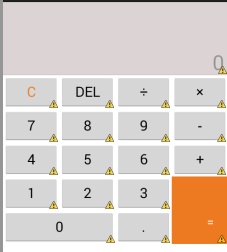
<LinearLayout xmlns:android="http://schemas.android.com/apk/res/android"
    xmlns:tools="http://schemas.android.com/tools"
    android:layout_width="match_parent"
    android:layout_height="match_parent"
    android:orientation="vertical"
    tools:context=".MainActivity" >
<!-- 上面的文本显示 -->
<TextView
android:layout_width="match_parent"
android:layout_height="wrap_content"
android:background="#33330000"
android:gravity="bottom|right"
android:hint="0"
android:lines="3"
android:paddingRight="5dp"
android:textSize="29sp" />
<!-- 下面的按键显示 -->
<LinearLayout
android:layout_width="match_parent"
android:layout_height="wrap_content"
android:orientation="vertical" >
<!-- 第一排按键 -->
<LinearLayout
android:layout_width="match_parent"
android:layout_height="wrap_content"
android:orientation="horizontal" >
<Button
android:layout_width="0dp"
android:layout_height="wrap_content"
android:layout_weight="1"
android:text="C"
android:textColor="#ED7A20"
android:textSize="20sp" />
<Button
android:layout_width="0dp"
android:layout_height="wrap_content"
android:layout_weight="1"
android:text="DEL"
android:textSize="20sp" />
<Button
android:layout_width="0dp"
android:layout_height="wrap_content"
android:layout_weight="1"
android:text="÷"
android:textSize="20sp" />
<Button
android:layout_width="0dp"
android:layout_height="wrap_content"
android:layout_weight="1"
android:text="×"
android:textSize="20sp" />
</LinearLayout>
<!-- 第二排按键 -->
<LinearLayout
android:layout_width="match_parent"
android:layout_height="wrap_content"
android:orientation="horizontal" >
<Button
android:layout_width="0dp"
android:layout_height="wrap_content"
android:layout_weight="1"
android:text="7"
android:textSize="20sp" />
<Button
android:layout_width="0dp"
android:layout_height="wrap_content"
android:layout_weight="1"
android:text="8"
android:textSize="20sp" />
<Button
android:layout_width="0dp"
android:layout_height="wrap_content"
android:layout_weight="1"
android:text="9"
android:textSize="20sp" />
<Button
android:layout_width="0dp"
android:layout_height="wrap_content"
android:layout_weight="1"
android:text="-"
android:textSize="20sp" />
</LinearLayout>
<!-- 第三排按键 -->
<LinearLayout
android:layout_width="match_parent"
android:layout_height="wrap_content"
android:orientation="horizontal" >
<Button
android:layout_width="0dp"
android:layout_height="wrap_content"
android:layout_weight="1"
android:text="4"
android:textSize="20sp" />
<Button
android:layout_width="0dp"
android:layout_height="wrap_content"
android:layout_weight="1"
android:text="5"
android:textSize="20sp" />
<Button
android:layout_width="0dp"
android:layout_height="wrap_content"
android:layout_weight="1"
android:text="6"
android:textSize="20sp" />
<Button
android:layout_width="0dp"
android:layout_height="wrap_content"
android:layout_weight="1"
android:text="+"
android:textSize="20sp" />
</LinearLayout>
<!-- 下面二排最外面 -->
<LinearLayout
android:layout_width="match_parent"
android:layout_height="wrap_content"
>
<!-- 左边 -->
<LinearLayout
android:layout_width="0dp"
android:layout_height="wrap_content"
android:layout_weight="3"
android:orientation="vertical" >
<!-- 左边上 -->
<LinearLayout
android:layout_width="match_parent"
android:layout_height="wrap_content"
>
<Button
android:layout_width="0dp"
android:layout_height="wrap_content"
android:layout_weight="1"
android:text="1"
android:textSize="20sp" />
<Button
android:layout_width="0dp"
android:layout_height="wrap_content"
android:layout_weight="1"
android:text="2"
android:textSize="20sp" />
<Button
android:layout_width="0dp"
android:layout_height="wrap_content"
android:layout_weight="1"
android:text="3"
android:textSize="20sp" />
</LinearLayout>
<!-- 左边下 -->
<LinearLayout
android:layout_width="match_parent"
android:layout_height="wrap_content"
>
<Button
android:layout_width="0dp"
android:layout_height="wrap_content"
android:layout_weight="2"
android:text="0"
android:textSize="20sp" />
<Button
android:layout_width="0dp"
android:layout_height="wrap_content"
android:layout_weight="1"
android:text="."
android:textSize="20sp" />
</LinearLayout>
</LinearLayout>
<!-- 右边按键 -->
<Button
android:layout_width="0dp"
android:layout_height="match_parent"
android:layout_weight="1"
android:background="#ED7A20"
android:gravity="bottom|right"
android:text="="
android:textColor="#ffffff"
android:paddingBottom="20dp"
android:paddingRight="20dp"/>
</LinearLayout>
</LinearLayout>
<AbsoluteLayout ></AbsoluteLayout>
</LinearLayout> |