| 最近反复研究日常经典必用的几个android
app,从主界面带来的交互方式入手进行分析,我将其大致分为三类。今天记录第一种方式,即主界面下面有几个tab页,最上端是标题栏,tab页和tab页之间不是通过滑动切换的,而是通过点击切换tab页。早期这种架构一直是使用tabhost+activitygroup来使用,随着fragment的出现及google官方也大力推荐使用fragment,后者大有代替前者之势。本文也使用fragment进行搭建,标题中的“经典”指这种交互经典,非本文的代码框架结构,欢迎大家提出指出不足,帮助完善。文中的fragment部分参考了郭神的博文(链接1
链接2 链接3),代码也是在郭神代码基础上加入了自己对框架的理解。
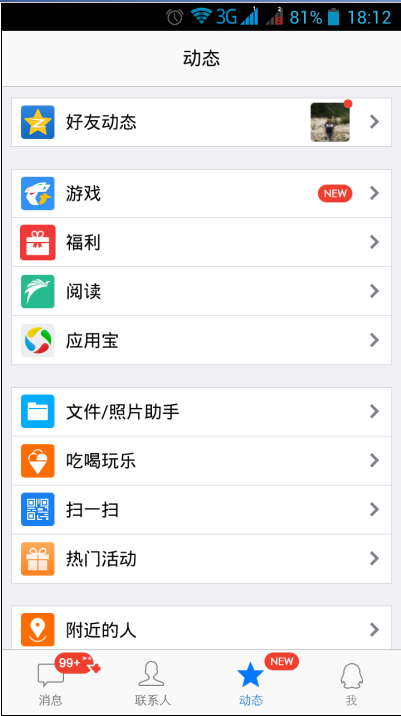
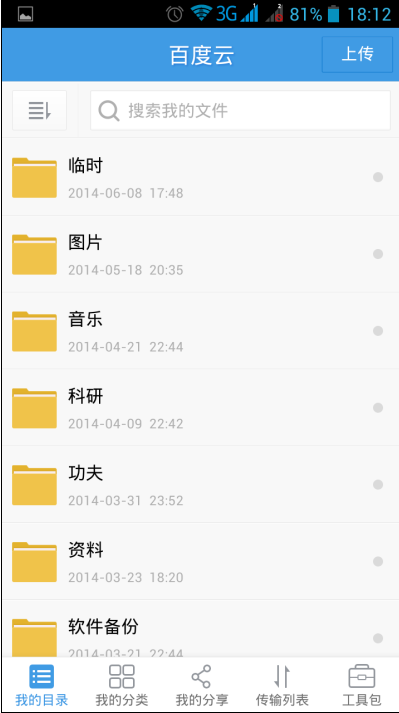
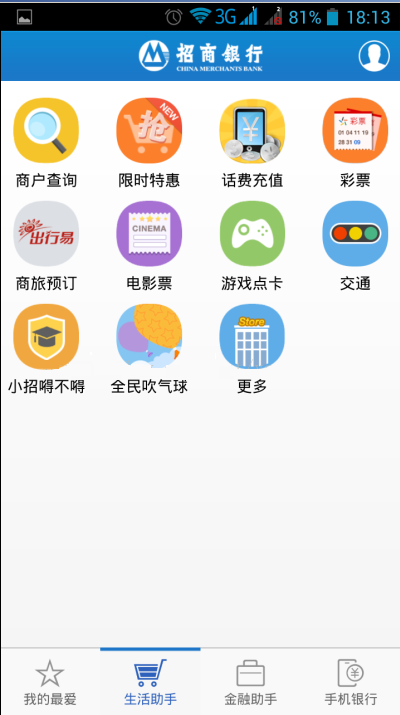
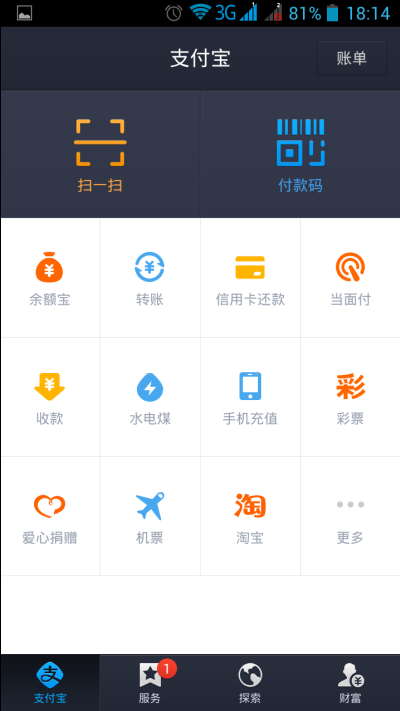
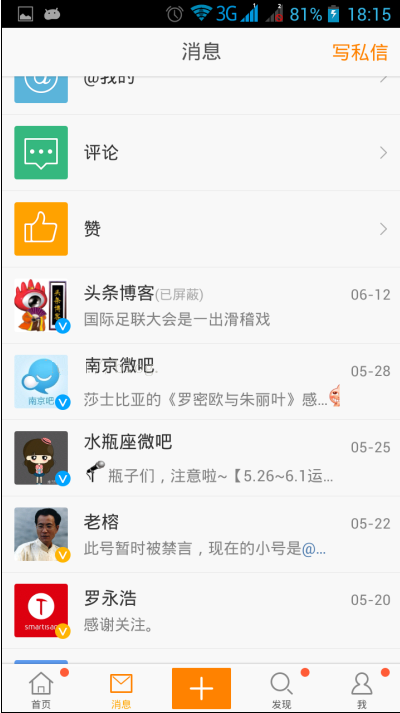
再次重申下这种主界面交互的特点:1,多个tab,不能滑动切换只能点击切换;2,上有标题栏。这种模式也是目前app中使用最多的。如qq、百度云盘、招商银行、微博、支付宝。几个月前支付宝还是能滑动切换的,后来取消了。视图如下:
下面本文从底部控制栏、顶部控制栏及中间的内容显示载体fragment三部分叙述。
一、底部控制栏
底部控制栏里每个控件都不是单一基础控件,上面是图片、下面是文字,右上角是红点,当有更新时红点显示,否则隐藏。另外像qq的右上角还能显示未读消息的个数,我的参考链接里是通过大量的layout一点一点搭出来的,这样的好处是方便控制比较直观,另外是可以利用Linearlayout里的layout_weight这个属性,让底部的这些item均匀分布,缺点是代码上有很多重复,维护起来不方便。既然是整理app的通用模板框架,因此我将每个item视为一个对象,然后将其放在底部就ok了。本代码里只封装了上面是图片下面是文字,右上角的红点么有封装进来。
ImageText.java就作了这样一件事:
<span style="font-family:Comic Sans MS;font-size:18px;">package org.yanzi.ui;
package org.yanzi.ui;
import org.yanzi.constant.Constant;
import android.content.Context;
import android.graphics.Color;
import android.util.AttributeSet;
import android.view.LayoutInflater;
import android.view.MotionEvent;
import android.view.View;
import android.view.ViewGroup;
import android.widget.ImageView;
import android.widget.LinearLayout;
import android.widget.TextView;
import com.example.fragmentproject.R;
public class ImageText extends LinearLayout{
    private Context mContext = null;
    private ImageView mImageView = null;
    private TextView mTextView = null;
    private final static int DEFAULT_IMAGE_WIDTH = 64;
    private final static int DEFAULT_IMAGE_HEIGHT = 64;
    private int CHECKED_COLOR = Color.rgb(29, 118, 199); //选中蓝色
    private int UNCHECKED_COLOR = Color.GRAY;   //自然灰色
    public ImageText(Context context) {
        super(context);
        // TODO Auto-generated constructor stub
        mContext = context;
    }

    public ImageText(Context context, AttributeSet attrs) {
        super(context, attrs);
        // TODO Auto-generated constructor stub
        mContext = context;
        LayoutInflater inflater = (LayoutInflater)
mContext.getSystemService(Context.LAYOUT_INFLATER_SERVICE);
  View parentView = inflater.inflate
(R.layout.image_text_layout, this, true);
  mImageView = (ImageView)findViewById(R.id.image_iamge_text);
        mTextView = (TextView)findViewById(R.id.text_iamge_text);
    }
    public void setImage(int id){
        if(mImageView != null){
            mImageView.setImageResource(id);
    setImageSize(DEFAULT_IMAGE_WIDTH, DEFAULT_IMAGE_HEIGHT);
        }
    }

    public void setText(String s){
        if(mTextView != null){
            mTextView.setText(s);
            mTextView.setTextColor(UNCHECKED_COLOR);
        }
    }

    @Override
    public boolean onInterceptTouchEvent(MotionEvent ev) {
        // TODO Auto-generated method stub
        return true;
    }
    private void setImageSize(int w, int h){
        if(mImageView != null){
    ViewGroup.LayoutParams params = mImageView.getLayoutParams();
            params.width = w;
            params.height = h;
            mImageView.setLayoutParams(params);
        }
    }
    public void setChecked(int itemID){
        if(mTextView != null){
            mTextView.setTextColor(CHECKED_COLOR);
        }
        int checkDrawableId = -1;
        switch (itemID){
        case Constant.BTN_FLAG_MESSAGE:
            checkDrawableId = R.drawable.message_selected;
            break;
        case Constant.BTN_FLAG_CONTACTS:
            checkDrawableId = R.drawable.contacts_selected;
            break;
        case Constant.BTN_FLAG_NEWS:
            checkDrawableId = R.drawable.news_selected;
            break;
        case Constant.BTN_FLAG_SETTING:
            checkDrawableId = R.drawable.setting_selected;
            break;
        default:break;
        }
        if(mImageView != null){
            mImageView.setImageResource(checkDrawableId);
        }
    }
}
</span> |
对应的布局:
<span style="font-family:Comic Sans MS;font-size:18px;"><?xml version="1.0" encoding="utf-8"?>
<LinearLayout xmlns:android="http://schemas.android.com/apk/res/android"
    android:layout_width="match_parent"
    android:layout_height="match_parent"
    android:orientation="vertical" >

    <ImageView
        android:id="@+id/image_iamge_text"
        android:layout_width="wrap_content"
        android:layout_height="wrap_content"
        android:layout_gravity="center_horizontal" />

    <TextView
        android:id="@+id/text_iamge_text"
        android:layout_width="wrap_content"
        android:layout_height="wrap_content"
        android:layout_gravity="center_horizontal" />

</LinearLayout></span> |
代码里用到了Constant.java,这里面放的都是常量:
<span style="font-family:Comic Sans MS;font-size:18px;">package org.yanzi.constant;
public class Constant {
    //Btn的标识
    public static final int BTN_FLAG_MESSAGE = 0x01;
    public static final int BTN_FLAG_CONTACTS = 0x01 << 1;
    public static final int BTN_FLAG_NEWS = 0x01 << 2;
    public static final int BTN_FLAG_SETTING = 0x01 << 3;

    //Fragment的标识
    public static final String FRAGMENT_FLAG_MESSAGE = "消息";
    public static final String FRAGMENT_FLAG_CONTACTS = "联系人";
    public static final String FRAGMENT_FLAG_NEWS = "新闻";
    public static final String FRAGMENT_FLAG_SETTING = "设置";
    public static final String FRAGMENT_FLAG_SIMPLE = "simple";
}
</span> |
第一排是复合Button的标识,下面的string类型的是将来创建fragment的标识。
完成了ImageText之后,下面就是将4个这样的控件放到一个布局里。为了控制方便,我们将底部栏抽象为一个对象BottomControlPanel.java,这样在维护底部栏相关内容时直接找他就行了。BottomControlPanel继承自RelativeLayout,先来看它的布局:
bottom_panel_layout.xml
<span style="font-family:Comic Sans MS;font-size:18px;">
<?xml version="1.0" encoding="utf-8"?>
<org.yanzi.ui.BottomControlPanel xmlns:android="http://schemas.android.com/apk/res/android"
    android:layout_width="match_parent"
    android:layout_height="60dp"
    android:layout_alignParentBottom="true"
    android:gravity="center_vertical"
    android:paddingLeft="20dp"
    android:paddingRight="20dp" >

    <org.yanzi.ui.ImageText
        android:id="@+id/btn_message"
        android:layout_width="wrap_content"
        android:layout_height="wrap_content"
        android:layout_alignParentLeft="true" />

    <org.yanzi.ui.ImageText
        android:id="@+id/btn_contacts"
        android:layout_width="wrap_content"
        android:layout_height="wrap_content"
        android:layout_toRightOf="@id/btn_message" />

    <org.yanzi.ui.ImageText
        android:id="@+id/btn_news"
        android:layout_width="wrap_content"
        android:layout_height="wrap_content"
        android:layout_toRightOf="@id/btn_contacts" />

    <org.yanzi.ui.ImageText
        android:id="@+id/btn_setting"
        android:layout_width="wrap_content"
        android:layout_height="wrap_content"
        android:layout_alignParentRight="true" />

</org.yanzi.ui.BottomControlPanel></span> |
对应的java文件:BottomControlPanel.java
<span style="font-family:Comic Sans MS;font-size:18px;">package org.yanzi.ui;

import java.util.ArrayList;
import java.util.List;

import org.yanzi.constant.Constant;

import android.content.Context;
import android.graphics.Color;
import android.util.AttributeSet;
import android.util.Log;
import android.view.View;
import android.widget.RelativeLayout;

import com.example.fragmentproject.R;

public class BottomControlPanel extends RelativeLayout implements View.OnClickListener {
    private Context mContext;
    private ImageText mMsgBtn = null;
    private ImageText mContactsBtn = null;
    private ImageText mNewsBtn = null;
    private ImageText mSettingBtn = null;
    private int DEFALUT_BACKGROUND_COLOR = Color.rgb(243, 243, 243);
//Color.rgb(192, 192, 192)
    private BottomPanelCallback mBottomCallback = null;
    private List<ImageText> viewList = new ArrayList<ImageText>();

    public interface BottomPanelCallback{
        public void onBottomPanelClick(int itemId);
    }
    public BottomControlPanel(Context context, AttributeSet attrs) {
        super(context, attrs);
        // TODO Auto-generated constructor stub
    }
    @Override
    protected void onFinishInflate() {
        // TODO Auto-generated method stub
        mMsgBtn = (ImageText)findViewById(R.id.btn_message);
        mContactsBtn = (ImageText)findViewById(R.id.btn_contacts);
        mNewsBtn = (ImageText)findViewById(R.id.btn_news);
        mSettingBtn = (ImageText)findViewById(R.id.btn_setting);
        setBackgroundColor(DEFALUT_BACKGROUND_COLOR);
        viewList.add(mMsgBtn);
        viewList.add(mContactsBtn);
        viewList.add(mNewsBtn);
        viewList.add(mSettingBtn);
    }
    public void initBottomPanel(){
        if(mMsgBtn != null){
            mMsgBtn.setImage(R.drawable.message_unselected);
            mMsgBtn.setText("消息");
        }
        if(mContactsBtn != null){
            mContactsBtn.setImage(R.drawable.contacts_unselected);
            mContactsBtn.setText("联系人");
        }
        if(mNewsBtn != null){
            mNewsBtn.setImage(R.drawable.news_unselected);
            mNewsBtn.setText("新闻");
        }
        if(mSettingBtn != null){
            mSettingBtn.setImage(R.drawable.setting_unselected);
            mSettingBtn.setText("设置");
        }
        setBtnListener();

    }
    private void setBtnListener(){
        int num = this.getChildCount();
        for(int i = 0; i < num; i++){
            View v = getChildAt(i);
            if(v != null){
                v.setOnClickListener(this);
            }
        }
    }
    public void setBottomCallback(BottomPanelCallback bottomCallback){
        mBottomCallback = bottomCallback;
    }
    @Override
    public void onClick(View v) {
        // TODO Auto-generated method stub
        initBottomPanel();
        int index = -1;
        switch(v.getId()){
        case R.id.btn_message:
            index = Constant.BTN_FLAG_MESSAGE;
            mMsgBtn.setChecked(Constant.BTN_FLAG_MESSAGE);
            break;
        case R.id.btn_contacts:
            index = Constant.BTN_FLAG_CONTACTS;
            mContactsBtn.setChecked(Constant.BTN_FLAG_CONTACTS);
            break;
        case R.id.btn_news:
            index = Constant.BTN_FLAG_NEWS;
            mNewsBtn.setChecked(Constant.BTN_FLAG_NEWS);
            break;
        case R.id.btn_setting:
            index = Constant.BTN_FLAG_SETTING;
            mSettingBtn.setChecked(Constant.BTN_FLAG_SETTING);
            break;
        default:break;
        }
        if(mBottomCallback != null){
            mBottomCallback.onBottomPanelClick(index);
        }
    }
    public void defaultBtnChecked(){
        if(mMsgBtn != null){
            mMsgBtn.setChecked(Constant.BTN_FLAG_MESSAGE);
        }
    }
    @Override
    protected void onLayout(boolean changed, int left, int top, int right, int bottom) {
        // TODO Auto-generated method stub
        super.onLayout(changed, left, top, right, bottom);
        layoutItems(left, top, right, bottom);
    }
    /**最左边和最右边的view由母布局的padding进行控制位置。
这里需对第2、3个view的位置重新设置
     * @param left
     * @param top
     * @param right
     * @param bottom
     */
    private void layoutItems(int left, int top, int right, int bottom){
        int n = getChildCount();
        if(n == 0){
            return;
        }
        int paddingLeft = getPaddingLeft();
        int paddingRight = getPaddingRight();
        Log.i("yanguoqi", "paddingLeft = " + paddingLeft + " paddingRight = " + paddingRight);
        int width = right - left;
        int height = bottom - top;
        Log.i("yanguoqi", "width = " + width + " height = " + height);
        int allViewWidth = 0;
        for(int i = 0; i< n; i++){
            View v = getChildAt(i);
            Log.i("yanguoqi", "v.getWidth() = " + v.getWidth());
            allViewWidth += v.getWidth();
        }
        int blankWidth = (width - allViewWidth - paddingLeft - paddingRight) / (n - 1);
        Log.i("yanguoqi", "blankV = " + blankWidth );

        LayoutParams params1 = (LayoutParams) viewList.get(1).getLayoutParams();
        params1.leftMargin = blankWidth;
        viewList.get(1).setLayoutParams(params1);

        LayoutParams params2 = (LayoutParams) viewList.get(2).getLayoutParams();
        params2.leftMargin = blankWidth;
        viewList.get(2).setLayoutParams(params2);
    }


}
</span> |
在onFinishInflate()函数里实例化里面的子元素,在initBottomPanel()里设置每个孩子的图片和文字、监听.onLayout()里对中间的2个孩子的位置进行调整,使其均匀分布,见我的前文。这个BottomControlPanel实现了View.OnClickListener接口,在onClick()里通过id来判断用户点击了哪一个孩子。判断出来后需要做两件事,一是对这个被点击的对象进行处理,如字体颜色、图片资源的变化,右上角小红点的隐藏等等。另一方面,BottomControlPanel要告诉将来它的主人,也就是Activity到底是点了哪个,通知Activity去切换fragment。可以看到,activity类似个总控中心,BottomControlPanel管理属于它的ImageText,同时上报Activity。Activity知道消息后再切换fragment,每个fragment都有自己的事务逻辑。
这里定义了
public interface BottomPanelCallback{
 public void onBottomPanelClick(int itemId);
} |
这个接口,通过传递Id来通知Activity。defaultBtnChecked()函数是apk初次打开后,默认切换到第一个消息fragment上。
这里有个地方需要注意,就是虽然ImageText和BottomControlPanel都是自定义控件,但两者在方式上是有区别的。在ImageText的构造函数里通过inflater将布局加载进来,它对应的布局是个普通的布局。而BottomControlPanel对应的布局文件里,直接使用了定义的BottomControlPanel,在onFinishInflate函数里实例化孩子View。前者是inflate之后实例化的。在使用ImageText到一个新的母布局时是通过<org.yanzi.ui.ImageText
/>这种方式进行的,那么使用BottomControlPanel有何区别,请见下文介绍Activity的布局时。
二、顶部控制栏
有了底部控制栏,顶部控制栏就可以如法炮制了。这里先交代几句,虽然Android3.0
后Google推出的有ActionBar来做顶部导航栏,参见郭神的这篇博文。但我发现,本文最前面贴图的几款应用应该都没有使用ActionBar,因为它不够灵活。ActionBar使用起来什么样,大家看看微信就知道了,那个的顶部控制栏就是ActionBar做的,这个应该没跑。
通过观察,顶部控制栏除了标题居中外,在右上角通常会再放一个按钮。不是ImageView就是TextView,这里我为了方便放的是两个TextView,右侧的按钮效果可以再TextView上弄个背景来实现。
HeadControlPanel.java
<span style="font-family:Comic Sans MS;font-size:18px;">package org.yanzi.ui;

import org.yanzi.constant.Constant;

import com.example.fragmentproject.R;

import android.content.Context;
import android.graphics.Color;
import android.util.AttributeSet;
import android.widget.RelativeLayout;
import android.widget.TextView;

public class HeadControlPanel extends RelativeLayout {

    private Context mContext;
    private TextView mMidleTitle;
    private TextView mRightTitle;
    private static final float middle_title_size = 20f;
    private static final float right_title_size = 17f;
    private static final int default_background_color = Color.rgb(23, 124, 202);

    public HeadControlPanel(Context context, AttributeSet attrs) {
        super(context, attrs);
        // TODO Auto-generated constructor stub
    }

    @Override
    protected void onFinishInflate() {
        // TODO Auto-generated method stub
        mMidleTitle = (TextView)findViewById(R.id.midle_title);
        mRightTitle = (TextView)findViewById(R.id.right_title);
        setBackgroundColor(default_background_color);
    }
    public void initHeadPanel(){

        if(mMidleTitle != null){
            setMiddleTitle(Constant.FRAGMENT_FLAG_MESSAGE);
        }
    }
    public void setMiddleTitle(String s){
        mMidleTitle.setText(s);
        mMidleTitle.setTextSize(middle_title_size);
    }


}
</span> |
布局文件head_panel_layout.xml
<span style="font-family:Comic Sans MS;font-size:18px;"><?xml version="1.0" encoding="utf-8"?>
<org.yanzi.ui.HeadControlPanel xmlns:android="http://schemas.android.com/apk/res/android"
    android:layout_width="match_parent"
    android:layout_height="50dp"
    android:layout_alignParentTop="true">
    <TextView
        android:id="@+id/midle_title"
        android:layout_width="wrap_content"
        android:layout_height="wrap_content"
        android:layout_centerInParent="true"
        android:textColor="@android:color/white"/>
    <TextView
         android:id="@+id/right_title"
        android:layout_width="wrap_content"
        android:layout_height="wrap_content"
        android:layout_alignParentRight="true"
        android:textColor="@android:color/white"/>

</org.yanzi.ui.HeadControlPanel>
</span> |
三、总控中心Activity和Fragment
先交代下Fragment的使用大致分两种,一种是将Fragment作为一个View写死在布局中,布局里使用android:name来告诉它对应的是哪个实体Fragment。这种添加fragment的方式不能delete和replace掉。另一种是通过获得activity的fragmentmanager和fragmentTransaction和进行动态的添加。这种方式更加灵活,一般使用此种方法。
先看Activity的布局activity_main.xml:
<span style="font-family:Comic Sans MS;font-size:18px;">
<RelativeLayout xmlns:android="http://schemas.android.com/apk/res/android"
    xmlns:tools="http://schemas.android.com/tools"
    android:id="@+id/root_layout"
    android:layout_width="match_parent"
    android:layout_height="match_parent"
    tools:context="org.yanzi.fragmentproject.MainActivity" >

    <include
        android:id="@+id/bottom_layout"
        layout="@layout/bottom_panel_layout" />

    <View
        android:layout_width="match_parent"
        android:layout_height="1dip"
        android:layout_above="@id/bottom_layout"
        android:background="#FFE7E7E7" />

    <include
        android:id="@+id/head_layout"
        layout="@layout/head_panel_layout" />

    <View
        android:layout_width="match_parent"
        android:layout_height="1dip"
        android:layout_below="@id/head_layout"
        android:background="#FFE7E7E7" />
    <FrameLayout
        android:id="@+id/fragment_content"
        android:layout_width="match_parent"
        android:layout_height="wrap_content"
        android:layout_below="@id/head_layout"
        android:layout_above="@id/bottom_layout" >
    </FrameLayout>

</RelativeLayout></span> |
注意看这里是通过include的方式把刚才自定义的上下panel加过来,而不能直接用<org.yanzi.ui.BottomControlPanel
/>这种方式直接加载。当然如果也模仿ImageText的构造方式,也是可以这样用的。关于include方式的使用有几个注意事项,就是最好让它的母布局是RelativeLayout,否则的话很难控制include进来的布局的位置。另外,include布局的位置一定要写在include之前,如底部面板在最底部,android:layout_alignParentBottom="true"这句话是在bottom_panel_layout.xml里写的,如果写在activity_main.xml里就是无效的,这着实是个蛋疼的问题。再就是include后设置的id会覆盖掉以前的,所以这里只在include的时候设置id。其中的两个View是分割线。整体是按照底部栏、上部栏、中间Fragment的容器来放置的。
在放Fragment的时候需要注意,究竟是否要将顶部控制栏放到各自的fragment里合适还是放到Activity里合适要看具体情况,如果顶部栏里多是显示标题这种功能或少量的点击事件,应该放到Activity里,即顶部栏的事务逻辑和当前fragment的事务逻辑耦合的不是很紧。举个例子,比如微信的顶部栏,不管你处在哪个Tab页(聊天、发现、通讯录),点击顶部栏里的按钮都呈现出同样的内容。但反过来讲,如果顶部栏里的事务逻辑和fragment耦合很紧,即在不同的fragment,顶部栏呈现的内容都不一样,且点击后处理的事务也和当前fragment紧密联系一起,那就应该一个fragment配套一个顶部栏,方便控制。本文是将两者分开的。所以让fragment的容器在顶部栏之下,底部栏之上,不这样写的话,就会遮挡。
<FrameLayout
        android:id="@+id/fragment_content"
        android:layout_width="match_parent"
        android:layout_height="wrap_content"
        android:layout_below="@id/head_layout"
        android:layout_above="@id/bottom_layout" >
</FrameLayout> |
MainActivity.java代码:
<span style="font-family:Comic Sans MS;font-size:18px;">package org.yanzi.activity;

import org.yanzi.constant.Constant;
import org.yanzi.fragment.BaseFragment;
import org.yanzi.fragment.ContactsFragment;
import org.yanzi.fragment.MessageFragment;
import org.yanzi.fragment.NewsFragment;
import org.yanzi.fragment.SettingFragment;
import org.yanzi.ui.BottomControlPanel;
import org.yanzi.ui.BottomControlPanel.BottomPanelCallback;
import org.yanzi.ui.HeadControlPanel;

import android.app.Activity;
import android.app.Fragment;
import android.app.FragmentManager;
import android.app.FragmentTransaction;
import android.os.Bundle;
import android.text.TextUtils;
import android.util.Log;
import android.view.Menu;
import android.widget.Toast;

import com.example.fragmentproject.R;

public class MainActivity extends Activity implements BottomPanelCallback {
    BottomControlPanel bottomPanel = null;
    HeadControlPanel headPanel = null;

    private FragmentManager fragmentManager = null;
    private FragmentTransaction fragmentTransaction = null;

/*  private MessageFragment messageFragment;
    private ContactsFragment contactsFragment;
    private NewsFragment newsFragment;
    private SettingFragment settingFragment;*/

    public static String currFragTag = "";
    @Override
    protected void onCreate(Bundle savedInstanceState) {
        super.onCreate(savedInstanceState);
        setContentView(R.layout.activity_main);
        initUI();
        fragmentManager = getFragmentManager();
        setDefaultFirstFragment(Constant.FRAGMENT_FLAG_MESSAGE);
    }

    @Override
    public boolean onCreateOptionsMenu(Menu menu) {
        // Inflate the menu; this adds items to the action bar if it is present.
        getMenuInflater().inflate(R.menu.main, menu);
        return true;
    }
    private void initUI(){
        bottomPanel = (BottomControlPanel)findViewById(R.id.bottom_layout);
        if(bottomPanel != null){
            bottomPanel.initBottomPanel();
            bottomPanel.setBottomCallback(this);
        }
        headPanel = (HeadControlPanel)findViewById(R.id.head_layout);
        if(headPanel != null){
            headPanel.initHeadPanel();
        }
    }

    /* 处理BottomControlPanel的回调
     * @see org.yanzi.ui.BottomControlPanel.BottomPanelCallback#onBottomPanelClick(int)
     */
    @Override
    public void onBottomPanelClick(int itemId) {
        // TODO Auto-generated method stub
        String tag = "";
        if((itemId & Constant.BTN_FLAG_MESSAGE) != 0){
            tag = Constant.FRAGMENT_FLAG_MESSAGE;
        }else if((itemId & Constant.BTN_FLAG_CONTACTS) != 0){
            tag = Constant.FRAGMENT_FLAG_CONTACTS;
        }else if((itemId & Constant.BTN_FLAG_NEWS) != 0){
            tag = Constant.FRAGMENT_FLAG_NEWS;
        }else if((itemId & Constant.BTN_FLAG_SETTING) != 0){
            tag = Constant.FRAGMENT_FLAG_SETTING;
        }
        setTabSelection(tag); //切换Fragment
        headPanel.setMiddleTitle(tag);//切换标题
    }

    private void setDefaultFirstFragment(String tag){
        Log.i("yan", "setDefaultFirstFragment enter... currFragTag = " + currFragTag);
        setTabSelection(tag);
        bottomPanel.defaultBtnChecked();
        Log.i("yan", "setDefaultFirstFragment exit...");
    }

    private void commitTransactions(String tag){
        if (fragmentTransaction != null && !fragmentTransaction.isEmpty()) {
            fragmentTransaction.commit();
            currFragTag = tag;
            fragmentTransaction = null;
        }
    }

    private FragmentTransaction ensureTransaction( ){
        if(fragmentTransaction == null){
            fragmentTransaction = fragmentManager.beginTransaction();
            fragmentTransaction
            .setTransition(FragmentTransaction.TRANSIT_FRAGMENT_FADE);

        }
        return fragmentTransaction;

    }

    private void attachFragment(int layout, Fragment f, String tag){
        if(f != null){
            if(f.isDetached()){
                ensureTransaction();
                fragmentTransaction.attach(f);

            }else if(!f.isAdded()){
                ensureTransaction();
                fragmentTransaction.add(layout, f, tag);
            }
        }
    }

    private Fragment getFragment(String tag){

        Fragment f = fragmentManager.findFragmentByTag(tag);

        if(f == null){
            Toast.makeText(getApplicationContext(), "fragment = null tag = " + tag, Toast.LENGTH_SHORT).show();
            f = BaseFragment.newInstance(getApplicationContext(), tag);
        }
        return f;

    }
    private void detachFragment(Fragment f){

        if(f != null && !f.isDetached()){
            ensureTransaction();
            fragmentTransaction.detach(f);
        }
    }
    /**切换fragment
     * @param tag
     */
    private  void switchFragment(String tag){
        if(TextUtils.equals(tag, currFragTag)){
            return;
        }
        //把上一个fragment detach掉
        if(currFragTag != null && !currFragTag.equals("")){
            detachFragment(getFragment(currFragTag));
        }
        attachFragment(R.id.fragment_content, getFragment(tag), tag);
        commitTransactions( tag);
    }

    /**设置选中的Tag
     * @param tag
     */
    public  void setTabSelection(String tag) {
        // 开启一个Fragment事务
        fragmentTransaction = fragmentManager.beginTransaction();
/*       if(TextUtils.equals(tag, Constant.FRAGMENT_FLAG_MESSAGE)){
           if (messageFragment == null) {
                messageFragment = new MessageFragment();
            }

        }else if(TextUtils.equals(tag, Constant.FRAGMENT_FLAG_CONTACTS)){
            if (contactsFragment == null) {
                contactsFragment = new ContactsFragment();
            }

        }else if(TextUtils.equals(tag, Constant.FRAGMENT_FLAG_NEWS)){
            if (newsFragment == null) {
                newsFragment = new NewsFragment();
            }

        }else if(TextUtils.equals(tag,Constant.FRAGMENT_FLAG_SETTING)){
            if (settingFragment == null) {
                settingFragment = new SettingFragment();
            }
        }else if(TextUtils.equals(tag, Constant.FRAGMENT_FLAG_SIMPLE)){
            if (simpleFragment == null) {
                simpleFragment = new SimpleFragment();
            }

        }*/
         switchFragment(tag);

    }

    @Override
    protected void onStop() {
        // TODO Auto-generated method stub
        super.onStop();
        currFragTag = "";
    }

    @Override
    protected void onSaveInstanceState(Bundle outState) {
        // TODO Auto-generated method stub
    }

}
</span> |
注意这块我作了改动,不需要申明
/*	private MessageFragment messageFragment;
	private ContactsFragment contactsFragment;
	private NewsFragment newsFragment;
private SettingFragment settingFragment;*/ |
这些内容,因为Fragment的生成是通过BaseFragment.newInstance()来生成的,传进去Tag生成相应的Fragment。所有的Fragment,ContactsFragment、MessageFragment、NewsFragment、SettingFragment都继承自BaseFragment,通过BaseFragment里的newInstance()接口进行实例化对应的fragment。优点是方便管理,缺点么也有,因为java继承继承一个类,不能同时继承两个类。所以如ListFragment这些,就没法同时继承了。不过好在有listview这些,也妨碍不了我们做到同样的效果。
Activity里事件的入口是在onBottomPanelClick()监听点击了谁,然后:
etTabSelection(tag); //切换Fragment
headPanel.setMiddleTitle(tag);//切换标题 |
先切换Fragment再切换顶部栏的标题。setTabSelection()里直接调switchFragment(),在switchFragment函数里先判断标签是否一样,一样则意外着无需切换,否则的话就先把当前Fragment找到然后detach掉,之后进到attachFragment()函数里。在这里,先判断这个fragment是不是被detach掉的,如果是的话意味着之前曾被add过,所以只需attach就ok了。否则的话,意味着这是第一次,进行add.这里记录下Fragment的声明周期:
MessageFragment正常打开:
Line 155: 01-04 11:50:46.688 E/MessageFragment( 2546): onAttach-----
	Line 159: 01-04 11:50:46.688 E/MessageFragment( 2546): onCreate------
	Line 161: 01-04 11:50:46.693 D/MessageFragment( 2546): onCreateView---->
	Line 165: 01-04 11:50:46.694 E/MessageFragment( 2546): onActivityCreated-------
	Line 169: 01-04 11:50:46.694 E/MessageFragment( 2546): onStart----->
Line 173: 01-04 11:50:46.694 E/MessageFragment( 2546): onresume----> |
返回键退出:
Line 183: 01-04 11:52:26.506 E/MessageFragment( 2546): onpause
	Line 259: 01-04 11:52:27.131 E/MessageFragment( 2546): onStop
	Line 263: 01-04 11:52:27.132 E/MessageFragment( 2546): ondestoryView
	Line 269: 01-04 11:52:27.134 E/MessageFragment( 2546): ondestory
Line 271: 01-04 11:52:27.135 D/MessageFragment( 2546): onDetach------ |
按home按键退出:
Line 97: 01-05 05:06:15.659 E/MessageFragment(18835): onpause
Line 215: 01-05 05:06:16.292 E/MessageFragment(18835): onStop |
再次打开:
Line 81: 01-05 05:07:02.408 E/MessageFragment(18835): onStart----->
Line 85: 01-05 05:07:02.408 E/MessageFragment(18835): onresume----> |
通过detach的方式切换至其他Fragment:
Line 69: 01-04 11:53:33.381 E/MessageFragment( 2546): onpause
	Line 73: 01-04 11:53:33.382 E/MessageFragment( 2546): onStop
Line 77: 01-04 11:53:33.382 E/MessageFragment( 2546): ondestoryView |
再次切换过来:
Line 55: 01-04 11:54:59.462 D/MessageFragment( 2546): onCreateView---->
	Line 59: 01-04 11:54:59.463 E/MessageFragment( 2546): onActivityCreated-------
	Line 63: 01-04 11:54:59.463 E/MessageFragment( 2546): onStart----->
Line 67: 01-04 11:54:59.464 E/MessageFragment( 2546): onresume----> |
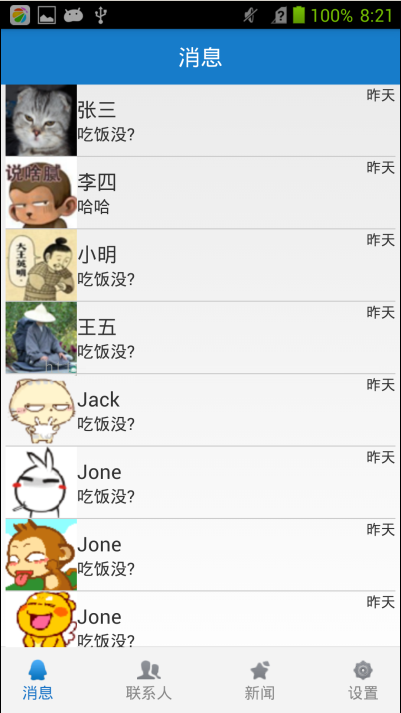
四、适配器和MessageBean
本来要连数据库的,时间原因用个简单的MessageBean代替了。一个消息分联系人头像、名字、消息正文和时间四部分组成,封装到一个MessageBean里。
MessageBean.java
<span style="font-family:Comic Sans MS;font-size:18px;">package org.yanzi.bean;

public class MessageBean {
    private int PhotoDrawableId;
    private String MessageName;
    private String MessageContent;
    private String MessageTime;

    public MessageBean(){

    }

    public MessageBean(int photoDrawableId, String messageName,
            String messageContent, String messageTime) {
        super();
        PhotoDrawableId = photoDrawableId;
        MessageName = messageName;
        MessageContent = messageContent;
        MessageTime = messageTime;
    }

    public int getPhotoDrawableId() {
        return PhotoDrawableId;
    }
    public void setPhotoDrawableId(int mPhotoDrawableId) {
        this.PhotoDrawableId = mPhotoDrawableId;
    }
    public String getMessageName() {
        return MessageName;
    }
    public void setMessageName(String messageName) {
        MessageName = messageName;
    }
    public String getMessageContent() {
        return MessageContent;
    }
    public void setMessageContent(String messageContent) {
        MessageContent = messageContent;
    }
    public String getMessageTime() {
        return MessageTime;
    }
    public void setMessageTime(String messageTime) {
        MessageTime = messageTime;
    }
    @Override
    public String toString() {
        return "MessageBean [mPhotoDrawableId=" + PhotoDrawableId
                + ", MessageName=" + MessageName + ", MessageContent="
                + MessageContent + ", MessageTime=" + MessageTime + "]";
    }


}
</span> |
然后就是MessageFragment的ListView里的适配器,MessageAdapter.java
<span style="font-family:Comic Sans MS;font-size:18px;">package org.yanzi.fragment.adapter;

import java.util.List;

import org.yanzi.bean.MessageBean;

import com.example.fragmentproject.R;

import android.content.Context;
import android.view.LayoutInflater;
import android.view.View;
import android.view.ViewGroup;
import android.widget.BaseAdapter;
import android.widget.ImageView;
import android.widget.TextView;

public class MessageAdapter extends BaseAdapter {
    private List<MessageBean> mListMsgBean = null;
    private Context mContext;
    private LayoutInflater mInflater;
    public MessageAdapter(List<MessageBean> listMsgBean, Context context){
        mListMsgBean = listMsgBean;
        mContext = context;
        mInflater = LayoutInflater.from(mContext);
    }
    @Override
    public int getCount() {
        // TODO Auto-generated method stub
        return mListMsgBean.size();
    }

    @Override
    public Object getItem(int position) {
        // TODO Auto-generated method stub
        return mListMsgBean.get(position);
    }

    @Override
    public long getItemId(int position) {
        // TODO Auto-generated method stub
        return position;
    }

    @Override
    public View getView(int position, View convertView, ViewGroup parent) {
        // TODO Auto-generated method stub
        View v = mInflater.inflate(R.layout.message_item_layout, null);

        ImageView imageView = (ImageView) v.findViewById(R.id.img_msg_item);
        imageView.setImageResource(mListMsgBean.get(position).getPhotoDrawableId());

        TextView nameMsg = (TextView)v.findViewById(R.id.name_msg_item);
        nameMsg.setText(mListMsgBean.get(position).getMessageName());

        TextView contentMsg = (TextView)v.findViewById(R.id.content_msg_item);
        contentMsg.setText(mListMsgBean.get(position).getMessageContent());

        TextView timeMsg = (TextView)v.findViewById(R.id.time_msg_item);
        timeMsg.setText(mListMsgBean.get(position).getMessageTime());

        return v;
    }

}
</span> |
因为是示例,getView里没用ViewHolder。
最后是MessageFragment里通过对listview设置适配器,将MessageBean作为信息的提供者也填充到适配器里。
MessageFragment.java代码:
<span style="font-family:Comic Sans MS;font-size:18px;">package org.yanzi.fragment;
import java.util.ArrayList;
import java.util.List;
import org.yanzi.activity.MainActivity;
import org.yanzi.bean.MessageBean;
import org.yanzi.constant.Constant;
import org.yanzi.fragment.adapter.MessageAdapter;
import android.app.Activity;
import android.os.Bundle;
import android.util.Log;
import android.view.LayoutInflater;
import android.view.View;
import android.view.ViewGroup;
import android.widget.AdapterView;
import android.widget.Toast;
import android.widget.AdapterView.OnItemClickListener;
import android.widget.ListView;
import com.example.fragmentproject.R;
public class MessageFragment extends BaseFragment {
private static final String TAG = "MessageFragment";
private MainActivity mMainActivity ;
private ListView mListView;
private MessageAdapter mMsgAdapter;
private List<MessageBean> mMsgBean = new ArrayList<MessageBean>();
public View onCreateView(LayoutInflater inflater, ViewGroup container,
Bundle savedInstanceState) {
View messageLayout = inflater.inflate(R.layout.message_layout,
container, false);
Log.d(TAG, "onCreateView---->");
mMainActivity = (MainActivity) getActivity();
mFragmentManager = getActivity().getFragmentManager();
mListView = (ListView)messageLayout.findViewById(R.id.listview_message);
mMsgAdapter = new MessageAdapter(mMsgBean, mMainActivity);
mListView.setAdapter(mMsgAdapter);
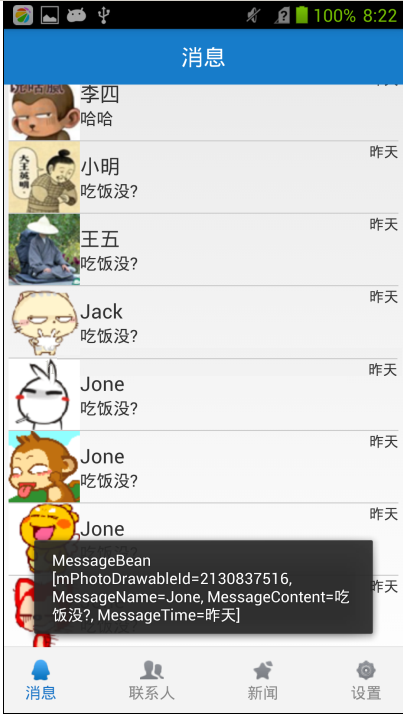
mListView.setOnItemClickListener(new OnItemClickListener() {
@Override
public void onItemClick(AdapterView<?> parent, View view,
int position, long id) {
// TODO Auto-generated method stub
Toast.makeText(mMainActivity, mMsgBean.get(position).toString(),
Toast.LENGTH_SHORT).show();
}
});
return messageLayout;
}
@Override
public void onAttach(Activity activity) {
// TODO Auto-generated method stub
super.onAttach(activity);
Log.e(TAG, "onAttach-----");
}
@Override
public void onCreate(Bundle savedInstanceState) {
// TODO Auto-generated method stub
super.onCreate(savedInstanceState);
Log.e(TAG, "onCreate------");
mMsgBean.add(new MessageBean(R.drawable.ic_photo_1, "张三", "吃饭没?", "昨天"));
mMsgBean.add(new MessageBean(R.drawable.ic_photo_2, "李四", "哈哈", "昨天"));
mMsgBean.add(new MessageBean(R.drawable.ic_photo_3, "小明", "吃饭没?", "昨天"));
mMsgBean.add(new MessageBean(R.drawable.ic_photo_4, "王五", "吃饭没?", "昨天"));
mMsgBean.add(new MessageBean(R.drawable.ic_photo_5, "Jack", "吃饭没?", "昨天"));
mMsgBean.add(new MessageBean(R.drawable.ic_photo_6, "Jone", "吃饭没?", "昨天"));
mMsgBean.add(new MessageBean(R.drawable.ic_photo_7, "Jone", "吃饭没?", "昨天"));
mMsgBean.add(new MessageBean(R.drawable.ic_photo_8, "Jone", "吃饭没?", "昨天"));
mMsgBean.add(new MessageBean(R.drawable.ic_photo_9, "Jone", "吃饭没?", "昨天"));
}
@Override
public void onActivityCreated(Bundle savedInstanceState) {
// TODO Auto-generated method stub
super.onActivityCreated(savedInstanceState);
Log.e(TAG, "onActivityCreated-------");
}
@Override
public void onStart() {
// TODO Auto-generated method stub
super.onStart();
Log.e(TAG, "onStart----->");
}
@Override
public void onResume() {
// TODO Auto-generated method stub
super.onResume();
Log.e(TAG, "onresume---->");
MainActivity.currFragTag = Constant.FRAGMENT_FLAG_MESSAGE;
}
@Override
public void onPause() {
// TODO Auto-generated method stub
super.onPause();
Log.e(TAG, "onpause");
}
@Override
public void onStop() {
// TODO Auto-generated method stub
super.onStop();
Log.e(TAG, "onStop");
}
@Override
public void onDestroyView() {
// TODO Auto-generated method stub
super.onDestroyView();
Log.e(TAG, "ondestoryView");
}
@Override
public void onDestroy() {
// TODO Auto-generated method stub
super.onDestroy();
Log.e(TAG, "ondestory");
}
@Override
public void onDetach() {
// TODO Auto-generated method stub
super.onDetach();
Log.d(TAG, "onDetach------");
}
}
</span> |
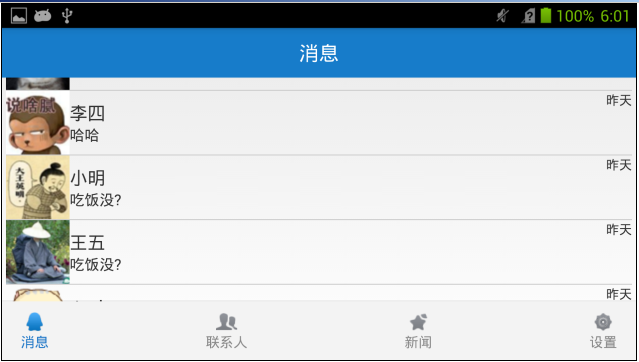
最后来看下效果吧,只有MessageFragment填充了数据:
横屏情况下:
|


