| 现在,很多Android设备都有内置的摄象头了,在本教程中,我们将学习如何在程序中调用Android手机中的摄象头进行图像的摄制,并且如何在拍摄照片后,如何利用用户已经安装在设备中的软件进行图片的剪裁,此外,本文还会展示对于用户的手机设备如果不支持图片捕捉和剪裁的话,应该如何去做.本文适合有一定Android
开发基础的用户阅读。
步骤1、创建新的Android工程
使用Eclipse创建一个新的工程,并且在主界面的实现类中,首先导入如下的包:
import android.app.Activity;
  import android.content.ActivityNotFoundException;
  import android.content.Intent;
  import android.graphics.Bitmap;
  import android.net.Uri;
  import android.os.Bundle;
  import android.provider.MediaStore;
  import android.view.View;
  import android.view.View.OnClickListener;
  import android.widget.Button;
  import android.widget.ImageView;
import android.widget.Toast; |
然后,在res/values目录中应用的定义字符串的文件strings.xml中,增加如下的定义:
<string name="intro">Capture a picture to crop!</string>
<string name="picture">Picture</string>
<string name="capture">Launch Camera</string> |
我们将在接下来的界面中应用这些定义好的字符串资源。
步骤2、设计应用的界面
首先,打开main.xml的主界面,我们使用Linearlayout布局格式,如下代码:
<LinearLayout xmlns:android="http://schemas.android.com/apk/res/android"
android:layout_width="fill_parent"
android:layout_height="fill_parent"
android:orientation="vertical" >
</LinearLayout> |
并且在布局文件中添加一个文本标签,如下:
<TextView
android:layout_width="fill_parent"
android:layout_height="wrap_content"
android:text="@string/intro"
android:layout_margin="3dp"
android:textStyle="bold" /> |
接着再加一个button按钮和一个image控件,代码如下:
<Button
android:id="@+id/capture_btn"
android:layout_width="wrap_content"
android:layout_height="wrap_content"
android:text="@string/capture" />
   <ImageView
android:id="@+id/picture"
android:layout_width="wrap_content"
android:layout_height="wrap_content"
android:contentDescription="@string/picture"
android:layout_margin="5dp"
android:background="@drawable/pic_border" /> |
在这里,我们将通过手机捕捉的图片放在imageview控件中,并且设置了该imageview控件的文字提示内容,并且设置了背景颜色为drawable目录中指定的pic_border样式定义的颜色.其中pic_border.xml如下:
<?xml version="1.0" encoding="utf-8"?>
<shape xmlns:android="http://schemas.android.com/apk/res/android"
    android:dither="true">
    <gradient
         android:startColor="#99ffffff"
         android:endColor="#99ffffff"
         android:centerColor="#00000000"
         android:angle="90" />
    <padding android:left="10dp" android:top="10dp"
            android:right="10dp" android:bottom="10dp" />
    <corners android:radius="5dp" />
    <stroke
        android:width="2dp"
        android:color="#ccffffff"
        />
</shape> |
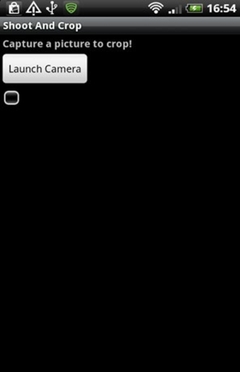
如果希望图片控件大小占满整个屏幕,则可以使用fill_parent属性而不是wrap_content,但这样要注意会减低图片的质量。这时我们运行下应用,可以看到现在的界面效果是如下图所示:
步骤3 用户点击事件的编写
接下来,我们针对按钮编写响应用户点击的事件,代码如下:
public class ShootAndCropActivity extends Activity implements OnClickListener {
Button captureBtn = (Button)findViewById(R.id.capture_btn);
captureBtn.setOnClickListener(this);
public void onClick(View v) {
if (v.getId() == R.id.capture_btn) {
}
} |
在上面的代码框架中,在if语句块中则写入对移动设备摄象头的调用代码,请继续看下一步
步骤4 启动摄象头
首先,我们声明如下的一些实例变量:
//该变量跟踪捕捉图像的intent
final int CAMERA_CAPTURE = 1;
//摄影图片后的uri
private Uri picUri; |
我们首先使用了一个变量来跟踪用户对使用摄象头的交互动作,因为用户总是调用摄象头后会返回,这里是跟踪其intent。第二个变量则是保存摄影图片后的uri,接着在上面的if判断语句块中,写入如下代码:
try {

  //使用标准的intent去进行视频捕捉

  Intent captureIntent = new Intent(MediaStore.ACTION_IMAGE_CAPTURE);

  //在onActivityForResult事件中进行相关的处理回调

  startActivityForResult(captureIntent, CAMERA_CAPTURE);

} |
当执行上面的代码时,会首先调用移动设备上的摄象头进行拍摄,并且会在OnActivityResult事件中对返回的图片的结果进行回调处理,这是通过之前定义的实例变量CAMERA_CAPTURE去判断用户是否正确从拍摄完视频后返回,记得要注意的时,我们还要判断用户的设备是否支持摄象头的拍摄功能,因为虽然目前大多数Android手机都有摄象头,但不能排除特殊情况,因此加入如下的异常捕捉代码:
catch(ActivityNotFoundException anfe){

  String errorMessage = "Whoops - your device doesn't support capturing images!";

  Toast toast = Toast.makeText(this, errorMessage, Toast.LENGTH_SHORT);

  toast.show();

} |
下图是通过设备摄象头拍摄的照片,如下:

步骤5 获得捕捉的图象
接下来,我们在onActivityResult事件中,获得返回的图像,先编写代码框架如下:
protected void onActivityResult(int requestCode, int resultCode, Intent data) {

  if (resultCode == RESULT_OK) {

  }

} |
然后在if语句块中,检查是否是从摄象头应用的app返回,并且同时返回获得图像,如下代码:
if(requestCode == CAMERA_CAPTURE){

  picUri = data.getData();

  //剪裁图片的方法

  performCrop();

} |
接下来,我们要编写针对图片的剪裁方法。
步骤6 图片剪裁方法
首先我们依然要写出异常的处理框架,以防止用户的设备不支持图片的剪裁,代码如下
try {

  }

  catch(ActivityNotFoundException anfe){

  //display an error message

  String errorMessage = "Whoops - your device doesn't support the crop action!";

  Toast toast = Toast.makeText(this, errorMessage, Toast.LENGTH_SHORT);

  toast.show();

} |
接下来,在try内写真正的剪裁剪代码的部分,代码如下:
Intent cropIntent = new Intent("com.android.camera.action.CROP");

  //图片来源

  cropIntent.setDataAndType(picUri, "image/*");

  //设置剪裁剪属性

  cropIntent.putExtra("crop", "true");

  cropIntent.putExtra("aspectX", 1);

  cropIntent.putExtra("aspectY", 1);

  //输出的坐标

  cropIntent.putExtra("outputX", 256);

  cropIntent.putExtra("outputY", 256);

  //返回剪裁的图片数据

  cropIntent.putExtra("return-data", true);

startActivityForResult(cropIntent, PIC_CROP); |
在上面的代码中,通过调用Android的剪裁图片的intent进行图片的剪裁功能,并设置了一系列的剪裁属性。跟之前一样,为了能跟踪用户剪裁图片完毕,必须设置一个实例变量
final int PIC_CROP = 2;
这个变量稍候也要在onActivityForResult响应事件中用到。
下图是拍摄图片后剪裁图片时的情况:

用户可以自由拖动剪裁的区域,如下图:

步骤7 显示剪裁区域的图片
最后我们要将剪裁的图片重新在我们应用中的界面中显示出来。首先,我们在onActivityResult方法中,在之前的判断是否从拍摄照片后的intent返回的if语句块后,增加如下的else判断语句,判断用户是否已经剪裁完毕:
else if(requestCode == PIC_CROP){

  //获得返回的数据

  Bundle extras = data.getExtras();

  //获得实际剪裁的区域的bitmap图形

  Bitmap thePic = extras.getParcelable("data");

  //获得imageview控件的引用

  ImageView picView = (ImageView)findViewById(R.id.picture);

  //在imageview控件中显示图片

  picView.setImageBitmap(thePic);

} |
最后,我们运行编写好的应用运行一下,如下图的界面,当点击Launch Camera后,则调用系统的摄象头进行拍摄,用户剪裁图片后,应用的主界面将显示返回的图片。
小结
在本文中,带领读者开发了一个简单的Android手机的图像拍摄和剪裁的应用,图片的拍摄和剪裁是很实用的技术,特别在开发一些比如SNS的应用中,希望读者可以根据这个原理扩展开发出更多的实用程序。
|


