| 在本文中,你将会学习到如何在Eclipse中创建Android
JUnit的单元测试工程以及在不同的条件下创建及运行自动测试用例。
准备工作
本文假设读者已经有一定的Android基础知识,并且已经安装了Eclipse和Android
SDK等开发工具。本文将指导读者如何将Android Junit框架应用到Android应用中去。本文还特别重点展示了如何测试Android中的Activity和如何识别程序中的错误。
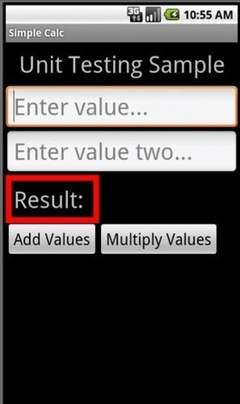
步骤1 被测试的应用SimpleCalc概况
在本文中,将以一个写好了的应用SimpleCalc简单计算器为例子进行讲解。这个简单计算器有两个功能,允许用户输入两个数并将它们相加或相乘,最后显示结果,如下图所示:
步骤2 SimpleCalc的的界面设计
由于应用比较简单,只占一屏,所以我们在/res/layout/main.xml中设计如下代码所示:
<?xml version="1.0" encoding="utf-8"?>
<LinearLayout xmlns:android="http://schemas.android.com/apk/res/android"
    android:orientation="vertical" android:layout_width="fill_parent"
    android:layout_height="fill_parent">
    <TextView android:layout_width="fill_parent"
        android:layout_height="wrap_content" android:text="@string/hello"
        android:gravity="center_horizontal" android:textSize="48px"
        android:padding="12px" />
    <EditText android:layout_height="wrap_content" android:id="@+id/value1"
        android:hint="@string/hint1" android:inputType="numberDecimal"
        android:layout_width="fill_parent" android:textSize="48px"></EditText>
    <EditText android:layout_height="wrap_content" android:id="@+id/value2"
        android:hint="@string/hint2" android:inputType="numberDecimal"
        android:layout_width="fill_parent" android:textSize="48px"></EditText>
    <FrameLayout android:id="@+id/FrameLayout01"
        android:layout_width="wrap_content" android:layout_height="wrap_content"
        android:padding="12px" android:background="#ff0000">
        <LinearLayout android:id="@+id/LinearLayout02"
            android:layout_width="wrap_content" android:layout_height="wrap_content"
            android:orientation="horizontal" android:background="#000000"
            android:padding="4px">
            <TextView android:layout_width="wrap_content"
                android:layout_height="wrap_content" android:text="@string/resultLabel"
                android:textSize="48px" android:id="@+id/resultLabel"></TextView>
            <TextView android:layout_width="wrap_content"
                android:layout_height="wrap_content" android:id="@+id/result"
                android:textSize="48px" android:textStyle="bold"
                android:layout_marginLeft="16px"></TextView>
        </LinearLayout>
    </FrameLayout>
    <LinearLayout android:id="@+id/LinearLayout03"
        android:layout_height="wrap_content" android:layout_width="fill_parent">
        <Button android:layout_height="wrap_content" android:id="@+id/addValues"
            android:text="@string/add" android:textSize="32px"
            android:layout_width="wrap_content"></Button>
        <Button android:layout_height="wrap_content" android:id="@+id/multiplyValues"
            android:text="@string/multiply" android:textSize="32px"
            android:layout_width="wrap_content"></Button>
    </LinearLayout>
</LinearLayout> |
简单解析一下这个界面设计,我们使用了LinearLayout,以使得控件能在垂直方向竖向排列。界面中包括了显示标题“Unit
Testing Sample”的textview,两个输入数字的edittext控件,一个FrameLayout控件中包含了一个水平的LinearLayout,在这个LinearLayout包含了一个显示结果的textview以及其提示文字“Result”,注意的是FrameLayout的背景颜色设置为红色,而LinearLayou设置成了黑色背景。
步骤3 SimpleCale Activity
本程序中只有一个Actity:MainActity.java,代码如下:
package com.mamlambo.article.simplecalc;
import android.app.Activity;
import android.os.Bundle;
import android.util.Log;
import android.view.View;
import android.view.View.OnClickListener;
import android.widget.Button;
import android.widget.EditText;
import android.widget.TextView;
public class MainActivity extends Activity {
/** Called when the activity is first created.
*/
@Override
public void onCreate(Bundle savedInstanceState)
{
final String LOG_TAG = "MainScreen";
super.onCreate(savedInstanceState);
setContentView(R.layout.main);
final EditText value1 = (EditText) findViewById(R.id.value1);
final EditText value2 = (EditText) findViewById(R.id.value2);
final TextView result = (TextView) findViewById(R.id.result);
Button addButton = (Button) findViewById(R.id.addValues);
addButton.setOnClickListener(new OnClickListener()
{
public void onClick(View v) {
try {
int val1 = Integer.parseInt(value1.getText().toString());
int val2 = Integer.parseInt(value2.getText().toString());
Integer answer = val1 + val2;
result.setText(answer.toString());
} catch (Exception e) {
Log.e(LOG_TAG, "Failed to add numbers",
e);
}
}
});
Button multiplyButton = (Button) findViewById(R.id.multiplyValues);
multiplyButton.setOnClickListener(new OnClickListener()
{
public void onClick(View v) {
try {
int val1 = Integer.parseInt(value1.getText().toString());
int val2 = Integer.parseInt(value2.getText().toString());
Integer answer = val1 * val2;
result.setText(answer.toString());
} catch (Exception e) {
Log.e(LOG_TAG, "Failed to multiply numbers",
e);
}
}
});
}
} |
上面的代码十分简单,分别在两个按钮的onclick事件中,对用户输入的数进行了相加和相乘,看上去代码似乎没问题,但接下来,我们将通过Junit去发现其中的bug。
步骤4 创建Android 单元测试工程
可以有两种方法去增加单元测试工程:一种是在创建新的Android工程时,在创建向导时同时创建单元测试工程,另外是针对已有的项目工程添加一个单元测试工程。本文由于已经有了一个项目工程,所以用如下步骤增加单元测试工程:
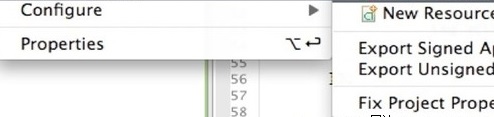
在Eclipse中,选择存在的工程SimpleCalc,鼠标右键后在弹出的菜单中选择Android
Tools-àNew Test Project,如下图所示:
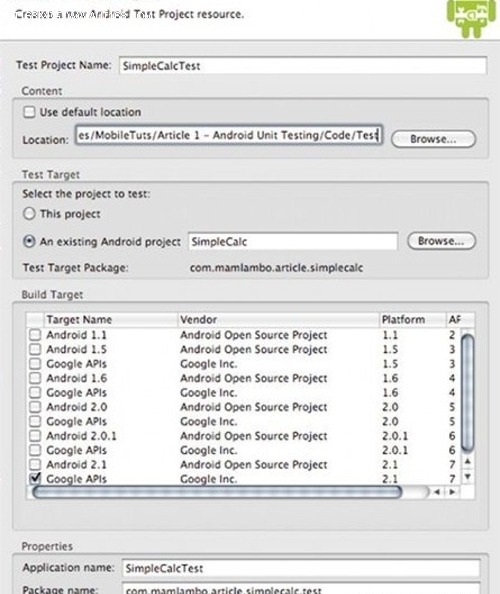
步骤5 设置测试工程
接下来需要对单元测试的工程进行设置,我们采用如下的设置方法:
测试工程名称:我们采用SimpleCalcTest
工程的位置:这个可以随便设置
选择被测试的工程:这里我们选择已经存在的SimpleCalc
构建的目标版本:这里我们选择Android 2.1
测试用例的包名:设置为com.mamlambo.article.simplecalc.test,
设置界面如下图所示:
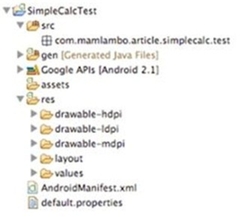
步骤6 SimpleCalcTest单元测试项目的结构
我们审视下SimpleCalcTest的项目结构如下图所示,可以看到这跟普通的Android工程没什么两样:
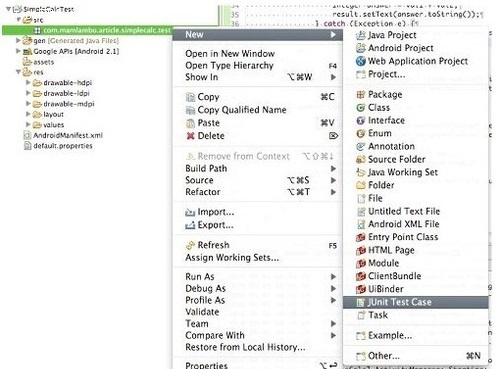
步骤7 创建单元测试用例
下面创建第一个单元测试用例,鼠标右键点击simplecalc.test的包,在弹出的菜单中选择NewàJUnit
Test Case,如下图所示:
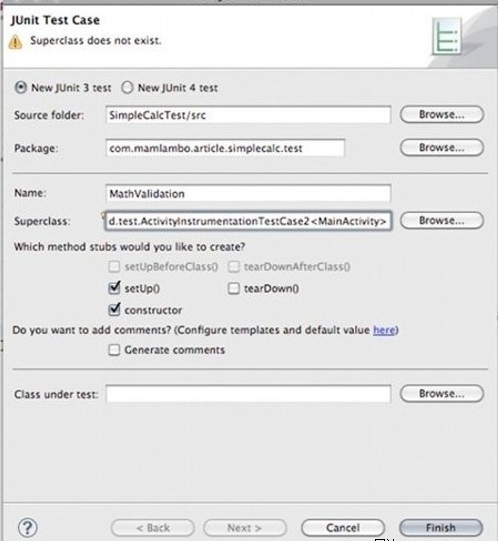
步骤8 设置单元测试用例
接下来对单元测试进行如下设置
设置选择使用Junit 3
源代码目录:这里要设置为SimpleCalcTest工程的代码目录
Package:这里设置为com.mamlambo.article.simplecalc.test,
测试用例名称:设置为MathValidation
测试的父类:这里选择“android.test.ActivityInstrumentationTestCase2.",这个是用来测试activity的Android的测试用例
将多选框中的setup,constructor两个都勾选上
如下图所示
步骤9 查看MatthValidation测试用例
在上图中,点”Finish”按钮后,MathVlidatiton.java测试用例就创建了。在单元测试中包括如下几个部分:construction,
setUp(), 针对方法的测试用例, tearDown(), 和destruction。在setup()方法中,主要是实现一些在测试工作前的资源及环境设置等的初始化设置;而针对方法的测试用例中,需要用户自己编写,一般是以“test+方法名”;而tearDown()在每个测试方法之后运行,用来撤消其初始化的测试环境。
代码如下:
package com.mamlambo.article.simplecalc.test;

import android.test.ActivityInstrumentationTestCase2;

public class MathValidation extends
       ActivityInstrumentationTestCase2 {

   public MathValidation(String name) {
       super(name);
   }

   protected void setUp() throws Exception {
       super.setUp();
   }
}
|
步骤10 修改MathValidation的构造函数
在测试用例的构造函数中,写入如下代码,以将我们正在使用的测试父类与测试环境设置进行绑定。
public MathValidation() {
  super("com.mamlambo.article.simplecalc", MainActivity.class);
  }
|
步骤11 编写setUp方法
现在可以收集数据去验证SimpleCalc的计算方法了。在setUp方法中,首先应该通过getActivity()方法获得当前的Activity,如下所示:
MainActivity mainActivity = getActivity(); |
接着,需要获得名为R.id.result的textview控件的实例,这个控件实际上保存计算器应用的运算结果的,代码如下所示:
package com.mamlambo.article.simplecalc.test;

import android.test.ActivityInstrumentationTestCase2;
import android.widget.TextView;
import com.mamlambo.article.simplecalc.MainActivity;
import com.mamlambo.article.simplecalc.R;

public class MathValidation extends ActivityInstrumentationTestCase2 {

   private TextView result;

   public MathValidation() {
       super ("com.mamlambo.article.simplecalc", MainActivity.class);
   }

   @Override
   protected void setUp() throws Exception {
       super.setUp();

       MainActivity mainActivity = getActivity();

       result = (TextView) mainActivity.findViewById(R.id.result);
   }
} |
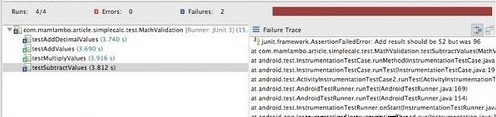
步骤12 SimpleCalc计算器中的加法测试用例
我们首先针对SimpleCalc中的加法进行测试用例的编写。这个测试用例中,会输入两个数(24和74),并测试是否其结果等于98。为了模拟在输入数字后点按钮的效果,我们使用了sendkeys方法,这个方法的优点在于可以在输入后自动将焦点切换到下一个控件上。最后,我们使用assertTrue的断言去判断实际结果是否就是等于98,代码如下:
private static final String NUMBER_24 = "2 4 ENTER ";
  private static final String NUMBER_74 = "7 4 ENTER ";
  private static final String ADD_RESULT = "98";
  public void testAddValues() {
  sendKeys(NUMBER_24);
  // now on value2 entry
  sendKeys(NUMBER_74);
  // now on Add button
  sendKeys("ENTER");
  // get result
  String mathResult = result.getText().toString();
  assertTrue("Add result should be 98", mathResult.equals(ADD_RESULT));
  }
|
步骤13 改进测试用例
由于每次测试时,其实都是使用同一个activity的,因此在每次测试时不需要清除旧的值,我们可以在一个sendKeys()方法中,发送一系列的输入命令,如下所示:
sendKeys(NUMBER_24 + NUMBER_74 + "ENTER"); |
我们测试一个小数的情况如下,看结果是否等于79.5
public void testAddDecimalValues() {
  sendKeys(NUMBER_5_DOT_5 + NUMBER_74 + "ENTER");
  String mathResult = result.getText().toString();
  assertTrue("Add result should be " + ADD_DECIMAL_RESULT + " but was "
  + mathResult, mathResult.equals(ADD_DECIMAL_RESULT));
} |
同样,我们去编写乘法的单元测试用例,这里我们继续使用sendKeys()方法,由于乘法的按钮就在加法的按钮右边,所以我们在用sendkey模拟输入了两个数后,发送“DRAD_RIGHT”的消息,就可以了。
public void testMultiplyValues() {
  sendKeys(NUMBER_24+NUMBER_74+ " DPAD_RIGHT ENTER");
  String mathResult = result.getText().toString();
  assertTrue("Multiply result should be " + MULTIPLY_RESULT + " but was "
  + mathResult, mathResult.equals(MULTIPLY_RESULT));
} |
步骤14 在模拟器中运行单元测试
运行单元测试的方法很简单,鼠标右键项目,在弹出的菜单中选择“Debug
ASàAndroid JUnit Test”即可,运行结果如下两图所示:
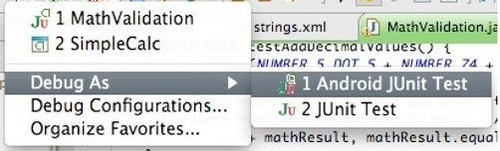
其中红色的表示测试没办法通过,绿色的条状表示测试已经通过。
步骤15 Android中对屏幕显示的单元测试
在Android 的单元测试中,还可以针对界面的显示位置等进行单元测试。比如我们在Eclipse时开发采用的界面模拟器是在800*480的模式下的,但如果在其他尺寸规格的移动设备上是否能正常运行呢?这就需要对界面设置部分进行单元测试了。
我们另外创建一个单元测试用例,用前文所讲的方法新建立一个名为LayoutTests的单元测试用例,如下图:
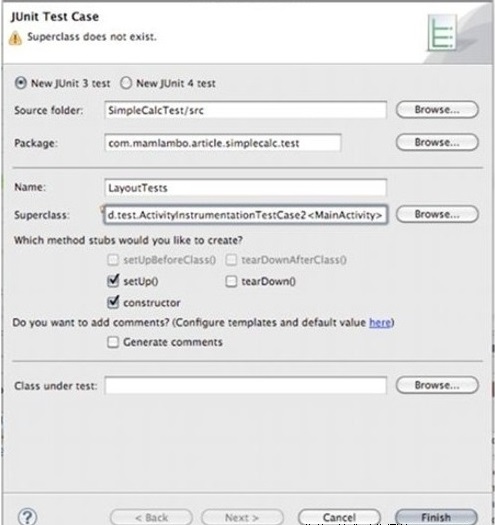
并编写如下代码:
package com.mamlambo.article.simplecalc.test;

  import android.test.ActivityInstrumentationTestCase2;

  import android.view.View;

  import android.widget.Button;

  import com.mamlambo.article.simplecalc.MainActivity;

  import com.mamlambo.article.simplecalc.R;

  public class LayoutTests extends ActivityInstrumentationTestCase2 {

  private Button addValues;

  private Button multiplyValues;

  private View mainLayout;

  public LayoutTests() {

  super("com.mamlambo.article.simplecalc", MainActivity.class);

  }

  protected void setUp() throws Exception {

  super.setUp();

  MainActivity mainActivity = getActivity();

  addValues = (Button) mainActivity.findViewById(R.id.addValues);

  multiplyValues = (Button) mainActivity

  .findViewById(R.id.multiplyValues);

  mainLayout = (View) mainActivity.findViewById(R.id.mainLayout);

  }
} |
这里,分别获得了加法按钮和乘法按钮的实例。接下来,增加一个testAddButtonOnScreen的方法,以测试按钮的位置是否正确。在这个方法中,首先你要决定屏幕的大小。有很多方法去检测屏幕的大小,比如用getWidth()和getHeight()方法,当然在考虑尺寸时,还必须考虑象标题栏,状态栏等所占用的位置大小。下面是其代码:
public void testAddButtonOnScreen() {

  int fullWidth = mainLayout.getWidth();

  int fullHeight = mainLayout.getHeight();

  int[] mainLayoutLocation = new int[2];

  mainLayout.getLocationOnScreen(mainLayoutLocation);

  int[] viewLocation = new int[2];

  addValues.getLocationOnScreen(viewLocation);

  Rect outRect = new Rect();

  addValues.getDrawingRect(outRect);

  assertTrue("Add button off the right of the screen", fullWidth

  + mainLayoutLocation[0] > outRect.width() + viewLocation[0]);

  assertTrue("Add button off the bottom of the screen", fullHeight

  + mainLayoutLocation[1] > outRect.height() + viewLocation[1]);

  }
|
在各类尺寸的模拟器上运行,可以得到如下结果所示的测试结果:
    480x800, portrait 模式 (通过)
  800x480, landscape mode (失败)
  320x480, portrait mode (失败)
  480x320, landscape (失败)
  480x854, portrait mode (通过)
854x480, landscape mode (失败)? |
大家可以思考下为什么有的测试用例成功有的失败。
总结
本文讲解了如何使用junit配合Android的应用进行单元测试及详细步骤,以及如何在Junit测试Android时的小技巧。可以看到,在设计完应用后应该编写单元测试用例,测试用例越多和越详细,则对程序的正确性提高越有好处。
|


