|
Android UI �������˵�һ:���ҵİ���,�������Ը㶨
��ʱ��,����Ҫ����һ�³���,��׳����׳,Ȼ��,�Ҹ������ĵĵܵ�/����,���ֻ�������/��,����/�����ҵİ�,����ij����ܲ��ܽ�������������,����,�������߲����ܶ�����̫������,Ҳ���ܱ�֤�����õ��ֻ��Ժ��Dz��������Ľ�׳��,������������ֻ�������ˤ,�������ǵ�������̫Զ�ˡ��Ͼ������������IJ�����Ӳ�ġ�
��Ȼ,������ţ��һ�Ѱѵ�,Ȼ��,google��˾���ǵ����ǵ���Ҫ,���Ҹ���ij��ţ��д�ij���,���ɵ��˱Ƚ��°汾��SDK
R8(�� android 2.2�Ժ�),Ȼ��,����������
monkey ��ʹ��
Monkey����������һ������С����ˮƽ,����,ʹ������Ҳ�Ƿdz���,��Ȼ,Ҳ������ʲô���ӵĶ���
adb shell monkey [options] <event-count>
| options |
event-count |
| ���������monkey������,����,ָ�������Ǹ���,��ָ����������������г���
|
�������monkey���Ͷ��ٴ��¼� |
��ϸ��monkey����,��options�IJ�����鿴
http://developer.android.com/guide/developing/tools/monkey.html
����Ͳ��ظ��������ˡ�
ʵ��:
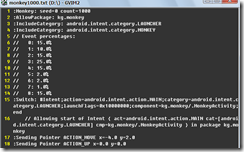
������֤���������1000���¼���,�ܲ�������������ȥ
adb shell monkey -p your.package.name
-vvv 1000 > monkey1000.txt
-v Ϊ verbose����д,������ϸ����¼��ȼ�,���3��v��������ȼ�1��3�������¼�,Ȼ����ʹ�ùܵ�����������ŵ�һ���ı����淽��鿴.���������ǿ���ij����ܲ����������������¼����ȥ��.
���Ͻظ�ͼ������
Ȼ��,����һ�¹ٷ��ĵ���û�и��µIJ������������Լ�����������,���,�㿴��ʱ��,�ٷ���������˵�����,ϣ���ܻظ���һ��,���Ҹ���һ�¡�
��Ҫ��������������
| [--port port�� |
ָ��monkey�Ķ˿�,ʵ��ʹ��Client-server Monkey,������������þ����������ͨ��telnet���ֶ�����monkey�IJ���,������monkey�������������������ܵĻ�����ϧ������һֱ��û��ɹ�. |
| [--setup scriptfile] [-f scriptfile
��.] |
�������monkey ָ���ֻ��еĽű�����. |
��������һ��,���������ñ���ָ��scriptfile�ɹ���ʹ��
I am trying to do 2 things with monkey
1. Execute a script with a command
like
adb shell monkey -p MY_PACKAGE --setup
scriptfile -f /sdcard/ mon_script1.txt 1
where mon_script.txt contains a few
touch commands. After I execute this, I see nothing
happening on the screen. It even does not give me the
"Number of events injected message". I have
verified that my touch co-ordinates fall over actual
UI elements.
This is the script file I am using
tap 79 29 tap 100 100 tap 200 200 tap
300 300 quit
2. Execute Monkey Network control to
type commands individually. I start up monkey to listen
to a port and use PuTTY to send commands. I get "OK"
return messages, but nothing happens on the screen.
Whenever I use monkey in the random
mode, I see interaction on the screen. But I need to
get one of the above 2 methods to work. I have seen
the sources of monkey and nothing seems to be wrong.
Has anyone used monkey in the above described way? If
so, please tell me what I am doing wrong.
ʹ��Զ��monkey �Ĵ���ģ��
adb �Ce shell monkey -p your.pakagename
--port 1080 &
Ȼ���ض������ǵ�ģ�����˿�
adb -e forward tcp 1080 tcp 1080
Ȼ��telnet �����ǵ�ģ����
telnet localhost 1080
����telnet�ɹ��Ժ��˵��������
tap 150 200
Ȼ��,�Ϳ��Կ������ǿ���UI�¼���,��ϧ����,����ô���Զ����ܳɹ���
��:
Ŀǰ����,monkey���������ʵ��������,��Щ�������ٷ��ĵ�����û����,����,��Ϊ����Ӧ�õ�ʹ�û����㹻��,�����Լ��ij�����ģ�����в��ϵı���ĥ��������Ҫ������Monkey�Ľ���--->MonkeyRunner
MonkeyRunner
���,���ֽε�monkey����������С��,��ômonkeyrunner����һ���������ˡ���֧��,�Լ���д���,�����¼�,��ʱ��ͼ,�����֮,�κ�����ģ����/�豸���ܸɵ�����,MonkeyRunner���ܸ�,���һ����Լ�¼�ͻط�!!!
������ܡ����ٷ��ĵ�.���ﻹ�Dz��ظ�������
http://developer.android.com/guide/developing/tools/monkeyrunner_concepts.html
ע��:android sdk r14��û�а�һ���ؼ���jar����libĿ¼��,����,��������,��Ȼ���뽫SDK
TOOLS ֱ�Ӹ��µ����µ�R15
�����ṩһЩ���õĽű�,�Լ��������İ�..
monkey_recorder.py
monkey_placback.py
help.py
http://115.com/file/e6r0sln9#
monkeyrunner_py�ű�.rar
��Ȼ,����Щ����,����,����Ӱ�����Ǵֵ���Ҫ.��������һ�ε��͵�monkeyRunner���뽲��!
ע��!���monkeyrunner�ű��ļ�Ҫʹ������,�ǵø�ʽ����Ϊutf8,��Ȼ��ASCNII(������ôƴд��..)��֧�ִ���
|
#����������Ҫ�õ��İ����ಢ�������
import sys
from com.android.monkeyrunner import MonkeyRunner as mr
from com.android.monkeyrunner import MonkeyDevice as md
from com.android.monkeyrunner import MonkeyImage as mi
#connect device �����豸
#��һ������Ϊ�ȴ������豸ʱ��
#�ڶ�������Ϊ�������ӵ��豸
device = mr.waitForConnection(1.0,'emulator-5554')
if not device:
print >> sys.stderr,"fail"
sys.exit(1)
#����Ҫ������Activity
componentName='kg.monkey/.MonkeyActivity'
#�����ض���Activity
device.startActivity(component=componentName)
mr.sleep(3.0)
#do someting �������ǵIJ���
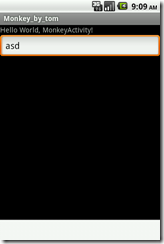
#���� a s d
device.type('asd')
#����س�
device.press('KEYCODE_ENTER')
#return keyboard �����������ȡ�����¿�����ͼ���·��İ���
#device.press('KEYCODE_BACK')
#------
#takeSnapshot��ͼ
mr.sleep(3.0)
result = device.takeSnapshot()
#save to file ���浽�ļ�
result.writeToFile('takeSnapshot\\result1.png','png'); |
���ϴ��������monkeyrunner ʵ�ֲ����ض������Ժ�,���ҽ�ͼ�Ĺ���,����ȥò��ͦ�鷳�ġ�������кܶ��豸Ҫһ�����,��ͻᷢ�����ϴ����Ƕ�ôˬѾѾ������.����ű���ʵ�ʾ���һ��python�ű�,����,python������,�����������ʵ�ַdz�ǿ���Ĺ���.����ʹ�ס��,��λ�뵽ʲô����,ʵ�õļǵûظ�һ�¡����һ����.
monkeyRunner �ļ�¼�ͻط�
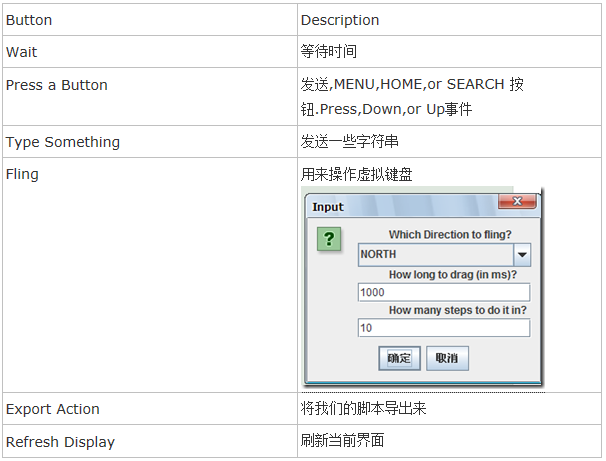
ǰ�潲�Ķ���һЩ���������ϵIJ���,�ҿɼDz�ס��ô���ָ�����,�ҿɲ�֪��,�ҵ���������������Ƕ���,�Ҷ�ôϣ��,���ܹ��ڿ��ӻ��������潲�ҵIJ�����¼����,Ȼ��,ֱ�����²���,�����һ��,�ҿ��Ժܸ��˵ĸ�����,MonkeyRunner���������ʵ������Ҳ�dz���,���ṩ�Ĵ���ļ�����һ��,monkey_recorder.py,ֱ�����������д���:monkeyrunner
monkey_recorder.py
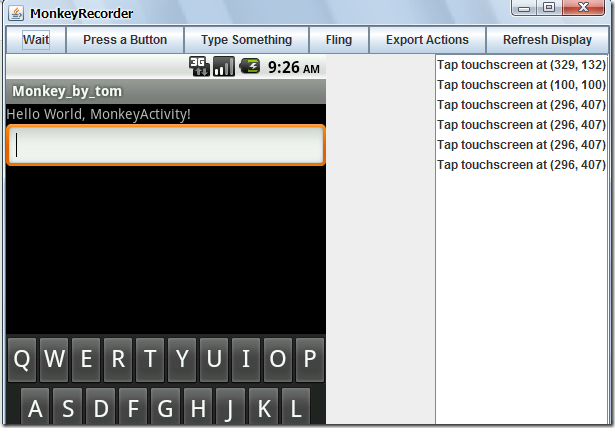
��������ɾ�����Ǹղŵ�asd�ַ������ͻ��¼���������еIJ���!,�ͻῴ�����Ͻ�ͼ!!!
�������������ǵı���Ľű�,Ȼ��,��Ϳ���ģ����,������ղ�һ���IJ���monkeyrunner
monkey_playback.py monkey_test.mr
�����ǵ��ļ����Կ�����ʵ����һЩmonkeyrunner��һЩ�ű�
TOUCH|{'x':329,'y':132,'type':'downAndUp',}
TOUCH|{'x':100,'y':100,'type':'downAndUp',}
TOUCH|{'x':296,'y':407,'type':'downAndUp',}
TOUCH|{'x':296,'y':407,'type':'downAndUp',}
TOUCH|{'x':296,'y':407,'type':'downAndUp',}
TOUCH|{'x':296,'y':407,'type':'downAndUp',}
TOUCH|{'x':351,'y':227,'type':'downAndUp',}
��Ȼ,�н���Ϊʲô������~~~�Ǻ�~
����һ��:�������Ҫ���ж��豸������ô����?
���ǿ��Դ�monkey_playback.py�ļ�
|
import sys
from com.android.monkeyrunner import MonkeyRunner
# The format of the file we are parsing is very carfeully constructed.
# Each line corresponds to a single command. The line is split into 2
# parts with a | character. Text to the left of the pipe denotes
# which command to run. The text to the right of the pipe is a python
# dictionary (it can be evaled into existence) that specifies the
# arguments for the command. In most cases, this directly maps to the
# keyword argument dictionary that could be passed to the underlying
# command.
# Lookup table to map command strings to functions that implement that
# command.
CMD_MAP = {
'TOUCH': lambda dev, arg: dev.touch(**arg),
'DRAG': lambda dev, arg: dev.drag(**arg),
'PRESS': lambda dev, arg: dev.press(**arg),
'TYPE': lambda dev, arg: dev.type(**arg),
'WAIT': lambda dev, arg: MonkeyRunner.sleep(**arg)
}
# Process a single file for the specified device.
def process_file(fp, device):
for line in fp:
(cmd, rest) = line.split('|')
try:
# Parse the pydict
rest = eval(rest)
except:
print 'unable to parse options'
continue
if cmd not in CMD_MAP:
print 'unknown command: ' + cmd
continue
CMD_MAP[cmd](device, rest)
def main():
file = sys.argv[1]
fp = open(file, 'r')
#������ָ������豸��
device = MonkeyRunner.waitForConnection()
process_file(fp, device)
fp.close();
if __name__ == '__main__':
main() |
��
����,monkeyrunner�ij��÷�ʽ����������,���ﲻ����˵��ô��дһ���Լ���monkeyrunner���,��Ϊ,�Ҿ��������Ͻ��ܵĹ�����ʵ�ʿ����л�������,����,monkeyrunner����,����һ���汾�л���һЩ����,����Ȥ��ͬѧ,�Լ����Ĺٷ��ĵ�,��Ȼ,Ҳ������ϵ���ˡ�
|


