MongoDB����
mongodb��C����д�ͣ�����������humongous������ʵ��м䲿�֣�����10gen������ά����,��������һ����������Ϊ��scalable,
high-performance, open source, schema-free, document-oriented
database��MongoDB����ҪĿ�����ڼ�/ֵ�洢��ʽ���ṩ�˸����ܺ߶������ԣ��Լ���ͳ��RDBMSϵͳ���ḻ�Ĺ��ܣ�����һ�������������ߵ�������һ����
MongoDB���ԣ�
/ �����ĵ��洢
/ ȫ����֧��,��չ���ڲ��������Ƕ����
/ ���ƺ߿���
/ �Զ���Ƭ֧���Ƽ���չ��
/ ��ѯ��¼����
/ ��̬��ѯ
/ ����,�͵ظ���
/ ֧��Map/Reduce����
/ GridFS�ļ�ϵͳ
/ ��ҵ֧��,��ѵ����ѯ
����
Master-slaves ģʽ

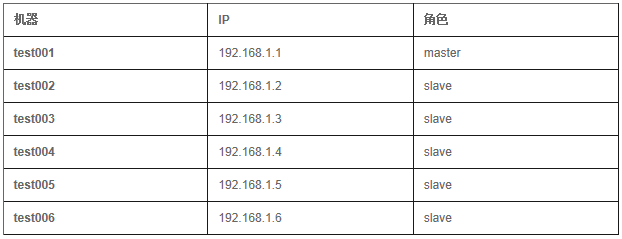
����master:
./mongod -dbpath=/mongodb/data/ -logpath=/mongodb/logs/mongodb.log
-oplogSize=10000 -logappend -master -port=27017 -fork
����repl�û�:
./mongo
>use local
> db.addUser('repl','replication');
����slaves:
./mongod -dbpath=/mongodb/data/ -logpath=/mongodb/logs/mongodb.log
-slave -port=27017 -source=test001:27017 --autoresync
-fork
����repl�û�:
./mongo
>use local
> db.addUser('repl','replication');
autoresync ��������ϵͳ���������������������ݲ�ͬ��ʱ���Զ��������Ʋ���
(ͬ������ 10 �����ڽ�ִ��һ��)������֮�⣬�������� �Cslavedelay �趨����Ƶ��(��)��
ͨ�����ǻ�ʹ�����ӷ���ʵ�ֶ�д���룬����Ҫ���� Slave_OK��
slaveOk
When querying a replica pair or replica
set, drivers route their requests to the master mongod
by default; to perform a query against an (arbitrarily-selected)
slave, the query can be run with the slaveOk option.
Here��s how to do so in the shell:
db.getMongo().setSlaveOk(); // enable
querying a slave
db.users.find(...)
Note: some language drivers permit specifying
the slaveOk option on each find(), others make this
a connection-wide setting. See your language��s driver
for details.
Replica Setģʽ
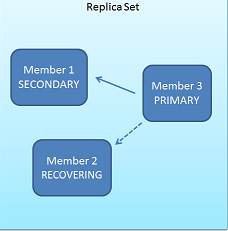
Replica Sets ʹ�� n �� Mongod �ڵ㣬�����߱��Զ��ݴ�ת��(auto-failover)���Զ��ָ�(auto-recovery)
�ĸ߿��÷�����
����:
./mongod -dbpath=/mongodb/data/ -logpath=/mongodb/logs/mongodb.log
-oplogSize=10000 -logappend -replSet set1 -port=27017
-fork �Crest
����repl�û�:
./mongo
>use local
> db.addUser('repl','replication');
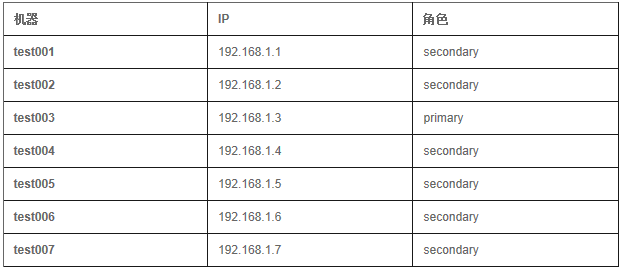
����:
config=
{_id:'set1',members:[
{_id:0,host:'test001:27017'},
{_id:1,host:'test002:27017'},
{_id:2,host:'test003:27017'},
{_id:3,host:'test004:27017'},
{_id:4,host:'test005:27017'},
{_id:5,host:'test006:27017'},
{_id:6,host:'test007:27017'}]
}
rs.initiate(config);
�鿴:
���� http://test001 :28017/_replSet
����
./mongo
> rs.status()
{
"set" :"set1",
"date" : "Fri Dec 03
2010 00:57:44 GMT+0800 (CST)",
"myState" : 2,
"members" : [
{
"_id" : 0,
"name" : "test001:27017",
"health" : 1,
"state" : 2,
"self" : true
},
{"_id" : 1,
"name" : "test002:27017",
"health" : 1,
"state" : 2,
"uptime" : 194451,
"lastHeartbeat" : "Fri
Dec 03 2010 00:57:42 GMT+0800 (CST)"
},
{"_id" : 2,
"name" : "test003:27017",
"health" : 1,
"state" : 1,
"uptime" : 194689,
"lastHeartbeat" : "Fri
Dec 03 2010 00:57:43 GMT+0800 (CST)"
},
{"_id" : 3,
"name" : "test004:27017",
"health" : 1,
"state" : 2,
"uptime" : 194689,
"lastHeartbeat" : "Fri
Dec 03 2010 00:57:42 GMT+0800 (CST)"
},
{"_id" : 4,
"name" : "test005:27017",
"health" : 1,
"state" : 2,
"uptime" : 194689,
"lastHeartbeat" : "Fri
Dec 03 2010 00:57:42 GMT+0800 (CST)"
},
{"_id" : 5,
"name" : "test006:27017",
"health" : 1,
"state" : 2,
"uptime" : 194689,
"lastHeartbeat" : "Fri
Dec 03 2010 00:57:43 GMT+0800 (CST)"},
{"_id" : 6,
"name" : "test007:27017",
"health" : 1,
"state" : 2,
"uptime" : 194689,
"lastHeartbeat" : "Fri
Dec 03 2010 00:57:42 GMT+0800 (CST)"
}
],
"ok" : 1
}
��Replica Sets�������������getlasterrorʹд����ͬ��������3̨������ŷ���
db.runCommand( { getlasterror : 1 ,
w : 3 } )
ע����ģʽ��֧��auth���ܣ���Ҫauth������ѡ��m-sģʽ
Shardingģʽ
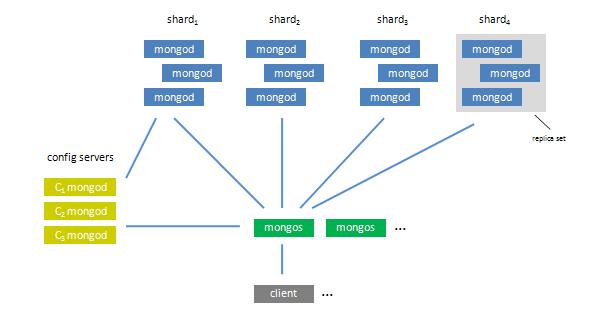
Ҫ����һ�� MongoDB Sharding Cluster����Ҫ���ֽ�ɫ��
- Shard Server: mongod ʵ�������ڴ洢ʵ�ʵ����ݿ顣
- Config Server: mongod ʵ�����洢������ Cluster Metadata�����а���
chunk ��Ϣ��
- Route Server: mongos ʵ����ǰ��·�ɣ��ͻ����ɴ˽��룬����������Ⱥ����ȥ��һ�������ݿ⡣
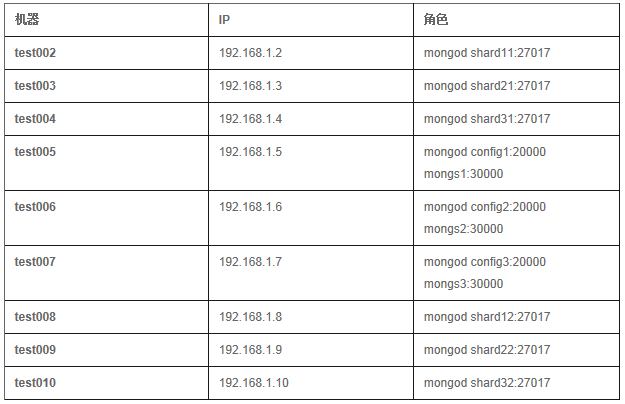
Shard����
Shard1
[test002; test008]
test002:
./mongod -shardsvr -replSet shard1
-port 27017 -dbpath /mongodb/data/shard11 -oplogSize
10000 -logpath /mongodb/logs/shard11.log -logappend
-fork
test008:
./mongod -shardsvr -replSet shard1
-port 27017 -dbpath /mongodb/data/shard12 -oplogSize
10000 -logpath /mongodb/logs/shard12.log -logappend
-fork
��ʼ��shard1
config=
{_id:'shard1',members:[
{_id:0,host:'test002:27017'},
{_id:1,host:'test008:27017'}]
}
rs.initiate(config);
Shard2
[test003; test009]
test003:
./mongod -shardsvr -replSet shard2
-port 27017 -dbpath /mongodb/data/shard21 -oplogSize
10000 -logpath /mongodb/logs/shard21.log -logappend
-fork
test009:
./mongod -shardsvr -replSet shard2
-port 27017 -dbpath /mongodb/data/shard22 -oplogSize
10000 -logpath /mongodb/logs/shard22.log -logappend
-fork
��ʼ��shard2
config=
{_id:'shard2',members:[
{_id:0,host:'test003:27017'},
{_id:1,host:'test009:27017'}]
}
rs.initiate(config);
Shard3
[test004; test010]
test004:
./mongod -shardsvr -replSet shard3
-port 27017 -dbpath /mongodb/data/shard31 -oplogSize
10000 -logpath /mongodb/logs/shard31.log -logappend
-fork
test010:
./mongod -shardsvr -replSet shard3
-port 27017 -dbpath /mongodb/data/shard32 -oplogSize
10000 -logpath /mongodb/logs/shard32.log -logappend
-fork
��ʼ��shard3
config=
{_id:'shard3',members:[
{_id:0,host:'test004:27017'},
{_id:1,host:'test010:27017'}]
}
rs.initiate(config);
config server����
[test005; test006; test007]
./mongod -configsvr -dbpath /mongodb/data/config
-port 20000 -logpath /mongodb/logs/config.log -logappend
-fork
Mongos����
[test005; test006; test007]
./mongos -configdb test005:20000,test006:20000,test007:20000
-port 30000 -chunkSize 5 -logpath /mongodb/logs/mongos.log
-logappend -fork
Route ת������ʵ�ʵ�Ŀ�������̣������������ϲ��ش����ͻ��ˡ�Route
���������洢�κ����ݺ�״̬����������ʱ�� Config Server ��ȡ��Ϣ��Config Server
�ϵ��κα䶯���ᴫ�ݸ����е� Route Process��
Configuring the Shard Cluster
1. ����admin���ݿ�
./mongo test005:30000/admin
2. ����shards
db.runCommand({addshard:"shard1/test002:27017,test008:27017",name:"s1",maxsize:20480});
db.runCommand({addshard:"shard2/test003:27017,test009:27017",name:"s2",maxsize:20480});
db.runCommand({addshard:"shard3/test004:27017,test010:27017",name:"s3",maxsize:20480});
3. Listing shards
db.runCommand({listshards:1})
����г�������3��shards����ʾshards�Ѿ����óɹ�
4. �������ݿ�ͱ���Ƭ
db.runCommand({enablesharding:"taobao"});
db.runCommand({shardcollection:"taobao.test0",key:{_id:1}});
db.runCommand({shardcollection:"taobao.test1",key:{_id:1}});
ʹ��
shell�������ݿ�
�����û���أ�
1) �������ݿ�admin
use admin
2) ���ӻ����û�����
db.addUser('name','pwd')
3) �鿴�û��б�
db.system.users.find()
4) �û���֤
db.auth('name','pwd')
5) ɾ���û�
db.removeUser('name')
6) �鿴�����û�
show users
7) �鿴�������ݿ�
show dbs
8) �鿴���е�collection
show collections
9) �鿴��collection��״̬
db.printCollectionStats()
10) �鿴���Ӹ���״̬
db.printReplicationInfo()
11) �����ݿ�
db.repairDatabase()
12) ���ü�¼profiling��0=off 1=slow 2=all
db.setProfilingLevel(1)
13) �鿴profiling
show profile
14) �������ݿ�
db.copyDatabase('mail_addr','mail_addr_tmp')
15) ɾ��collection
db.mail_addr.drop()
16) ɾ����ǰ�����ݿ�
db.dropDatabase()
����ɾ����:
1) Insert
db.user.insert({'name':'dump','age':1})
or
db.user.save({'name':'dump','age':1})
Ƕ����:
db.foo.save({'name':'dump','address':{'city':'hangzhou','post':310015},'phone':[138888888,13999999999]})
�������:
db.user_addr.save({'Uid':'dump','Al':['test-1@taobao.com','test-2@taobao.com']})
2) delete
ɾ��name=��dump�����û���Ϣ:
db.user.remove({'name':'dump'})
ɾ��foo��������Ϣ:
db.foo.remove()
3) update
//update foo set xx=4 where yy=6
//�������������룬�����Ķ�����¼
db.foo.update({'yy':6},{'$set':{'xx':4}},upsert=true,multi=true)
��ѯ:
coll.find() // select * from coll
coll.find().limit(10) // select * from
coll limit 10
coll.find().sort({x:1}) // select *
from coll order by x asc
coll.find().sort({x:1}).skip(5).limit(10)
// select * from coll order by x asc limit 5, 10
coll.find({x:10}) // select * from coll
where x = 10
coll.find({x: {$lt:10}}) // select *
from coll where x <= 10
coll.find({}, {y:true}) // select y
from coll
coll.count() //select count(*) from
coll
����:
coll.find({"address.city":"gz"})
// ����Ƕ���ĵ�address��cityֵΪgz�ļ�¼
coll.find({likes:"math"})
// ��������
coll.find({name: {$exists: true}});
//��ѯ���д���name�ֶεļ�¼
coll.find({phone: {$exists: false}});
//��ѯ���в�����phone�ֶεļ�¼
coll.find({name: {$type: 2}}); //��ѯ����name�ֶ����ַ����͵�
coll.find({age: {$type: 16}}); //��ѯ����age�ֶ������͵�
����:
(ascending),-1(descending)
coll.ensureIndex({productid:1}) //
��productid�Ͻ�����ͨ����
coll.ensureIndex({district:1, plate:1})
// ���ֶ�����
coll.ensureIndex({"address.city":1})
// ��Ƕ���ĵ����ֶ��Ͻ�����
coll.ensureIndex({productid:1}, {unique:true})
// Ψһ����
coll.ensureIndex({productid:1}, {unique:true,
dropDups:true|) // ������ʱ��������������ֶ�ֵ�Ѿ����ֹ����������ɾ���ظ���¼
coll.getIndexes() // �鿴����coll.dropIndex({productid:1})
// ɾ����������
MongoDB Drivers
C
C#
C++
Haskell
Java
Javascript
Perl
PHP
Python
Ruby
Scala (via Casbah)
Mongodb֧�ֵ�client ���api�dz��࣬����dump�����ǽ�����hadoop�Ļ����ϵģ��������ؽ���java
api,����IJ��Գ�����õ�Ҳ��java api.
MongoDB in Java
����MongoDB��Java��������jar��(mongo-2.3.jar)�ӵ���Ŀ��ȥ�����ˣ�
Java�У�Mongo�������̰߳�ȫ�ģ�һ��Ӧ����Ӧ��ֻʹ��һ��Mongo����Mongo������Զ�ά��һ�����ӳأ�Ĭ��������Ϊ10��
import com.mongodb.*
try{
Mongo mg = new Mongo(server_lists);//
List<ServerAddress> server _lists
DB db = mg.getDB("taobao");
if (db.isAuthenticated() == false) {
db.authenticate("name", "pwd".toCharArray());
}
DBCollection coll=db.getCollection("category_property_values");
coll.slaveOk();//repl setģʽ������ã���������query��ֻ�������ڵ��ѯ
//insert
BasicDBObject doc = <strong>new</strong>
BasicDBObject();
//��ֵ
doc.put("name", "MongoDB");
doc.put("type", "database");
coll.insert(doc);
����
//select
//��ѯһ������
BasicDBObject doc = <strong>new</strong>
BasicDBObject();
doc.put("name", "MongoDB");
DBObject query = coll.findOne(doc);
����
//ʹ���α��ѯ
DBCursor cur = coll.find(doc);
while(cur.hasNext()) {
cur.next();
����
}
����
//update
DBObject dblist = new BasicDBObject();
DBObject qlist = new BasicDBObject();
qlist.put("_id", j);
dblist.put("t1", str);
coll.update(qlist, dblist);
����
//delete
DBObject dlist = new BasicDBObject();
dlist.put("_id", j);
coll.remove(dlist);
}catch(MongoException ex){
}
MongoDB ����
���汾: 1.6.3
���õ��̷ֱ߳����100��300��,500��,1000�����ݺͶ���̣߳�ÿ�̲߳���100������.
�������ݸ�ʽ:
{ "_id" : NumberLong(16),
"nid" : NumberLong(16), "t1" : "search_engine_insert",
"t2" : "search_engine_insert", "t3"
: "search_engine_insert", "t4" :
"search_engine_insert" }
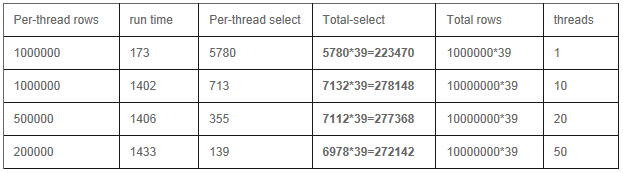
1) Master slavesģʽ
Insert
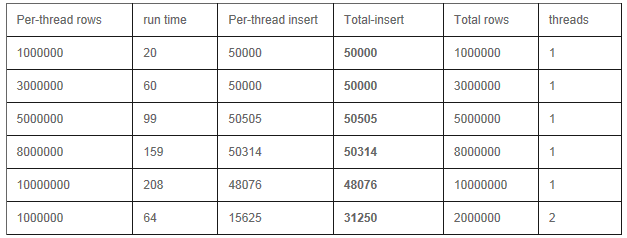
Mongodbֻ�����ڵ���ܽ��в�����²���.
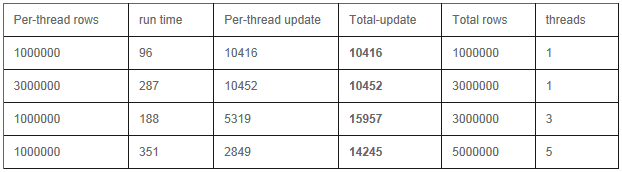
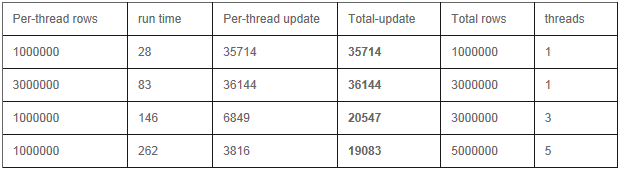
Update
���ݸ�ʽ:
{ "_id" : NumberLong(16),
"nid" : NumberLong(16), "t1" : "search_engine_update",
"t2" : "search_engine_update", "t3"
: "search_engine_update", "t4" :
"search_engine_update" }
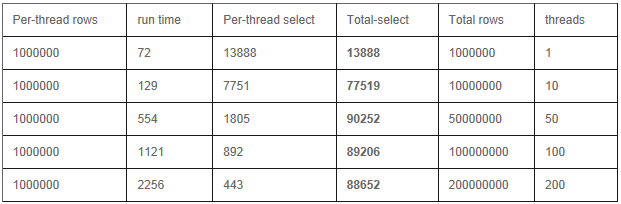
Select
�ԡ�_id���ֶ�Ϊkey������������¼
a) �ͻ���:�������߳�
b) �ͻ���:�ֲ�ʽ���߳�
��������39̨������
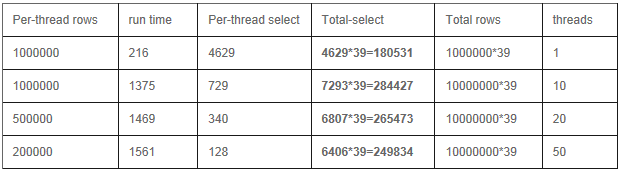
2) Replica Set ģʽ
Insert
Update
Select
�ԡ�_id���ֶ�Ϊkey������������¼
a) �ͻ���:�������߳�
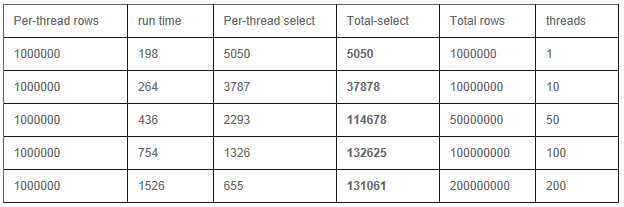
b) �ͻ���:�ֲ�ʽ���߳�
��������39̨������
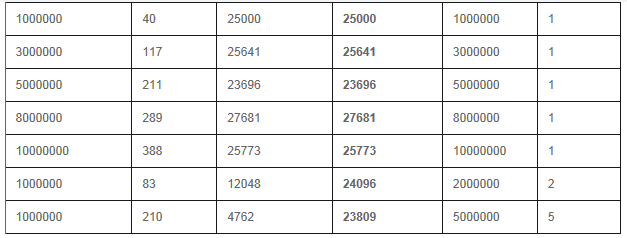
3) Sharding ģʽ
Insert

Update
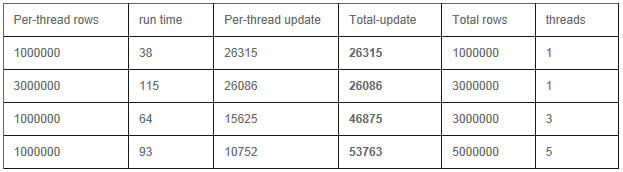
Select
�ԡ�_id���ֶ�Ϊkey������������¼
a) �ͻ���:�������߳�
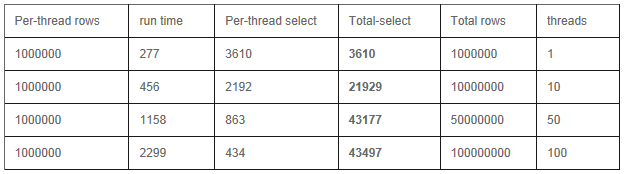
b) �ͻ���:�ֲ�ʽ���߳�
��������39̨������

��:
Mongodb��M-S��Repl-Setģʽ�²�ѯЧ�ʻ��Dz����ģ���������Repl-Setģʽ�����primary�ڵ�ҵ���ϵͳ�Լ���ѡ�ٳ���һ��primary�ڵ㣬����Ӱ�������ʹ�ã�ԭ�������ڵ�ָ����Զ���Ϊsecondary�ڵ�,��M-Sģʽһ��master
�ڵ�ҵ���Ҫ�ֹ������slaves �ڵ��ij�master,����Repl-Setģʽ���ֻ����7���ڵ�.
����shardingģʽ��ѯ�ٶ��½����ԣ���ʱ̫��,����ֻ������2��,������������Ӧ�����������dz���Ļ����²������ֳ�����,�������ݽ����ο�������ֻ�ǼĽ����˲��ԣ����������Դ�����һ���о�����ӭ����Ȥ��ͬѧ��ཻ����
|


