|
���죬�����ؽ����������������ݣ�
- measure����
- WRAP_CONTENT��MATCH_PARENT/FILL_PARENT���Ե�ԭ��˵��
- xml�����ļ�������View�������̷�����
ϣ���Դ�����а�����- - �����汾����Android 2.3 ��
1��WRAP_CONTENT��MATCH_PARENT/FILL_PARENT
����Android���õ�ͬѧ�ǣ�������������һ���ְ��ֺޡ�������ʹ������ͦˬ��---�պ�«��ư���ɣ���
ȴ��ʱ�������⼸�����Ե����壬��Ҫ��˼�����С��ڴ��Ŵ���������⼸�����Ե��÷���(ϣ����û�І���)��
���������Զ�������Ӧ��ͼ��ˮƽ��ֱ��С��һ������ͼ�����ݻ�ߴ�Ϊ�����IJ��ֱȾ�ȷ��ָ����ͼ��Χ
���ӷ��㡣
�� fill_parent
����һ����ͼ�IJ���Ϊfill_parent��ǿ���Ե�ʹ��ͼ��չ����Ԫ�ش�С��
�� match_parent
Android ��match_parent��fill_parent��˼һ������match_parent�����У����Ǵ�2.2��ʼ�����ʶ�����
�ã���2.3�汾����ʹ��match_parent��
�� wrap_content
����Ӧ��С��ǿ���Ե�ʹ��ͼ��չ�Ա���ʾ��ȫ�����ݡ���TextView��ImageView�ؼ�Ϊ��������Ϊ
wrap_content��������ʾ���ڲ����ı���ͼ����Ԫ�ؽ��������ݸ��Ĵ�С��
�ɲ�Ҫ�ظ������ӣ�����ժ��<<Android fill_parent��wrap_content��match_parent������>>��
��Ȼ�����ǿ�������View��ȷ�п��ߣ�����������������ָ����
01.android:layout_weight="wrap_content" //����Ӧ��С
02.android:layout_weight="match_parent" //�븸��ͼ�ȸ�
03.android:layout_weight="fill_parent" //�븸��ͼ�ȸ�
04.android:layout_weight="100dip" //��ȷ���ø߶�ֵΪ 100dip |
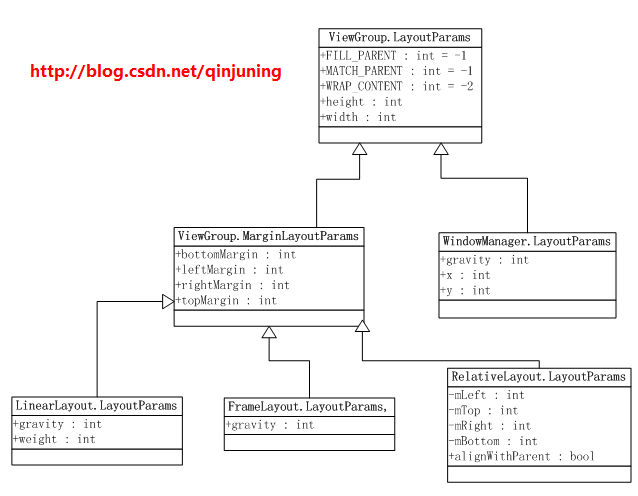
��������������Ҫת�����ӽǣ�����ViewGroup.LayoutParams�༰�������ࡣ
2��ViewGroup.LayoutParams�༰��������
2.1�� ViewGroup.LayoutParams��˵��
Android API�����½��ܣ�
LayoutParams are used by views to tell
their parents how they want to be laid out.
��˼�����˵�� Viewͨ��LayoutParams������丸��ͼ����Ҫ�ش�С(�������ȺͿ���)��
��ˣ�ÿ��View������һ��ViewGroup.LayoutParams������������࣬View��������ViewGroup.LayoutParams��
·����frameworks\base\core\java\android\view\View.java
01.public class View implements Drawable.Callback, KeyEvent.Callback, AccessibilityEventSource {
02. ...
03. /**
04. * The layout parameters associated with this view and used by the parent
05. * {@link android.view.ViewGroup} to determine how this view should be
06. * laid out.
07. * {@hide}
08. */
09. //��Viewӵ�е� LayoutParams���ԣ�����ͼ���Ӹ�Viewʱ����Ϊ�丳ֵ���ر�ע�⣬������ΪViewGroup.LayoutParams��
10. protected ViewGroup.LayoutParams mLayoutParams;
11. ...
12.} |
2.2�� ViewGroup.LayoutParamsԴ�����
·��λ�ڣ�frameworks\base\core\java\android\view\ViewGroup.java
01.public abstract class ViewGroup extends View implements ViewParent, ViewManager {
02. ...
03. public static class LayoutParams {
04. /**
05. * Special value for the height or width requested by a View.
06. * FILL_PARENT means that the view wants to be as big as its parent,
07. * minus the parent's padding, if any. This value is deprecated
08. * starting in API Level 8 and replaced by {@link #MATCH_PARENT}.
09. */
10. @Deprecated
11. public static final int FILL_PARENT = -1; // ע��ֵΪ-1��Android2.2�汾������ʹ��
12. /**
13. * Special value for the height or width requested by a View.
14. * MATCH_PARENT means that the view wants to be as big as its parent,
15. * minus the parent's padding, if any. Introduced in API Level 8.
16. */
17. public static final int MATCH_PARENT = -1; // ע��ֵΪ-1
18. /**
19. * Special value for the height or width requested by a View.
20. * WRAP_CONTENT means that the view wants to be just large enough to fit
21. * its own internal content, taking its own padding into account.
22. */
23. public static final int WRAP_CONTENT = -2; // ע��ֵΪ-2
24. /**
25. * Information about how wide the view wants to be. Can be one of the
26. * constants FILL_PARENT (replaced by MATCH_PARENT ,
27. * in API Level 8) or WRAP_CONTENT. or an exact size.
28. */
29. public int width; //��View�Ŀ��ȣ�����ΪWRAP_CONTENT/MATCH_PARENT ����һ������ֵ
30. /**
31. * Information about how tall the view wants to be. Can be one of the
32. * constants FILL_PARENT (replaced by MATCH_PARENT ,
33. * in API Level 8) or WRAP_CONTENT. or an exact size.
34. */
35. public int height; //��View�ĸ߶ȣ�����ΪWRAP_CONTENT/MATCH_PARENT ����һ������ֵ
36. /**
37. * Used to animate layouts.
38. */
39. public LayoutAnimationController.AnimationParameters layoutAnimationParameters;
40. /**
41. * Creates a new set of layout parameters. The values are extracted from
42. * the supplied attributes set and context. The XML attributes mapped
43. * to this set of layout parameters are:��
44. */
45. public LayoutParams(Context c, AttributeSet attrs) {
46. TypedArray a = c.obtainStyledAttributes(attrs, R.styleable.ViewGroup_Layout);
47. setBaseAttributes(a,
48. R.styleable.ViewGroup_Layout_layout_width,
49. R.styleable.ViewGroup_Layout_layout_height);
50. a.recycle();
51. }
52.
53. /**
54. * Creates a new set of layout parameters with the specified width
55. * and height.
56. */
57. public LayoutParams(int width, int height) {
58. this.width = width;
59. this.height = height;
60. }
61. /**
62. * Copy constructor. Clones the width and height values of the source.
63. *
64. * @param source The layout params to copy from.
65. */
66. public LayoutParams(LayoutParams source) {
67. this.width = source.width;
68. this.height = source.height;
69. }
70. /**
71. * Used internally by MarginLayoutParams.
72. * @hide
73. */
74. LayoutParams() {
75. }
76. /**
77. * Extracts the layout parameters from the supplied attributes.
78. *
79. * @param a the style attributes to extract the parameters from
80. * @param widthAttr the identifier of the width attribute
81. * @param heightAttr the identifier of the height attribute
82. */
83. protected void setBaseAttributes(TypedArray a, int widthAttr, int heightAttr) {
84. width = a.getLayoutDimension(widthAttr, "layout_width");
85. height = a.getLayoutDimension(heightAttr, "layout_height");
86. }
87.} |
���Ƿ���FILL_PARENT/MATCH_PARENTֵΪ -1 ��WRAP_CONETENTֵΪ-2���Dz����е���죿
��ֵ
����Ϊ��ֵ��Ŀ����Ϊ������View�ľ���ֵ(an exact size)
���Ǵ���0�ġ�
ViewGroup�������ʵ���Զ���LayoutParams���Զ���LayoutParams�ṩ�˸��õ���չ�ԣ�����LinearLayout
����LinearLayout. LayoutParams�Զ�����(������)������LayoutParams����廹��ͦ���ӵġ�
ViewGroup.LayoutParams���䳣�����������ͼ(������ͼ)���£�
����ͼ����̫�Ӵ��ˣ��������Ȥ��ȥ����Android API�ɡ�
ǰ������˵����ÿ��View������һ��ViewGroup.LayoutParams������������࣬�������ǵ�������Android���
��ʱ���ΪView������LayoutParams���Եġ�
�����ַ���������View��LayoutParams���ԣ�
1�� ֱ��������Viewʱ�����������¼��ַ�����ViewGroup.java
01.//Adds a child view.
02.void addView(View child, int index)
03.//Adds a child view with this ViewGroup's default layout parameters
04.//and the specified width and height.
05.void addView(View child, int width, int height)
06.//Adds a child view with the specified layout parameters.
07.void addView(View child, ViewGroup.LayoutParams params) |
�������ط���������ֻ������Viewʱ����LayoutParams����ķ�ʽ��ͬ���ѣ��Ժ�����̽Ѱһ�����ǵ�Դ�롣
2�� ͨ��xml�����ļ�ָ��ij��View������Ϊ��android:layout_heigth=�����Լ�android:layout_weight=����
ʱ��
�ܵ���˵�������ַ�ʽ�����趨View��LayoutParams����ֵ----ָ���Ļ���Defaultֵ��
��ʽ1���̷�����
ֱ��������Viewʱ���Ƚ��������⣬���������������ַ�ʽ����LayoutParams�Ĺ��̣�
·����\frameworks\base\core\java\android\view\ViewGroup.java
01.public abstract class ViewGroup extends View implements ViewParent, ViewManager {
02. ...
03. /**
04. * Adds a child view. If no layout parameters are already set on the child, the
05. * default parameters for this ViewGroup are set on the child.
06. *
07. * @param child the child view to add
08. *
09. * @see #generateDefaultLayoutParams()
10. */
11. public void addView(View child) {
12. addView(child, -1);
13. }
14. /**
15. * Adds a child view. If no layout parameters are already set on the child, the
16. * default parameters for this ViewGroup are set on the child.
17. *
18. * @param child the child view to add
19. * @param index the position at which to add the child
20. *
21. * @see #generateDefaultLayoutParams()
22. */
23. public void addView(View child, int index) {
24. LayoutParams params = child.getLayoutParams();
25. if (params == null) {
26. params = generateDefaultLayoutParams(); //����Ĭ�ϵ�LayoutParams�࣬��Ϊ��View������ֵ
27. if (params == null) {//������ܻ�ȡ��LayoutParams�������׳��쳣��
28. throw new IllegalArgumentException("generateDefaultLayoutParams() cannot return null");
29. }
30. }
31. addView(child, index, params);
32. }
33. /**
34. * Adds a child view with this ViewGroup's default layout parameters and the
35. * specified width and height.
36. *
37. * @param child the child view to add
38. */
39. public void addView(View child, int width, int height) {
40. //����Ĭ�ϵ�LayoutParams�࣬��Ϊ��View������ֵ
41. final LayoutParams params = generateDefaultLayoutParams();
42. params.width = width; //��������widthֵ
43. params.height = height; //��������heightֵ
44. addView(child, -1, params); //�����������ָ��width��height�Ĵ�С�ˡ�
45. }
46. /**
47. * Adds a child view with the specified layout parameters.
48. *
49. * @param child the child view to add
50. * @param params the layout parameters to set on the child
51. */
52. public void addView(View child, LayoutParams params) {
53. addView(child, -1, params);
54. }
55. /**
56. * Adds a child view with the specified layout parameters.
57. *
58. * @param child the child view to add
59. * @param index the position at which to add the child
60. * @param params the layout parameters to set on the child
61. */
62. public void addView(View child, int index, LayoutParams params) {
63. ...
64. // addViewInner() will call child.requestLayout() when setting the new LayoutParams
65. // therefore, we call requestLayout() on ourselves before, so that the child's request
66. // will be blocked at our level
67. requestLayout();
68. invalidate();
69. addViewInner(child, index, params, false);
70. }
71. /**
72. * Returns a set of default layout parameters. These parameters are requested
73. * when the View passed to {@link #addView(View)} has no layout parameters
74. * already set. If null is returned, an exception is thrown from addView.
75. *
76. * @return a set of default layout parameters or null
77. */
78. protected LayoutParams generateDefaultLayoutParams() {
79. //width Ϊ WRAP_CONTENT��С �� height ΪWRAP_CONTENT
80. //ViewGroup�����������д�÷������ﵽ���ض�Ҫ���Ժ����LinearLayout��Ϊ��˵����
81. return new LayoutParams(LayoutParams.WRAP_CONTENT, LayoutParams.WRAP_CONTENT);
82. }
83. private void addViewInner(View child, int index, LayoutParams params,
84. boolean preventRequestLayout) {
85.
86. if (!checkLayoutParams(params)) { //params�����Ƿ�Ϊnull
87. params = generateLayoutParams(params); //���params������Ϊnull�����¹����LayoutParams����
88. }
89. //preventRequestLayoutֵΪfalse
90. if (preventRequestLayout) {
91. child.mLayoutParams = params; //ΪView��mLayoutParams���Ը�ֵ
92. } else {
93. child.setLayoutParams(params);//ΪView��mLayoutParams���Ը�ֵ���������requestLayout()�������²���
94. }
95. //if else ��������ViewΪmLayoutParams���Ը�ֵ
96. ...
97. }
98. ...
99.} |
��Ҫ���ܾ�����������ViewʱΪ�乹����һ��LayoutParams��������Ҫ���ǣ�ViewGroup�����������������ļ��������������ض���LayoutParams�������磺����LinearLayout���ԣ�����LinearLayout.LayoutParams������ô����Ŀ���ǣ�����������Ҫ���ĵط������Խ���ǿ��ת����LinearLayout.LayoutParams����
LinearLayout��д������ʵ��Ϊ��
01.public class LinearLayout extends ViewGroup {
02. ...
03. @Override
04. public LayoutParams generateLayoutParams(AttributeSet attrs) {
05. return new LinearLayout.LayoutParams(getContext(), attrs);
06. }
07. @Override
08. protected LayoutParams generateDefaultLayoutParams() {
09. //��LinearLayout��ˮƽ�����Ǵ�ֱ����
10. if (mOrientation == HORIZONTAL) {
11. return new LayoutParams(LayoutParams.WRAP_CONTENT, LayoutParams.WRAP_CONTENT);
12. } else if (mOrientation == VERTICAL) {
13. return new LayoutParams(LayoutParams.MATCH_PARENT, LayoutParams.WRAP_CONTENT);
14. }
15. return null;
16. }
17. @Override
18. protected LayoutParams generateLayoutParams(ViewGroup.LayoutParams p) {
19. return new LayoutParams(p);
20. }
21. /**
22. * Per-child layout information associated with ViewLinearLayout.
23. *
24. * @attr ref android.R.styleable#LinearLayout_Layout_layout_weight
25. * @attr ref android.R.styleable#LinearLayout_Layout_layout_gravity
26. */ //�Զ����LayoutParams��
27. public static class LayoutParams extends ViewGroup.MarginLayoutParams {
28. /**
29. * Indicates how much of the extra space in the LinearLayout will be
30. * allocated to the view associated with these LayoutParams. Specify
31. * 0 if the view should not be stretched. Otherwise the extra pixels
32. * will be pro-rated among all views whose weight is greater than 0.
33. */
34. @ViewDebug.ExportedProperty(category = "layout")
35. public float weight; // �������ԣ�android:layout_weight="" ;
36. /**
37. * Gravity for the view associated with these LayoutParams.
38. *
39. * @see android.view.Gravity
40. */
41. public int gravity = -1; // �������ԣ� android:layout_gravity="" ;
42. /**
43. * {@inheritDoc}
44. */
45. public LayoutParams(Context c, AttributeSet attrs) {
46. super(c, attrs);
47. TypedArray a =c.obtainStyledAttributes(attrs, com.android.internal.R.styleable.LinearLayout_Layout);
48. weight = a.getFloat(com.android.internal.R.styleable.LinearLayout_Layout_layout_weight, 0);
49. gravity = a.getInt(com.android.internal.R.styleable.LinearLayout_Layout_layout_gravity, -1);
50.
51. a.recycle();
52. }
53. /**
54. * {@inheritDoc}
55. */
56. public LayoutParams(int width, int height) {
57. super(width, height);
58. weight = 0;
59. }
60. /**
61. * Creates a new set of layout parameters with the specified width, height
62. * and weight.
63. *
64. * @param width the width, either {@link #MATCH_PARENT},
65. * {@link #WRAP_CONTENT} or a fixed size in pixels
66. * @param height the height, either {@link #MATCH_PARENT},
67. * {@link #WRAP_CONTENT} or a fixed size in pixels
68. * @param weight the weight
69. */
70. public LayoutParams(int width, int height, float weight) {
71. super(width, height);
72. this.weight = weight;
73. }
74. public LayoutParams(ViewGroup.LayoutParams p) {
75. super(p);
76. }
77. public LayoutParams(MarginLayoutParams source) {
78. super(source);
79. }
80. }
81. ...
82.} |
LinearLayout.LayoutParams��̳���ViewGroup.MarginLayoutParams�࣬�����˶�android:layout_weight�Լ�
android:layout_gravity���������ԵĻ�ȡ�ͱ��档����������д�������صĶ���LinearLayout.LayoutParams���͡����������ǿ����ٶ���View������������ʱ�����Խ�����ǿ��ת����LinearLayout.LayoutParams�������ʹ�á�
���磬LinearLayout����measure���̣�ʹ����LinearLayout.LayoutParam���������´��룺
01.public class LinearLayout extends ViewGroup {
02. ...
03. @Override //onMeasure������
04. protected void onMeasure(int widthMeasureSpec, int heightMeasureSpec) {
05. //�ж��Ǵ�ֱ������ˮƽ����������Ǽ�����VERTICAL��ֱ����
06. if (mOrientation == VERTICAL) {
07. measureVertical(widthMeasureSpec, heightMeasureSpec);
08. } else {
09. measureHorizontal(widthMeasureSpec, heightMeasureSpec);
10. }
11. }
12. /**
13. * Measures the children when the orientation of this LinearLayout is set
14. * to {@link #VERTICAL}.
15. *
16. * @param widthMeasureSpec Horizontal space requirements as imposed by the parent.
17. * @param heightMeasureSpec Vertical space requirements as imposed by the parent.
18. *
19. * @see #getOrientation()
20. * @see #setOrientation(int)
21. * @see #onMeasure(int, int)
22. */
23. void measureVertical(int widthMeasureSpec, int heightMeasureSpec) {
24. mTotalLength = 0;
25. ...
26. // See how tall everyone is. Also remember max width.
27. for (int i = 0; i < count; ++i) {
28. final View child = getVirtualChildAt(i); //���������Ϊi����VIew
29. ...
30. //ע�⣬���ǽ�����Ϊ ViewGroup.LayoutParams��ʵ������ǿ��ת��Ϊ��LinearLayout.LayoutParams��
31. //��������ת��Ϊ���Ӷ�������������ԭ�����LinearLayout��������View��LayoutParams���Ͷ�Ϊ
32. //LinearLayout.LayoutParams
33. LinearLayout.LayoutParams lp = (LinearLayout.LayoutParams) child.getLayoutParams();
34. ...
35. }
36. ...
37.} |
����ViewGroup.LayoutParamsǿ��ת��Ϊ������LinearLayout.LayoutParams����ΪLinearLayout��ÿ����ֱ�ӡ���View��LayoutParams���Զ���LinearLayout.LayoutParams���ͣ���˿���ȫת����
PS : Android 2.3Դ��Launcher2��Ҳʵ�����Զ����LayoutParams�࣬��IDLE�����ÿ��View���ٰ�������
��Ϣ������X����ĵ�Ԫ�������߶ȡ�����Y����ĵ�Ԫ�������߶ȵȡ�
·��: packages\apps\Launcher2\src\com\android\launcher2\CellLayout.java
01.public class CellLayout extends ViewGroup {
02. ...
03. public static class LayoutParams extends ViewGroup.MarginLayoutParams {
04. /**
05. * Horizontal location of the item in the grid.
06. */
07. public int cellX; //X����ĵ�Ԫ������
08. /**
09. * Vertical location of the item in the grid.
10. */
11. public int cellY; //Y����ĵ�Ԫ������
12. /**
13. * Number of cells spanned horizontally by the item.
14. */
15. public int cellHSpan; //ˮƽ������ռ�߶�
16. /**
17. * Number of cells spanned vertically by the item.
18. */
19. public int cellVSpan; //��ֱ������ռ�߶�
20. ...
21. public LayoutParams(Context c, AttributeSet attrs) {
22. super(c, attrs);
23. cellHSpan = 1; //Ĭ��Ϊ�߶� 1
24. cellVSpan = 1;
25. }
26.
27. public LayoutParams(ViewGroup.LayoutParams source) {
28. super(source); //Ĭ��Ϊ�߶� 1
29. cellHSpan = 1;
30. cellVSpan = 1;
31. }
32.
33. public LayoutParams(int cellX, int cellY, int cellHSpan, int cellVSpan) {
34. super(LayoutParams.MATCH_PARENT, LayoutParams.MATCH_PARENT);
35. this.cellX = cellX;
36. this.cellY = cellY;
37. this.cellHSpan = cellHSpan;
38. this.cellVSpan = cellVSpan;
39. }
40. ...
41. }
42. ...
43.} |
�Ը��Զ���CellLayout.LayoutParams���ʹ�ÿ��Բο�LinearLayout.LayoutParams�࣬��Ҳ�������ˡ�
����2���̷�����
ʹ������android:layout_heigth=�����Լ�android:layout_weight=����
ʱ��Ϊij��View����LayoutParamsֵ��
��ʵ���ָ�ֵ������ʵҲ��ͬǰ�����֣�ֻ��������Ҫһ��ǰ�ڷ�������---��Ҫ����XML�����������ļ�������һ��������View�����ɱ�С�����ˣ�����Xxx.xml�IJ����ļ�����Ҫ������һ��������View�������棬���Ǿ�����ϸ��������̣��ص��ע������������
�١�xml��������ν�����View���� ;
�ڡ�android:layout_heigth=������android:layout_weight=�����Ľ�����
PS�� һֱ�������Ҷ��뵱Ȼandroid:layout_heigth�Լ�android:layout_weight���������ԵĽ�����������View.java�ڲ���ɵģ�����������ȥ��Ѱʱ��ȴһֱû����View.java�����ViewGroup.java���ҵ���ֱ��һλ���ѵ�һ�����ʣ��ŷ������ǵIJ���֮�ء�
3�������ļ��������̷���
���������ļ�ʱ��ʹ�õ���ΪLayoutInflater�� ���ڸ����ʹ����ο����²��ͣ�
<android��LayoutInflater��ʹ�� >>
��Ҫ������API������
public View inflate (XmlPullParser parser,
ViewGroup root, boolean attachToRoot)
public View inflate (int resource, ViewGroup
root)
public View inflate (int resource, ViewGroup
root, boolean attachToRoot)
����������Ҫ�Ի�֮�����ڵ���������attachToRoot�����Ƿ�View�����ӵ�root��ȥ������ɿ���ƪ���ͣ�
<<����inflate�ĵ�3������>>
��Ȼ����LayoutInflater��inflate()���������ط�������ҿ��������˽��¡�
��������������Ӹ��������������� ��
01.public class MainActivity extends Activity {
02. /** Called when the activity is first created. */
03. @Override
04. public void onCreate(Bundle savedInstanceState) {
05. super.onCreate(savedInstanceState);
06. //1���÷�������Ҳ����õ� LayoutInflater��inflate()������ȥ������
07. setContentView(R.layout.main);
08.
09. //2��ʹ�ó�����API����ȥ����xml�����ļ���
10. LayoutInflater layoutInflater = (LayoutInflater)getSystemService();
11. View root = layoutInflater.inflate(R.layout.main, null);
12. }
13.} |
Step 1�����LayoutInflater�����á�
·����\frameworks\base\core\java\android\app\ContextImpl.java
01./**
02. * Common implementation of Context API, which provides the base
03. * context object for Activity and other application components.
04. */
05.class ContextImpl extends Context {
06. if (WINDOW_SERVICE.equals(name)) {
07. return WindowManagerImpl.getDefault();
08. } else if (LAYOUT_INFLATER_SERVICE.equals(name)) {
09. synchronized (mSync) {
10. LayoutInflater inflater = mLayoutInflater;
11. //�Ƿ��Ѿ���ֵ������ǣ�ֱ�ӷ�������
12. if (inflater != null) {
13. return inflater;
14. }
15. //����һ��LayoutInflater����getOuterContext()ָ�������ǵ�Activity��Service����Application����
16. mLayoutInflater = inflater = PolicyManager.makeNewLayoutInflater(getOuterContext());
17. return inflater;
18. }
19. } else if (ACTIVITY_SERVICE.equals(name)) {
20. return getActivityManager();
21. }...
22.} |
����ȥPolicyManager��ѯ��Ӧ�����������ڲ�ʵ�֡�
·����frameworks\base\core\java\com\android\internal\policy\PolicyManager.java
01.public final class PolicyManager {
02. private static final String POLICY_IMPL_CLASS_NAME = "com.android.internal.policy.impl.Policy";
03. private static final IPolicy sPolicy; // ��ɲ���Binder���ƶ��ֻ����һ���ӿڣ��������
04. static {
05. // Pull in the actual implementation of the policy at run-time
06. try {
07. Class policyClass = Class.forName(POLICY_IMPL_CLASS_NAME);
08. sPolicy = (IPolicy)policyClass.newInstance();
09. }
10. ...
11. }
12. ...
13. public static LayoutInflater makeNewLayoutInflater(Context context) {
14. return sPolicy.makeNewLayoutInflater(context); //����ȥʵ������ȥ����
15. }
16.} |
IPolicy�ӿڵ�ʵ�ֶ�ΪPolicy�ࡣ·����/frameworks/base/policy/src/com/android/internal/policy/impl/Policy.java
01.//Simple implementation of the policy interface that spawns the right
02.//set of objects
03.public class Policy implements IPolicy{
04. ...
05. public PhoneLayoutInflater makeNewLayoutInflater(Context context) {
06. //ʵ���Ϸ��ص���PhoneLayoutInflater�ࡣ
07. return new PhoneLayoutInflater(context);
08. }
09.}
10.//PhoneLayoutInflater�̳���LayoutInflater��
11.public class PhoneLayoutInflater extends LayoutInflater {
12. ...
13. /**
14. * Instead of instantiating directly, you should retrieve an instance
15. * through {@link Context#getSystemService}
16. *
17. * @param context The Context in which in which to find resources and other
18. * application-specific things.
19. *
20. * @see Context#getSystemService
21. */
22. public PhoneLayoutInflater(Context context) {
23. super(context);
24. }
25. ...
26.} |
LayoutInflater�Ǹ������࣬ʵ�������Ƿ��ص���PhoneLayoutInflater�࣬���������̵IJ�������������
LayoutInflater����ɵء�
Step 2������inflate()����ȥ���������ļ���
01.public abstract class LayoutInflater {
02. ...
03. public View inflate(int resource, ViewGroup root) {
04. //�������¸�������ע��rootΪnull
05. return inflate(resource, root, root != null);
06. }
07.
08. public View inflate(int resource, ViewGroup root, boolean attachToRoot) {
09. //��ȡһ��XmlResourceParser������XML�ļ�---�����ļ���
10. //XmlResourceParser���Լ�xml����ν����ģ�����Լ�����Ȥ���ҡ�
11. XmlResourceParser parser = getContext().getResources().getLayout(resource);
12. try {
13. return inflate(parser, root, attachToRoot);
14. } finally {
15. parser.close();
16. }
17. }
18.}
19./**
20. * The XML parsing interface returned for an XML resource. This is a standard
21. * XmlPullParser interface, as well as an extended AttributeSet interface and
22. * an additional close() method on this interface for the client to indicate
23. * when it is done reading the resource.
24. */
25.public interface XmlResourceParser extends XmlPullParser, AttributeSet {
26. /**
27. * Close this interface to the resource. Calls on the interface are no
28. * longer value after this call.
29. */
30. public void close();
31.} |
���ǻ����һ����ǰӦ�ó�����XmlResourceParser���ö������Ҫ���þ���������xml�����ļ��ġ�XmlResourceParser���Ǹ��ӿ��࣬
Step 3 �������ؿ�ʼ�������� ��
01.public abstract class LayoutInflater {
02. ...
03. /**
04. * Inflate a new view hierarchy from the specified XML node. Throws
05. * {@link InflateException} if there is an error.
06. */
07. //���Ǵ��ݹ����IJ������£� root Ϊnull �� attachToRootΪfalse ��
08. public View inflate(XmlPullParser parser, ViewGroup root, boolean attachToRoot) {
09. synchronized (mConstructorArgs) {
10. final AttributeSet attrs = Xml.asAttributeSet(parser);
11. Context lastContext = (Context)mConstructorArgs[0];
12. mConstructorArgs[0] = mContext; //��mConstructorArgs����������Ϊ�������ݸ�View�Ĺ��캯��
13. View result = root; //��View
14.
15. try {
16. // Look for the root node.
17. int type;
18. while ((type = parser.next()) != XmlPullParser.START_TAG &&
19. type != XmlPullParser.END_DOCUMENT) {
20. // Empty
21. }
22. ...
23. final String name = parser.getName(); //�ڵ�������API�еĿؼ������Զ���View����������
24. if (TAG_MERGE.equals(name)) { // ������ǩ
25. if (root == null || !attachToRoot) {
26. throw new InflateException(" can be used only with a valid "
27. + "ViewGroup root and attachToRoot=true");
28. }
29. //����ǩ��View��������root�У��ú����Ժ���
30. rInflate(parser, root, attrs);
31. } else {
32. // Temp is the root view that was found in the xml
33. //������xml�����ļ�����Ӧ�ĸ�View��
34. View temp = createViewFromTag(name, attrs);
35.
36. ViewGroup.LayoutParams params = null;
37.
38. if (root != null) {
39. // Create layout params that match root, if supplied
40. //����AttributeSet���Ի��һ��LayoutParamsʵ������ס������Ϊroot��
41. params = root.generateLayoutParams(attrs);
42. if (!attachToRoot) { //��������temp��LayoutParams
43. // Set the layout params for temp if we are not
44. // attaching. (If we are, we use addView, below)
45. temp.setLayoutParams(params);
46. }
47. }
48. // Inflate all children under temp
49. //�����������ӽڵ㣬������������View
50. rInflate(parser, temp, attrs);
51.
52. // We are supposed to attach all the views we found (int temp)
53. // to root. Do that now.
54. if (root != null && attachToRoot) {
55. root.addView(temp, params);
56. }
57. // Decide whether to return the root that was passed in or the
58. // top view found in xml.
59. if (root == null || !attachToRoot) {
60. result = temp;
61. }
62. }
63. }
64. ...
65. return result;
66. }
67. }
68.
69. /*
70. * default visibility so the BridgeInflater can override it.
71. */
72. View createViewFromTag(String name, AttributeSet attrs) {
73. //�ڵ��Ƿ�ΪView������ǽ������¸�ֵ������
74. if (name.equals("view")) {
75. name = attrs.getAttributeValue(null, "class");
76. }
77. try {
78. View view = (mFactory == null) ? null : mFactory.onCreateView(name,
79. mContext, attrs); //û�����ù�������
80.
81. if (view == null) {
82. //ͨ������ж���Android API��View�������Զ���View
83. if (-1 == name.indexOf('.')) {
84. view = onCreateView(name, attrs); //����Android API��Viewʵ��
85. } else {
86. view = createView(name, null, attrs);//����һ���Զ���Viewʵ��
87. }
88. }
89. return view;
90. }
91. ...
92. }
93. //��þ�����ͼ��ʵ������
94. public final View createView(String name, String prefix, AttributeSet attrs) {
95. Constructor constructor = sConstructorMap.get(name);
96. Class clazz = null;
97. //���¹�����Ҫ�ǻ�ȡ�������������
98. //1��������� ClassLoader
99. //2��Class����
100. //3����Ĺ��췽����� Constructor
101. try {
102. if (constructor == null) {
103. // Class not found in the cache, see if it's real, and try to add it
104. clazz = mContext.getClassLoader().loadClass(prefix != null ? (prefix + name) : name);
105. ...
106. constructor = clazz.getConstructor(mConstructorSignature);
107. sConstructorMap.put(name, constructor);
108. } else {
109. // If we have a filter, apply it to cached constructor
110. if (mFilter != null) {
111. ...
112. }
113. }
114. //���ݲ�����ø�Viewʵ������
115. Object[] args = mConstructorArgs;
116. args[1] = attrs;
117. return (View) constructor.newInstance(args);
118. }
119. ...
120. }
121.
122.} |
��δ���������ǻ�ȡxml�����ļ���root View������������������
1����ȡxml���ֵ�Viewʵ����ͨ��createViewFromTag()������ȡ���÷������жϽڵ�����API
�ؼ�
�����Զ���ؼ����̶����ú��ʵķ���ȥʵ����View��
2���ж�root�Լ�attachToRoot��������������root Viewֵ�Լ�temp������LayoutParamsֵ��
�����ϸ���Ŷδ��룬��֪���������û���ɻ�rootΪnullʱ�����ǵ�temp������LayoutParamsֵ��Ϊ
null�ģ��������ᱻ��ֵ���и�View��LayoutParamsֵΪ�գ���ô����ϵͳ�в��ᱨ�쳣�𣿼����沿��
���룺
01.//���Ǵ��ݹ����IJ������£� root Ϊnull �� attachToRootΪfalse ��
02.public View inflate(XmlPullParser parser, ViewGroup root, boolean attachToRoot) {
03. synchronized (mConstructorArgs) {
04. ...
05. try {
06.
07. ...
08. if (TAG_MERGE.equals(name)) { // ������ǩ
09. ...
10. } else {
11. // Temp is the root view that was found in the xml
12. //������xml�����ļ�����Ӧ�ĸ�View��
13. View temp = createViewFromTag(name, attrs);
14. ViewGroup.LayoutParams params = null;
15.
16. //ע�⣡���� rootΪnullʱ��temp������LayoutParams���Բ��ᱻ��ֵ�ġ�
17. if (root != null) {
18. // Create layout params that match root, if supplied
19. //����AttributeSet���Ի��һ��LayoutParamsʵ������ס������Ϊroot��
20. params = root.generateLayoutParams(attrs);
21. if (!attachToRoot) { //��������temp��LayoutParams
22. // Set the layout params for temp if we are not
23. // attaching. (If we are, we use addView, below)
24. temp.setLayoutParams(params);
25. }
26. }
27. ...
28. }
29. }
30. ...
31. }
32.} |
��������������ϸ�𰸣��һ��ں��潲��������Ҽ�˵�£��κ�View���Ķ���View������������ʱ��һ�����WindowManager.addView()����������ʱ�������������ȥ����һ����������ʹ��LayoutParamsֵΪ�գ�UI���ÿ��measure()ʱ�����Ը�View��LayoutParamsֵ������ֱ�Ӵ���MeasureSpecֵ��View����
�����������ǹ�ע����һ��������rInflate()���÷�����ݹ����ÿ��View�µ��ӽڵ㣬�Ե�ǰView��Ϊ��View�γ�һ��View����
01./**
02. * Recursive method used to descend down the xml hierarchy and instantiate
03. * views, instantiate their children, and then call onFinishInflate().
04. */
05.//�ݹ����ÿ���ֽڵ�
06.private void rInflate(XmlPullParser parser, View parent, final AttributeSet attrs)
07. throws XmlPullParserException, IOException {
08.
09. final int depth = parser.getDepth();
10. int type;
11.
12. while (((type = parser.next()) != XmlPullParser.END_TAG ||
13. parser.getDepth() > depth) && type != XmlPullParser.END_DOCUMENT) {
14.
15. if (type != XmlPullParser.START_TAG) {
16. continue;
17. }
18. final String name = parser.getName();
19.
20. if (TAG_REQUEST_FOCUS.equals(name)) { //������ǩ
21. parseRequestFocus(parser, parent);
22. } else if (TAG_INCLUDE.equals(name)) { //������ǩ
23. if (parser.getDepth() == 0) {
24. throw new InflateException(" cannot be the root element");
25. }
26. parseInclude(parser, parent, attrs);//�����ڵ�
27. } else if (TAG_MERGE.equals(name)) { //������ǩ
28. throw new InflateException(" must be the root element");
29. } else {
30. //���ݽڵ�������һ��Viewʵ������
31. final View view = createViewFromTag(name, attrs);
32. final ViewGroup viewGroup = (ViewGroup) parent;
33. //����generateLayoutParams()��������һ��LayoutParamsʵ������
34. final ViewGroup.LayoutParams params = viewGroup.generateLayoutParams(attrs);
35. rInflate(parser, view, attrs); //�����ݹ����
36. viewGroup.addView(view, params); //OK������View���ض�LayoutParamsֵ��������View��
37. }
38. }
39. parent.onFinishInflate(); //����˽������̣�֪ͨ....
40.} |
ֵ��ע����ǣ�ÿ��addViewǰ��������viewGroup.generateLayoutParams(attrs)ȥ����һ��LayoutParams
ʵ����Ȼ����addView()������Ϊ�丳ֵ���μ����´��룺ViewGroup.java
01.public abstract class ViewGroup extends View implements ViewParent, ViewManager {
02. ...
03.
04. public LayoutParams generateLayoutParams(AttributeSet attrs) {
05. return new LayoutParams(getContext(), attrs);
06. }
07. public static class LayoutParams {
08. ... //�����������캯��
09. public LayoutParams(Context c, AttributeSet attrs) {
10. TypedArray a = c.obtainStyledAttributes(attrs, R.styleable.ViewGroup_Layout);
11. setBaseAttributes(a,
12. R.styleable.ViewGroup_Layout_layout_width,
13. R.styleable.ViewGroup_Layout_layout_height);
14. a.recycle();
15. }
16. protected void setBaseAttributes(TypedArray a, int widthAttr, int heightAttr) {
17. width = a.getLayoutDimension(widthAttr, "layout_width");
18. height = a.getLayoutDimension(heightAttr, "layout_height");
19. }
20.
21.} |
�ð� ~~ ���ǻ���̽Ѱ���ף�ȥTypeArray���getLayoutDimension()������
·����/frameworks/base/core/java/android/content/res/TypedArray.java
01.public class TypedArray {
02. ...
03. /**
04. * Special version of {@link #getDimensionPixelSize} for retrieving
05. * {@link android.view.ViewGroup}'s layout_width and layout_height
06. * attributes. This is only here for performance reasons; applications
07. * should use {@link #getDimensionPixelSize}.
08. *
09. * @param index Index of the attribute to retrieve.
10. * @param name Textual name of attribute for error reporting.
11. *
12. * @return Attribute dimension value multiplied by the appropriate
13. * metric and truncated to integer pixels.
14. */
15. public int getLayoutDimension(int index, String name) {
16. index *= AssetManager.STYLE_NUM_ENTRIES;
17. final int[] data = mData;
18. //������Զ�Ӧ�ı�ʶ�� �� Identifies��Ŀǰ��û����ϸ�о�����ࡣ
19. final int type = data[index+AssetManager.STYLE_TYPE];
20. if (type >= TypedValue.TYPE_FIRST_INT
21. && type <= TypedValue.TYPE_LAST_INT) {
22. return data[index+AssetManager.STYLE_DATA];
23. } else if (type == TypedValue.TYPE_DIMENSION) { //����Ϊdimension����
24. return TypedValue.complexToDimensionPixelSize(
25. data[index+AssetManager.STYLE_DATA], mResources.mMetrics);
26. }
27. //û���ṩlayout_weight��layout_height�������˴� ������ᱨ�쳣��
28. //��˲����ļ��е�View�����Զ���View�����������layout_weight��layout_height��
29. throw new RuntimeException(getPositionDescription()
30. + ": You must supply a " + name + " attribute.");
31. }
32. ...
33.} |
�������֪�� ���ǽ�View��AttributeSet���Դ��ݸ�generateLayoutParams()���������乹�����ʵ�LayoutParams�����ҳ�ʼ������ֵweight��height��ͬʱ����Ҳ��֪
�����ļ��е�View�����Զ���View�����������layout_weight��layout_height������ᱨ�쳣��
Step 3 ��Ҫ�����������飺
���ȣ�������˲����ļ���root View���������ļ�������View��
��Σ�ͨ���ݹ���ã������γ�������View���Լ�������ÿ��View��LayoutParams����
�ܽͨ���Բ����ļ��Ľ������̵�ѧϰ��Ҳ����ת��ΪView���Ĺ��̣����������˽������̵ĸ��а���Լ�
����ViewLayoutParams����Ĺ��̡����ǣ��������ֻ�Ǽĸ�����Ӱ�������ε�����ϣ�����������ѧϰ��
������������ȥ����д�ģ��������������Ĵ���̫�࣬�����е㳤�����Լ�Ҳ�е������ˣ���˾�������ƪ���ͷ����ɡ���ƪ���ݰ������·��棺
- MeasureSpec��˵�� ;
- measure�����������ȷ����ÿ��View�ij��� ;
- UI�����ȷ���ö���View��LayoutParams����Activity���ԣ�����View����DecorView�������Ľ�����ͨView�ˡ�
��ƪ�����У������˽���View����ת�������Լ��������View��LayoutParams�ġ����ļ������żȶ��켣����δ��ɵ�job��
��Ҫ֪ʶ�����£�
- MeasureSpc��˵��
- measure�������(������ϸ��);
- root View������������ʱ��UI��������������LayoutParamsֵ�á�
�ڽ���measure����ǰ�����Ƿdz��б�Ҫ����MeasureSpc���ʹ�ã�������������Ҳֻ�������������档
1��MeasureSpc��˵��
1.1 SDK ˵������
A MeasureSpec encapsulates the layout
requirements passed from parent to child. Each MeasureSpec
represents a requirement for either the width or the
height. A MeasureSpec is comprised of a size and a mode.
����
MeasureSpc���װ�˸�View���ݸ���View�IJ���(layout)Ҫ��ÿ��MeasureSpcʵ���������Ȼ��߸߶�(ֻ������һ)Ҫ��
��������ģʽ��
�١�UNSPECIFIED(δָ��)����Ԫ�ز�����Ԫ��ʩ���κ���������Ԫ�ؿ��Եõ�������Ҫ�Ĵ�С��
�ڡ�EXACTLY(��ȫ)����Ԫ�ؾ�����Ԫ�ص�ȷ�д�С����Ԫ�ؽ������ڸ����ı߽����������������С��
�ۡ�AT_MOST(����)����Ԫ������ﵽָ����С��ֵ��
���õ�����������
static int getMode(int measureSpec)
: �����ṩ�IJ���ֵ(��ʽ)��ȡģʽ(��������ģʽ֮һ)
static int getSize(int measureSpec)
: �����ṩ�IJ���ֵ(��ʽ)��ȡ��Сֵ(�����СҲ��������ͨ����˵�Ĵ�С)
static int makeMeasureSpec(int size,int
mode) : �����ṩ�Ĵ�Сֵ��ģʽ����һ������ֵ(��ʽ)
1.2 MeasureSpc��Դ�����
��ΪView.java����ڲ��࣬·����\frameworks\base\core\java\android\view\View.java
01.public class View implements ... {
02. ...
03. public static class MeasureSpec {
04. private static final int MODE_SHIFT = 30; //��λλ��Ϊ30
05. //int����ռ32λ��������λ30λ�������Ա�ʾ����ֵ��������size��mode����"&"���㣬��ȡ��Ӧֵ��
06. private static final int MODE_MASK = 0x3 << MODE_SHIFT;
07.
08. //������λ30λ����ֵΪ00 + (30λ0) , �� 0x0000(16���Ʊ�ʾ)
09. public static final int UNSPECIFIED = 0 << MODE_SHIFT;
10. //������λ30λ����ֵΪ01 + (30λ0) , ��0x1000(16���Ʊ�ʾ)
11. public static final int EXACTLY = 1 << MODE_SHIFT;
12. //������λ30λ����ֵΪ02 + (30λ0) , ��0x2000(16���Ʊ�ʾ)
13. public static final int AT_MOST = 2 << MODE_SHIFT;
14.
15. //����һ������ֵ�������λ����mode���ͣ�����30λ�����������ʵ��ֵ��
������WRAP_CONTENT��MATCH_PARENT������Сexactly size
16. public static int makeMeasureSpec(int size, int mode) {
17. return size + mode;
18. }
19. //��ȡģʽ ��������
20. public static int getMode(int measureSpec) {
21. return (measureSpec & MODE_MASK);
22. }
23. //��ȡ�������ʵ��ֵ ��������
24. public static int getSize(int measureSpec) {
25. return (measureSpec & ~MODE_MASK);
26. }
27.
28. }
29. ...
30.} |
MeasureSpec��Ĵ���˼·�ǣ�
�١��������㣬ʹint ���͵ĸ���λ��ʾģʽ��ʵ��ֵ������30λ��ʾ����30λ�����������ʵ��ֵ----������
WRAP_CONTENT��MATCH_PARENT������Сexactly
size��
�ڡ�ͨ������MODE_MASK���������� ��&����ȡ��ģʽ(mode)�Լ������(value)��ʵ��ֵ��
2��measure�������
2.1 measure�����������
֮ǰ��һƪ����<< Android��View���������Լ�invalidate()����ط�������>>�����Ǵӡ���B����Ա���ĽǶȼ�
����measure���̵ĵ��ù��̡�������ô�࣬����Ҳ�������ˣ�- - �������뿪ʼ�ӡ���ͨ����Ա���Ƕ�ȥ����������̡������ص�鿴measure�����е���ط�����
����˵������UI��ܿ�ʼ����ʱ�����Ǵ�ViewRoot.java�ʼ���Ƶġ�ViewRoot���Ҫ˵��:
�κ���ʾ���豸�еĴ��ڣ����磺Activity��Dialog�ȣ�������һ��ViewRootʵ����������Ҫ������Զ��
WindowManagerService�����Լ�����(��ʼ/����)���ơ�
Step 1�� ��ʼUI���� �� ������Ʒ������ǣ�
01.·����\frameworks\base\core\java\android\view\ViewRoot.java
02.public final class ViewRoot extends Handler implements ViewParent,View.AttachInfo.Callbacks {
03. ...
04. //mView����ָ���������ڵ�root View ����Activity���ڶ��ԣ�����DecorView����
05. View mView;
06.
07. //��ʼView��������
08. private void performTraversals(){
09. ...
10. //������ֵ�����ں�������ʱ���ڻع�ͷ����������ô��ֵ�ġ�����ֻ��Ҫ��ס��ֵMeasureSpec.
makeMeasureSpec()�����ġ�
11. int childWidthMeasureSpec; //��ֵ��MeasureSpec��� , makeMeasureSpec
12. int childHeightMeasureSpec;//��ֵ��MeasureSpec��� , makeMeasureSpec
13.
14.
15. // Ask host how big it wants to be
16. host.measure(childWidthMeasureSpec, childHeightMeasureSpec);
17. ...
18. }
19. ...
20.} |
������Ҳ�û��˵��childWidthMeasureSpec��childHeightMeasureSpec�������(Ϊ�˱������ؿ������ȵ�
��������ʱ��������������������ֻ��Ҫ��ס��ֵMeasureSpec.makeMeasureSpec()�����ġ�
Step 2 ������measure()����ȥ��һЩǰ����
measure()����ԭ�Ͷ�����View.java���У�final���η����Σ��䲻�ܱ����أ�
01.public class View implements ... {
02. ...
03. /**
04. * This is called to find out how big a view should be. The parent
05. * supplies constraint information in the width and height parameters.
06. *
07. * @param widthMeasureSpec Horizontal space requirements as imposed by the
08. * parent
09. * @param heightMeasureSpec Vertical space requirements as imposed by the
10. * parent
11. * @see #onMeasure(int, int)
12. */
13. public final void measure(int widthMeasureSpec, int heightMeasureSpec) {
14. //�ж��Ƿ�Ϊǿ�Ʋ��֣������С�FORCE_LAYOUT����� �Լ� widthMeasureSpec��heightMeasureSpec�����˸ı�
15. if ((mPrivateFlags & FORCE_LAYOUT) == FORCE_LAYOUT ||
16. widthMeasureSpec != mOldWidthMeasureSpec ||
17. heightMeasureSpec != mOldHeightMeasureSpec) {
18.
19. // first clears the measured dimension flag
20. //���MEASURED_DIMENSION_SET��� ���ñ�ǻ���onMeasure()����������
21. mPrivateFlags &= ~MEASURED_DIMENSION_SET;
22.
23. // measure ourselves, this should set the measured dimension flag back
24. // 1�� ������View�����Ĵ�С �� 2 �� ����MEASURED_DIMENSION_SET��ǣ������д���ᱨ�쳣��
25. onMeasure(widthMeasureSpec, heightMeasureSpec);
26.
27. // flag not set, setMeasuredDimension() was not invoked, we raise
28. // an exception to warn the developer
29. if ((mPrivateFlags & MEASURED_DIMENSION_SET) != MEASURED_DIMENSION_SET) {
30. throw new IllegalStateException("onMeasure() did not set the"
31. + " measured dimension by calling" + " setMeasuredDimension()");
32. }
33.
34. mPrivateFlags |= LAYOUT_REQUIRED; //��һ����layout�ˣ�����LAYOUT_REQUIRED���
35. }
36.
37. mOldWidthMeasureSpec = widthMeasureSpec; //����ֵ
38. mOldHeightMeasureSpec = heightMeasureSpec; //����ֵ
39. }
40. ...
41.} |
����widthMeasureSpec��heightMeasureSpec
�ɸ�View��������ʾ��View����View�IJ���Ҫ����ֵ�ع���
�������沽������⡣
measure()������ʾ�ж��Ƿ���Ҫ���µ������ø�View��С��������onMeasure()������Ȼ�����������ʶ����
�١�����MEASURED_DIMENSION_SET �� onMeasure()�����У���Ҫ���Ӹñ�ʶ�������ᱨ�쳣��
�ڡ�����LAYOUT_REQUIRED �� ��ʾ��Ҫ����layout������
����浱ǰ��widthMeasureSpec��heightMeasureSpecֵ��
Step 3 ������onMeasure()����ȥ��������View�ij���ֵ����Ĭ��ʵ��Ϊ��
01./**
02. * Measure the view and its content to determine the measured width and the
03. * measured height. This method is invoked by {@link #measure(int, int)} and
04. * should be overriden by subclasses to provide accurate and efficient
05. * measurement of their contents.
06. *
07. * @param widthMeasureSpec horizontal space requirements as imposed by the parent.
08. * The requirements are encoded with
09. * @param heightMeasureSpec vertical space requirements as imposed by the parent.
10. * The requirements are encoded with
11. */
12. //���ø�View�����ش�С
13. protected void onMeasure(int widthMeasureSpec, int heightMeasureSpec) {
14. setMeasuredDimension(getDefaultSize(getSuggestedMinimumWidth(), widthMeasureSpec),
15. getDefaultSize(getSuggestedMinimumHeight(), heightMeasureSpec));
16. }
17.
18. /**
19. * Utility to return a default size. Uses the supplied size if the
20. * MeasureSpec imposed no contraints. Will get larger if allowed
21. * by the MeasureSpec.
22. *
23. * @param size Default size for this view
24. * @param measureSpec Constraints imposed by the parent
25. * @return The size this view should be.
26. */
27. //@param size����һ���ʾ������android:minHeight���Ի��߸�View����ͼƬ�Ĵ�Сֵ
28. public static int getDefaultSize(int size, int measureSpec) {
29. int result = size;
30. int specMode = MeasureSpec.getMode(measureSpec);
31. int specSize = MeasureSpec.getSize(measureSpec);
32.
33. //���ݲ�ͬ��modeֵ��ȡ�ÿ��ߵ�ʵ��ֵ��
34. switch (specMode) {
35. case MeasureSpec.UNSPECIFIED: //��ʾ��View�Ĵ�С����ͼδ��������ΪĬ��ֵ
36. result = size;
37. break;
38. case MeasureSpec.AT_MOST: //��ʾ��View�Ĵ�С�ɸ���ͼָ����
39. case MeasureSpec.EXACTLY:
40. result = specSize;
41. break;
42. }
43. return result;
44. }
45. //���������android:minHeight���Ի��߸�View����ͼƬ�Ĵ�Сֵ�� ��Ϊ��View�IJο�ֵ
46. protected int getSuggestedMinimumWidth() {
47. int suggestedMinWidth = mMinWidth; // android:minHeight
48.
49. if (mBGDrawable != null) { // ����ͼƬ��Ӧ��Width��
50. final int bgMinWidth = mBGDrawable.getMinimumWidth();
51. if (suggestedMinWidth < bgMinWidth) {
52. suggestedMinWidth = bgMinWidth;
53. }
54. }
55.
56. return suggestedMinWidth;
57. }
58. //����View��measure�������
59. protected final void setMeasuredDimension(int measuredWidth, int measuredHeight) {
60. mMeasuredWidth = measuredWidth;
61. mMeasuredHeight = measuredHeight;
62.
63. mPrivateFlags |= MEASURED_DIMENSION_SET; //������MEASURED_DIMENSION_SET���
64. } |
��Ҫ���ܾ��Ǹ��ݸ�View����(android:minWidth�ͱ���ͼƬ��С)��View�Ը���View��"����Ҫ��"�����ø�
View�� mMeasuredWidth �� mMeasuredHeight ֵ��
���ֻ��һ���View���͵�ʵ�ַ�����һ����˵����View��Ҳ����ViewGroup���ͣ�����Ҫ����дonMeasure()
����������������View������ÿ����View�Ĵ�С������˼�����£�����������View������ÿ����View�Ĵ�С��α�����ʾΪ��
01.//ij��ViewGroup���͵���ͼ
02.protected void onMeasure(int widthMeasureSpec, int heightMeasureSpec) {
03. //�������super.ononMeasure()����ֱ�ӵ���setMeasuredDimension()�������ø�View��С������ᱨ�쳣��
04. super.onMeasure(widthMeasureSpec , heightMeasureSpec)
05. //setMeasuredDimension(getDefaultSize(getSuggestedMinimumWidth(), widthMeasureSpec),
06. // getDefaultSize(getSuggestedMinimumHeight(), heightMeasureSpec));
07.
08. //����ÿ����View
09. for(int i = 0 ; i < getChildCount() ; i++){
10. View child = getChildAt(i);
11. //������View��onMeasure���������ǵĴ�С��childWidthMeasureSpec �� childHeightMeasureSpec ?
12. child.onMeasure(childWidthMeasureSpec, childHeightMeasureSpec);
13. }
14.} |
Step 2��Step 3 ����Ҳ�ȽϺ����⣬������������ʾ��������widthMeasureSpec��heightMeasureSpec�����ȷ�����أ���View������趨��ֵ�ģ�
Ҫ��ش�������⣬���ǿ���ȥԴ���������Ҵ𰸰ɡ���ViewGroup.java���У�Ϊ�����ṩ������������ȥ����ÿ����View�Ĵ�С������˼��Ҳ��ͬ����֮ǰ������˼�룺����������View������ÿ����View�Ĵ�С��
��Ҫ�����·�����
01./**
02. * Ask all of the children of this view to measure themselves, taking into
03. * account both the MeasureSpec requirements for this view and its padding.
04. * We skip children that are in the GONE state The heavy lifting is done in
05. * getChildMeasureSpec.
06. */
07.//widthMeasureSpec �� heightMeasureSpec ��ʾ�ø�View�IJ���Ҫ��
08.//����ÿ����View��Ȼ�����measureChild()����ȥʵ��ÿ����View��С
09.protected void measureChildren(int widthMeasureSpec, int heightMeasureSpec) {
10. final int size = mChildrenCount;
11. final View[] children = mChildren;
12. for (int i = 0; i < size; ++i) {
13. final View child = children[i];
14. if ((child.mViewFlags & VISIBILITY_MASK) != GONE) { // ������ ��GONE�� ״̬
15. measureChild(child, widthMeasureSpec, heightMeasureSpec);
16. }
17. }
18.}
19.
20./**
21. * Ask one of the children of this view to measure itself, taking into
22. * account both the MeasureSpec requirements for this view and its padding.
23. * The heavy lifting is done in getChildMeasureSpec.
24. *
25. * @param child The child to measure
26. * @param parentWidthMeasureSpec The width requirements for this view
27. * @param parentHeightMeasureSpec The height requirements for this view
28. */
29.//����ÿ����View�߿�ʱ������˸�View�����ı߾��С����android:padding���� ��android:paddingLeft�����Ա��
30.protected void measureChild(View child, int parentWidthMeasureSpec,
31. int parentHeightMeasureSpec) {
32. final LayoutParams lp = child.getLayoutParams(); // LayoutParams����
33. //������View��childWidthMeasureSpec���ԣ�ȥ���˸ø�View�ı߾�ֵ mPaddingLeft + mPaddingRight
34. final int childWidthMeasureSpec = getChildMeasureSpec(parentWidthMeasureSpec,
35. mPaddingLeft + mPaddingRight, lp.width);
36. //������View��childHeightMeasureSpec���ԣ�ȥ���˸ø�View�ı߾�ֵ mPaddingTop + mPaddingBottom
37. final int childHeightMeasureSpec = getChildMeasureSpec(parentHeightMeasureSpec,
38. mPaddingTop + mPaddingBottom, lp.height);
39.
40. child.measure(childWidthMeasureSpec, childHeightMeasureSpec);
41.} |
measureChildren()����������������View������measureChild()����ȥ���ø���View������ֵ��
measureChild() ���� �� ��ȡ�ض���View��widthMeasureSpec��heightMeasureSpec������measure()����������View��ʵ�ʿ���ֵ��
getChildMeasureSpec()���ǻ�ȡ��View��widthMeasureSpec��heightMeasureSpecֵ��
01./**
02. * Does the hard part of measureChildren: figuring out the MeasureSpec to
03. * pass to a particular child. This method figures out the right MeasureSpec
04. * for one dimension (height or width) of one child view.
05. *
06. * The goal is to combine information from our MeasureSpec with the
07. * LayoutParams of the child to get the best possible results.
08. */
09.// spec���� ��ʾ�ø�View������ռ��widthMeasureSpec �� heightMeasureSpecֵ
10.// padding���� ��ʾ�ø�View�ı߾��С������android:padding���� ��android:paddingLeft�����Ա��
11.// childDimension���� ��ʾ����View�ڲ�LayoutParams���Ե�ֵ��������wrap_content��match_parent��
һ����ȷָ(an exactly size),
12.// ���磺��android:widthָ���ȡ�
13.public static int getChildMeasureSpec(int spec, int padding, int childDimension) {
14. int specMode = MeasureSpec.getMode(spec); //��ø�View��mode
15. int specSize = MeasureSpec.getSize(spec); //��ø�View��ʵ��ֵ
16.
17. int size = Math.max(0, specSize - padding); //��ViewΪ��View�趨�Ĵ�С����ȥ�߾�ֵ��
18.
19. int resultSize = 0; //��View��Ӧ�� size ʵ��ֵ �����������������ֵ
20. int resultMode = 0; //��View��Ӧ�� mode ֵ �� ���������������ֵ
21.
22. switch (specMode) {
23. // Parent has imposed an exact size on us
24. //1����View��EXACTLY�� ��
25. case MeasureSpec.EXACTLY:
26. //1.1����View��width��height�Ǹ���ȷֵ (an exactly size)
27. if (childDimension >= 0) {
28. resultSize = childDimension; //sizeΪ��ȷֵ
29. resultMode = MeasureSpec.EXACTLY; //modeΪ EXACTLY ��
30. }
31. //1.2����View��width��heightΪ MATCH_PARENT/FILL_PARENT
32. else if (childDimension == LayoutParams.MATCH_PARENT) {
33. // Child wants to be our size. So be it.
34. resultSize = size; //sizeΪ����ͼ��С
35. resultMode = MeasureSpec.EXACTLY; //modeΪ EXACTLY ��
36. }
37. //1.3����View��width��heightΪ WRAP_CONTENT
38. else if (childDimension == LayoutParams.WRAP_CONTENT) {
39. // Child wants to determine its own size. It can't be
40. // bigger than us.
41. resultSize = size; //sizeΪ����ͼ��С
42. resultMode = MeasureSpec.AT_MOST; //modeΪAT_MOST ��
43. }
44. break;
45.
46. // Parent has imposed a maximum size on us
47. //2����View��AT_MOST�� ��
48. case MeasureSpec.AT_MOST:
49. //2.1����View��width��height�Ǹ���ȷֵ (an exactly size)
50. if (childDimension >= 0) {
51. // Child wants a specific size... so be it
52. resultSize = childDimension; //sizeΪ��ȷֵ
53. resultMode = MeasureSpec.EXACTLY; //modeΪ EXACTLY ��
54. }
55. //2.2����View��width��heightΪ MATCH_PARENT/FILL_PARENT
56. else if (childDimension == LayoutParams.MATCH_PARENT) {
57. // Child wants to be our size, but our size is not fixed.
58. // Constrain child to not be bigger than us.
59. resultSize = size; //sizeΪ����ͼ��С
60. resultMode = MeasureSpec.AT_MOST; //modeΪAT_MOST
61. }
62. //2.3����View��width��heightΪ WRAP_CONTENT
63. else if (childDimension == LayoutParams.WRAP_CONTENT) {
64. // Child wants to determine its own size. It can't be
65. // bigger than us.
66. resultSize = size; //sizeΪ����ͼ��С
67. resultMode = MeasureSpec.AT_MOST; //modeΪAT_MOST
68. }
69. break;
70.
71. // Parent asked to see how big we want to be
72. //3����View��UNSPECIFIED�� ��
73. case MeasureSpec.UNSPECIFIED:
74. //3.1����View��width��height�Ǹ���ȷֵ (an exactly size)
75. if (childDimension >= 0) {
76. // Child wants a specific size... let him have it
77. resultSize = childDimension; //sizeΪ��ȷֵ
78. resultMode = MeasureSpec.EXACTLY; //modeΪ EXACTLY
79. }
80. //3.2����View��width��heightΪ MATCH_PARENT/FILL_PARENT
81. else if (childDimension == LayoutParams.MATCH_PARENT) {
82. // Child wants to be our size... find out how big it should
83. // be
84. resultSize = 0; //sizeΪ0�� ,��ֵδ��
85. resultMode = MeasureSpec.UNSPECIFIED; //modeΪ UNSPECIFIED
86. }
87. //3.3����View��width��heightΪ WRAP_CONTENT
88. else if (childDimension == LayoutParams.WRAP_CONTENT) {
89. // Child wants to determine its own size.... find out how
90. // big it should be
91. resultSize = 0; //sizeΪ0! ����ֵδ��
92. resultMode = MeasureSpec.UNSPECIFIED; //modeΪ UNSPECIFIED
93. }
94. break;
95. }
96. //����������������ȡ��mode��size����MeasureSpec����
97. return MeasureSpec.makeMeasureSpec(resultSize, resultMode);
98.} |
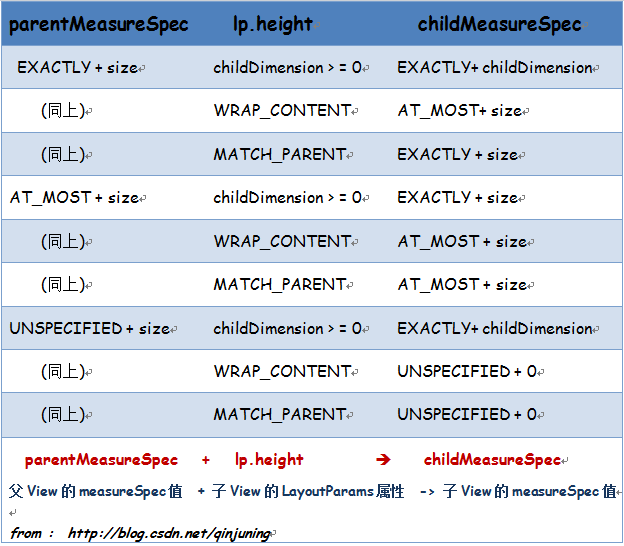
Ϊ�˱��ڷ������ҽ���������ж����ʹ���б��������˵��.
getChildMeasureSpec()��������Ҫ�������£�
���ݸ�View��measureSpecֵ(widthMeasureSpec,heightMeasureSpec)ֵ�Լ���View����View�ڲ�LayoutParams����ֵ����ͬ������View��measureSpecֵ�Ĵ�С����Ҫ�ж�������ҪΪMeasureSpec��mode�����Լ�LayoutParams�Ŀ���ʵ��ֵ(lp.width,lp.height)�������������������е��б��
1�� 1.1 ; 1.2 ; 1.3 ; 2��2.1�ȡ�
���磬�����б�3�����赱��ViewΪMeasureSpec.UNSPECIFIED���ͣ���δ����ʱ��ֻ�е���View��width��heightָ��ʱ����mode��ΪMeasureSpec.EXACTLY�����߸�View
sizeΪ 0 ��modeΪMeasureSpec.UNSPECIFIEDʱ��������δָ��״̬��
�ɴ˿��Եó��� ÿ��View��С���趨�������丸View�Լ���View��ͬ�����ġ�����ֻ��һ�������Ĵ�С��ÿ��View�ڲ���ʱ���մ�С���趨����setMeasuredDimension()���վ����ġ���ˣ�����ȷ��һ��View�ġ������������������¼�������Ӱ�죺
- ��View��MeasureSpec���ԣ�
- ��View��LayoutParams���� ��
- setMeasuredDimension()�������������趨 mMeasuredWidth ��
mMeasuredHeight ֵ�ķ�����
setMeasuredDimension()ԭ�ͣ�
01.//����View��measure�������
02.protected final void setMeasuredDimension(int measuredWidth, int measuredHeight) {
03. mMeasuredWidth = measuredWidth;
04. mMeasuredHeight = measuredHeight;
05.
06. mPrivateFlags |= MEASURED_DIMENSION_SET; //������MEASURED_DIMENSION_SET���
07.} |
�������б���ת��Ϊ����Ϊ��
���ű�����ܰ������Ƿ���View��MeasureSpec��ȷ��������ϵ��
Ϊ�˰���������⣬�������Ƿ���ij������ʹ�õ�xml�����ļ�������Ū�����xml�����ļ���ÿ��View��
MeasureSpecֵ����ɡ�
01.<?xml version="1.0" encoding="utf-8"?>
02.<LinearLayout xmlns:android="http://schemas.android.com/apk/res/android"
03.    android:id="@+id/llayout"
04.       android:orientation="vertical"
05.    android:layout_width="match_parent"
06.       android:layout_height="match_parent">
07.
08.
09.    <TextView android:id="@+id/tv"
10.        android:layout_width="match_parent"
11.        android:layout_height="wrap_content"
12.        android:text="@string/hello" />
13.
14.</LinearLayout> |
�ò����ļ���������View�� �١�idΪllayout��LinearLayout���ֿؼ�
;�ڡ�idΪtv��TextView�ؼ���
����LinearLayout�ĸ�View��Ӧ��widthSpec��heightSpecֵ��ΪMeasureSpec.EXACTLY����(Activity���ڵĸ�ViewΪDecorView������ԭ�����������˵��)��
��LinearLayout���ԱȽϼ����� android:layout_width="match_parent"�������width��Ӧ��widthSpec
modeֵΪMeasureSpec.EXACTLY �� size�ɸ���ͼ��Сָ�� ; ����android:layout_height
= "match_parent"�������height��Ӧ��heightSpec modeֵΪMeasureSpec.EXACTLY��size�ɸ���ͼ��Сָ��
;
��TextView���� ���丸ViewΪLinearLayout��widthSpec��heightSpecֵ��ΪMeasureSpec.EXACTLY���ͣ�����android:layout_width="match_parent"
�� �����width��Ӧ��widthSpec modeֵΪMeasureSpec.EXACTLY��size�ɸ���ͼ��Сָ��
; ����android:layout_width="wrap_content" ��
�����height��Ӧ��widthSpec modeֵΪMeasureSpec.AT_MOST��size�ɸ���ͼ��Сָ��
��
���Ǽ���������LinearLayout������ν���measure���̵ģ�
01. public class LinearLayout extends ViewGroup {
02....
03.@Override //onMeasure������
04.protected void onMeasure(int widthMeasureSpec, int heightMeasureSpec) {
05. //�ж��Ǵ�ֱ������ˮƽ����������Ǽ�����VERTICAL��ֱ����
06. if (mOrientation == VERTICAL) {
07. measureVertical(widthMeasureSpec, heightMeasureSpec);
08. } else {
09. measureHorizontal(widthMeasureSpec, heightMeasureSpec);
10. }
11.}
12.//��ֱ����
13. void measureVertical(int widthMeasureSpec, int heightMeasureSpec) {
14. mTotalLength = 0; //��LinearLayout������Viewʱ���ܸ߶ȡ�
15. float totalWeight = 0; //������View��Ȩ�غ� , android:layout_weight
16. int maxWidth = 0; //������View�����widthֵ
17. ...
18. final int count = getVirtualChildCount(); //��View�ĸ���
19.
20. final int widthMode = MeasureSpec.getMode(widthMeasureSpec);
21. final int heightMode = MeasureSpec.getMode(heightMeasureSpec);
22. ...
23. // See how tall everyone is. Also remember max width.
24. for (int i = 0; i < count; ++i) {
25. final View child = getVirtualChildAt(i);
26. ...
27. LinearLayout.LayoutParams lp = (LinearLayout.LayoutParams) child.getLayoutParams();
28.
29. totalWeight += lp.weight;
30. //�����������View���ڸ�LinearLayout��ʣ��߶�ʱ������������measure()
31. if (heightMode == MeasureSpec.EXACTLY && lp.height == 0 && lp.weight > 0) {
32. ...
33. } else {
34. int oldHeight = Integer.MIN_VALUE;
35. //���View��hightֵΪ0������������android:layout_weight���ԣ����¾�����heightֵΪWRAP_CONTENT
36. if (lp.height == 0 && lp.weight > 0) {
37. oldHeight = 0;
38. lp.height = LayoutParams.WRAP_CONTENT;
39. }
40. // Determine how big this child would like to be. If this or
41. // previous children have given a weight, then we allow it to
42. // use all available space (and we will shrink things later
43. // if needed).
44. //��ÿ����View����measure()����
45. measureChildBeforeLayout(
46. child, i, widthMeasureSpec, 0, heightMeasureSpec,
47. totalWeight == 0 ? mTotalLength : 0);
48.
49. //�����д������������������飺
50. //1����ø�View��measuredHeightֵ��ÿ��View����������ǵ�������ȷ����ֵ > 0 ;
51. //2������mTotalLengthֵ��ȡ��ǰ�߶�mTotalLengthֵ��mTotalLength + childHeight �����ֵ
52. // ���Ƕ���android:layout_height="wrap_height"���Ե�LinearLayout�ؼ�Ҳ��֪��������ȷ�и߶�ֵ�ˡ�
53. final int childHeight = child.getMeasuredHeight();
54. final int totalLength = mTotalLength;
55. mTotalLength = Math.max(totalLength, totalLength + childHeight + lp.topMargin +
56. lp.bottomMargin + getNextLocationOffset(child));
57. ...
58. }
59. final int margin = lp.leftMargin + lp.rightMargin;
60. final int measuredWidth = child.getMeasuredWidth() + margin;
61. maxWidth = Math.max(maxWidth, measuredWidth);
62. ...
63. }
64. //�������кܶദ������������measure()ijЩ������������View
65. ...
66. }
67. void measureChildBeforeLayout(View child, int childIndex,
68. int widthMeasureSpec, int totalWidth, int heightMeasureSpec,
69. int totalHeight) {
70. //����measureChildWithMargins()����ȥ������View��С
71. measureChildWithMargins(child, widthMeasureSpec, totalWidth,
72. heightMeasureSpec, totalHeight);
73. }
74.... |
��������measureChildWithMargins()�������÷���������ViewGroup.java�ڣ���������ͬ��measureChild()�������������˶���View
Margin�Ĵ���������android:margin���Ի���android:marginLeft�����ԵĴ�����
measureChildWithMargins@ViewGroup.java
01./**
02. * Ask one of the children of this view to measure itself, taking into
03. * account both the MeasureSpec requirements for this view and its padding
04. * and margins. The child must have MarginLayoutParams The heavy lifting is
05. * done in getChildMeasureSpec.
06. */
07.//��������ͬ��measureChild()�������������˶���View Margin�Ĵ�����
����android:margin���Ի���android:marginLeft�����ԵĴ���
08.//widthUsed���� ��ʾ�ø�View�Ѿ�ʹ�õĿ���
09.//heightUsed���� ��ʾ�ø�View�Ѿ�ʹ�õĸ߶�
10.protected void measureChildWithMargins(View child,
11. int parentWidthMeasureSpec, int widthUsed,
12. int parentHeightMeasureSpec, int heightUsed) {
13. final MarginLayoutParams lp = (MarginLayoutParams) child.getLayoutParams();
14.
15. //�����View��childWidthMeasureSpec��childHeightMeasureSpecֵ
16. final int childWidthMeasureSpec = getChildMeasureSpec(parentWidthMeasureSpec,
17. mPaddingLeft + mPaddingRight + lp.leftMargin + lp.rightMargin
18. + widthUsed, lp.width);
19. final int childHeightMeasureSpec = getChildMeasureSpec(parentHeightMeasureSpec,
20. mPaddingTop + mPaddingBottom + lp.topMargin + lp.bottomMargin
21. + heightUsed, lp.height);
22.
23. child.measure(childWidthMeasureSpec, childHeightMeasureSpec);
24.}
|
measure()����ʱ��LinearLayout�������������� ��
1������ÿ����View���������measure()������
2����View measure()��ɺ���Ҫȡ�ø���View�ؿ���ʵ��ֵ���̶�������(���磺LinearLayout����Ϊandroid:widht="wrap_content"ʱ��LinearLayout��ʵ��widthֵ����ÿ����View��widthֵ���ۼ�ֵ)��
2.2 WRAP_CONTENT��MATCH_PARENT�Լ�measure����������View�ؿ���ʵ��ֵ
����child.getMeasuredWidth()ֵ�÷������ջ���һ��ȷ��ֵ�� �ѵ�WRAP_CONTENT(��ֵΪ-2)
��MATCH_PARENT(ֵΪ-1)����˵һ������ֵ(an exactly size > 0)��ǰ������˵��,View���ա�������ֵ��ȷ����������������ɵأ�
�١���View��MeasureSpec���ԣ�
�ڡ���View��LayoutParams���� ��
�ۡ�setMeasuredDimension()�������������趨 mMeasuredWidth
�� mMeasuredHeight ֵ�ķ�����
��ˣ�һ��View������ij�ֺ��ʵط���ȷ���������մ�С�����磬�����Զ���View��
01.//�Զ���View
02.public Class MyView extends View {
03.
04. //��Բ�ͬ��modeֵ�����ñ�View�ش�С
05. protected void onMeasure(int widthMeasureSpec, int heightMeasureSpec){
06. //��ø�View���ݸ����ǵز�������
07. int widthMode = MeasureSpec.getMode(widthMeasureSpec);
08. int heightMode = MeasureSpec.getMode(heightMeasureSpec);
09.
10. int width = 0 ;
11. int height = 0 ;
12. //��UNSPECIFIED ���׳��쳣
13. if(widthMode == MeasureSpec.UNSPECIFIED || heightMode == MeasureSpec.UNSPECIFIED)
14. throw new RuntimeException("widthMode or heightMode cannot be UNSPECIFIED");
15.
16. //��ȷָ��
17. if(widthMode == MeasureSpec.EXACTLY){
18. width = 100 ;
19. }
20. //ģ��ָ��
21. else if(widthMode == MeasureSpec.AT_MOST )
22. width = 50 ;
23.
24. //��ȷָ��
25. if(heightMode == MeasureSpec.EXACTLY){
26. height = 100 ;
27. }
28. //ģ��ָ��
29. else if(heightMode == MeasureSpec.AT_MOST )
30. height = 50 ;
31.
32. setMeasuredDimension(width , height) ;
33. }
34.} |
���Զ���View��д��onMeasure()���������ݴ��ݹ�����widthMeasureSpec��heightMeasureSpec�������˸�View��mMeasuredWidth
�� mMeasuredHeightֵ��
����TextView���ԣ��������mode����Exactly���� �� �������һЩ���ԣ����磺android:textStyle��android:textSizeandroid:typeface��ȥȷ��TextView�����Ҫռ�õس��Ϳ���
��ˣ��������Զ���View�����ֶ��Բ�ͬmode������������������mode�����������Ч�ġ�
Android������ṩ��һϵ��View/ViewGroup����Ҫȥ�������measure()���̵�
����Ϊ��layout()�����У���View��Ҫ����getMeasuredWidth()��getMeasuredHeight()ȥΪÿ����View�������ǵز������ֻ꣬��ȷ������������������ؽ���View
����(draw)�����������View��layout��СΪ0���ò�������Ч�������Ǽ�������LinearLayout��layout���ֹ��̣�
01.public class LinearLayout extends ViewGroup {
02. ...
03. @Override //layout ����
04. protected void onLayout(boolean changed, int l, int t, int r, int b) {
05. //�ٶ��Ǵ�ֱ����
06. if (mOrientation == VERTICAL) {
07. layoutVertical();
08. } else {
09. layoutHorizontal();
10. }
11. }
12. //��ÿ����View����layout����
13. void layoutVertical() {
14. ...
15. final int count = getVirtualChildCount();
16. ...
17. for (int i = 0; i < count; i++) {
18. final View child = getVirtualChildAt(i);
19. if (child == null) { //һ��Ϊ��null
20. childTop += measureNullChild(i);
21. } else if (child.getVisibility() != GONE) {
22. //�����View����ʱ��ʵ�ʿ���ֵ��
23. final int childWidth = child.getMeasuredWidth();
24. final int childHeight = child.getMeasuredHeight();
25.
26. ...
27. // ��װ��child.layout()������������
28. setChildFrame(child, childLeft, childTop + getLocationOffset(child),
29. childWidth, childHeight);
30. childTop += childHeight + lp.bottomMargin + getNextLocationOffset(child);
31.
32. i += getChildrenSkipCount(child, i);
33. }
34. }
35. }
36. //width = getMeasuredWidth() ; height = childHeight(); View�Ĵ�С���Dz�����С
37. private void setChildFrame(View child, int left, int top, int width, int height) {
38.
39. child.layout(left, top, left + width, top + height);
40. }
41. ...
42.} |
��һ��View����measure��������ҪĿ�ľ���Ϊ��ȷ����View�ز��ִ�С����������ʾ���롣��measure����ͨ���Ǻ�ʱ�ģ���˶��Զ���ViewGroup���ԣ����ǿ������ɿ���measure��layout���̣��������֪�����layoutһ��View�����ǿ���������ViewGroup��measure����(onMeasure()������measure������View��)��ֱ��ȥlayout
��ǰ��һƪ����<<Android�л�����̽ ---- scrollTo
�Լ� scrollBy����ʹ��˵��>>�У������Զ�����һ�� ViewGroup, ������д��onMeasure()��onLayout()����ȥ�ֱ����ÿ��View����ViewGroup���ԣ�����ֻ��Ҫ��дonLayout()�������ɣ���Ϊ����֪�����layoutÿ����View�����´�����ʾ��
01.//�Զ���ViewGroup �� ����������LinearLayout�ؼ�������ڲ�ͬ�IJ���λ��
02.public class MultiViewGroup extends ViewGroup {
03. private void init() {
04. // ��ʼ��3�� LinearLayout�ؼ�
05. LinearLayout oneLL = new LinearLayout(mContext);
06. oneLL.setBackgroundColor(Color.RED);
07. addView(oneLL);
08. ...
09. }
10. @Override
11. // ����֪��ÿ����View��layout���ִ�С��������Dz���ҪΪÿ����View����measure()�����ˡ�
12.// protected void onMeasure(int widthMeasureSpec, int heightMeasureSpec) {
13.// setMeasuredDimension(width, height);
14.// // ���ø�ViewGroup�Ĵ�С
15.// int width = MeasureSpec.getSize(widthMeasureSpec);
16.// int height = MeasureSpec.getSize(heightMeasureSpec);
17.// int childCount = getChildCount();
18.// for (int i = 0; i < childCount; i++) {
19.// View child = getChildAt(i);
20.// // ����ÿ������ͼ�Ĵ�С �� ��ȫ��
21.// child.measure(MultiScreenActivity.screenWidth, MultiScreenActivity.scrrenHeight);
22.// }
23. }
24.
25. // layout����
26. @Override
27. protected void onLayout(boolean changed, int l, int t, int r, int b) {
28. // TODO Auto-generated method stub
29. Log.i(TAG, "--- start onLayout --");
30. int startLeft = 0; // ÿ������ͼ����ʼ��������
31. int startTop = 10; // �������Ϊ10px �൱�� android��marginTop= "10px"
32. int childCount = getChildCount();
33. Log.i(TAG, "--- onLayout childCount is -->" + childCount);
34. for (int i = 0; i < childCount; i++) {
35. View child = getChildAt(i);
36. child.layout(startLeft, startTop,
37. startLeft + MultiScreenActivity.screenWidth,
38. startTop + MultiScreenActivity.scrrenHeight);
39. startLeft = startLeft + MultiScreenActivity.screenWidth ; //Уÿ����View����ʼ����λ��
40. //��������ͼ������Ļ�еķֲ����� [0 , 320] / [320,640] / [640,960]
41. }
42. }
43.} |
3��root View������������ʱ��UI��������������LayoutParamsֵ
���ӵ��¾����ԣ�������һ��һ����������������������� UI����Ҳ���Ǹ��ݹ���̡�����������ܹ���Ҳ�͡�������һ�����ĵ㡱�ˡ��ڵ�һ���У�����û��˵����ʼUI����ʱ
��û��˵��mView.measure()����������������Ҳ�������DZ�����ҪŪ���ġ����� --- root
View�� widthMeasureSpec��heightMeasureSpec �����ȷ���ġ�
�������²����ļ��� main.xml
01.<?xml version="1.0" encoding="utf-8"?>
02.<LinearLayout xmlns:android="http://schemas.android.com/apk/res/android"
03.    android:orientation="vertical"
04.    android:layout_width="fill_parent"
05.    android:layout_height="fill_parent"
06.    >
07.<TextView
08.    android:layout_width="fill_parent"
09.    android:layout_height="wrap_content"
10.    android:text="@string/hello"
11.    />
12.</LinearLayout> |
��ʹ��LayoutInflater�������Viewʱ ��LinearLayout�����LayoutParams����Ϊnull
������ԭ����ο���ƪ����
�κ�һ��View������������ʱ������Ҫ����WindowManager��ȥ���������磬���´��룺
01.//��ʾһ���������� �� just so so
02.public void showView()
03.{
04. //���������ļ�
05. LayoutInflater layoutInflater = (LayoutInflater)getSystemService(Context.LAYOUT_INFLATER_SERVICE);
06. //rootView��Ӧ��LayoutParams����ֵΪnull��������UI����ʱ�趨��ֵ
07. View rootView = layoutInflater.inflate(R.layout.main, null);
08.
09. WindowManager windowManager = (WindowManager)getSystemService(Context.WINDOW_SERVICE);
10. //����WindowManager.LayoutParams����ֵ����Ϊ�ô��ڵĸ�������
11. WindowManager.LayoutParams winparams = WindowManager.LayoutParams();
12. // ����Ļ���Ͻ�Ϊԭ�㣬����x��y��ʼֵ
13. winparams.x = 0;
14. winparams.y = 0;
15.
16. //�����������ڳ�������
17. winparams.width = WindowManager.LayoutParams.WRAP_CONTENT;;
18. winparams.height = WindowManager.LayoutParams.WRAP_CONTENT;;
19.
20. windowManager.addView(rootView, winparams);
21.} |
���棬���Ǵӻ��WindowManager�������ÿ�ʼ��һ�����۲�addView()����һЩʲô���顣
Step 1 �����WindowManager������� ������ʵ������ContextImpl.java����
·���� /frameworks/base/core/java/android/app/ContextImpl.java
01.@Override
02.public Object getSystemService(String name) {
03.    if (WINDOW_SERVICE.equals(name)) {
04.        return WindowManagerImpl.getDefault();
05.    }
06.    ...
07.} |
WindowManager�Ǹ��ӿڣ����巵�ض�������WindowManagerImpl�ĵ�������
Step 2 �� ���WindowManagerImpl�ĵ��������Լ�����Դ�����
·���� /frameworks/base/core/java/android/view/WindowManagerImpl.java
01.public class WindowManagerImpl implements WindowManager{
02.
03. public static WindowManagerImpl getDefault()
04. {
05. return mWindowManager;
06. }
07. //���ض�Window��������һ������
08. public void addView(View view, ViewGroup.LayoutParams params)
09. {
10. addView(view, params, false);
11. }
12. //����nest��ʾ�ô����Dz���һ���ִ���
13. private void addView(View view, ViewGroup.LayoutParams params, boolean nest)
14. { ...
15. final WindowManager.LayoutParams wparams = (WindowManager.LayoutParams)params;
16.
17. ViewRoot root;
18. View panelParentView = null; //���Ӵ��ڶ�Ӧ�ظ�����View
19.
20. synchronized (this) {
21.
22. ...//��Ҫ�Դ��ݹ����ز������м��...
23.
24. //��ÿ�����ڽԹ���һ��ViewRoot����
25. root = new ViewRoot(view.getContext());
26. root.mAddNesting = 1;
27. //����root View ��LayoutParamsΪwparams����WindowManager.LayoutParams����
28. view.setLayoutParams(wparams);
29. ...//�Բ�����⣬�Լ�����ԭ������...
30.
31. //�����ڶ�Ӧ��view��root��wparams���������Լ�����
32. mViews[index] = view;
33. mRoots[index] = root;
34. mParams[index] = wparams;
35. }
36. // do this last because it fires off messages to start doing things
37. // ����ViewRoot����ȥ֪ͨϵͳ����һ������
38. root.setView(view, wparams, panelParentView);
39. }
40. ...
41. //����������ֱ𱣴���һ�����ڶ�Ӧ������
42. private View[] mViews; //root View���� �� View����
43. private ViewRoot[] mRoots; //ViewRoot���� �� ��WMSͨ��
44. private WindowManager.LayoutParams[] mParams; //��������
45.
46. //WindowManagerImplʵ���˵���ģʽ
47. private static WindowManagerImpl mWindowManager = new WindowManagerImpl();
48.} |
WindowManagerImpl����������鼯�ϱ�����ÿ������������ԣ��������ǿ���ͨ����Щ����ȥ�����ض��Ĵ���(���磬���Ը���Viewȥ����/���ٸô���)�����������ɹ�ʱ������һ��ViewRoot��������������root
View ��LayoutParamsΪwparams����WindowManager.LayoutParams���͡�������root.setView()����ȥ֪ͨϵͳ��Ҫ�����ô��ڡ����ǽ��������¿���ViewRoot����ز�����
Step 3��
01.public final class ViewRoot extends Handler implements ViewParent,View.AttachInfo.Callbacks {
02.
03. View mView; //���д��ڵ�root View
04. final WindowManager.LayoutParams mWindowAttributes = new WindowManager.LayoutParams();
05.
06. ...
07. /**
08. * We have one child
09. */
10. public void setView(View view, WindowManager.LayoutParams attrs,
11. View panelParentView) {
12. synchronized (this) {
13. if (mView == null) {
14. mView = view;
15. mWindowAttributes.copyFrom(attrs); //����WindowManager.LayoutParams����ֵ
16. attrs = mWindowAttributes;
17. ...
18.
19. mAdded = true;
20. int res; /* = WindowManagerImpl.ADD_OKAY; */
21.
22. // Schedule the first layout -before- adding to the window
23. // manager, to make sure we do the relayout before receiving
24. // any other events from the system.
25. requestLayout(); //����UI��ʼ���ơ�
26. mInputChannel = new InputChannel(); //����һ��InputChannel��������Ϣ
27. try {
28. //֪ͨWindowManagerService����һ������
29. res = sWindowSession.add(mWindow, mWindowAttributes,
30. getHostVisibility(), mAttachInfo.mContentInsets,
31. mInputChannel);
32. }
33. ...
34. view.assignParent(this); //��root View�ĸ�View����Ϊ��ViewRoot����(ʵ����ViewParent�ӿ�)
35. ...
36. }
37. }
38. }
39.} |
˵����ViewRoot��̳���Handler��ʵ����ViewParent�ӿ�
setView()��������Ҫ�������£�
- �����������ֵ�����磺mView��mWindowAttributes�ȣ�
- ����requestLayout()��������UI���ƣ�����ViewRoot�Ǹ�Handler�����첽����
- ֪ͨWindowManagerService����һ�����ڣ�
- ע��һ���¼������ܵ�����������������(KeyEvent)�ʹ���(MotionEvent)�¼���
��������ص��ע requestLayout()��������UI���Ƶ����̡�
Step 4���첽��������UI����
01./**
02. * {@inheritDoc}
03. */
04.public void requestLayout() {
05. checkThread(); //����Dz���UI�̵߳��ã��������UI�̣߳��ᱨ�쳣
06. mLayoutRequested = true; //��Ϊ�棬��ʾ��Ҫ����measure��layout����
07. scheduleTraversals();
08.}
09.//��ʼUI��������
10.public void scheduleTraversals() {
11. if (!mTraversalScheduled) {
12. mTraversalScheduled = true; //��ֹ��ε���
13. sendEmptyMessage(DO_TRAVERSAL); //�첽����UI����
14. }
15.}
16.@Override
17.public void handleMessage(Message msg) {
18. switch (msg.what) {
19. case DO_TRAVERSAL:
20. performTraversals(); //��ʼUI����
21. break;
22. }
23.} |
����performTraversals()�����Ƚϸ��ӣ����Dz����ڵ�һ������root
View��widhtSpecSize�Լ�
heightSpecSizeֵ��
01.private void performTraversals() {
02. // cache mView since it is used so much below...
03. final View host = mView;
04.
05. mTraversalScheduled = false;
06. boolean surfaceChanged = false;
07. WindowManager.LayoutParams lp = mWindowAttributes;
08.
09. int desiredWindowWidth; //��ʾ�ô�������widthֵ
10. int desiredWindowHeight; //��ʾ�ô�������widthֵ
11. int childWidthMeasureSpec; //����root View��widthMeasureSpec
12. int childHeightMeasureSpec; //����root View��heightMeasureSpec
13.
14. final View.AttachInfo attachInfo = mAttachInfo;
15.
16. final int viewVisibility = getHostVisibility();
17. boolean viewVisibilityChanged = mViewVisibility != viewVisibility
18. || mNewSurfaceNeeded;
19.
20. float appScale = mAttachInfo.mApplicationScale;
21.
22. WindowManager.LayoutParams params = null;
23. if (mWindowAttributesChanged) {
24. mWindowAttributesChanged = false;
25. surfaceChanged = true;
26. params = lp;
27. }
28. Rect frame = mWinFrame;
29. if (mFirst) { //mFirst��ʾ�Ƿ��ǵ�һ�λ��Ƹ�Window
30. fullRedrawNeeded = true;
31. mLayoutRequested = true;
32.
33. DisplayMetrics packageMetrics =
34. mView.getContext().getResources().getDisplayMetrics();
35. //��һ�λ���ʱdesiredWindowWidth��desiredWindowHeight ֵ��СΪ��Ļ��С
36. desiredWindowWidth = packageMetrics.widthPixels;
37. desiredWindowHeight = packageMetrics.heightPixels;
38. ...
39. } else { //���ǵ�һ�λ��ƣ���desiredWindowWidthֵΪframe�����С��frameֵ����WMS���
40. desiredWindowWidth = frame.width();
41. desiredWindowHeight = frame.height();
42. ...
43. }
44. ...
45. boolean insetsChanged = false;
46.
47. if (mLayoutRequested) {
48. ...//���root View��widthMeasureSpec �� heightMeasureSpecֵ
49. childWidthMeasureSpec = getRootMeasureSpec(desiredWindowWidth, lp.width);
50. childHeightMeasureSpec = getRootMeasureSpec(desiredWindowHeight, lp.height);
51. //��ʼmeasure����
52. host.measure(childWidthMeasureSpec, childHeightMeasureSpec);
53. }
54. ...
55. final boolean didLayout = mLayoutRequested;
56.
57. boolean triggerGlobalLayoutListener = didLayout
58. || attachInfo.mRecomputeGlobalAttributes;
59. if (didLayout) {
60. ... //layout����
61. host.layout(0, 0, host.mMeasuredWidth, host.mMeasuredHeight);
62. ...
63. }
64. ...
65. if (!cancelDraw && !newSurface) {
66. mFullRedrawNeeded = false;
67. draw(fullRedrawNeeded);
68. ...
69.} |
01./**
02.  * @param windowSize  The available width or height of the window
03.  *
04.  * @param rootDimension The layout params for one dimension (width or height) of the window.
05. */
06. private int getRootMeasureSpec(int windowSize, int rootDimension) {
07.     int measureSpec;
08.     switch (rootDimension) {
09.     case ViewGroup.LayoutParams.MATCH_PARENT:
10.         // Window can't resize. Force root view to be windowSize.
11.         measureSpec = MeasureSpec.makeMeasureSpec(windowSize, MeasureSpec.EXACTLY);
12.         break;
13.     case ViewGroup.LayoutParams.WRAP_CONTENT:
14.         // Window can resize. Set max size for root view.
15.         measureSpec = MeasureSpec.makeMeasureSpec(windowSize, MeasureSpec.AT_MOST);
16.         break;
17.     default:
18.         // Window wants to be an exact size. Force root view to be that size.
19.         measureSpec = MeasureSpec.makeMeasureSpec(rootDimension, MeasureSpec.EXACTLY);
20.         break;
21.     }
22.     return measureSpec;
23. } |
����root View��measure()����ʱ�����������getRootMeasureSpec()���õģ�����˼·ͬ����ǰ��������
��ࡣ�������Ĵ���ֻ�Ǽ���г���measure ��layout
�� draw ���̵ĵ��õ㣬�����кܶ��������� |


