Google App Engine 曾经一度是 Python 开发人员
的专利。那是一段黑暗的岁月。Google Inc. 在 2009 年 4 月向 Java™
开发人员开放了其云计算平台。在这个共分三部分的系列文章中,Java 技术作家兼培训师 Rick Hightower
将带领您了解这个可靠、健壮、有趣的平台,并将它用于基于 Java 的开发。在本文中,您将了解到为什么 Google
App Engine for Java 将成为您构建高度可伸缩的杀手级应用程序的开发平台,然后开始使用
Google Plugin for Eclipse 构建两个示例应用程序:一个基于 Google Web
Toolkit (GWT),另一个基于 Java Servlet API。您将了解到 Google App
Engine for Java 带来的巨大改变,包括从头构建应用程序以及将它部署到高达 5 百万个视图。(这仅仅是免费版提供的功能)。
头脑里出现的想法就好像是被蚊虫叮了一样:您需要抓痒痒,这样做才感觉舒服一些。作为软件开发人员,我们花了大量时间来为各种应用程序捕捉想法。很有趣,不是吗?困难的部分在于想出如何使一个软件产品获得成功。需要构想出一些东西并随后
实现它。考虑其他的问题(即没有被抓过的痒处)只会让人灰心。
许多应用程序从未获得进展的一个原因就是无法满足对基础设施的需求。一个得到良好维护的基础设施常常需要一个由系统管理员、DBA
和网络工程师组成的团队,到目前为止,这一直是企业获得成功的主因。即使雇用第三方来托管您的应用程序也绝不简单:如果应用程序大受欢迎并且突然之间获得很高的点击率,会发生什么?所谓的
Slashdot 效应 可以帮助获得一个好的想法,仅仅因为很难预测加载峰值。
但是,众所周知,事物是不断变化的。Web 服务的基础在不断演变,如今它为我们带来了许多新方式,通过云计算和强大的平台即服务/PAAS
更轻松地构建、部署和发布应用程序。现在,在编写下一个 Twitter 并将其部署到云平台上时,它将不断扩展。哇,感觉很棒!
在这份共分三部分的系列文章中,您将了解到为什么云计算/PAAS 对于软件开发来说是如此重要的一个演变,同时开始使用一种令人振奋的新平台进行
Java 开发:Google App Engine for Java,目前可以使用它的预览版。我将首先对
App Engine for Java 进行概述,包括它所提供的应用程序服务的类型。之后将直接查看第一个应用程序示例(共两个),它使用
App Engine for Java Google Plugin for Eclipse。第一个应用程序示例将利用
App Engine for Java 对 Java Servlet API 的支持,第二个示例将利用对
GWT 的支持。在 第
2 部分 中,您将利用 App Engine for Java 对 servlets 和 GWT
提供的支持创建一个小型的联系人管理应用程序。在第 3 部分中,将使用自己构建的应用程序来利用 App Engine
for Java 的基于 Java 的持久性支持,这种支持的基础是 Java Data Objects
(JDO) 和 Java Persistence API (JPA)。
好的,不说废话了:让我们开始吧!
Google(同时也是一些搜索引擎的创建者)于 2008 年 4 月首度发布了 Google App
Engine。令许多 Java 开发人员失望的是,初始版完全只服务于 Python 程序员 ― 那些认为应该大块使用空白的人!(我曾经撰写过一本有关
Python 的书,因此我想我应该知道)。Google 响应了用户的普遍要求,于 2009 年 4 月发布了
Google App Engine for Java。
Google App Engine for Java 为企业 Java 开发提供了一个端到端解决方案:一个易于使用的基于浏览器的
Ajax GUI、Eclipse 工具支持以及后端的 Google App Engine。易于使用和工具支持是
Google App Engine for Java 优于其他云计算解决方案的两大优势。
App Engine for Java 中的应用程序开发意味着使用 Google 的资源存储和检索 Java
对象。数据存储的基础是 BigTable,但是使用的是
JDO 和 JPA 接口,这些接口允许您编写没有直接绑定到 BigTable 的代码。事实上,Google
为许多 API 提供了基于标准的支持,这样就可以编写没有全部绑定到 App Engine for Java
的代码。
App Engine for Java 依赖以下标准 Java API:
java.net.URL,检索服务(通过使用 HTTP 和 HTTPS
协议与其他主机通信) - JavaMail,发送邮件消息
- 一个通向 Memcache 的 JCache (JSR 107) 接口,提供快速、临时的分布式存储,用于缓存查询和计算
此外,App Engine for Java 为以下应用程序服务提供了支持:
- 用户身份验证和授权
- CRON
- 数据导入/导出
- 访问防火墙数据
对于将数据从其他来源移动到您的 App Engine for Java 应用程序,数据导入/导出十分重要。这也不需要绑定到
App Engine for Java。Google 的 CRON 支持基于对某个调度的内部 URL 命中率,从而使它成为不需要绑定
App Engine for Java 的出色服务。用户身份验证和授权机制是 特定于 App
Engine for Java 的,但是您可以编写一个 ServletFilter、aspect
或 Spring Security 插件,以便最小化这种紧密耦合。
如果您已经阅读了前面的内容,那么已经准备好开始构建第一个 App Engine for Java 应用程序。首先需要
安装
Google Plugin for Eclipse for App Engine for Java;安装之后,您就有了好的起点。
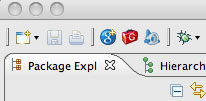
打开 Eclipse IDE,您将看到在 Eclipse IDE 中,Printer 按钮旁边出现了三个新按钮:一个
G 显示在蓝色小球中,另一个 G 显示在红色工具箱中,还有一个 App Engine
for Java 迷你喷气式飞机,如图 1 所示:
图 1. Eclipse IDE 中的新按钮

下面列出了这些按钮的功能:
- 蓝色小球让您能够访问 App Engine for Java 项目创建向导。
- 红色工具箱让您编译一个 GWT 项目。
- 迷你喷气式飞机图标让您能够部署一个 App Engine 项目。
您将使用项目创建向导创建两个新项目:一个基于 servlets,另一个使用 GWT 构建。将使用工具箱功能编译
GWT 项目。当您准备好部署 App Engine 项目时,将启动迷你喷气式分机,激活项目。
首先创建一个 App Engine for Java 项目。第一步,单击蓝色小球以访问项目创建向导。然后使用名称为
gaej.example 的包创建名为 SimpleServletApp 的应用程序,如图 2 所示:
图 2. 开始一个新项目
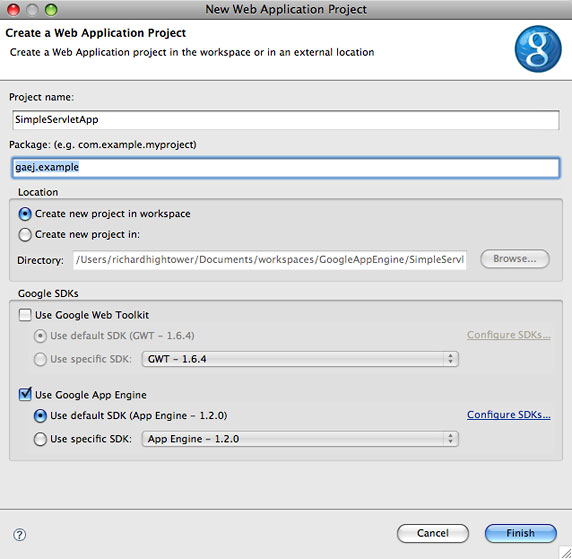
注意,对于这第一个简单示例,没有选择 GWT 支持。完成了这一步后,项目创建向导将创建一个简单的基于
servlet 的应用程序,提供了一个 Hello World 类型的 servlet。图 3 展示了这个项目的屏幕截图。
图 3. SimpleServletApp 项目
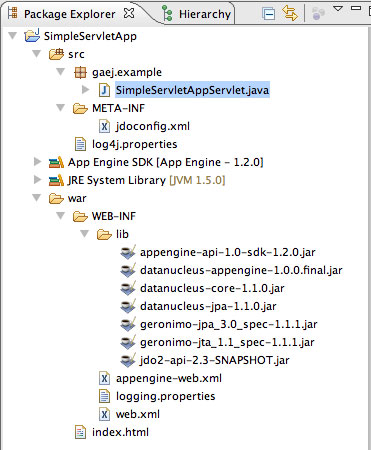
注意,这个新的基于 servlet 的项目自动包含了 JAR 文件:
- datanucleus-*.jar:用于使用标准 JDO 或低级 DataNucleus
API访问 App Engine for Java 数据库
- appengine-api-sdk.1.2.0.jar:用于使用非标准 App Engine
for Java 应用程序服务,比如 App Engine for Java Security
- geronimo-*.jar:用于使用标准 Java API,比如 Java Transaction
Management API (JTA) 和 JPA
- jdo2-api-2.3-SNAPSHOT.jar:用于使用 JDO API
在本系列 第
2 部分 中,您将了解到如何使用 App Engine for Java 的持久化 API 和
App Engine for Java 的一些应用程序服务。
还需注意用于为 Google App Engine 配置运行时容器的文件,名为 appengine.xml。在本例中,appengine.xml
用于配置 logging.properties 文件,以使用 App Engine for Java 完成登录。
App Engine
for Java servlet 应用程序初探
在项目创建向导中完成所有配置后,App Engine for Java 将向您显示一个 Hello World
风格的 servlet 应用程序的骨架。查看代码并看看如何使用 App Engine for Java
Eclipse 工具运行应用程序。该应用程序的主要入口点为 SimpleServletAppServlet,如清单
1 所示:
清单 1. SimpleServletAppServlet
package gaej.example;

import java.io.IOException;
import javax.servlet.http.*;

@SuppressWarnings("serial")
public class SimpleServletAppServlet extends HttpServlet {
    public void doGet(HttpServletRequest req, HttpServletResponse resp)
            throws IOException {
        resp.setContentType("text/plain");
        resp.getWriter().println("Hello, world");
    }
}
|
servlet 在 web.xml 中的 URI /simpleservletapp
下完成映射,如清单 2 所示:
清单 2. web.xml
<?xml version="1.0" encoding="utf-8"?>
<!DOCTYPE web-app PUBLIC
 "-//Sun Microsystems, Inc.//DTD Web Application 2.3//EN"
 "http://java.sun.com/dtd/web-app_2_3.dtd">

<web-app xmlns="http://java.sun.com/xml/ns/javaee" version="2.5">
    <servlet>
        <servlet-name>simpleservletapp</servlet-name>
        <servlet-class>gaej.example.SimpleServletAppServlet</servlet-class>
    </servlet>
    <servlet-mapping>
        <servlet-name>simpleservletapp</servlet-name>
        <url-pattern>/simpleservletapp</url-pattern>
    </servlet-mapping>
    <welcome-file-list>
        <welcome-file>index.html</welcome-file>
    </welcome-file-list>
</web-app>
|
项目创建还提供了一个 index.html 文件,包含了连接新 servlet 的链接,如清单 3 所示:
清单 3. 项目创建向导生成的 index.html
<!DOCTYPE HTML PUBLIC "-//W3C//DTD HTML 4.01 Transitional//EN">
<!-- The HTML 4.01 Transitional DOCTYPE declaration-->
<!-- above set at the top of the file will set     -->
<!-- the browser's rendering engine into           -->
<!-- "Quirks Mode". Replacing this declaration     -->
<!-- with a "Standards Mode" doctype is supported, -->
<!-- but may lead to some differences in layout.   -->

<html>
  <head>
    <meta http-equiv="content-type" content="text/html; charset=UTF-8">

    <!--                                           -->
    <!-- Any title is fine                         -->
    <!--                                           -->
    <title>Hello App Engine</title>
  </head>

  <!--                                           -->
  <!-- The body can have arbitrary html, or      -->
  <!-- you can leave the body empty if you want  -->
  <!-- to create a completely dynamic UI.        -->
  <!--                                           -->
  <body>
    <h1>Hello App Engine!</h1>

    <table>
      <tr>
        <td colspan="2" style="font-weight:bold;">Available Servlets:</td>
      </tr>
      <tr>
        <td><a href="simpleservletapp"/>SimpleServletAppServlet</td>
      </tr>
    </table>
  </body>
</html>
|
您现在已经使用了一些 Java API 构建了一个简单的 servlet 应用程序。并且重点在于:App
Engine for Java 使用标准 Java API 封装 App Engine 功能,使 App
Engine 能够支持面向 Java 平台的丰富框架。
部署应用程序
要使用 App Engine for Java Eclipse 工具运行我们的基于 servlet 的应用程序,首先右键单击该项目并选择
Run As 菜单,然后选择旁边有一个蓝色小球的 “Web Application”,如图
4 所示:
图 4. 运行 App Engine for Java
部署服务器
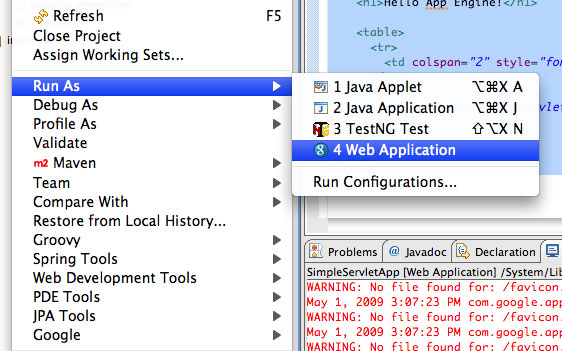
现在您应当能够在浏览器中导航到 http://localhost:8080/simpleservletapp
并看到应用程序显示出 Hello World 消息。
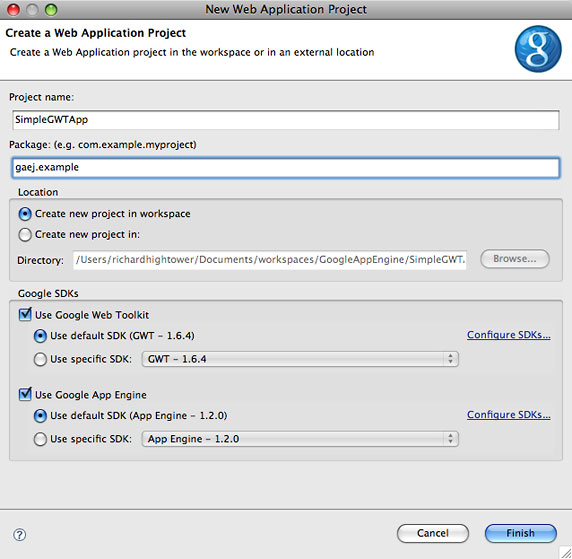
您已经了解了一个简单 App Engine for Java servlet 应用程序的工作原理,那么接下来让我们探讨一下面向
GWT 应用程序的 App Engine for Java Eclipse 工具。首先单击 Eclipse
IDE 工具栏中的蓝色小球来激活 Google 项目创建向导。这一次,选择 GWT 支持,如图 5 所示:
图 5. 使用 App Engine for Java 项目创建向导创建一个简单的
GWT 应用程序
如图 6 所示,与简单的基于 servlet 的应用程序相比,App Engine for Java
为 GWT 应用程序提供了更多的代码工件。示例应用程序是一个在 GWT 执行的 GUI,它可以与一个问候(greeting)服务应用程序通信。
图 6. 为 GWT 应用程序提供的代码工件
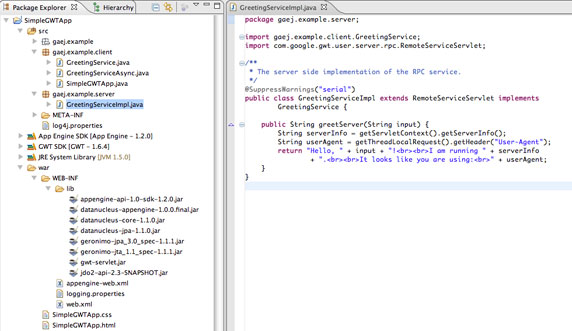
为 GWT 应用程序提供的一个额外 JAR 对于基于 servlet 的应用程序并不是必须的,这个 JAR
文件就是 gwt-servlet.jar。
其他工件包括:
- src/gaej/example:SimpleGWTApp.gwt.xml:GWT 模块描述符
- src/gaej.example.server:GreetingServiceImpl.java:问候服务的实现
- src/gaej.example.client:GreetingService.java:问候服务的同步
API
- src/gaej.example.client:GreetingServiceAsync.java:问候服务的异步
API
- src/gaej.example.client:SimpleGWTApp.java:构建启动 GUI
的主要入口点
- war/WEB-INF:web.xml:配置
GreetingServiceImpl
的部署描述符
- war:SimpleGWTApp.html:显示 GWT GUI 的 HTML 页面
- war:SimpleGWTApp.css:GWT GUI 的样式表
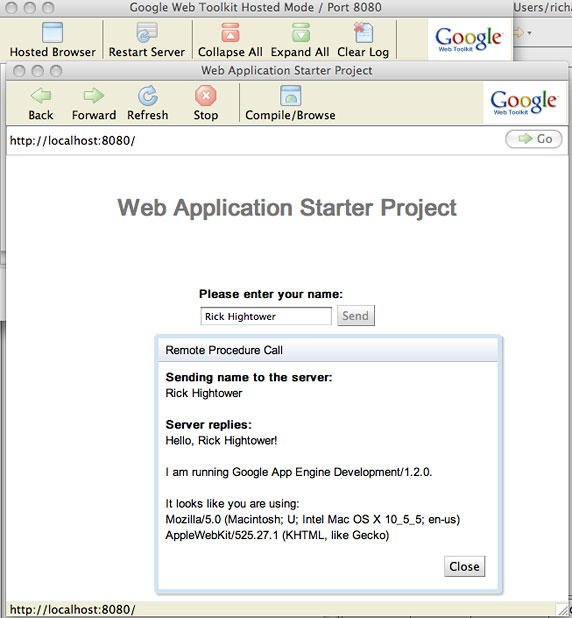
在深入研究应用程序的架构和源代码之前,看看运行它的时候会发生什么状况。要运行应用程序,单击工具栏中的红色工具箱,然后单击
Compile 按钮。现在右键单击项目并像刚才一样选择 Run As―> Web
Application 菜单项。这一次,由于您处理的是一个 GWT 应用程序,将显示一个 GWT
Hosted Mode Console 和浏览器。继续并使用 Web 应用程序输入您的名字并观察响应。我收到如图
7 所示的响应:
图 7. 运行样例 GWT 应用程序
在下一小节中,我将带领您遍历样例 GWT 应用程序。如果希望了解更多关于 GWT 的信息(或者获得 GWT
教程),请参见 参考资料。
详细了解 GWT
应用程序
根据已经提供的配置,Eclipse 的 GWT 工具创建了一个启动应用程序,包含一个 HTML 前端(SimpleGWTApp.html,如
清单 10 所示),可以加载 simplegwtapp.js
和 simplegwtapp.nocache.js。这是由 GWT 从 Java 代码中生成的 JavaScript
代码;也就是说,位于 gaej.example.client 包中的 src 目录下的代码(参见清单 6、7
和 8)。
创建 GUI 的主要入口点是 gaej.example.client.SimpleGWTApp,如
清单 8 所示。该类创建 GWT GUI 元素并将它们与
SimpleGWTApp.html 中的 HTML DOM 元素关联起来(参见 清单
10)。SimpleGWTApp.html 定义了两个 DOM 元素,分别命名为
nameFieldContainer 和 sendButtonContainer(表中的两列)。SimpleGWTApp
类使用 RootPanel.get("nameFieldContainer")
访问与这些 DOM 元素关联的面板并使用 GUI 元素替换它们。SimpleGWTApp
类随后定义一个文本框和按钮,可以使用它们输入某人的名字并发送一句问候语(参见 清单
10)。
GWT 知道 SimpleGWTApp 类是应用程序的主要入口点,因为 SimpleGWTApp.gwt.xml
使用入口点元素进行了指定。
SimpleGWTApp 封装了名为 sendButton
的按钮,这样当它被单击时,SimpleGWTApp 将对 GreetingService
调用 greetServer 方法。GreetingService
接口在 src/gaej.example.client.GreetingService.java 中被定义(参见
清单 6)。
由于 Ajax 天生就具有异步性,因此 GWT 定义了一个异步接口来访问远程服务。SimpleGWTApp
使用 src/gaej.example.client.GreetingServiceAsync.java
中定义的异步接口(参见 清单 7)。GreetingServiceImpl(src/gaej.example.server.GreetingServiceImpl.java)实现了
GreetingService 中定义的 greetServer方法(参见
清单 5)。GreetingServiceImpl.greetServer
方法返回一条问候消息 String,SimpleGWTApp 用它在所创建的对话框中显示问候消息。
GWT 模块描述符声明了 GUI 应用程序的主要入口点,即 gaej.example.client.SimpleGWTApp,如清单
4 所示:
清单 4. GWT 模块描述符(src/gaej/example/SimpleGWTApp.gwt.xml)
<?xml version="1.0" encoding="UTF-8"?>
<!DOCTYPE module PUBLIC "-//Google Inc.//DTD Google Web Toolkit 1.6.4//EN"

"http://google-web-toolkit.googlecode.com/svn/tags/1.6.4/
  distro-source/core/src/gwt-module.dtd">


<module rename-to='simplegwtapp'>
  <!-- Inherit the core Web Toolkit stuff.                        -->
  <inherits name='com.google.gwt.user.User'/>

  <!-- Inherit the default GWT style sheet.  You can change       -->
  <!-- the theme of your GWT application by uncommenting          -->
  <!-- any one of the following lines.                            -->
  <inherits name='com.google.gwt.user.theme.standard.Standard'/>
  <!-- <inherits name='com.google.gwt.user.theme.chrome.Chrome'/> -->
  <!-- <inherits name='com.google.gwt.user.theme.dark.Dark'/>     -->

  <!-- Other module inherits                                      -->

  <!-- Specify the app entry point class.                         -->
  <entry-point class='gaej.example.client.SimpleGWTApp'/>
</module>
|
GreetingServiceImpl 是问候服务应用程序的实际实现,如清单
5 所示。它运行在服务器端,并且客户机代码通过一个远程过程调用来调用它。
清单 5. greeting-service 应用程序的实现(src/gaej.example.server.GreetingServiceImpl.java)
package gaej.example.server;

import gaej.example.client.GreetingService;
import com.google.gwt.user.server.rpc.RemoteServiceServlet;

/**
 * The server side implementation of the RPC service.
 */
@SuppressWarnings("serial")
public class GreetingServiceImpl extends RemoteServiceServlet implements
        GreetingService {

    public String greetServer(String input) {
        String serverInfo = getServletContext().getServerInfo();
        String userAgent = getThreadLocalRequest().getHeader("User-Agent");
        return "Hello, " + input + "!<br><br>I am running " + serverInfo
                + ".<br><br>It looks like you are using:<br>" + userAgent;
    }
}
|
如清单 6 所示,GreetingService 是客户机代码使用的远程过程调用的接口:
清单 6. 同步 API (src/gaej.example.client.GreetingService.java)
package gaej.example.client;

import com.google.gwt.user.client.rpc.RemoteService;
import com.google.gwt.user.client.rpc.RemoteServiceRelativePath;

/**
 * The client side stub for the RPC service.
 */
@RemoteServiceRelativePath("greet")
public interface GreetingService extends RemoteService {
    String greetServer(String name);
}
|
GreetingServiceAsync 是客户机代码将使用的实际接口,如清单
7 所示。每个方法都提供了一个回调对象,这样就可以在完成远程过程调用后收到异步通知。至于内部原理,GWT
使用了 Ajax。在客户机上使用 Ajax 时,最好不要阻塞客户机,这样就不会阻塞异步调用。阻塞会违背使用
Ajax 的初衷:
清单 7. 异步 API(src/gaej.example.client.GreetingServiceAsync.java)
package gaej.example.client;

import com.google.gwt.user.client.rpc.AsyncCallback;

/**
 * The async counterpart of <code>GreetingService</code>.
 */
public interface GreetingServiceAsync {
    void greetServer(String input, AsyncCallback<String> callback);
}
|
SimpleGWTApp 中包含了最多的操作。它注册了 GUI 事件,然后将
Ajax 请求发送到 GreetingService。
清单 8. 应用程序的主入口点还构建了启动 GUI(src/gaej.example.client.SimpleGWTApp.java)
package gaej.example.client;

import com.google.gwt.core.client.EntryPoint;
import com.google.gwt.core.client.GWT;
import com.google.gwt.event.dom.client.ClickEvent;
import com.google.gwt.event.dom.client.ClickHandler;
import com.google.gwt.event.dom.client.KeyCodes;
import com.google.gwt.event.dom.client.KeyUpEvent;
import com.google.gwt.event.dom.client.KeyUpHandler;
import com.google.gwt.user.client.rpc.AsyncCallback;
import com.google.gwt.user.client.ui.Button;
import com.google.gwt.user.client.ui.DialogBox;
import com.google.gwt.user.client.ui.HTML;
import com.google.gwt.user.client.ui.Label;
import com.google.gwt.user.client.ui.RootPanel;
import com.google.gwt.user.client.ui.TextBox;
import com.google.gwt.user.client.ui.VerticalPanel;

/**
 * Entry point classes define <code>onModuleLoad()</code>.
 */
public class SimpleGWTApp implements EntryPoint {
    /**
     * The message displayed to the user when the server cannot be reached or
     * returns an error.
     */
    private static final String SERVER_ERROR = "An error occurred while "
            + "attempting to contact the server. Please check your network "
            + "connection and try again.";

    /**
     * Create a remote service proxy to talk to the server-side Greeting service.
     */
    private final GreetingServiceAsync greetingService = GWT
            .create(GreetingService.class);

    /**
     * This is the entry point method.
     */
    public void onModuleLoad() {
        final Button sendButton = new Button("Send");
        final TextBox nameField = new TextBox();
        nameField.setText("GWT User");

        // You can add style names to widgets
        sendButton.addStyleName("sendButton");

        // Add the nameField and sendButton to the RootPanel
        // Use RootPanel.get() to get the entire body element
        RootPanel.get("nameFieldContainer").add(nameField);
        RootPanel.get("sendButtonContainer").add(sendButton);

        // Focus the cursor on the name field when the app loads
        nameField.setFocus(true);
        nameField.selectAll();

        // Create the popup dialog box
        final DialogBox dialogBox = new DialogBox();
        dialogBox.setText("Remote Procedure Call");
        dialogBox.setAnimationEnabled(true);
        final Button closeButton = new Button("Close");
        // You can set the id of a widget by accessing its Element
        closeButton.getElement().setId("closeButton");
        final Label textToServerLabel = new Label();
        final HTML serverResponseLabel = new HTML();
        VerticalPanel dialogVPanel = new VerticalPanel();
        dialogVPanel.addStyleName("dialogVPanel");
        dialogVPanel.add(new HTML("<b>Sending name to the server:</b>"));
        dialogVPanel.add(textToServerLabel);
        dialogVPanel.add(new HTML("<br><b>Server replies:</b>"));
        dialogVPanel.add(serverResponseLabel);
        dialogVPanel.setHorizontalAlignment(VerticalPanel.ALIGN_RIGHT);
        dialogVPanel.add(closeButton);
        dialogBox.setWidget(dialogVPanel);

        // Add a handler to close the DialogBox
        closeButton.addClickHandler(new ClickHandler() {
            public void onClick(ClickEvent event) {
                dialogBox.hide();
                sendButton.setEnabled(true);
                sendButton.setFocus(true);
            }
        });

        // Create a handler for the sendButton and nameField
        class MyHandler implements ClickHandler, KeyUpHandler {
            /**
             * Fired when the user clicks on the sendButton.
             */
            public void onClick(ClickEvent event) {
                sendNameToServer();
            }

            /**
             * Fired when the user types in the nameField.
             */
            public void onKeyUp(KeyUpEvent event) {
                if (event.getNativeKeyCode() == KeyCodes.KEY_ENTER) {
                    sendNameToServer();
                }
            }

            /**
             * Send the name from the nameField to the server and wait for a response.
             */
            private void sendNameToServer() {
                sendButton.setEnabled(false);
                String textToServer = nameField.getText();
                textToServerLabel.setText(textToServer);
                serverResponseLabel.setText("");
                greetingService.greetServer(textToServer,
                        new AsyncCallback<String>() {
                            public void onFailure(Throwable caught) {
                                // Show the RPC error message to the user
                                dialogBox
                                        .setText("Remote Procedure Call - Failure");
                                serverResponseLabel
                                        .addStyleName("serverResponseLabelError");
                                serverResponseLabel.setHTML(SERVER_ERROR);
                                dialogBox.center();
                                closeButton.setFocus(true);
                            }

                            public void onSuccess(String result) {
                                dialogBox.setText("Remote Procedure Call");
                                serverResponseLabel
                                        .removeStyleName("serverResponseLabelError");
                                serverResponseLabel.setHTML(result);
                                dialogBox.center();
                                closeButton.setFocus(true);
                            }
                        });
            }
        }

        // Add a handler to send the name to the server
        MyHandler handler = new MyHandler();
        sendButton.addClickHandler(handler);
        nameField.addKeyUpHandler(handler);
    }
}
|
Web 部署描述符(web.xml,如清单 9 所示)将 GreetingService
映射为一个基于 servlet 的 Web 资源。它在 /simplegwtapp/greet
名称下映射 GreetingService servlet,这样 SimpleGWTApp
就可以加载它并对它发起调用。Web 部署描述符还可以将 SimpleGWTApp.html 指定为应用程序的欢迎页面,这样就会始终加载它。
清单 9. 配置 GreetingServiceImpl (war/WEB-INF/web.xml)
的部署描述符
<?xml version="1.0" encoding="UTF-8"?>
<!DOCTYPE web-app
    PUBLIC "-//Sun Microsystems, Inc.//DTD Web Application 2.3//EN"
    "http://java.sun.com/dtd/web-app_2_3.dtd">

<web-app>

  <!-- Default page to serve -->
  <welcome-file-list>
    <welcome-file>SimpleGWTApp.html</welcome-file>
  </welcome-file-list>

  <!-- Servlets -->
  <servlet>
    <servlet-name>greetServlet</servlet-name>
    <servlet-class>gaej.example.server.GreetingServiceImpl</servlet-class>
  </servlet>

  <servlet-mapping>
    <servlet-name>greetServlet</servlet-name>
    <url-pattern>/simplegwtapp/greet</url-pattern>
  </servlet-mapping>

</web-app>
|
HTML 前端为 SimpleGWTApp.html,如清单 10 所示。这是加载 simplegwtapp.js
和 simplegwtapp.nocache.js 的页面,是由 GWT 从 Java 代码中生成的 JavaScript
代码。如前所述,这段代码位于 gaej.example.client 包的 src 目录中(来自清单 6、7
和 8)。
清单 10. 显示 GWT GUI (war/SimpleGWTApp.html)
的 HTML 页面
<!DOCTYPE HTML PUBLIC "-//W3C//DTD HTML 4.01 Transitional//EN">
<!-- The HTML 4.01 Transitional DOCTYPE declaration-->
<!-- above set at the top of the file will set     -->
<!-- the browser's rendering engine into           -->
<!-- "Quirks Mode". Replacing this declaration     -->
<!-- with a "Standards Mode" doctype is supported, -->
<!-- but may lead to some differences in layout.   -->

<html>
  <head>
    <meta http-equiv="content-type" content="text/html; charset=UTF-8">

    <!--                                                               -->
    <!-- Consider inlining CSS to reduce the number of requested files -->
    <!--                                                               -->
    <link type="text/css" rel="stylesheet" href="SimpleGWTApp.css">

    <!--                                           -->
    <!-- Any title is fine                         -->
    <!--                                           -->
    <title>Web Application Starter Project</title>

    <!--                                           -->
    <!-- This script loads your compiled module.   -->
    <!-- If you add any GWT meta tags, they must   -->
    <!-- be added before this line.                -->
    <!--                                           -->
    <script type="text/javascript" language="javascript"
  src="simplegwtapp/simplegwtapp.nocache.js"></script>
  </head>

  <!--                                           -->
  <!-- The body can have arbitrary html, or      -->
  <!-- you can leave the body empty if you want  -->
  <!-- to create a completely dynamic UI.        -->
  <!--                                           -->
  <body>

    <!-- OPTIONAL: include this if you want history support -->
    <iframe src="javascript:''" id="__gwt_historyFrame" tabIndex='-1'
  style="position:absolute;width:0;height:0;border:0"></iframe>

    <h1>Web Application Starter Project</h1>

    <table align="center">
      <tr>
        <td colspan="2" style="font-weight:bold;">Please enter your name:</td>
      </tr>
      <tr>
        <td id="nameFieldContainer"></td>
        <td id="sendButtonContainer"></td>
      </tr>
    </table>
  </body>
</html>
|
使用 GWT,您可以通过 CSS 控制应用程序的观感,如清单 11 所示:
清单 11. GWT GUI (war/SimpleGWTApp.css)
的样式表
/** Add css rules here for your application. */


/** Example rules used by the template application (remove for your app) */
h1 {
  font-size: 2em;
  font-weight: bold;
  color: #777777;
  margin: 40px 0px 70px;
  text-align: center;
}

.sendButton {
  display: block;
  font-size: 16pt;
}

/** Most GWT widgets already have a style name defined */
.gwt-DialogBox {
  width: 400px;
}

.dialogVPanel {
  margin: 5px;
}

.serverResponseLabelError {
  color: red;
}

/** Set ids using widget.getElement().setId("idOfElement") */
#closeButton {
  margin: 15px 6px 6px;
}
|
创建了下一代杀手级应用程序后(因为我们确实需要一个用户友好的问候应用程序),您需要部署它。使用 Google
App Engine 的重点就是可以将应用程序部署到 Google 提供的可靠基础设施中,使它更易于扩展。Google
App Engine 的设计初衷就是为构建可伸缩应用程序提供一个平台,可伸缩应用程序就是指 “能够在不触动基础设施的情况下将用户轻松增长到数百万”(正如
App Engine 主页中描述的那样)。为使用这种基础设施,您需要一个 Google
App Engine for Java 帐户。
就像许多其他产品一样,第一次体验总是免费的。App Engine for Java 的免费版提供了一个已部署的应用程序,提供了足够的
CPU、带宽和存储来为 500 万个页面访问次数提供服务。超过使用次数开始收费(同样需要注意,在撰写本文时可以获得
App Engine for Java 平台的预览版)。
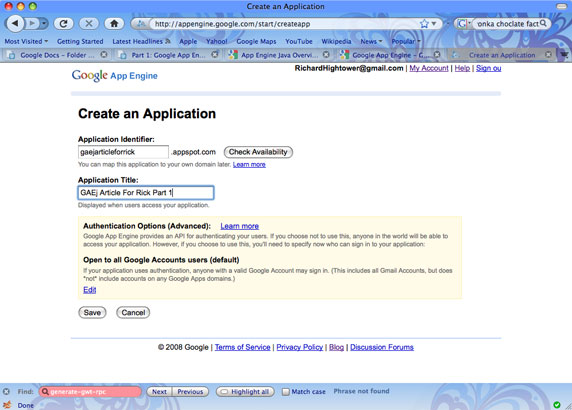
获得帐户之后,您应该可以在 App Engine for Java
站点 看到一个空的应用程序列表。单击 Create New Application
按钮,应当出现一个如图 8 所示的表单。输入一个独特的应用程序名称和描述,之后您将看到一条显示有应用程序标识符的确认消息。
该标识符也位于应用程序的 app.yaml 文件中。注意,该标识符不可修改。如果对您的应用程序使用 Google
身份验证,那么在访问应用程序时,“GAEj Article For Rick Part 1” 将显示在
Sign In 页面中。您将使用 gaejarticleforrick 和 App
Engine for Java Eclipse 插件来将应用程序部署到 Google App Engine。
图 8. 创建一个新的 App Engine for Java
应用程序
设置好应用程序 ID 后,可以从 Eclipse 中部署您的应用程序。首先,单击看上去类似 Google
App Engine 徽标的工具栏按钮(显示机翼和尾翼的喷气式发动机),如图 9 所示:
图 9. App Engine for Java Eclipse
插件
在单击图 10 所示的对话框中的 Deploy 之前,可能需要确保 App Engine
for Java 项目被选中。将要求您输入 Google 凭证,即您的电子邮件地址和用户名。
图 10. 部署项目
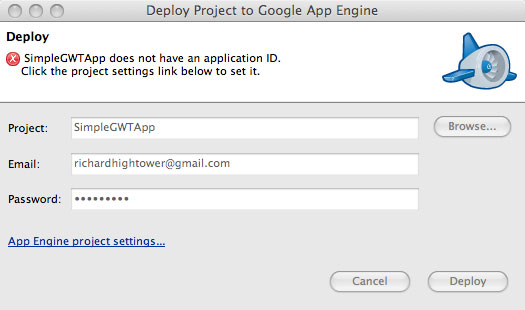
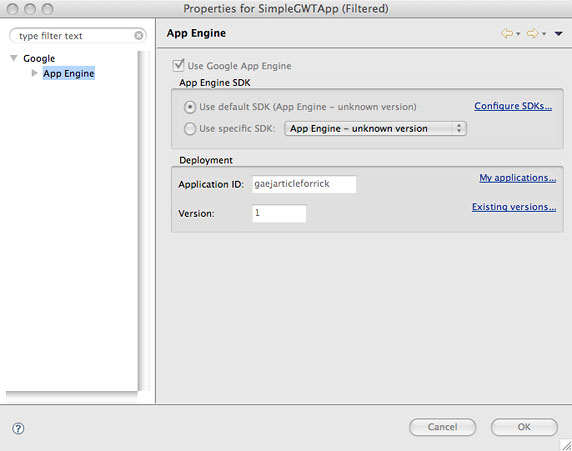
图 10 中的对话框包含一个 “App Engine Project setting” 链接。单击此链接(也可以从项目设置文件访问)并输入应用程序
ID(在本例中为 gaejarticleforrick),如图 11 所示。填充好应用程序
ID 后,单击 OK,然后单击 Deploy。
图 11. Google App Engine 的项目设置
部署完应用程序后,该应用程序可以通过 http://<application id>.appspot.com/
访问。您还会看到应用程序出现在
http://gaejarticleforrick.appspot.com/ 中。
Google App Engine for Java 系列的第一部分到此结束。至此,您已经大致了解了
App Engine for Java 是什么,并通过使用 App Engine for Java Google
Plugin for Eclipse 迈出了第一步。您创建了两个启动应用程序(一个基于 servlet,另一个基于
GWT)并随后将 GWT 应用程序部署到 Google App Engine 平台。
本文的示例到目前为止演示了可以更轻松地创建和部署基于 Java 的应用程序的工具和功能 ― 这些应用程序有可能扩展到
YouTube 或 Facebook 那样的规模。在 第
2 部分 中,您将继续为 Java 开发人员介绍使用 App Engine for Java 的机会。从本文演示的示例应用程序出发,您将构建一个定制的联系人管理应用程序。该应用程序将成为第
3 部分的中心内容,第 3 部分将进一步了解 App Engine for Java 的数据存储及其 GUI
前端。
学习
获得产品和技术
讨论
| 