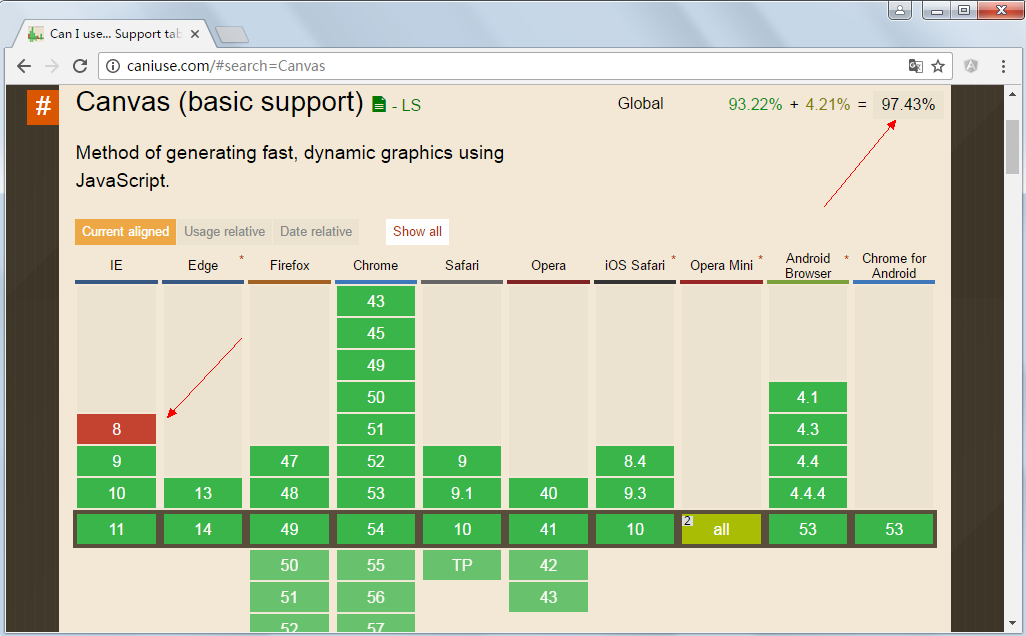
| БрМЭЦМі: |
| БОЮФРДздгкВЉПЭ
,БОЮФНщЩмСЫcanvasЛцжЦЭМЯёЮФзжЁЂWebGL HTML5гЮЯЗПЊЗЂЁЂSVGМАгІгУЪЕР§ЁЃ |
|
вЛЁЂCanvas
canvasЪЧHTML5жааТдівЛИіHTML5БъЧЉгыВйзїcanvasЕФjavascript APIЃЌЫќПЩвдЪЕЯждкЭјвГжаЭъГЩЖЏЬЌЕФ2Dгы3DЭМЯёММЪѕЁЃ<canvas> БъМЧКЭ SVGвдМА VML жЎМфЕФвЛИіживЊЕФВЛЭЌЪЧЃЌ<canvas> гавЛИіЛљгк JavaScript ЕФЛцЭМ APIЃЌЖј SVG КЭ VML ЪЙгУвЛИі XML ЮФЕЕРДУшЪіЛцЭМЁЃSVG ЛцЭМКмШнвзБрМгыЩњГЩЃЌЕЋЙІФмУїЯдвЊШѕвЛаЉЁЃ
canvasПЩвдЭъГЩЖЏЛЁЂгЮЯЗЁЂЭМБэЁЂЭМЯёДІРэЕШдРДашвЊFlashЭъГЩЕФвЛаЉЙІФмЁЃ
фЏРРЦїжЇГжЧщПіШчЯТЃК
1.1ЁЂДДНЈcanvasдЊЫи
<canvas id="can" width="800" height="600">ВЛжЇГжCanvas</canvas>
вдЩЯДњТыДДНЈСЫвЛИіПэЖШЮЊ800ЯёЫиЃЌИпЖШЮЊ600ЯёЫиЕФcanvasЁЃВЛНЈвщЪЙгУCSSбљЪНжИЖЈПэЖШКЭИпЖШЁЃ
canvasБъЧЉжаМфЕФФкШнЮЊЬцДњЯдЪОФкШнЃЌЕБфЏРРЦїВЛжЇГжcanvasБъЧЉЪБЛсЯдЪОГіРДЁЃ
ДДНЈСЫcanvasдЊЫиКѓЃЌвЊдкcanvasдЊЫиЩЯУцЛцжЦЭМЯѓЃЌЪзЯШБиаыЛёШЁcanvasЛЗОГЩЯЯТЮФЃК
canvas.getContext(ЛВМЩЯЛцжЦЕФРраЭ)
2dЃК БэЪО2ЮЌ
experimental-webglЃК БэЪОЪдбщАц3ЮЌ
webglЃКБэЪО3ЮЌ
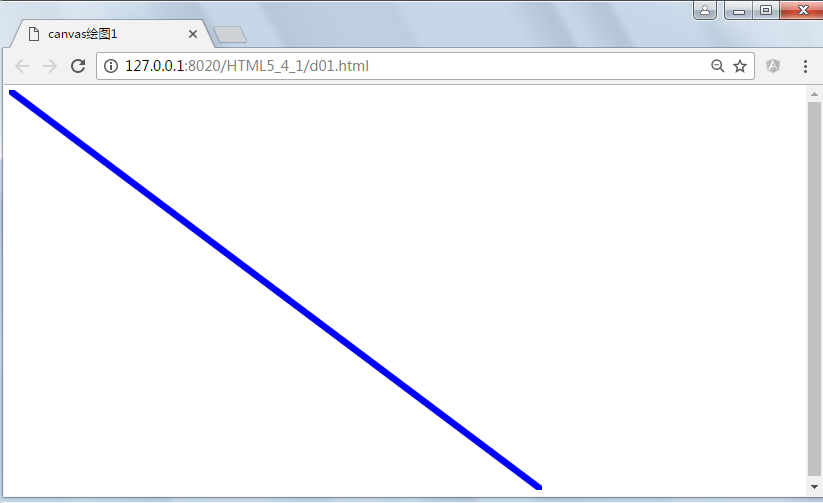
Hello WolrdЪОР§ДњТыЃК
<!DOCTYPE html>
<html>
<head>
<meta charset="UTF-8">
<title>canvasЛцЭМ1</title>
</head>
<body>
<canvas id="canvas1" width="800" height="600"></canvas>
<script type="text/javascript">
//ЛёЕУЛВМдЊЫи
var canvas1=document.getElementById("canvas1");
//ЛёЕУ2ЮЌЛцЭМЕФЩЯЯТЮФ
var ctx=canvas1.getContext("2d");
//ЩшжУЯпПэ
ctx.lineWidth=10;
//ЩшжУЯпЕФбеЩЋ
ctx.strokeStyle="blue";
//НЋЛБЪвЦЖЏЕН00Еу
ctx.moveTo(0,0);
//ЛЯпЕН800ЃЌ600ЕФзјБъ
ctx.lineTo(800,600);
//жДааЛЯп
ctx.stroke();
</script>
</body>
</html> |
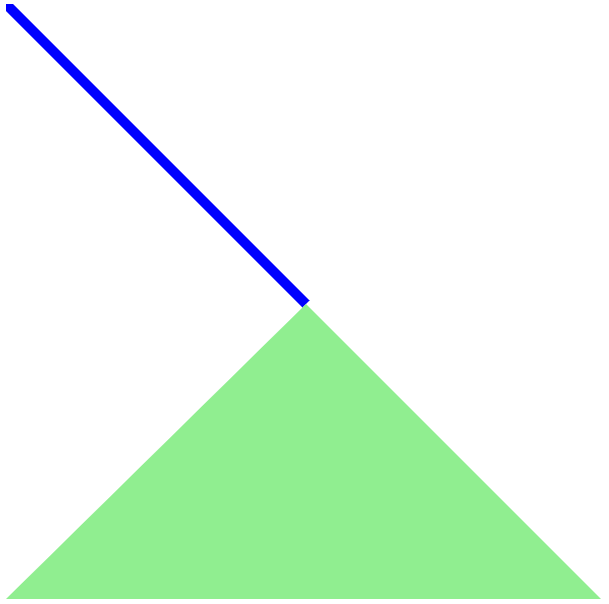
дЫаааЇЙћЃК
дквГУцЩЯОЭЯдЪОСЫвЛЬѕжБЯпЃЌСэДцЮЊКѓОЭЪЧвЛеХБГОАЭИУїЕФpngЭМЦЌЁЃ
СЗЯАЃКЛвЛИі100X100ЕФе§ЗНаЮдкЛВМе§жабы
1.2ЁЂЛЯп
context.moveTo(x,y)
АбЛБЪвЦЖЏЕНx,yзјБъЃЌНЈСЂаТЕФзгТЗОЖЁЃ
context.lineTo(x,y)
НЈСЂЩЯвЛИіЕуЕНx,yзјБъЕФжБЯпЃЌШчЙћУЛгаЩЯвЛИіЕуЃЌдђЕШЭЌгкmoveTo(x,y)ЃЌАбЃЈx,yЃЉЬэМгЕНзгТЗОЖжаЁЃ
context.stroke()
УшЛцзгТЗОЖ
//ЩшжУЯпПэ
ctx.lineWidth = 10;
//ЩшжУЯпЕФбеЩЋ
ctx.strokeStyle = "blue";
//НЋЛБЪвЦЕНx0,y0ДІ
context.moveTo(x0, y0);
//Дгx0,y0ЕНx1,y1ЛвЛЬѕЯп
ontext.lineTo(x1, y1);
//Дгx1,y1ЕНx2,y2ЛЬѕЯп
ontext.lineTo(x2, y2);
//жДааЬюГф
ontext.fill();
//жДааЛЯп
context.stroke(); |
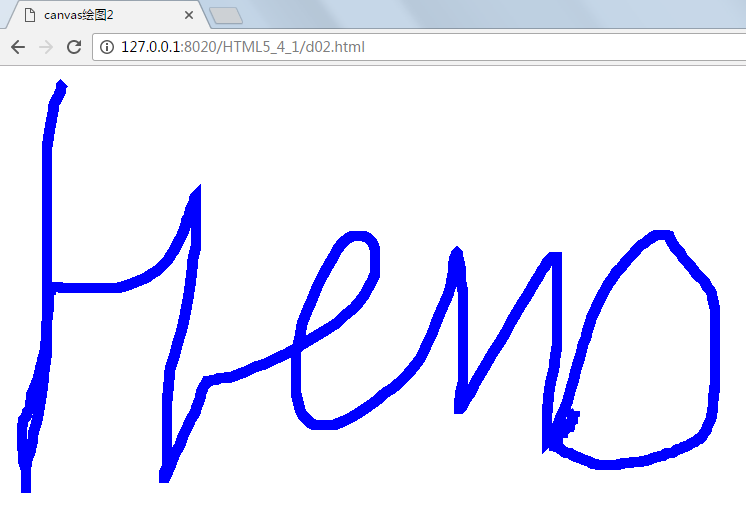
НсКЯjavascriptЪТМўЪЕЯжЪѓБъздгЩЛЎЯпЃК
<!DOCTYPE html>
<html>
<head>
<meta charset="UTF-8">
<title>canvasЛцЭМ2</title>
</head>
<body>
<canvas id="canvas1" width="800" height="600"></canvas>
<script type="text/javascript">
//ЛёЕУЛВМдЊЫи
var canvas1 = document.getElementById("canvas1");
//ЛёЕУ2ЮЌЛцЭМЕФЩЯЯТЮФ
var ctx = canvas1.getContext("2d");
//ЩшжУЯпПэ
ctx.lineWidth = 10;
//ЩшжУЯпЕФбеЩЋ
ctx.strokeStyle = "blue";
canvas1.onmousemove=function(e){
//ЛЎЯпЕНЕБЧАПЭЛЇЖЫЕФxгыyзљБъ
ctx.lineTo(e.clientX, e.clientY);
//жДааЛЯп
ctx.stroke();
}
</script>
</body>
</html> |
дЫаааЇЙћЃК
вЦЖЏЪжЛњЖЫЃК
<!DOCTYPE html>
<html>
<head>
<meta charset="utf-8">
<title></title>
<meta name="viewport" content="width=device-width,initial-scale=1,minimum-scale=1,maximum-scale=1,user-scalable=no" />
<script>
var canvas1;
var ctx;
var width;
var height;
var msg;
window.onload = function() {
canvas1 = document.getElementById("canvas1");
msg = document.getElementById("msg");
ctx = canvas1.getContext("2d");
width = canvas1.width;
height = canvas1.height;
ctx.fillRect(0, 0, width, height);
ctx.moveTo(0, 0);
ctx.lineTo(100, 100);
ctx.strokeStyle = "red";
ctx.lineWidth = 2;
ctx.stroke();
canvas1.onmousemove = function(e) {
ctx.lineTo(e.clientX, e.clientY);
ctx.stroke();
}
canvas1.ontouchmove = function(e) {
e.preventDefault();
var touchE=e.targetTouches[0]
msg.innerHTML += touchE.clientX+"ЃЌ"+touchE.clientY+ "<br/>";
ctx.lineTo(touchE.clientX, touchE.clientY);
ctx.stroke();
}
canvas1.ontouchstart = function() {
msg.innerHTML += "ontouchstart" + "<br/>";
}
canvas1.ontouchend = function() {
msg.innerHTML += "ontouchend" + "<br/>";
}
}
</script>
</head>
<body>
<canvas id="canvas1" width="500" height="500">ВЛжЇГж</canvas>
<div id="msg"></div>
</body>
</html> |
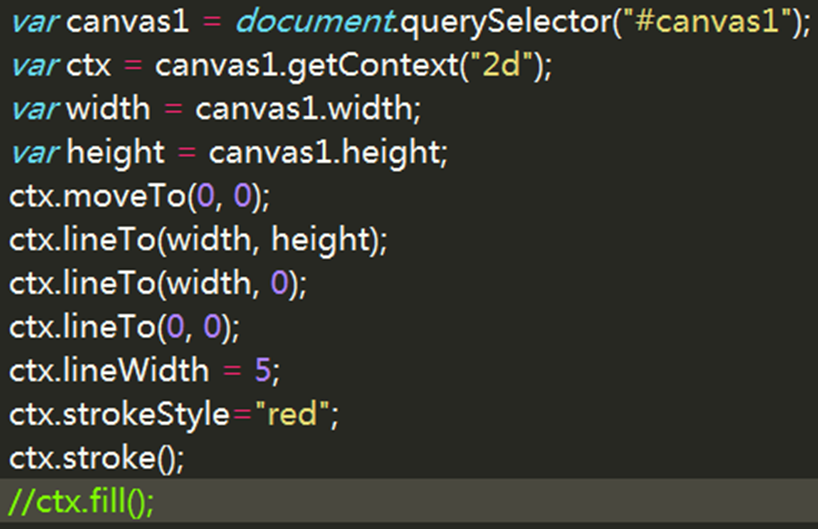
1.2.1ЁЂТЗОЖгыclosePathЃЌbeginPath,fill
canvasЕФЛЗОГЩЯЯТЮФжазмгаЮЈвЛвЛИіТЗОЖЃЌТЗОЖАќКЌЖрИізгТЗОЖЃЌетаЉзгТЗОЖПЩвдПДГЩЪЧвЛЯЕСаЕуЕФМЏКЯЁЃ
beginPath()
ЧхПезгТЗОЖЃЌвЛАугУгкПЊЪМТЗОЖЕФДДНЈЁЃдкМИДЮбЛЗЕиДДНЈТЗОЖЕФЙ§ГЬжаЃЌУПДЮПЊЪМДДНЈЪБЖМвЊЕїгУbeginPathКЏЪ§ЁЃ
closePath()
ШчЙћЕБЧАзгТЗОЖЪЧДђПЊЕФЃЌОЭЙиБеЫќЁЃЗёдђАбзгТЗОЖжаЕФзюКѓвЛИіЕуКЭТЗОЖжаЕФЕквЛИіЕуСЌНгЦ№РДЃЌаЮГЩБеКЯЛиТЗЁЃ
canvasЛцЭМгаСНжжФЃЪНЃЌвЛжжЪЧfillЃЌвЛжжЪЧstroke,fillЪЧЬюГфЃЌstrokeЪЧУшБпЯпЃЌfillstyle,strokeStyleжИЖЈЛцЭМбљЪН
ЪОР§ДњТыЃК
<!DOCTYPE html>
<html>
<head>
<meta charset="UTF-8">
<title>ТЗОЖгыclosePathЃЌbeginPath,fill</title>
</head>
<body>
<canvas id="canvas1" width="600" height="600"></canvas>
<script type="text/javascript">
//ЛёЕУЛВМдЊЫи
var canvas1 = document.getElementById("canvas1");
//ЛёЕУ2ЮЌЛцЭМЕФЩЯЯТЮФ
var ctx = canvas1.getContext("2d");
//ЩшжУЯпПэ
ctx.lineWidth = 10;
//ЩшжУЯпЕФбеЩЋ
ctx.strokeStyle = "blue";
ctx.moveTo(0,0); //вЦЖЏЛБЪЕН0,0Еу
ctx.lineTo(300,300); //ЛЯпЕН300,300ЕФЮЛжУ
ctx.stroke(); //жДааУшБп
ctx.beginPath(); //ЧхПезгТЗОЖЃЌвЛАугУгкПЊЪМТЗОЖЕФДДНЈ
ctx.strokeStyle = "red";
ctx.moveTo(300,300);
ctx.lineTo(0,595); //ЛЯпЕН0,300ЕФЮЛжУ
ctx.lineTo(595,595); //ЛЯпЕНгвЯТНЧ
ctx.closePath(); //БеКЯ
//ctx.stroke(); //жДааУшБп
ctx.fillStyle="lightgreen"; //ЩшжУЬюГфбеЩЋ
ctx.fill(); //жДааЬюГф
</script>
</body>
</html> |
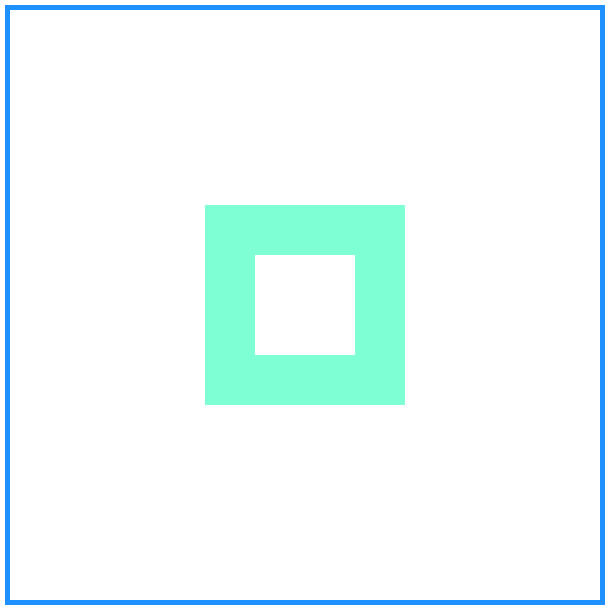
дЫаааЇЙћЃК
СЗЯАЃКЪдзХЭъГЩвЛИіЯѓЦхЛђЮЇЦхЦхХЬЁЃ
1.3ЁЂЛцжЦОиаЮ
context.strokeRect(x,y,width,height)
вдx,yЮЊзѓЩЯНЧЃЌЛцжЦПэЖШЮЊwidth,ИпЖШЮЊheightЕФОиаЮЁЃ
context.fillRect(x,y,width,height)
вдx,yЮЊзѓЩЯНЧЃЌЬюГфПэЖШЮЊwidth,ИпЖШЮЊheightЕФОиаЮЁЃ
context.clearRect(x,y,width,height)
ЧхГ§вдx,yЮЊзѓЩЯНЧЃЌПэЖШЮЊwidth,ИпЖШЮЊheightЕФОиаЮЧјгђЁЃ
ЪОР§ДњТыЃК
<!DOCTYPE html>
<html>
<head>
<meta charset="UTF-8">
<title>ЛцжЦОиаЮ</title>
</head>
<body>
<canvas id="canvas1" width="600" height="600"></canvas>
<script type="text/javascript">
//ЛёЕУЛВМдЊЫи
var canvas1 = document.getElementById("canvas1");
//ЛёЕУ2ЮЌЛцЭМЕФЩЯЯТЮФ
var ctx = canvas1.getContext("2d");
//ЩшжУЯпПэ
ctx.lineWidth = 10;
//ЩшжУЯпЕФбеЩЋ
ctx.strokeStyle ="dodgerblue";
//ЛвЛИіПеаФЕФОиаЮЃЌ
ctx.strokeRect(0,0,600,600);
//ЛвЛИіЪЕаФОиаЮ
ctx.fillStyle="aquamarine";
ctx.fillRect(200,200,200,200);
//ЧхГ§жИЖЈЕФОиаЮЧјгђ
ctx.clearRect(250,250,100,100);
</script>
</body>
</html>
|
дЫаааЇЙћЃК
1.4ЁЂЛцжЦдВЛЁ
context.arc(x,y,radius ,startAngle,endAngle ,anticlockwise)
arcЗНЗЈгУРДЛцжЦвЛЖЮдВЛЁТЗОЖЃЌвд(x,y)дВаФЮЛжУradiusЮЊАыОЖЁЂstartAngleЮЊЦ№ЪМЛЁЖШЁЂendAngleЮЊжежЙЛЁЖШРДЃЌЖјдкЛдВЛЁЪБЕФа§зЊЗНЯђдђгЩзюКѓвЛИіВЮЪ§ anticlockwise РДжИЖЈЃЌШчЙћЮЊ true ОЭЪЧФцЪБеыЃЌfalse дђЮЊЫГЪБеыЃЌMath.PI * 2 ИеКУЮЊвЛжмЁЃ
ЪОР§ДњТыЃК
<!DOCTYPE html>
<html>
<head>
<meta charset="UTF-8">
<title>ЛцжЦдВЛЁ</title>
</head>
<body>
<canvas id="canvas1" width="600" height="600"></canvas>
<script type="text/javascript">
//ЛёЕУЛВМдЊЫи
var canvas1 = document.getElementById("canvas1");
//ЛёЕУ2ЮЌЛцЭМЕФЩЯЯТЮФ
var ctx = canvas1.getContext("2d");
//ЩшжУЯпПэ
ctx.lineWidth = 10;
//ЩшжУЯпЕФбеЩЋ
ctx.strokeStyle ="dodgerblue";
//ЛвЛЖЮдВЛЁ,300,300ЪЧдВаФЃЌ200ЪЧАыОЖЃЌ0ЪЧГЌЪМНЧЖШЃЌMath.PIЪЧНсЪјНЧЖШ,ЪЧЗёФцЪБжг
ctx.arc(300,300,200,0,Math.PI,false);
//БеКЯ
ctx.closePath();
ctx.stroke();
ctx.beginPath();
ctx.fillStyle="aquamarine";
ctx.arc(300,300,100,0,Math.PI*2,false);
ctx.fill();
</script>
</body>
</html>
|
дЫаааЇЙћЃК

СЗЯАЃК
aЁЂФЃФтжгБэЕФЪБЃЌЗжЃЌУы
bЁЂФЃФтЫЎВЈЃЌвЛИіКкЩЋЕФЦСФЛЃЌЖрИіДгжааФЫцЛњВњЩњВЪЩЋЕФШІВЛЖЯЕФЗХДѓЃЌНгДЅЕНЦСФЛНсЪјЁЃ
1.5ЁЂЛцжЦЭМЯё
context.drawImage(image,x,y)
АбimageЭМЯёЛцжЦЕНЛВМЩЯx,yзјБъЮЛжУЁЃ
context.drawImage(image,x,y,w,h)
АбimageЭМЯёЛцжЦЕНЛВМЩЯx,yзјБъЮЛжУЃЌЭМЯёЕФПэЖШЪЧw,ИпЖШЪЧhЁЃ
context.drawImage(image,sx,sy,sw,sh,dx,dy,dw,dh)
НиШЁimageЭМЯёвдsx,syЮЊзѓЩЯНЧзјБъЃЌПэЖШЮЊsw,ИпЖШЮЊshЕФвЛПщОиаЮЧјгђЛцжЦЕНЛВМЩЯвдdx,dyзјБъЮЛжУЃЌЭМЯёПэЖШЪЧdw,ИпЖШЪЧdhЁЃ
ЦфжаimageПЩвдЪЧhtmlImageElementдЊЫиЃЌhtmlcanvasElementдЊЫиЃЌhtmlVideoElementдЊЫи
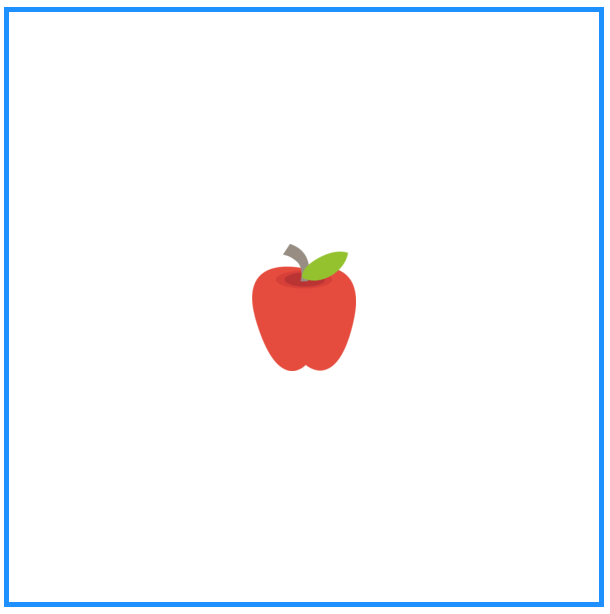
ЪОР§ДњТыЃК
<!DOCTYPE html>
<html>
<head>
<meta charset="UTF-8">
<title>ЛцжЦЭМЯё</title>
</head>
<body>
<canvas id="canvas1" width="600" height="600"></canvas>
<img src="img/apple.png" id="apple" hidden="hidden" />
<script type="text/javascript">
//БиаыЕБвГУцжаЕФЭМЦЌзЪдДМгдиГЩЙІ
window.onload = function() {
//ЛёЕУЛВМдЊЫи
var canvas1 = document.getElementById("canvas1");
//ЛёЕУ2ЮЌЛцЭМЕФЩЯЯТЮФ
var ctx = canvas1.getContext("2d");
//ЩшжУЯпПэ
ctx.lineWidth = 10;
//ЩшжУЯпЕФбеЩЋ
ctx.strokeStyle = "dodgerblue";
ctx.moveTo(0,0);
ctx.strokeRect(0,0,600,600);
//ЭМЦЌ
var apple = document.getElementById("apple");
//НЋЭМЯёЛцжЦЕНЛВМЕФЃЌЭМЦЌЕФзѓЩЯНЧ
ctx.drawImage(apple, 300-52, 300-63);
}
</script>
</body>
</html>
|
дЫаааЇЙћЃК
1.6ЁЂЛцжЦЮФзж
context.fillText(text,x,y,[maxWidth])
дкcanvasЩЯЬюГфЮФзжЃЌtextБэЪОашвЊЛцжЦЕФЮФзжЃЌx,yЗжБ№БэЪОЛцжЦдкcanvasЩЯЕФКсЃЌзнзјБъЃЌзюКѓвЛИіВЮЪ§ПЩбЁЃЌБэЪОЯдЪОЮФзжЕФзюДѓПэЖШЃЌЗРжЙЮФзжЯдЪОвчГіЁЃ
context.strokeText(text,x,y,[maxWidth])
дкcanvasЩЯУшБпЮФзжЃЌВЮЪ§ЕФвтвхЭЌfillText
ЪЙгУcontext.fontЪєадЩшжУзжЬх
context.font='italic bolder 48px КкЬх';
ЪОР§ДњТыЃК
<!DOCTYPE html>
<html>
<head>
<meta charset="UTF-8">
<title>ЛцжЦЮФзж</title>
</head>
<body>
<canvas id="canvas1" width="600" height="600"></canvas>
<img src="img/apple.png" id="apple" hidden="hidden" />
<script type="text/javascript">
//БиаыЕБвГУцжаЕФЭМЦЌзЪдДМгдиГЩЙІ
window.onload = function() {
//ЛёЕУЛВМдЊЫи
var canvas1 = document.getElementById("canvas1");
//ЛёЕУ2ЮЌЛцЭМЕФЩЯЯТЮФ
var ctx = canvas1.getContext("2d");
//ЩшжУЯпПэ
ctx.lineWidth = 1;
//ЩшжУЯпЕФбеЩЋ
ctx.strokeStyle = "dodgerblue";
ctx.moveTo(0,0);
ctx.strokeRect(0,0,600,600);
//ЛцжЦЮФзж
//УшБп
ctx.font="50px microsoft yahei";
ctx.strokeText("Hello Zhangguo",20,100);
//ЬюГф
ctx.fillStyle=
ctx.fillText("Hello Zhangguo",20,200);
}
</script>
</body>
</html>
|
дЫааНсЙћЃК

1.7ЁЂЫцЛњбеЩЋгыМђЕЅЖЏЛ
жївЊНсКЯЫцЛњЗНЗЈгыЖЈЪБЦїЁЂЪБжгЪЕЯжМђЕЅЕФЖЏЛЁЃ
<!DOCTYPE html>
<html>
<head>
<meta charset="UTF-8">
<title>ЫцЛњбеЩЋгыМђЕЅЖЏЛ</title>
</head>
<body>
<canvas id="canvas1" width="1000" height="650"></canvas>
<img src="img/apple.png" id="apple" hidden="hidden" />
<script type="text/javascript">
var magicCircle = {
randomColor: function() {
return "#" + parseInt(Math.random() * 16777216).toString(16);
},
getNum: function(min, max) {
return parseInt(Math.random() * (max - min)) + min;
},
r: 10,
run: function() {
//ЛёЕУЛВМдЊЫи
this.canvas1 = document.getElementById("canvas1");
//ЛёЕУ2ЮЌЛцЭМЕФЩЯЯТЮФ
this.ctx = this.canvas1.getContext("2d");
//дЫаа
setInterval(this.draw, 100);
this.bindEvent();
},
draw: function() {
magicCircle.ctx.beginPath();
magicCircle.ctx.lineWidth = magicCircle.getNum(1,10);
magicCircle.ctx.strokeStyle = magicCircle.randomColor();
magicCircle.ctx.arc(magicCircle.getNum(1,1000), magicCircle.getNum(1,600), magicCircle.r, 0, Math.PI * 2);
magicCircle.ctx.stroke();
magicCircle.r += 10;
if(magicCircle.r > 300) magicCircle.r = 10;
},
bindEvent:function()
{
this.canvas1.onmousemove=function(e){
magicCircle.ctx.lineWidth = magicCircle.getNum(1,10);
magicCircle.ctx.strokeStyle = magicCircle.randomColor();
magicCircle.ctx.arc(e.clientX, e.clientY, magicCircle.r, 0, Math.PI * 2);
magicCircle.ctx.stroke();
magicCircle.r += 10;
if(magicCircle.r > 300) magicCircle.r = 10;
}
}
};
magicCircle.run();
</script>
</body>
</html>
|
дЫаааЇЙћЃК
ЖўЁЂWebGL
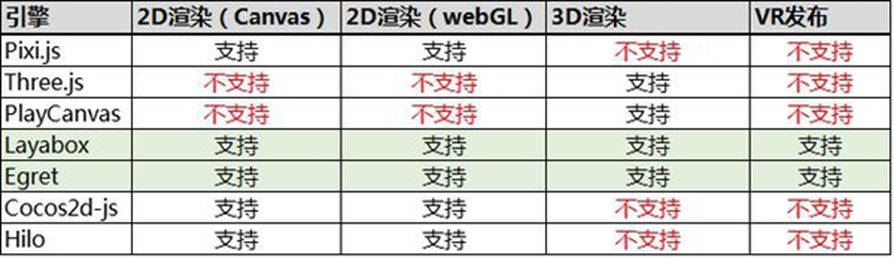
WebGLЃЈШЋаДWeb Graphics LibraryЃЉЪЧвЛжж3DЛцЭМБъзМЃЌетжжЛцЭМММЪѕБъзМдЪаэАбJavaScriptКЭOpenGL ES 2.0НсКЯдквЛЦ№ЃЌЭЈЙ§діМгOpenGL ES 2.0ЕФвЛИіJavaScriptАѓЖЈЃЌWebGLПЩвдЮЊHTML5 CanvasЬсЙЉгВМў3DМгЫйфжШОЃЌетбљWebПЊЗЂШЫдБОЭПЩвдНшжњЯЕЭГЯдПЈРДдкфЏРРЦїРяИќСїГЉЕиеЙЪО3DГЁОАКЭФЃаЭСЫЃЌЛЙФмДДНЈИДдгЕФЕМКНКЭЪ§ОнЪгОѕЛЏЁЃЯдШЛЃЌWebGLММЪѕБъзМУтШЅСЫПЊЗЂЭјвГзЈгУфжШОВхМўЕФТщЗГЃЌПЩБЛгУгкДДНЈОпгаИДдг3DНсЙЙЕФЭјеОвГУцЃЌЩѕжСПЩвдгУРДЩшМЦ3DЭјвГгЮЯЗЕШЕШЁЃ
WebGLЭъУРЕиНтОіСЫЯжгаЕФWebНЛЛЅЪНШ§ЮЌЖЏЛЕФСНИіЮЪЬтЃК
ЕквЛЃЌЫќЭЈЙ§HTMLНХБОБОЩэЪЕЯжWebНЛЛЅЪНШ§ЮЌЖЏЛЕФжЦзїЃЌЮоашШЮКЮфЏРРЦїВхМўжЇГж;
ЕкЖўЃЌЫќРћгУЕзВуЕФЭМаЮгВМўМгЫйЙІФмНјааЕФЭМаЮфжШОЃЌЪЧЭЈЙ§ЭГвЛЕФЁЂБъзМЕФЁЂПчЦНЬЈЕФOpenGLНгПкЪЕЯжЕФЁЃ
ЭЈЫзЫЕWebGLжаcanvasЛцЭМжаЕФ3DАцБОЁЃвђЮЊдЩњЕФWebGLКмИДдгЃЌЮвУЧОГЃЛсЪЙгУвЛаЉШ§ЗНЕФПтЃЌШчthree.jsЕШЃЌетаЉПтЖрЪ§гУгкHTML5гЮЯЗПЊЗЂЁЃ
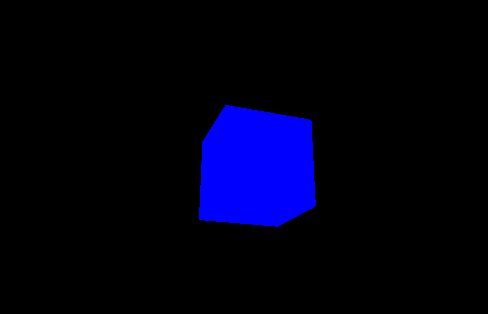
Three.jsЕФЪОР§ДњТыЃК
<!DOCTYPE html>
<html>
<head>
<meta charset="UTF-8">
<title>Three.js</title>
</head>
<body>
<script src="js/three.min.js" type="text/javascript" charset="utf-8"></script>
<script type="text/javascript">
var scene = new THREE.Scene();
var camera = new THREE.PerspectiveCamera(75, window.innerWidth / window.innerHeight, 0.1, 1000);
var renderer = new THREE.WebGLRenderer();
renderer.setSize(window.innerWidth, window.innerHeight);
document.body.appendChild(renderer.domElement);
var geometry = new THREE.CubeGeometry(1, 1, 1);
var material = new THREE.MeshBasicMaterial({
color: 0x0000ff
});
var cube = new THREE.Mesh(geometry, material);
scene.add(cube);
camera.position.z = 5;
function render() {
requestAnimationFrame(render);
cube.rotation.x += 0.1;
cube.rotation.y += 0.1;
renderer.render(scene, camera);
}
render();
</script>
</body>
</html>
|
three.jsЪОР§дЫааНсЙћЃК
2.1ЁЂHTML5гЮЯЗПЊЗЂ
ЫцзХHTML5ЕФЗЂеЙгыгВМўадФмЕФЬсЩ§HTML5гЮЯЗПЊЗЂдНРДдНЪмЕНгЮЯЗПЊЗЂепЕФжиЪгЃЌвђЮЊWebGLДцдквЛЖЈЕФИДдгЖШЃЌЫљгаВњЩњСЫаэЖргХауЕФПЊдДHTML5гЮЯЗв§ЧцЃЌЯТУцЪЧgithubЩЯПЊдДУтЗбЕФHTML5гЮЯЗв§ЧцЃК
| Name |
Updated Time |
Watch |
Star |
Fork |
Commits |
Contributors |
| Three.js |
2016/3/28 |
1590 |
24041 |
7768 |
14825 |
588 |
| Phaser |
2016/2/18 |
837 |
11782 |
4095 |
4423 |
206 |
| Pixi.js |
2016/3/17 |
656 |
10063 |
1942 |
2860 |
161 |
| egret |
2016/3/30 |
215 |
1275 |
303 |
4268 |
25 |
| enchantjs |
2016/1/4 |
185 |
1445 |
301 |
1683 |
27 |
| crafty |
2016/3/21 |
134 |
2050 |
473 |
1807 |
106 |
| turbulenz |
2015/11/23 |
271 |
2544 |
406 |
1737 |
13 |
| cocos2d-js |
2016/3/30 |
162 |
1207 |
469 |
4559 |
45 |
| playcanvas |
2016/3/30 |
164 |
1784 |
368 |
5142 |
16 |
| melonjs |
2016/3/30 |
13 |
1579 |
371 |
3907 |
40 |
| quintus |
2016/2/3 |
136 |
1023 |
412 |
256 |
33 |
| Hilo |
2016/2/3 |
173 |
2449 |
340 |
20 |
2 |
2.2.1ЁЂCocos2D-HTML5
ПЊдДЃЌУтЗбЕФHTML5 2DгЮЯЗПЊЗЂПђМмЃЌCocos2DгЕгаМИИіжївЊАцБОЃЌАќРЈCocos2D-iPhoneЁЂCocos2D-XЃЌвдМАБЛЩчЧјЦеБщПДКУЕФCocos2D-HTML5КЭJavaScriptbindings for Cocos2D-XЁЃCocoStudioЙЄОпМЏЪЧПЊдДгЮЯЗв§ЧцЁЃЬиЕуЃКгыCocos2dЕФAPIРрЫЦЃЌШнвзЩЯЪжЁЂжаЮФЮФЕЕЦыШЋЃЌзЪСЯЗсИЛЁЂЛљгкMITавщЕФПЊдДв§ЧцЁЃЫќгЩЙњФкCocos2d-xКЫаФЭХЖгжїЕМПЊЗЂКЭЮЌЛЄЃЌаавЕСьафЁЂHTML5ДѓСІЭЦЖЏепGoogleЮЊетИіЯюФПЬсЙЉжЇГжЁЃ
github:https:// github.com/cocos2d/cocos2d-html5
ЙйЭјЃКhttp://www.cocos.com/
HelloWorldЪОР§ЃК
<!DOCTYPE html>
<html>
<head>
<title>Hello Cocos2d-JS</title>
</head>
<body>
<canvas id="gameCanvas" width="800" height="450"></canvas>
<script type="text/javascript" src="cocos2d-js-v3.12-lite.js" charset="UTF-8"></script>
<script type="text/javascript">
window.onload = function(){
cc.game.onStart = function(){
//load resources
cc.LoaderScene.preload(["HelloWorld.png"], function () {
var MyScene = cc.Scene.extend({
onEnter:function () {
this._super();
var size = cc.director.getWinSize();
var sprite = cc.Sprite.create("HelloWorld.png");
sprite.setPosition(size.width / 2, size.height / 2);
sprite.setScale(0.8);
this.addChild(sprite, 0);
var label = cc.LabelTTF.create("Hello World", "Arial", 40);
label.setPosition(size.width / 2, size.height / 2);
this.addChild(label, 1);
}
});
cc.director.runScene(new MyScene());
}, this);
};
cc.game.run("gameCanvas");
};
</script>
</body>
</html>
|
дЫааНсЙћЃК

2.2.2ЁЂEgretЃЈАз№ив§ЧцЃЉ
ЪЧвЛИіЛљгкTypeScriptгябдПЊЗЂЕФHTML5гЮЯЗв§ЧцЃЌЮЇзЁЩёОУЈОЭЪЧгУетИіПђМмПЊЗЂЕФЁЃ
ЙйЭјЃКhttp://www.egret.com/
ЬиЕуЃК
a)ЁЂЛљгкTypeScriptМАJavaScriptММЪѕЃЌжЇГжFlashЕНEgretИпаЇзЊЛЛЃЌв§ЧцЁЂЙЄОпЁЂдЫааЪБЭъећЙЄзїСї
b)ЁЂПчЦНЬЈЃКHTML5,iOS,Android,Windows Phone
c)ЁЂШЋжаЮФЮФЕЕЃКЮФЕЕгыПЊЗЂепЩчЧјЦыШЋ
d)ЁЂПЊдДУтЗбЃЌBSDПЊдДавщЁЂШЮвтЖЈжЦМАРЉеЙ
Ш§ЁЂSVG
SVGПЩЫѕЗХЪИСПЭМаЮЃЈScalable Vector GraphicsЃЉЪЧЛљгкПЩРЉеЙБъМЧгябдЃЈXMLЃЉЃЌгУгкУшЪіЖўЮЌЪИСПЭМаЮЕФвЛжжЭМаЮИёЪНЁЃSVGЪЧW3C("World Wide Web ConSortium" МД " ЙњМЪЛЅСЊЭјБъзМзщжЏ")дк2000Фъ8дТжЦЖЈЕФвЛжжаТЕФЖўЮЌЪИСПЭМаЮИёЪНЃЌвВЪЧЙцЗЖжаЕФЭјТчЪИСПЭМаЮБъзМЁЃSVGбЯИёзёДгXMLгяЗЈЃЌВЂгУЮФБОИёЪНЕФУшЪіадгябдРДУшЪіЭМЯёФкШнЃЌвђДЫЪЧвЛжжКЭЭМЯёЗжБцТЪЮоЙиЕФЪИСПЭМаЮИёЪНЁЃSVG гк 2003 Фъ 1 дТ 14 ШеГЩЮЊ W3C ЭЦМіБъзМЁЃ

ЬиЕуЃК
1ЃЎШЮвтЗХЫѕ
гУЛЇПЩвдШЮвтЫѕЗХЭМЯёЯдЪОЃЌЖјВЛЛсЦЦЛЕЭМЯёЕФЧхЮњЖШЁЂЯИНкЕШЁЃ
2ЃЎЮФБОЖРСЂ
SVGЭМЯёжаЕФЮФзжЖРСЂгкЭМЯёЃЌЮФзжБЃСєПЩБрМКЭПЩЫббАЕФзДЬЌЁЃвВВЛЛсдйгазжЬхЕФЯожЦЃЌгУЛЇЯЕЭГМДЪЙУЛгаАВзАФГвЛзжЬхЃЌвВЛсПДЕНКЭЫћУЧжЦзїЪБЭъШЋЯрЭЌЕФЛУцЁЃ
3ЃЎНЯаЁЮФМў
змЬхРДНВЃЌSVGЮФМўБШФЧаЉGIFКЭJPEGИёЪНЕФЮФМўвЊаЁКмЖрЃЌвђЖјЯТдивВКмПьЁЃ
4ЃЎГЌЧПЯдЪОаЇЙћ
SVGЭМЯёдкЦСФЛЩЯзмЪЧБпдЕЧхЮњЃЌЫќЕФЧхЮњЖШЪЪКЯШЮКЮЦСФЛЗжБцТЪКЭДђгЁЗжБцТЪЁЃ
5ЃЎГЌМЖбеЩЋПижЦ
SVGЭМЯёЬсЙЉвЛИі1600ЭђжжбеЩЋЕФЕїЩЋАхЃЌжЇГжICCбеЩЋУшЪіЮФМўБъзМЁЂRGBЁЂЯпXЬюГфЁЂНЅБфКЭУЩАцЁЃ
6ЃЎНЛЛЅXКЭжЧФмЛЏЁЃSVGУцСйЕФжївЊЮЪЬтвЛИіЪЧШчКЮКЭвбОеМгаживЊЪаГЁЗнЖюЕФЪИСПЭМаЮИёЪНFlashОКељЕФЮЪЬтЃЌСэвЛИіЮЪЬтОЭЪЧSVGЕФБОЕидЫааЛЗОГЯТЕФГЇМвжЇГжГЬЖШЁЃ
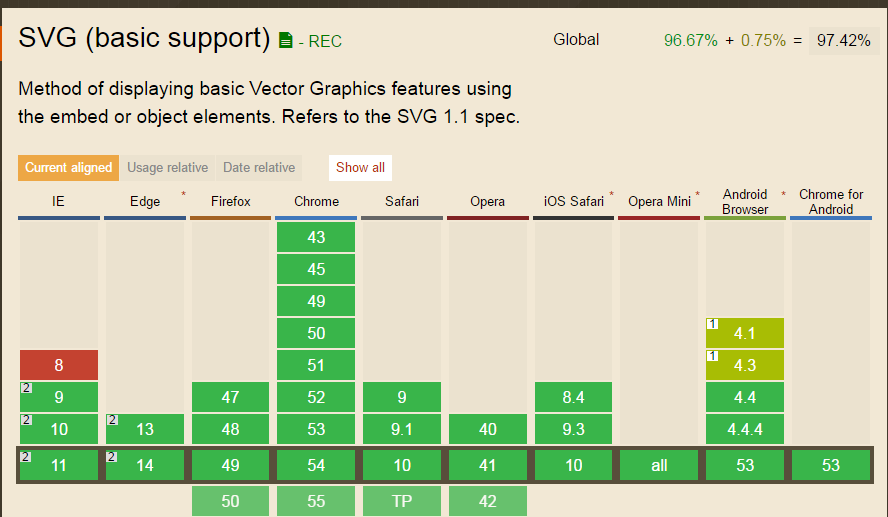
фЏРРЦїжЇГжЃК
Internet Explorer9ЃЌЛ№КќЃЌЙШИшChromeЃЌOperaКЭSafariЖМжЇГжSVGЁЃ
IE8КЭдчЦкАцБОЖМашвЊвЛИіВхМў - ШчAdobe SVGфЏРРЦїЃЌетЪЧУтЗбЬсЙЉЕФЁЃ
3.1ЁЂSVG Hello Wrold
<!DOCTYPE html>
<html>
<head>
<meta charset="UTF-8">
<title>SVG Hello World</title>
</head>
<body>
<svg xmlns="http://www.w3.org/2000/svg" version="1.1">
<circle cx="100" cy="100" r="30" stroke="blue" stroke-width="2" fill="red" />
</svg>
</body>
</html> |
дЫааНсЙћЃК

svgЪЧвЛИіаТдіМгБъЧЉЃЌxmlnsЪЧУќУћПеМфЃЌversionЪЧsvgЕФАцБОЃЌcircleБъЧЉОЭЪЧЖдsvgвЊеЙЪОЕФЭМЯёНјааУшЪіЃЌcxгыcyБэЪОЮЛжУЃЌrБэЪОАыОЖЃЌstrokeЪЧУшБпбљЪНЃЌstroke-widthОЭЯпПэЃЌfillЪЧЬюГфбљЪНЁЃфЏРРЦїМцШнадКмКУЃК
3.2ЁЂЖржжв§ШыSVGЕФЗНЗЈ
SVG ЮФМўПЩЭЈЙ§вдЯТБъЧЉЧЖШы HTML ЮФЕЕЃК<embed>ЁЂ<object> Лђеп <iframe>ЁЃ
SVGЕФДњТыПЩвджБНгЧЖШыЕНHTMLвГУцжаЃЌЛђФњПЩвджБНгСДНгЕНSVGЮФМў
в§ШыЗНЪНШчЯТЃК
<!DOCTYPE html>
<html>
<head>
<meta charset="UTF-8">
<title>в§ШыSVGЕФЗНЗЈ</title>
<style type="text/css">
body{
background:url(me.svg);
}
</style>
</head>
<body>
<h2>embed</h2>
<embed src="me.svg" type="image/svg+xml" width="108" height="108" /> гХЪЦЃКЫљгажївЊфЏРРЦїЖМжЇГжЃЌВЂдЪаэЪЙгУНХБО ШБЕуЃКВЛЭЦМідкHTML4КЭXHTMLжаЪЙгУЃЈЕЋдкHTML5дЪаэЃЉ
<h2>object</h2>
<object data="me.svg" type="image/svg+xml" width="108" height="108"></object> гХЪЦЃКЫљгажївЊфЏРРЦїЖМжЇГжЃЌВЂжЇГжHTML4ЃЌXHTMLКЭHTML5БъзМ ШБЕуЃКВЛдЪаэЪЙгУНХБОЁЃ
<h2>iframe</h2>
<iframe src="me.svg" frameborder="0" width="108" height="108"></iframe> гХЪЦЃКЫљгажївЊфЏРРЦїЖМжЇГжЃЌВЂдЪаэЪЙгУНХБО ШБЕуЃКВЛЭЦМідкHTML4КЭXHTMLжаЪЙгУЃЈЕЋдкHTML5дЪаэЃЉ
<h2>жБНгЧЖШы</h2>
<svg xmlns="http://www.w3.org/2000/svg" version="1.1" width="108" height="108">
<circle cx="54" cy="54" r="50" stroke="blue" stroke-width="2" fill="blue" />
</svg>
дкFirefoxЁЂInternet Explorer9ЁЂЙШИшChromeКЭSafariжаЃЌФуПЩвджБНгдкHTMLЧЖШыSVGДњТыЁЃ зЂвтЃКSVGВЛФмжБНгЧЖШыЕНOperaЁЃ
<h2>image</h2>
<img src="me.svg" width="108" height="108" />
</body>
</html>
|
дЫааНсЙћЃК

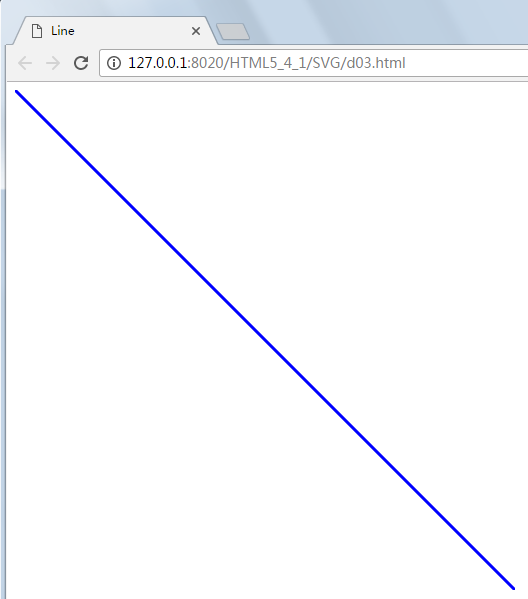
3.3ЁЂЛжБЯп
ЪОР§ДњТыЃК
<!DOCTYPE html>
<html>
<head>
<meta charset="UTF-8">
<title>Line</title>
</head>
<body>
<svg xmlns="http://www.w3.org/2000/svg" version="1.1" width="500" height="500">
<line x1="0" y1="0" x2="500" y2="500" style="stroke:rgb(0,0,255);stroke-width:3" />
</svg>
</body>
</html> |
ВЮЪ§ЃК
x1 Ъєаддк x жсЖЈвхЯпЬѕЕФПЊЪМ
y1 Ъєаддк y жсЖЈвхЯпЬѕЕФПЊЪМ
x2 Ъєаддк x жсЖЈвхЯпЬѕЕФНсЪј
y2 Ъєаддк y жсЖЈвхЯпЬѕЕФНсЪј
дЫааНсЙћЃК
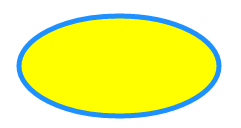
3.4ЁЂЛЭждВ
ЪОР§ДњТыЃК
<!DOCTYPE html>
<html>
<head>
<meta charset="UTF-8">
<title>ЭждВ</title>
</head>
<body>
<svg xmlns="http://www.w3.org/2000/svg" version="1.1" width="500" hidden="500">
<ellipse cx="300" cy="80" rx="100" ry="50" style="fill:yellow;stroke:dodgerblue;stroke-width:5" />
</svg>
</body>
</html> |
ВЮЪ§ЃК
CXЪєадЖЈвхЕФЭждВжааФЕФxзјБъ
CYЪєадЖЈвхЕФЭждВжааФЕФyзјБъ
RXЪєадЖЈвхЕФЫЎЦНАыОЖ
RYЪєадЖЈвхЕФДЙжБАыОЖ
дЫааНсЙћЃК
3.5ЁЂЮФБОгыОиаЮ
ЪОР§ДњТыЃК
<!DOCTYPE html>
<html>
<head>
<meta charset="UTF-8">
<title>ЮФБОгыОиаЮ</title>
</head>
<body>
<svg xmlns="http://www.w3.org/2000/svg" version="1.1" width="800" height="500">
<text x="0" y="50" fill="blue" style="font-size:30px; font-family: 'microsoft yahei';">My Teacher Zhangguo</text>
<rect x="40" y="60" width="260" height="260" style="fill:blue;stroke:pink;stroke-width:5;
fill-opacity:0.1;stroke-opacity:0.9" />
</svg>
</body>
</html> |
дЫааНсЙћЃК

3.6ЁЂЯђЯТМцШнгыЭМБъ
IE8ВЂВЛжБНгМцШнSVGЃЌШчЙћашвЊЯдЪОдђПЩвдЪЙгУВхМўЃЌШчЙћВЛЪЙгУВхМўвВгаЯђЯТМцШнЕФАьЗЈЁЃ
ЪОР§ДњТыЃК
<!DOCTYPE html>
<html>
<head>
<meta charset="UTF-8">
<title>ЯђЯТМцШнгыЭМБъ</title>
</head>
<body>
<svg width="78" height="78">
<image xlink:href="money.svg" width="78" height="78" src="money.png"></image>
</svg>
</body>
</html> |
дЫааНсЙћЃК
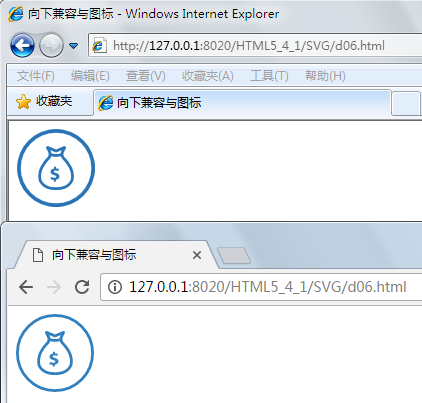
ВЮЪ§ЃК
imageБОЩэОЭЪЧsvgжав§ШыЭтВПЭМЯёЕФдЊЫиЃЌИеКУдкie8ЯТгжФмБЛНтЮіЁЃ
ЫФЁЂЪОР§ЯТди
ЪОР§ДњТыЃКhttps:// github.com/zhangguo5/HTML5_4_1.git
|


