| БрМЭЦМі: |
| БОЮФРДздsegmentfaultЃЌЮФеТжївЊДгЙЙНЈвЛИіаЁУзБуЧЉгІгУРДбЇЯАдѕУДЪЙгУVuexЕШЯрЙиФкШнЁЃ |
|
дкетИіНЬГЬжаЃЌЮвУЧЛсЭЈЙ§ЙЙНЈвЛИіаЁУзБуЧЉгІгУРДбЇЯАдѕУДЪЙгУVuex,ПЊЪМЮвЛсМђЕЅЕФНщЩмVuexЕФвЛаЉЛљДЁФкШнЃЌЪВУДЪБКђЪЙгУвдМАгУVuexдѕУДзщжЏДњТыЃЌШЛКѓвЛВНвЛВНЕФАбетаЉИХФюгІгУЕНаЁУзБуЧЉгІгУРяУцЁЃ
ЗЯЛАВЛЖрЫЕЃЌЯШИјДѓМвПДвЛЯТаЁУзБуЧЉгІгУЕФНиЭМЃК
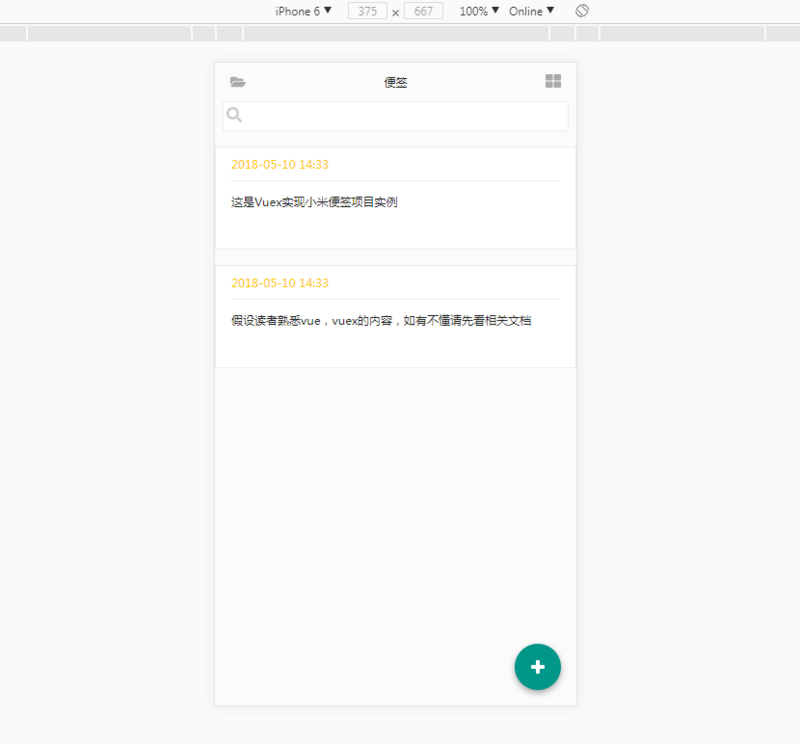
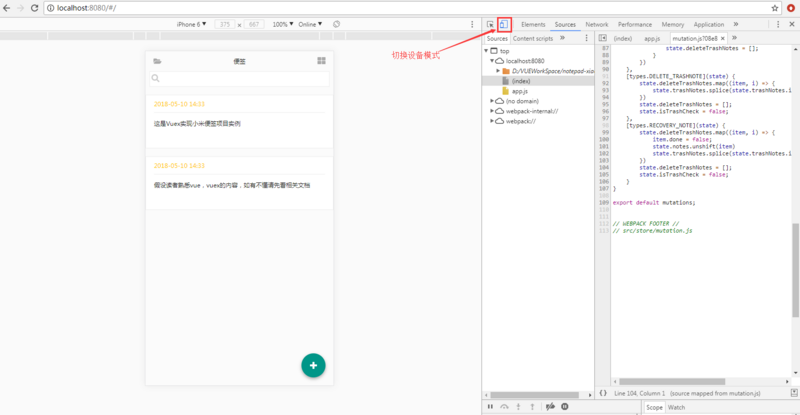
ФуПЩвдДгGitHubЩЯЯТдидДТыЃЌетРяЪЧЯюФПдДДњТыЕФЕижЗКЭдкЯпдЄРРЕижЗЃЌАВзАГЩЙІКѓЭЦМіЪЙгУchromeЕФЩшБИФЃЪНВщПДаЇЙћИќМбЁЃ
VuexИХЪі
Vuex ЪЧвЛИізЈУХЮЊ Vue.js гІгУЫљЩшМЦЕФМЏжаЪНзДЬЌЙмРэМмЙЙЃЌЫќНшМјСЫ Flux КЭ Redux
ЕФЩшМЦЫМЯыЃЌЕЋМђЛЏСЫИХФюЃЌВЂЧвВЩгУСЫвЛжжЮЊФмИќКУЗЂЛг Vue.js Ъ§ОнЯьгІЛњжЦЖјзЈУХЩшМЦЕФЪЕЯжЁЃ
ШчЙћФуВЛЬЋРэНт Vue.js гІгУРяЕФзДЬЌЪЧЪВУДвтЫМЕФЛАЃЌФуПЩвдЯыЯѓвЛЯТФуДЫЧАаДЕФ Vue зщМўРяУцЕФ
data зжЖЮЁЃVuex АбзДЬЌЗжГЩзщМўФкВПзДЬЌКЭгІгУМЖБ№зДЬЌЃК
зщМўФкВПзДЬЌЃКНідквЛИізщМўФкЪЙгУЕФзДЬЌ(data зжЖЮ)
гІгУМЖБ№зДЬЌЃКЖрИізщМўЙВгУЕФзДЬЌ
ОйИіР§згЃКБШШчЫЕгавЛИіИИзщМўЃЌЫќгаСНИізгзщМўЁЃетИіИИзщМўПЩвдгУ props ЯђзгзщМўДЋЕнЪ§ОнЃЌетЬѕЪ§ОнЭЈЕРКмКУРэНтЁЃ
ФЧШчЙћетСНИізгзщМўЯрЛЅжЎМфашвЊЙВЯэЪ§ОнФи?ЛђепзгзщМўашвЊЯђИИзщМўДЋЕнЪ§ОнФи?етСНИіЮЪЬтдкгІгУЬхСПНЯаЁЕФЪБКђЖМКУНтОіЃЌжЛвЊгУздЖЈвхЪТМўМДПЩЁЃ
ЕЋЪЧЫцзХгІгУЙцФЃЕФРЉДѓЃК
зЗзйетаЉЪТМўдНРДдНФбСЫЁЃетИіЪТМўЪЧФФИізщМўДЅЗЂЕФЃПЫдкМрЬ§ЫќЃП
вЕЮёТпМБщВМИїИізщМўЃЌЕМжТИїжжвтЯыВЛЕНЕФЮЪЬтЁЃ
гЩгквЊЯдЪНЕиЗжЗЂКЭМрЬ§ЪТМўЃЌИИзщМўКЭзгзщМўЧПёюКЯЁЃ
Vuex вЊНтОіЕФОЭЪЧетаЉЮЪЬтЃЌVuex БГКѓгаЫФИіКЫаФЕФИХФюЃК
State: АќКЌЫљгагІгУМЖБ№зДЬЌЕФЖдЯѓ
Getters: дкзщМўФкВПЛёШЁ store жазДЬЌЕФКЏЪ§
Mutations: аоИФзДЬЌЕФЪТМўЛиЕїКЏЪ§
Actions: зщМўФкВПгУРДЗжЗЂ mutations ЪТМўЕФКЏЪ§
ЯТУцетеХЭМЭъУРЕиНтЪЭСЫвЛИі Vuex гІгУФкВПЕФЪ§ОнСїЖЏЃК
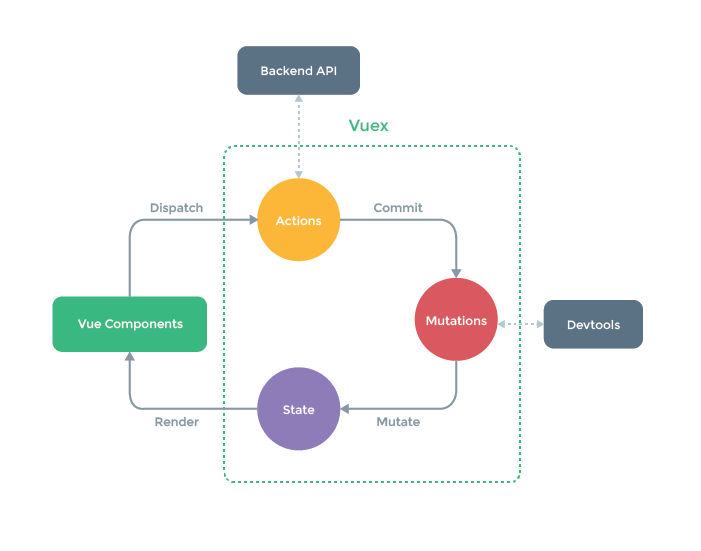
етеХЭМЕФжиЕуЃК
Ъ§ОнСїЖЏЪЧЕЅЯђЕФ
зщМўПЩвдЕїгУ actions
Actions ЪЧгУРДЗжЗЂ mutations ЕФ
жЛга mutations ПЩвдаоИФзДЬЌ
store ЪЧЗДгІЪНЕФЃЌМДЃЌзДЬЌЕФБфЛЏЛсдкзщМўФкВПЕУЕНЗДгГ
ДюНЈЯюФП
ЯюФПНсЙЙЃК
ЯюФПжївЊЮФМўДцЗХгкsrcФПТМЯТЃК
assets/ЙЋЙВЭМЦЌЃЌcssЮФМў
components/АќКЌЫљгазщМў
libs/РЉеЙЮФМў
router/ТЗгЩЮФМў
store/vuexЯрЙиЮФМў(state,actions,getters,mutation)
App.vueИљзщМў
main.jsгІгУзмШыПк
аТНЈЯюФПЃК
ЪЙгУvue-cliНХЪжМмЃЌПЩгУгкПьЫйДюНЈДѓаЭЕЅвГгІгУЁЃИУЙЄОпЮЊЯжДњЛЏЕФЧАЖЫПЊЗЂЙЄзїСїЬсЙЉСЫПЊЯфМДгУЕФЙЙНЈХфжУЁЃжЛашМИЗжжгМДПЩДДНЈВЂЦєЖЏвЛИіДјШШжидиЁЂБЃДцЪБОВЬЌМьВщвдМАПЩгУгкЩњВњЛЗОГЕФЙЙНЈХфжУЕФЯюФПЃК
# АВзАvue
npm install vue
# ШЋОжАВзА vue-cli
npm install --global vue-cli
# ДДНЈвЛИіЛљгк webpack ФЃАхЕФаТЯюФП
vue init webpack notepad-xiaomi
# АВзАвРРЕЃЌзпФу
cd notepad-xiaomi
# АВзАвРРЕ
npm install muse-ui vue-awesome --save
# АВзАvuex
npm install vue vuex --save
# дЫаа
npm run dev |
ЪЙгУvue-cliНХЪжМмДДНЈЯюФПЪБЃЌвЛЖЈвЊАВзАvue-routerВхМўЁЃ
АВзАвРРЕКѓдйmain.jsжав§гУ
ДДНЈVuex Store
дкstoreЮФМўМаЯТДДНЈЕквЛИіindex.jsЃК
import Vue from
'vue'
import Vuex from 'vuex'
import state from './state'
import mutations from './mutation'
import * as getters from './getters'
import * as actions from './actions'
Vue.use(Vuex)
export default new Vuex.Store({
state,
mutations,
getters,
actions
}) |
ЯждкЮвгУЯТУцетеХЭМАбгІгУЗжНтГЩЖрИізщМўЃЌВЂАбзщМўФкВПашвЊЕФЪ§ОнЖдгІЕН store.js РяЕФ stateЁЃ

AppИљзщМўЃЌЕквЛЗљЭМжаЕФКьЩЋКазг
HeaderЭЗВПзщМўЃЌЕквЛЗљЭМжаЕФТЬЩЋКазг
NoteListСаБэзщМўЃЌЕквЛЗљЭМжаЕФГШЩЋКазг
ToolBarЙЄОпРИзщМўЃЌЕквЛЗљЭМжаЕФРЖЩЋКазгЃЈАќРЈЩОГ§КЭвЦЖЏАДХЅЃЉ
EditorБрМзщМўЃЌЕкЖўЗљЭМЃЌ
NoteFolderБуЧЉМазщМўЃЌЕкШ§ЗљЭМ
TrashHeaderЗЯжНТЈЭЗВПзщМўЃЌЕкЫФЗљЭМРЖЩЋКазг
TrashNoteListЗЯжНТЈСаБэзщМўЃЌЕкЫФЗљЭМЛвЩЋКазг
TrashToolBarЗЯжНТЈЙЄОпРИзщМўЃЌЕкЫФЗљЭМЛЦЩЋКазг
state.jsРяУцЕФзДЬЌЖдЯѓЛсАќКЌЫљгагІгУМЖБ№ЕФзДЬЌЃЌвВОЭЪЧИїИізщМўашвЊЙВЯэЕФзДЬЌЁЃ
БЪМЧСаБэ(notes: [])АќКЌСЫ NodesList зщМўвЊфжШОЕФ notes ЖдЯѓЁЃЕБЧАБуЧЉ(activeNote:
{})дђАќКЌЕБЧАБрМЕФБуЧЉЖдЯѓЃЌЖрИізщМўЖМашвЊетИіЖдЯѓЁЃ
СФЭъСЫзДЬЌstate,ЮвУЧРДПДПД mutations, ЮвУЧвЊЪЕЯжЕФ mutation ЗНЗЈАќРЈЃК
ЬэМгБъЧЉЕНnotesЪ§зщжа
БрМбЁжаБуЧЉ
ЩОГ§БуЧЉ
БуЧЉВМОж
ЙДбЁБуЧЉ
ШЋВП/ШЁЯћЙДбЁБуЧЉ
БЃДцБуЧЉ
ЙДбЁЗЯжНТЈБуЧЉ
ШЋВП/ШЁЯћЙДбЁЗЯжНТЈБуЧЉ
ЛжИДЗЯжНТЈБуЧЉ
mutation-typesжагУгкНЋГЃСПЗХдкЕЅЖРЕФЮФМўжаЃЌЗНБуазїПЊЗЂЁЃ
export const
NEW_NOTE = 'NEW_NOTE'
export const EDIT_NOTE = 'EDIT_NOTE'
export const TOGGLE_NOTE = 'TOGGLE_NOTE'
export const CANCEL_CHECK = 'CANCEL_CHECK'
export const ALL_CHECK = 'ALL_CHECK'
export const DELETE_NOTE = 'DELETE_NOTE'
export const BACK_SAVE = 'BACK_SAVE'
export const TOGGLE_TRASHNOTE = 'TOGGLE_TRASHNOTE'
export const CANCEL_TRASHCHECk = 'CANCEL_TRASHCHECk'
export const ALL_TRASHCHECK = 'ALL_TRASHCHECK'
export const DELETE_TRASHNOTE = 'DELETE_TRASHNOTE'
export const RECOVERY_NOTE = 'RECOVERY_NOTE' |
ЪзЯШЃЌДДНЈвЛЬѕаТЕФБуЧЉЃЌЮвУЧашвЊзіЕФЪЧ:
аТНЈвЛИіЖдЯѓ
ГѕЪМЛЏЪєад
pushЕНstate.notesЪ§зщжа
[types.NEW_NOTE](state)
{
let newNote = {
id: +new Date(),
date: new Date().Format('yyyy-MM-dd hh:mm'),
content: '',
done: false
}
state.notes.push(newNote)
} |
ШЛКѓЃЌБрМБуЧЉашвЊгУБЪМЧФкШн content зїВЮЪ§ЃК
[types.EDIT_NOTE](state,
note) {
state.activeNote = note;
} |
ЪЃЯТЕФетаЉ mutations КмМђЕЅОЭВЛвЛвЛзИЪіСЫЁЃећИі store/mutation.js ШчЯТЃК
import Format
from '../libs/dateFormat'
import * as types from './mutation-types';
const mutations = {
[types.NEW_NOTE](state) {
let newNote = {
id: +new Date(),
date: new Date().Format('yyyy-MM-dd hh:mm'),
content: '',
done: false
}
state.notes.push(newNote)
},
[types.EDIT_NOTE](state, note) {
state.activeNote = note;
},
[types.TOGGLE_NOTE](state, note) {
state.notes.map((item, i) => {
if (item.id == note.id) {
item.done = !note.done;
}
})
if (note.done) {
state.deleteNotes.push(note);
} else {
state.deleteNotes.splice(state.deleteNotes.
indexOf(note),
1);
}
},
[types.CANCEL_CHECK](state) {
state.notes.map((item, i) => {
item.done = false;
})
state.deleteNotes = [];
state.isCheck = false;
},
[types.ALL_CHECK](state, done) {
state.deleteNotes = [];
state.notes.map((item, i) => {
item.done = done;
if (done) {
state.deleteNotes.push(item);
} else {
state.deleteNotes = [];
}
})
},
[types.DELETE_NOTE](state) {
state.deleteNotes.map((item, i) => {
item.done = false;
state.notes.splice(state.notes.indexOf(item),
1);
state.trashNotes.push(item)
})
state.isCheck = false;
state.deleteNotes = [];
},
[types.BACK_SAVE](state, note) {
if (note.content != '') return;
state.notes.splice(state.notes.indexOf(note),
1);
},
[types.TOGGLE_TRASHNOTE](state, note) {
state.trashNotes.map((item, i) => {
if (item.id == note.id) {
item.done = !note.done;
}
})
if (note.done) {
state.deleteTrashNotes.push(note);
} else {
state.deleteTrashNotes.splice(state.
deleteTrashNotes.indexOf(note),
1);
}
},
[types.CANCEL_TRASHCHECk](state) {
state.trashNotes.map((item, i) => {
item.done = false;
})
state.deleteTrashNotes = [];
state.isTrashCheck = false;
},
[types.ALL_TRASHCHECK](state, done) {
state.deleteTrashNotes = [];
state.trashNotes.map((item, i) => {
item.done = done;
if (done) {
state.deleteTrashNotes.push(item);
} else {
state.deleteTrashNotes = [];
}
})
},
[types.DELETE_TRASHNOTE](state) {
state.deleteTrashNotes.map((item, i) => {
state.trashNotes.splice(state.trashNotes.indexOf(item),
1);
})
state.deleteTrashNotes = [];
state.isTrashCheck = false;
},
[types.RECOVERY_NOTE](state) {
state.deleteTrashNotes.map((item, i) => {
item.done = false;
state.notes.unshift(item)
state.trashNotes.splice(state.trashNotes.indexOf(item),
1);
})
state.deleteTrashNotes = [];
state.isTrashCheck = false;
}
}
export default mutations; |
НгЯТРДСФ actions, actions ЪЧзщМўФкгУРДЗжЗЂ mutations ЕФКЏЪ§ЁЃЫќУЧНгЪе
store зїЮЊЕквЛИіВЮЪ§ЁЃБШЗНЫЕЃЌЕБгУЛЇЕуЛї Toolbar зщМўЕФЬэМгАДХЅЪБЃЌЮвУЧЯывЊЕїгУвЛИіФмЗжЗЂNEW_NOTE
mutation ЕФ actionЁЃЯждкЮвУЧдк store/ЮФМўМаЯТДДНЈвЛИі actions.js
ВЂдкРяУцаДЩЯ newNoteКЏЪ§:
// ДДНЈаТБуЧЉ
export const newNote = ({ commit }) => {
commit(types.NEW_NOTE)
} |
ЦфЫћЕФетаЉactionsЖМРрЫЦЃЌећИіstore/actions.jsШчЯТЃК
import * as
types from './mutation-types';
//ДДНЈаТБуЧЉ
export const newNote = ({ commit }) => {
commit(types.NEW_NOTE)
}
//БрМБуЧЉ
export const editNote = ({ commit }, note) =>
{
commit(types.EDIT_NOTE, note)
}
//ЙДбЁБуЧЉ
export const toggleNote = ({ commit }, note)
=> {
commit(types.TOGGLE_NOTE, note)
}
//ШЁЯћЙДбЁБуЧЉ
export const cancelCheck = ({ commit }) =>
{
commit(types.CANCEL_CHECK)
}
//ШЋВПЙДбЁ
export const allCheck = ({ commit }, done) =>
{
commit(types.ALL_CHECK, done)
}
//ЩОГ§БуЧЉ
export const deleteNote = ({ commit }) =>
{
commit(types.DELETE_NOTE)
}
//ЗЕЛиздЖЏБЃДц
export const backSave = ({ commit }, note) =>
{
commit(types.BACK_SAVE, note)
}
//ЙДбЁЗЯжНТЈБуЧЉ
export const toggleTrashNote = ({ commit },
note) => {
commit(types.TOGGLE_TRASHNOTE, note)
}
//ШЁЯћЙДбЁЗЯжНТЈБуЧЉ
export const cancelTrashCheck = ({ commit })
=> {
commit(types.CANCEL_TRASHCHECk)
}
//ШЋбЁЗЯжНТЈБуЧЉ
export const allTrashCheck = ({ commit }, done)
=> {
commit(types.ALL_TRASHCHECK, done)
}
//ЩОГ§ЗЯжНТЈБуЧЉ
export const deleteTrashNote = ({ commit })
=> {
commit(types.DELETE_TRASHNOTE)
}
//ЛжИДБуЧЉ
export const recoveryNote = ({ commit }) =>
{
commit(types.RECOVERY_NOTE)
} |
зюКѓЫЕвЛЯТgetters,дкStoreВжПтРяЃЌstateОЭЪЧгУРДДцЗХЪ§ОнЃЌШєЪЧЖдЪ§ОнНјааДІРэЪфГіЃЌБШШчЪ§ОнвЊЙ§ТЫЃЌвЛАуЮвУЧПЩвдаДЕНcomputedжаЁЃЕЋЪЧШчЙћКмЖрзщМўЖМЪЙгУетИіЙ§ТЫКѓЕФЪ§ОнЃЌБШШчБ§зДЭМзщМўКЭЧњЯпЭМзщМўЃЌЮвУЧЪЧЗёПЩвдАбетИіЪ§ОнГщЬсГіРДЙВЯэЃПетОЭЪЧgettersДцдкЕФвтвхЁЃЮвУЧПЩвдШЯЮЊЃЌgettersЪЧstoreЕФМЦЫуЪєад
// ЫбЫїЙ§ТЫБуЧЉ
export const filterNote = (state) => {
if (state.search != '' && state.notes.length
> 0) {
return state.notes.filter(note => note.content.indexOf(state.search)
> -1) || {}
} else {
return state.notes || {}
}
}
// ЕБЧАБрМЕФБуЧЉ
export const activeNote = (state) => {
return state.activeNote
}
// БуЧЉСаБэВМОж
export const layout = state => state.layout
// БуЧЉбЁжазДЬЌ
export const isCheck = state => state.isCheck
// ЗЯжНТЈБуЧЉбЁжазДЬЌ
export const isTrashCheck = state => state.isTrashCheck |
етбљЃЌдк storeЮФМўМаРяУцвЊаДЕФДњТыОЭЖМаДЭъСЫЁЃетРяУцАќРЈСЫ state.js жаЕФ state
КЭ mutation.jsжаЕФmutations,вдМА actions.js РяУцгУРДЗжЗЂ mutations
ЕФ actionsЃЌКЭgetters.jsжаЕФДІРэЪфГіЁЃ
ЙЙНЈVueзщМў
зюКѓетИіаЁНсЃЌЮвУЧРДЪЕЯжЫФИізщМў (App, Header,Toolbar, NoteList КЭ
Editor) ВЂбЇЯАдѕУДдкетаЉзщМўРяУцЛёШЁ Vuex store РяЕФЪ§ОнвдМАЕїгУ actionsЁЃ
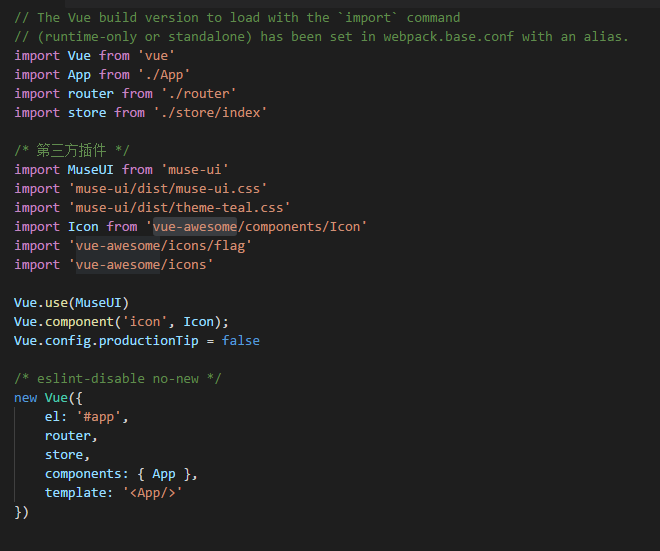
ДДНЈИљЪЕР§ - main.js
main.jsЪЧгІгУЕФШыПкЮФМўЃЌРяУцгаИљЪЕР§ЃЌЮвУЧвЊАб Vuex store МгЕНЕНетИіИљЪЕР§РяУцЃЌНјЖјзЂШыЕНЫќЫљгаЕФзгзщМўРяУцЃК
// The Vue build
version to load with the `import` command
// (runtime-only or standalone) has been set in
webpack.base.conf with an alias.
import Vue from 'vue'
import App from './App'
import router from './router'
import store from './store/index'
/* ЕкШ§ЗНВхМў */
import MuseUI from 'muse-ui'
import 'muse-ui/dist/muse-ui.css'
import 'muse-ui/dist/theme-teal.css'
import Icon from 'vue-awesome/components/Icon'
import 'vue-awesome/icons/flag'
import 'vue-awesome/icons'
Vue.use(MuseUI)
Vue.component('icon', Icon);
Vue.config.productionTip = false
/* eslint-disable no-new */
new Vue({
el: '#app',
router,
store,
components: { App },
template: '<App/>'
}) |
App - ИљзщМў
ИљзщМў App зїЮЊзмЕФТЗгЩШыПк:
<template>
<div id="app">
<router-view/>
</div>
</template>
<script>
export default {
name: 'App'
}
</script> |
Notepad
Notepad зщМўЛс import ЦфгрШ§ИізщМўЃКHeader,NoteListКЭToolBarЃК
<template>
<div class="notepad">
<Header
/>
<NoteList />
<ToolBar />
</div>
</template>
<script>
import Header from './Header'
import NoteList from './NoteList'
import ToolBar from './ToolBar'
export default {
name: 'Notepad',
data () {
return {
}
},
components:{
Header,
NoteList,
ToolBar,
}
}
</script> |
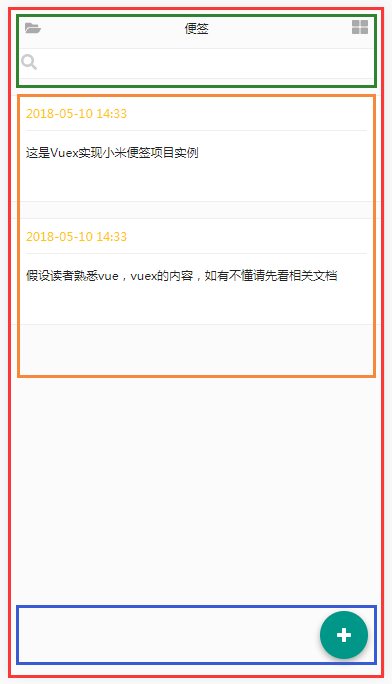
Header
HeaderзщМўЬсЙЉЫбЫїКЭБуЧЉЙДбЁКЭШЁЯћЃЌВЂЭГМЦЙДбЁЪ§СПЙІФмЃЌШчЭМЃК
ЖдгкHeaderзщМўРДЫЕЃЌЫбЫїПђжаЪфШыВщбЏФкШнЪБЃЌашвЊЖдБуЧЉСаБэжаЕФЪ§ОнНјааЙ§ТЫЃЌдкДДНЈstate.jsЕФЪБКђОЭЬэМгСЫsearchзжЖЮЃЌгУгкДцДЂЫбЫїФкШнЃЌЖјдкgetters.jsжаЭЈЙ§filterNoteЗНЗЈЖдБуЧЉСаБэНјааЙ§ТЫЃЌЩИбЁГіЗћКЯЬѕМўЕФБуЧЉВЂЗЕЛиЃЌетЪБКђЮвУЧдкNoteListзщМўжаОЭжБНгБщРњfilterNoteЗНЗЈОЭПЩвдЪЕЯжЫбЫїЙІФмЁЃ
store/gettersжаЪЕЯжfilterNoteЗНЗЈ
// ЫбЫїЙ§ТЫБуЧЉ
export const filterNote = (state) => {
if (state.search != '' && state.notes.length
> 0) {
return state.notes.filter(note => note.content.indexOf(state.search)
> -1) || {}
} else {
return state.notes || {}
}
} |
NoteListзщМўжаБщРњfilterNote
<li v-for="note
in filterNote" :key="note.id" @mousedown="gtouchstart(note)"
@mouseup="gtouchend(note)" @touchstart="loopstart(note)"
@touchend="clearLoop">
<h4>{{note.date}}</h4>
<p>{{note.content}}</p>
<mu-checkbox
label="" v-model="note.done"
class="checkbox" v-show="isCheck"/>
</li> |
HeaderзщМўЃК
...mapGettersжаЕФ...ЪЧes6ЕФРЉеЙдЫЫуЗћЃЌВЛЖЎЕФПЩвдВщдФes6ЮФЕЕ
<template>
<header class="header" :class="{visible:isVisible}">
<mu-flexbox class="headerTool" :class="{visible:isVisible}">
<mu-flexbox-item order="0" class="flex">
<mu-raised-button v-if="isCheck"
label="ШЁЯћ" @click="cancelCheck"
class="raised-button"/>
<span
v-else class="icon" @click="openFolder"><icon
name="folder-open"></icon></span>
</mu-flexbox-item>
<mu-flexbox-item
order="1" class="flex" style="text-align:center">
<span v-if="isCheck">{{checkTitle}}</span>
<span v-else>{{title}}</span>
</mu-flexbox-item>
<mu-flexbox-item
order="2" class="flex" style="text-align:right">
<mu-raised-button v-if="isCheck"
:label="checkBtnTxt" @click="allCheck(!allChecked)"
class="raised-button"/>
<span
v-else>
<span class="icon"
v-if="layout=='grid'" @click="changeLayout"><icon
name="list"></icon></span>
<span class="icon" v-else @click="changeLayout"><icon
name="th-large"></icon></span>
</span>
</mu-flexbox-item>
</mu-flexbox>
<div class="search">
<div class="icon"><icon name="search"></icon></div>
<input type="text" v-model="searchTxt"
@keyup="search" @focus="searchFocus"
@blur="searchBlur"/>
</div>
</header>
</template>
<script>
import { mapActions,mapGetters } from 'vuex'
export default {
name: 'Header',
data(){
return {
title:'БуЧЉ',
checkBtnTxt:'ШЋбЁ',
searchTxt:'',
isVisible:false
}
},
computed:{
...mapGetters([
'layout',
'isCheck'
]),
//ЛёШЁБуЧЉЙДбЁзДЬЌ
allChecked(){
return this.$store.state.notes.every(note =>
note.done)
},
//БуЧЉбЁжаЪ§СПЬсЪО
checkTitle(){
return `вббЁдё${this.$store.state.deleteNotes.length}Яю`
}
},
methods:{
//ЯдЪОЫбЫїПђ
searchFocus(){
this.isVisible = true;
},
//вўВиЫбЫїПђ
searchBlur(){
this.isVisible = false;
},
//ЫбЫї
search(){
this.$store.state.search = this.searchTxt
},
//ЧаЛЛВМОж
changeLayout(){
if(this.$store.state.layout == 'list'){
this.$store.state.layout = 'grid'
}else{
this.$store.state.layout = 'list'
}
},
//ШЁЯћЙДбЁ
cancelCheck(){
this.$store.dispatch('cancelCheck')
},
//ШЋбЁЧаЛЛ
allCheck(done){
this.checkBtnTxt = done?'ШЁЯћШЋбЁ':'ШЋбЁ'
this.$store.dispatch('allCheck',done)
},
//ДђПЊБуЧЉМа
openFolder(){
this.$router.push({path:'noteFolder'})
}
}
}
</script>
|
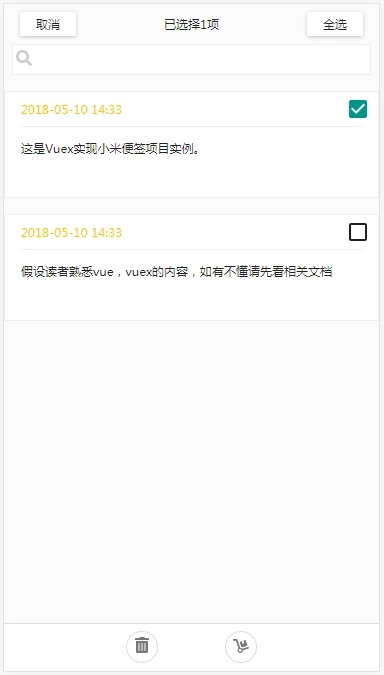
NoteList
NotesList зщМўжївЊгаШ§ИіЙІФмЃК
фжШОБуЧЉСаБэ
ЖдБуЧЉНјааЙДбЁЛђШЁЯћ
ЕуЛїБрМБуЧЉ
<template>
<ul class="noteList" :class="layout">
<li v-for="note in filterNote" :key="note.id"
@mousedown="gtouchstart(note)" @mouseup="gtouchend(note)"
@touchstart="loopstart(note)" @touchend="clearLoop">
<h4>{{note.date}}</h4>
<p>{{note.content}}</p>
<mu-checkbox label="" v-model="note.done"
class="checkbox" v-show="isCheck"/>
</li>
</ul>
</template>
<script>
import { mapGetters,mapActions } from 'vuex'
export default {
name: 'NoteList',
data(){
return {
timeOutEvent: 0,
Loop:null
}
},
computed:{
...mapGetters([
'filterNote',
'layout',
'isCheck'
])
},
methods:{
//БрМ&бЁжа
editNote(note){
if(this.isCheck){
this.$store.dispatch('toggleNote',note);
}else{
this.$store.dispatch('editNote',note);
this.$router.push({path:'/editor'})
}
},
//ЪѓБъАДЯТЃЌФЃФтГЄАДЪТМў
gtouchstart(note){
var _this = this;
this.timeOutEvent = setTimeout(function(){
_this.longPress(note)
},500);//етРяЩшжУЖЈЪБЦїЃЌЖЈвхГЄАД500КСУыДЅЗЂГЄАДЪТМўЃЌЪБМфПЩвдздМКИФЃЌИіШЫИаОѕ500КСУыЗЧГЃКЯЪЪ
return false;
},
//ЪѓБъЗХПЊЃЌФЃФтГЄАДЪТМў
gtouchend(note){
clearTimeout(this.timeOutEvent);//ЧхГ§ЖЈЪБЦї
if(this.timeOutEvent!=0){
//етРяаДвЊжДааЕФФкШнЃЈгШШчonclickЪТМўЃЉ
this.editNote(note);
}
return false;
},
longPress(note){
this.timeOutEvent = 0;
this.$store.state.isCheck = true;
this.$store.dispatch('toggleNote',note);
},
//ЪжАДзЁПЊЪМЃЌФЃФтГЄАДЪТМў
loopstart(note){
var _this = this;
clearInterval(this.Loop);
ЁЁЁЁЁЁЁЁЁЁЁЁ this.Loop = setTimeout(function(){
ЁЁЁЁЁЁЁЁ _this.$store.state.isCheck = true;
_this.$store.dispatch('toggleNote',note);
ЁЁЁЁЁЁЁЁЁЁЁЁ},500);
},
//ЪжЗХПЊНсЪјЃЌФЃФтГЄАДЪТМў
clearLoop(){
clearTimeout(this.Loop);
}
}
}
</script>
|
ToolBar
ToolbarзщМўЬсЙЉИјгУЛЇШ§ИіАДХЅЃКДДНЈБуЧЉЃЌБрМБуЧЉКЭвЦЖЏБуЧЉЃЈвЦЖЏБуЧЉЙІФмЛЙУЛгазіЃЉЃК
<template>
<div class="toolBar">
<div
class="toolBtn" v-if="isCheck">
<span class="icon" @click="deleteNote"><icon
name="trash-alt"></icon></span>
<span class="icon"><icon name="dolly"></icon></span>
</div>
<div class="addNote"
v-else>
<div class="float-button
mu-float-button" @click="addNote"><icon
name="plus"></icon></div>
</div>
<mu-dialog :open="dialog"
title="ЩОГ§БуЧЉ" @close="close">
ФњШЗЖЈЩОГ§ЫљбЁБуЧЉТ№ЃП
<mu-flat-button slot="actions"
@click="close" primary label="ШЁЯћ"/>
<mu-flat-button slot="actions" primary
@click="deleteConfirm" label="ШЗЖЈ"/>
</mu-dialog>
</div>
</template>
<script>
import { mapGetters,mapActions } from 'vuex'
export default {
name: 'ToolBar',
data(){
return {
dialog: false
}
},
computed:{
...mapGetters([
'isCheck'
])
},
methods:{
//ЬэМгБуЧЉ
addNote(){
this.$store.dispatch('newNote');
this.$router.push({path:'editor'});
},
//ЩОГ§БуЧЉ
deleteNote(){
this.dialog = true;
},
//ЙиБеДАПк
close () {
this.dialog = false;
},
//ШЗЖЈЩОГ§
deleteConfirm(){
this.dialog = false;
this.$store.dispatch('deleteNote');
}
}
}
</script> |
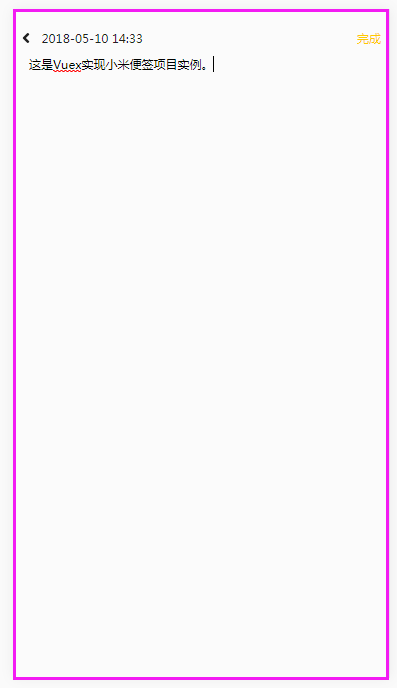
Editor
Editor зщМўЪЧзюМђЕЅЕФЃЌЫќжЛзіСНМўЪТЃК
Дг store ЛёШЁЕБЧАБЪМЧactiveNoteЃЌАбЫќЕФФкШнеЙЪОдк textarea
дкгУЛЇИќаТБЪМЧЕФЪБКђЃЌЕїгУ editNote() action
вдЯТЪЧЭъећЕФ Editor.vue:
<template>
<div class="edit-panel">
<div
class="edit-tool">
<span class="back-list"
@click="backList"><icon name="angle-left"></icon></span>
<span class="date" v-text="activeNote.date"></span>
<span class="saveNote" v-show="isShow"
@click="backList">ЭъГЩ</span>
</div>
<textarea v-focus class="edit-area"
v-model="activeNote.content" @keyup="editorNote"></textarea>
</div>
</template>
<script>
import { mapGetters } from 'vuex'
export default {
name: 'Editor',
data(){
return {
content:'',
isShow:false
}
},
created(){
this.content = this.activeNote.content
},
computed:{
//ЛёШЁе§дкВйзїЕФБуЧЉ
...mapGetters([
'activeNote'
])
},
directives:{
focus:{
inserted(el){
el.focus();
}
}
},
methods:{
//ЗЕЛиБуЧЉСаБэ
backList(){
this.$router.push({path:'/'})
this.$store.dispatch('backSave',this.activeNote)
},
//ЭъГЩАДХЅЯдЪО&вўВи
editorNote(){
if(this.content != this.activeNote.content){
this.isShow = true;
}else{
this.isShow = false;
}
}
}
}
</script> |
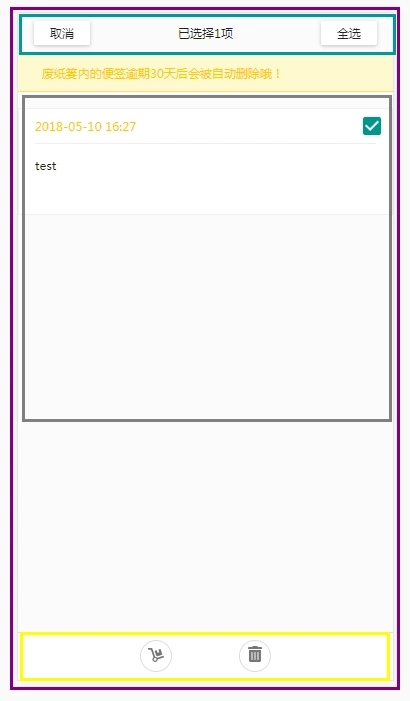
етОЭЪЧвЛИіаЁУзБуЧЉЕФДДНЈКЭБрМЃЌЛЙгаЩОГ§вдМАЗЯжНТЈЙІФметРяОЭВЛЖрЫЕСЫЃЌЙІФмЖМКмМђЕЅВЛУїАзЕФЕиЗНПЩвдПДдДДњТыЃЌШЛКѓздМКЪЕеНВйзївЛЗЌЃЌШчгааДЕФВЛЖдЕФЕиЗНДѓМвЬсГіРДЃЌЛЅЯрбЇЯАЛЅЯрАяжњТяЃЌаЛаЛЃЁ
|