VuexЪЧвЛИізЈЮЊVueЗўЮёЃЌгУгкЙмРэвГУцЪ§ОнзДЬЌЁЂЬсЙЉЭГвЛЪ§ОнВйзїЕФЩњЬЌЯЕЭГЁЃЫќМЏжагкMVCФЃЪНжаЕФModelВуЃЌЙцЖЈЫљгаЕФЪ§ОнВйзїБиаыЭЈЙ§
action - mutation - state change ЕФСїГЬРДНјааЃЌдйНсКЯVueЕФЪ§ОнЪгЭМЫЋЯђАѓЖЈЬиадРДЪЕЯжвГУцЕФеЙЪОИќаТЁЃЭГвЛЕФвГУцзДЬЌЙмРэвдМАВйзїДІРэЃЌПЩвдШУИДдгЕФзщМўНЛЛЅБфЕУМђЕЅЧхЮњЃЌЭЌЪБПЩдкЕїЪдФЃЪНЯТНјааЪБЙтЛњАуЕФЕЙЭЫЧАНјВйзїЃЌВщПДЪ§ОнИФБфЙ§ГЬЃЌЪЙcode
debugИќМгЗНБуЁЃ
зюНќдкПЊЗЂЕФЯюФПжагУЕНСЫVuexРДЙмРэећЬхвГУцзДЬЌЃЌгіЕНСЫКмЖрЮЪЬтЁЃОіЖЈбаОПЯТдДТыЃЌдкД№вЩНтЛѓжЎЭтЃЌФмЩюШыбЇЯАЦфЪЕЯждРэЁЃ
ЯШНЋЮЪЬтХзГіРДЃЌЪЙбЇЯАКЭбаОПИќгаеыЖдадЃК
ЪЙгУVuexжЛашжДаа Vue.use(Vuex)ЃЌВЂдкVueЕФХфжУжаДЋШывЛИіstoreЖдЯѓЕФЪОР§ЃЌstoreЪЧШчКЮЪЕЯжзЂШыЕФЃП
stateФкВПЪЧШчКЮЪЕЯжжЇГжФЃПщХфжУКЭФЃПщЧЖЬзЕФЃП
дкжДааdispatchДЅЗЂactionЃЈcommitЭЌРэЃЉЕФЪБКђЃЌжЛашДЋШыЃЈtype, payloadЃЉЃЌactionжДааКЏЪ§жаЕквЛИіВЮЪ§storeДгФФРяЛёШЁЕФЃП
ШчКЮЧјЗжstateЪЧЭтВПжБНгаоИФЃЌЛЙЪЧЭЈЙ§mutationЗНЗЈаоИФЕФЃП
ЕїЪдЪБЕФЁАЪБПеДЉЫѓЁБЙІФмЪЧШчКЮЪЕЯжЕФЃП
зЂЃКБОЮФЖдгаVuexгаЪЕМЪЪЙгУОбщЕФЭЌбЇАяжњИќДѓЃЌФмИќЧхЮњРэНтVuexЕФЙЄзїСїГЬКЭдРэЃЌЪЙгУЦ№РДИќЕУаФгІЪжЁЃГѕДЮНгДЅЕФЭЌбЇЃЌПЩвдЯШВЮПМVuexЙйЗНЮФЕЕНјааЛљДЁИХФюЕФбЇЯАЁЃ
вЛЁЂПђМмКЫаФСїГЬ
НјаадДТыЗжЮіжЎЧАЃЌЯШСЫНтвЛЯТЙйЗНЮФЕЕжаЬсЙЉЕФКЫаФЫМЯыЭМЃЌЫќвВДњБэзХећИіVuexПђМмЕФдЫааСїГЬЁЃ

ШчЭМЪОЃЌVuexЮЊVue ComponentsНЈСЂЦ№СЫвЛИіЭъећЕФЩњЬЌШІЃЌАќРЈПЊЗЂжаЕФAPIЕїгУвЛЛЗЁЃЮЇШЦетИіЩњЬЌШІЃЌМђвЊНщЩмвЛЯТИїФЃПщдкКЫаФСїГЬжаЕФжївЊЙІФмЃК
Vue ComponentsЃКVueзщМўЁЃHTMLвГУцЩЯЃЌИКд№НгЪегУЛЇВйзїЕШНЛЛЅааЮЊЃЌжДааdispatchЗНЗЈДЅЗЂЖдгІactionНјааЛигІЁЃ
dispatchЃКВйзїааЮЊДЅЗЂЗНЗЈЃЌЪЧЮЈвЛФмжДааactionЕФЗНЗЈЁЃ
actionsЃКВйзїааЮЊДІРэФЃПщЁЃИКд№ДІРэVue ComponentsНгЪеЕНЕФЫљгаНЛЛЅааЮЊЁЃАќКЌЭЌВН/вьВНВйзїЃЌжЇГжЖрИіЭЌУћЗНЗЈЃЌАДеезЂВсЕФЫГађвРДЮДЅЗЂЁЃЯђКѓЬЈAPIЧыЧѓЕФВйзїОЭдкетИіФЃПщжаНјааЃЌАќРЈДЅЗЂЦфЫћactionвдМАЬсНЛmutationЕФВйзїЁЃИУФЃПщЬсЙЉСЫPromiseЕФЗтзАЃЌвджЇГжactionЕФСДЪНДЅЗЂЁЃ
commitЃКзДЬЌИФБфЬсНЛВйзїЗНЗЈЁЃЖдmutationНјааЬсНЛЃЌЪЧЮЈвЛФмжДааmutationЕФЗНЗЈЁЃ
mutationsЃКзДЬЌИФБфВйзїЗНЗЈЁЃЪЧVuexаоИФstateЕФЮЈвЛЭЦМіЗНЗЈЃЌЦфЫћаоИФЗНЪНдкбЯИёФЃЪНЯТНЋЛсБЈДэЁЃИУЗНЗЈжЛФмНјааЭЌВНВйзїЃЌЧвЗНЗЈУћжЛФмШЋОжЮЈвЛЁЃВйзїжЎжаЛсгавЛаЉhookБЉТЖГіРДЃЌвдНјааstateЕФМрПиЕШЁЃ
stateЃКвГУцзДЬЌЙмРэШнЦїЖдЯѓЁЃМЏжаДцДЂVue componentsжаdataЖдЯѓЕФСуЩЂЪ§ОнЃЌШЋОжЮЈвЛЃЌвдНјааЭГвЛЕФзДЬЌЙмРэЁЃвГУцЯдЪОЫљашЕФЪ§ОнДгИУЖдЯѓжаНјааЖСШЁЃЌРћгУVueЕФЯИСЃЖШЪ§ОнЯьгІЛњжЦРДНјааИпаЇЕФзДЬЌИќаТЁЃ
gettersЃКstateЖдЯѓЖСШЁЗНЗЈЁЃЭМжаУЛгаЕЅЖРСаГіИУФЃПщЃЌгІИУБЛАќКЌдкСЫrenderжаЃЌVue
ComponentsЭЈЙ§ИУЗНЗЈЖСШЁШЋОжstateЖдЯѓЁЃ
VueзщМўНгЪеНЛЛЅааЮЊЃЌЕїгУdispatchЗНЗЈДЅЗЂactionЯрЙиДІРэЃЌШєвГУцзДЬЌашвЊИФБфЃЌдђЕїгУcommitЗНЗЈЬсНЛmutationаоИФstateЃЌЭЈЙ§gettersЛёШЁЕНstateаТжЕЃЌжиаТфжШОVue
ComponentsЃЌНчУцЫцжЎИќаТЁЃ
ЖўЁЂФПТМНсЙЙНщЩм
ДђПЊVuexЯюФПЃЌПДЯТдДТыФПТМНсЙЙЁЃ
VuexЬсЙЉСЫЗЧГЃЧПДѓЕФзДЬЌЙмРэЙІФмЃЌдДТыДњТыСПШДВЛЖрЃЌФПТМНсЙЙЛЎЗжвВКмЧхЮњЁЃЯШДѓЬхНщЩмЯТИїИіФПТМЮФМўЕФЙІФмЃК
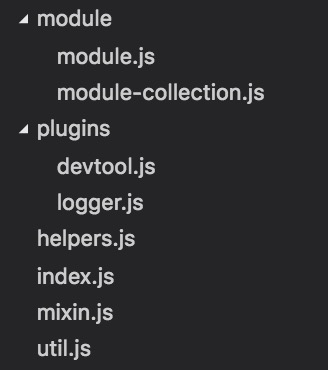
moduleЃКЬсЙЉmoduleЖдЯѓгыmoduleЖдЯѓЪїЕФДДНЈЙІФмЃЛ
pluginsЃКЬсЙЉПЊЗЂИЈжњВхМўЃЌШчЁАЪБЙтДЉЫѓЁБЙІФмЃЌstateаоИФЕФШежОМЧТМЙІФмЕШЃЛ
helpers.jsЃКЬсЙЉactionЁЂmutationsвдМАgettersЕФВщевAPIЃЛ
index.jsЃКЪЧдДТыжїШыПкЮФМўЃЌЬсЙЉstoreЕФИїmoduleЙЙНЈАВзАЃЛ
mixin.jsЃКЬсЙЉСЫstoreдкVueЪЕР§ЩЯЕФзАдизЂШыЃЛ
util.jsЃКЬсЙЉСЫЙЄОпЗНЗЈШчfindЁЂdeepCopyЁЂforEachValueвдМАassertЕШЗНЗЈЁЃ
Ш§ЁЂГѕЪМЛЏзАдигызЂШы
СЫНтДѓИХЕФФПТММАЖдгІЙІФмКѓЃЌЯТУцПЊЪМНјаадДТыЗжЮіЁЃindex.jsжаАќКЌСЫЫљгаЕФКЫаФДњТыЃЌДгИУЮФМўШыЪжНјааЗжЮіЁЃ
3.1 зАдиЪЕР§
ЯШПДИіМђЕЅЕФР§згЃК
/**
* store.jsЮФМў
* ДДНЈstoreЖдЯѓЃЌХфжУstateЁЂactionЁЂmutationвдМАgetter
*
**/
import Vue from 'vue'
import Vuex from 'vuex'
// install VuexПђМм
Vue.use(Vuex)
// ДДНЈВЂЕМГіstoreЖдЯѓЁЃЮЊСЫЗНБуЃЌВЛХфжУШЮКЮВЮЪ§
export default new Vuex.Store() |
store.jsЮФМўжаЃЌМгдиVuexПђМмЃЌДДНЈВЂЕМГівЛИіПеХфжУЕФstoreЖдЯѓЪЕР§ЁЃ
/**
* vue-index.jsЮФМў
*
*
**/
import Vue from 'vue'
import App from './../pages/app.vue'
import store from './store.js'
new Vue({
el: '#root',
router,
store,
render: h => h(App)
}) |
ШЛКѓдкindex.jsжаЃЌе§ГЃГѕЪМЛЏвЛИівГУцИљМЖБ№ЕФVueзщМўЃЌДЋШыетИіздЖЈвхЕФstoreЖдЯѓЁЃ
ШчЮЪЬт1ЫљЪіЃЌвдЩЯЪЕЧçСЫVueЕФГѕЪМЛЏДњТыЃЌжЛЪЧЖрСЫвЛИіstoreЖдЯѓЕФДЋШыЁЃвЛЦ№ПДЯТдДТыжаЕФЪЕЯжЗНЪНЁЃ
3.2 зАдиЗжЮі
index.jsЮФМўДњТыжДааПЊЭЗЃЌЖЈвхОжВП Vue БфСПЃЌгУгкХаЖЯЪЧЗёвбОзАдиКЭМѕЩйШЋОжзїгУгђВщевЁЃ
ШЛКѓХаЖЯШєДІгкфЏРРЦїЛЗОГЯТЧвМгдиЙ§VueЃЌдђжДааinstallЗНЗЈЁЃ
// auto install
in dist mode
if (typeof window !== 'undefined' && window.Vue)
{
install(window.Vue)
} |
installЗНЗЈНЋVuexзАдиЕНVueЖдЯѓЩЯЃЌVue.use(Vuex) вВЪЧЭЈЙ§ЫќжДааЃЌЯШПДЯТVue.useЗНЗЈЪЕЯжЃК
function (plugin: Function
| Object) {
/* istanbul ignore if */
if (plugin.installed) {
return
}
// additional parameters
const args = toArray(arguments, 1)
args.unshift(this)
if (typeof plugin.install === 'function') {
// ЪЕМЪжДааВхМўЕФinstallЗНЗЈ
plugin.install.apply(plugin, args)
} else {
plugin.apply(null, args)
}
plugin.installed = true
return this
} |
ШєЪЧЪзДЮМгдиЃЌНЋОжВПVueБфСПИГжЕЮЊШЋОжЕФVueЖдЯѓЃЌВЂжДааapplyMixinЗНЗЈЃЌinstallЪЕЯжШчЯТЃК
function install (_Vue) {
if (Vue) {
console.error(
'[vuex] already installed. Vue.use(Vuex) should
be called only once.'
)
return
}
Vue = _Vue
applyMixin(Vue)
} |
РДПДЯТapplyMixinЗНЗЈФкВПДњТыЁЃШчЙћЪЧ2.x.xвдЩЯАцБОЃЌПЩвдЪЙгУ hook ЕФаЮЪННјаазЂШыЃЌЛђЪЙгУЗтзАВЂЬцЛЛVueЖдЯѓдаЭЕФ_initЗНЗЈЃЌЪЕЯжзЂШыЁЃ
export default function (Vue)
{
const version = Number(Vue.version.split('.')[0])
if (version >= 2) {
const usesInit = Vue.config._lifecycleHooks.indexOf('init')
> -1
Vue.mixin(usesInit ? { init: vuexInit } : {
beforeCreate: vuexInit })
} else {
// override init and inject vuex init procedure
// for 1.x backwards compatibility.
const _init = Vue.prototype._init
Vue.prototype._init = function (options = {})
{
options.init = options.init
? [vuexInit].concat(options.init)
: vuexInit
_init.call(this, options)
}
} |
ОпЬхЪЕЯжЃКНЋГѕЪМЛЏVueИљзщМўЪБДЋШыЕФstoreЩшжУЕНthisЖдЯѓЕФ$storeЪєадЩЯЃЌзгзщМўДгЦфИИзщМўв§гУ$storeЪєадЃЌВуВуЧЖЬзНјааЩшжУЁЃдкШЮвтзщМўжажДаа
this.$store ЖМФмевЕНзАдиЕФФЧИіstoreЖдЯѓЃЌvuexInitЗНЗЈЪЕЯжШчЯТЃК
function vuexInit () {
const options = this.$options
// store injection
if (options.store) {
this.$store = options.store
} else if (options.parent && options.parent.$store)
{
this.$store = options.parent.$store
}
} |
ПДИіЭМР§РэНтЯТstoreЕФДЋЕнЁЃ
вГУцVueНсЙЙЭМЃК 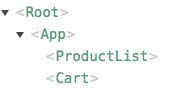
ЖдгІstoreСїЯђЃК 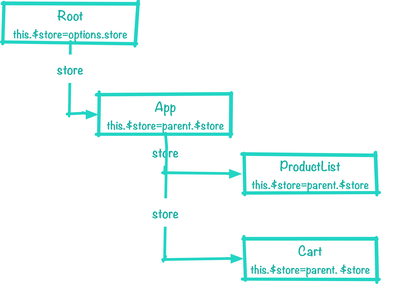
ЫФЁЂstoreЖдЯѓЙЙдь
ЩЯУцЖдVuexПђМмЕФзАдивдМАзЂШыздЖЈвхstoreЖдЯѓНјааЗжЮіЃЌНтОіСЫЮЪЬт1ЁЃНгЯТРДЯъЯИЗжЮіstoreЖдЯѓЕФФкВПЙІФмКЭОпЬхЪЕЯжЃЌРДНтД№
ЮЊЪВУДactionsЁЂgettersЁЂmutationsжаФмДгarguments[0]жаФУЕНstoreЕФЯрЙиЪ§Он?
ЕШЮЪЬтЁЃ
storeЖдЯѓЪЕЯжТпМБШНЯИДдгЃЌЯШПДЯТЙЙдьЗНЗЈЕФећЬхТпМСїГЬРДАяжњКѓУцЕФРэНтЃК
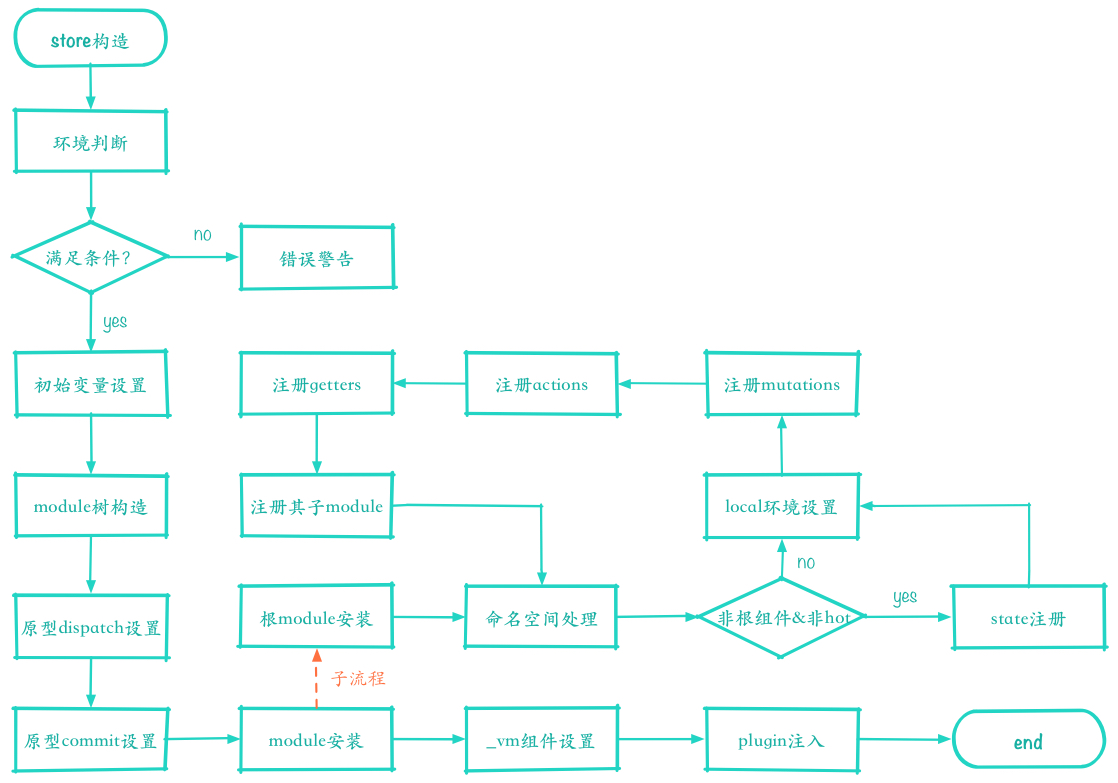
4.1 ЛЗОГХаЖЯ
ПЊЪМЗжЮіstoreЕФЙЙдьКЏЪ§ЃЌЗжаЁНкж№КЏЪ§ж№ааЕФЗжЮіЦфЙІФмЁЃ
constructor (options = {})
{
assert (Vue, `must call Vue.use(Vuex) before creating
a store instance.`)
assert (typeof Promise !== 'undefined', `vuex
requires a Promise polyfill in this browser.`) |
дкstoreЙЙдьКЏЪ§жажДааЛЗОГХаЖЯЃЌвдЯТЖМЪЧVuexЙЄзїЕФБивЊЬѕМўЃК
вбОжДааАВзАКЏЪ§НјаазАдиЃЛ
жЇГжPromiseгяЗЈЁЃ
assertКЏЪ§ЪЧвЛИіМђЕЅЕФЖЯбдКЏЪ§ЕФЪЕЯжЃЌвЛааДњТыМДПЩЪЕЯжЁЃ
function assert (condition,
msg) {
if (!condition) throw new Error(`[vuex] ${msg}`)
} |
4.2 Ъ§ОнГѕЪМЛЏЁЂmoduleЪїЙЙдь
ЛЗОГХаЖЯКѓЃЌИљОнnewЙЙдьДЋШыЕФoptionsЛђФЌШЯжЕЃЌГѕЪМЛЏФкВПЪ§ОнЁЃ
const {
state = {},
plugins = [],
strict = false
} = options
// store internal state
this._committing = false // ЪЧЗёдкНјааЬсНЛзДЬЌБъЪЖ
this._actions = Object.create(null) // acitonsВйзїЖдЯѓ
this._mutations = Object.create(null) // mutationsВйзїЖдЯѓ
this._wrappedGetters = Object.create(null) //
ЗтзАКѓЕФgettersМЏКЯЖдЯѓ
this._modules = new ModuleCollection(options)
// VuexжЇГжstoreЗжФЃПщДЋШыЃЌДцДЂЗжЮіКѓЕФmodules
this._modulesNamespaceMap = Object.create(null)
// ФЃПщУќУћПеМфmap
this._subscribers = [] // ЖЉдФКЏЪ§МЏКЯЃЌVuexЬсЙЉСЫsubscribeЙІФм
this._watcherVM = new Vue() // VueзщМўгУгкwatchМрЪгБфЛЏ |
ЕїгУ new Vuex.store(options) ЪБДЋШыЕФoptionsЖдЯѓЃЌгУгкЙЙдьModuleCollectionРрЃЌЯТУцПДПДЦфЙІФмЁЃ
constructor (rawRootModule)
{
// register root module (Vuex.Store options)
this.root = new Module(rawRootModule, false)
// register all nested modules
if (rawRootModule.modules) {
forEachValue(rawRootModule.modules, (rawModule,
key) => {
this.register([key], rawModule, false)
})
} |
ModuleCollectionжївЊНЋДЋШыЕФoptionsЖдЯѓећИіЙЙдьЮЊвЛИіmoduleЖдЯѓЃЌВЂбЛЗЕїгУ
this.register([key], rawModule, false) ЮЊЦфжаЕФmodulesЪєадНјааФЃПщзЂВсЃЌЪЙЦфЖМГЩЮЊmoduleЖдЯѓЃЌзюКѓoptionsЖдЯѓБЛЙЙдьГЩвЛИіЭъећЕФзщМўЪїЁЃModuleCollectionРрЛЙЬсЙЉСЫmodulesЕФИќЬцЙІФмЃЌЯъЯИЪЕЯжПЩвдВщПДдДЮФМўmodule-collection.jsЁЃ
4.3 dispatchгыcommitЩшжУ
МЬајЛиЕНstoreЕФЙЙдьКЏЪ§ДњТыЁЃ
// bind commit and dispatch
to self
const store = this
const { dispatch, commit } = this
this.dispatch = function boundDispatch (type,
payload) {
return dispatch.call(store, type, payload)
}
this.commit = function boundCommit (type, payload,
options) {
return commit.call(store, type, payload, options)
} |
ЗтзАЬцЛЛдаЭжаЕФdispatchКЭcommitЗНЗЈЃЌНЋthisжИЯђЕБЧАstoreЖдЯѓЁЃdispatchКЭcommitЗНЗЈОпЬхЪЕЯжШчЯТЃК
dispatch (_type, _payload)
{
// check object-style dispatch
const {
type,
payload
} = unifyObjectStyle(_type, _payload) // ХфжУВЮЪ§ДІРэ
// ЕБЧАtypeЯТЫљгаactionДІРэКЏЪ§МЏКЯ
const entry = this._actions[type]
if (!entry) {
console.error(`[vuex] unknown action type: ${type}`)
return
}
return entry.length > 1
? Promise.all(entry.map(handler => handler(payload)))
: entry[0](payload)
} |
ЧАУцЬсЕНЃЌdispatchЕФЙІФмЪЧДЅЗЂВЂДЋЕнвЛаЉВЮЪ§ЃЈpayloadЃЉИјЖдгІtypeЕФactionЁЃвђЮЊЦфжЇГж2жжЕїгУЗНЗЈЃЌЫљвддкdispatchжаЃЌЯШНјааВЮЪ§ЕФЪЪХфДІРэЃЌШЛКѓХаЖЯaction
typeЪЧЗёДцдкЃЌШєДцдкОЭж№ИіжДааЃЈзЂЃКЩЯУцДњТыжаЕФthis._actions[type] вдМА ЯТУцЕФ
this._mutations[type] ОљЪЧДІРэЙ§ЕФКЏЪ§МЏКЯЃЌОпЬхФкШнСєЕНКѓУцНјааЗжЮіЃЉЁЃ
commitЗНЗЈКЭdispatchЯрБШЫфШЛЖМЪЧДЅЗЂtypeЃЌЕЋЪЧЖдгІЕФДІРэШДЯрЖдИДдгЃЌДњТыШчЯТЁЃ
commit (_type, _payload,
_options) {
// check object-style commit
const {
type,
payload,
options
} = unifyObjectStyle(_type, _payload, _options)
const mutation = { type, payload }
const entry = this._mutations[type]
if (!entry) {
console.error(`[vuex] unknown mutation type:
${type}`)
return
}
// зЈгУаоИФstateЗНЗЈЃЌЦфЫћаоИФstateЗНЗЈОљЪЧЗЧЗЈаоИФ
this._withCommit(() => {
entry.forEach(function commitIterator (handler)
{
handler(payload)
})
})
// ЖЉдФепКЏЪ§БщРњжДааЃЌДЋШыЕБЧАЕФmutationЖдЯѓКЭЕБЧАЕФstate
this._subscribers.forEach(sub => sub(mutation,
this.state))
if (options && options.silent) {
console.warn(
`[vuex] mutation type: ${type}. Silent option
has been removed. ` +
'Use the filter functionality in the vue-devtools'
)
}
} |
ИУЗНЗЈЭЌбљжЇГж2жжЕїгУЗНЗЈЁЃЯШНјааВЮЪ§ЪЪХфЃЌХаЖЯДЅЗЂmutation typeЃЌРћгУ_withCommitЗНЗЈжДааБОДЮХњСПДЅЗЂmutationДІРэКЏЪ§ЃЌВЂДЋШыpayloadВЮЪ§ЁЃжДааЭъГЩКѓЃЌЭЈжЊЫљга_subscribersЃЈЖЉдФКЏЪ§ЃЉБОДЮВйзїЕФmutationЖдЯѓвдМАЕБЧАЕФstateзДЬЌЃЌШчЙћДЋШыСЫвбОвЦГ§ЕФsilentбЁЯюдђНјааЬсЪООЏИцЁЃ
4.4 stateаоИФЗНЗЈ
_withCommitЪЧвЛИіДњРэЗНЗЈЃЌЫљгаДЅЗЂmutationЕФНјааstateаоИФЕФВйзїЖМОЙ§ЫќЃЌгЩДЫРДЭГвЛЙмРэМрПиstateзДЬЌЕФаоИФЁЃЪЕЯжДњТыШчЯТЁЃ
_withCommit (fn) {
// БЃДцжЎЧАЕФЬсНЛзДЬЌ
const committing = this._committing
// НјааБОДЮЬсНЛЃЌШєВЛЩшжУЮЊtrueЃЌжБНгаоИФstateЃЌstrictФЃЪНЯТЃЌVuexНЋЛсВњЩњЗЧЗЈаоИФstateЕФОЏИц
this._committing = true
// жДааstateЕФаоИФВйзї
fn()
// аоИФЭъГЩЃЌЛЙдБОДЮаоИФжЎЧАЕФзДЬЌ
this._committing = committing
} |
ЛКДцжДааЪБЕФcommittingзДЬЌНЋЕБЧАзДЬЌЩшжУЮЊtrueКѓНјааБОДЮЬсНЛВйзїЃЌД§ВйзїЭъБЯКѓЃЌНЋcommittingзДЬЌЛЙдЮЊжЎЧАЕФзДЬЌЁЃ
4.5 moduleАВзА
АѓЖЈdispatchКЭcommitЗНЗЈжЎКѓЃЌНјаабЯИёФЃЪНЕФЩшжУЃЌвдМАФЃПщЕФАВзАЃЈinstallModuleЃЉЁЃгЩгкеМгУзЪдДНЯЖргАЯьвГУцадФмЃЌбЯИёФЃЪННЈвщжЛдкПЊЗЂФЃЪНПЊЦєЃЌЩЯЯпКѓашвЊЙиБеЁЃ
// strict mode
this.strict = strict
// init root module.
// this also recursively registers all sub-modules
// and collects all module getters inside this._wrappedGetters
installModule(this, state, [], this._modules.root) |
4.5.1 ГѕЪМЛЏrootState
ЩЯЪіДњТыЕФБИзЂжаЃЌЬсЕНinstallModuleЗНЗЈГѕЪМЛЏзщМўЪїИљзщМўЁЂзЂВсЫљгазгзщМўЃЌВЂНЋЦфжаЫљгаЕФgettersДцДЂЕНthis._wrappedGettersЪєаджаЃЌШУЮвУЧПДПДЦфжаЕФДњТыЪЕЯжЁЃ
function installModule (store,
rootState, path, module, hot) {
const isRoot = !path.length
const namespace = store._modules.getNamespace(path)
// register in namespace map
if (namespace) {
store._modulesNamespaceMap[namespace] = module
}
// ЗЧИљзщМўЩшжУ state ЗНЗЈ
if (!isRoot && !hot) {
const parentState = getNestedState(rootState,
path.slice(0, -1))
const moduleName = path[path.length - 1]
store._withCommit(() => {
Vue.set(parentState, moduleName, module.state)
})
}
ЁЄЁЄЁЄЁЄЁЄЁЄ |
ХаЖЯЪЧЗёЪЧИљФПТМЃЌвдМАЪЧЗёЩшжУСЫУќУћПеМфЃЌШєДцдкдђдкnamespaceжаНјааmoduleЕФДцДЂЃЌдкВЛЪЧИљзщМўЧвВЛЪЧ
hot ЬѕМўЕФЧщПіЯТЃЌЭЈЙ§getNestedStateЗНЗЈФУЕНИУmoduleИИМЖЕФstateЃЌФУЕНЦфЫљдкЕФ
moduleName ЃЌЕїгУ Vue.set(parentState, moduleName, module.state)
ЗНЗЈНЋЦфstateЩшжУЕНИИМЖstateЖдЯѓЕФmoduleNameЪєаджаЃЌгЩДЫЪЕЯжИУФЃПщЕФstateзЂВсЃЈЪзДЮжДааетРяЃЌвђЮЊЪЧИљФПТМзЂВсЃЌЫљвдВЂВЛЛсжДааИУЬѕМўжаЕФЗНЗЈЃЉЁЃgetNestedStateЗНЗЈДњТыКмМђЕЅЃЌЗжЮіpathФУЕНstateЃЌШчЯТЁЃ
function getNestedState (state,
path) {
return path.length
? path.reduce((state, key) => state[key], state)
: state
} |
4.5.2 moduleЩЯЯТЮФЛЗОГЩшжУ
| const local = module.context
= makeLocalContext(store, namespace, path) |
УќУћПеМфКЭИљФПТМЬѕМўХаЖЯЭъБЯКѓЃЌНгЯТРДЖЈвхlocalБфСПКЭmodule.contextЕФжЕЃЌжДааmakeLocalContextЗНЗЈЃЌЮЊИУmoduleЩшжУОжВПЕФ
dispatchЁЂcommitЗНЗЈвдМАgettersКЭstateЃЈгЩгкnamespaceЕФДцдкашвЊзіМцШнДІРэЃЉЁЃ
4.5.3 mutationsЁЂactionsвдМАgettersзЂВс
ЖЈвхlocalЛЗОГКѓЃЌбЛЗзЂВсЮвУЧдкoptionsжаХфжУЕФactionвдМАmutationЕШЁЃж№ИіЗжЮіИїзЂВсКЏЪ§жЎЧАЃЌЯШПДЯТФЃПщМфЕФТпМЙиЯЕСїГЬЭМЃК

ЯТУцЗжЮіДњТыТпМЃК
// зЂВсЖдгІФЃПщЕФmutationЃЌЙЉstateаоИФЪЙгУ
module.forEachMutation((mutation, key) => {
const namespacedType = namespace + key
registerMutation(store, namespacedType, mutation,
local)
})
// зЂВсЖдгІФЃПщЕФactionЃЌЙЉЪ§ОнВйзїЁЂЬсНЛmutationЕШвьВНВйзїЪЙгУ
module.forEachAction((action, key) => {
const namespacedType = namespace + key
registerAction(store, namespacedType, action,
local)
})
// зЂВсЖдгІФЃПщЕФgettersЃЌЙЉstateЖСШЁЪЙгУ
module.forEachGetter((getter, key) => {
const namespacedType = namespace + key
registerGetter(store, namespacedType, getter,
local)
}) |
registerMutationЗНЗЈжаЃЌЛёШЁstoreжаЕФЖдгІmutation typeЕФДІРэКЏЪ§МЏКЯЃЌНЋаТЕФДІРэКЏЪ§pushНјШЅЁЃетРяНЋЮвУЧЩшжУдкmutations
typeЩЯЖдгІЕФ handler НјааСЫЗтзАЃЌИјдКЏЪ§ДЋШыСЫstateЁЃдкжДаа commit('xxx',
payload) ЕФЪБКђЃЌtypeЮЊ xxx ЕФmutationЕФЫљгаhandlerЖМЛсНгЪеЕНstateвдМАpayloadЃЌетОЭЪЧдкhandlerРяУцФУЕНstateЕФдвђЁЃ
function registerMutation
(store, type, handler, local) {
// ШЁГіЖдгІtypeЕФmutations-handlerМЏКЯ
const entry = store._mutations[type] || (store._mutations[type]
= [])
// commitЪЕМЪЕїгУЕФВЛЪЧЮвУЧДЋШыЕФhandlerЃЌЖјЪЧОЙ§ЗтзАЕФ
entry.push(function wrappedMutationHandler (payload)
{
// ЕїгУhandlerВЂНЋstateДЋШы
handler(local.state, payload)
})
} |
actionКЭgetterЕФзЂВсвВЪЧЭЌРэЕФЃЌПДвЛЯТДњТыЃЈзЂЃКЧАУцЬсЕНЕФ this.actions вдМА
this.mutationsдкДЫДІНјааЩшжУЃЉЁЃ
function registerAction (store,
type, handler, local) {
// ШЁГіЖдгІtypeЕФactions-handlerМЏКЯ
const entry = store._actions[type] || (store._actions[type]
= [])
// ДцДЂаТЕФЗтзАЙ§ЕФaction-handler
entry.push(function wrappedActionHandler (payload,
cb) {
// ДЋШы state ЕШЖдЯѓЙЉЮвУЧдaction-handlerЪЙгУ
let res = handler({
dispatch: local.dispatch,
commit: local.commit,
getters: local.getters,
state: local.state,
rootGetters: store.getters,
rootState: store.state
}, payload, cb)
// actionашвЊжЇГжpromiseНјааСДЪНЕїгУЃЌетРяНјааМцШнДІРэ
if (!isPromise(res)) {
res = Promise.resolve(res)
}
if (store._devtoolHook) {
return res.catch(err => {
store._devtoolHook.emit('vuex:error', err)
throw err
})
} else {
return res
}
})
}
function registerGetter (store, type, rawGetter,
local) {
// gettersжЛдЪаэДцдквЛИіДІРэКЏЪ§ЃЌШєжиИДашвЊБЈДэ
if (store._wrappedGetters[type]) {
console.error(`[vuex] duplicate getter key:
${type}`)
return
}
// ДцДЂЗтзАЙ§ЕФgettersДІРэКЏЪ§
store._wrappedGetters[type] = function wrappedGetter
(store) {
// ЮЊдgettersДЋШыЖдгІзДЬЌ
return rawGetter(
local.state, // local state
local.getters, // local getters
store.state, // root state
store.getters // root getters
)
}
} |
action handlerБШmutation handlerвдМАgetter wrapperЖрФУЕНdispatchКЭcommitВйзїЗНЗЈЃЌвђДЫactionПЩвдНјааdispatch
actionКЭcommit mutationВйзїЁЃ
4.5.4 згmoduleАВзА
зЂВсЭъСЫИљзщМўЕФactionsЁЂmutationsвдМАgettersКѓЃЌЕнЙщЕїгУздЩэЃЌЮЊзгзщМўзЂВсЦфstateЃЌactionsЁЂmutationsвдМАgettersЕШЁЃ
module.forEachChild((child,
key) => {
installModule(store, rootState, path.concat(key),
child, hot)
}) |
4.5.5 ЪЕР§НсКЯ
ЧАУцНщЩмСЫdispatchКЭcommitЗНЗЈвдМАactionsЕШЕФЪЕЯжЃЌЯТУцНсКЯвЛИіЙйЗНЕФЙКЮяГЕЪЕР§жаЕФВПЗжДњТыРДМгЩюРэНтЁЃ
VuexХфжУДњТыЃК
/
* store-index.js storeХфжУЮФМў
*
/
import Vue from 'vue'
import Vuex from 'vuex'
import * as actions from './actions'
import * as getters from './getters'
import cart from './modules/cart'
import products from './modules/products'
import createLogger from '../../../src/plugins/logger'
Vue.use(Vuex)
const debug = process.env.NODE_ENV !== 'production'
export default new Vuex.Store({
actions,
getters,
modules: {
cart,
products
},
strict: debug,
plugins: debug ? [createLogger()] : []
}) |
VuexзщМўmoduleжаИїФЃПщstateХфжУДњТыВПЗжЃК
/**
* cart.js
*
**/
const state = {
added: [],
checkoutStatus: null
}
/**
* products.js
*
**/
const state = {
all: []
} |
МгдиЩЯЪіХфжУКѓЃЌвГУцstateНсЙЙШчЯТЭМЃК
cart_state
stateжаЕФЪєадХфжУЖМЪЧАДееoptionХфжУжаmodule pathЕФЙцдђРДНјааЕФЃЌЯТУцПДactionЕФВйзїЪЕР§ЁЃ
VuecartзщМўДњТыВПЗжЃК
/**
* Cart.vue ЪЁТдtemplateДњТыЃЌжЛПДscriptВПЗж
*
**/
export default {
methods: {
// ЙКЮяГЕжаЕФЙКТђАДХЅЃЌЕуЛїКѓЛсДЅЗЂНсЫуЁЃдДТыжаЛсЕїгУ dispatchЗНЗЈ
checkout (products) {
this.$store.dispatch('checkout', products)
}
}
}
Vuexca |
Vuexcart.jsзщМўactionХфжУДњТыВПЗжЃК
const actions = {
checkout ({ commit, state }, products) {
const savedCartItems = [...state.added] // ДцДЂЬэМгЕНЙКЮяГЕЕФЩЬЦЗ
commit(types.CHECKOUT_REQUEST) // ЩшжУЬсНЛНсЫузДЬЌ
shop.buyProducts( // ЬсНЛapiЧыЧѓЃЌВЂДЋШыГЩЙІгыЪЇАмЕФcb-func
products,
() => commit(types.CHECKOUT_SUCCESS), // ЧыЧѓЗЕЛиГЩЙІдђЩшжУЬсНЛГЩЙІзДЬЌ
() => commit(types.CHECKOUT_FAILURE, { savedCartItems
}) // ЧыЧѓЗЕЛиЪЇАмдђЩшжУЬсНЛЪЇАмзДЬЌ
)
}
} |
VueзщМўжаЕуЛїЙКТђжДааЕБЧАmoduleЕФdispatchЗНЗЈЃЌДЋШыtypeжЕЮЊ 'checkout'ЃЌpayloadжЕЮЊ
'products'ЃЌдкдДТыжаdispatchЗНЗЈдкЫљгазЂВсЙ§ЕФactionsжаВщев'checkout'ЕФЖдгІжДааЪ§зщЃЌШЁГібЛЗжДааЁЃжДааЕФЪЧБЛЗтзАЙ§ЕФБЛУќУћЮЊwrappedActionHandlerЕФЗНЗЈЃЌеце§ДЋШыЕФcheckoutЕФжДааКЏЪ§дкwrappedActionHandlerетИіЗНЗЈжаБЛжДааЃЌдДТыШчЯТЃЈзЂЃКЧАУцЬљЙ§ЃЌетРядйПДвЛДЮЃЉЃК
function wrappedActionHandler
(payload, cb) {
let res = handler({
dispatch: local.dispatch,
commit: local.commit,
getters: local.getters,
state: local.state,
rootGetters: store.getters,
rootState: store.state
}, payload, cb)
if (!isPromise(res)) {
res = Promise.resolve(res)
}
if (store._devtoolHook) {
return res.catch(err => {
store._devtoolHook.emit('vuex:error', err)
throw err
})
} else {
return res
}
} |
handlerдкетРяОЭЪЧДЋШыЕФcheckoutКЏЪ§ЃЌЦфжДааашвЊЕФcommitвдМАstateОЭЪЧдкетРяБЛДЋШыЃЌpayloadвВДЋШыСЫЃЌдкЪЕР§жаЖдгІНгЪеЕФВЮЪ§УћЮЊproductsЁЃcommitЕФжДаавВЪЧЭЌРэЕФЃЌЪЕР§жаcheckoutЛЙНјааСЫвЛДЮcommitВйзїЃЌЬсНЛвЛДЮtypeжЕЮЊtypes.CHECKOUT_REQUESTЕФаоИФЃЌвђЮЊmutationУћзжЪЧЮЈвЛЕФЃЌетРяНјааСЫГЃСПаЮЪНЕФЕїгУЃЌЗРжЙУќУћжиИДЃЌжДааИњдДТыЗжЮіжавЛжТЃЌЕїгУ
function wrappedMutationHandler (payload) { handler(local.state,
payload) } ЗтзАКЏЪ§РДЪЕМЪЕїгУХфжУЕФmutationЗНЗЈЁЃ
ПДЕНЭъдДТыЗжЮіКЭЩЯУцЕФаЁЪЕР§ЃЌгІИУФмРэНтdispatch actionКЭcommit mutationЕФЙЄзїдРэСЫЁЃНгзХПДдДТыЃЌПДПДgettersЪЧШчКЮЪЕЯжstateЪЕЪБЗУЮЪЕФЁЃ
4.6 store._vmзщМўЩшжУ
жДааЭъИїmoduleЕФinstallКѓЃЌжДааresetStoreVMЗНЗЈЃЌНјааstoreзщМўЕФГѕЪМЛЏЁЃ
// initialize
the store vm, which is responsible for the reactivity
// (also registers _wrappedGetters as computed
properties)
resetStoreVM(this, state) |
злКЯЧАУцЕФЗжЮіПЩвдСЫНтЕНЃЌVuexЦфЪЕЙЙНЈЕФОЭЪЧвЛИіУћЮЊstoreЕФvmзщМўЃЌЫљгаХфжУЕФstateЁЂactionsЁЂmutationsвдМАgettersЖМЪЧЦфзщМўЕФЪєадЃЌЫљгаЕФВйзїЖМЪЧЖдетИіvmзщМўНјааЕФЁЃ
вЛЦ№ПДЯТresetStoreVMЗНЗЈЕФФкВПЪЕЯжЁЃ
function resetStoreVM
(store, state) {
const oldVm = store._vm // ЛКДцЧАvmзщМў
// bind store public getters
store.getters = {}
const wrappedGetters = store._wrappedGetters
const computed = {}
// бЛЗЫљгаДІРэЙ§ЕФgettersЃЌВЂаТНЈcomputedЖдЯѓНјааДцДЂЃЌЭЈЙ§Object.definePropertyЗНЗЈЮЊgettersЖдЯѓНЈСЂЪєадЃЌЪЙЕУЮвУЧЭЈЙ§this.$store.getters.xxxgetterФмЙЛЗУЮЪЕНИУgetters
forEachValue(wrappedGetters, (fn, key) =>
{
// use computed to leverage its lazy-caching
mechanism
computed[key] = () => fn(store)
Object.defineProperty(store.getters, key, {
get: () => store._vm[key],
enumerable: true // for local getters
})
})
// use a Vue instance to store the state tree
// suppress warnings just in case the user has
added
// some funky global mixins
const silent = Vue.config.silent
// днЪБНЋVueЩшЮЊОВФЌФЃЪНЃЌБмУтБЈГігУЛЇМгдиЕФФГаЉВхМўДЅЗЂЕФОЏИц
Vue.config.silent = true
// ЩшжУаТЕФstoreVmЃЌНЋЕБЧАГѕЪМЛЏЕФstateвдМАgettersзїЮЊcomputedЪєадЃЈИеИеБщРњЩњГЩЕФЃЉ
store._vm = new Vue({
data: { state },
computed
})
// ЛжИДVueЕФФЃЪН
Vue.config.silent = silent
// enable strict mode for new vm
if (store.strict) {
// ИУЗНЗЈЖдstateжДаа$watchвдНћжЙДгmutationЭтВПаоИФstate
enableStrictMode(store)
}
// ШєВЛЪЧГѕЪМЛЏЙ§ГЬжДааЕФИУЗНЗЈЃЌНЋОЩЕФзщМўstateЩшжУЮЊnullЃЌЧПжЦИќаТЫљгаМрЬ§еп(watchers)ЃЌД§ИќаТЩњаЇЃЌDOMИќаТЭъГЩКѓЃЌжДааvmзщМўЕФdestroyЗНЗЈНјааЯњЛйЃЌМѕЩйФкДцЕФеМгУ
if (oldVm) {
// dispatch changes in all subscribed watchers
// to force getter re-evaluation.
store._withCommit(() => {
oldVm.state = null
})
Vue.nextTick(() => oldVm.$destroy())
}
} |
resetStoreVmЗНЗЈДДНЈСЫЕБЧАstoreЪЕР§ЕФ_vmзщМўЃЌжСДЫstoreОЭДДНЈЭъБЯСЫЁЃЩЯУцДњТыЩцМАЕНСЫбЯИёФЃЪНЕФХаЖЯЃЌПДвЛЯТбЯИёФЃЪНШчКЮЪЕЯжЕФЁЃ
function enableStrictMode
(store) {
store._vm.$watch('state', () => {
assert(store._committing, `Do not mutate vuex
store state outside mutation handlers.`)
}, { deep: true, sync: true })
} |
КмМђЕЅЕФгІгУЃЌМрЪгstateЕФБфЛЏЃЌШчЙћУЛгаЭЈЙ§ this._withCommit() ЗНЗЈНјааstateаоИФЃЌдђБЈДэЁЃ
4.7 pluginзЂШы
зюКѓжДааpluginЕФжВШыЁЃ
| plugins.concat(devtoolPlugin).forEach(plugin
=> plugin(this)) |
devtoolPluginЬсЙЉЕФЙІФмга3ИіЃК
// 1. ДЅЗЂVuexзщМўГѕЪМЛЏЕФhook
devtoolHook.emit('vuex:init', store)
// 2. ЬсЙЉЁАЪБПеДЉЫѓЁБЙІФмЃЌМДstateВйзїЕФЧАНјКЭЕЙЭЫ
devtoolHook.on('vuex:travel-to-state', targetState
=> {
store.replaceState(targetState)
})
// 3. mutationБЛжДааЪБЃЌДЅЗЂhookЃЌВЂЬсЙЉБЛДЅЗЂЕФmutationКЏЪ§КЭЕБЧАЕФstateзДЬЌ
store.subscribe((mutation, state) => {
devtoolHook.emit s('vuex:mutation', mutation,
state)
}) |
дДТыЗжЮіЕНетРяЃЌVuexПђМмЕФЪЕЯждРэЛљБОЖМвбОЗжЮіЭъБЯЁЃ
ЮхЁЂзмНс
зюКѓЮвУЧЛиЙ§РДПДЮФеТПЊЪМЬсГіЕФ5ИіЮЪЬтЁЃ
1. ЮЪЃКЪЙгУVuexжЛашжДаа Vue.use(Vuex)ЃЌВЂдкVueЕФХфжУжаДЋШывЛИіstoreЖдЯѓЕФЪОР§ЃЌstoreЪЧШчКЮЪЕЯжзЂШыЕФЃП
Д№ЃКVue.use(Vuex) ЗНЗЈжДааЕФЪЧinstallЗНЗЈЃЌЫќЪЕЯжСЫVueЪЕР§ЖдЯѓЕФinitЗНЗЈЗтзАКЭзЂШыЃЌЪЙДЋШыЕФstoreЖдЯѓБЛЩшжУЕНVueЩЯЯТЮФЛЗОГЕФ$storeжаЁЃвђДЫдкVue
ComponentШЮвтЕиЗНЖМФмЙЛЭЈЙ§this.$storeЗУЮЪЕНИУstoreЁЃ
2. ЮЪЃКstateФкВПжЇГжФЃПщХфжУКЭФЃПщЧЖЬзЃЌШчКЮЪЕЯжЕФЃП
Д№ЃКдкstoreЙЙдьЗНЗЈжагаmakeLocalContextЗНЗЈЃЌЫљгаmoduleЖМЛсгавЛИіlocal
contextЃЌИљОнХфжУЪБЕФpathНјааЦЅХфЁЃЫљвджДааШчdispatch('submitOrder',
payload)етРрactionЪБЃЌФЌШЯЕФФУЕНЖМЪЧmoduleЕФlocal stateЃЌШчЙћвЊЗУЮЪзюЭтВуЛђепЪЧЦфЫћmoduleЕФstateЃЌжЛФмДгrootStateАДееpathТЗОЖж№ВННјааЗУЮЪЁЃ
3. ЮЪЃКдкжДааdispatchДЅЗЂaction(commitЭЌРэ)ЕФЪБКђЃЌжЛашДЋШы(type,
payload)ЃЌactionжДааКЏЪ§жаЕквЛИіВЮЪ§storeДгФФРяЛёШЁЕФЃП
Д№ЃКstoreГѕЪМЛЏЪБЃЌЫљгаХфжУЕФactionКЭmutationвдМАgettersОљБЛЗтзАЙ§ЁЃдкжДааШчdispatch('submitOrder',
payload)ЕФЪБКђЃЌactionsжаtypeЮЊsubmitOrderЕФЫљгаДІРэЗНЗЈЖМЪЧБЛЗтзАКѓЕФЃЌЦфЕквЛИіВЮЪ§ЮЊЕБЧАЕФstoreЖдЯѓЃЌЫљвдФмЙЛЛёШЁЕН
{ dispatch, commit, state, rootState } ЕШЪ§ОнЁЃ
4. ЮЪЃКVuexШчКЮЧјЗжstateЪЧЭтВПжБНгаоИФЃЌЛЙЪЧЭЈЙ§mutationЗНЗЈаоИФЕФЃП
Д№ЃКVuexжааоИФstateЕФЮЈвЛЧўЕРОЭЪЧжДаа commit('xx', payload) ЗНЗЈЃЌЦфЕзВуЭЈЙ§жДаа
this._withCommit(fn) ЩшжУ_committingБъжОБфСПЮЊtrueЃЌШЛКѓВХФмаоИФstateЃЌаоИФЭъБЯЛЙашвЊЛЙд_committingБфСПЁЃЭтВПаоИФЫфШЛФмЙЛжБНгаоИФstateЃЌЕЋЪЧВЂУЛгааоИФ_committingБъжОЮЛЃЌЫљвджЛвЊwatchвЛЯТstateЃЌstate
changeЪБХаЖЯЪЧЗё_committingжЕЮЊtrueЃЌМДПЩХаЖЯаоИФЕФКЯЗЈадЁЃ
5. ЮЪЃКЕїЪдЪБЕФ"ЪБПеДЉЫѓ"ЙІФмЪЧШчКЮЪЕЯжЕФЃП
Д№ЃКdevtoolPluginжаЬсЙЉСЫДЫЙІФмЁЃвђЮЊdevФЃЪНЯТЫљгаЕФstate changeЖМЛсБЛМЧТМЯТРДЃЌ'ЪБПеДЉЫѓ'
ЙІФмЦфЪЕОЭЪЧНЋЕБЧАЕФstateЬцЛЛЮЊМЧТМжаФГИіЪБПЬЕФstateзДЬЌЃЌРћгУ store.replaceState(targetState)
ЗНЗЈНЋжДааthis._vm.state = state ЪЕЯжЁЃ
дДТыжаЛЙгавЛаЉЙЄОпКЏЪ§РрЫЦregisterModuleЁЂunregisterModuleЁЂhotUpdateЁЂwatchвдМАsubscribeЕШЃЌШчгааЫШЄПЩвдДђПЊдДТыПДПДЃЌетРяВЛдйЯИЪіЁЃ
|