ľłłŲłŇńÓ£ļ
- Pod: «Kubernetes◊ÓĽýĪĺĶń≤Ņ ūĶų∂»Ķ•‘™£¨Ņ…“‘įŁļ¨container£¨¬Ŗľ≠…ŌĪŪ ĺń≥÷÷”¶”√Ķń“ĽłŲ Ķņż°£Ī»»Á“ĽłŲweb’ĺĶ„”¶”√”…«į∂ň°Ęļů∂ňľį żĺ›Ņ‚ĻĻĹ®∂Ý≥…£¨’‚»żłŲ◊ťľĢĹę‘ň––‘ŕłų◊‘Ķń»›∆ų÷–£¨ń«√īő“√«Ņ…“‘īīĹ®įŁļ¨»żłŲcontainerĶńpod°£
- node: « KubernetesĶńworkerĹŕĶ„£¨Õ®≥£“≤≥∆◊ųő™Minion node°£≥żŃň‘ň––“Ľ–©kubernetesĶń◊ťľĢ“‘Õ‚£®kubelet, kube-proxyĶ»£©£¨ĽĻ≥–Ķ£◊Ň‘ň––»›∆ų∑ĢőŮĶń÷ō»ő°£
- ReplicationController£ļ «podĶńłī÷∆≥ťŌů£¨”√”ŕĹ‚ĺŲpodĶńņ©»›ňű»›ő Ő‚°£Õ®≥££¨∑÷≤ľ Ĺ”¶”√ő™Ńň–‘ń‹ĽÚłŖŅ…”√–‘ĶńŅľ¬«£¨–Ť“™łī÷∆∂ŗ∑›◊ ‘ī£¨≤Ę«“łý図ļ‘ō«ťŅŲ∂ĮŐ¨…žňű°£Õ®ĻżReplicationController£¨ő“√«Ņ…“‘÷ł∂®“ĽłŲ”¶”√–Ť“™ľł∑›łī÷∆£¨KubernetesĹęő™√Ņ∑›łī÷∆īīĹ®“ĽłŲpod£¨≤Ę«“Ī£÷§ Ķľ ‘ň––pod żŃŅ◊‹ «”Žł√łī÷∆ żŃŅŌŗĶ»(ņż»Á£¨ĶĪ«įń≥łŲpodŚīĽķ Ī£¨◊‘∂ĮīīĹ®–¬ĶńpodņīŐśĽĽ)
Ľ∑ĺ≥Ĺť…‹£ļ
ő™Ńň—› ĺkubernetes”¶”√≤Ņ ū≤Ŗ¬‘£¨◊ľĪłŃň7Ő®Ľķ∆ų£®1łŲkubernetes masterĹŕĶ„ļÕ6łŲkubernetes workerĹŕĶ„£©£¨»ÁŌ¬Õľňý ĺ°£
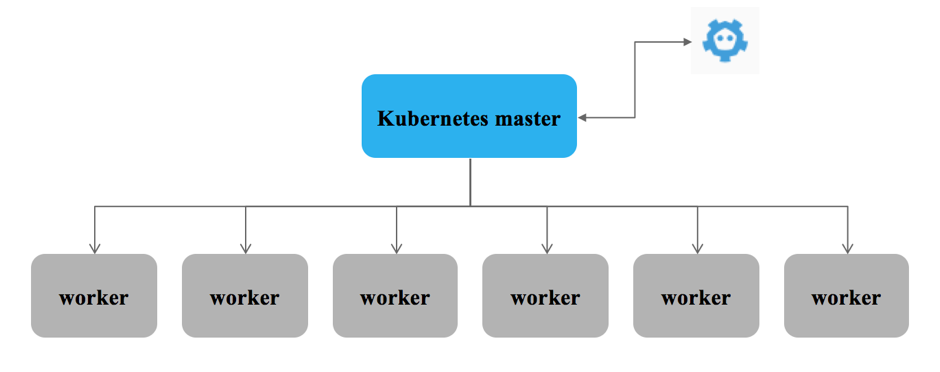
Õľ∆¨√Ť Ų
∆š÷–£ļ
1) kubernetes master: hchenk8s1(ubuntu 16.04 LTS)
2) etcd: hchenk8s1£®Ņ…“‘ļÕkubernetes master≤Ľ‘ŕ“ĽłŲĹŕĶ„…Ō√ś£©
3) worker nodes: hchenk8s2 - hchenk8s7£®◊‹Ļ≤6Ő®Ľķ∆ų, ≤Ŕ◊ųŌĶÕ≥ő™ubuntu 16.04 LTS£©
ÕÍŃňĺÕŅ™ ľĽ∑ĺ≥īÓĹ®£¨’‚ņÔĺÕ≤Ľ—› ĺŃň£¨Ľ∑ĺ≥īÓĹ®≤Ņ∑÷ÕÝ…Ōļ‹∂ŗ°£Ņ…Ļ©≤őŅľĶńĪ»ĹŌ∂ŗ°£
ĹÝ»Ž÷ųŐ‚
ńŅ«į£¨kubernetesŐŠĻ©Ńň3÷–”¶”√≤Ņ ū≤Ŗ¬‘£¨Ō¬√ś“Ľ“ĽĹÝ––Ĺť…‹£ļ
1. nodeSelector:
nodeSelector «kubernetesŐŠĻ©Ķń◊ÓľÚĶ•Ķń“Ľ÷÷”¶”√≤Ņ ū≤Ŗ¬‘£¨Õ®Ļż“Ľ÷÷key=valueĶń∑Ĺ Ĺņī≤Ņ ū”√ĽßĶń”¶”√°£
ī”’‚łŲ≤ő żĺÕń‹Ņī≥Ųņī£¨’‚÷÷≤Ŗ¬‘ĶńĶų∂»∂‘Ōů «node£¨“≤ĺÕ «…Ō√śňĶĶńkubernetesĶńworker£¨ňĶĶńłŁ√ųį◊“ĽĶ„ «£¨”√Ľß‘ŕīīĹ®”¶”√Ķń ĪļÚ£¨Ņ…“‘Õ®ĻżnodeSelectorņī÷ł∂®ń≥łŲ°ĘĽÚ’Ŗń≥◊ťĺŖ”–ń≥–© Ű–‘Ķńworker nodeņīīīĹ®’‚–©»›∆ų∑ĢőŮ°£’‚ņÔľ»»ĽŐŠĶĹŃň–Ť“™łýĺ›worker nodeĶńń≥–© Ű–‘ņīīīĹ®’‚–©»›∆ų∑ĢőŮ£¨ń«ĺÕ≤ĽĶ√≤ĽĹť…‹“ĽŌ¬worker nodeĶńlabel.
Label: ĪÍ«©Ķń“‚ňľ£¨ Ļ”√‘ŕworker node…Ō√śĻň√Żňľ“ŚĺÕ «”√ņī∂‘worker nodeĹÝ––“Ľ–©ĪÍľ«Ķń°£Ī»»ÁňĶworker nodeĶńcpuľ‹ĻĻ£®ppc64, x86, etc£©ĽÚ’Ŗ∑÷◊ť–ŇŌĘį° ≤√īĶń°£nodeSelectorĺÕ «Õ®Ļż’‚–©ĪÍ«©ņī—°‘Ů”¶”√ĶĹĶ◊“™‘ŕńń–©Ľķ∆ų…Ō»•≤Ņ ū°£
◊Ō»Ō»≤ťŅīĶĪ«įkubernetes clusterĶńworker nodeĶń«ťŅŲ°£
root@hchenk8s1:~# kubectl get nodes
NAME STATUS AGE
9.111.254.207 Ready,SchedulingDisabled 1d
9.111.254.208 Ready 1d
9.111.254.209 Ready 1d
9.111.254.212 Ready 1d
9.111.254.213 Ready 1d
9.111.254.214 Ready 1d
9.111.254.218 Ready 1d |
ī” š≥ŲŅ…“‘ŅīĶĹńŅ«į≤‚ ‘ľĮ»ļ÷–”–6Ő®worker nodeļÕ“ĽłŲ≤ĽŅ…Ķų∂»ĶńmasterĹŕĶ„°£
Ō¬√śő“√«Õ®ĻżnodeSelectorņī≤Ņ ū”¶”√£¨≤Ę«“”¶”√–Ť“™≤Ņ ū‘ŕ÷ł∂®ĶńĽķ∆ų…Ō√ś°£
‘ŕkubernetesľĮ»ļ÷–£¨kubeletĽŠ…ŌĪ®“Ľ–©Ľķ∆ų Ű–‘Ī»»Áhostname, os, archĶ»–ŇŌĘľ«¬ľ‘ŕnodesĶńlabelņÔ√ś°£Ō¬√śŌ»≤ťŅī“ĽŌ¬’‚–©label.
root@hchenk8s1:~# kubectl get nodes --show-labels
NAME STATUS AGE LABELS
9.111.254.207 Ready,SchedulingDisabled 1d beta.kubernetes.io/arch= amd64,beta.kubernetes.io/os= linux,kubernetes.io/hostname= 9.111.254.207
9.111.254.208 Ready 1d beta.kubernetes.io/arch= amd64,beta.kubernetes.io/os= linux,kubernetes.io/hostname= 9.111.254.208
9.111.254.209 Ready 1d beta.kubernetes.io/arch= amd64,beta.kubernetes.io/os= linux,kubernetes.io/hostname= 9.111.254.209
9.111.254.212 Ready 1d beta.kubernetes.io/arch= amd64,beta.kubernetes.io/os= linux,kubernetes.io/hostname= 9.111.254.212
9.111.254.213 Ready 1d beta.kubernetes.io/arch= amd64,beta.kubernetes.io/os= linux,kubernetes.io/hostname= 9.111.254.213
9.111.254.214 Ready 1d beta.kubernetes.io/arch= amd64,beta.kubernetes.io/os= linux,kubernetes.io/hostname= 9.111.254.214
9.111.254.218 Ready 1d beta.kubernetes.io/arch= amd64,beta.kubernetes.io/os= linux,kubernetes.io/hostname= 9.111.254.218 |
ī” š≥ŲĹŠĻŻŅ…“‘ŅīĶĹ£¨√ŅłŲnode∂ľ”–3łŲlabel∑÷Īū «beta.kubernetes.io/arch£¨beta.kubernetes.io/os£¨kubernetes.io/hostname°£Ō¬√śÕ®Ļżhostname◊ųő™”¶”√≤Ņ ūĶń—°‘Ů≤Ŗ¬‘ņī≤Ņ ū”¶”√ĶĹ9.111.254.218Ľķ∆ų…Ō√ś°£
“‘nginx”¶”√ő™ņż£¨◊ľĪł“ĽłŲ»›∆ų”¶”√≤Ņ ūĶńkubernetesĶńdeploymentőńľĢ°£
kind: Deployment
apiVersion: extensions/v1beta1
metadata:
name: nginx
spec:
replicas: 1
template:
metadata:
labels:
app: nginx
image: nginx_1_8_1
spec:
hostNetwork: false
containers:
- name: nginx
image: nginx:1.8.1
imagePullPolicy: Always
ports:
- protocol: TCP
containerPort: 80
resources:
limits:
cpu: 1000m
memory: 1024Mi
nodeSelector:
kubernetes.io/hostname: 9.111.254.218 |
‘ŕyamlőńľĢ÷–ľ”»ŽnodeSelector, ∆š÷–keyļÕvalue∑÷Īūő™labelĶńnameļÕvalue.
Ō¬√śĺÕŅ™ ľľŻ÷§∆śľ£Ńň°£
Õ®ĻżkubectlīīĹ®”¶”√»›∆ų∑ĢőŮ°£
root@hchenk8s1:~# kubectl create -f nginx.yaml
deployment "nginx" created
root@hchenk8s1:~# kubectl get deployment
NAME DESIRED CURRENT UP-TO-DATE AVAILABLE AGE
nginx 1 1 1 1 9m
root@hchenk8s1:~# kubectl get pods -o wide
NAME READY STATUS RESTARTS AGE IP NODE
nginx-1245594662-sjjp9 1/1 Running 0 1m 10.1.20.130 9.111.254.218 |
ī” š≥ŲŅ…“‘ŅīĶĹ, nginxĶń»›∆ų∑ĢőŮ“—ĺ≠≤Ņ ūĶĹŃňł’ł’÷ł∂®ĶńĽķ∆ų…Ō√ś°£
ĶĪ»Ľ£¨nodeSelector◊‘…ŪŅ…“‘÷ß≥÷∂ŗłŲ—°‘ŮŐűľĢ£¨ĶĪīīĹ®”¶”√Ķń ĪļÚ£¨nodeSelectorņÔ√śĶńŐűľĢ∂ľ¬ķ◊„ĶńĽķ∆ųĽŠĪĽ—°‘Ů≥Ųņī”√ņī≤Ņ ūpod.
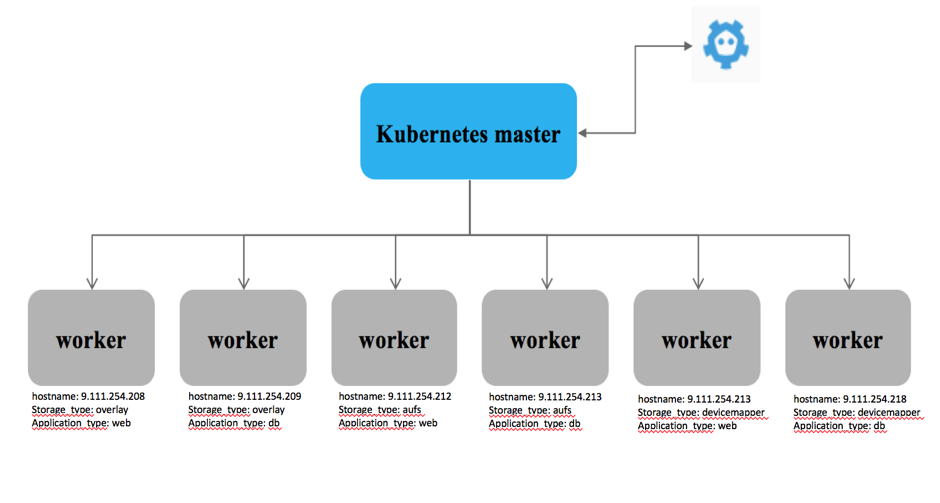
ő™Ńň≤‚ ‘nodeSelector∂ŗŐűľĢ÷ß≥÷Ķń≤‚ ‘£¨ő“√«∂‘6łŲworker∑÷ĪūĹÝ––ĪÍľ«£ļ
root@hchenk8s1:~# kubectl label node 9.111.254.208 storage_type=overlay application_type=web
node "9.111.254.208" labeled
root@hchenk8s1:~# kubectl label node 9.111.254.209 storage_type=overlay application_type=db
node "9.111.254.209" labeled
root@hchenk8s1:~# kubectl label node 9.111.254.212 storage_type=aufs application_type=web
node "9.111.254.212" labeled
root@hchenk8s1:~# kubectl label node 9.111.254.213 storage_type=aufs application_type=db
node "9.111.254.213" labeled
root@hchenk8s1:~# kubectl label node 9.111.254.214 storage_type=devicemapper application_type=web
node "9.111.254.214" labeled
root@hchenk8s1:~# kubectl label node 9.111.254.218 storage_type=devicemapper application_type=db
node "9.111.254.218" labeled |
ĪÍľ«ļů£¨ ľĮ»ļĹŠĻĻ»ÁŌ¬Õľňý ĺ°£
Ō¬√śÕ®Ļż”¶”√≤Ņ ūņī≤‚ ‘nodeSelectorĶń∂ŗŐűľĢ—°‘Ů£ļ
≥°ĺį1:
īīĹ®“ĽłŲnginx web∑ĢőŮ£¨—°‘Ůworker node…Ō√ś£¨storage_typeĪÍľ«ő™į°aufsĶńĹŕĶ„£ļ
∆ŕÕŻĹŠĻŻ£ļ
nginx web∑ĢőŮ≤Ņ ū‘ŕĹŕĶ„9.111.254.212…Ō√ś
≤Ĺ÷Ť£ļ
◊ľĪł–Ť“™īīĹ®∑ĢőŮňý–Ť“™ĶńyamlőńľĢ£ļ
kind: Deployment
apiVersion: extensions/v1beta1
metadata:
name: nginx
spec:
replicas: 1
template:
metadata:
labels:
app: nginx
image: nginx_1_8_1
spec:
hostNetwork: false
containers:
- name: nginx
image: nginx:1.8.1
imagePullPolicy: IfNotPresent
ports:
- protocol: TCP
containerPort: 80
resources:
limits:
cpu: 1000m
memory: 1024Mi
nodeSelector:
storage_type: aufs
application_type: web |
ī”…Ō√śĶńyamlőńľĢŅ…“‘ŅīĶĹ£¨nodeSelectorņÔ√ś∂®“ŚŃňŃĹłŲŐűľĢ£¨∑÷Īū «storage_typeļÕapplication_type£¨ ”¶”√÷Ľ”–īīĹ®‘ŕŃĹłŲŐűľĢÕ¨ Ī¬ķ◊„ĶńĹŕĶ„…Ō√ś°£
Ō¬√śŅ™ ľīīĹ®»›∆ų∑ĢőŮ°£
root@hchenk8s1:~# kubectl create -f nginx.yaml
deployment "nginx" created
root@hchenk8s1:~# kubectl get deployment
NAME DESIRED CURRENT UP-TO-DATE AVAILABLE AGE
nginx 1 1 1 1 46s
root@hchenk8s1:~# kubectl get pods -o wide
NAME READY STATUS RESTARTS AGE IP NODE
nginx-2704164239-lr0gj 1/1 Running 0 1m 10.1.58.235 9.111.254.212 |
ī” š≥ŲŅ…“‘ŅīĶĹ£¨nginx∑ĢőŮ“—ĺ≠—°‘ŮĽķ∆ų9.111.254.212»•≤Ņ ū”¶”√°£
≥°ĺį2:
īīĹ®“ĽłŲnginx web∑ĢőŮ£¨—°‘Ůworker node…Ō√ś£¨storage_typeĪÍľ«ő™į°btrfsĶńĹŕĶ„£ļ
∆ŕÕŻĹŠĻŻ£ļ
nginx web—°‘Ů≤ĽĶĹļŌ ĶńĽķ∆ų≤Ņ ū”¶”√°£
≤Ĺ÷Ť£ļ
◊ľĪł–Ť“™īīĹ®∑ĢőŮňý–Ť“™ĶńyamlőńľĢ£ļ
kind: Deployment
apiVersion: extensions/v1beta1
metadata:
name: nginx
spec:
replicas: 1
template:
metadata:
labels:
app: nginx
image: nginx_1_8_1
spec:
hostNetwork: false
containers:
- name: nginx
image: nginx:1.8.1
imagePullPolicy: IfNotPresent
ports:
- protocol: TCP
containerPort: 80
resources:
limits:
cpu: 1000m
memory: 1024Mi
nodeSelector:
storage_type: btrfs
application_type: web |
Ō¬√śŅ™ ľīīĹ®»›∆ų∑ĢőŮ°£
root@hchenk8s1:~# kubectl create -f nginx.yaml
deployment "nginx" created
root@hchenk8s1:~# kubectl get deployment
NAME DESIRED CURRENT UP-TO-DATE AVAILABLE AGE
nginx 1 1 1 0 58s
root@hchenk8s1:~# kubectl get pods -o wide
NAME READY STATUS RESTARTS AGE IP NODE
nginx-155862529-m5pr1 0/1 Pending 0 1m <none>
root@hchenk8s1:~# kubectl describe pods nginx-155862529-m5pr1
Name: nginx-155862529-m5pr1
Namespace: default
Node: /
Labels: app=nginx
pod-template-hash=155862529
Status: Pending
IP:
Controllers: ReplicaSet/nginx-155862529
Containers:
nginx:
Image: nginx:latest
Port: 80/TCP
Limits:
cpu: 1
memory: 1Gi
Requests:
cpu: 1
memory: 1Gi
Volume Mounts:
/var/run/secrets/kubernetes.io/serviceaccount from default-token-5rj87 (ro)
Environment Variables: <none>
Conditions:
Type Status
PodScheduled False
Volumes:
default-token-5rj87:
Type: Secret (a volume populated by a Secret)
SecretName: default-token-5rj87
QoS Class: Guaranteed
Tolerations: <none>
Events:
FirstSeen LastSeen Count From SubObjectPath Type Reason Message
--------- -------- ----- ---- ------------- -------- ------ -------
1m 27s 8 {default-scheduler } Warning FailedScheduling pod (nginx-155862529-m5pr1) failed to fit in any node
fit failure summary on nodes : MatchNodeSelector (6) |
ī” š≥ŲŅ…“‘ŅīĶĹ£¨podīīĹ® ßį‹Ńň£¨‘≠“Ú «√Ľ”–’“ĶĹļŌ ĶńĽķ∆ų»•≤Ņ ū°£
◊‹ĹŠ“ĽŌ¬£ļnodeSelectorÕ®Ļżlabel—°‘ŮĽķ÷∆£¨ŐŠĻ©ŃňĪ»ĹŌľÚĶ•÷ĪĻŘĶńpod≤Ņ ū≤Ŗ¬‘£¨ī”“Ľ–©∑Ĺ√ś ĶŌ÷ŃňĹŕĶ„Ķń«◊ļÕ£Į∑ī«◊ļÕĶń≤Ŗ¬‘°£ňš»ĽŌ÷‘໑»Ľīś‘ŕ‘ŕkubernetes÷–£¨≤ĽĻżŌŗ–Ň’‚łŲĻ¶ń‹ĽŠ¬ż¬żĪĽĹ”Ō¬ņī“™ŐŠĶĹĶńnode AffinityļÕinter-pod affinity»°∂Ýīķ÷ģ°£
2. NodeAffinity
NodeAffinity «kubernetes 1.2Ķń ĪļÚľĮ≥…ĹÝņīĶń£¨łŇńÓ…Ōņŗň∆”ŕ…Ō√śĹť…‹ĶńnodeSelector, Õ®Ļż∂‘node labelĶń—°‘Ůņī≤Ņ ūń„ĶńpodĶń°£
Ō»ňĶňĶnodeAffinityĶńņŗ–Õ£ļ
ńŅ«įnodeAffinity÷ß≥÷requiredDuringSchedulingIgnoredDuringExecutionļÕpreferredDuringSchedulingIgnoredDuringExecution’‚ŃĹ÷÷ņŗ–Õ°£ī”◊÷√ś“‚ňľĺÕń‹ŅīĶĹ£¨ņŗ–Õ“ĽĶń“™«ů“™Ī»ņŗ–Õ∂ĢĶńŅŃŅŐĶń∂ŗ£¨∂‘”ŕņŗ–Õ“ĽņīňĶ£¨łŁŌŮ «…Ō√śĹť…‹ĶńnodeSelectorĶńłŖľ∂įś£¨∂Ý∂‘”ŕņŗ–Õ∂ĢņīňĶ£¨‘ŕīīĹ®podĶń ĪļÚĽŠłý図ų÷÷Ķų∂»ŐűľĢ∂‘Ņ…Ķų∂»ĶńĽķ∆ųĹÝ––ŇŇ–Ú£¨≤Ę«“≤ĽĽŠŌŮņŗ–Õ“Ľń«—ý£¨“Úő™◊ ‘ī≤ĽĻĽĽÚ’Ŗ“Ľ–©∆šňŻ‘≠“Ú∂ÝīīĹ® ßį‹£¨Õň∂Ý«ů∆šīőņī»•—°‘Ů∆šňŻĶńĽķ∆ųľŐ–ÝīīĹ®°£
‘ŕ’‚ŃĹ÷÷ņŗ–Õ÷–£¨ignoredDuringExecutionĶń“‚ňľ «‘ŕnode‘ŕ‘ň––∆ŕľš»ÁĻŻlabel∑Ę…ķŃňĪšĽĮ£¨÷ģľšÕ®Ļż’‚–©ņŗ–Õ≤Ņ ūĶńpod≤ĽĽŠ“Úő™node labelĶńĪšĽĮ∂Ý»•÷ō–¬≤Ņ ūņī¬ķ◊„“—ĺ≠∂®“Śļ√Ķń«◊ļÕ£Į∑ī«◊ļÕĶń≤Ŗ¬‘°£≤ĽĻż…Á«Ýľ∆ĽģĽŠ’Ž∂‘’‚–©caseŐŠĻ©requiredDuringSchedulingRequiredDuringExecutionĶńņŗ–Õņī”¶∂‘“Úő™node labelĪšĽĮ£¨∂®“ŚĶń«◊ļÕ£Į∑ī«◊ļÕĶń≤Ŗ¬‘∑Ę…ķĪšĽĮĶńő Ő‚£¨ĶĪ»Ľ£¨podŅ…ń‹ĺÕ–Ť“™÷ō–¬≤Ņ ūņī ”¶“—ĺ≠∑Ę…ķĶńĪšĽĮ°£
Ō¬√ś…Ťľ∆“ĽłŲ≥°ĺįĽĻ ‘“ĽŌ¬£ļ
≥°ĺį1:
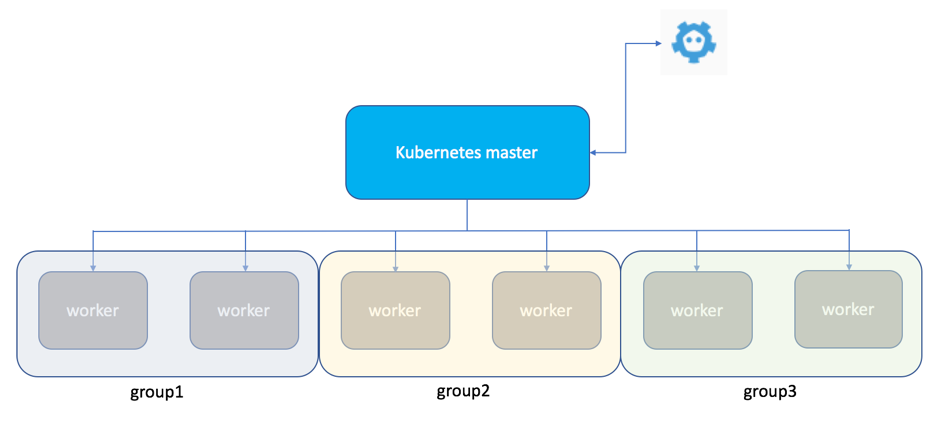
ľĮ»ļ÷–Ķń6łŲworker node∑÷Īū Ű”ŕ3łŲ≤ĽÕ¨Ķń◊ť£¨’‚ņÔ∑÷Īū√Ł√Żő™group1, group2, group3. –Ť“™≤Ņ ū“ĽłŲnignx”¶”√£¨≤Ę«“”–4łŲłĪĪĺ£¨“™«ůnignx”¶”√≤Ņ ū‘ŕ≥żŃňgroup3“‘Õ‚Ķń∆šňŻgroup…Ō√ś°£
∆ŕÕŻĹŠĻŻ£ļ
nginxĶń”¶”√ń‹≤Ņ ū‘ŕgroup1ļÕgroup2ņÔĶńworker node°£
≤Ĺ÷Ť£ļ
◊Ō»£¨∂‘ľĮ»ļ÷–Ķńworker nodeŐŪľ”labelņīĪÍ ∂◊ť–ŇŌĘ°£
root@hchenk8s1:~# kubectl label node 9.111.254.208 group=group1
node "9.111.254.208" labeled
root@hchenk8s1:~# kubectl label node 9.111.254.209 group=group1
node "9.111.254.209" labeled
root@hchenk8s1:~# kubectl label node 9.111.254.212 group=group2
node "9.111.254.212" labeled
root@hchenk8s1:~# kubectl label node 9.111.254.213 group=group2
node "9.111.254.213" labeled
root@hchenk8s1:~# kubectl label node 9.111.254.214 group=group3
node "9.111.254.214" labeled
root@hchenk8s1:~# kubectl label node 9.111.254.218 group=group3
node "9.111.254.218" labeled |
ĪÍ ∂ÕÍļůĶńworker node–ŇŌĘ»ÁŌ¬Õľňý ĺ°£
Ō¬√ś◊ľĪł“ĽłŲ”√ņī≤‚ ‘ĶńyamlőńľĢ£ļ
kind: Deployment
apiVersion: extensions/v1beta1
metadata:
name: nginx
spec:
replicas: 4
template:
metadata:
labels:
app: nginx
annotations:
scheduler.alpha.kubernetes.io/affinity: >
{
"nodeAffinity": {
"requiredDuringSchedulingIgnoredDuringExecution": {
"nodeSelectorTerms": [
{
"matchExpressions": [
{
"key": "group",
"operator": "In",
"values": ["group1", "group2"]
}
]
}
]
}
}
}
spec:
hostNetwork: false
containers:
- name: nginx
image: nginx:latest
imagePullPolicy: IfNotPresent
ports:
- protocol: TCP
containerPort: 80
resources:
limits:
cpu: 500m
memory: 512Mi |
Ō¬√śŅ™ ľīīĹ®»›∆ų∑ĢőŮ°£
root@hchenk8s1:~# kc create -f nginx_nodeaffinity.yaml
deployment "nginx" created
root@hchenk8s1:~# kc get pods -o wide
NAME READY STATUS RESTARTS AGE IP NODE
nginx-3792017226-5cn0s 1/1 Running 0 1m 10.1.36.194 9.111.254.213
nginx-3792017226-ljq9h 1/1 Running 0 1m 10.1.56.66 9.111.254.208
nginx-3792017226-qfbvs 1/1 Running 0 1m 10.1.64.66 9.111.254.212
nginx-3792017226-tdm23 1/1 Running 0 1m 10.1.183.3 9.111.254.209 |
ī”≤‚ ‘ĹŠĻŻŅ…“‘ŅīĶĹ£¨4łŲłĪĪĺ∑÷Īū≤Ņ ū‘ŕŃňgroup1ļÕgroup2…ŌĶńĽķ∆ų°£
…Ō√śĶńņż◊”÷–”√ŃňInĶńoperator£¨matchExpressionsĶńoperatorīůłŇ”–“ĽŌ¬ľł÷÷£ļ
In: ∑≤ «¬ķ◊„valuesņÔ√śŐűľĢĶńĽķ∆ų∂ľĽŠĪĽ—°‘Ů≥Ųņī°£“‘…Ō√śĶńņż◊”ő™ņż£¨∑≤ «¬ķ◊„group=group1ĽÚ’Ŗgroup=group2ĶńĽķ∆ų∂ľĽŠĪĽ—°‘Ů≥Ųņī°£
NotIn: ļÕInŌŗ∑ī£¨∑≤ «¬ķ◊„valuesņÔ√śŐűľĢĶńĽķ∆ų∂ľĽŠĪĽŐř≥ż≥Ų»•°£»ÁĻŻ“‘…Ō√śĶńņż◊”ő™ņż£¨operatorĽĽ≥…NotIn, ń«√īgroup=group1“‘ľįgroup=group2ĶńĽķ∆ųĺÕĽŠĪĽŐř≥ż≥Ų»•£¨∂Ýgroup=group3ĶńĽķ∆ų‘ÚĽŠĪĽ—°‘Ů≥Ųņī°£
Exists: ļÕInĪ»ĹŌņŗň∆£¨∑≤ «”–ń≥łŲĪÍ«©ĶńĽķ∆ų∂ľĽŠĪĽ—°‘Ů≥Ųņī°£ Ļ”√ExistsĶńoperatorĶńĽį£¨valuesņÔ√śĺÕ≤Ľń‹–ī∂ęőųŃň°£
DoesNotExist: ļÕExistsŌŗ∑ī£¨∑≤ «≤ĽĺŖĪłń≥łŲĪÍ«©ĶńĽķ∆ų‘ÚĽŠĪĽ—°‘Ů≥Ųņī°£ļÕExistsĶńOperator“Ľ—ý£¨valuesņÔ√ś“≤≤Ľń‹–ī∂ęőųŃň°£
Gt: greater thanĶń“‚ňľ£¨ĪŪ ĺ∑≤ «ń≥łŲvalueīů”ŕ…Ť∂®Ķń÷ĶĶńĽķ∆ų‘ÚĽŠĪĽ—°‘Ů≥Ųņī°£
Lt: less thanĶń“‚ňľ£¨ĪŪ ĺ∑≤ «ń≥łŲvalue–°”ŕ…Ť∂®Ķń÷ĶĶńĽķ∆ų‘ÚĽŠĪĽ—°‘Ů≥Ųņī°£
Ō¬√ś2łŲņż◊”∑÷ĪūŅīŅī∆šňŻľłłŲoperatorĶń Ļ”√“‘ľį≤‚ ‘ĹŠĻŻ°£
≥°ĺį2:
ľĮ»ļ÷–Ķń6łŲworker node£¨∆š÷–Ķń2Ő®ĪÍľ«ŃňnetworkĶńĪÍ«©£¨∂Ý∆šňŻĶń4Ő®√Ľ”–networkĪÍ«©°£Õ®ĻżdeploymentīīĹ®“ĽłŲnginx”¶”√£¨≤Ę«“nginx”¶”√”–4łŲłĪĪĺ£¨Õ®ĻżnodeAffinity—°‘Ů”–networkĪÍ«©ĶńĽķ∆ųĹÝ––”¶”√≤Ņ ū°£
∆ŕÕŻĹŠĻŻ:
nginxĶń”¶”√ń‹≤Ņ ū‘ŕ”–networkĶńĪÍ«©ĶńĽķ∆ų…Ō√ś°£
≤Ĺ÷Ť:
◊Ō»£¨∂‘ľĮ»ļ÷–Ķńworker nodeŐŪľ”labelņīĪÍ ∂◊ť–ŇŌĘ£¨Õ®Ļż√ŁŃÓŅ…“‘≤ťŅīĶĪ«įľĮ»ļ÷–Ķńworker nodeĶńlabel–ŇŌĘ°£
root@hchenk8s1:~# kubectl get nodes --show-labels
NAME STATUS AGE LABELS
9.111.254.208 Ready 6d beta.kubernetes.io/arch= amd64,beta.kubernetes.io/os= linux,group= group1,kubernetes.io/hostname= 9.111.254.208,network=calico
9.111.254.209 Ready 6d beta.kubernetes.io/arch= amd64,beta.kubernetes.io/os= linux,group= group1,kubernetes.io/hostname= 9.111.254.209,network=calico
9.111.254.212 Ready 6d beta.kubernetes.io/arch= amd64,beta.kubernetes.io/os= linux,group= group2,kubernetes.io/hostname= 9.111.254.212
9.111.254.213 Ready 6d beta.kubernetes.io/arch= amd64,beta.kubernetes.io/os= linux,group= group2,kubernetes.io/hostname= 9.111.254.213
9.111.254.214 Ready 6d beta.kubernetes.io/arch= amd64,beta.kubernetes.io/os= linux,group= group3,kubernetes.io/hostname= 9.111.254.214
9.111.254.218 Ready 6d beta.kubernetes.io/arch= amd64,beta.kubernetes.io/os= linux,group= group3,kubernetes.io/hostname= 9.111.254.218 |
◊ľĪłīīĹ®nginx”¶”√Ķńdeployment
kind: Deployment
apiVersion: extensions/v1beta1
metadata:
name: nginx
spec:
replicas: 4
template:
metadata:
labels:
app: nginx
annotations:
scheduler.alpha.kubernetes.io/affinity: >
{
"nodeAffinity": {
"requiredDuringSchedulingIgnoredDuringExecution": {
"nodeSelectorTerms": [
{
"matchExpressions": [
{
"key": "network",
"operator": "Exists"
}
]
}
]
}
}
}
spec:
hostNetwork: false
containers:
- name: nginx
image: nginx:latest
imagePullPolicy: IfNotPresent
ports:
- protocol: TCP
containerPort: 80
resources:
limits:
cpu: 500m
memory: 512Mi |
ī”…Ō√śĶńyamlőńľĢŅ…“‘ŅīĶĹ£¨matchExpressionņÔ√ś∂®“ŚŃňnodeAffinityĶń—°‘ŮŐűľĢ£¨ī”…Ō√śĶńņż◊”Ņ…“‘ŅīĶĹ£¨nginx”¶”√∆ŕÕŻń‹īīĹ®‘ŕ”–network labelĶńĽķ∆ų…Ō°£
Ō¬√śŅ™ ľīīĹ®”¶”√
root@hchenk8s1:~# kubectl create -f nginx_exist.yaml
deployment "nginx" created
root@hchenk8s1:~# kubectl get pods -o wide
NAME READY STATUS RESTARTS AGE IP NODE
nginx-3031338627-7bbfc 1/1 Running 0 7s 10.1.183.17 9.111.254.209
nginx-3031338627-cd1jz 1/1 Running 0 7s 10.1.56.80 9.111.254.208
nginx-3031338627-wslpb 1/1 Running 0 7s 10.1.183.16 9.111.254.209
nginx-3031338627-zgrxn 1/1 Running 0 7s 10.1.56.79 9.111.254.208 |
ī”≤‚ ‘ĹŠĻŻŅ…“‘ŅīĶĹ£¨4łŲłĪĪĺ∑÷Īū≤Ņ ū‘ŕŃň”–network labelĶńĽķ∆ų…Ō√ś°£
≥°ĺį3:
ľĮ»ļ÷–Ķń6łŲworker node£¨∆š÷–Ķń2Ő®”–kernel-versionĪÍ«©£¨”√ņīľ«¬ľĽķ∆ųĶńńŕļňįśĪĺ°£Õ®ĻżdeploymentīīĹ®“ĽłŲnginx”¶”√£¨≤Ę«“nginx”¶”√”–4łŲłĪĪĺ£¨Õ®ĻżnodeAffinity—°‘ŮńŕļňįśĪĺ∑∂őßņīĹÝ––”¶”√≤Ņ ū°£
∆ŕÕŻĹŠĻŻ£ļ
∆ŕÕŻnginxĶń”¶”√≤Ņ ū‘ŕkerver-versionīů”ŕ0320ĶńĽķ∆ų…Ō√ś°£
≤Ĺ÷Ť£ļ
◊Ō»ő™ľĮ»ļ÷–ĶńĽķ∆ųŐŪľ”lableņīĪÍ ĺĽķ∆ųĶńńŕļňįśĪĺ–ŇŌĘ£ļ
root@hchenk8s1:~# kc get nodes --show-labels -l worker=true
NAME STATUS AGE LABELS
9.111.254.208 Ready 6d beta.kubernetes.io/arch= amd64,beta.kubernetes.io/os= linux,group=group1,kernel-version=0310,kubernetes.io/hostname= 9.111.254.208,worker=true
9.111.254.209 Ready 6d beta.kubernetes.io/arch=amd64, beta.kubernetes.io/os= linux,group=group1,kernel-version=0404,kubernetes.io/hostname= 9.111.254.209,worker=true
9.111.254.212 Ready 6d beta.kubernetes.io/arch= amd64,beta.kubernetes.io/os= linux,group= group2,kubernetes.io/hostname= 9.111.254.212,worker=true
9.111.254.213 Ready 6d beta.kubernetes.io/arch= amd64,beta.kubernetes.io/os= linux,group= group2,kubernetes.io/hostname= 9.111.254.213,worker=true
9.111.254.214 Ready 6d beta.kubernetes.io/arch= amd64,beta.kubernetes.io/os= linux,group= group3,kubernetes.io/hostname= 9.111.254.214,worker=true
9.111.254.218 Ready 6d beta.kubernetes.io/arch= amd64,beta.kubernetes.io/os= linux,group= group3,kubernetes.io/hostname= 9.111.254.218,worker=true |
ī”…Ō√śĶń š≥ŲŅ…“‘ŅīĶĹ£¨9.111.254.208Ķńkernel-versionő™0310£¨9.111.254.209Ķńkernel-versionő™0404.
Ō¬√ś◊ľĪł“ĽłŲnginxĶńyamlőńľĢ£¨”√ņīīīĹ®nginx∑ĢőŮ£ļ
kind: Deployment
apiVersion: extensions/v1beta1
metadata:
name: nginx
spec:
replicas: 4
template:
metadata:
labels:
app: nginx
annotations:
scheduler.alpha.kubernetes.io/affinity: >
{
"nodeAffinity": {
"requiredDuringSchedulingIgnoredDuringExecution": {
"nodeSelectorTerms": [
{
"matchExpressions": [
{
"key": "kernel-version",
"operator": "Gt",
"values": ["0320"]
}
]
}
]
}
}
}
spec:
hostNetwork: false
containers:
- name: nginx
image: nginx:latest
imagePullPolicy: IfNotPresent
ports:
- protocol: TCP
containerPort: 80
resources:
limits:
cpu: 200m
memory: 256Mi |
…Ō√śĶńőńľĢĪŪ ĺĶń≤Ŗ¬‘ «∆ŕÕŻīīĹ®∑ĢőŮĶĹkernel-versionīů”ŕ0320ĶńĽķ∆ų…Ō√ś°£
Ō¬√śŅ™ ľīīĹ®£Ľ
root@hchenk8s1:~# kubectl create -f nginx_gt.yaml
deployment "nginx" created
root@hchenk8s1:~# kubectl get pods -o wide
NAME READY STATUS RESTARTS AGE IP NODE
nginx-4087060041-2x9lw 1/1 Running 0 4s 10.1.183.26 9.111.254.209
nginx-4087060041-4x1dd 1/1 Running 0 4s 10.1.183.23 9.111.254.209
nginx-4087060041-bgt0z 1/1 Running 0 4s 10.1.183.24 9.111.254.209
nginx-4087060041-brgb3 1/1 Running 0 4s 10.1.183.25 9.111.254.209 |
ī”≤‚ ‘ĹŠĻŻŅ…“‘ŅīĶĹ£¨4łŲłĪĪĺ∂ľīīĹ®‘ŕŃňkernel-versionő™0404ĶńĽķ∆ų…Ō°£
3. Inter-pod affinity/anti-affinity
Inter-pod affinity/anti-affinity «kubernetes 1.4Ņ™ ľ÷ß≥÷Ķń£¨podĶń≤Ņ ū≤Ŗ¬‘≤Ľ‘ŔĶ•Ķ•Ķń÷Ľ «Õ®Ļżnode labelĶń—°‘Ů£¨∂Ý «Ņ…“‘ī”pod≤„√śÕ®ĻżpodĶń labelņī≤Ņ ū◊‘ľļĶń”¶”√£¨ľÚĶ•Ķ„ňĶĺÕ «ń„Ņ…“‘Õ®Ļżinter-pod affinity/anti-affinityņīĺŲ∂®◊‘ľļĶń»›∆ų”¶”√«◊ĹŁĽÚ’Ŗ‘∂ņŽĺŖ”–ń≥–©labelĶń»›∆ų”¶”√°£
ļÕnodeAffinity“Ľ—ý£¨inter-pod affinity/anti-affinity“≤”–requiredDuringSchedulingIgnoredDuringExecutionļÕpreferredDuringSchedulingIgnoredDuringExecutionŃĹ÷÷ņŗ–Õ£¨∑÷ĪūĪŪ ĺ°Īhard°ĪļÕ°Īsoft°ĪŃĹ÷÷–Ť«ů°£
≥°ĺį1:
ľĮ»ļ÷–”–łŲdb»›∆ų∑ĢőŮ(mysql)£¨Õ®Ļż Ļ”√inter-pod affinity ĻĶ√ żĺ›Ņ‚…Ō≤„∑ĢőŮ(wordpress)ń‹ĻĽļÕdb»›∆ų∑ĢőŮ‘ŕ“ĽŐ®Ľķ∆ų…Ō°£
≤Ĺ÷Ť£ļ
◊Ō»◊ľĪłmysql.yamlőńľĢ≤Ę«“īīĹ®»›∆ų∑ĢőŮ°£
apiVersion: v1
kind: Pod
metadata:
name: mysql
labels:
name: mysql
spec:
containers:
- resources:
limits :
cpu: 0.5
image: mysql:5.6
name: mysql
args:
- "--ignore-db-dir"
- "lost+found"
env:
- name: MYSQL_ROOT_PASSWORD
# change this
value: changeit
ports:
- containerPort: 3306
name: mysql |
Ō¬√śŅ™ ľīīĹ®£ļ
root@hchenk8s1:~# kubectl create -f mysql.yaml
pod "mysql" created
root@hchenk8s1:~# kc get pods -owide --show-labels
NAME READY STATUS RESTARTS AGE IP NODE LABELS
mysql 1/1 Running 0 8m 10.1.226.66 9.111.254.214 name=mysql |
mysqlīīĹ®ļ√Ńň£¨Ō¬√śŅ™ ľ◊ľĪłwordpressĶńyamlőńľĢ°£
apiVersion: v1
kind: Pod
metadata:
name: wordpress
spec:
affinity:
podAffinity:
requiredDuringSchedulingIgnoredDuringExecution:
- labelSelector:
matchExpressions:
- key: name
operator: In
values:
- mysql
topologyKey: kubernetes.io/hostname
containers:
- image: wordpress:4.7.3-apache
name: wordpress
env:
- name: WORDPRESS_DB_HOST
value: 10.1.226.66
- name: WORDPRESS_DB_PASSWORD
value: changeit
ports:
- containerPort: 80
name: wordpress |
yamlőńľĢņÔ√ś∂®“ŚŃňpodAffinity, matchExpressionsņÔ√ś÷ł∂®Ńň–Ť“™—°‘Ůname mysqlĶńpod labelņī≤Ņ ūwordpressĶńpod.
Ō¬√śŅ™ ľīīĹ®:
root@hchenk8s1:~# kubectl create -f wordpress.yaml
pod "wordpress" created
root@hchenk8s1:~# kubectl get pods -owide --show-labels
NAME READY STATUS RESTARTS AGE IP NODE LABELS
mysql 1/1 Running 0 1d 10.1.226.66 9.111.254.214 name=mysql
wordpress 1/1 Running 0 1d 10.1.226.67 9.111.254.214 <none> |
ī” š≥ŲŅ…“‘ŅīĶĹ£¨wordpressļÕmysqlĶńpod≤Ņ ū‘ŕŃň“ĽŐ®Ľķ∆ų…Ō√ś£¨ ĶŌ÷Ńňkubernetes.io/hostname…ŌĶń«◊ļÕ≤Ŗ¬‘°£
≥°ĺį2.
ľĮ»ļ÷–”–łŲdb»›∆ų∑ĢőŮ(mysql)£¨Õ®Ļż Ļ”√inter-pod anti-affinity ĻĶ√ żĺ›Ņ‚…Ō≤„∑ĢőŮ(wordpress)ń‹ĻĽļÕdb»›∆ų∑ĢőŮ≤Ľ‘ŕ“ĽŐ®Ľķ∆ų…Ō°£
—””√…Ō√śĶńmysqlĶńpod, ÷ĪĹ”ī”wordpressĶń”¶”√Ņ™ ľ°£
◊Ō»ĽĻ «ī”yamlőńľĢĶń◊ľĪłŅ™ ľ£ļ
apiVersion: v1
kind: Pod
metadata:
name: wordpress
spec:
affinity:
podAntiAffinity:
requiredDuringSchedulingIgnoredDuringExecution:
- labelSelector:
matchExpressions:
- key: name
operator: In
values:
- mysql
topologyKey: kubernetes.io/hostname
containers:
- image: wordpress:4.7.3-apache
name: wordpress
env:
- name: WORDPRESS_DB_HOST
value: 10.1.226.66
- name: WORDPRESS_DB_PASSWORD
value: changeit
ports:
- containerPort: 80
name: wordpress |
Ō¬√śŅ™ ľīīĹ®£ļ
root@hchenk8s1:~# kubectl create -f wordpress.yaml
pod "wordpress" created
root@hchenk8s1:~# kubectl get pods -owide --show-labels
NAME READY STATUS RESTARTS AGE IP NODE LABELS
mysql 1/1 Running 0 1d 10.1.226.66 9.111.254.214 name=mysql
wordpress 1/1 Running 0 4m 10.1.36.207 9.111.254.213 <none> |
ī”≤‚ ‘ĹŠĻŻŅ…“‘ŅīĶĹ£¨pod∑÷≤ľ‘ŕŃň≤ĽÕ¨ĶńĽķ∆ų…Ō√ś°£
ŃŪÕ‚£¨kubernetesĶńtaintsļÕtolerations“≤ «”√ņī∂‘podĹÝ––Ķų∂»Ķń£¨’‚łŲĽŠ‘ŕŌ¬∆ŕĹÝ––Ĺť…‹°£ |