|
这一章想讲一下Spark的缓存是如何实现的。这个persist方法是在RDD里面的,所以我们直接打开RDD这个类。
def persist(newLevel: StorageLevel): this.type = {
    // StorageLevel不能随意更改
    if (storageLevel != StorageLevel.NONE && newLevel != storageLevel) {
      throw new UnsupportedOperationException("Cannot change storage level of an RDD after it was already assigned a level")
    }
    sc.persistRDD(this)
    // Register the RDD with the ContextCleaner for automatic GC-based cleanup
    // 注册清理方法
    sc.cleaner.foreach(_.registerRDDForCleanup(this))
    storageLevel = newLevel
    this
} |
它调用SparkContext去缓存这个RDD,追杀下去。
private[spark] def persistRDD(rdd: RDD[_]) {
    persistentRdds(rdd.id) = rdd
} |
它居然是用一个HashMap来存的,具体看这个map的类型是TimeStampedWeakValueHashMap[Int,
RDD[_]]类型。把存进去的值都隐式转换成WeakReference,然后加到一个内部的一个ConcurrentHashMap里面。这里貌似也没干啥,这是有个鸟蛋用。。大神莫喷,知道干啥用的人希望告诉我一下。
CacheManager
现在并没有保存,等到真正运行Task运行的时候才会去缓存起来。入口在Task的runTask方法里面,具体的我们可以看ResultTask,它调用了RDD的iterator方法。
final def iterator(split: Partition, context: TaskContext): Iterator[T] = {
    if (storageLevel != StorageLevel.NONE) {
      SparkEnv.get.cacheManager.getOrCompute(this, split, context, storageLevel)
    } else {
      computeOrReadCheckpoint(split, context)
    }
} |
一旦设置了StorageLevel,就要从SparkEnv的cacheManager取数据。
def getOrCompute[T](rdd: RDD[T], split: Partition, context: TaskContext, storageLevel: StorageLevel): Iterator[T] = {
    val key = RDDBlockId(rdd.id, split.index)
    blockManager.get(key) match {
      case Some(values) =>
        // 已经有了,直接返回就可以了
        new InterruptibleIterator(context, values.asInstanceOf[Iterator[T]])
case None =>
// loading包含这个key表示已经有人在加载了,等到loading被释放了,就可以去blockManager里面取到了
loading.synchronized {
if (loading.contains(key)) {
while (loading.contains(key)) {
try {
loading.wait()
} catch {
case e: Exception =>
logWarning(s"Got an exception while waiting
for another thread to load $key", e)
}
}
// 别人成功拿到了,我们直接取结果就是了,如果别人取失败了,我们再来取一次
blockManager.get(key) match {
case Some(values) =>
return new InterruptibleIterator(context, values.asInstanceOf[Iterator[T]])
case None =>
loading.add(key)
}
} else {
loading.add(key)
}
}
try {
// 通过rdd自身的compute方法去计算得到结果,回去看看RDD那文章,自己看看源码就清楚了
val computedValues = rdd.computeOrReadCheckpoint(split,
context)
// 如果是本地运行的,就没必要缓存了,直接返回即可
if (context.runningLocally) {
return computedValues
}
// 跟踪blocks的更新状态
var updatedBlocks = Seq[(BlockId, BlockStatus)]()
val returnValue: Iterator[T] = {
if (storageLevel.useDisk && !storageLevel.useMemory)
{
/* 这是RDD采用DISK_ONLY的情况,直接扔给blockManager
* 然后把结果直接返回,它不需要把结果一下子全部加载进内存
* 这同样适用于MEMORY_ONLY_SER,但是我们需要在启用它之前确认blocks没被block
store给丢弃 */
updatedBlocks = blockManager.put(key, computedValues,
storageLevel, tellMaster = true)
blockManager.get(key) match {
case Some(values) =>
values.asInstanceOf[Iterator[T]]
case None =>
throw new Exception("Block manager failed
to return persisted valued")
}
} else {
// 先存到一个ArrayBuffer,然后一次返回,在blockManager里也存一份
val elements = new ArrayBuffer[Any]
elements ++= computedValues
updatedBlocks = blockManager.put(key, elements,
storageLevel, tellMaster = true)
elements.iterator.asInstanceOf[Iterator[T]]
}
}
// 更新task的监控参数
val metrics = context.taskMetrics
metrics.updatedBlocks = Some(updatedBlocks)
new InterruptibleIterator(context, returnValue)
} finally {
// 改完了,释放锁
loading.synchronized {
loading.remove(key)
loading.notifyAll()
}
}
}
} |
1、如果blockManager当中有,直接从blockManager当中取。
2、如果blockManager没有,就先用RDD的compute函数得到出来一个Iterable接口。
3、如果StorageLevel是只保存在硬盘的话,就把值存在blockManager当中,然后从blockManager当中取出一个Iterable接口,这样的好处是不会一次把数据全部加载进内存。
4、如果StorageLevel是需要使用内存的情况,就把结果添加到一个ArrayBuffer当中一次返回,另外在blockManager存上一份,下次直接从blockManager取。
对StorageLevel说明一下吧,贴一下它的源码。
class StorageLevel private(
    private var useDisk_ : Boolean,
    private var useMemory_ : Boolean,
    private var useOffHeap_ : Boolean,
    private var deserialized_ : Boolean,
    private var replication_ : Int = 1)
val NONE = new StorageLevel(false, false, false,
false)
val DISK_ONLY = new StorageLevel(true, false,
false, false)
val DISK_ONLY_2 = new StorageLevel(true, false,
false, false, 2)
val MEMORY_ONLY = new StorageLevel(false, true,
false, true)
val MEMORY_ONLY_2 = new StorageLevel(false, true,
false, true, 2)
val MEMORY_ONLY_SER = new StorageLevel(false,
true, false, false)
val MEMORY_ONLY_SER_2 = new StorageLevel(false,
true, false, false, 2)
val MEMORY_AND_DISK = new StorageLevel(true, true,
false, true)
val MEMORY_AND_DISK_2 = new StorageLevel(true,
true, false, true, 2)
val MEMORY_AND_DISK_SER = new StorageLevel(true,
true, false, false)
val MEMORY_AND_DISK_SER_2 = new StorageLevel(true,
true, false, false, 2)
val OFF_HEAP = new StorageLevel(false, false,
true, false) |
大家注意看它那几个参数,useDisk_、useMemory_、useOffHeap_、deserialized_、replication_
在具体的类型的时候是传的什么值。
下面我们的目标要放到blockManager。
BlockManager
BlockManager这个类比较大,我们从两方面开始看吧,putBytes和get方法。先从putBytes说起,之前说过Task运行结束之后,结果超过10M的话,会用BlockManager缓存起来。
env.blockManager.putBytes(blockId, serializedDirectResult, StorageLevel.MEMORY_AND_DISK_SER) |
putBytes内部又掉了另外一个方法doPut,方法很大呀,先折叠起来。
private def doPut(
      blockId: BlockId,
      data: Values,
      level: StorageLevel,
      tellMaster: Boolean = true): Seq[(BlockId, BlockStatus)] = {// Return value
    val updatedBlocks = new ArrayBuffer[(BlockId, BlockStatus)]
// 记录它的StorageLevel,以便我们可以在它加载进内存之后,可以按需写入硬盘。
// 此外,在我们把调用BlockInfo的markReay方法之前,都没法通过get方法获得该部分内容
val putBlockInfo = {
val tinfo = new BlockInfo(level, tellMaster)
// 如果不存在,就添加到blockInfo里面
val oldBlockOpt = blockInfo.putIfAbsent(blockId,
tinfo)
if (oldBlockOpt.isDefined) {
// 如果已经存在了,就不需要重复添加了
if (oldBlockOpt.get.waitForReady()) {return updatedBlocks
}
// 存在于blockInfo当中->但是上一次保存失败了,拿出旧的信息,再试一遍
oldBlockOpt.get
} else {
tinfo
}
}
val startTimeMs = System.currentTimeMillis
// 当我们需要存储数据,并且要复制数据到别的机器,我们需要访问它的值,但是因为我们的put操作会读取整个iterator,
// 这就不会有任何的值留下。在我们保存序列化的数据的场景,我们可以记住这些bytes,但在其他场景,比如反序列化存储的
// 时候,我们就必须依赖返回一个Iterator
var valuesAfterPut: Iterator[Any] = null
// Ditto for the bytes after the put
var bytesAfterPut: ByteBuffer = null
// Size of the block in bytes
var size = 0L
// 在保存数据之前,我们要实例化,在数据已经序列化并且准备好发送的情况下,这个过程是很快的
val replicationFuture = if (data.isInstanceOf[ByteBufferValues]
&& level.replication > 1) {
// duplicate并不是复制这些数据,只是做了一个包装
val bufferView = data.asInstanceOf[ByteBufferValues].buffer.duplicate()
Future {
// 把block复制到别的机器上去
replicate(blockId, bufferView, level)
}
} else {
null
}
putBlockInfo.synchronized {
var marked = false
try {
if (level.useMemory) {
// 首先是保存到内存里面,尽管它也使用硬盘,等内存不够的时候,才会写入硬盘
// 下面分了三种情况,但是Task的结果是ByteBufferValues这种情况,具体看putBytes方法
val res = data match {
case IteratorValues(iterator) =>
memoryStore.putValues(blockId, iterator, level,
true)
case ArrayBufferValues(array) =>
memoryStore.putValues(blockId, array, level, true)
case ByteBufferValues(bytes) =>
bytes.rewind()
memoryStore.putBytes(blockId, bytes, level)
}
size = res.size
// 这里写得那么恶心,是跟data的类型有关系的,data: Either[Iterator[_],
ByteBuffer],Left是Iterator,Right是ByteBuffer
res.data match {
case Right(newBytes) => bytesAfterPut = newBytes
case Left(newIterator) => valuesAfterPut =
newIterator
}
// 把被置换到硬盘的blocks记录到updatedBlocks上
res.droppedBlocks.foreach { block => updatedBlocks
+= block }
} else if (level.useOffHeap) {
// 保存到Tachyon上.
val res = data match {
case IteratorValues(iterator) =>
tachyonStore.putValues(blockId, iterator, level,
false)
case ArrayBufferValues(array) =>
tachyonStore.putValues(blockId, array, level,
false)
case ByteBufferValues(bytes) =>
bytes.rewind()
tachyonStore.putBytes(blockId, bytes, level)
}
size = res.size
res.data match {
case Right(newBytes) => bytesAfterPut = newBytes
case _ =>
}
} else {
// 直接保存到硬盘,不要复制到其它节点的就别返回数据了.
val askForBytes = level.replication > 1
val res = data match {
case IteratorValues(iterator) =>
diskStore.putValues(blockId, iterator, level,
askForBytes)
case ArrayBufferValues(array) =>
diskStore.putValues(blockId, array, level, askForBytes)
case ByteBufferValues(bytes) =>
bytes.rewind()
diskStore.putBytes(blockId, bytes, level)
}
size = res.size
res.data match {
case Right(newBytes) => bytesAfterPut = newBytes
case _ =>
}
}
// 通过blockId获得当前的block状态
val putBlockStatus = getCurrentBlockStatus(blockId,
putBlockInfo)
if (putBlockStatus.storageLevel != StorageLevel.NONE)
{
// 成功了,把该block标记为ready,通知BlockManagerMaster
marked = true
putBlockInfo.markReady(size)
if (tellMaster) {
reportBlockStatus(blockId, putBlockInfo, putBlockStatus)
}
updatedBlocks += ((blockId, putBlockStatus))
}
} finally {
// 如果没有标记成功,就把该block信息清除
if (!marked) {
blockInfo.remove(blockId)
putBlockInfo.markFailure()
}
}
}
// 把数据发送到别的节点做备份
if (level.replication > 1) {
data match {
case ByteBufferValues(bytes) => Await.ready(replicationFuture,
Duration.Inf)
case _ => {
val remoteStartTime = System.currentTimeMillis
// 把Iterator里面的数据序列化之后,发送到别的节点
if (bytesAfterPut == null) {
if (valuesAfterPut == null) {
throw new SparkException("Underlying put
returned neither an Iterator nor bytes! This shouldn't
happen.")
}
bytesAfterPut = dataSerialize(blockId, valuesAfterPut)
}
replicate(blockId, bytesAfterPut, level)
}
}
}
// 销毁bytesAfterPut
BlockManager.dispose(bytesAfterPut)
updatedBlocks
} |
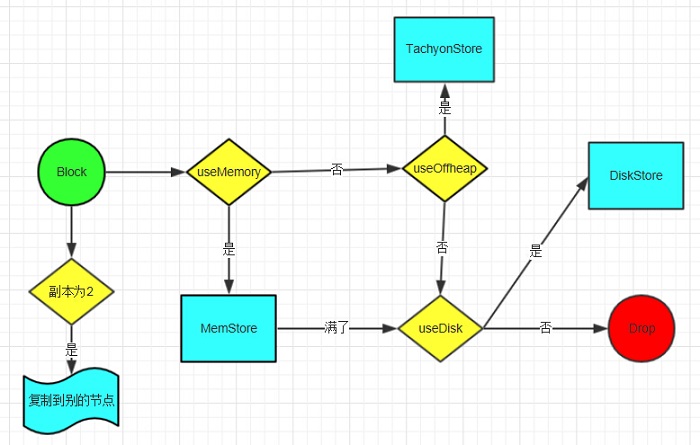
从上面的的来看:
1、存储的时候按照不同的存储级别分了3种情况来处理:存在内存当中(包括MEMORY字样的),存在tachyon上(OFF_HEAP),只存在硬盘上(DISK_ONLY)。
2、存储完成之后会根据存储级别决定是否发送到别的节点,在名字上最后带2字的都是这种,2表示一个block会在两个节点上保存。
3、存储完毕之后,会向BlockManagerMaster汇报block的情况。
4、这里面的序列化其实是先压缩后序列化,默认使用的是LZF压缩,可以通过spark.io.compression.codec设定为snappy或者lzo,序列化方式通过spark.serializer设置,默认是JavaSerializer。
接下来我们再看get的情况。
  val local = getLocal(blockId)
    if (local.isDefined) return local
    val remote = getRemote(blockId)
    if (remote.isDefined) return remote
    None
|
先从本地取,本地没有再去别的节点取,都没有,返回None。从本地取就不说了,怎么进怎么出。讲一下怎么从别的节点去,它们是一个什么样子的关系?
我们先看getRemote方法
private def doGetRemote(blockId: BlockId, asValues: Boolean): Option[Any] = {
    val locations = Random.shuffle(master.getLocations(blockId))
    for (loc <- locations) {
      val data = BlockManagerWorker.syncGetBlock(GetBlock(blockId), ConnectionManagerId(loc.host, loc.port))
      if (data != null) {
        if (asValues) {
          return Some(dataDeserialize(blockId, data))
        } else {
          return Some(data)
        }
      }
    }
    None
  }
|
这个方法包括两个步骤:
1、用blockId通过master的getLocations方法找到它的位置。
2、通过BlockManagerWorker.syncGetBlock到指定的节点获取数据。
ok,下面就重点讲BlockManager和BlockManagerMaster之间的关系,以及BlockManager之间是如何相互传输数据。
BlockManager与BlockManagerMaster的关系
BlockManager我们使用的时候是从SparkEnv.get获得的,我们观察了一下SparkEnv,发现它包含了我们运行时候常用的那些东东。那它创建是怎么创建的呢,我们找到SparkEnv里面的create方法,右键FindUsages,就会找到两个地方调用了,一个是SparkContext,另一个是Executor。在SparkEnv的create方法里面会实例化一个BlockManager和BlockManagerMaster。这里我们需要注意看BlockManagerMaster的实例化方法,里面调用了registerOrLookup方法。
def registerOrLookup(name: String, newActor: => Actor): ActorRef = {
      if (isDriver) {
        actorSystem.actorOf(Props(newActor), name = name)
      } else {
        val driverHost: String = conf.get("spark.driver.host", "localhost")
        val driverPort: Int = conf.getInt("spark.driver.port", 7077)
        Utils.checkHost(driverHost, "Expected hostname")
        val url = s"akka.tcp://spark@$driverHost:$driverPort/user/$name"
        val timeout = AkkaUtils.lookupTimeout(conf)
        Await.result(actorSystem.actorSelection(url).resolveOne(timeout), timeout)
      }
} |
|


