| БрМЭЦМі: |
ЮФеТНщЩмСЫДгЛЗОГзМБИЕНзюКѓЕФwebгІгУДђАќВПЪ№ЕФвЛИіЭъећЕФвдЬЋЗЛDAppПЊЗЂЙ§ГЬЃЌЯЃЭћЖдФњФмгаЫљАяжњЁЃ
БОЮФРДздгкcnblogsЃЌгЩЛ№СњЙћШэМўLucaБрМЁЂЭЦМіЁЃ |
|
ЛЗОГзМБИ
ubuntu 16.04ЃЌ 64ЮЛ
ЛЙашвЊАВзАвдЬЋЗЛЯрЙиЕФЛЗОГ:
* nodejs
* truffle
* solidity
* testrpc
СэЭтЃЌБОЦЊЛЙЛсгУЕНwebpackЃЌАВзАНЬГЬЭјЩЯвВгаКмЖрЁЃетВПЗжШчЙћВЛЪьЯЄЕФЛАЧыздааВщдФбЇЯАЯТЁЃашвЊзЂвтЕФЪЧБОЦЊЮвгУЕФwebpackАцБОЪЧ3.xЃЌБОЮФаДзїЪБwebpack4.xвбОЗЂВМЁЃ4.xИФЖЏЛЙЪЧБШНЯДѓЃЌНЈвщДѓМвЪЙгУ3.xЕФАцБОдЫааБОЮФжаЕФДњТыЪОР§ЁЃ
БраДжЧФмКЯдМ
ЪзЯШдкгУЛЇФПТМЯТаТНЈconferenceФПТМЃЌНјШыФПТМжДааtruffle initЃЌИУУќСюЛсНЈСЂШчЯТЕФзгФПТМКЭЮФМў:
contracts/: жЧФмКЯдМДцЗХЕФФПТМЃЌФЌШЯЧщПіЯТвбОАяФуДДНЈ Migrations.solКЯдМЁЃ
migrations/: ДцЗХВПЪ№НХБО
test/: ДцЗХВтЪдНХБО
truffle.js: truffleЕФХфжУЮФМў
аоИФtruffle.jsЮФМўЃЌИФГЩШчЯТ:
module.exports
= {
networks: {
development: {
host: "localhost",
port: 8545,
network_id: "*" // ЦЅХфШЮКЮnetwork id
}
}
}; |
етРяЪЧЩшжУЮвУЧЩдКѓвЊВПЪ№жЧФмКЯдМЕФЮЛжУ, ЗёдђЛсБЈЭјТчДэЮѓЁЃ
ПЊЦєвЛИіжеЖЫЃЌЪфШыtestrpcдЫааВтЪдНкЕуЁЃtestrpcЪЧвЛИіЭъећЕФдкФкДцжаЕФЧјПщСДВтЪдЛЗОГЃЌЦєЖЏ
testrpc ОКѓЃЌЛсФЌШЯДДНЈ10ИіеЪКХЃЌAvailable AccountsЪЧеЪКХСаБэЃЌPrivate
KeysЪЧЯрЖдгІЕФеЪКХУмдПЁЃ
НјШыcontractsФПТМЃЌетРяЪЧДцЗХКЯдМДњТыЕФЕиЗНЁЃЮвУЧПЩвдЪЙгУsublimeЕШЙЄОпБраДВтЪдКЯдМДњТыЁЃЮветРяжЛЬљГіВПЗжДњТыЃЌЮФеТзюКѓЛсИјГіЭъећдДТыЕФЕижЗЁЃ
pragma solidity
^0.4.19;
contract Conference { // can be killed, so the
owner gets sent the money in the end
address public organizer;
mapping (address => uint) public registrantsPaid;
uint public numRegistrants;
uint public quota;
event Deposit(address _from, uint _amount); //
so you can log the event
event Refund(address _to, uint _amount); // so
you can log the event
function Conference() {
organizer = msg.sender;
quota = 100;
numRegistrants = 0;
}
... |
КЯдМФкШнКмМђЕЅЃЌЪЧвЛИіеыЖдЛсвщЕФжЧФмКЯдМЃЌЭЈЙ§ЫќВЮЛсепПЩвдТђЦБЃЌзщжЏепПЩвдЩшжУВЮЛсШЫЪ§ЩЯЯоЃЌвдМАЭЫПюВпТдЁЃ
БрвыВПЪ№жЧФмКЯдМ
аоИФmigrationsЯТЕФ1_initial_migration.jsЮФМўЃЌИФГЩШчЯТЃК
//var Migrations
= artifacts.require("./Migrations.sol");
var Conference = artifacts.require("./Conference.sol");
module.exports = function(deployer) {
//deployer.deploy(Migrations);
deployer.deploy(Conference);
}; |
БрвыЃЌ
| $ sudo truffle
compile --compile-all |
зЂвтПДЯТгаЮоБЈДэЁЃ
TruffleНіФЌШЯБрвыздЩЯДЮБрвыКѓБЛаоИФЙ§ЕФЮФМўЃЌРДМѕЩйВЛБивЊЕФБрвыЁЃШчЙћФуЯыБрвыШЋВПЮФМўЃЌПЩвдЪЙгУЈCcompile-allбЁЯюЁЃ
ШЛКѓЛсЖрГівЛИіbuildФПТМЃЌИУФПТМЯТЕФЮФМўЖМВЛвЊзіШЮКЮЕФаоИФЁЃ
ВПЪ№ЃЌ
| $ sudo truffle
migrate --reset |
етИіУќСюЛсжДааЫљгаmigrationsФПТМЯТЕФjsЮФМўЁЃШчЙћжЎЧАжДааЙ§truffle migrateУќСюЃЌдйДЮжДааЃЌжЛЛсВПЪ№аТЕФjsЮФМўЃЌШчЙћУЛгааТЕФjsЮФМўЃЌВЛЛсЦ№ШЮКЮзїгУЁЃШчЙћЪЙгУЈCresetВЮЪ§ЃЌдђЛсжиаТЕФжДааЫљгаНХБОЕФВПЪ№ЁЃ
ВтЪдЯТЃЌдкtestФПТМаТдівЛИіconference.jsВтЪдЮФМўЃЌ
var Conference
= artifacts.require("./Conference.sol");
contract('Conference', function(accounts) {
console.log("start testing");
//console.log(accounts);
var owner_account = accounts[0];
var sender_account = accounts[1]; it("Initial
conference settings should match", function(done)
{
Conference.new({from: owner_account}).then(
function(conference) {
conference.quota.call().then(
function(quota) {
assert.equal(quota, 100, "Quota doesn't match!");
}).then(
function() {
return conference.numRegistrants.call();
}).then(
function(num) {
assert.equal(num, 0, "Registrants doesn't
match!");
return conference.organizer.call();
}).then(
function(organizer) {
assert.equal(organizer, owner_account, "Owner
doesn't match!");
done();
}).catch(done);
}).catch(done);
});
... |
етРяжЛЬљГіВПЗжДњТыЃЌЫФИіВтЪдcaseЃЌдЫааtruffle testВщПДВтЪдНсЙћЁЃ
$ truffle test
Using network 'development'.
start testing
Contract: Conference
Initial conference settings should match (191ms)
Should update quota (174ms)
Should let you buy a ticket (717ms)
Should issue a refund by owner only (714ms)
4
passing (2s) |
БраДwebгІгУ
дкconferenceФПТМЯТжДааnpm initЃЌШЛКѓвЛТЗЛиГЕЃЌЛсЩњГЩвЛИіУћЮЊpackage.jsonЕФЮФМўЃЌБрМетИіЮФМўЃЌдкscriptsВПЗждіМгСНИіУќСюЃЌзюжеШчЯТ:
{
"name":
"conference",
"version":
"1.0.0",
"description":
"",
"main": "truffle-config.js",
"directories": {
"test":
"test"
},
"scripts": {
"test":
"echo \"Error: no test specified\"
&& exit 1",
"start":
"webpack",
"server": "webpack-dev-server
--open"
},
"author": "",
"license":
"ISC"
} |
package.jsonЮФМўЖЈвхСЫетИіЯюФПЫљашвЊЕФИїжжФЃПщЃЌвдМАЯюФПЕФХфжУаХЯЂЃЈБШШчУћГЦЁЂАцБОЁЂаэПЩжЄЕШдЊЪ§ОнЃЉЁЃnpm
УќСюИљОнетИіХфжУЮФМўЃЌздЖЏЯТдиЫљашЕФФЃПщЃЌвВОЭЪЧХфжУЯюФПЫљашЕФдЫааКЭПЊЗЂЛЗОГЁЃ
ШЛКѓдкconferenceФПТМЯТаТНЈappФПТМЃЌВЂДДНЈindex.htmlЮФМўЃЌШчЯТ:
<!DOCTYPE
html>
<html>
<head>
<title>Conference DApp2</title>
<link href='https://fonts.loli.net/css?family=Open+Sans:400,700,300'
rel='stylesheet' type='text/css'>
<script
type="text/javascript" src="http://code.jquery.com/jquery-1.9.1.min.js"></script>
<script src="./app.js"></script>
</head>
<body>
<h1>Conference DApp</h1>
<div class="section">
Contract deployed at: <div id="confAddress"></div>
</div>
<div class="section">
Organizer: <input type="text" id="confOrganizer"
/>
</div>
<div class="section">
Quota: <input type="text" id="confQuota"
/>
<button id="changeQuota">Change</button>
<span id="changeQuotaResult"></span>
</div>
<div class="section">
Registrants: <span id="numRegistrants">0</span>
</div>
<hr/>
</body>
</html> |
ШЛКѓдкappФПТМЯТаТНЈjavascriptsФПТМКЭstyleheetsФПТМЃЌЗжБ№ДцЗХjsНХБОЮФМўКЭcssбљЪНЮФМўЁЃеце§КЭКЯдМНЛЛЅЕФОЭЪЧНХБОЮФМўЁЃ
НХБОЮФМўУћЮЊapp.jsЃЌВПЗжДњТыШчЯТ:
import "../stylesheets/app.css";
import { default as Web3 } from 'web3';
import { default as contract } from 'truffle-contract';
import conference_artifacts from '../../build/contracts/Conference.json'
var accounts, sim;
var Conference = contract(conference_artifacts);
window.addEventListener('load', function()
{
//alert("aaaaa");
// Checking if Web3 has been injected by the
browser (Mist/MetaMask)
if (typeof web3 !== 'undefined') {
console.warn("Using web3 detected from
external source. If you find that your accounts
don't appear or you have 0 MetaCoin, ensure
you've configured that source properly. If using
MetaMask, see the following link. Feel free
to delete this warning. :) http://truffleframework.com/tutorials/truffle-and-metamask")
// Use Mist/MetaMask's provider
window.web3 = new Web3(web3.currentProvider);
} else {
console.warn("No web3 detected. Falling
back to http://localhost:8545. You should remove
this fallback when you deploy live, as it's
inherently insecure. Consider switching to Metamask
for development. More info here: http://truffleframework.com/tutorials/truffle-and-metamask");
// fallback - use your fallback strategy (local
node / hosted node + in-dapp id mgmt / fail)
window.web3 = new Web3(new Web3.providers.HttpProvider("http://localhost:8545"));
}
Conference.setProvider(web3.currentProvider);
App.start();
$("#changeQuota").click(function()
{
var newquota = $("#confQuota").val();
App.changeQuota(newquota);
});
// Wire up the UI elements
});
... |
етИіДњТыЮввВВЛДђЫуЙ§ЖрЕФНтЪЭЃЌжївЊОЭЪЧгУJSМгwweb3 APIЕїгУКЯдМЕФКЏЪ§ЖјвбЁЃ
ЕНетРяЮЊжЙЃЌwebВПЗжЛљБОвбОзМБИКУСЫЃЌЮвУЧжЛашвЊгУwebpackДђАќВПЪ№МДПЩЁЃwebpackДђАќЛЙашвЊвЛИіХфжУЮФМўЃЌУћЮЊwebpack.config.jsЃЌетИіЮФМўЪЧИцЫпwebpackДђАќЕФЙцдђЃЌЩцМАwebpackЕФгУЗЈЃЌетРяВЛзіЙ§ЖрЕФНтЪЭЁЃ
ДђАќВПЪ№webгІгУ
ДђАќВПЪ№ашвЊАВзАwebpackКЭЯрЙиЕФзщМўЃЌАВзАЕФЗНЪНгаШЋОжАВзАКЭОжВПАВзАСНжжЁЃЫљЮНЕФОжВПАВзАЃЌЪЧжИзщМўЖМЪЧАВзАдкЯюФПЕФФПТМЯТ(conference/node_modules)ЁЃЮветРяВЩгУЕФОЭЪЧОжВПАВзАЁЃИљОнЮвУЧЯюФПЕФЪЕМЪЧщПіЃЌашвЊАВзАвдЯТзщМўЃЌ
npm install --save-dev
webpack@3.0.0
npm install babel-loader --save-dev
npm install babel-core --save-dev
npm install html-loader --save-dev
npm install --save-dev webpack-dev-server@2.11.0
npm install html-webpack-plugin --save-dev
npm install truffle-contract --save-dev
npm install --save-dev style-loader css-loader |
ЛЗОГзАКУЃЌПЩвдДђАќСЫЁЃ
$ sudo npm run
start
> conference@1.0.0 start /home/pony/ethereum/conference
> webpack
Hash: ec8b764f75c05b477d9d
Version: webpack 3.0.0
Time: 2686ms
Asset Size Chunks Chunk Names
bundle.js 3.36 MB 0 [emitted] [big] main
./index.html 740 bytes [emitted]
[10] (webpack)/buildin/global.js 509 bytes {0}
[built]
[16] (webpack)/buildin/module.js 517 bytes {0}
[built]
[47] ./app/javascripts/app.js 3.85 kB {0} [built]
[48] ./app/stylesheets/app.css 1.08 kB {0} [built]
[49] ./node_modules/css-loader!./app/stylesheets/app.css
413 bytes {0} [built]
[175] ./build/contracts/Conference.json 71.1 kB
{0} [built]
+ 170 hidden modules
Child html-webpack-plugin for "index.html":
[0] ./node_modules/html-webpack-plugin/lib/loader.js!./app/index.html
706 bytes {0} [built] |
УЛБЈДэЕФЛАЃЌНјШыbuildФПТМПЩвдПДЕНbundle.jsКЭindex.htmlСНИіЮФМўЃЌетСНИіОЭЪЧзюжеДђАќКУЕФЭјвГЮФМўЁЃ
ШЛКѓВПЪ№ЃЌ
$ sudo npm run
server
> conference@1.0.0 server /home/pony/ethereum/conference
> webpack-dev-server --open
Project is running at http://localhost:8080/
webpack output is served from /
Content not from webpack is served from ./build
404s will fallback to /index.html
Hash: ecae3662137376f80de0
Version: webpack 3.0.0
... |
етбљЯрЕБгкдЫааСЫвЛИіаЁаЭЕФnodejsЗўЮёЦїЃЌЮвУЧПЩвддкфЏРРЦїЪфШыhttp://localhost:8080/ПДПДаЇЙћ:
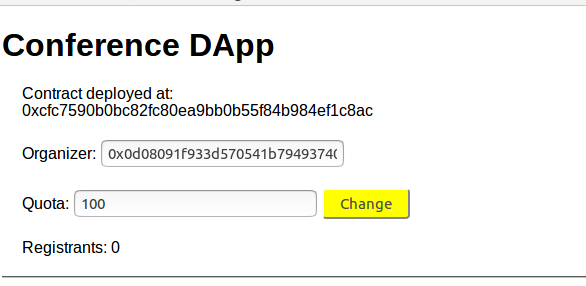
ПЩвдПДЕНКЯдМЕФЗЂВМЕижЗКЭЛсвщзщжЏепЕижЗ(msg.sender)ЖМвбОГЩЙІЕФЯдЪОГіРДСЫЃЌЕуЛїchangeАДХЅЛЙПЩвдИФБфquotaЕФжЕЁЃ
БОЮФЕФДњТыЮввбОЩЯДЋЕНgithubЩЯЁЃ
https://github.com/pony-maggie/conference
|