This guide explains
how to install and configure IBM® Rational®
ClearQuest® Version 7.0 on the Linux® platform.
Although ClearQuest 7.0 provides comprehensive solutions
for Linux, as well as for Microsoft® Windows®,
deploying and configuring it on Linux is somewhat more
difficult. Also, users must upgrade to the current version
of ClearQuest to access the existing database. You will
also learn how to deploy the ClearQuest Web component
on IBM® WebSphere® Application Server rather
than on the ClearQuest Web application and get troubleshooting
tips for connecting to the database created or configured
by previous versions of ClearQuest. This article is
intended for readers who have some similar experience
on Windows.
The IBM® Rational® ClearQuest®
Version 7.0 for Linux® installation package is somewhat
different from the Microsoft® Windows® version.
There are no administration tools, such as the Maintenance
Tool, User Administration, and ClearQuest Designer,
in the Linux installation package. Therefore, to deploy
ClearQuest on Linux, it is necessary to set up a Windows
platform for administration purposes.
For the backend database for ClearQuest,
we set up an IBM® DB2® database on Linux to
use in examples for this article. It is important to
be aware that ClearQuest 7.0 includes a driver to access
a DB2 server, rather than using the DB2 client that
was mandatory in previous releases.
Setup used in these
examples
The examples used in this article are
based on this setup:
- Databases for ClearQuest 7.0 have
been created on Linux and configured through the ClearQuest
7.0 administration tools within Windows. Table 1,
which follows, shows the connection information.
- Two existing DB2 databases have
been created, in Windows, and configured by the previous
ClearQuest previous version, 2003.06.19. The connection
information for those is also listed in Table 1.
- IBM WebSphere Application Server
is installed on the same Linux machine where ClearQuest
7.0 will be deployed, in this directory:
/opt/IBM/WebShphere
- The installation package was not
unpacked into the /images/CQ7Install/linux_x86 location,
where there are two subdirectories: clearquest
and common
- A Rational License issue that existed
previously has been resolved. Thus, in preparing examples
for this article, we used the remote license server.
Table 1. Database
connection information
| Platform |
Variables |
Values |
| Linux
|
Schema repository database name |
DB4CQSHR |
| User database name |
DB4CQUSR |
| User account (also
DB2 instance name) |
db2inst2 |
| Port for IBM DB2
connection |
50001 |
| Microsoft
Windows |
Schema repository database name |
s_cqtm |
| User database name
in DB2 |
ur_cqtm |
| User account |
tester |
| Port for DB2 connection |
50000 (default) |
First, set up the installation package
in a release area using the command prompt.
Set up a release
area
- Navigate to this directory: /images/CQ7Install/linux_x86/clearquest/install
- Issue this command:
/site_prep
- At the prompt for the ClearQuest
license host, enter the license server address.
- At the prompt for the HTTP port
for Rational Web Platform, use the default value:
80
- Leave the account name for
Rational Web Platform as "nobody."
- Leave the group name for
Rational Web Platform as "nobody."
- At the prompt to enable e-mail notification,
select No.
Note:
The values set in Steps 4, 5 and 6 are not relevant
in this article. Simply accept all the default ones
to continue the process.
Install ClearQuest
components
- Navigate to /images/CQ7Install/linux_x86/clearquest/install
, and issue the
./install_release
command to begin installation.
- At the prompt to choose installation
methods, select 1: Local Install
- Enter
1 to accept the
license agreement.
- At the prompt to choose installation
operations or models, choose 2: Full-copy
- Specify the installation folder:
/opt/rational for examples in this article
- Accept the default value for Pathname
to the network-wide release directory, which should
be the same as what had been set in the release area
setup process.
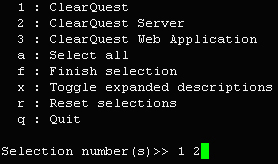
- At the prompt to select the components
to install (see Figure 1), choose these items: 1.
ClearQuest and 2. ClearQuest Server. Do
not specify 3, ClearQuest Web Application, because
you will configure IBM® WebSphere® Application
Server for such functionality.
Figure 1. Select
components to install
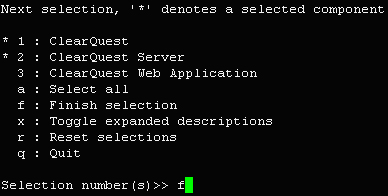
- When you have completed the previous
steps, you will see asterisks beside items 1 and 2
(see Figure 2) to indicate those items as your choices.
Select f: finish selection.
Figure 2. Installation
preview
- Specify the License Server at the
prompt.
- At the prompt to enable e-mail notification,
select No.
- At the prompt, select Yes
to continue installation.
- Accept the default value for ClearQuest
database registry directory. If it does not exist,
just accept the default value to create it.
- Wait until the installation is finished,
without errors.
Modify environment
variables
- Before running ClearQuest, it is
necessary to add the entries shown in Listing 1 to
the Linux login environment in the /root/.bashrc
file.
Listing 1.
Modify the system environment
#ClearQuest
export TZ=PRC
export LD_ASSUME_KERNEL=2.4.19
export LD_LIBRARY_PATH=/opt/rational/clearquest/linux_x86/shlib
export MOZILLA_FIVE_HOME=/nowhere
. /opt/rational/clearquest/cq_setup.sh |
- Log out and log in again to make
those variables effective, and then issue the
clearquest
command to launch ClearQuest on Linux.
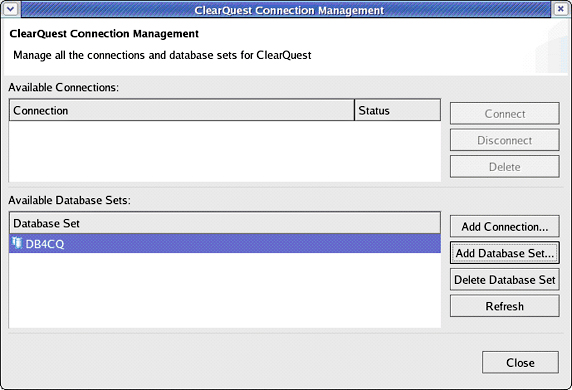
- In ClearQuest client, click File
> Database > Manage Connections to display
the ClearQuest Connection Management panel (Figure
3).
Figure 3. ClearQuest
Connection Management panel
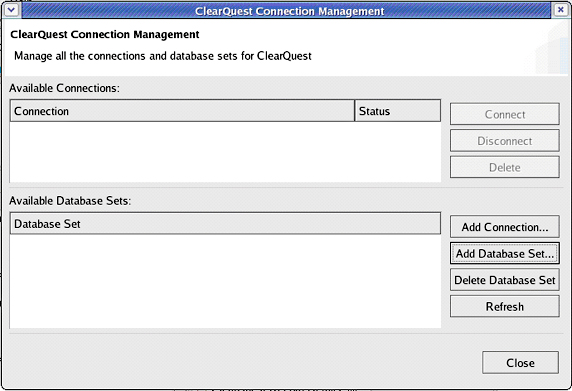
- In the ClearQuest Connection Management
panel (Figure 3), click Add Database Set to
launch the New ClearQuest Database Set options
shown in Figure 4.
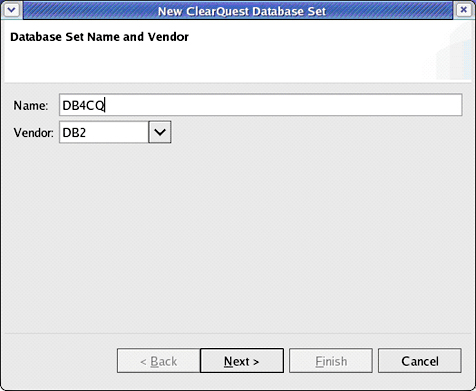
- Type the connection name in the
Name field (
DB4CQ in this example),
and, from the drop-down menu, choose DB2 as
vendor.
- Then click Next.
Figure 4. Database
Set Name and Vendor dialog box
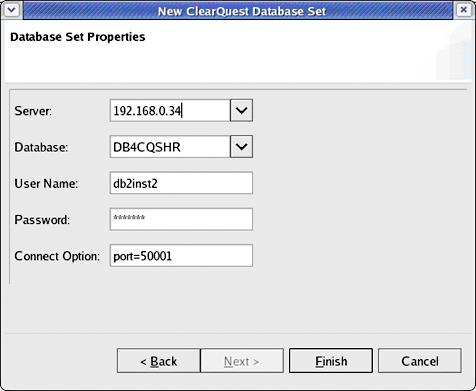
- In the next window of the
New ClearQuest Database Set wizard, specify the server
name or IP address for Server field, the schema repository
database name for the Database field, the database
access account and password, and, essentially, the
port option for DB2 connection mentioned in the Assumption
section, previously. For this example, as Figure 5
shows, we used these entries:
- Server: 192.068.0.34
(selected from the drop-down menu)
- Database: DB4CQSHR (selected
from the drop-down menu)
- User Name:
db2inst2
- Password:
*******
- Connect Option:
port=500001
- Then click Finish to complete
creation of the database set.
Figure 5. Database
Set Properties dialog box
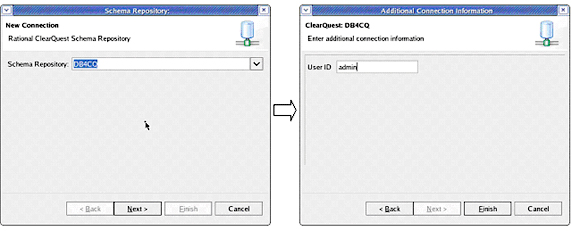
- Now, set the connection to user
database by highlighting the database set that you
just created (DB4CQ in the example that Figure 6 shows),
and then clicking Add Connection .
Figure 6. ClearQuest
Connection Management dialog box showing the Database
Set created
- Leave the Schema Repository name
as it shows (which is the same as Database Set name),
click Next, and then specify your User ID
to access the user database, which is defined in the
ClearQuest User Administration tool.
- Click Finish (see Figure
7).
Figure 7. New
Connection to schema repository
- Next, choose the user database from
the drop-down menu, and type the correct password
to log in to the repository (Figure 8).
Figure 8. Connect
to user database
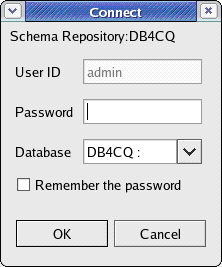
Now you are ready to work on
the selected user database within ClearQuest.
In the ClearQuest packages, you can
use the Web application included, as the option 3 indicated
in Figure 3.
However, you might prefer to deploy and configure ClearQuest
Web on IBM WebSphere Application Server (WebSphere for
short hereafter) for various reasons, such as unified
architecture, scalable performance, and so on. For that
alternative, follow these steps:
- Launch the WebSphere Application
Server Administration Console on Linux from the main
menu, and log in.
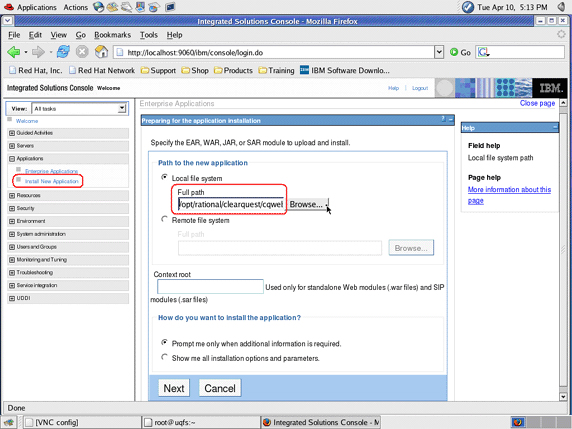
- Under Applications in the
directory tree on the left, click Install New Application,
as shown as Figure 9.
- In the Full path field in
the middle panel, enter this EAR file name:
/opt/rational/clearquest/cqweb/cqwebws.ear
- Click Next to proceed.
Figure 9. Install
the new application on WebSphere Application Server
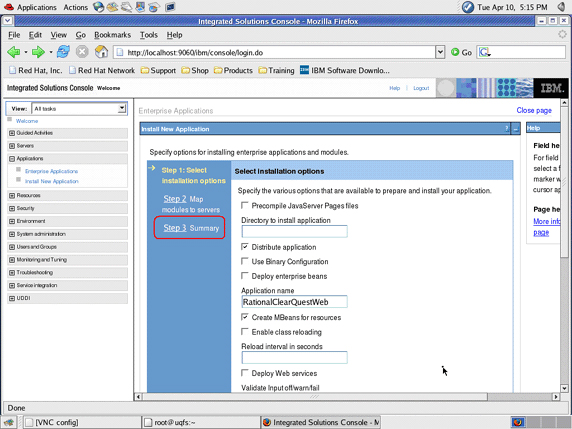
- Accept all of the default settings
(no action required), and click Step 3, Summary
(see Figure 10).
- Then click the Finish button
at the bottom of the Summary page.
Figure 10. Steps
to install the new application in WebSphere Application
Server
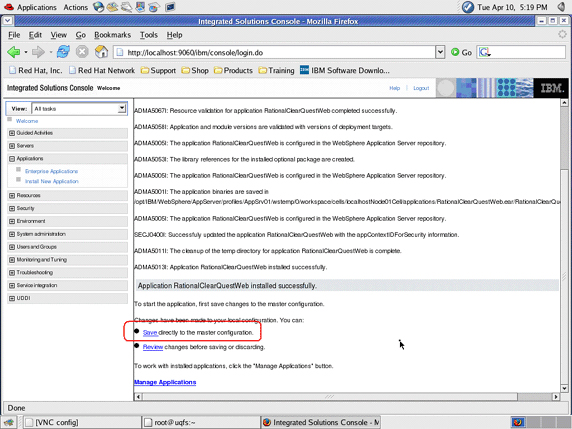
- Next, click "Save directly
to the master configuration" (see Figure 11).
Figure 11. Save
your changes to the master configuration
- In the command console where WebSphere
Application Server is installed, navigate to the Classes
directory:
/opt/IBM/WebSphere/AppServer/profiles /AppSrv01/installedApps/localhostNode01Cell/RationalClearQuestWeb.ear/CQWebModule.war/WEB-INF/classes
- Modify the common.properties
file to specify the properties shown in Listing 2.
Listing 2.
Modify the common.properties file
CQ_WEB_SERVER_NAME=localhost
PROPERTIES_DIR=/opt/IBM/WebSphere/AppServer/profiles/AppSrv01
		/installedApps/localhostNode01Cell/RationalClearQuestWeb.ear
		/CQWebModule.war/WEB-INF/classes
UPLOAD_DIR=/opt/IBM/WebSphere/AppServer/profiles/AppSrv01/installedApps
		/localhostNode01Cell/RationalClearQuestWeb.ear/CQWebModule.war
		/htdocs/cqattachments
DOWNLOAD_DIR=/cqweb/htdocs/cqattachments
CHTRPT_DOWNLOAD_DIR=/opt/IBM/WebSphere/AppServer/profiles/AppSrv01/installedApps
		/localhostNode01Cell/RationalClearQuestWeb.ear/CQWebModule.war
		/htdocs/cqchtrpts
CHTRPT_DOWNLOAD_URL=/cqweb/htdocs/cqchtrpts |
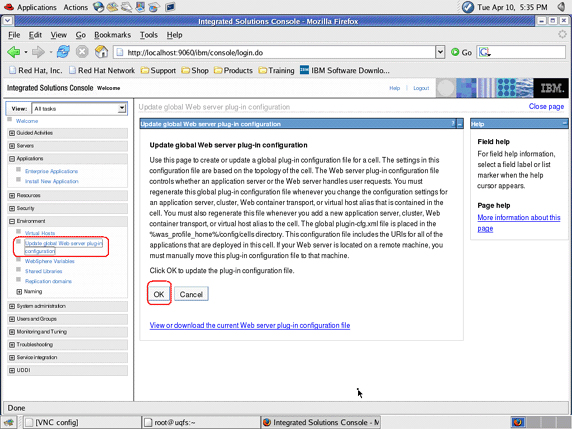
- Return to the administration console.
- Click OK on the Update
global Web Server Plug-In Configuration view of
the WebSphere administrative console (Figure 12) to
regenerate the plug-in configuration.
Figure 12. Update
the Web server plug-in configuration
- Now, restart WebSphere Application
Server, and then start the Rational ClearQuest Web
application.
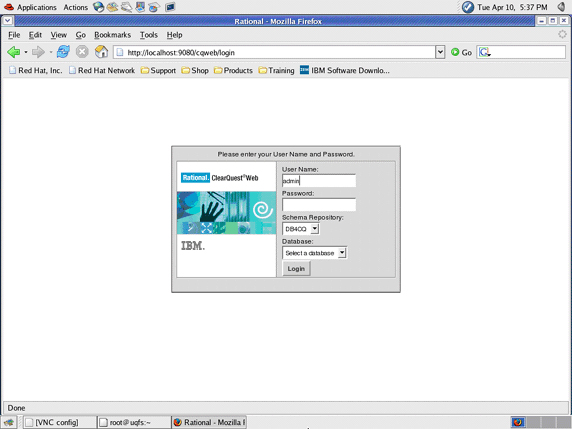
- Verify the Rational ClearQuest Web
application deployment on WebSphere by entering the
following Web address in your browser, similar to
what Figure
18 shows:
http://localhost:9080/cqweb/login
Figure 13. ClearQuest
Web
When you want to add a connection that
is based on the Connection Set to an IBM® DB2®
database that was created and configured by a previous
version of ClearQuest (2003.06.19, for example), that
connection might fail. The reason is that, before ClearQuest
7.0, the database connection in ClearQuest depended
on a DB2 client, where the database information was
cataloged to a local machine for connecting. It is not
a problem that the server name information in the Repository
Schema for both master and user databases are the same
as their corresponding database names. However, ClearQuest
7.0 no longer needs a DB2 client, because it accesses
DB2 database directly, based on the connection information
installed in schema repository, including the server
name. Thus, the name of that server is essential to
the connection.
Therefore, when you use ClearQuest
7.0, use the ClearQuest Maintenance Tool and ClearQuest
Designer to update server information for both the schema
repository and user database. Such updating will not
affect users of previous versions of ClearQuest.
Update the schema
repository
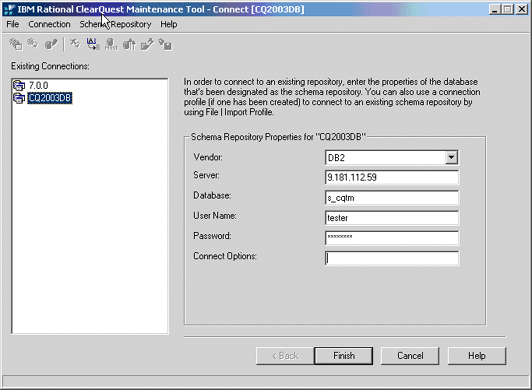
- Launch the ClearQuest Maintenance
Tool in Windows, and create a new connection to
the Repository Schema for the database in
the previous version of ClearQuest, as shown in Figure
14. You will need to complete these fields:
- Vendor
- Server
- Database
- User Name
- Password
- Connect Options (if any, or
leave blank)
Figure 14. Create
a new connection in the ClearQuest Maintenance Tool
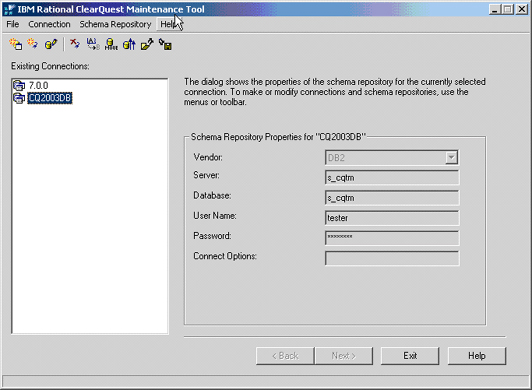
- When you have finished creating
the new connection, notice that the server name for
the connection has changed from 9.181.112.59 to s_cqtm,
as shown in Figure 15.
Figure 15. Server
name changed
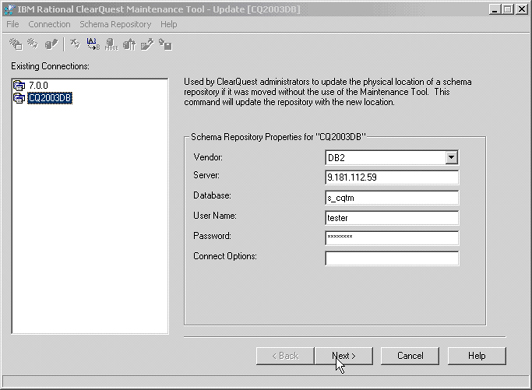
- From the menu, select Schema
Repository > Update > Selected Connection.
- Change the server name from
s_cqtm
to the IP address or server name where the
database is located (in this example: 9.181.112.59),
as Figure 16 shows.
- Click Next.
Figure 16. Update
server name for Schema Repository
- Enter the super user name and password
(
admin for this example), as Figure 17
shows, to proceed.
Figure 17. Super
user login information to update
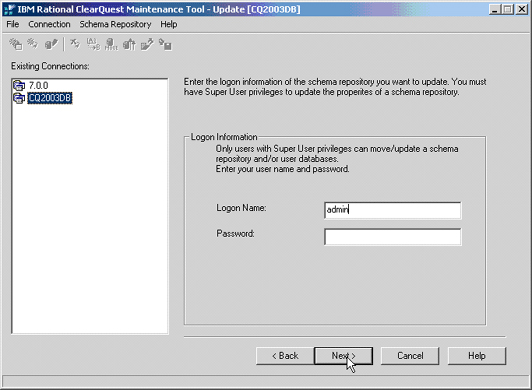
- Click Done to finish.
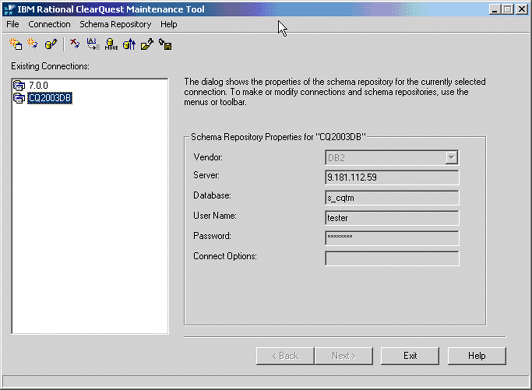
- Now, verify that the server information
is correct under Existing Connections (see Figure
18).
Figure 18. Correct
server name
Update the
user database
- Launch ClearQuest Designer in Windows,
and choose the connection that you just created in
the ClearQuest Maintenance Tool (CQ2003DB in this
example).
- Log in with correct user account
and password.
- From the ClearQuest Designer
menu, select Database > Update User Database
Properties, choose the user database (logical
database) to update, and then click the Properties
button.
- Change the Server name from
ur_cqtm to the IP address or server name where the
database is located (9.181.112.59 in Figure 19).
- Click Update.
Figure 19. Update
server name for user database
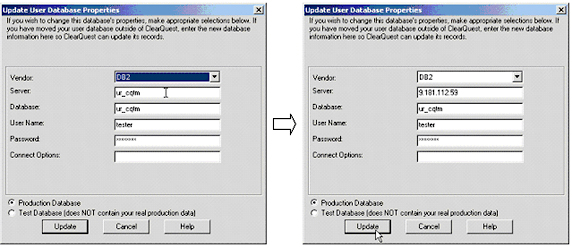
You can verify that the server
information is correct, and you can now access the database
from the ClearQuest 7.0 client.
Learn
Get products and technologies
- ClearQuest users and administrators
can find more resources in the ClearQuest section
of the
developerWorks Rational zone, including hooks,
Eclipse plug-ins, product documentation, articles
and whitepapers.
- Download
IBM product evaluation versions and get your hands
on application development tools and middleware products
from DB2®, Lotus®, Rational®, Tivoli®,
and WebSphere®.
Discuss
|
