Introduction
This tutorial will review Subversion
(SVN), and teach Mind Project staff how to use the popular
Windows SVN client, TortoiseSVN.
For More Information
For more SVN info, see
Version Control with Subversion.
QuickLinks
Please Note:
There is often more than one way to
perform an operation. I have written instructions for
completing common tasks in the most basic way possible.
Undoubtedly, as you grow familiar with TortoiseSVN,
you will find better ways of doing things.
- Checkouts
- Commits
- Renaming
- Deleting
- Adding
- Updating
- Conflicts
SVN
Subversion (abbreviated SVN) is an
open source version control system that facilitates
source code development by multiple software developers
across time and location. SVN helps resolve a number
of issues that multi-developer projects regularly encounter,
such as restoring previous working versions of source
code, and conflicting versions of the same source code
(more on these problems below).
Why we use SVN
At the Mind Project, all of the source
code we develop is stored in an SVN repository on our
new server, Coruscant. SVN allows us to easily maintain
backups of source code, keep copies of every single
version of the code, and prevents developers from overwriting
each other's work.
SVN: the Basics
SVN is an system that can be served
on a variety of web servers, and implementations exist
to setup an SVN server on home PCs. SVN clients can
be installed on a variety of platforms; here, we will
focus on a popular Windows client, TortoiseSVN. SVN
stores files (binary and text) in categories called
repositories. For example, we have a repository for
all of the Mobile Robot software; this repository is
named iris4. By accessing the iris4 repository,
every version of all of the Iris.4 Mobile Robot software
can be accessed, from the first version of the CCP,
to the latest version of the Robix Controller Interface.
Access to Mind Project Repositories
If you wish to access a Mind Project
SVN repository, you must first get an account from our
system administrator (contact Dr. Anderson or Bob for
more information). Once you have an account, you can
access the specific SVN repositories you have been given
authorization to with your UliD and UliD Password.
TortoiseSVN
(What follows only applies to Windows
users - if you want to access a Mind Project SVN repository
via another operating system, you will have to figure
out how to do that on your own, but the connection info
on this page should still be valuable to you.)
In what follows, I will guide you through
using TortoiseSVN to access a Mind Project Repository.
Before we begin, please be sure to have a Mind Project
repository name (e.g. iris4, pt, etc.), and make sure
that you have authorization to access that specific
repository. If you do not have a UliD, you should have
been given an unique ID of some sort for accessing Mind
Project resources; use this in place of a UliD.
TortoiseSVN is a Windows shell extension
that allows you to access SVN repositories within Windows
Explorer. Basically, any folder on your hard drive can
be turned into an SVN folder and used to store a revision
of an SVN repository with just a few mouse clicks and
some connections info.
Checkouts and Commits
When a developer wishes to work with
SVN version-controlled source code, he or she must first
'check out' the current version of the code (or possibly
an older version, if necessary). 'Check out' describes
the process of the TortoiseSVN client connecting to
the SVN server, and downloading a version of the code
in a repository. Once the code is checked out, it can
be worked with just like un-versioned code. After some
milestone has been reached (or the workday has ended),
the updated code can then be 'committed' back to the
SVN repository as a new version of the source code,
and subsequent attempts to check out the latest version
of the code will acquire this newer, updated version.
The Checkout Operation
In the following example, we will be
'checking out' the latest version of the iris4 source
code (just replace the name iris4 with the repository
you wish to access).
- Download and install the latest
version of
TortoiseSVN.
- Restart your computer.
- Now that TortoiseSVN is installed
and ready to go, we'll use it to checkout the latest
version of the Iris.4 Mobile Robot source code. Create
a new folder called SVN somewhere on your system
(e.g. in your My Documents folder, or on the Desktop).
Within the SVN folder, create a second new folder,
this one named iris4.
- Now, right-click on the iris4 folder.
In the shell context menu that pops up, select SVN
Checkout....
- A window should pop up that
looks like this:
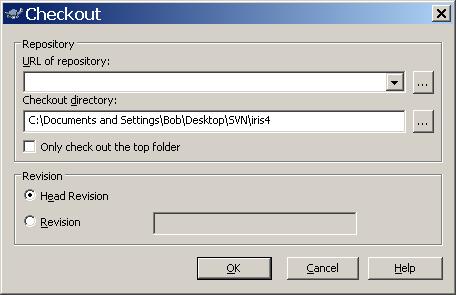
For the URL of repository:
field, enter: http://subversion.mind.ilstu.edu/svn/iris4
- For the Checkout directory:
field, click on the ellipses button
 and surf to the iris4 folder you just right-clicked
on, and select it.
and surf to the iris4 folder you just right-clicked
on, and select it.
Your SVN client should now look
something like this:

- Click OK on the client
GUI. If you have not previously saved your UliD and
password for this repository with TortoiseSVN, you
will be prompted for it now. Enter your UliD and password,
check the Check box to save them, and click OK.
You should see a new screen like this:
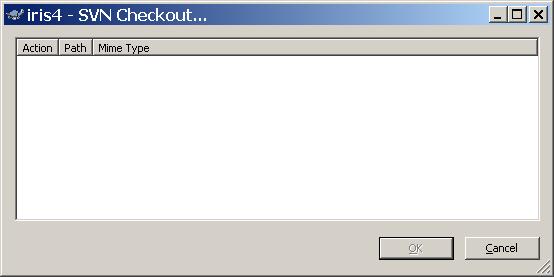
Assuming that your credentials
checked out, and you entered in all of the connection
information correctly, a progress list of files
being checked out will stream down the Checkout
Results screen.
- Once TortoiseSVN is finished
processing your request, the OK button will
become active; click it.
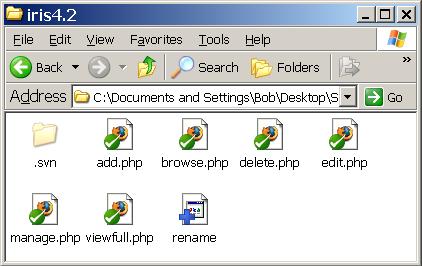
You now have a whole bunch of robot
source code on your hard drive. Go to the SVN folder.
The iris4 folder should now have a special
SVN icon:
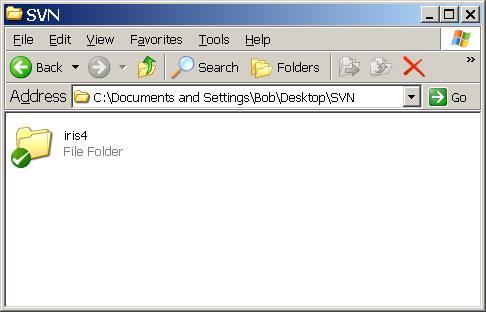
The green check means that the
folder contains SVN files. Go into the folder and
browse its contents; you should see a whole bunch
of C++ and Java code in a variety of folders.
Please note that you could have
just check out a sub-folder of the repository, or
even a single file. To do this, just modify the
URL of repository... field, and run the checkout
operation as usual. For example, to get just the
Java source code from the iris4 repository, enter
http://subversion.mind.ilstu.edu/svn/iris4/java
in the URL of repository... field and click
OK. Go ahead, try it out yourself!
The Commit Operation
In the following example, we will be
committing a change to the repository. Note: please
don't actually make a commit to the repository for this
tutorial - just read along! (We don't want the iris4
repo to get messed up with a bunch of 'SVN practice'
commits.)
If you have modified any of the files
you have checked out, added new files to the folder
(or a sub-folder) where you have versioned files, or
if you have deleted versioned files, you will have to
commit these changes to the SVN repository to try and
make them stick. I say try here because it is
possible that the commit operation will fail if your
changes conflict with someone else's changes (more on
this below, under Conflicts.
- You may have made changes
to just one file, or just a set of files within a
subfolder of the local snapshot of the repository,
or you may have made changes all over the place, added
files, deleted folders, etc. You can commit these
changes by right-clicking on the file, sub-folder,
or repository folder (whichever will cover the entire
set of files/folders you have changed), and select
SVN Commit.... You should see a screen pop
up like the following:
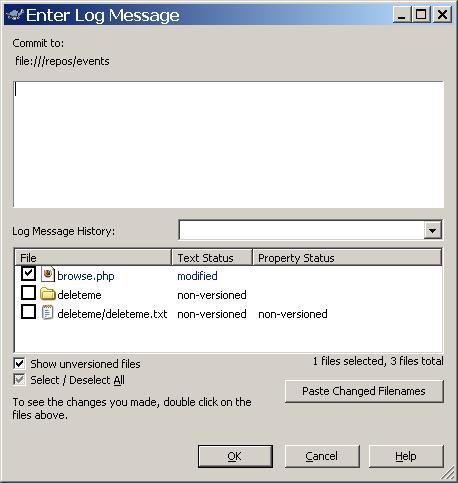
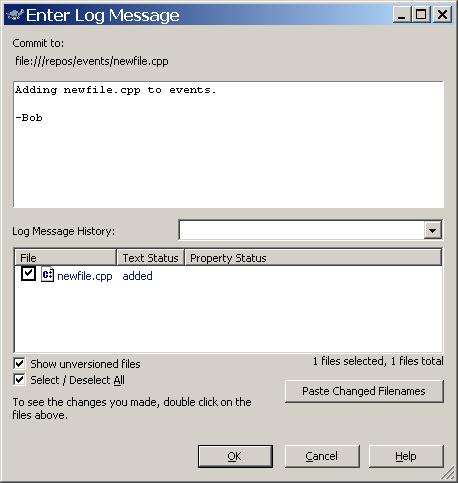
- The above screen will show you a
list of all the modified files, and will include other
information depending on whether you've been deleting
files/folders, renamed them, or added them to the
repository. In the upper text box, write a comment
that is concise, yet fully describes the important
changes you have made to the repository (for example,
you might comment, "Adding interface.h and fixed
the I/O bug in main() in file main.cpp"). Only
use accurate, descriptive comments so others can understand
how the new version of code you are creating differs
from the previous version!
- You may need to interact with
the commit interface further; more info on deleting,
renaming, and adding files and folders is available
below. Once you are done, (or, if you just updated
a versioned file and did nothing else), click OK.
Once the operation completes, you should see something
like the following:
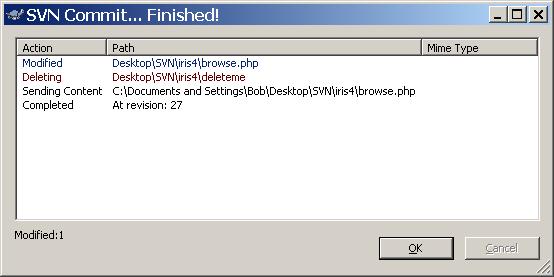
- Click OK, you have successfully
committed a change to the repository. To see your
change, go ahead and delete the entire iris4 folder.
Create a new iris4 folder in the same location as
the old one (the new folder will not be checked).
Now, checkout the iris4 repository again. Go to the
file(s) you updated, and you will be able to see your
changes.
Other Operations
This section covers a variety of common
operations you will need to perform when using SVN.
Renaming Files and Folders
To rename a file or a folder you must
first checkout the file or folder to your machine. Once
it's on your machine, right-click on the file or folder,
and select the menu option SVN Rename.... Type
in the new name, and the icon for the file or folder
will change to:
 <> <>
Now, just run a Commit and the repository
will be updated with the new name, and any other changes
you've made. If you just want to commit the name change
(and not changes to other files/folders), right-click
on the file you renamed and select the SVN Commit...
menu option.
Please Note:
SVN handles renaming in a strange way;
when you rename a file or folder, what actually happens
is a new file/folder is created and added to the repository
with the new name. However, the original file/folder
remains in the repository. Thus if you renamed the file
main_c.cpp to main.cpp, ran a Commit, then ran a Checkout
of main_c.cpp and main.cpp's containing folder, both
files would be downloaded from the repository. So...
once you've renamed the file/folder, you should delete
the original from the repository.
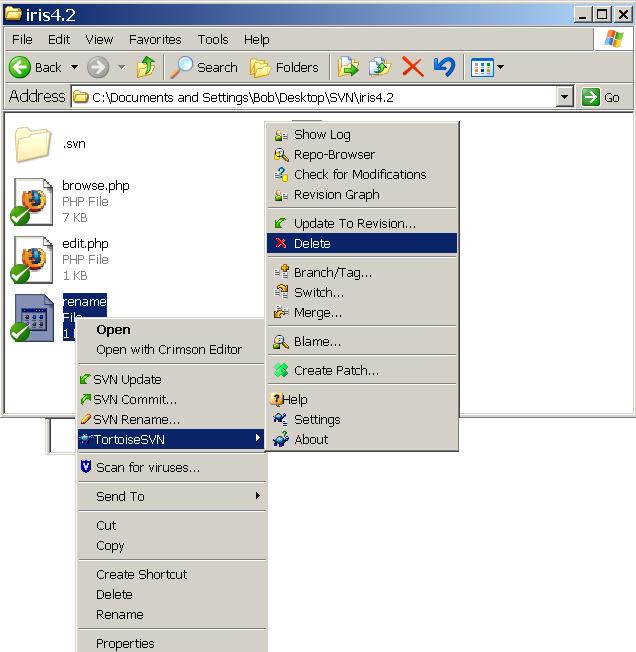
Deleting Files and Folders
To delete a file or folder, simply
right-click on it, and select the Delete... option
from the TortoiseSVN menu:
Once the operation completes, the folder
will be deleted from your hard drive. To make the delete
stick, run a Commit, and make sure the check boxes are
checked for deleting the items you want deleted:
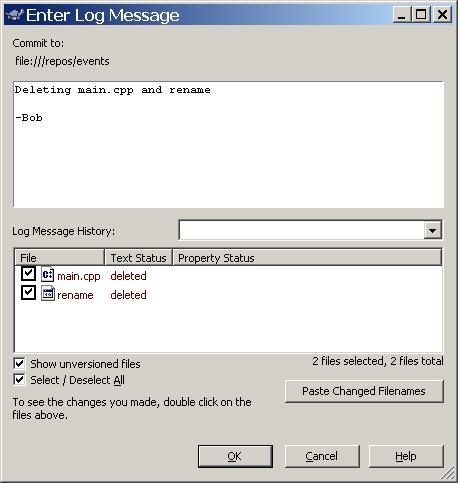
When the operation completes, the repository
will be updated to a new version and the file(s) and
folder(s) you deleted will not be contained in the new
version.
Adding Files and Folders
To add a file or folder, check out
the repo (if you haven't already done so). move the
new file(s) and folder(s) to the location you want them
in the repository (for e.g. to add the file newfile.cpp
to the iris4/java/newclient/ folder, move newfile.cpp
to that folder). Now, with everything in its place,
right-click on the file(s) and folder(s) you want to
add to the repository, and select the SVN Add...
menu option. You will be prompted with a confirmation
dialog box:
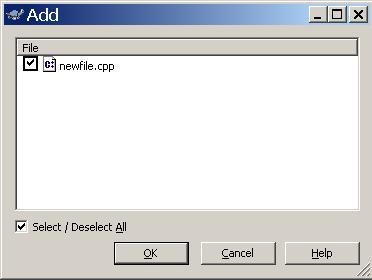
If everything is as you want it, click
OK. You will then see the TortoiseSVN Add dialog
box which shows the progress of the operation. When
it is complete, hit OK to continue.
To make the change stick, run a Commit
and make sure the check boxes are checked for adding
the items you want to add:
When everything is as you want it,
click OK. Once the Commit operation completes,
the file(s) and folder(s) will have been added to the
repository, and the version will have increased.
Updates
At any time you can update your local
snapshot of the repository to the latest version available
by running an Update Operation. To do this, just right-click
on a folder containing versioned files and folders in
it, and select the SVN Update... menu option.
Please Note:
When you run an update, only the files
already checked out will be updated (or deleted, if
they were deleted in the repository since you last updated)
- if new files have been added to the repository, or
you if you have deleted a file (or renamed a file),
you will not get all of the files in the current version.
Again, only the files already on your hard drive will
be touched, and they can only be deleted or overwritten
with the latest version of the file.
Warning...
Be very careful when you update you
local version of the repository - any changes you have
made to versioned files being updated will be completely
wiped out. If you want to update a folder with modified
versioned files in it, first run a Commit to commit
your changes, then run the update. Also note that entire
files/folders can be deleted when running an update
(if they were deleted in the repository since you last
updated).
Conflicts
Conflicts primarily occur in a situation
like the following. Suppose you have been working on
a file, main.cpp, in the irsi4 repository using revision
31. While you are busily programming away, someone else
commits a modified version main.cpp to the same repository
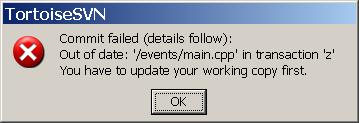
(thus updating the code to revision 32). Now main.cpp
v32 in the SVN repository is different from the version
you have been working on (v31). When you try and commit
your modified file, main.cpp, you will get an error
like this:
You then run an Update operation, and
you will see the following:

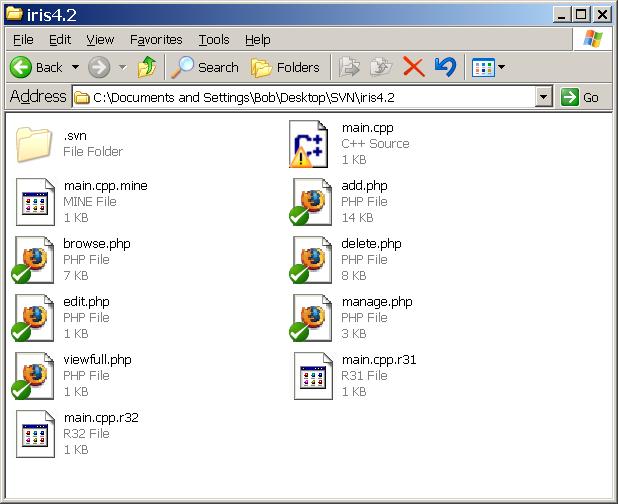
After you click OK, the folder
containing main.cpp would now have several new, non-versioned
files in it:
- main.cpp.mine
This is what main.cpp v31 looked
like after you changed it (no conflict markers).
- main.cpp.r31
This is what version 31 of main.cpp
looked like (the file you checkout and then modified).
- main.cpp.r32
This is what the current version
of main.cpp looks like (on the server).
- main.cpp
During the Update operation, conflict
markers were inserted into this file.
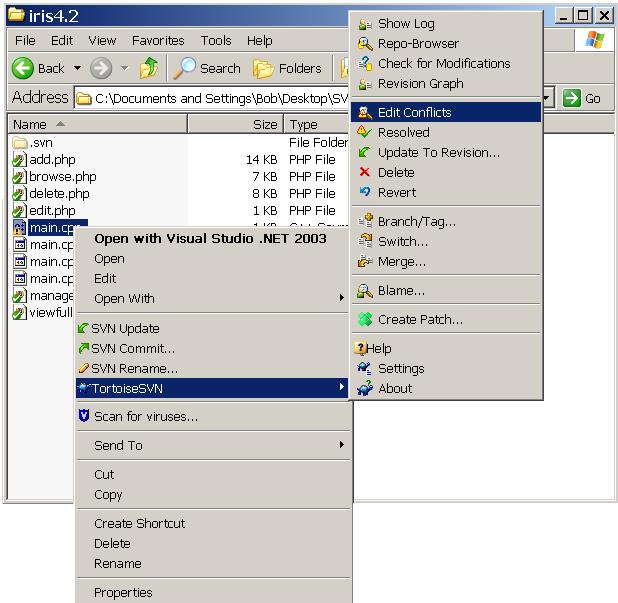
You can now right-click on the file
main.cpp, and under the TortoiseSVN option,
select Edit Conflicts:
For details on using this Merge program,
see the help file (just hit F1). Basically, you
need to decide which parts of the file should go in
the new 'merged' version of the file. Once you've done
this, you can mark the file as merged (either from within
the merge program, or from the TortoiseSVN context menu
(right-click on the file in question)). You can now
commit the changes to the repository; the conflict is
resolved!
Please Notes:
The description of conflicts I've provided
above is incomplete - there is actually quite a bit
more to this issue than I've let on, but the basics
I've outlined above should get you through most situations.
For more info, see the online book,
Version Control with Subversion.
Also, whenever you are resolving conflicts,
make sure you know exactly what you are doing - if there
is any doubt, contact the author(s) of the conflicting
file(s)!!!
|
