| 编辑推荐: |
| 本文来自于cnblogs,主要讲解了怎么搭建环境,案例讲解,代码代码详解等等。 |
|
搭建开发环境
为了能开发插件,开发环境需要安装Maven和JDK 6.0以上版本。
1、安装JDK
打开cmd, 输入java –version
如下图,说明安装完成。

图1
如果没安装,点击安装
2、安装Maven
1. 下载Maven
如下图:

图2
将安装包解压到任意地址,我的路径是D:\apache-maven-3.0.5
新建环境变量M2_HOME 指向D:\apache-maven-3.0.5
在path添加路径%M2_HOME%\bin
打开cmd 输入mvn –v,
如下图:
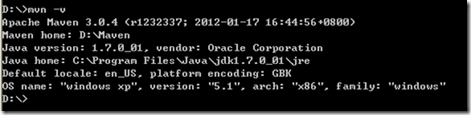
图3
安装成功。
给eclipse安装插件m2eclipse。
1、 打开eclipse
2、 Help-Install New Software出现下图:

图4
3、 点击Add
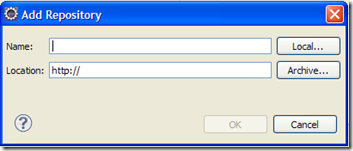
图5
在name输入 m2e
在Location输入 http://m2eclipse.sonatype.org/sites/m2e
4、 确定后出现下图:
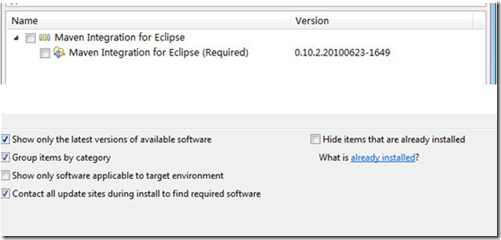
图6
5、 勾选Maven Integration for Eclipse
6、 然后一直下一步直到安装完毕
7、 检查是否安装成功
(1) 点击Help – about eclipse – installation details,看是否存在Maven
Integration for Eclipse(Required),如下图:

图7
(2) 再检查eclipse是否可以创建Maven项目了,File->New->Other
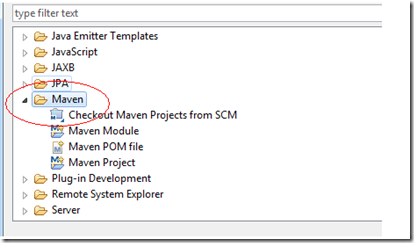
图8
到此Maven安装完成了。
3、安装jenkins
下载jenkins 链接http://jenkins-ci.org/
将jenkins.war,拷贝到D:\jenkins下,打开cmd,转到D:\jenkins目录下
然后运行java –jar jenkins.war
最后出现jenkins is fully up an running。说明安装成功。
访问http://localhost:8080界面如下图:
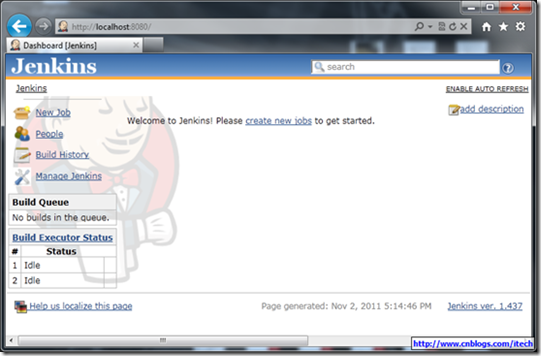
图9
插件开发流程
1、设置环境
由于是使用maven进行开发,需要对%USERPROFILE%\.m2\settings.xml(USERPROFILE为用户名路径如C:\Documents
and Settings下的用户)文件添加以下内容:
<settings>
<pluginGroups>
<pluginGroup>org.jenkins-ci.tools</pluginGroup>
</pluginGroups>
<profiles>
<!-- Give access to Jenkins plugins -->
<profile>
<id>jenkins</id>
<activation>
<activeByDefault>true</activeByDefault>
<!-- change this to false, if you don't like to
have it on per default -->
</activation>
<repositories>
<repository>
<id>repo.jenkins-ci.org</id>
<url>http://repo.jenkins-ci.org/public/</url>
</repository>
</repositories>
<pluginRepositories>
<pluginRepository>
<id>repo.jenkins-ci.org</id>
<url>http://repo.jenkins-ci.org/public/</url>
</pluginRepository>
</pluginRepositories>
</profile>
</profiles>
<mirrors>
<mirror>
<id>repo.jenkins-ci.org</id>
<url>http://repo.jenkins-ci.org/public/</url>
<mirrorOf>m.g.o-public</mirrorOf>
</mirror>
</mirrors>
这将可以使用缩短的命令来执行运行。
2、生成新的插件
开发新的插件,执行以下命令:
mvn –U hpi:create
将会提示出现需要输入groupid和artifactid,如下:
groupid:com.jysong.jenkins
artifactid: newplugin
这样便生成了新的插件,会生成一个简单的例子,同时在当前目录下生成新的文件夹newplugin,然后再执行下面的命令。
cd newplugin
mvn package
使用这个命令将工程进行打包,不过由于版本的不同可能会出现错误。如果出现错误参考下面的源代码部分进行修改。
在第一次执行命令时会下载很多的文件,需要耐心的等待。
3、编译插件
mvn install
运行此命令将会生成文件 ./target/newplugin.hpi。可以把它加载到jenkins中。并且将./target/newplugin.hpi、pom.xml、./target/newplugin.jar这几个文件安装到maven的本地仓库中,就可以被其他的工程调用了。
也可以使用mvn package,只是进行打包生成所需文件,并不安装到本地仓库中。
4、为IDE设置开发环境
使用eclipse进行代码开发。
mvn -DdownloadSources= true -DdownloadJavadocs=true
–DoutputDirectory = target/eclipse-classes eclipse:eclipse或者mvn
eclipse:eclipse
在此目录中生成eclipse工程,可以使用eclipse将工程进行导入。如下图:
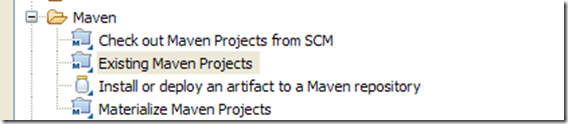
图10
5、工作空间布局
导入之后目录结构如下图:
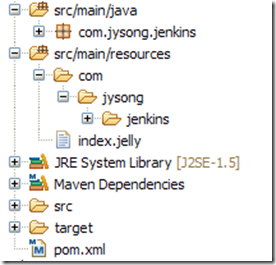
图11
src/main/java :存放java源文件。
src/main/resources:jelly/Groovy视图文件。
src/main/webapp:静态资源文件,例如图片,HTML文件。
pom.xml:配置文件,Maven使用此文件编译插件。
6、源代码
在src/main/java/com/jysong/jenkins目录下可能有个null文件夹,在文件夹下面有HelloWorldBuilder.java文件,将HelloWorldBuilder.java文件拷贝到jenkins文件夹下面,将null文件夹删除。并且将HelloWorldBuilder.java文件中的第一行的package最后面的.null删除。HelloWorldBuilder.java文件是一个开发插件的模板,包含了开发一个简单插件的所有内容。后面将对这个文件代码进行详细分析。
在src/main/resources/com/jysong/jenkins目录下可能有个null文件夹,在文件夹下面有个HelloWorldBuilder文件夹,将HelloWorldBuilder文件夹拷贝到jenkins文件夹下面,将null文件夹删除。在HelloWorldBuilder文件夹下面有global.jelly和config.jelly配置文件。这两个文件是进行页面配置的文件。
7、调试插件
在windows系统上,执行以下命令:
set MAVEN_OPTS=-Xdebug -Xrunjdwp:transport=dt_socket,
server=y, address =8000, suspend=n
mvn hpi:run
使用http://localhost:8080/ 在浏览器中登录,将会看到jenkins页在Jetty中运行。MAVEN_OPTS启动了端口为8000的调试器,可以在这个端口开启一个调试会话。
如果8080的端口被占用,将会出现错误,不会运行jetty服务器。可以更改端口使用以下命令:
mvn hpi:run –Djetty.port=8090
可以使用http://localhost:8090/进行登录了。
设置上下文路径
mvn hpi:run –Dhpi.prefix=/Jenkins
执行这个命令之后登录地址将变为http://localhost:8090/jenkins
8、发布插件
运行以下命令,生成你的插件的图片。
mvn package
生成 ./target/*.hpi文件,其他使用者可以使用jenkins的web界面上传到jenkins。
9、安装插件
在jenkins的web界面中由
Manage Jenkins>Manage Plugins>Advanced
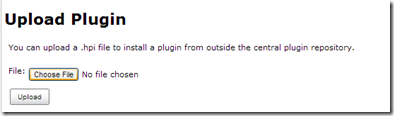
图12
点击Choose File,选择你的插件的target目录下的hpi文件。选择之后点击Upload,插件就会配置到jenkins中。
到此一个简单的插件开发完成了,可以在此基础上进行更复杂的开发。详细开发插件流程的地址https://wiki.jenkins-ci.org/display/JENKINS/Plugin+tutorial
源码分析
1、java源代码
在目录src/main/java/com/jysong/jenkins下有文件HelloWorldBuilder.java。代码如下:
1 public class
HelloWorldBuilder extends Builder {
2 private final String name;
3
4 // Fields in config.jelly must match the parameter
names in the "DataBoundConstructor"
5 @DataBoundConstructor
6 public HelloWorldBuilder(String name) {
7 this.name = name;
8 }
9 /**
10 * We'll use this from the <tt>config.jelly</tt>.
11 */
12 public String getName() {
13 return name;
14 }
15
16 @Override
17 public boolean perform (AbstractBuild build,
Launcher launcher, BuildListener listener) {
18 // This is where you 'build' the project.
19 // Since this is a dummy, we just say 'hello
world' and call that a build.
20 // This also shows how you can consult the
global configuration of the builder
21 if (getDescriptor().getUseFrench())
22 listener.getLogger().println ("Bonjour,
" +name+"!");
23 else
24 listener.getLogger().println("Hello, "+name+ "!");
25
26 return true;
27 }
28
29 // Overridden for better type safety.
30 // If your plugin doesn't really define any
property on Descriptor,
31 // you don't have to do this.
32
33 @Override
34 public DescriptorImpl getDescriptor() {
35 return (DescriptorImpl)super.getDescriptor();
36 }
37
38 /**
39 * Descriptor for {@link HelloWorldBuilder}.
Used as a singleton.
40 * The class is marked as public so that it
can be accessed from views.
41 *
42 * <p>
43 * See <tt>src/main/resources/hudson/plugins/ hello_world/HelloWorldBuilder/*.jelly</tt>
44 * for the actual HTM L fragment for the configuration
screen.
45 */
46
47 @Extension // This indicates to Jenkins that
this is an implementation of an extension point.
48 public static final class DescriptorImpl extends
BuildStepDescriptor<Builder> {
49 /**
50 * To persist global configuration information,
51 * simply store it in a field and call save().
52 *
53 * <p>
54 * If you don't want fields to be persisted,
use <tt>transient</tt>.
55 */
56 private boolean useFrench;
57 /**
58 * Performs on-the-fly validation of the form
field 'name'.
59 *
60 * @param value
61 * This parameter receives the value that the
user has typed.
62 * @return
63 * Indicates the outcome of the validation.
This is sent to the browser.
64 */
65 public FormValidation doCheckName (@QueryParameter
String value)
66 throws IOException, ServletException {
67 if (value.length() == 0)
68 return FormValidation.error ("Please set
a name");
69 if (value.length() < 4)
70 return FormValidation.warning ("Isn't the
name too short?");
71 return FormValidation.ok();
72 }
73 public boolean isApplicable (Class<? extends
AbstractProject> aClass) {
74 // Indicates that this builder can be used
with all kinds of project types
75 return true;
76 }
77 /**
78 * This human readable name is used in the configuration
screen.
79 */
80 public String getDisplayName() {
81 return "Say hello world";
82 }
83
84 @Override
85 public boolean configure (StaplerRequest req,
JSONObject formData) throws FormException {
86 // To persist global configuration information,
87 // set that to properties and call save().
88 useFrench = formData.getBoolean ("useFrench");
89 // ^Can also use req.bindJSON (this, formData);
90 // (easier when there are many fields; need
set* methods for this, like setUseFrench)
91 save();
92 return super.configure (req,formData);
93 }
94
95 /**
96 * This method returns true if the global configuration
says we should speak French.
97 *
98 * The method name is bit awkward because global.jelly
calls this method to determine
99 * the initial state of the checkbox by the
naming convention.
100 */
101
102 public boolean getUseFrench() {
103 return useFrench;
104 }
105 }
106 }
107
108 |
这里主要使用了jenkins的Builder作为扩展点,Builder扩展点是编译时的功能,更多扩展点。
HelloWorldBuilder类中的构造函数使用@DataBoundConstructor来声明。构造函数要对变量进行赋值。
HelloWorldBuilder类中perform重载函数。构建的执行通过实现perform方法来进行自定义。每次执行编译时都会运行perform函数。它有三个参数:
Build参数是描述了当前任务的一次构建,通过它可以访问到一些比较重要的模型对象如:project当前项目的对象、workspace构建的工作空间、Result当前构建步骤的结果。
Launcher参数用于启动构建。
BuildListener该接口用于检查构建过程的状态(开始、失败、成功..),通过它可以在构建过程中发送一些控制台信息给jenkins。
perform方法的返回值告诉jenkins当前步骤是否成功,如果失败了jenkins将放弃后续的步骤。
在这个例子中if..else..语句是向控制台端输出日志信息,其中name的信息由构造函数有关。
将if..else..语句进行删除,添加以下代码。
1 int number =
build.getNumber();
2
3 String version = build.getHudsonVersion();
4
5 Calendar startedTime = build.getTimestamp();
6
7 SimpleDateFormat simpleDateFormat = new SimpleDateFormat
("yyyy-MM-dd'T'HH:mm:ss.SSSZ");
8
9 String started = simpleDateFormat.format (startedTime.getTime());
10
11 String durationMillis = build.getDuration();
12
13 String log = build.getLog();
14
15 String fileName = "D:\\workspace\\newplugin\\BuildLog"
+ number + ".txt";
16
17 String content;
18
19 content = version + "\n\t"
20 + name + "\n\t"
21 + started + "\n\t"
22 + durationMillis + "\n\t"
23 + log;
24
25 try{
26 FileWriter writer = new FileWriter(fileName,true);
27 writer.write(content);
28 writer.close();
29 }catch(IOException e)
30 {
31 e.printStackTrace();
32 }
33
34 |
这段代码是获得编译时的一些信息,然后输出到一个文本文件中。其中AbstractBuild类包含了编译的大部分的信息,可以查看API获得更详细的信息
http://javadoc.jenkins-ci.org/ Hudson.model.AbstractBuild。
此外有一个内部静态类DescriptorImpl,该类通过@Extension声明告诉jenkins,告诉系统该内部类是作为BuildStepDescriptor的扩展出现。有以下几个方法。
isApplicable方法,是否对所有项目类型可用。
其他的方法和配置文件有关,在下面介绍配置文件时在详细说明。
2、视图配置文件
Jenkins使用了Jelly页面渲染技术,这是一个基于XML的服务端页面渲染引擎,其将基于Jelly的xml标签转换为对应的Html标签并输出到客户端。模型对象的信息通过Jexl表达式被传递到页面上(相当于Jsp的JSTL)。jelly文件以.jelly为后缀,在hudson中使用类全名的形式来查找模型类对应的jelly页面文件,如名为src/main/java/com/jysong
/jenkins/HelloWorldBuilder.java的类,其对应的页面文件应该存在于src/main/resources/com/jysong
/jenkins/HelloWorldBuilder目录的下。
此外hudson通过固定的命名方式来确定页面文件属于局部配置还是全局配置:config.jelly提供局部配置;global.jelly提供全局配置。config.jelly是具体的某个job的配置,global.jelly是指jenkins的系统配置。
视图有三种:1,全局配置(global.jelly)2,Job配置(config.jelly),还有就是使用帮助(help-字段名).html
1、全局配置详解
global.jelly为全局配置页面。
1 <j:jelly
xmlns:j="jelly:core" xmlns:st="jelly:stapler"
xmlns:d="jelly:define" xmlns:l="/lib/layout"
xmlns:t="/lib/hudson" xmlns:f="/lib/form">
2
3 <!--
4
5 This Jelly script is used to produce the global
configuration option.
6
7 Jenkins uses a set of tag libraries to provide
uniformity in forms.
8
9 To determine where this tag is defined, first
check the namespace URI,
10
11 and then look under $JENKINS/views/. For example,
<f:section> is defined
12
13 in $JENKINS/views/lib/form/section.jelly.
14
15 It's also often useful to just check other
similar scripts to see what
16
17 tags they use. Views are always organized according
to its owner class,
18
19 so it should be straightforward to find them.
20
21 -->
22
23 <f:section title="Hello World Builder">
24
25 <f:entry title="French" field="useFrench"
26
27 description="Check if we should say hello
in French">
28
29 <f:checkbox />
30
31 </f:entry>
32
33 </f:section>
34
35 </j:jelly>
36
37 |
其中title为标题,表示要显示的内容。field为将调用DescriptorImpl内部类的方法getUseFrench(),field域会将方法去掉get并且将第一个字母小写,找到相对应的方法。description将显示描述信息。f:checkbox为复选框控件。
在每次保存全局配置时,jenkins都会调用该descriptor对象,并调用其configure方法,可以实现该方法并提供自己的定制
在DescriptorImpl中的configure方法中,可以对全局配置进行操作。save方法用于将当前Descriptor所提供的配置持久化(通过get**方法),为了使save能正常工作,需要提供配置项的get方法。
2、局部配置详解
config.jelly 的内容将被包含在扩展功能的配置中,在HelloWorldBuilder文件夹下面的配置内容是:
1 <j:jelly
xmlns:j="jelly:core" xmlns:st="jelly:stapler"
xmlns:d="jelly:define" xmlns:l="/lib/layout"
xmlns:t="/lib/hudson" xmlns:f="/lib/form">
2
3 <!--
4
5 This jelly script is used for per-project configuration.
6
7 See global.jelly for a general discussion about
jelly script.
8
9 -->
10
11 <!--
12
13 Creates a text field that shows the value of
the "name" property.
14
15 When submitted, it will be passed to the corresponding
constructor parameter.
16
17 -->
18
19 <f:entry title="Name" field="name">
20
21 <f:textbox />
22
23 </f:entry>
24
25 </j:jelly>
26
27 |
其中entry 表示用于交互的html表单域,title将作为表单域label的值,在界面中要显示的内容。
field表示的是HelloWorldBuilder的构造函数中的参数。如果有多个field,就要有多个相对应的参数。textbox
表示简单的渲染一个输入文本,输入的值将赋给name。
将插件部署到jenkins后实际效果如下图:
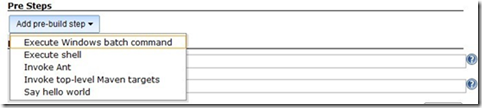
图13
选择Say hello world,

图14
Say hello world是由于在DescriptorImpl内部类中有方法getDisplayName(),此方法返回的字符串作为pre-build
step的名称。
在DescriptorImpl内部类中doCheckName(@QueryParameter String
value)方法,在光标不再在输入框时,将执行这个方法,其中输入框的输入值以value值传入,在这个函数里可以进行验证,是否符合输入条件。
允许为表单域增加帮助说明(在页面上对应于文本框后面出现问号按钮,一点击可出现提示):
在同名目录下有help-{fileName}.html,在该文件中添加帮助内容;帮助内容允许是动态的,即可以从模型中拉取信息进行显示,这需要将html后缀改为jelly,而help-name.html文件的形式大致如下:
1 <div>
2
3 Help file for fields are discovered through
a file name convention. This file is
4
5 help for the "name" field. You can
have <i>arbitrary</i> HTML here. You
can write
6
7 this file as a Jelly script if you need a dynamic
content (but if you do so, change
8
9 the extension to <tt>.jelly</tt>).
10
11 </div>
12
13 |
在输入框中输入相对目录。
测试案例
在此基础之上,实现一个简单的案例。
1、编写代码
在HelloWorldBuilder类中的perform方法中,添加代码:
1 FilePath workspace
= build.getWorkspace();
2
3 String filePath = workspace.toString() + "\\"
+ path;
4
5 File files = new File(filePath);
6
7 File[] fileList = files.listFiles();
8
9 String strFile = "";
10 for(int i=0;i<fileList.length;i++)
11 {
12 strFile += fileList[i].getName() + " \n";
13 }
14 String fileName = "D:\\workspace\\newplugin\\FilePath"
+ number + ".txt";
15 try
16 {
17 FileWriter writer = new FileWriter(fileName,true);
18 writer.write(strFile);
19 writer.close();
20 }catch(IOException e)
21 {
22 e.printStackTrace();
23 }
24
25 |
以上代码是为了获得job的workspace,然后根据传入的name,获取目录下面的文件名,最后写入到一个文本文件中。
打开cmd,转到工程目录下,执行
mvn package
2、准备编译工作
将jetty服务器启动,使用端口8090
在浏览器中打开http://loaclhost:8090,新建一个job。点击运行。
在工程目录下面有个work文件夹,进入work文件夹,下面有个jobs文件夹。在jobs文件夹下面存放着所有的job,进入刚新建的job,下面有builds文件夹和workspace文件夹。其中builds文件夹下面存放着每次编译产生的所有的信息文件。workspace文件夹下面存放着要进行编译的工程文件和代码文件。
在workspace目录下使用VS2010新建一个工程,HelloTest。
3、配置jenkins
在jenkins中点击新建的工程,然后点击configure,在Build下Add build step

图15
选择Execute Windows batch command,输入以下
"C:\WINDOWS\Microsoft. NET\Framework\v4.0.30319\MSBuild.exe"
"\HelloTest\HelloTest.sln"
如下图:
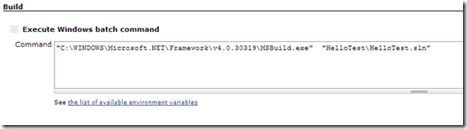
图16
在点击Add build step,选择Say hello work在下面输入:
HelloTest\Debug
如下图:
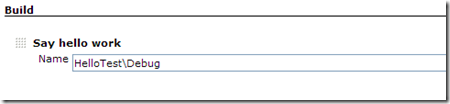
图17
点击保存。
4、进行编译
点击 进行编译,编译完成之后就会在工程目录下面生成两个文件,一个文件中存放着编译的信息,一个文件中存放着workspace目录下工程Debug编译生成的文件名。
|


