| 内容摘要:本示例应用将采用
eclipse Dynamic Web Project 向导默认生成的目录结构,在 WEB-INF 目录下添加
config 和 flows 子目录,其中 config 子目录用来存放各种配置文件, flows 子目录下存放
Spring Web Flow 的定义文件。
Spring Web Flow 2.0 就是 Spring Web MVC 的一个扩展,如果粗略一些来讲,所谓
flow 就相当于 Spring Web MVC 中一种特殊的 controller ,这种 controller
可通过 XML 文件加以配置,因此在使用 Spring Web Flow 2.0 前须先对 Spring
Web MVC进行配置,步骤如下:
创建 Web 应用的目录结构
在 /WEB-INF/lib 下导入相关类库
在 Web 应用部署描述符文件 web.xml 中声明 DispatcherServlet 并指定配置文件
添加 DispatcherServlet 映射
创建 web-application-config.xml 文件
创建 webmvc-config.xml 文件
创建 index.jsp
创建 Web 应用的目录结构
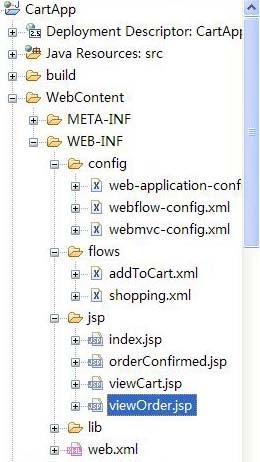
本示例应用将采用 eclipse Dynamic Web Project 向导默认生成的目录结构,在
WEB-INF 目录下添加 config 和 flows 子目录,其中 config 子目录用来存放各种配置文件,
flows 子目录下存放 Spring Web Flow 的定义文件。最后目录如图3所示:
图 2 目录结构
在 /WEB-INF/lib 下导入相关类库
只需将以下几个 jar 包导入 /WEB-INF/lib 目录下就可以了:
commons-logging.jar
jstl.jar
standard.jar
spring-webmvc.jar
spring.jar
声明 DispatcherServlet 并指定配置文件
为使用 Spring Web MVC ,须在 web.xml 中声明 DispatcherServlet
,见清单3:
清单 3 声明 DispatcherServlet 和指定配置文件
<servlet>

                         <servlet-name>CartServlet</servlet-name>

                         <servlet-class>

                         org.springframework.web.servlet.DispatcherServlet

                         </servlet-class>

                         <init-param>

                          <param-name>contextConfigLocation</param-name>

                          <param-value>

                          /WEB-INF/config/web-application-config.xml

                          </param-value>

                         </init-param>

                         <load-on-startup>1</load-on-startup>

                        </servlet>
添加 DispatcherServlet 映射
要让 DispatcherServlet 处理所有以 /spring/ 开头的请求,见清单 4:
清单 4 web.xml 中的 DispatcherServlet映射
<servlet-mapping>

                        <servlet-name>CartServlet</servlet-name>

                        <url-pattern>/spring/*</url-pattern>

                        </servlet-mapping>
创建 web-application-config.xml
开发基于 Spring Web Flow 的应用往往会有大量的配置,这些配置全放在一个文件中是不合适的。本示例参考
Spring Web Flow 2.0 自带示例,将不同功能的配置文件分开。其中 web-application-config.xml
用于配置与 Web 应用全局相关的内容, Spring Web MVC 的相关配置放在 webmvc-config.xml
中,教程后面要添加的 Spring Web Flow 的配置则放在 webflow-config.xml
中。在 web-application-config.xml 中用 import 元素导入其他的配置文件。
web-application-config.xml的内容见清单5:
清单 5 web-application-config.xml
<?xml version="1.0"
                        encoding="utf-8"?>

                        <beans

                         xmlns="http://www.springframework.org/schema/beans"

                         xmlns:xsi="http://www.w3.org/2001/XMLSchema-instance"

                         xmlns:context="http://www.springframework.org/schema/context"

                         xsi:schemaLocation="http://www.springframework.org/schema/beans

                          http://www.springframework.org/schema/beans/spring-beans-2.5.xsd

                          http://www.springframework.org/schema/context

                          http://www.springframework.org/schema/context/spring-context-2.5.xsd">

                          <!-- 搜索 samples.webflow 包里的 @Component 注解,并将其部署到容器中
                        -->

                          <context:component-scan base-package="samples.webflow"
                        />

                          <!-- 启用基于注解的配置 -->

                          <context:annotation-config />

                          <import resource="webmvc-config.xml"/>

                        </beans>
加入注解功能是出于最后运行 Web Flow 示例的需要,在这里只要知道注解功能已被启用就可以了。
创建 webmvc-config.xml
webmvc-config.xml 主要用于配置 Spring Web MVC 。所要做的就是添加一个
view resolver (视图解析器),用于将视图名解析成真实的视图资源。另外,再配置好 URL 请求的
handler (处理器),用于将 URL 请求定向到某个控制器,在本例中,用到的是 UrlFilenameViewController。
清单 6 webmvc-config.xml
<?xml version="1.0"
                        encoding="UTF-8"?>

                        <beans

                         xmlns="http://www.springframework.org/schema/beans"

                         xmlns:xsi="http://www.w3.org/2001/XMLSchema-instance"

                         xsi:schemaLocation="

                          http://www.springframework.org/schema/beans

                          http://www.springframework.org/schema/beans/spring-beans.xsd">

                          <bean id="viewResolver"

                           class="org.springframework.web.servlet.view.InternalResourceViewResolver">

                           <property name="viewClass"

                           value="org.springframework.web.servlet.view.JstlView"/>

                           <property name="prefix" value="/WEB-INF/jsp/"/>

                           <property name="suffix" value=".jsp"/>

                          </bean>

                          <bean id="viewMappings"

                           class="org.springframework.web.servlet.handler.SimpleUrlHandlerMapping">

                           <property name="defaultHandler">

                           <!-- UrlFilenameViewController 会将 "/index"
                        这样的请求映射成名为 "index" 的视图 -->

                           <bean class="org.springframework.web.servlet.mvc.UrlFilenameViewController"
                        />

                          </property>

                         </bean>

                        </beans>
创建 index.jsp
现在的 index.jsp 只是显示一行文字。
清单 7 index.jsp
<?xml version="1.0"
                        encoding="utf-8" ?>

                        <!DOCTYPE html PUBLIC "-//W3C//DTD XHTML 1.0 Transitional//EN"

                         "http://www.w3.org/TR/xhtml1/DTD/xhtml1-transitional.dtd">

                        <html xmlns="http://www.w3.org/1999/xhtml">

                         <head>

                          <meta http-equiv="Content-Type" content="text/html;
                        charset=utf-8" />

                          <title>Cart Application</title>

                         </head>

                         <body>

                          <h1>Hello!</h1>

                         </body>

                        </html>
运行应用程序
将应用程序发布到 Tomcat 容器,再通过 http://localhost:8080/CartApp/spring/index.jsp
访问 index.jsp 页面(应用程序所在文件夹名是 CartApp ),测试 Spring Web
MVC 配置是否正确。如果一切正常,可得到如下页面:
图 3 显示结果

| 