| 编辑推荐: |
| 本文来自于csdn,本文主要简单介绍了QML的配置以及对象的属性和anchors锚布局,希望对您的学习能有所帮助。 |
|
QML是一种声明式语言,它提供了一组接口用来描述可视化组件以及他们之间的互动。它是一个高度可读的语言,并且被设计成使组件以一个动态的方式相互连接。同时它使组件很容易被复用以及创建定制的用户界面。使用QtQuick模块,设计者和开发者可以很容易使用QML建立带有流畅动画的用户界面,并将这些界面连接到后端的C++库上面。
QML是一个用户接口规范和编程语言。它允许开发者和设计者创建高性能的,流畅的动画和视觉效果的应用。QML提供了一个高度可读的,声明式的,类似JSON语法的,并支持与JavaScript表达式相结合来达到动态属性的绑定。
项目文件结构如下图:
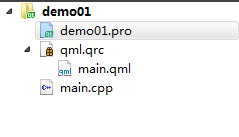
先看看工程文件demo01.pro
TEMPLATE = app
QT += qml quick # 这里需要添加qml和quick模块
CONFIG += c++11 # c++11标准支持
SOURCES += main.cpp
RESOURCES += qml.qrc
# Additional import path used to resolve QML modules
in Qt Creator's code model
QML_IMPORT_PATH =
# Additional import path used to resolve QML modules
just for Qt Quick Designer
QML_DESIGNER_IMPORT_PATH =
# The following define makes your compiler emit
warnings if you use
# any feature of Qt which as been marked deprecated
(the exact warnings
# depend on your compiler). Please consult the
documentation of the
# deprecated API in order to know how to port
your code away from it.
DEFINES += QT_DEPRECATED_WARNINGS
# You can also make your code fail to compile
if you use deprecated APIs.
# In order to do so, uncomment the following line.
# You can also select to disable deprecated APIs
only up to a certain version of Qt.
#DEFINES += QT_DISABLE_DEPRECATED_BEFORE=0x060000
# disables all the APIs deprecated before Qt 6.0.0
# Default rules for deployment.
qnx: target.path = /tmp/$${TARGET}/bin
else: unix:!android: target.path = /opt/$${TARGET}/bin
!isEmpty(target.path): INSTALLS += target |
main.cpp
#include <QGuiApplication>
#include <QQmlApplicationEngine>
int main(int argc, char *argv[])
{
QGuiApplication app(argc, argv);
QQmlApplicationEngine engine; /// QML引擎
engine.load(QUrl(QStringLiteral("qrc:/main.qml")));
/// 加载QML文件
return app.exec();
} |
补充:QStringLiteral宏创建一个QString在编译的时候,如果编译器支持这种操作。这个宏避免了运行时动态分配空间。
main.qml
QML基本介绍
qml的文件结构分为三部分:import声明、对象声明和注释。
import声明
一个QML文件在文件顶部可能含有一个或多个import声明. 一个import声明可能为以下几种类型:
注册的是哪个版本的命名空间。
a relative directory which contains type-definitions
as QML documents
一个JavaScript文件
JavaScript file imports must be qualified when imported,
so that the properties and methods they provide can
be accessed.
import声明有以下几种形式:
import Namespace VersionMajor.VersionMinor
import Namespace VersionMajor.VersionMinor as SingletonTypeIdentifier
import “directory”
import “file.js” as ScriptIdentifier
例子:
import QtQuick
2.0
import QtQuick.LocalStorage 2.0 as Database
import "../privateComponents"
import "somefile.js" as Script |
对象声明
对象的几个常用属性
id属性
QML对象的id属性是唯一的,不同对象的id属性值不能相同,我们可通过某个对象的id属性来访问这个对象。id属性是QML语言内建的一个属性,在对象实例化完成后其值是不能被修改的,不同于其它的普通属性。id属性值必须以小写字母或下划线开头,且不能包含字母、数字、下划线以外的其它字符,如下所示:
Rectangle {
id: root
width: 800; height: 480
color: "lightblue"
Column {
Text { id: myText; text: "Hello World"
}
Text { text: myText.text }
}
} |
通过对象的id来访问这个对象:
自定义属性
在QML文件中我们可自定义属性,语法如下:
| property <propertyType>
<propertyName> [ : <value> ] |
自定义属性完成后会自动为这个属性创建一个属性值改变的信号和相应的信号处理器onChanged,这里的ProperName是这个属性的名字,首字母大写,如下所示:
Rectangle {
id: root
property string someText
onSomeTextChanged: console.log("The someText
will be: " + someText)
width: 800; height: 480
color: "lightblue"
MouseArea {
anchors.fill: parent
onClicked: someText = "click"
}
} |
properName以一个小写字母开头,只能包括字母、数字和下划线。propertyType可以是QML基本类型,enumeration以int来代替,也可以是QML对象类型,神奇的var类型是返型的,支持任何类型的属性值,如下所示:
Item {
property int theNumber
property string theString
property url theUrl
property Item someItem
property Rectangle someRectangle
property var someNumber: 1.5
property var someString: "abc"
property var someBool: true
property var someList: [1, 2, "three",
"four"]
property var someObject: Rectangle { width: 100;
height: 100; color: "red" }
} |
属性值可以被初始化,也可以使用JavaScript表达式来赋值,通过这两种方式赋值时,可以是一个静态值,也可以是一个与其它属性绑定的值。
Rectangle {
id: rootRect
property color theColor: "green"
property color previousColor: rootRect.color
property color nextColor
width: 100; height: 100
color: "red"
Component.onCompleted: {
rootRect.nextColor = rootRect.color
console.log(theColor, previousColor, nextColor,
rootRect.color)
}
} |
属性是类型安全的,赋值时属性值必须与属性类型匹配,否则会出错,如下所示:
// Invalid property
assignment: int expected
property int theNumber: "one" |
列表属性
先看如下代码:
Item {
children: [
Text { text: "textOne" },
Text { text: "textTwo" },
Text { text: "textThree" }
]
Component.onCompleted: {
for(var i = 0; i < children.length; i++)
console.log("text of lable", i, ":",
children[i].text)
}
} |
上面例子中的children属性就是一个列表属性,包含在一对方括号中,里面的元素必须是QML对象类型而不能是QML基本类型,并以逗号分隔。列表内的元素可通过数组下标[index]访问,元素个数由length属性提供。若列表内只有一个元素,方括号可省略。
自定义列表属性,代码如下:
Item {
property list<Rectangle> siblingRects
property list<Rectangle> childRects: [
Rectangle { color: "red" },
Rectangle { color: "green" },
Rectangle { color: "blue"}
]
Component.onCompleted: {
for(var i = 0; i < childRects.length; i++)
console.log("color of lable", i, ":",
childRects[i].color)
}
} |
分组属性
在某些情况下,属性可以是由若干个子属性构成的一个逻辑组,我们可以用“.”符号或者分组符号对其进行赋值。
Text {
Text {
//dot notation
font.pixelSize: 12
font.bold: true
}
Text {
//group notation
font { pixelSize: 12; bold: true }
} |
属性别名
属性别名引用其它的属性,语法如下:
| [default] property
alias <name>: <alias reference> |
name是我们自定以的属性名,alias reference是属性别名所引用的那个属性或对象,也就是说属性别名可以引用自一个单一的属性,也可以引用自一个复杂的对象。属性绑定是动态的,但不是双向的,而通过属性别名可达到动态、双向的效果,即修改name和aliasreference中任一个的值,与之关联的另一个属性值也会随之改变。还有一点需要注意的是,如果属性别名与已有的属性名相同,就会把已有的属性覆盖掉,当我们再使用这个属性的时候,实际上使用的是我们自定义的那个属性,如下所示:
Rectangle {
id: rootRect
property alias color: blueRect.color
property alias theRect: blueRect
color: "red"
Rectangle {
id: blueRect
color: "#1234ff"
}
Component.onCompleted: {
console.log ("color:", color, // "#1234ff"
"blueRect.color:", blueRect.color,
// "#1234ff"
"theRect.color:",
theRect.color, // "#1234ff"
"rootRect.color:",
rootRect.color) // "#1234ff"
color = "#884646"
console.log ("color:", color, // "#884646"
"blueRect.color:", blueRect.color,
// "#884646"
"theRect.color:",
theRect.color, // "#884646"
"rootRect.color:",
rootRect.color) // "#884646"
blueRect.color = "#123456"
console.log ("color:", color, // "#123456"
"blueRect.color:", blueRect.color,
// "#123456"
"theRect.color:",
theRect.color, // "#123456"
"rootRect.color:",
rootRect.color) // "#123456"
theRect.color = "#ff00ff"
console.log ("color:", color, // "#ff00ff"
"blueRect.color:", blueRect.color,
// "#ff00ff"
"theRect.color:",
theRect.color, // "#ff00ff"
"rootRect.color:",
rootRect.color) // "#ff00ff"
}
} |
默认属性
任何基于Item的类型都有一个data列表属性,这个属性就是该类型的默认属性,保存了所有的孩子对象,其中可视的孩子对象又保存在了children列表属性中,不可视的孩子对象保存在了resources列表属性中,在添加子对象时children、resources属性可写可不写,都会自动添加到对应的属性列表中,所以在之前介绍列表属性的例子中可省略children关键字,修改后如下:
Item {
Text { text: "textOne" }
Text { text: "textTwo" }
Text { text: "textThree" }
Component.onCompleted: {
for(var i = 0; i < children.length; i++)
console.log("text of lable", i, ":",
children[i].text)
}
} |
另外,我们还可以在自定义属性时添加default关键字,将这个属性作为默认属性。
只读属性
使用readonly关键字可定义一个只读属性,语法如下:
| readonly property
<propertyType> <propertyName> : <initialValue>
|
只读属性必须初始化,且不能修改,也不能是default属性和alias属性,如下所示:
Item {
readonly property int someNumber: 10
Component.onCompleted: someNumber = 20 // TypeError:
Cannot assign to read-only property "someNumber"
} |
附加属性
QML语言还包括了一些附加属性和信号处理器,由相应的附加类型提供,使用语法如下:
<AttachingType>.<propertyName>
<AttachingType>.on<SignalName> |
anchors锚布局
QML的布局方式一般采用两种,一种就是直接设置,X与Y坐标的值。一种是采用相对位置布局,anchors锚布局。使用锚布局的能够使界面更紧凑,更有整体化。锚布局相当于Qt的
Grid,HBox,VBox layout。
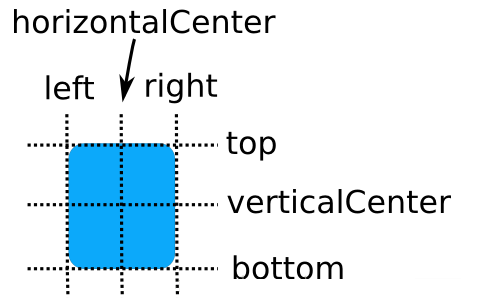
锚布局包含器个属性:left, horizontalCenter,
right, top, verticalCenter, baseline, and bottom.
The Qt Quick anchoring system allows
you to define relationships between the anchor lines
of different items. For example, you can write:
Rectangle {
id: rect1; ... }
Rectangle { id: rect2; anchors.left: rect1.right;
... } |

You can specify multiple anchors.
For example:
Rectangle {
id: rect1; ... }
Rectangle { id: rect2; anchors.left: rect1.right;
anchors.top: rect1.bottom; ... } |

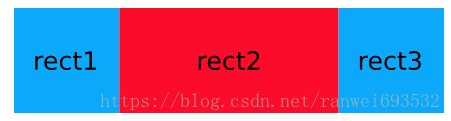
By specifying multiple horizontal
or vertical anchors you can control the size of an
item. Below, rect2 is anchored to the right of rect1
and the left of rect3. If either of the blue rectangles
are moved, rect2 will stretch and shrink as necessary:
Rectangle { id:
rect1; x: 0; ... }
Rectangle { id: rect2; anchors.left: rect1.right;
anchors.right: rect3.left; ... }
Rectangle { id: rect3; x: 150; ... }
|
锚布局的Margins和Offsets
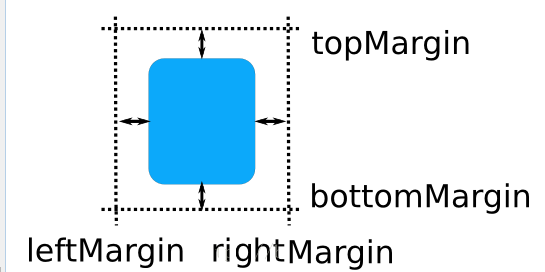
Rectangle {
id: rect1; ... }
Rectangle { id: rect2; anchors.left: rect1.right;
anchors.leftMargin: 5; ... } |

2注意:处于性能原因,你仅被允许相对它的兄弟对象或者父对象来锚定一个对象。
代码
import QtQuick
2.6
import QtQuick.Window 2.2
/*
Window对象为Qt Quick 视窗创建一个顶层的窗口.
要使用这个对象,必须增加如下import声明:
import QtQuick.Window 2.2
*/
Window {
visible: true // 是否可见
width: 640
height: 480
title: qsTr("Hello World")
/*
MouseArea是一个不可见的对象,通常用来关联一个可见的对象,以便为它提供鼠标操作。
*/
MouseArea {
/*
anchors.centerIn:parent,是将子控件放在父控件的正中心,子控件的宽高是自己设置的;anchors.fill:parent,
是在子控件的大小设置与父控件大小一样,特别是mouseArea中经常使用anchors.fill:parent,这是为了指定鼠标事件接受的范围。如果是两个矩形控件,颜色不同,那么子控件会完全覆盖父控件,全是子控件的颜色显示。
还有一点,就是parent是指父类,直接相关的父类。anchors.fill指定的父类是必须是直接的父类,如果不是,会报错的。
*/
anchors.fill: parent
/*
鼠标位置信息和按键点击事件通过signals提供.使用频率最高的鼠标按下和点击处理事件:onClicked,
onDoubleClicked, onPressed, onReleased and onPressAndHold.
还可以使用onWheel信号去操作塑标滚动事件。
*/
onClicked: {
/*
console.log, console.debug, console.info, console.warn和console.error可以被用来打印调试信息到控制台上.
*/
console.log(qsTr('Clicked on background. Text:
"' + textEdit.text + '"'))
}
}
TextEdit {
/*
ID属性:
QML对象的id属性是唯一的,不同对象的id属性值不能相同,我们可通过某个对象的id属性来访问这个对象。
id属性是QML语言内建的一个属性,在对象实例化完成后其值是不能被修改的,不同于其它的普通属性。
id属性值必须以小写字母或下划线开头,且不能包含字母、数字、下划线以外的其它字符。
*/
id: textEdit
text: qsTr("Enter some text...")
/*
horizontalAlignment和verticalAlignment。
Valid values for horizontalAlignment are:
TextEdit.AlignLeft (default)
TextEdit.AlignRight
TextEdit.AlignHCenter
TextEdit.AlignJustify
Valid values for verticalAlignment are:
TextEdit.AlignTop (default)
TextEdit.AlignBottom
TextEdit.AlignVCenter
*/
verticalAlignment: Text.AlignVCenter
anchors.top: parent.top
anchors.horizontalCenter: parent.horizontalCenter
anchors.topMargin: 20
Rectangle {
anchors.fill: parent
anchors.margins: -10
color: "transparent"
border.width: 1
}
}
}
|
|


