«ťł–«ť–ųľž≤‚ «◊‘»Ľ”Ô—‘ņŪĹ‚ĶńĻōľŁ“™ňō°£◊ÓĹŁ£¨ő“√«Ĺę‘≠ņīĶńŌÓńŅ«®“∆ĶĹŃň–¬ĶńľĮ≥…ŌĶÕ≥…Ō£¨ł√ŌĶÕ≥Ľý”ଝ °ņŪĻ§—ß‘ļ√ĹŐŚ Ķ—ť “Õ∆≥ŲĶńNLPń£–ÕīÓĹ®∂Ý≥…°£
īķ¬Ž“—ĺ≠Ņ™‘īŃň£°£®ŌÍľŻGitHub£ļhttps://github.com/huggingface/torchMoji£©
ł√ń£–Õ◊Ó≥űĶń…Ťľ∆ Ļ”√ŃňTensorFlow°ĘTheanoļÕKeras£¨Ĺ”◊Ňő“√«Ĺę∆š“∆÷≤ĶĹŃňpyTorch…Ō°£”ŽKerasŌŗĪ»£¨pyTorchń‹»√ő“√«łŁ◊‘”…ĶōŅ™∑ĘļÕ≤‚ ‘łų÷÷∂®÷∆ĽĮĶń…Ůĺ≠ÕݬÁń£Ņť£¨≤Ę Ļ”√“◊”ŕ‘ń∂ŃĶńnumpy∑ÁłŮņīĪŗ–īīķ¬Ž°£‘ŕ’‚∆™őń’¬÷–£¨ő“ĹęŌÍŌłňĶ√ų‘ŕ“∆÷≤Ļż≥Ő÷–≥ŲŌ÷ĶńľłłŲ”–»§Ķńő Ő‚£ļ
- »Áļő Ļ”√◊‘∂®“Śľ§ĽÓĻ¶ń‹∂®÷∆pyTorch LSTM
- PackedSequence∂‘ŌůĶńĻ§◊ų‘≠ņŪľį∆šĻĻĹ®
- »ÁļőĹęĻō◊Ę≤„ī”Keras◊™ĽĽ≥…pyTorch
- »Áļő‘ŕpyTorch÷–ľ”‘ō żĺ›£ļDataSetļÕSmart Batching
- »Áļő‘ŕpyTorch÷– ĶŌ÷KerasĶń»®÷ō≥ű ľĽĮ
◊Ō»£¨ő“√«ņīŅīŅītorchMoji/DeepMojiĶńń£–Õ°£ňŁ «“ĽłŲŌŗĶĪĪÍ◊ľ∂Ý«ŅīůĶń»ňĻ§”Ô—‘ī¶ņŪ…Ůĺ≠ÕݬÁ£¨ĺŖ”–ŃĹłŲňęLSTM≤„£¨∆šļů «Ļō◊Ę≤„ļÕ∑÷ņŗ∆ų£ļ
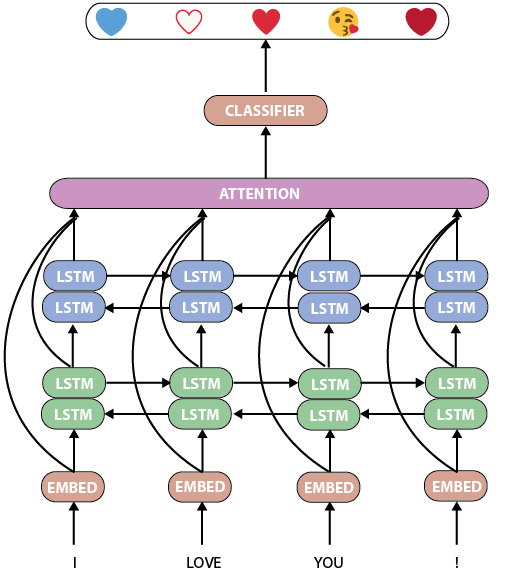
torchMoji/DeepMojiń£–Õ
»ÁļőĻĻĹ®“ĽłŲ∂®÷∆ĽĮĶńpyTorch LSTMń£Ņť
DeepMoji”–“ĽłŲļ‹≤ĽīŪĶńŐōĶ„£ļBjarke Felboľį∆š–≠◊ų’Ŗń‹ĻĽ‘ŕ“ĽłŲ”Ķ”–16“ŕŐűľ«¬ľĶńļ£ŃŅ żĺ›ľĮ…Ō—ĶŃ∑ł√ń£–Õ°£“Úīň£¨‘§Ō»—ĶŃ∑Ķńń£–Õ‘ŕīň—ĶŃ∑ľĮ÷–ĺŖ”–∑«≥£∑ŠłĽĶń«ťł–ļÕ«ť–ųĪŪ’ų£¨ő“√«Ņ…“‘ļ‹∑ĹĪ„Ķō Ļ”√’‚łŲ—ĶŃ∑ĻżĶńń£–Õ°£
ł√ń£–Õ « Ļ”√’Ž∂‘LSTMĶńĽōĻťńŕļňĶńTheano/Kerasń¨»Ōľ§ĽÓļĮ żhard sigmoid—ĶŃ∑Ķń£¨∂ÝpyTorch «Ľý”ŕNVIDIAĶńcuDNNŅ‚Ĺ®ń£Ķń£¨’‚—ý£¨Ņ…ĽŮĶ√‘≠…ķ÷ß≥÷LSTMĶńGPUľ”ňŔ”ŽĪÍ◊ľĶńsigmoidĽōĻťľ§ĽÓļĮ ż£ļ
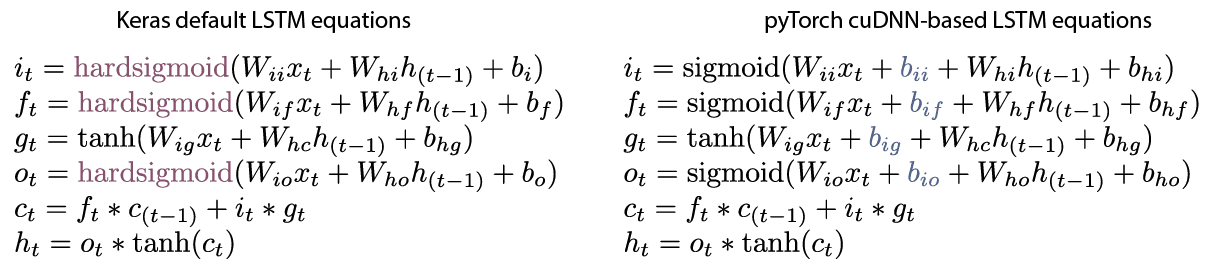
Kerasń¨»ŌĶńLSTMļÕpyTorchń¨»ŌĶńLSTM
“Úīň£¨ő“–īŃň“ĽłŲĺŖ”–hard sigmoidĽōĻťľ§ĽÓļĮ żĶń◊‘∂®“ŚLSTM≤„£ļ
def LSTMCell(input, hidden, w_ih, w_hh, b_ih=None, b_hh=None):
"""
A modified LSTM cell with hard sigmoid activation on the input, forget and output gates.
"""
hx, cx = hidden
gates = F.linear(input, w_ih, b_ih) + F.linear(hx, w_hh, b_hh)
ingate, forgetgate, cellgate, outgate = gates.chunk(4, 1)
ingate = hard_sigmoid(ingate)
forgetgate = hard_sigmoid(forgetgate)
cellgate = F.tanh(cellgate)
outgate = hard_sigmoid(outgate)
cy = (forgetgate * cx) + (ingate * cellgate)
hy = outgate * F.tanh(cy)
return hy, cy
def hard_sigmoid(x):
"""
Computes element-wise hard sigmoid of x.
See e.g. https://github.com/Theano/Theano/blob/master/theano/tensor/nnet/sigm.py#L279
"""
x = (0.2 * x) + 0.5
x = F.threshold(-x, -1, -1)
x = F.threshold(-x, 0, 0)
return x |
’‚łŲLSTMĶ•‘™Īō–ŽľĮ≥…‘ŕ“ĽłŲÕÍ’ŻĶńń£Ņť÷–£¨’‚—ý≤ŇŅ…“‘ Ļ”√pyTorchňý”–ĶńĻ¶ń‹°£’‚łŲľĮ≥…ŌŗĻōĶńīķ¬Žļ‹≥§£¨Ĺ®“ť÷ĪĹ”“ż”√ĶĹGithub÷–ĶńŌŗĻō‘īīķ¬Ž°£
KerasļÕpyTorch÷–ĶńĻō◊Ę≤„
ń£–ÕĶńĻō◊Ę≤„ «“ĽłŲ”–»§Ķńń£Ņť£¨ő“√«Ņ…“‘∑÷Īū‘ŕKerasļÕpyTorchĶńīķ¬Ž÷–ĹÝ––Ī»ĹŌ£ļ
class Attention(Module):
"""
Computes a weighted average of channels across timesteps (1 parameter pr. channel).
"""
def __init__(self, attention_size, return_attention=False):
""" Initialize the attention layer
# Arguments:
attention_size: Size of the attention vector.
return_attention: If true, output will include the weight for each input token
used for the prediction
"""
super(Attention, self).__init__()
self.return_attention = return_attention
self.attention_size = attention_size
self.attention_vector = Parameter(torch.FloatTensor(attention_size))
def __repr__(self):
s = '{name}({attention_size}, return attention={return_attention})'
return s.format(name=self.__class__.__name__, **self.__dict__)
def forward(self, inputs, input_lengths):
""" Forward pass.
# Arguments:
inputs (Torch.Variable): Tensor of input sequences
input_lengths (torch.LongTensor): Lengths of the sequences
# Return:
Tuple with (representations and attentions if self.return_attention else None).
"""
logits = inputs.matmul(self.attention_vector)
unnorm_ai = (logits - logits.max()).exp()
# Compute a mask for the attention on the padded sequences
# See e.g. https://discuss.pytorch.org/t/self-attention-on-words-and-masking/5671/5
max_len = unnorm_ai.size(1)
idxes = torch.arange(0, max_len, out=torch.LongTensor(max_len)).unsqueeze(0)
if torch.cuda.is_available():
idxes = idxes.cuda()
mask = Variable((idxes < input_lengths.unsqueeze(1)).float())
# apply mask and renormalize attention scores (weights)
masked_weights = unnorm_ai * mask
att_sums = masked_weights.sum(dim=1, keepdim=True) # sums per sequence
attentions = masked_weights.div(att_sums)
# apply attention weights
weighted = torch.mul(inputs, attentions.unsqueeze(-1).expand_as(inputs))
# get the final fixed vector representations of the sentences
representations = weighted.sum(dim=1)
return (representations, attentions if self.return_attention else None)
class AttentionWeightedAverage(Layer):
"""
Computes a weighted average of the different channels across timesteps.
Uses 1 parameter pr. channel to compute the attention value for a single timestep.
"""
def __init__(self, return_attention=False, **kwargs):
self.init = initializers.get('uniform')
self.supports_masking = True
self.return_attention = return_attention
super(AttentionWeightedAverage, self).__init__(** kwargs)
def build(self, input_shape):
self.input_spec = [InputSpec(ndim=3)]
assert len(input_shape) == 3
self.W = self.add_weight(shape=(input_shape[2], 1),
name='{}_W'.format(self.name),
initializer=self.init)
self.trainable_weights = [self.W]
super(AttentionWeightedAverage, self).build(input_shape)
def call(self, x, mask=None):
# computes a probability distribution over the timesteps
# uses 'max trick' for numerical stability
# reshape is done to avoid issue with Tensorflow
# and 1-dimensional weights
logits = K.dot(x, self.W)
x_shape = K.shape(x)
logits = K.reshape(logits, (x_shape[0], x_shape[1]))
ai = K.exp(logits - K.max(logits, axis=-1, keepdims=True))
# masked timesteps have zero weight
if mask is not None:
mask = K.cast(mask, K.floatx())
ai = ai * mask
att_weights = ai / K.sum(ai, axis=1, keepdims=True)
weighted_input = x * K.expand_dims(att_weights)
result = K.sum(weighted_input, axis=1)
if self.return_attention:
return [result, att_weights]
return result
def get_output_shape_for(self, input_shape):
return self.compute_output_shape(input_shape)
def compute_output_shape(self, input_shape):
output_len = input_shape[2]
if self.return_attention:
return [(input_shape[0], output_len), (input_shape[0], input_shape[1])]
return (input_shape[0], output_len)
def compute_mask(self, input, input_mask=None):
if isinstance(input_mask, list):
return [None] * len(input_mask)
else:
return None |
»Áń„ňýľŻ£¨÷ų“™Ķńň„∑®īů÷¬ŌŗÕ¨£¨ĶęPyTorchīķ¬Ž÷–Ķńīů≤Ņ∑÷∂ľ «◊Ę Õ£¨∂ÝKeras‘Ú–Ť“™Īŗ–īľłłŲłĹľ”ļĮ ż≤ĘĹÝ––Ķų”√°£
*‘ŕĪŗ–īļÕĶų ‘◊‘∂®“Śń£ŅťļÕ≤„ Ī£¨pyTorch «“ĽłŲłŁŅžĶń—°‘Ů£Ľ∂Ý∂‘”ŕŅžňŔ—ĶŃ∑ļÕ≤‚ ‘”…ĪÍ◊ľ≤„ĻĻĹ®Ķńń£–Õ Ī£¨KerasŌ‘»ĽłŁľ”ļŌ °£
PackedSequence∂‘ŌůĶńĻ§◊ų‘≠ņŪ
Keras”–“ĽłŲ≤ĽīŪĶń—଎Ļ¶ń‹Ņ…“‘”√ņīī¶ņŪŅ…Īš≥§∂»–ÚŃ–°£ń«√ī‘ŕpyTorch÷–”÷ł√»Áļőī¶ņŪ’‚łŲńō£ŅŅ…“‘ Ļ”√PackedSequences£° pyTorchőńĶĶ÷–”–ĻōPackedSequenceĶńĹť…‹≤Ę≤Ľ «ļ‹ŌÍŌł£¨ňý“‘’‚ņÔĽŠŌÍŌł√Ť ŲňŁĶńŌłĹŕ°£
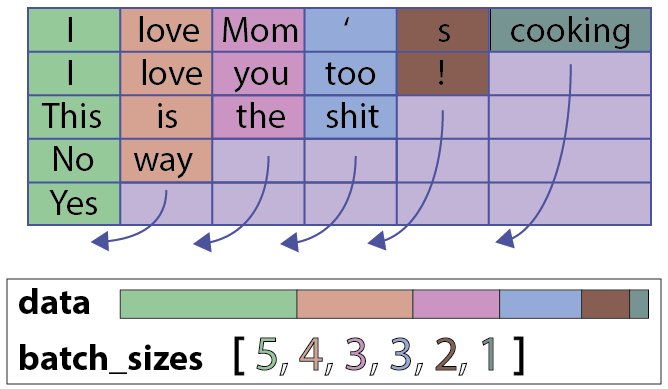
“ĽłŲ”Ķ”–5łŲ–ÚŃ–18łŲŃÓŇ∆ĶńĶš–ÕNLPŇķīő
ľŔ…Ťő“√«”–“ĽŇķŅ…Īš≥§∂»Ķń–ÚŃ–£®‘ŕNLP”¶”√÷–Õ®≥£ĺÕ «’‚—ýĶń£©°£ő™Ńň‘ŕGPU…Ō≤Ę––ľ∆ň„’‚—ý“ĽłŲŇķīő£¨ő“√«Ō£ÕŻ£ļ
- ĺ°Ņ…ń‹∂ŗĶō≤Ę––ī¶ņŪ’‚łŲ–ÚŃ–£¨“Úő™LSTM“Ģ≤ō◊īŐ¨“ņņĶ”ŕ√ŅłŲ–ÚŃ–Ķń«į“ĽłŲ Īľš≤Ĺ≥§£¨“‘ľį
- “‘’ż»∑Ķń Īľš≤Ĺ≥§£®√ŅłŲ–ÚŃ–ĶńĹŠő≤£©Õ£÷Ļ√ŅłŲ–ÚŃ–Ķńľ∆ň„°£
’‚Ņ…“‘Õ®Ļż Ļ”√pyTorch÷–ĶńPackedSequenceņŗņī ĶŌ÷°£ő“√« ◊Ō»Õ®Ļżľű…Ŕ≥§∂»ņī∂‘–ÚŃ–ĹÝ––ŇŇ–Ú£¨≤ĘĹęňŁ√«∑ŇĶĹ‘ŕ’ŇŃŅ÷–°£»Ľļů∂‘’ŇŃŅļÕ–ÚŃ–≥§∂»Ń–ĪŪĶų”√pack_padded_sequenceļĮ ż
# input_seqs is a batch of input sequences as a numpy array of integers (word indices in vocabulary) padded with zeroas
input_seqs = Variable(torch.from_numpy(input_seqs.astype('int64')).long())
# First: order the batch by decreasing sequence length
input_lengths = torch.LongTensor([torch.max(input_seqs[i, :].data.nonzero()) + 1 for i in range(input_seqs.size()[0])])
input_lengths, perm_idx = input_lengths.sort(0, descending=True)
input_seqs = input_seqs[perm_idx][:, :input_lengths.max()]
# Then pack the sequences
packed_input = pack_padded_sequence(input_seqs, input_lengths.cpu().numpy(), batch_first=True) |
PackedSequence∂‘ŌůįŁņ®£ļ
- “ĽłŲdata∂‘Ōů£ļ“ĽłŲtorch.Variable£®ŃÓŇ∆Ķń◊‹ ż£¨√ŅłŲŃÓŇ∆Ķńő¨∂»£©£¨‘ŕ’‚łŲľÚĶ•Ķńņż◊”÷–”–őŚłŲŃÓŇ∆–ÚŃ–£®”√’Ż żĪŪ ĺ£©£ļ£®18£¨1£©
- “ĽłŲbatch_sizes∂‘Ōů£ļ√ŅłŲ Īľš≤Ĺ≥§ĶńŃÓŇ∆ żŃ–ĪŪ£¨‘ŕ’‚łŲņż◊”÷–ő™£ļ[6£¨5£¨2£¨4£¨1]
”√pack_padded_sequenceļĮ żņīĻĻ‘ž’‚łŲ∂‘Ōů∑«≥£ĶńľÚĶ•£ļ
»ÁļőĻĻ‘ž“ĽłŲPackedSequence∂‘Ōů£®batch_first = True£©
PackedSequence∂‘Ōů”–“ĽłŲļ‹≤ĽīŪĶńŐō–‘£¨ĺÕ «ő“√«őř–Ť∂‘–ÚŃ–Ĺ‚įŁ£®’‚“Ľ≤Ĺ≤Ŕ◊ų∑«≥£¬ż£©ľīŅ…÷ĪĹ”‘ŕPackedSequence żĺ›ĪšŃŅ…Ō÷ī–––Ū∂ŗ≤Ŕ◊ų°£ŐōĪū «ő“√«Ņ…“‘∂‘ŃÓŇ∆÷ī––»őļő≤Ŕ◊ų£®ľī∂‘ŃÓŇ∆Ķńň≥–Ú/…ŌŌ¬őń≤Ľ√Űł–£©°£ĶĪ»Ľ£¨ő“√«“≤Ņ…“‘ Ļ”√Ĺ” ‹PackedSequence◊ųő™ š»ŽĶń»őļő“ĽłŲpyTorchń£Ņť£®pyTorch 0.2£©°£
ņż»Á£¨‘ŕő“√«ĶńNLPń£–Õ÷–£¨ő“√«Ņ…“‘‘ŕ∂‘PackedSequence∂‘Ōů≤ĽĹ‚įŁĶń«ťŅŲŌ¬Ń¨Ĺ”ŃĹłŲLSTMń£ŅťĶń š≥Ų£¨≤Ę‘ŕīň∂‘Ōů…Ō”¶”√LSTM°£ő“√«ĽĻŅ…“‘‘ŕ≤ĽĹ‚įŁĶń«ťŅŲŌ¬÷ī––Ļō◊Ę≤„Ķń“Ľ–©≤Ŕ◊ų°£
pyTorch÷–Ķń÷«ń‹ żĺ›ľ”‘ō£ļDataSetsļÕBatches
‘ŕKeras÷–£¨ żĺ›ľ”‘ōļÕŇķī¶ņŪÕ®≥£“Ģ≤ō‘ŕfit_generatorļĮ ż÷–°£÷ō…Í“ĽĪť£¨»ÁĻŻń„ŌŽ“™ŅžňŔĶō≤‚ ‘ń£–Õ£¨Kerasļ‹ļ√”√£¨Ķę’‚“≤“‚ő∂◊Ňő“√«≤Ľń‹ÕÍ»ęŅō÷∆ń£–Õ÷–Ķń÷ō“™≤Ņ∑÷°£
‘ŕpyTorch÷–£¨ő“√«Ĺę Ļ”√»żłŲņŗņīÕÍ≥…’‚łŲ»őőŮ£ļ
- “ĽłŲDataSetņŗ£¨”√”ŕĪ£īś°Ę‘§ī¶ņŪļÕňų“ż żĺ›ľĮ
- “ĽłŲBatchSamplerņŗ£¨”√”ŕŅō÷∆—ýĪĺ»ÁļőŇķŃŅ ’ľĮ
- “ĽłŲDataLoaderņŗ£¨łļ‘ūĹę’‚–©ŇķīőŐŠĻ©łÝń£–Õ
ő“√«ĶńDataSetņŗ∑«≥£ľÚĶ•£ļ
class DeepMojiDataset(Dataset):
""" A simple Dataset class.
# Arguments:
X_in: Inputs of the given dataset.
y_in: Outputs of the given dataset.
# __getitem__ output:
(torch.LongTensor, torch.LongTensor)
"""
def __init__(self, X_in, y_in):
# Check if we have Torch.LongTensor inputs (assume Numpy array otherwise)
if not isinstance(X_in, torch.LongTensor):
X_in = torch.from_numpy(X_in.astype('int64')).long()
if not isinstance(y_in, torch.LongTensor):
y_in = torch.from_numpy(y_in.astype('int64')).long()
self.X_in = torch.split(X_in, 1, dim=0)
self.y_in = torch.split(y_in, 1, dim=0)
def __len__(self):
return len(self.X_in)
def __getitem__(self, idx):
return self.X_in[idx].squeeze(), self.y_in[idx].squeeze() |
ő“√«BatchSampler‘ÚłŁ”–»§°£
ő“√«”–ľłłŲ–°ĶńNLP żĺ›ľĮ£¨”√”ŕőĘĶų«ťł–«ť–ųľž≤‚ń£–Õ°£’‚–© żĺ›ľĮ”–◊Ň≤ĽÕ¨Ķń≥§∂»ļÕń≥–©≤Ľ∆Ĺļ‚Ķń÷÷ņŗ£¨ňý“‘ő“√«ŌŽ…Ťľ∆’‚√ī“ĽłŲŇķŃŅ≤…—ý∆ų£ļ
- ‘ŕ‘§Ō»∂®“ŚĶń—ýĪĺ ż÷– ’ľĮŇķīő£¨’‚—ýő“√«Ķń—ĶŃ∑Ļż≥ŐĺÕŅ…“‘≤Ľ“ņņĶ”ŕŇķīőĶń≥§∂»ń‹ĻĽī”≤Ľ∆Ĺļ‚Ķń żĺ›ľĮ÷–“‘∆Ĺļ‚Ķń∑Ĺ ĹĹÝ––≤…—ý°£
- ‘ŕPyTorch÷–£¨BatchSampler «“ĽłŲŅ…“‘ĶŁīķ…ķ≥…ŇķīőĶńņŗ£¨BatchSamplerĶń√ŅłŲŇķī¶ņŪ∂ľįŁļ¨“ĽłŲŃ–ĪŪ£¨∆š÷–įŁļ¨“™‘ŕDataSet÷–—°‘ŮĶń—ýĪĺĶńňų“ż°£
“Úīň£¨ő“√«Ņ…“‘∂®“Ś“ĽłŲ”√ żĺ›ľĮņŗĪÍ«©ŌÚŃŅņī≥ű ľĽĮĶńBatchSampler∂‘Ōů£¨“‘ĻĻĹ®¬ķ◊„ő“√«–Ť«ůĶńŇķīőŃ–ĪŪ£ļ
class DeepMojiBatchSampler(object):
"""A Batch sampler that enables larger epochs on small datasets and
has upsampling functionality.
# Arguments:
y_in: Labels of the dataset.
batch_size: Batch size.
epoch_size: Number of samples in an epoch.
upsample: Whether upsampling should be done. This flag should only be
set on binary class problems.
seed: Random number generator seed.
# __iter__ output:
iterator of lists (batches) of indices in the dataset
"""
def __init__(self, y_in, batch_size, epoch_size, upsample, seed):
self.batch_size = batch_size
self.epoch_size = epoch_size
self.upsample = upsample
np.random.seed(seed)
if upsample:
# Should only be used on binary class problems
assert len(y_in.shape) == 1
neg = np.where(y_in.numpy() == 0)[0]
pos = np.where(y_in.numpy() == 1)[0]
assert epoch_size % 2 == 0
samples_pr_class = int(epoch_size / 2)
else:
ind = range(len(y_in))
if not upsample:
# Randomly sample observations in a balanced way
self.sample_ind = np.random.choice(ind, epoch_size, replace=True)
else:
# Randomly sample observations in a balanced way
sample_neg = np.random.choice(neg, samples_pr_class, replace=True)
sample_pos = np.random.choice(pos, samples_pr_class, replace=True)
concat_ind = np.concatenate((sample_neg, sample_pos), axis=0)
# Shuffle to avoid labels being in specific order
# (all negative then positive)
p = np.random.permutation(len(concat_ind))
self.sample_ind = concat_ind[p]
label_dist = np.mean(y_in.numpy()[self.sample_ind])
assert(label_dist > 0.45)
assert(label_dist < 0.55)
def __iter__(self):
# Hand-off data using batch_size
for i in range(int(self.epoch_size/self.batch_size)):
start = i * self.batch_size
end = min(start + self.batch_size, self.epoch_size)
yield self.sample_ind[start:end]
def __len__(self):
# Take care of the last (maybe incomplete) batch
return (self.epoch_size + self.batch_size - 1) // self.batch_size |
ī”KerasĶĹpyTorch£ļ≤Ľ“™ÕŁľ«≥ű ľĽĮ
ĹęKeras/Tensorflow/Theanoīķ¬Ž“∆÷≤ĶĹpyTorchĶńĻż≥Ő÷–£¨◊Óļů–Ť“™◊Ę“‚Ķń ¬«ť «∂‘»®÷ōĶń≥ű ľĽĮ°£
Keras‘ŕŅ™∑ĘňŔ∂»∑Ĺ√śĶńŃŪ“ĽłŲ«ŅīůŐōĶ„ «≤„Ķńń¨»Ō≥ű ľĽĮ°£
Ōŗ∑ī£¨pyTorch≤Ę√Ľ”–≥ű ľĽĮ»®÷ō£¨∂Ý «”…Ņ™∑Ę’Ŗ◊‘ľļņīĺŲ∂®°£ő™Ńň‘ŕőĘĶų»®÷ō ĪĽŮĶ√“Ľ÷¬ĶńĹŠĻŻ£¨ő“√«ĹęŌŮ»ÁŌ¬īķ¬Žń«—ýłī÷∆ń¨»ŌĶńKeras»®÷ō≥ű ľĽĮ£ļ
def init_weights(self):
"""
Here we reproduce Keras default initialization weights to initialize Embeddings/LSTM weights
"""
ih = (param.data for name, param in self.named_parameters() if 'weight_ih' in name)
hh = (param.data for name, param in self.named_parameters() if 'weight_hh' in name)
b = (param.data for name, param in self.named_parameters() if 'bias' in name)
nn.init.uniform(self.embed.weight.data, a=-0.5, b=0.5)
for t in ih:
nn.init.xavier_uniform(t)
for t in hh:
nn.init.orthogonal(t)
for t in b:
nn.init.constant(t, 0) |
ĹŠ¬Ř
ĶĪő“√«’Ž∂‘“ĽłŲń£–ÕĪ»ĹŌKerasļÕpyTorch’‚ŃĹłŲŅÚľ‹ Ī£¨ő“√«Ņ…“‘ł–ĺűĶĹňŁ√«”–◊Ň≤ĽÕ¨Ķń’‹—ßļÕńŅĪÍ°£
łýĺ›ő“Ķńĺ≠—ťņīŅī£ļ
- Keras∑«≥£ ļŌ”ŕŅžňŔ≤‚ ‘‘ŕłÝ∂®»őőŮ…Ō◊ťļŌĪÍ◊ľ…Ůĺ≠ÕݬÁŅťĶńłų÷÷∑Ĺ∑®£Ľ
- pyTorch∑«≥£ ļŌ”ŕŅžňŔŅ™∑ĘļÕ≤‚ ‘◊‘∂®“ŚĶń…Ůĺ≠ÕݬÁń£Ņť£¨“Úő™ňŁ”–◊Ňļ‹īůĶń◊‘”…∂»ļÕ“◊”ŕ‘ń∂ŃĶńnumpy∑ÁłŮĶńīķ¬Ž°£
|


