| БрМЭЦМі: |
БОЮФжиЕуНщЩмСЫpreactЪЧЪВУД?ащФтDOMЁЂзщМўЁЂdiffЫуЗЈЁЂвьВНsetStateЕШЯрЙиФкШнЁЃ
БОЮФРДздгкЫМЗё,гЩЛ№СњЙћШэМўAnnaБрМЭЦМіЁЃ |
|
ЧАбд
preactЫфШЛЪЧreactЕФзюаЁЪЕЯж, КмЖрreactЕФЬиадpreactРявЛЕуЖМУЛгаЩй, БШШчcontextAPI,
FragmentЕШЁЃЮвУЧЗжЮіЪБИќзЂжиЪЕЯжЙ§ГЬЃЌЛсЖдвЛаЉAPIЕФЪЕЯжНјааКіТдЁЃЧыМћСТ
preactЪЧЪВУД?
Fast 3kB React alternative with the
same modern API. Components & Virtual DOM
preactПЩвдЫЕЪЧРрreactПђМмЕФзюаЁЪЕЯж
ащФтDOM
Йигкjsx
ЮвУЧЪзЯШПДЯТpreactЙйЭјЩЯЕФdemoЁЃ
import { h, render
} from 'preact';
render((
<h1 id="title" >Hello, world!</h1>
), document.body); |
ЦфЪЕЩЯУцЕФjsxДњТыЃЌБОжЪЪЧЯТУцДњТыЕФгяЗЈЬЧ
h(
'h1',
{ id: 'title' },
'Hello, world!'
) |
preactЪЧШчКЮзіЕНЕФФиЃПpreactБОЩэВЂУЛгаЪЕЯжетИігяЗЈзЊЛЛЕФЙІФмЃЌpreactЪЧвРРЕtransform-react-jsxЕФbabelВхМўзіЕНЕФЁЃ
createElement
ЧАУцЮвУЧПДЕНСЫjsxЕФДњТыЛсБЛзЊЛЛЮЊгУhКЏЪ§АќЙќЕФДњТы, ЮвУЧНгЯТРДПДЯТhКЏЪ§ЪЧШчКЮЪЕЯжЕФЁЃcreateElementКЏЪ§ЮЛгкcreate-element.jsетИіЮФМўжаЁЃ
ЮФМўжажївЊЮЊ3ИіКЏЪ§, createElementКЭcreateVNode, вдМАcoerceToVNodeЁЃ
createElementКЭcreateVNodeЪЧвЛЖдЕФ, createElementЛсНЋchildrenЙвдиЕНVNodeЕФpropsжаЁЃМШprops.childrenЕФЪ§зщжаЁЃcreateVNodeдђЛсНЋИљОнетаЉВЮЪ§ЗЕЛивЛИіЖдЯѓ,
етИіЖдЯѓОЭЪЧащФтDOMЁЃ
дкcreateElementжаЮвУЧЛЙПЩвдПДЕНЖдdefaultPropsЕФДІРэ, ЖјdefaultPropsПЩвдЮЊЮвУЧЩшжУpropsЕФФЌШЯЕФГѕЪМжЕЁЃ
export function createElement (type, props, children)
{
if (props==null) props = {};
if (arguments.length>3) {
children = [children];
for (let i=3; i<arguments.length; i++) {
children.push(arguments[i]);
}
}
if (children!=null) {
props.children = children;
}
if (type!=null && type.defaultProps!=null)
{
for (let i in type.defaultProps) {
if (props[i]===undefined) props[i] = type.defaultProps[i];
}
}
let ref = props.ref;
if (ref) delete props.ref;
let key = props.key;
if (key) delete props.key;
return createVNode (type, props, null, key,
ref);
}
export function createVNode (type, props, text,
key, ref) {
const vnode = {
type,
props,
text,
key,
ref,
_children: null,
_dom: null,
_lastDomChild: null,
_component: null
};
return vnode;
}
|
ЖјcoerceToVNodeКЏЪ§ЕФзїгУдђЪЧНЋвЛаЉУЛгаtypeРраЭЕФНкЕуЁЃБШШчвЛЖЮзжЗћДЎ,
вЛИіЪ§зжЧПжЦзЊЛЛЮЊVNodeНкЕу, етаЉНкЕуЕФtypeжЕЮЊnull, textЪєаджаБЃСєСЫзжЗћДЎКЭЪ§зжЕФжЕЁЃ
export function
coerceToVNode (possibleVNode) {
if (possibleVNode == null || typeof possibleVNode
=== 'boolean') return null;
if (typeof possibleVNode === 'string' || typeof
possibleVNode === 'number') {
return createVNode (null, null, possibleVNode,
null, null);
}
if (Array.isArray(possibleVNode)) {
return createElement(Fragment, null, possibleVNode);
}
if (possibleVNode._dom!=null) {
return createVNode (possibleVNode.type, possibleVNode.props,
possibleVNode.text, possibleVNode.key, null);
}
return possibleVNode;
}
|
ЕНетРяcreate-elementЕФетИіФЃПщЮвУЧОЭНщЩмЭъСЫЁЃетЪЧвЛИіЗЧГЃМђЕЅЕФФЃПщ, зіЕФЙІФмОЭЪЧИљОнЖдгІЕФjsx->ащФтDOMЁЃЮвУЧетРяЛЙУЛгаЩцМАШчКЮфжШОГіеце§ЕФDOMНкЕу,
етЪЧвђЮЊpreactжафжШОЕФЙ§ГЬЪЧжБНгдкdiffЫуЗЈжаЪЕЯжЃЌвЛБпБШЖдвЛБпИњИќаТецЪЕЕФdomЁЃ
зщМў
preactжагавЛИіЭЈгУComponentРр, зщМўЕФЪЕЯжашвЊМЬГаетИіЭЈгУЕФComponentРрЁЃЮвУЧРДПДЯТpreactжаComponentРрЪЧШчКЮЪЕЯжЕФЁЃЫќЮЛгкcomponent.jsЮФМў??жаЁЃ
ЮвУЧЪзЯШПДЯТComponentРрЕФЙЙдьКЏЪ§ЃЌЗЧГЃЕФМђЕЅЁЃжЛгаСНИіЪєадprops, contextЁЃвђЮЊЭЈгУЕФComponentРрЪЕЯжСЫpropsЪєадЃЌЫљвдЮвУЧЕФзщМўРрдкМЬГаComponentРрКѓЃЌашвЊЯдЪНЕФЪЙгУsuperзїЮЊКЏЪ§ЕїгУЃЌВЂНЋpropsДЋШыЁЃ
export function Component(props,
context) {
this.props = props
this.context = context
}
|
ComponentРржаЪЕЯжСЫsetStateЗНЗЈ, forceUpdateЗНЗЈЃЌrenderЗНЗЈЃЌвдМАЦфЫћЕФвЛаЉИЈжњКЏЪ§ЁЃforceUpdateЩцМАЕНСЫsetStateЕФвьВНИќаТ,
ЮвУЧНЋдкsetStateвЛНкжазЈУХНщЩмЁЃетРяднВЛзіНщЩмЁЃЮвУЧНгЯТРДПДПДsetStateЕФЪЕЯжЁЃ
Component.prototype.setState
= function(update, callback) {
let s = (this._nextState!==this.state &&
this._nextState) || (this._nextState = assign({},
this.state));
if (typeof update!=='function' || (update
= update(s, this.props))) {
assign(s, update);
}
if (update==null) return;
if (this._vnode) {
if (callback) this._renderCallbacks.push(callback);
enqueueRender (this);
}
};
// src/util.js
export function assign(obj, props) {
for (let i in props) obj[i] = props[i];
return obj;
} |
дкpreactЕФsetStateЗНЗЈ, ЭЌreactвЛбљжЇГжКЏЪ§ЛђепObjectСНжжЗНЪНИќаТstate,
ВЂЧвжЇГжsetStateЕФЛиЕїЁЃЮвУЧетРяПДЕНСЫСНИіИіЫНгаЪєад_nextState, _renderCallbacksЁЃ_renderCallbacksдђЪЧДцДЂСЫsetStateЛиЕїЕФЖгСаЁЃ
_nextStateРяДцДЂСЫзюаТЕФstate, ЮЊЪВУДЮвУЧВЛШЅжБНгИќаТstateФиЃПвђЮЊЮвУЧвЊЪЕЯжЩњУќжмЦк,
БШШчgetDerivedStateFromPropsЩњУќжмЦкжазщМўЕФstateВЂУЛгаИќаТФиЁЃЮвУЧашвЊЪЙгУ_nextStateДцДЂзюаТЕФstate??ЁЃenqueueRenderКЏЪ§ЩцМАЕНСЫstateЕФвьВНИќаТ,
ЮвУЧдкБОНкЯШВЛНщЩмЁЃ
// src/component.js
export function Fragment() { }
Component.prototype.render = Fragment; |
ЛљРрЕФrenderЗНЗЈБОЩэЪЧвЛИіПеКЏЪ§, ашвЊМЬГаЕФзгРрздМКОпЬхЪЕЯжЁЃ
component.jsЕФФЃПщЕФВПЗжФкШнЃЌЮвУЧвбОНщЩмЭъГЩСЫ, ЭЌбљВЛЪЧКмИДдгЁЃcomponent.jsЕФФЃПщЕФЦфЫћЕФФкШнвђЮЊЩцМАСЫsetStateвьВНИќаТЖгСаЃЌЫљвдЮвУЧНЋдкsetStateвЛНкжаЁЃЛиЙ§ЭЗРДНщЩмЫќЁЃ
diffЫуЗЈ
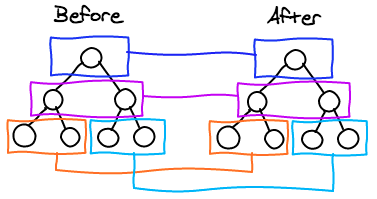
ps:ЮвУЧжЛашвЊБШНЯЭЌМЖЕФНкЕу(ЯрЭЌбеЩЋПђФкЕФ), ШчЙћСНИіНкЕуtypeВЛвЛжТ,
ЮвУЧЛсЯњЛйЕБЧАЕФНкЕуЁЃВЛНјааБШНЯзгНкЕуЕФВйзїЁЃ
дкpreactжаdiffЫуЗЈвдМАецЪЕdomЕФИќаТКЭфжШОЪЧдгєлдквЛЦ№ЕФЁЃЫљвдБОНкФкШнЛсБШНЯЖрЁЃ
preactЛсДцДЂЩЯвЛДЮЕФфжШОЕФVNode(ДцДЂдк_prevVNodeЕФЫНгаЪєадЩЯ)ЁЃЖјБОДЮфжШОЙ§ГЬжаЮвУЧЛсБШНЯБОДЮЕФVNodeЩЯЧАвЛДЮЕФ_prevVNodeЁЃХаЖЯЪЧЗёашвЊЩњГЩаТЕФDom,
аЖдиDomЕФВйзї, ИќаТецЪЕdomЕФВйзї(ЮвУЧНЋVNodeЖдгІЕФецЪЕЕФdomДцДЂдкVNodeЕФЫНгаЪєад_dom,
ПЩвдЪЕЯждкdiffЕФЙ§ГЬжаИќаТdomЕФВйзї)ЁЃ
render
ЖдБШЮФБОНкЕу
ЮвУЧЪзЯШЛивфвЛЯТЮФБОНкЕуЕФVNodeЕФНсЙЙЪЧдѕУДбљЕФ
// ЮФБОНкЕуVNode
{
type: null,
props: null,
text: 'ФуЕФЮФБО'
_dom: TextNode
} |
ЮвУЧЪзЯШНјШыdiffЗНЗЈЁЃdiffЗНЗЈжаЛсЖдVNodeРраЭНјааХаЖЯ,
ШчЙћВЛЪЧfunctionРраЭ(зщМўРраЭ), КЭFragmentРраЭЁЃЮвУЧЕФЛсЕїгУdiffElementNodesКЏЪ§ЁЃ
// src/diff/index.js
// func diff
// ВЮЪ§КмЖр, ЮвУЧРДЫЕЯТМИИіВЮЪ§ЕФОпЬхКЌвх
// domЮЊVNodeЖдгІЕФецЪЕЕФDomНкЕу
// newVNodeаТЕФVNode
// oldVNodeОЩЕФVNode
// mountsДцДЂЙвдизщМўЕФСаБэ
dom = diffElementNodes(dom, newVNode, oldVNode,
context, isSvg, excessDomChildren, mounts, ancestorComponent) |
ШчЙћДЫЪБdomЛЙУЛгаДДНЈЁЃГѕДЮфжШО, ФЧУДЮвУЧИљОнVNodeРраЭДДНЈЖдгІЕФецЪЕdomНкЕуЁЃЮФБОРраЭЛсЪЙгУcreateTextNodeДДНЈЮФБОНкЕуЁЃ
НгЯТРДЮвУЧЛсБъЧЉжЎЧАVNodeЕФtextЕФФкШн, ШчЙћаТОЩВЛЯрЕШЁЃЮвУЧНЋаТVNodeЕФtextЪєадЃЌИГжЕИјdomНкЕуЁЃЭъГЩЖдdomЕФИќаТВйзїЁЃ
// src/diff/index.js
// func diffElementNodes
if (dom==null) {
dom = newVNode.type===null ? document.createTextNode(newVNode.text)
: isSvg ? document.createElementNS('http://www.w3.org/2000/svg',
newVNode.type) : document.createElement(newVNode.type);
excessDomChildren = null;
}
newVNode._dom = dom;
if (newVNode.type===null) {
if ((d===null || dom===d) && newVNode.text!==oldVNode.text)
{
dom.data = newVNode.text;
}
} |
ЖдБШЗЧЮФБОDOMНкЕу
ЗЧЮФБОDOMНкЕужИЕФЪЧФЧаЉtypeЮЊdiv, span, h1ЕФVNodeНкЕуЁЃетаЉРраЭЕФНкЕудкdiffЗНЗЈжа,
ЮвУЧвРОЩЛсЕїгУdiffElementNodesКЏЪ§ШЅДІРэЁЃ
// src/diff/index.js
// func diff
dom = diffElementNodes(dom, newVNode, oldVNode,
context, isSvg, excessDomChildren, mounts, ancestorComponent) |
НјШыdiffElementNodesЗНЗЈКѓ, ШчЙћЪЧГѕДЮфжШОЮвУЧЛсЪЙгУcreateElementДДНЈецЪЕЕФdomНкЕуЙвдиЕНVNodeЕФ_domЪєадЩЯЁЃ
НгЯТРДЮвУЧЛсБШНЯаТОЩVNodeЕФЪєадpropsЁЃЕЋЪЧжЎЧАЛсЕїгУdiffChildrenЗНЗЈ,
ЖдЕБЧАЕФVNodeзгНкЕуНјааБШНЯЁЃЮвУЧетРяЯШВЛНјШыdiffChildrenКЏЪ§жаЁЃЮвУЧжЛашвЊжЊЕРЮвУЧдкИќаТЕБЧАНкЕуЪєадЕФЪБКђ,
ЮвУЧвбОЭЈЙ§ЕнЙщаЮЪН, ЭъГЩСЫЖдЕБЧАНкЕуЕФзгНкЕуЕФИќаТВйзїЁЃНгЯТРДЮвУЧНјШыdiffPropsКЏЪ§жаЁЃ
// src/diff/index.js
// func diffElementNodes
if (dom==null) {
dom = newVNode.type===null ? document.createTextNode
(newVNode.text) : isSvg ? document.createElementNS
('http://www.w3.org/2000/svg', newVNode.type)
: document.createElement (newVNode.type);
}
newVNode._dom = dom;
if (newVNode !== oldVNode) {
let oldProps = oldVNode.props;
let newProps = newVNode.props;
if (oldProps == null) {
oldProps = {};
}
diffChildren(dom, newVNode, oldVNode, context,
newVNode.type === 'foreignObject' ? false :
isSvg, excessDomChildren, mounts, ancestorComponent);
diffProps (dom, newProps, oldProps, isSvg);
}
|
дкdiffPropsКЏЪ§жаЮвУЧЛсзіСНМўЪТЁЃЩшжУ, ИќаТЪєадЁЃЩОГ§аТЕФpropsжаВЛДцдкЕФЪєадЁЃsetPropertyдкpreactжаЕФОпЬхЪЕЯж,
ЮвУЧЭљЯТПДЁЃ
// src/diff/props.js
export function diffProps (dom, newProps, oldProps,
isSvg) {
// ЩшжУЛђИќаТЪєаджЕ
for (let i in newProps) {
if (i!=='children' && i!=='key' &&
(!oldProps || ((i==='value' || i==='checked')
? dom : oldProps) [i]!==newProps[i])) {
setProperty(dom, i, newProps[i], oldProps[i],
isSvg);
}
}
// ЩОГ§Ъєад
for (let i in oldProps) {
if (i!=='children' && i!=='key' &&
(!newProps || !(i in newProps))) {
setProperty (dom, i, null, oldProps[i], isSvg);
}
}
} |
дкsetPropertyЗНЗЈжа, ШчЙћvalue(аТЕФЪєаджЕ)ЮЊnull, ЮвУЧЛсЩОГ§ЖдгІЕФЪєадЁЃШчЙћВЛЮЊnull,
ЮвУЧНЋЛсИќаТЛђепЩшжУаТЕФЪєадЁЃЭЌЪБЛЙЛсЖдЪТМўНјааДІРэ, Р§ШчonClickЪєад, ЮвУЧЛсЪЙгУaddEventListenerЬэМгдЩњЕФclickЪТМўЁЃ
// src/diff/props.js
function setProperty (dom, name, value, oldValue,
isSvg) {
let v;
// ЖдclassДІРэ
if (name==='class' || name==='className') name
= isSvg ? 'class' : 'className';
// ЖдstyleДІРэ, styleДЋШыObjectЛђепзжЗћДЎЖМЛсЕУЕНМцШнЕФДІРэ
if (name==='style') {
let s = dom.style;
// ШчЙћstyleЪЧstringРраЭ
if (typeof value==='string') {
s.cssText = value;
}
else {
// ШчЙћstyleЪЧobjectРраЭ
if (typeof oldValue==='string') s.cssText =
'';
else {
for (let i in oldValue) {
if (value==null || !(i in value)) s.setProperty (i.replace(CAMEL_REG,
'-'), '');
}
}
for (let i in value) {
v = value[i];
if (oldValue==null || v!==oldValue[i]) {
s.setProperty(i.replace(CAMEL_REG, '-'), typeof
v==='number' && IS_NON_DIMENSIONAL.test(i)===false
? (v + 'px') : v);
}
}
}
}
else if (name==='dangerouslySetInnerHTML') {
return;
}
else if (name[0]==='o' & & name[1]==='n')
{
// ЖдЪТМўДІРэ
let useCapture = name !== (name=name.replace(/Capture$/,
''));
let nameLower = name.toLowerCase();
name = (nameLower in dom ? nameLower : name).substring(2);
if (value) {
if (!oldValue) dom.addEventListener (name, eventProxy,
useCapture);
}
else {
dom.removeEventListener (name, eventProxy, useCapture);
}
(dom._listeners || (dom._listeners = {}))[name]
= value;
}
else if (name!=='list' && name!=='tagName'
&& !isSvg && (name in dom))
{
dom[name] = value==null ? '' : value;
}
else if (value==null || value===false) {
// ЩОГ§вдМАЮЊnullЕФЪєад
if (name!== (name = name.replace(/^xlink:?/,
''))) dom.removeAttributeNS ('http://www.w3.org/1999/xlink',
name.toLowerCase());
else dom.removeAttribute(name);
}
else if (typeof value!=='function') {
// ИќаТЛђЩшжУаТЕФЪєад
if (name!==(name = name.replace(/^xlink:?/,
''))) dom.setAttributeNS ('http://www.w3.org/1999/xlink',
name.toLowerCase(), value);
else dom.setAttribute (name, value);
}
} |
ЖдБШзщМў 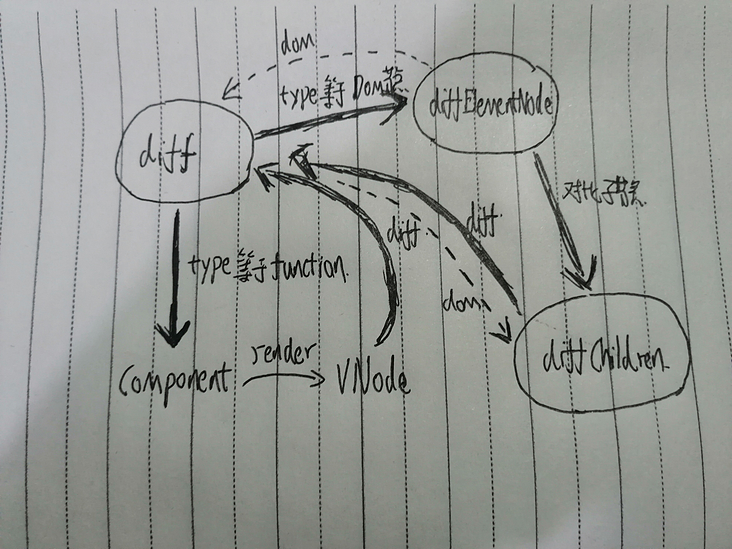
ШчЙћVNodeЪЧзщМўРраЭЁЃдкdiffКЏЪ§жа, ЛсдкВЛЭЌЕФЪБПЬжДаазщМўЕФЩњУќжмЦкЁЃдкdiffжа, жДаазщМўЪЕР§ЕФrenderКЏЪ§ЁЃЮвУЧНЋЛсФУЕНзщМўЗЕЛиЕФVNode,
ШЛКѓдйНЋVNodeдйвЛДЮДјШыdiffЗНЗЈжаНјааdiffБШНЯЁЃДѓжТЕФСїГЬПЩвдШчЩЯЭМЫљЪОЁЃ
// src/diff/index.js
// func diff
let c, p, isNew = false, oldProps, oldState,
snapshot,
newType = newVNode.type;
let cxType = newType.contextType;
let provider = cxType && context[cxType._id];
let cctx = cxType != null ? (provider ? provider.props.value
: cxType._defaultValue) : context;
if (oldVNode._component) {
c = newVNode._component = oldVNode._component;
clearProcessingException = c._processingException;
}
else {
isNew = true;
// ДДНЈзщМўЕФЪЕР§
if (newType.prototype && newType.prototype.render)
{
newVNode._component = c = new newType(newVNode.props,
cctx);
}
else {
newVNode._component = c = new Component(newVNode.props,
cctx);
c.constructor = newType;
c.render = doRender;
}
c._ancestorComponent = ancestorComponent;
if (provider) provider.sub(c);
// ГѕЪМЛЏ,зщМўЕФstate, propsЕФЪєад
c.props = newVNode.props;
if (!c.state) c.state = {};
c.context = cctx;
c._context = context;
c._dirty = true;
c._renderCallbacks = [];
}
// зщМўЕФЪЕР§ЩЯЙвдизщМўЫљЖдгІЕФVNodeНкЕу
c._vnode = newVNode;
let s = c._nextState || c.state;
// жДааgetDerivedStateFromPropsЩњУќжмЦкКЏЪ§, ЗЕЛижЛЛсИќаТзщМўЕФstate
if (newType.getDerivedStateFromProps != null)
{
oldState = assign({}, c.state);
if (s === c.state) s = c._nextState = assign({},
s);
assign(s, newType.getDerivedStateFromProps(newVNode.props,
s));
}
if (isNew) {
// жДааcomponentWillMountЩњУќжмЦк
if (newType.getDerivedStateFromProps == null
&& c.componentWillMount != null) c.componentWillMount();
// НЋашвЊжДааcomponentDidMountЩњУќжмЦкЕФзщМў, pushЕНmountsЖгСажа
if (c.componentDidMount != null) mounts.push(c);
}
else {
// жДааcomponentWillReceivePropsЩњУќжмЦк
if (newType.getDerivedStateFromProps == null
&& force == null && c.componentWillReceiveProps
!= null) {
c.componentWillReceiveProps(newVNode.props,
cctx);
s = c._nextState || c.state;
}
// жДааshouldComponentUpdateЩњУќжмЦк, ВЂНЋ_dirtyЩшжУЮЊfalse,
ЕБ_dirtyБЛЩшжУЮЊfalseЪБ, жДааЕФИќаТВйзїНЋЛсБЛднЭЃ
if (!force && c.shouldComponentUpdate
!= null && c.shouldComponentUpdate (newVNode.props,
s, cctx) === false) {
c.props = newVNode.props;
c.state = s;
c._dirty = false;
// breakКѓЃЌВЛдкжДаавдЯТЕФДњТы
break outer;
}
// жДааcomponentWillUpdateЩњУќжмЦк
if (c.componentWillUpdate != null) {
c.componentWillUpdate (newVNode.props, s, cctx);
}
}
oldProps = c.props;
if (!oldState) oldState = c.state;
c.context = cctx;
c.props = newVNode.props;
// НЋИќаТКѓЕФstateЕФsЃЌИГгшзщМўЕФstate
c.state = s;
// prevЮЊЩЯвЛДЮфжШОЪБЖдгІЕФVNodeНкЕу
let prev = c._prevVNode;
// ЕїгУзщМўЕФrenderЗНЗЈЛёШЁзщМўЕФVNode
let vnode = c._prevVNode = coerceToVNode (c.render(c.props,
c.state, c.context));
c._dirty = false;
if (c.getChildContext != null) {
context = assign (assign({}, context), c.getChildContext());
}
// жДааgetSnapshotBeforeUpdateЩњУќжмЦк
if (!isNew && c.getSnapshotBeforeUpdate
!= null) {
snapshot = c.getSnapshotBeforeUpdate(oldProps,
oldState);
}
// ИќаТзщМўЫљЖдгІЕФVNodeЃЌЗЕЛиЖдгІЕФdom
c.base = dom = diff(dom, parentDom, vnode, prev,
context, isSvg, excessDomChildren, mounts, c,
null);
if (vnode != null) {
newVNode._lastDomChild = vnode._lastDomChild;
}
c._parentDom = parentDom; |
дкdiffКЏЪ§ЕФЖЅВПгаетбљвЛЖЮДњТыЩЯУцгавЛОфгЂЮФзЂЪЭ(If the
previous type doesn't match the new type we drop the
whole subtree), ШчЙћoldVNodeКЭnewVNodeРраЭВЛЭЌЃЌЮвУЧНЋЛсаЖдиећИізгЪїЁЃ
if (oldVNode==null || newVNode==null || oldVNode.type!==newVNode.type)
{
// ШчЙћnewVNodeЮЊnull, ЮвУЧНЋЛсаЖдиећИізщМў, ВЂЩОГ§ЖдгІЕФdomНкЕу
if (oldVNode!=null) unmount(oldVNode, ancestorComponent);
if (newVNode==null) return null;
dom = null;
oldVNode = EMPTY_OBJ;
} |
ЖдБШзгНкЕу
export function diffChildren (parentDom, newParentVNode,
oldParentVNode, context, isSvg, excessDomChildren,
mounts, ancestorComponent) {
let childVNode, i, j, p, index, oldVNode, newDom,
nextDom, sibDom, focus,
childDom;
let newChildren = newParentVNode._children
|| toChildArray (newParentVNode.props.children,
newParentVNode._children=[], coerceToVNode);
let oldChildren = oldParentVNode !=null &&
oldParentVNode!= EMPTY_OBJ && oldParentVNode._children
|| EMPTY_ARR;
let oldChildrenLength = oldChildren.length;
childDom = oldChildrenLength ? oldChildren[0]
&& oldChildren[0]._dom : null;
for (i=0; i<newChildren.length; i++) {
childVNode = newChildren[i] = coerceToVNode(newChildren[i]);
oldVNode = index = null;
p = oldChildren[i];
//
if (p != null && (childVNode.key==null
&& p.key==null ? (childVNode.type ===
p.type) : (childVNode.key === p.key))) {
index = i;
}
else {
for (j=0; j<oldChildrenLength; j++) {
p = oldChildren[j];
if (p!=null) {
if (childVNode.key==null && p.key==null
? (childVNode.type === p.type) : (childVNode.key
=== p.key)) {
index = j;
break;
}
}
}
}
if (index!=null) {
oldVNode = oldChildren[index];
oldChildren[index] = null;
}
nextDom = childDom!=null && childDom.nextSibling;
newDom = diff (oldVNode==null ? null : oldVNode._dom,
parentDom, childVNode, oldVNode, context, isSvg,
excessDomChildren, mounts, ancestorComponent,
null);
if (childVNode!=null && newDom !=null)
{
focus = document.activeElement;
if (childVNode._lastDomChild != null) {
newDom = childVNode._lastDomChild;
}
else if (excessDomChildren==oldVNode || newDom!=childDom
|| newDom.parentNode==null) {
outer: if (childDom==null || childDom.parentNode !==parentDom)
{
parentDom.appendChild(newDom);
}
else {
sibDom = childDom;
j = 0;
while ((sibDom=sibDom.nextSibling) &&
j++<oldChildrenLength/2) {
if (sibDom===newDom) {
break outer;
}
}
parentDom.insertBefore (newDom, childDom);
}
}
if (focus!== document.activeElement) {
focus.focus();
}
childDom = newDom! =null ? newDom.nextSibling
: nextDom;
}
}
for (i=oldChildrenLength; i--; ) {
if (oldChildren[i]!=null) {
unmount(oldChildren[i], ancestorComponent);
}
}
} |
diffChildrenЪЧзюЮЊИДдгЕФвЛВПЗжФкШнЁЃзгVNodeзїЮЊвЛИіЪ§зщ, Ъ§зщжаЕФФкШнПЩФмИФБфСЫЫГађЛђепЪ§ФП,
КмФбШЗЖЈаТЕФVNodeвЊКЭФЧвЛИіОЩЕФVNodeБШНЯЁЃЫљвдpreactжаЕБУцЖдСаБэЪБЃЌЮвУЧНЋвЊЧѓгУЛЇЬсЙЉkey,
АяжњЮвУЧБШНЯVNodeЁЃДяЕНИДгУDomЕФФПЕФЁЃ
дкdiffChildrenжаЃЌЮвУЧЛсЪзЯШЭЈЙ§toChildArrayКЏЪ§НЋзгНкЕувдЪ§зщЕФаЮЪНДцДЂдк_childrenЪєадЩЯЁЃ
childDomЮЊЕквЛИізгНкЕуецЪЕЕФdom(етКмгагУ, ЮвУЧдкКѓУцНЋЭЈЙ§ЫќРДХаЖЯЪЧЪЙгУappendChildВхШыnewDomЛЙЪЧЪЙгУinsertBeforeВхШыnewDomЃЌЛђепЪВУДЖМВЛзі)
НгЯТРДБщРњ_childrenЪєадЁЃШчЙћVNodeгаkeyЪєад, дђевЕНkeyгыkeyЯрЕШЕФОЩЕФVNodeЁЃШчЙћУЛгаkey,
дђевЕНзюНќЕФtypeЯрЕШЕФОЩЕФVNodeЁЃШЛКѓНЋoldChildrenЖдгІЕФЮЛжУЩшжУnull, БмУтжиИДЕФВщевЁЃЪЙгУdiffЫуЗЈЖдБШ,
аТОЩVNodeЁЃЗЕЛиаТЕФdomЁЃ
ШчЙћchildDomЮЊnull, дђНЋаТdom, appendЕФЕНИИDOMжаЁЃШчЙћевЕНСЫгыаТЕФdomЯрЕШЕФdom(в§гУРраЭ),
ЮвУЧдђВЛзіШЮКЮДІРэ(propsвбОдкdiffElementNodeжаИќаТСЫ)ЁЃШчЙћдкchildDomЕФnextSiblingУЛгаевЕНКЭаТЕФdomЯрЕШЕФdom,
ЮвУЧНЋdomВхШыchildDomЕФЧАУцЁЃНгзХИќаТchildomЁЃ
БщРњЪЃгрУЛгаЪЙгУЕНoldChildren, аЖдиетаЉНкЕуЛђепзщМўЁЃ
вьВНsetState
preactГ§СЫЪЙгУdiffЫуЗЈМѕЩйdomВйзїгХЛЏадФмЭт, preactЛсНЋвЛЖЮЪБМфФкЕФЖрДЮsetStateКЯВЂМѕЩйзщМўфжШОЕФДЮЪ§ЁЃ
ЮвУЧЪзЯШдкsetStateжа, ВЂУЛгажБНгИќаТstate, ЛђепжБНгжиаТфжШОКЏЪ§КЏЪ§ЁЃЖјЪЧНЋзщМўЕФЪЕР§ДјШыЕНСЫenqueueRenderКЏЪ§жаЁЃ
Component.prototype.setState = function(update,
callback) {
let s = (this._nextState!== this.state &&
this._nextState) || (this._nextState = assign({},
this.state));
if (typeof update!== 'function' || (update
= update(s, this.props))) {
assign(s, update);
}
if (update==null) return;
if (this._vnode) {
if (callback) this._renderCallbacks.push (callback);
enqueueRender(this);
}
};
|
дкenqueueRenderКЏЪ§жа, ЮвУЧНЋзщМўpushЕНЖгСаqжаЁЃ
ЭЌЪБЪЙгУ_dirtyПижЦ, БмУтqЖгСажаБЛpushСЫЯрЭЌЕФзщМўЁЃЮвУЧгІИУдкЖрГЄЪБМфФкЧхПеqЖгСаФи?
ЮвУЧИУШчКЮЖЈвхетУДвЛЖЮЪБМфФиЃПБШНЯКУЕФзіЗЈЪЧЪЙгУPromise.resolve()ЁЃдкетвЛЖЮЪБМфЕФsetStateВйзїЖМЛсБЛpushЕНqЖгСажаЁЃ_nextStateНЋЛсБЛКЯВЂдкЧхПеЖгСаЕФЪБКђЃЌвЛВЂИќаТЕНstateЩЯЃЌБмУтСЫжиИДЕФфжШОЁЃ
let q = [];
export function enqueueRender(c) {
if (!c._dirty && (c._dirty = true) &&
q.push(c) === 1) {
(options.debounceRendering || defer)(process);
}
}
function process() {
let p;
while ((p=q.pop())) {
if (p._dirty) p.forceUpdate(false);
}
}
const defer = typeof Promise=='function' ?
Promise.prototype.then.bind(Promise.resolve())
: setTimeout;
|
дкКъШЮЮёЭъГЩКѓЃЌЮвУЧжДааЮЂШЮЮёPromise.resolve(),
ЧхПеqЖгСаЃЌЪЙгУdiffЗНЗЈИќаТЖгСажаЕФзщМўЁЃ
Component.prototype.forceUpdate
= function(callback) {
let vnode = this._vnode, dom = this._vnode._dom,
parentDom = this._parentDom;
if (parentDom) {
const force = callback!==false;
let mounts = [];
dom = diff (dom, parentDom, vnode, vnode, this._context,
parentDom.ownerSVGElement!==undefined, null,
mounts, this._ancestorComponent, force);
if (dom!=null && dom.parentNode!==parentDom)
{
parentDom.appendChild(dom);
}
commitRoot(mounts, vnode);
}
if (callback) callback();
};
|
Нсгя
ЕНетРяЮвУЧвбОАЩpreactЕФдДТыДѓжТфЏРРСЫвЛБщЁЃЮвУЧНгЯТРДПЩвдВЮПМpreactЕФдДТыЃЌЪЕЯжздМКЕФreactЁЃЛАЫЕЮвЛЙИјpreactЕФЯюФПЬсНЛСЫprЃЌВЛЙ§ЛЙУЛгаmergeЁЃ
|