Ŀ¼��
hadoop����֮һHDFSԪ���ݽ���
1��Ԫ���ݣ�Metadata����ά��HDFS�ļ�ϵͳ���ļ���Ŀ¼����Ϣ����Ϊ�ڴ�Ԫ���ݺ�Ԫ�����ļ����֡�NameNodeά������Ԫ���ݡ�
HDFSʵ��ʱ��û�в��ö��ڵ���Ԫ���ݵķ��������Dz���Ԫ���ݾ����ļ���FSImage��+�����ļ���edits���ı��ݻ��ơ�
2��Block���ļ����ݶ��ԡ�
Ѱ·�����̣�
·����Ϣ bocks[] triplets[]
Client ------------��INode---------------------��BlockInfo
--------------------------��DataNode��
INode���ļ��Ļ���Ԫ�أ��ļ���Ŀ¼
BlockInfo�� �ļ����ݶ���
DatanodeDescriptor:����洢����
3 �� FSImage��edits��checkPoint��FSImage��2��״̬���ֱ���FsImage��FsImage.ckpt,���߱�ʾ����checkpoint�Ĺ����У��ϴ�����ΪFSImage�ļ���ͬ��editsҲ������״̬��edits��edits.new��
4��NameNode format�龰������
����Ԫ���ݴ洢Ŀ¼����ʾ�û��Ƿ��ʽ����(NameNode.java��format������
|
01.private static boolean format( Configuration conf ,
02.                                boolean isConfirmationNeeded )
03.      throws IOException {
04.    Collection<URI > dirsToFormat = FSNamesystem. getNamespaceDirs(conf );
05.    Collection<URI > editDirsToFormat =
06.                 FSNamesystem .getNamespaceEditsDirs (conf );
07.    for( Iterator< URI> it = dirsToFormat.iterator (); it. hasNext() ;) {
08.      File curDir = new File (it .next (). getPath()) ;
09.      if (! curDir. exists())
10.        continue;
11.      if (isConfirmationNeeded ) {
12.        System .err .print ("Re-format filesystem in " + curDir + " ? (Y or N) ");
13.        if (! (System .in .read () == 'Y')) {
14.          System .err .println ("Format aborted in " + curDir );
15.          return true ;
16.        }
17.        while(System .in .read () != '\n') ; // discard the enter-key
18.      }
19.    }
20.
21.    FSNamesystem nsys = new FSNamesystem (new FSImage(dirsToFormat ,
22.                                         editDirsToFormat ), conf) ;
23.    nsys.dir.fsImage .format ();
24.    return false;
25. } |
����Ԫ�����ڴ澵������FSNamesystemʵ����������FSDirectoryʵ����������FSImage������Edits������FsNameSystem������Ҫ��ɣ�BlockManager��FSDirectory�����Լ���ʼ����Ա������FSImage������Ҫ��ɶ�layoutVersion��namespaceID��CTime��ֵΪ0��ʵ����FSEditLog������FSDirectory��������HDFS��Ŀ¼�ڵ�rootDir��
|
01.FSNamesystem( FSImage fsImage, Configuration conf ) throws IOException {
02.    this. blockManager = new BlockManager (this, conf) ;
03.    setConfigurationParameters (conf );
04.    this. dir = new FSDirectory(fsImage , this, conf );
05.    dtSecretManager = createDelegationTokenSecretManager (conf );
06.  }
07.
08.  FSImage( Collection< URI> fsDirs , Collection< URI> fsEditsDirs )
09.      throws IOException {
10.    this() ;
11.    setStorageDirectories( fsDirs, fsEditsDirs );
12.  }
13.
14. void setStorageDirectories(Collection <URI > fsNameDirs,
15.                             Collection< URI> fsEditsDirs ) throws IOException {
16.    this. storageDirs = new ArrayList <StorageDirectory >() ;
17.    this. removedStorageDirs = new ArrayList <StorageDirectory >() ;
18.
19.   // Add all name dirs with appropriate NameNodeDirType
20.    for (URI dirName : fsNameDirs ) {
21.      checkSchemeConsistency (dirName );
22.      boolean isAlsoEdits = false;
23.      for (URI editsDirName : fsEditsDirs) {
24.        if (editsDirName .compareTo (dirName ) == 0) {
25.          isAlsoEdits = true;
26.          fsEditsDirs .remove (editsDirName );
27.          break;
28.        }
29.      }
30.      NameNodeDirType dirType = (isAlsoEdits ) ?
31.                          NameNodeDirType .IMAGE_AND_EDITS :
32.                          NameNodeDirType .IMAGE ;
33.      // Add to the list of storage directories, only if the
34.      // URI is of type file://
35.      if(dirName .getScheme (). compareTo( JournalType.FILE .name (). toLowerCase())
36.          == 0){
37.        this.addStorageDir (new StorageDirectory(new File(dirName. getPath()) ,
38.            dirType ));
39.      }
40.    }
41.
42.    // Add edits dirs if they are different from name dirs
43.    for (URI dirName : fsEditsDirs ) {
44.      checkSchemeConsistency (dirName );
45.      // Add to the list of storage directories, only if the
46.      // URI is of type file://
47.      if(dirName .getScheme (). compareTo( JournalType.FILE .name (). toLowerCase())
48.          == 0)
49.        this.addStorageDir (new StorageDirectory(new File(dirName. getPath()) ,
50.                    NameNodeDirType .EDITS ));
51.    }
52. } |
���ڴ澵�������е����ݽṹ���г�ʼ������Ҫ��FSImage��format������ɣ�layoutVersion�����������İ汾��namespaceID����Formatʱ���������data
nodeע�ᵽName Node���ø�NameNode��NameSpaceID������Ϊ������NameNodeͨѶ�����ݱ�ʶ������δ֪���ݵ�Data
Node��NameNode�ܾ�ͨ�š�CTime����ʾFSimage������ʱ�䡣checkpointTime����ʾNameSpace��һ��checkpoint��ʱ�䡣
|
01.public void format () throws IOException {
02.   this. layoutVersion = FSConstants .LAYOUT_VERSION ;
03.   this. namespaceID = newNamespaceID ();
04.   this. cTime = 0L ;
05.   this. checkpointTime = FSNamesystem .now ();
06.   for (Iterator <StorageDirectory > it =
07.                          dirIterator (); it. hasNext() ;) {
08.     StorageDirectory sd = it .next ();
09.     format (sd );
10.   }
11. } |
���ڴ澵��д��Ԫ���ݱ���Ŀ¼��FSImage��format������������е�Ŀ¼���б��ݡ������FSImage���ļ�Ŀ¼�������saveFSImage����FSImage�������Edits�������editLog.createEditLogFile,������sd.write��������fstime��VERSION�ļ���VERSION�ļ�ͨ�����д�롣
|
01.void format(StorageDirectory sd ) throws IOException {
02.    sd.clearDirectory (); // create currrent dir
03.    sd.lock ();
04.    try {
05.      saveCurrent (sd );
06.    } finally {
07.      sd .unlock ();
08.    }
09.    LOG.info ("Storage directory " + sd. getRoot()
10.             + " has been successfully formatted.");
11. } |
������һ��Ԫ����Ӧ�õij�����
1����ʽ��ʱ��
2��Hadoop����ʱ��
3��Ԫ���ݸ��²���ʱ��
4�����NameNode��Secondary NameNode��Backup
Node��checkpoint Node���ʹ��ʱ�������checkPoint������
hadoop����֮��Ԫ���ݱ��ݷ����Ļ���
1��NameNode��������Ԫ�����龰����
- NameNode���������FSNamesystemm��ȡdfs.namenode.name.dir��dfs.namenode.edits.dir����FSDirectory��
- FSImage��recoverTransitionRead��saveNameSpace�ֱ�ʵ����Ԫ���ݵļ�顢���ء��ڴ�ϲ���Ԫ���ݵij־û��洢��
- saveNameSpace��Ԫ����д�뵽���̣�����������裺���Ƚ�currentĿ¼������Ϊlastcheckpoint.tmp;Ȼ���ڴ����µ�currentĿ¼���������ļ������lastcheckpoint.tmp������Ϊprivios.checkpoint.
- checkPoint�Ĺ��̣�Secondary NameNode��֪ͨnameNode����һ��edit
log�ļ�edits.new��֮�����е���־����д�뵽edits.new�ļ��С�������Secondary
NameNode���namenode����fsimage��edits�ļ������кϲ������µ�fsimage.ckpt;Ȼ��Secondary�Ὣfsimage.ckpt�ļ��ϴ���namenode�����namenode��������fsimage.ckptΪfsimage��edtis.newΪedits��
2��Ԫ���ݸ��¼���־д���龰����
��mkdir��:
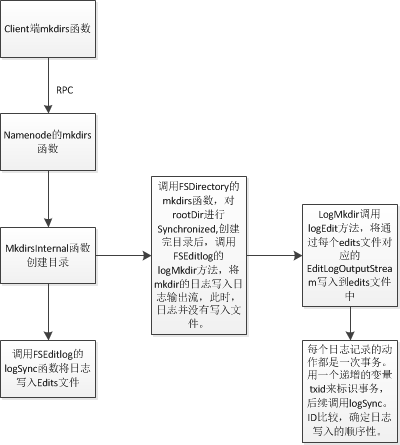
logSync���������
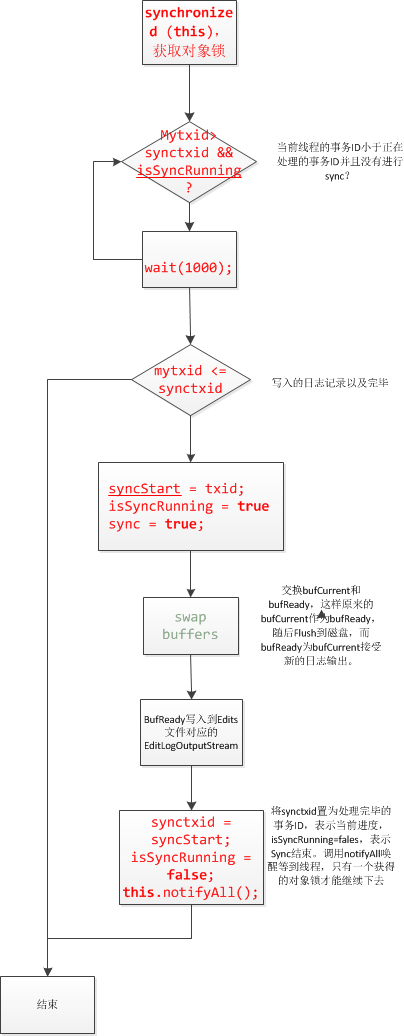
����:
|
01.public void logSync () throws IOException {
02.ArrayList<EditLogOutputStream > errorStreams = null ;
03.long syncStart = 0;
04.
05.// Fetch the transactionId of this thread.
06.long mytxid = myTransactionId .get (). txid;
07.EditLogOutputStream streams[] = null;
08.boolean sync = false;
09.try {
10.synchronized (this) {
11.assert editStreams. size() > 0 : "no editlog streams" ;
12.printStatistics (false);
13.// if somebody is already syncing, then wait
14.while (mytxid > synctxid && isSyncRunning) {
15.try {
16.wait (1000 );
17.} catch (InterruptedException ie ) {
18.}
19.}
20.//
21.// If this transaction was already flushed, then nothing to do
22.//
23.if (mytxid <= synctxid ) {
24.numTransactionsBatchedInSync ++;
25.if (metrics != null) // Metrics is non-null only when used inside name node
26.metrics .transactionsBatchedInSync .inc ();
27.return;
28.}
29.// now, this thread will do the sync
30.syncStart = txid ;
31.isSyncRunning = true;
32.sync = true;
33.// swap buffers
34.for( EditLogOutputStream eStream : editStreams ) {
35.eStream .setReadyToFlush ();
36.}
37.streams =
38.editStreams .toArray (new EditLogOutputStream[editStreams. size()]) ;
39.}
40.// do the sync
41.long start = FSNamesystem.now();
42.for (int idx = 0; idx < streams. length; idx++ ) {
43.EditLogOutputStream eStream = streams [idx ];
44.try {
45.eStream .flush ();
46.} catch (IOException ie ) {
47.FSNamesystem .LOG .error ("Unable to sync edit log." , ie );
48.//
49.// remember the streams that encountered an error.
50.//
51.if (errorStreams == null) {
52.errorStreams = new ArrayList <EditLogOutputStream >( 1) ;
53.}
54.errorStreams .add (eStream );
55.}
56.}
57.long elapsed = FSNamesystem.now() - start ;
58.processIOError (errorStreams , true);
59.if (metrics != null) // Metrics non-null only when used inside name node
60.metrics .syncs .inc (elapsed );
61.} finally {
62.synchronized (this) {
63.synctxid = syncStart ;
64.if (sync ) {
65.isSyncRunning = false;
66.}
67.this.notifyAll ();
68.}
69.}
70.} |
3��Backup Node ��checkpoint�Ĺ��̷�����

|
01./**
02.* Create a new checkpoint
03.*/
04.void doCheckpoint() throws IOException {
05.long startTime = FSNamesystem.now ();
06.NamenodeCommand cmd =
07.getNamenode().startCheckpoint( backupNode. getRegistration());
08.CheckpointCommand cpCmd = null;
09.switch( cmd. getAction()) {
10.case NamenodeProtocol .ACT_SHUTDOWN :
11.shutdown() ;
12.throw new IOException ("Name-node " + backupNode .nnRpcAddress
13.+ " requested shutdown.");
14.case NamenodeProtocol .ACT_CHECKPOINT :
15.cpCmd = (CheckpointCommand )cmd ;
16.break;
17.default:
18.throw new IOException ("Unsupported NamenodeCommand: "+cmd.getAction()) ;
19.}
20.
21.CheckpointSignature sig = cpCmd. getSignature();
22.assert FSConstants.LAYOUT_VERSION == sig .getLayoutVersion () :
23."Signature should have current layout version. Expected: "
24.+ FSConstants.LAYOUT_VERSION + " actual " + sig. getLayoutVersion();
25.assert !backupNode .isRole (NamenodeRole .CHECKPOINT ) ||
26.cpCmd. isImageObsolete() : "checkpoint node should always download image.";
27.backupNode. setCheckpointState(CheckpointStates .UPLOAD_START );
28.if( cpCmd. isImageObsolete()) {
29.// First reset storage on disk and memory state
30.backupNode. resetNamespace();
31.downloadCheckpoint(sig);
32.}
33.
34.BackupStorage bnImage = getFSImage() ;
35.bnImage. loadCheckpoint(sig);
36.sig.validateStorageInfo( bnImage) ;
37.bnImage. saveCheckpoint();
38.
39.if( cpCmd. needToReturnImage())
40.uploadCheckpoint(sig);
41.
42.getNamenode() .endCheckpoint (backupNode .getRegistration (), sig );
43.
44.bnImage. convergeJournalSpool();
45.backupNode. setRegistration(); // keep registration up to date
46.if( backupNode. isRole( NamenodeRole.CHECKPOINT ))
47.getFSImage() .getEditLog (). close() ;
48.LOG. info( "Checkpoint completed in "
49.+ (FSNamesystem .now() - startTime )/ 1000 + " seconds."
50.+ " New Image Size: " + bnImage .getFsImageName (). length()) ;
51.}
52.} |
4��Ԫ���ݿɿ��Ի��ơ�
- ���ö������·����NameNode�ڸ�����־�����Checkpoint�Ĺ��̣��ὫԪ���ݷ��ڶ��Ŀ¼�¡�
- ����ûһ����Ҫ�����Ԫ�����ļ���������һ����������Է��ʹ����г��ֵ��쳣��������д����������Ƴ������ٺ��ʵ�ʱ���ٴμ���Ƴ����������Ƿ�ָ���������Ч�ı�֤�˱�����������쳣���⡣
- �����˶��ֻ�������֤Ԫ���ݵĿɿ��ԡ�������checkpoint�Ĺ����У���Ϊ�����Σ�ͨ����ͬ���ļ�������ʶ��ǰ������״̬��Ϊ�洢ʧ�ܺ���лָ��ṩ�˿��ܡ�
5��Ԫ���ݵ�һ���Ի��ơ�
- ���ȴ�NameNode����ʱ����ÿ������Ŀ¼�Ƿ��ʽ����Ŀ¼Ԫ�����ļ����Ƿ���ȷ�Ƚ��м�飬ȷ��Ԫ�����ļ����״̬һ���ԣ�Ȼ��ѡȡ���µļ��ص��ڴ棬��������ȷ��HDFS��ǰ״̬�����һ�ιر�ʱ��״̬һ���ԡ�
- ��Σ�ͨ���쳣������Ĵ���������ȷ��������������ݵ�һ���ԡ�
- ����ͬ�����ƣ�ȷ���������һ�������⡣
hadoop����֮��org.apache.hadoop.hdfs.server.namenode������Ĺ������ɫ
��hadoop0.21����
NameNode.java: ��Ҫά���ļ�ϵͳ�����ֿռ���ļ���Ԫ���ݣ������Ǵ����е�˵����
|
01./**********************************************************
02. * NameNode serves as both directory namespace manager and
03. * "inode table" for the Hadoop DFS.  There is a single NameNode
04. * running in any DFS deployment.  (Well, except when there
05. * is a second backup/failover NameNode.)
06. *
07. * The NameNode controls two critical tables:
08. *   1)  filename ->blocksequence (namespace)
09. *   2)  block ->machinelist ("inodes")
10. *
11. * The first table is stored on disk and is very precious.
12. * The second table is rebuilt every time the NameNode comes
13. * up.
14. *
15. * 'NameNode' refers to both this class as well as the 'NameNode server'.
16. * The 'FSNamesystem' class actually performs most of the filesystem
17. * management.  The majority of the 'NameNode' class itself is concerned
18. * with exposing the IPC interface and the http server to the outside world,
19. * plus some configuration management.
20. *
21. * NameNode implements the ClientProtocol interface, which allows
22. * clients to ask for DFS services.  ClientProtocol is not
23. * designed for direct use by authors of DFS client code.  End -users
24. * should instead use the org.apache.nutch.hadoop.fs.FileSystem class.
25. *
26. * NameNode also implements the DatanodeProtocol interface, used by
27. * DataNode programs that actually store DFS data blocks.  These
28. * methods are invoked repeatedly and automatically by all the
29. * DataNodes in a DFS deployment.
30. *
31. * NameNode also implements the NamenodeProtocol interface, used by
32. * secondary namenodes or rebalancing processes to get partial namenode's
33. * state, for example partial blocksMap etc.
34. **********************************************************/ |
FSNamesystem.java: ��Ҫά������������Ϣ��ά�����ļ�����block�б���ӳ���ϵ����Ч��block�ļ��ϣ�block��ڵ��б���ӳ���ϵ���ڵ���block�б���ӳ���ϵ�����µ�heatbeat�ڵ��LRU
cache
|
01./***************************************************
02. * FSNamesystem does the actual bookkeeping work for the
03. * DataNode.
04. *
05. * It tracks several important tables.
06. *
07. * 1)  valid fsname --> blocklist  (kept on disk, logged)
08. * 2)  Set of all valid blocks (inverted #1)
09. * 3)  block --> machinelist (kept in memory, rebuilt dynamically from reports)
10. * 4)  machine --> blocklist (inverted #2)
11. * 5)  LRU cache of updated -heartbeat machines
12. ***************************************************/ |
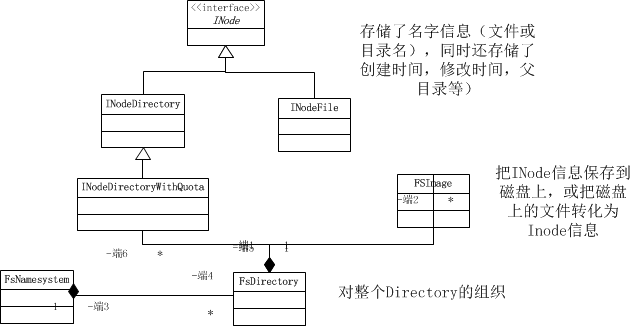
INode.java��HDFS���ļ����ļ�Ŀ¼�����INode��
|
01./**
02. * We keep an in-memory representation of the file/block hierarchy.
03. * This is a base INode class containing common fields for file and
04. * directory inodes.
05. */ |
FSImage.java����Ҫ��INode��Ϣ�־û���������FSImage�ϡ�
|
01./**
02. * FSImage handles checkpointing and logging of the namespace edits.
03. *
04. */ |
FSEditLog.java:дEdits�ļ�
|
01./**
02. * FSEditLog maintains a log of the namespace modifications.
03. *
04. */ |
BlockInfo.java:INode��Ҫ�����ļ���Ŀ¼��Ϣ�ģ��������ļ���������˵��������block�����ġ����Ǽ���һ���ļ��ij��ȴ�СΪSize,��ô���ļ���0ƫ�ƿ�ʼ�����չ̶���С��˳����ļ����ֲ���ţ����ֺõ�ÿһ��Ϊһ��block
|
01./**
02. * Internal class for block metadata.
03. */ |
DatanodeDescriptor.java:�����ľ���Ĵ洢����
|
01./**************************************************
02. * DatanodeDescriptor tracks stats on a given DataNode,
03. * such as available storage capacity, last update time, etc.,
04. * and maintains a set of blocks stored on the datanode.
05. *
06. * This data structure is a data structure that is internal
07. * to the namenode. It is *not* sent over- the- wire to the Client
08. * or the Datnodes. Neither is it stored persistently in the
09. * fsImage.
10.
11. **************************************************/ |
FSDirectory.java: ������HDFS�е�����Ŀ¼�ͽṹ����
|
01./*************************************************
02. * FSDirectory stores the filesystem directory state.
03. * It handles writing/loading values to disk, and logging
04. * changes as we go.
05. *
06. * It keeps the filename->blockset mapping always- current
07. * and logged to disk.
08. *
09. *************************************************/ |
EditLogOutputStream.java:���е���־��¼����ͨ��EditLogOutputStream������ھ���ʵ������ʱ����һ��EditLogOutputStream�������EditLogFIleOutputStream��һ��EditLogBackupOutputStream
|
01./**
02. * A generic abstract class to support journaling of edits logs into
03. * a persistent storage.
04. */ |
EditLogFileOutputStream.java:����־��¼д��edits��edits.new�С�
|
01./**
02. * An implementation of the abstract class {@link EditLogOutputStream}, which
03. * stores edits in a local file.
04. */ |
EditLogBackupOutputStream.java������־ͨ�����緢�͵�backupnode�ϡ�
|
01./**
02. * An implementation of the abstract class {@link EditLogOutputStream},
03. * which streams edits to a backup node.
04. *
05. * @see org.apache.hadoop.hdfs.server.protocol.NamenodeProtocol#journal
06. * (org.apache.hadoop.hdfs.server.protocol.NamenodeRegistration,
07. *  int, int, byte[])
08. */ |
BackupNode.java��name Node��backup��������Secondary
Name Node -��Checkpoint Node(���ڱ���Ԫ���ݣ�����checkpoint) -��Backup
Node(���ڴ��б���һ�ݺ�Name Node��ȫһ�µľ���Ԫ���ݷ����仯ʱ����Ԫ���ݽ��и��£��������������ľ�����checkpoint�������nameNode����)-��Standby
Node�����Խ����ȱ���
|
01./**
02. * BackupNode.
03. * <p>
04. * Backup node can play two roles.
05. * <ol>
06. * <li>{@link NamenodeRole#CHECKPOINT} node periodically creates checkpoints,
07. * that is downloads image and edits from the active node, merges them, and
08. * uploads the new image back to the active. </li>
09. * <li>{@link NamenodeRole#BACKUP} node keeps its namespace in sync with the
10. * active node, and periodically creates checkpoints by simply saving the
11. * namespace image to local disk(s).</li>
12. * </ol>
13. */ |
BackupStorage.java����Backup Node����Ŀ¼�´���jspool��������edits.new,�������ָ��edits.new
|
01./**
02. * Load checkpoint from local files only if the memory state is empty.

03. * Set new checkpoint time received from the name -node.

04. * Move lastcheckpoint.tmp  to previous.checkpoint .
05. * @throws IOException
06. */ |
TransferFsImage.java:�����name Nodeȥ�ļ���
|
01./**
02. * This class provides fetching a specified file from the NameNode.
03. */ |
GetImageServlet.java����httpServlet�����࣬����doGet����
|
01./**
02. * This class is used in Namesystem's jetty to retrieve a file.
03. * Typically used by the Secondary NameNode to retrieve image and
04. * edit file for periodic checkpointing.
05. */ |
hadoop����֮�ģ�����hadoop namenode��˫���ȱ��ݷ���
����hadoopnamenode��˫���ȱ��ݷ���
1�� ǰ��
Ŀǰhadoop-0.20.2û���ṩname node�ı��ݣ�ֻ���ṩ��һ��secondary
node����������һ���̶����ܹ���֤��name node�ı��ݣ�����name node���ڵĻ������ֹ���ʱ��secondary
node�����ṩʵʱ�Ľ����л������ҿ��ܳ������ݶ�ʧ�Ŀ����ԡ�
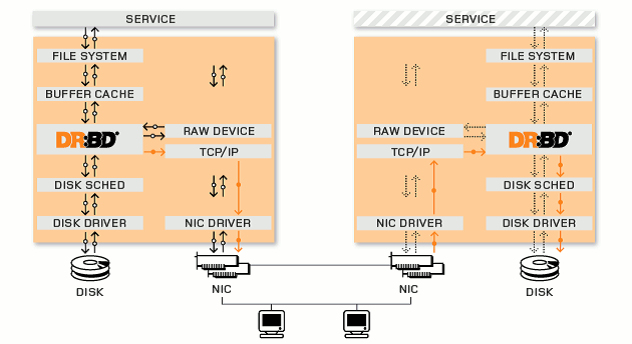
���Dz���drbd + heartbeat����ʵ��name node��HA��
����drbdʵ�ֹ����洢������heartbeatʵ��������أ����з�����������˫����������һ������ר�����ڽ��������������ӡ�
2�� ��������
2.1��Ӳ������
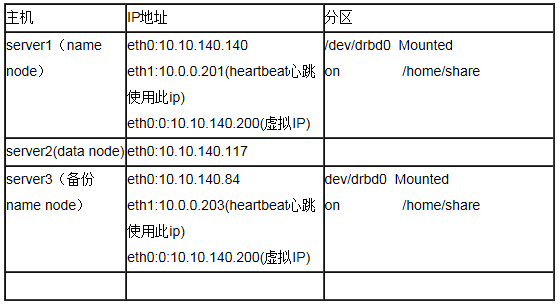
����VMWare���������Ϊ���Ի���һ����̨��������̨�ֱ��ṩ2������������һ����������ͨѶ��һ��Ϊheartbeat������������һ���հĴ�С��ͬ�ķ�������drbdʹ�ã�������������RedHat
Linux AS 5��hadoop-0.20.2, �����������ͼ��
2.1����������
2.2.1����server1��server3��hosts����ͬ���ļ�
|
vi /etc/hosts
10.10.140.140  server1
10.10.140.117  server2
10.10.140.84   server3
10.10.140.200  servervip
10.0.0.201     server1
10.0.0.203 server3 |
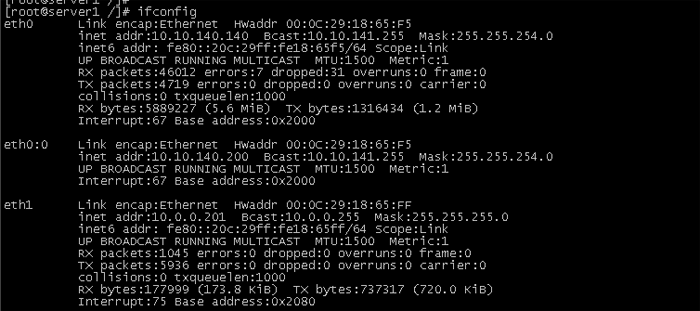
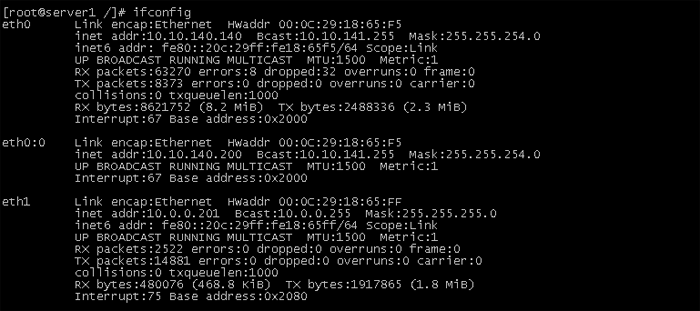
2.2.2��server1��server3�������������£�
server1���������ã�
|
[root@server1 ~]#cat /etc/sysconfig/network-scripts/ifcfg-eth0
# Advanced MicroDevices [AMD] 79c970 [PCnet32 LANCE]
DEVICE=eth0
BOOTPROTO=none
HWADDR=00:0C:29:18:65:F5
ONBOOT=yes
IPADDR=10.10.140.140
NETMASK=255.255.254.0
GATEWAY=10.10.140.1
TYPE=Ethernet

[root@server1 ~]#cat /etc/sysconfig/network-scripts/ifcfg-eth1
# Please read/usr/share/doc/initscripts-*/sysconfig.txt
# for thedocumentation of these parameters.
GATEWAY=10.0.0.1
TYPE=Ethernet
DEVICE=eth1
HWADDR=00:0c:29:18:65:ff
BOOTPROTO=none
NETMASK=255.255.255.0
IPADDR=10.0.0.201
ONBOOT=yes
USERCTL=no
IPV6INIT=no
PEERDNS=yes |
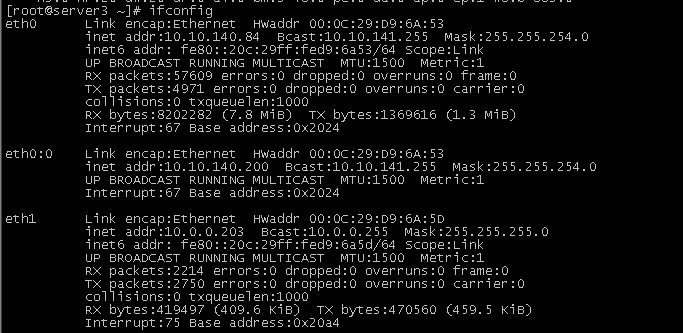
Server3���������ã�
|
[root@server3 ~]#cat /etc/sysconfig/network-scripts/ifcfg-eth0
# Advanced MicroDevices [AMD] 79c970 [PCnet32 LANCE]
DEVICE=eth0
BOOTPROTO=none
HWADDR=00:0C:29:D9:6A:53
ONBOOT=yes
IPADDR=10.10.140.84
NETMASK=255.255.254.0
GATEWAY=10.10.140.1
TYPE=Ethernet

[root@server3 ~]#cat /etc/sysconfig/network-scripts/ifcfg-eth1
# Please read/usr/share/doc/initscripts-*/sysconfig.txt
# for thedocumentation of these parameters.
GATEWAY=10.0.0.1
TYPE=Ethernet
DEVICE=eth1
HWADDR=00:0c:29:d9:6a:5d
BOOTPROTO=none
NETMASK=255.255.255.0
IPADDR=10.0.0.203
ONBOOT=yes
USERCTL=no
IPV6INIT=no
PEERDNS=yes |
2.2.3����������
|
[root@server1 ~]#cat /etc/sysconfig/network
NETWORKING=yes
NETWORKING_IPV6=yes
HOSTNAME=server1

[root@server3 ~]#cat /etc/sysconfig/network
NETWORKING=yes
NETWORKING_IPV6=yes
HOSTNAME=server3 |
2.2.4�� �رշ���ǽ
|
[root@server1 ~]#chkconfig iptables off
[root@server3 ~]# chkconfig iptables off |
3�� DRBD��װ������
3.1��DRBD��ԭ��
DRBD��DistributedReplicated Block Device���ǻ���Linuxϵͳ�µĿ鸴�Ʒַ��豸��������ʵʱ��ͬ��Զ�������ͱ�������֮������ݣ�������Raid1�Ĺ��ܣ����ǿ��Խ�������Ϊ����
Raid1���ڷ������ϲ���ʹ��DRBD�������������湲���������еĹ��ܣ���Ϊ����ͬʱ�����ڱ��غ�Զ�˵ķ������ϣ������ط��������ֹ���ʱ������ʹ��Զ�˷������ϵ����ݼ������������Ҫʵ����ϵķ�����ͨ��drbd�����һ����Դ����heartbeat��ʵ�ַ������ӹܡ�DRBD�Ĺ���ԭ������ͼ��
3.2����װ
���ذ�װ����wget http://oss.linbit.com/drbd/8.3/drbd-8.3.0.tar.gz��ִ���������
|
tar xvzf drbd-8.3.0.tar.gz
cd drbd-8.3.0
cd drbd
make clean all
cd ..
make tools
make install
make install-tools |
��֤��װ�Ƿ���ȷ��
|
# insmod drbd/drbd.ko ���� # modprobe drbd
# lsmod | grep drbd
drbd 220056 2 |
��ʾ��װ��ȷ����Ҫ��server1�Ϻͺ�server3�϶�Ҫ��װ
3.3������
3.3.1��DRBDʹ�õ�Ӳ�̷���
server1��server3�����Ĵ�С����ʽ������ͬ�����ұ��붼Ϊ�հ�����������װϵͳǰԤ������������Ѿ���װ�õ�ϵͳ������ʹ��gparted���߽��з�����
ʹ�÷������Բο���http://hi.baidu.com/migicq/blog/item/5e13f1c5c675ccb68226ac38.html
server1��ip��ַΪ10.10.140.140��drbd�ķ���Ϊ��/dev/sda4
server3��ip��ַΪ10.10.140.84��drbd�ķ���Ϊ��/dev/sda4
3.3.2����Ҫ�������ļ�
DRBD����ʱ�����ȡһ�������ļ�/etc/drbd.conf������ļ���������DRBD�豸��Ӳ�̷�����ӳ���ϵ����DRBD��һЩ���ò�����
|
[root@server1 ~]#vi /etc/drbd.conf
#�Ƿ�μ�DRBDʹ����ͳ��.Ĭ����yes
global {
usage-count yes;
}
# ���������ڵ�ͬ��ʱ�������������ֵ,��λ���ֽ�
common {
syncer { rate 10M; }
# һ��DRBD�豸(��:/dev/drbdX),����һ��"��Դ".�������һ��DRBD�豸������#�ڵ�������Ϣ��
resource r0 {
# ʹ��Э��C.��ʾ�յ�Զ��������д��ȷ�Ϻ�,����Ϊд�����.
protocol C;
net {
# ����������֮��ͨ��ʹ�õ���Ϣ�㷨.
cram-hmac-alg sha1;
shared-secret"FooFunFactory";
allow-two-primaries;
}
syncer {
rate 10M;
}
# ÿ��������˵����"on"��ͷ,������������.�ں����{}��Ϊ������������� on server1 {
device /dev/drbd0;
#ʹ�õĴ��̷�����/dev/sda4
disk /dev/sda4;
# ����DRBD�ļ����˿�,��������һ̨����ͨ��
address 10.10.140.140:7788;
flexible-meta-disk internal;
}
on server3 {
device /dev/drbd0;
disk /dev/sda4;
address 10.10.140.84:7788;
meta-disk internal;
}
} |
3.3.3����drbd.conf�ļ����Ƶ�������/etcĿ¼��
[root@server1 ~]#scp /etc/drbd.conf
root@server3:/etc/
3.4��DRBD����
������֮ǰ����Ҫ�ֱ���2�������ϵĿհ����ϴ�����Ӧ��Ԫ���ݱ�������ݿ飺
����֮ǰ�ֽ�����հ��������������
�ֱ�������������ִ��
#dd if=/dev/zero of=/dev/sdbX bs=1M
count=128
������һ�������
|
.........

Device size would be truncated,which
 would corrupt data and result in
 'access beyond end of device' errors.
 You need to either
  * use external meta data (recommended)
  * shrink that filesystem first
  * zero out the device (destroy thefilesystem)
 Operation refused.
.......... |
�ֱ���server1��server3����ִ��
3.4.1��#drbdadmcreate-md r0 ����Ԫ����
ȷ���ɹ��������Ϳ�������drbd������(��server01��server02ͬʱ����)��
3.4.2 ��server1��server3�Ϸֱ�ִ��
[root@server01~]# /etc/init.d/drbd
start ��servicedrbd start
StartingDRBD resources: [ d(r0) s(r0)
n(r0) ].
3.4.3 �������ڵ�
��server1ִ����������(��һ��)������server1Ϊ���ڵ�,�Ժ������
drbdadmprimary db
#drbdsetup /dev/drbd0 primary �Co
3.4.4 �鿴����
�ڵ�һ��������ͬ�����̵����ݡ�

3.4.5 �Կհ״��̽��и�ʽ����mount���ļ�ϵͳ��
�˲���ֻ��primary�ڵ���ִ�С�
|
[root@server1 ~]# mkfs.ext2/dev/drbd0
mke2fs 1.39 (29-May-2006)
Filesystem label=
OS type: Linux
Block size=4096 (log=2)
Fragment size=4096 (log=2)
655360 inodes, 1309232 blocks
65461 blocks (5.00%) reserved forthe super user
First data block=0
Maximum filesystemblocks=1342177280
40 block groups
32768 blocks per group, 32768fragments per group
16384 inodes per group
Superblock backups stored onblocks:
        32768, 98304, 163840, 229376, 294912,819200, 884736
Writing inode tables: done
Creating journal (32768 blocks):done
Writing superblocks and filesystemaccounting information: done
This filesystem will beautomatically checked every 35 mounts or
180 days, whichever comesfirst.  Use tune2fs -c or -i to override.
[root@server1 ~]# mount /dev/drbd0 /home/share |
3.4.6 ����drbd����ʱ�Զ�����
chkconfig--level 35 drbd on
3.5��DRBD����
3.5.1 �������ֶ��л�
��ж��������drbd�豸
[root@server1 ~]# umount /dev/drbd0
��server1��Ϊ�ӽڵ�
[root@server1 ~]# drbdadm secondary
r0
��ѯserver1��״̬

��server3����Ϊ���ڵ�
[root@server3 ~]# drbdadm primary r0
��server3�Ϲ��ڵ�drbd�豸��
[root@server3 ~]# mount /dev/drbd0
/home/share
�鿴server3��״̬

4�� Heartbeat�İ�װ������
4.1 Heartbeat�İ�װ
��server1��server3����yum��װheartbeat
[root@server1~]# yum install heartbeat
4.2 Heartbeat������
����/etc/ha.d/ha.cf
1��ʹ��������������Heartbeat RPM����װ���ͷŵ�ha.cf���������ļ���
rpm -qd heartbeat | grepha.cf
2��ʹ�������������������ļ����Ƶ��ʵ���λ�ã�
cp/usr/share/doc/packages/heartbeat/ha.cf
/etc/ha.d/
3���༭/etc/ha.d/ha.cf�ļ���ȡ��ע�ͷ��Ż������������ݣ�
udpport 694
#����ucast��ʽ��ʹ������eth1�����������ͱ��÷�����֮�䷢��������Ϣ��ָ���Զ�ip������server1��ָ��10.0.0.203����server3��ָ��10.0.0.201
ucast eth1 10.0.0.203
4��ͬʱ��ȡ��keepalive��deadtime��initdead�����е�ע�ͷ��ţ�
keepalive 2
deadtime 30
initdead 120
initdead��ָ��heartbeat�ػ������״�������Ӧ�õȴ�120������������������ϵ���Դ��keepalive��ָ��������Ϣ֮��Ӧ�ü�������룬deadtime��ָ�����÷������������������������϶�û���յ�������Ϣʱ��Ӧ�õȴ��ʱ�䣬Heartbeat���ܻᷢ�;�����Ϣָ���������˲���ȷ��ֵ�����磺���������deadtime��ֵ�dz��ӽ�keepalive��ֵ��ȷ��һ����ȫ���ã���
5���������������ӵ�/etc/ha.d/ha.cf�ļ���ĩβ��
node server1
node server3
������д�������÷����������֣�uname -n����ص�ֵ��
5��ȥ������ע�Ϳ��Բ鿴heartbeat��������־���Դ�������кܴ����
debugfile /var/log/ha-debug
logfile /var/log/ha-log
���� /etc/ha.d/authkeys
1��ʹ����������λ����authkeys�ļ��������临�Ƶ��ʵ���λ�ã�
rpm -qd heartbeat | grep authkeys
cp/usr/share/doc/packages/heartbeat/authkeys
/etc/ha.d
2���༭/etc/ha.d/authkeys�ļ���ȡ��������������ǰ��ע�ͷ��ţ�
auth1
1 crc
3��ȷ��authkeys�ļ�ֻ����root��ȡ��
chmod 600/etc/ha.d/authkeys
4.3 �ڱ��÷������ϰ�װHeartbeat
�������ļ����������÷�������
[root@server1 ~]# scp -r/etc/ha.d root@server3:/etc/ha.d
4.4 ����Heartbeat
1 �����������ͱ��÷������ϰ�heartbeat����Ϊ�����Զ�����
chkconfig --level 35 heartbeat on
2 �ֹ���ͣ����
/etc/init.d/heartbeat start
����
service heartbeat start
/etc/init.d/heartbeat stop
����
service heartbeat stop
5�� Hadoop��Ҫ�����ļ�������
��ʾ��������heartbeatǰ��Ӧ����formatnamenode��drbd�����в���Ԫ���ݡ�
masters
01.servervip
slaves
server2
core-site.xml
|
01.<property>
02. <name>hadoop.tmp.dir</name>
03. <value>/home/share/hadoopdata/</value>
04. <description>A base for other temporary directories.</description>
05.</property>
06.<property>
07. <name>fs.default.name</name>
08. <value>hdfs://servervip:9000</value>
09. <description>The name of the default file system.  A URI whose
10.  schemeand authority determine the FileSystem implementation.  The
11.  uri'sscheme determines the config property (fs.SCHEME.impl) naming
12.  theFileSystem implementation class.  Theuri's authority is used to
13. determine the host, port, etc. for a filesystem.</description>
14.</property
15.<property>
16. <name>fs.checkpoint.dir</name>
17. <value>${hadoop.tmp.dir}/dfs/namesecondary</value>
18. <description>Determines where on the local filesystem the DFSsecondary
19.      namenode should store the temporary images to merge.
20.      Ifthis is a comma-delimited list of directories then the image is
21.     replicated in all of the directories for redundancy.
22. </description>
23.</property
24.<property>
25. <name>fs.checkpoint.edits.dir</name>
26. <value>${fs.checkpoint.dir}</value>
27. <description>Determines where on the local filesystem the DFSsecondary
28.      namenode should store the temporary edits to merge.
29.      Ifthis is a comma-delimited list of directoires then teh edits is
30.     replicated in all of the directoires for redundancy.
31.     Default value is same as fs.checkpoint.dir
32. </description>
33.</property> |
hdfs-site.xml
|
01.<property>
02.  <name>dfs.name.dir</name>
03.  <value>${hadoop.tmp.dir}/dfs/name</value>
04.  <description>Determines where on the local filesystem the DFS
05.   namenode should store the name table(fsimage). If this is a
06.   comma-delimitedlist of directories then the name table is
07.  replicated in all of the directories, for
08.  redundancy.</description>
09.</property>
10.     <property>
11.  <name>dfs.name.edits.dir</name>
12.  <value>${dfs.name.dir}</value>
13.  <description>Determines where on the local filesystem the DFS
14.   namenode should store the transaction (edits) file. If this is
15.   acomma-delimited list of directories then the transaction file
16.   isreplicated in all of the directories, for redundancy.
17.  Default value is same as dfs.name.dir</description>
18.</property> |
mapred-site.xml
|
01.<property>
02. <name>mapred.job.tracker</name>
03. <value>servervip:9001</value>
04. <description>The host and port that the MapReduce job tracker runs
05.  at.  If "local", then jobs are run in-processas a single map
06.  andreduce task.
07. </description>
08.</property> |
6�� ͨ��haresource�����Զ��л�
�����ʹ��heartbeat������£�DRBDֻ���ֹ��л����ӹ�ϵ��������heartbeat�������ļ���ʹDRBD����ͨ��heartbeat�Զ��л���
6.1 ������Դ�ű�
1���½��ű�hadoop-hdfs��������ͣhdfs�ļ�ϵͳ��ͬ��Ҳ���Խ��ű�hadoop-all,hadoop-jobtracker����Դ�ļ�����hdfsΪ���������£�
[root@server1 conf]# cat/etc/ha.d/resource.d/hadoop-hdfs
|
01.cd /etc/ha.d/resource.d
02.vi hadoop-hdfs
03.#!/bin/sh
04.case "$1" in
05.start)
06.# Start commands go here
07.cd /home/hadoop-0.20.2/bin
08.msg=`su - root -c "sh/home/hadoop-0.20.2/bin/start-dfs.sh"`
09.logger $msg
10.;;
11.stop)
12.# Stop commands go here
13.cd /home/hadoop-0.20.2/bin
14.msg=`su - root -c "sh/home/hadoop-0.20.2/bin/stop-dfs.sh"`
15.logger $msg
16.;;
17.status)
18.# Status commands go here
19.;; |
2����Ȩ��
[root@server1 conf]# chmod755 /etc/ha.d/resource.d/hadoop-hdfs
3�� �ѽű����������ݻ���ͬ����Ȩ��
[root@server1 conf]# scp/etc/ha.d/resource.d/hadoop-hdfs
server3: /etc/ha.d/resource.d/
6.2 ����haresources
[root@server1 conf]# cat /etc/ha.d/haresources
server1 IPaddr::10.10.140.200 drbddisk::r0
Filesystem::/dev/drbd0::/home/share::ext2hadoop-hdfs
ע�ͣ�
Server1 ����������
10.10.140.200 �������IP����
drbddisk::r0 ��Դdrbddisk������Ϊr0
Filesystem::/dev/drbd0::/home/share::ext2��ԴFilesystem��mount�豸/dev/drbd0��/home/shareĿ¼������Ϊext2
Hadoop-hdfs�ļ�ϵͳ��Դ
7�� DRBD��heartbeat��hadoop����
7.1�����ļ���Ŀ¼
1����server1�����ڵ㣩��drbd��heartbeat�����š�����heartbeat�����������ַ10.10.140.200�����䵽���ڵ��ϡ�������鿴��
������cat /proc/drbd�鿴server1��server3�Ƿ�ͨ�����������Կ���server1��server3�ֱ�Ϊ���ӽڵ㡣

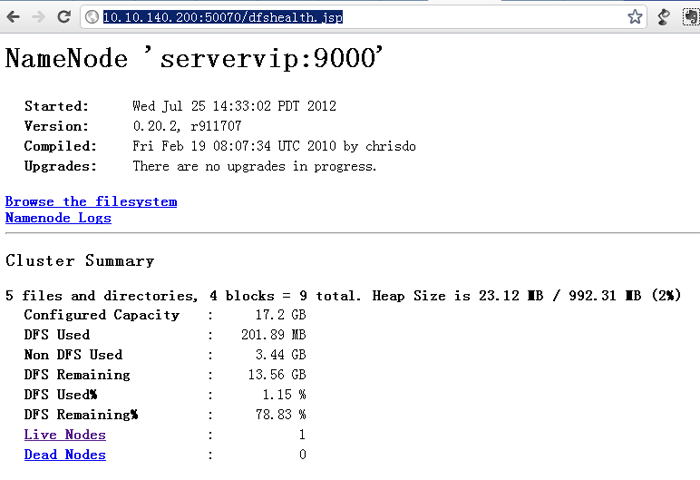
�鿴drbd�����Ƿ����

2���鿴hadoop dfs�Ƿ���������http://10.10.140.200:50070/dfshealth.jsp
3����hadoop�ϴ��ļ�
����һ��Ŀ¼���ϴ�һ�������ļ���
[root@server1hadoop-0.20.2]# bin/hadoop
dfs -mkdir testdir
[root@server1 hadoop-0.20.2]# bin/hadoop
dfs-copyFromLocal /home/share/temp2 testdir
�鿴�ļ���

7.2 �������л�
1����server1��ֹͣheartbeat
[root@server1 /]# service heartbeat
stop
Stopping High-Availabilityservices:
[ OK ]
2�����Բ鿴����IP�Ѿ��л���server3����
3����֤server3�ϲ鿴hadoop�ļ�ϵͳ

7.3 �������ٴ��л�
1����server1������heartbeat
[root@server1 /]# service heartbeatstart
Starting High-Availability services:
2012/07/25_15:03:31 INFO: Resource is
stopped
[ OK ]
2���鿴����IP�Ѿ��л���server1�ϡ�
3����֤server1�ϲ鿴hadoop�ļ�ϵͳ

8�� ��������
8.1 split brain�����
split brainʵ������ָ��ij������£����drbd�������ڵ�Ͽ������ӣ�����primary�����������С���drbdijprimary�ڵ����ӶԷ��ڵ���������Ϣ��ʱ��������ֶԷ�Ҳ��primary״̬����ô����������жϿ����ӣ����϶���ǰ�Ѿ�����split
brain�ˣ���ʱ��������ϵͳ��־�м�¼������Ϣ����Split-Brain detected,droppingconnection!��������split
brain֮������鿴����״̬���������ٻ���һ����StandAlone״̬������һ������Ҳ��StandAlone�������ͬʱ����split
brain״̬����Ҳ�п�����WFConnection��״̬��
1 �ڵ���������ʱ����dmesg�г��ִ�����ʾ��
drbd0: Split-Brain detected, dropping
connection!
drbd0: self055F46EA3829909E:899EC0EBD8690AFD:FEA4014923297FC8:3435CD2BACCECFCB
drbd0: peer 7E18F3FEEA113778:899EC0EBD8690AFC:FEA4014923297FC8:3435CD2BACCECFCB
drbd0: helper command: /sbin/drbdadm
split-brain minor-0
drbd0: meta connection shut down by
peer.
2��203�鿴cat/proc/drbd��203����ΪStandAlone״̬
version: 8.3.0 (api:88/proto:86-89)
GIT-hash: 9ba8b93e24d842f0dd3fb1f9b90e8348ddb95829build
by root@ost3, 2008-12-30 17:16:32
0: cs:StandAlone ro:Secondary/Unknownds:UpToDate/DUnknown
r---
ns:0 nr:0 dw:0 dr:0 al:0 bm:0 lo:0 pe:0ua:0
ap:0 ep:1 wo:b oos:664
3��202�鿴cat /proc/drbd��202����ΪStandAlone״̬
version: 8.3.0 (api:88/proto:86-89)
GIT-hash:9ba8b93e24d842f0dd3fb1f9b90e8348ddb95829
build by root@ost2, 2008-12-3017:23:44
0: cs:StandAlone ro:Primary/Unknownds:UpToDate/DUnknown
r---
ns:0 nr:0 dw:4 dr:21 al:1 bm:0 lo:0pe:0
ua:0 ap:0 ep:1 wo:b oos:68
4 ԭ�����
���ڽڵ������������ݲ�һ�£��������ļ���û�������Զ�����������ݣ������������ʧ�ܣ�������ͬ����
split brain�����ֽ���취���ֶ��������Զ�������
�ֶ�����
1 ��203��ֹͣheartbeat
Heartbeat��������Դ��ֻ��ֹͣ������ͷ�
/etc/init.d/heartbeat stop
2 ����Ϊsecondary�Ľڵ��Ϸ�������Դ������
��ost3��
/sbin/drbdadm -- --discard-my-dataconnect
r0
3����Ϊprimary�Ľڵ���������secondary
��ost2��
/sbin/drbdadm disconnect r0
/sbin/drbdadm connect r0
��ost2����Ϊ���ڵ�
/sbin/drbdadm primary r0
4��203����������heartbeat
/etc/init.d/heartbeat start
5 �鿴202״̬ cat /proc/drbd����ʾΪConnected���Ѿ��ָ���������
version: 8.3.0 (api:88/proto:86-89)
GIT-hash: 9ba8b93e24d842f0dd3fb1f9b90e8348ddb95829
build byroot@ost2, 2008-12-30 17:23:44
0: cs:Connected ro:Primary/Secondary
ds:UpToDate/UpToDate C r---
ns:768 nr:0 dw:800 dr:905 al:11 bm:10
lo:0 pe:0 ua:0 ap:0 ep:1wo:b oos:0
6�鿴203״̬ cat/proc/drbd����ʾΪConnected���Ѿ��ָ���������
version: 8.3.0 (api:88/proto:86-89)
GIT-hash:9ba8b93e24d842f0dd3fb1f9b90e8348ddb95829
build by root@ost3, 2008-12-3017:16:32
0: cs:Connected ro:Secondary/Primaryds:UpToDate/UpToDate
C r---
ns:0 nr:768 dw:768 dr:0 al:0 bm:10 lo:0pe:0
ua:0 ap:0 ep:1 wo:b oos:0
�Զ�����
ͨ��/etc/drbd.conf�����������Զ��������ԣ��ڷ������ݲ�һ��ʱ�Զ��������Զ��������Զ������£�
1 after-sb-0pri.
�������ڵ��״̬����secondaryʱ������ͨ��after-sb-0pri�����Զ��ָ���
1��disconnect
Ĭ�ϲ��ԣ�û���Զ��ָ����ĶϿ����ӡ�
2��discard-younger-primary
��split brain����ǰ�����ڵ��Զ�ͬ����
3��discard-older-primary
��split brain����ʱ�ӱ��primary�Ľڵ�ͬ�����ݡ�
4��discard-least-changes
��split brain����ʱ�ӿ����Ľڵ�ͬ�����ݡ�
5��discard-node-NODENAME
�Զ�ͬ�������ֽڵ�
2 after-sb-1pri
�������ڵ��״ֻ̬��һ����primaryʱ������ͨ��after-sb-1pri�����Զ��ָ���
1��disconnect
Ĭ�ϲ��ԣ�û���Զ��ָ����ĶϿ����ӡ�
2��consensus
����secondary���ĶϿ����ӡ�
3��discard-secondary
����secondary���ݡ�
4��call-pri-lost-after-sb
����after-sb-0pri�IJ���ִ�С�
3 after-sb-2pri
�������ڵ��״̬����primaryʱ������ͨ��after-sb-2pri�����Զ��ָ���
1��disconnect
Ĭ�ϲ��ԣ�û���Զ��ָ����ĶϿ����ӡ�
2��violently-as0p
����after-sb-0pri�IJ���ִ�С�
3��call-pri-lost-after-sb
����after-sb-0pri�IJ���ִ�У������������ڵ㡣
4 �����Զ��ָ�
�༭/etc/drbd.conf���ҵ�resource r0���֣����ò������£����нڵ���ȫһ�¡�
#after-sb-0pri disconnect;
after-sb-0pri discard-younger-primary;
#after-sb-1pri disconnect;
after-sb-1pri discard-secondary;
#after-sb-2pri disconnect;
after-sb-2pri call-pri-lost-after-sb;
�ο����ϣ�Hadoop_HDFSϵͳ˫���ȱ�����.pdf
DRBD��װ����(����ģʽ)--��ϸ����ͼ�IJ�ï.doc |


