| 编辑推荐: |
| 本文来自于简书,本文主要介绍了如何使用到Spring
Cloud Netflix中的Eureka进行接口配置和服务调用,希望对您的学习有所帮助。 |
|
案例中有三个角色:服务注册中心、服务提供者、服务消费者,流程是首先启动注册中心,服务提供者生产服务并注册到服务中心中,消费者从服务中心中获取服务并执行。

其中我们分别使用到Spring Cloud Netflix中的Eureka作为服务发现,而服务提供者和服务消费者均为Spring
Boot提供的Restful接口。
而Feign则作为调用实现
(Feign是一个声明式Web Service客户端。使用Feign能让编写Web Service客户端更加简单,
它的使用方法是定义一个接口,然后在上面添加注解,同时也支持JAX-RS标准的注解。Feign也支持可拔插式的编码器和解码器。Spring
Cloud对Feign进行了封装,使其支持了Spring MVC标准注解和HttpMessageConverters。Feign可以与Eureka和Ribbon组合使用以支持负载均衡。)
部署服务发现Eureka
首先创建Maven项目,并在pom文件里配置所需的依赖。以下是我的服务发现配置文件。
<?xml version="1.0"
encoding="UTF-8"?>
<project xmlns="http://maven.apache.org/POM/4.0.0"
xmlns:xsi="http://www.w3.org/2001/XMLSchema-instance"
xsi:schemaLocation="http://maven.apache.org/POM/4.0.0
http://maven.apache.org/xsd/maven-4.0.0.xsd">
<modelVersion>4.0.0</modelVersion>
<groupId>com.eureka</groupId>
<artifactId>demo</artifactId>
<version>0.0.1-SNAPSHOT</version>
<packaging>jar</packaging>
<name>spring-cloud-eureka</name>
<description>Demo project for Spring Boot</description>
<parent>
<groupId>org.springframework.boot</groupId>
<artifactId>spring-boot-starter-parent</artifactId>
<version>2.0.0.RELEASE</version>
<relativePath/> <!-- lookup parent from
repository -->
</parent>
<properties>
<project.build.sourceEncoding>UTF-8</project.build.sourceEncoding>
<project.reporting.outputEncoding>UTF-8</project.reporting.outputEncoding>
<java.version>1.8</java.version>
<spring-cloud.version>Finchley.BUILD-SNAPSHOT</spring-cloud.version>
</properties>
<dependencies>
<dependency>
<groupId>org.springframework.cloud</groupId>
<artifactId>spring-cloud-starter-netflix-eureka-server</artifactId>
</dependency>
<dependency>
<groupId>org.springframework.boot</groupId>
<artifactId>spring-boot-starter-test</artifactId>
<scope>test</scope>
</dependency>
</dependencies>
<dependencyManagement>
<dependencies>
<dependency>
<groupId>org.springframework.cloud</groupId>
<artifactId>spring-cloud-dependencies</artifactId>
<version>${spring-cloud.version}</version>
<type>pom</type>
<scope>import</scope>
</dependency>
</dependencies>
</dependencyManagement>
<build>
<plugins>
<plugin>
<groupId>org.springframework.boot</groupId>
<artifactId>spring-boot-maven-plugin</artifactId>
</plugin>
</plugins>
</build>
<repositories>
<repository>
<id>spring-snapshots</id>
<name>Spring
Snapshots</name>
<url>https://repo.spring.io/snapshot</url>
<snapshots>
<enabled>true</enabled>
</snapshots>
</repository>
<repository>
<id>spring-milestones</id>
<name>Spring Milestones</name>
<url>https://repo.spring.io/milestone</url>
<snapshots>
<enabled>false</enabled>
</snapshots>
</repository>
</repositories>
</project>
|
然后更新Maven依赖,然后在入口文件添加@EnableEurekaServer注解
| package com.eureka.demo;
import org.springframework.boot.SpringApplication;
import org.springframework.boot.autoconfigure.SpringBoot
Application;
import org.springframework.cloud.netflix.eureka.server.
EnableEurekaServer;
@SpringBootApplication
//启用服务注册服务
@EnableEurekaServer
public class SpringCloudEurekaApplication {
public static void main(String[] args) {
SpringApplication.run(SpringCloudEurekaApplication.
class, args);
}
}
|
配置application.properties文件
| spring.application.name=spring-cloud-eureka
server.port=8000
eureka.client.register-with-eureka=false
eureka.client.fetch-registry=false
eureka.client.serviceUrl.defaultZone=
http://localhost:8000/eureka/
|

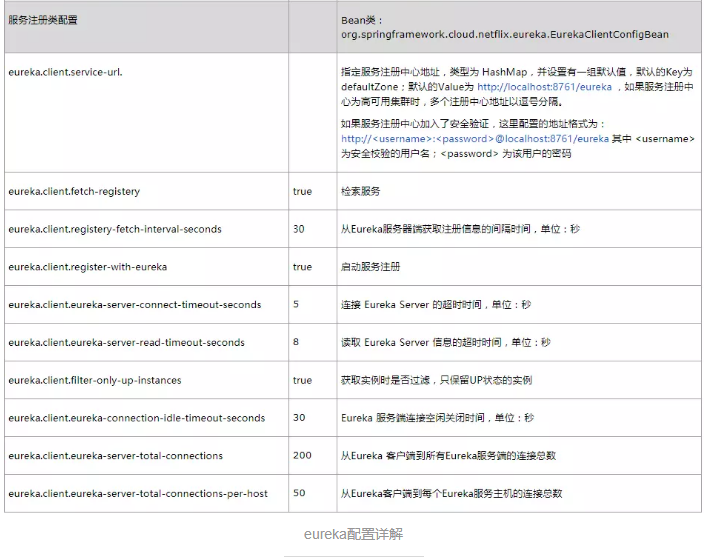
配置好配置文件之后就可以,启动服务发现服务了。配置文件中详细的提供了服务发现的地址。
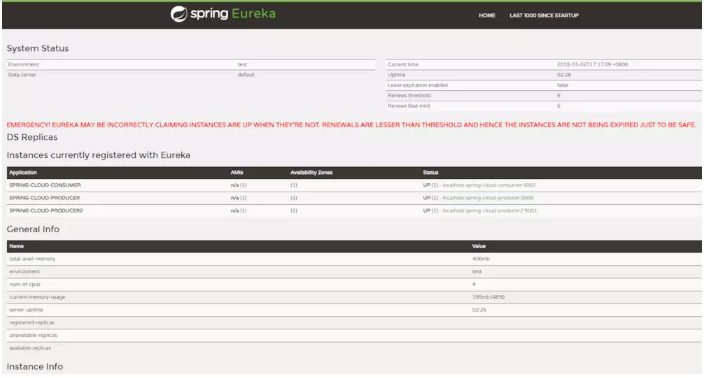
然后访问http://localhost:8000/显示以下页面表示启动成功了。
部署服务提供者
创建Maven项目,并在pom文件里配置所需的依赖。以下是我的服务提供者配置文件。
<?xml version="1.0"
encoding="UTF-8"?>
<project xmlns="http://maven.apache.org/POM/4.0.0"
xmlns:xsi="http://www.w3.org/2001/XMLSchema-instance"
xsi:schemaLocation="http://maven.apache.org/POM/4.0.0
http://maven.apache.org/xsd/maven-4.0.0.xsd">
<modelVersion>4.0.0</modelVersion>
<groupId>com.example</groupId>
<artifactId>demo</artifactId>
<version>0.0.1-SNAPSHOT</version>
<packaging>jar</packaging>
<name>spring-cloud-producer</name>
<description>Demo project for Spring cloud
producer</description>
<parent>
<groupId>org.springframework.boot</groupId>
<artifactId>spring-boot-starter-parent</artifactId>
<version>1.5.3.RELEASE</version>
<relativePath/> <!-- lookup parent from
repository -->
</parent>
<properties>
<project.build.sourceEncoding>UTF-8</project.build.sourceEncoding>
<project.reporting.outputEncoding>UTF-8</project.reporting.outputEncoding>
<java.version>1.8</java.version>
<spring-cloud.version>Dalston.RELEASE</spring-cloud.version>
</properties>
<dependencies>
<dependency>
<groupId>org.springframework.cloud</groupId>
<artifactId>spring-cloud-starter-eureka</artifactId>
</dependency>
<dependency>
<groupId>org.springframework.boot</groupId>
<artifactId>spring-boot-starter-test</artifactId>
<scope>test</scope>
</dependency>
</dependencies>
<dependencyManagement>
<dependencies>
<dependency>
<groupId>org.springframework.cloud</groupId>
<artifactId>spring-cloud-dependencies</artifactId>
<version>${spring-cloud.version}</version>
<type>pom</type>
<scope>import</scope>
</dependency>
</dependencies>
</dependencyManagement>
<build>
<plugins>
<plugin>
<groupId>org.springframework.boot</groupId>
<artifactId>spring-boot-maven-plugin</artifactId>
</plugin>
</plugins>
</build></project>
|
然后更新Maven依赖,然后在入口文件添加@EnableEurekaClient注解,声明这个一个服务提供者。
| package com.example.producer;
import org.springframework.boot.SpringApplication;
import org.springframework.boot.autoconfigure.SpringBoot
Application;
import org.springframework.cloud.netflix.eureka.
EnableEurekaClient;
@SpringBootApplication
@EnableEurekaClient
public class SpringCloudProducerApplication
{
public static void main(String[] args) {
SpringApplication.run(SpringCloudProducerApplication.
class, args);
}
} |
配置application.properties文件
#指定微服务的名称后续在调用的时候只需要使用该
名称就可以进行服务的访问
spring.application.name=spring-cloud-producer
#配置端口号
server.port=9000
#服务注册中心的配置内容,指定服务注册中心的Url
eureka.client.serviceUrl.defaultZone=
http://localhost:8000/eureka/ |
然后启动服务,刷新http://localhost:8000/就可以看见我们创建的服务已经被服务发现了。
| package com.example.producer.controller;
import org.springframework.web.bind.annotation.GetMapping;
import org.springframework.web.bind.annotation.PathVariable;
import org.springframework.web.bind.annotation.RestController;
@RestController
public class HelloController {
//restful api方式
@GetMapping("/hello/{name}")
public String index(@PathVariable String name){
return "hello!" + name;
}
// 传统api方式
// @RequestMapping("/hello")
// public String index(@RequestParam String
name) {
// return "hello "+name+",this
is first messge";
// }
} |
部署服务消费者
我们提供了服务当然是想要服务消费者去使用这些服务,接下来我们搭建服务消费者。
创建Maven项目,并在pom文件里配置所需的依赖。以下是我的服务消费者配置文件。
<?xml version="1.0"
encoding="UTF-8"?>
<project xmlns="http://maven.apache.org/POM/4.0.0"
xmlns:xsi="http://www.w3.org/2001/XMLSchema-instance"
xsi:schemaLocation="http://maven.apache.org/POM/4.0.0
http://maven.apache.org/xsd/maven-4.0.0.xsd">
<modelVersion>4.0.0</modelVersion>
<groupId>com.example</groupId>
<artifactId>demo</artifactId>
<version>0.0.1-SNAPSHOT</version>
<packaging>jar</packaging>
<name>spring-cloud-consumer</name>
<description>Demo project for Spring Boot</description>
<parent>
<groupId>org.springframework.boot</groupId>
<artifactId>spring-boot-starter-parent</artifactId>
<version>1.5.3.RELEASE</version>
<relativePath/> <!-- lookup parent from
repository -->
</parent>
<properties>
<project.build.sourceEncoding>UTF-8</project.build.sourceEncoding>
<project.reporting.outputEncoding>UTF-8</project.reporting.outputEncoding>
<java.version>1.7</java.version>
<spring-cloud.version>Dalston.RELEASE</spring-cloud.version>
</properties>
<dependencies>
<dependency>
<groupId>org.springframework.cloud</groupId>
<artifactId>spring-cloud-starter-feign</artifactId>
</dependency>
<dependency>
<groupId>org.springframework.cloud</groupId>
<artifactId>spring-cloud-starter-eureka</artifactId>
</dependency>
<dependency>
<groupId>org.springframework.boot</groupId>
<artifactId>spring-boot-starter-test</artifactId>
<scope>test</scope>
</dependency>
</dependencies>
<dependencyManagement>
<dependencies>
<dependency>
<groupId>org.springframework.cloud</groupId>
<artifactId>spring-cloud-dependencies</artifactId>
<version>${spring-cloud.version}</version>
<type>pom</type>
<scope>import</scope>
</dependency>
</dependencies>
</dependencyManagement>
<build>
<plugins>
<plugin>
<groupId>org.springframework.boot</groupId>
<artifactId>spring-boot-maven-plugin</artifactId>
</plugin>
</plugins>
</build>
</project>
|
然后更新Maven依赖,然后在入口文件添加@EnableDiscoveryClient注解和@EnableFeignClients注解,声明这个一个服务消费者。
| package com.example.consumer;
import org.springframework.boot.SpringApplication;
import org.springframework.boot.autoconfigure.
SpringBootApplication;
import org.springframework.cloud.client.discovery.
EnableDiscoveryClient;
import org.springframework.cloud.netflix.feign
.EnableFeignClients;
@SpringBootApplication
//启用服务注册与发现
@EnableDiscoveryClient
//启用feign进行远程调用
@EnableFeignClients
public class SpringCloudConsumerApplication
{
public static void main(String[] args) {
SpringApplication.run(SpringCloudConsumerApplication.
class, args);
}
} |
配置application.properties文件
#指定微服务的名称后续在调用的时候只需要使用
该名称就可以进行服务的访问
spring.application.name=spring-cloud-consumer
#配置端口号
server.port=9002
#服务注册中心的配置内容,指定服务注册中心的Url
eureka.client.serviceUrl.defaultZone=
http://localhost:8000/eureka/ |
编写feign调用实现接口
| package com.example.consumer.remote;
import org.springframework.cloud.netflix.feign.FeignClient;
import org.springframework.web.bind.annotation.GetMapping;
import org.springframework.web.bind.annotation.PathVariable;
@FeignClient(name= "spring-cloud-producer")
public interface HelloRemote {
//restful api 调用
@GetMapping("/hello/{name}")
public String hello(@PathVariable("name")
String name);
//传统api调用
//@GetMapping(value = "/hello")
//public String hello(@RequestParam(value =
"name") String name);
} |
web层调用远程服务
| package com.example.consumer.controller;
import com.example.consumer.remote.HelloRemote;
import com.example.consumer.remote.HiRemote;
import org.springframework.beans.factory.annotation.Autowired;
import org.springframework.web.bind.annotation.GetMapping;
import org.springframework.web.bind.annotation.PathVariable;
import org.springframework.web.bind.annotation.RestController;
@RestController
public class ConsumerController {
@Autowired
HelloRemote helloRemote;
@GetMapping("/hello/{name}")
public String index(@PathVariable("name")
String name) {
return helloRemote.hello(name);;
}
} |
然后启动服务,访问服务显示返回结果及表示成功!
|


