| БрМЭЦМі: |
| БОЮФРДдДcsdnЃЌЮФеТЪЧЕкШ§ЦЊЃЌНєНгзХЩЯЮФНВЪіСЫвЕЮёВугыclassЮФМўМАESB-Broker
ServerЦєЖЏЙ§ГЬЃЌДњТыа№ЪіЯъЯИЁЃ |
|
ЮФеТНгЩЯЮФздМКЖЏЪжЩшМЦESBЃЈ2ЃЉ
4-2-3ЁЂвЕЮёВугыClassЮФМўЙмРэ
zookeeperПижЦФЃПщЕФвЕЮёЯрЙиВуЃЈЗтзАВуЃЉЃЌИКд№ИљОнApache CuratorВуЗжЮіКУЕФЪТМўРраЭЁЂPath
NodeУћГЦаХЯЂЁЂPath NodeФкШнаХЯЂЃЌНјааClassЮФМўЕФЩњГЩЁЃетРяЕФЙиМќЕуЪЧЃЌApache
CamelгавЛИіЖЏЬЌМгдиЕФЯожЦЃКЫќжЛФмдкБЛДДНЈЕФЯпГЬжаЭъГЩServiceЃЈР§ШчRouteТЗгЩЖЈвхЃЉЕФЖЏЬЌМгдиЙ§ГЬЁЃApache
CuratorЪТМўМрЬ§ЙцдђЛљгкzookeeperдЩњПЭЛЇЖЫЃЌЕБЗЂЩњZKЪТМўЪБApache CuratorЛсЪЙгУвЛИіЖРСЂЯпГЬДІРэетИіЪТМўЖјВЛЪЧдкЦєЖЏApache
CuratorзщМўЕФЯпГЬЁЃЫљвдApache CamelЕФContextЩЯЯТЮФЖдЯѓЕФЖЏЬЌМгдиВйзїВЛФмдкЪТМўЯпГЬжаНјааЃЌЮвУЧашвЊвЛИіЭЌВНЖгСаНЋClass
FileЮФМўЩњГЩжЎКѓЕФЃЌЖдApache CamelЯрЙиЕФВйзїЙ§ГЬЭЈжЊЕНЦфЫћЯпГЬШЅМЬајжДааЁЃЧыПДвдЯТвЕЮёЯрЙиВуЕФЪЕЯжРрЕФДњТыЦЌЖЮЃЈЖдESBCamelServiceListenerНгПкЕФЪЕЯжЃЉЃК
public class ESBCamelServiceListenerImpl implements ESBCamelServiceListener {
......
public void onProcessorAdded( String systemId, String packageName, String className, byte[] contents) {
/*
* ЕБвЛИіДІРэЦїНјааЬэМгЪБЃЌвЊзівдЯТДІРэ
* 1ЁЂЪзЯШИљОнsystemIdЕФаХЯЂЃЌдкESB-Broker ServerЕФгГЩфШнЦїжабА
* евИівЕЮёЯЕЭГЖЈвхЕФИїжжServer Class ЮФМўдкESB-Broker ServerНкЕуБОЕиДцДЂЕФИљТЗОЖ
* 2ЁЂШЛКѓАДееpackageNameЁЂclassNameЁЂcontentsЕФаХЯЂНЋетИіclassЮФМўаДШыЕНе§ШЗЕФЮЛжУ
*
* зЂвтЃКгЩгкДЫЪБжЛЪЧЭъГЩСЫclassСЫЮФМўЕФаДШыЃЌЫљвдетИіclassЮФМўЛЙУЛгаБЛclassloaderНјааГѕЪМЛЏЁЃ
* СэЭтгЩгкЃЌCamelContextВЂУЛгаЬсЙЉЕЅЖРНјааprocessorДІРэЦїМгдиЕФЙІФмЃЌЖјЪЧЫцзХroutesЪЕР§ЕФМгдиЖјМгди
* ЖјетИіЙЄзїНЋдкonRouteDefineChangedЪТМўжаЭъГЩЃЌЫљвддкЭъГЩprocessor-classЮФМўЕФаДШыКѓЃЌОЭВЛашвЊдйзіЦфЫќЪТЧщСЫЁЃ
* */
if(StringUtils.isEmpty(systemId) || StringUtils.isEmpty(packageName)
|| StringUtils.isEmpty(className) || contents == null) {
ESBCamelServiceListenerImpl.LOGGER.error( "БивЊЕФШыВЮЪ§ОнВЛе§ШЗЃЌЧыМьВщЃЁ");
return;
}
this.createClassfile( systemId, packageName, className, contents);
}
......
public void onRouteDefineAdded (String systemId, String packageName, String className, byte[] contents) {
/*
* ЕБвЛИіаТЕФТЗгЩЖЈвхЪТМўЗЂЩњЪБЃЌвЊзівдЯТМИМўЪТЧщЃК
*
* 1ЁЂИљОнsystemIdЕФаХЯЂЃЌдкESB-Broker ServerЕФгГЩфШнЦїжабА
* евИівЕЮёЯЕЭГЖЈвхЕФИїжжServer Class ЮФМўдкESB-Broker ServerНкЕуБОЕиДцДЂЕФИљТЗОЖ
* 2ЁЂШЛКѓАДееpackageNameЁЂclassNameЁЂcontentsЕФаХЯЂНЋетИіclassЮФМўаДШыЕНе§ШЗЕФЮЛжУ
* 3ЁЂВЛФмдкБОЯпГЬВйзїApache CamelЃЌжЛФмЭЈЙ§вЛИіЭЌВНЖгСаЭЈжЊApache CamelжїЯпГЬ
* */
if(StringUtils.isEmpty(systemId) || StringUtils.isEmpty(packageName)
|| StringUtils.isEmpty(className) || contents == null) {
ESBCamelServiceListenerImpl.LOGGER.error ("БивЊЕФШыВЮЪ§ОнВЛе§ШЗЃЌЧыМьВщЃЁ");
return;
}
// Ек1ЁЂ2СНВНДІРэЙ§ГЬЃЌЖМЪЧдкетРяЭъГЩ
this.createClassfile(systemId, packageName, className, contents);
// 3ЁЂ===============МгдиЕНCamelContextжа
SynchronousQueue<String> camelContextOperateQueue = CamelContextOperateQueueUtils. getCamelContextOperateQueue();
try {
camelContextOperateQueue.put( packageName + "." + className);
} catch (InterruptedException e) {
ESBCamelServiceListenerImpl. LOGGER.error(e.getMessage() , e);
}
}
......
/**
* етИіЫНгаЗНЗЈгУгкЩњГЩclassЮФМў
* @param systemId
* @param packageName
* @param className
* @param contents
*/
private void createClassfile( String systemId, String packageName, String className, byte[] contents) {
// 1ЁЂ============
Map<String, URL> systemPathMapping = SystemRootPathUtils.getSystemPathMapping();
URL systemRootURL = systemPathMapping.get( systemId);
if(systemRootURL == null) {
return;
}
// 2ЁЂ============ПЊЪМаДШыclassЮФМў
ClassFileUtils.createClassfile( systemRootURL, packageName, className, contents);
// ЭъГЩ
ESBCamelServiceListenerImpl.LOGGER.info( "===================" + packageName + "." + className + ".class ЩњГЩЙ§ГЬНсЪј");
}
} |
вдЩЯДњТыЦЌЖЮжЛСаОйЖдESBCamelServiceListenerНгПкЕФСНИіЪЕЯжЗНЗЈЃКonProcessorAdded(String,
String, String, byte[])КЭonRouteDefineAdded(String,
String, String, byte[])ЃЌЦфЫћЕФЪЕЯжЗНЗЈДІРэЙ§ГЬЖМЪЧЯрЫЦЕФЃЌЮЊСЫНкдМЦЊЗљОЭВЛдйзИЪіСЫЁЃЧызЂвтcreateClassfile(String,
String, String, byte[])етИіЫНгаЗНЗЈЃЌетИіЫНгаЗНЗЈЪЧНјааЮФМўаДШыЕФВйзїЃЌЫќНЋдкжИЖЈЕФвЕЮёЯЕЭГДцДЂClass
FileЕФФПТМЯТЃЌаДШызюаТЕФClassЮФМўЁЃ
ЖјОпЬхЕФЮФМўДІРэЙ§ГЬЗХдкЁАClassFileUtilsЁБетИіЙЄОпРржаЃЌетИіЙЄОпРрЪЧБЪепздЖЈвхЕФЙЄОпРрЃЌжївЊЪЧБЃжЄЮФМўДІРэЙ§ГЬФмЙЛдкИїДІНјааДњТыжигУЁЃЦфжаЮоЗЧОЭЪЧFile
StreamЕФаДШыЙ§ГЬЃЌвђЮЊЙ§гкМђЕЅОЭВЛдйеМгУЮФеТЦЊЗљСЫЁЃетРяНиШЁвЛаЉЁАClassFileUtilsЁБЙЄОпРрЕФДњТыЦЌЖЮЃК
/**
* classЮФМўЕФДІРэЙЄОпЁЃЙЄОпРрВЛдЪаэМЬГа
* @author yinwenjie
*/
public final class ClassFileUtils {
......
/**
* ЙЄОпРрВЛдЪаэНјааЪЕР§ЛЏ
*/
private ClassFileUtils() {
}
......
/**
* ЭЈЙ§етИіЙЄОпЗНЗЈЃЌПЩвдНјааclassЮФМўЕФДДНЈ
* @param systemRootURL БОДЮНјааЯЕЭГДДНЈЕФsystemвЕЮёЯЕЭГДцДЂclassЮФМўЕФИљФПТМ
* @param packageName classЮФМўЕФАќаХЯЂ
* @param className classЮФМўЕФРрУћаХЯЂ
* @param contents classЮФМўЕФФкШнаХЯЂ
*/
public static void createClassfile( URL systemRootURL , String packageName, String className, byte[] contents) {
......
// ПЊЪМЪфГіЮФМўФкШн
try {
ByteArrayInputStream byteInputStream = new ByteArrayInputStream(contents);
FileOutputStream fileOut = new FileOutputStream(classFile);
int realLen;
byte[] fileContexts = new byte[4096];
while((realLen = byteInputStream.read( fileContexts, 0, 4096)) != -1) {
fileOut.write(fileContexts, 0, realLen);
}
fileOut.close();
byteInputStream.close();
} catch (Exception e) {
ClassFileUtils.LOGGER.error( e.getMessage() , e);
return;
}
......
}
......
} |
дкESBCamelServiceListenerImplРрЕФДњТыЦЌЖЮжаЃЌашвЊзЂвтЕФСэвЛИіЯИНкЪЧЃКonRouteDefineAddedЗНЗЈжаЪЙгУЕФЁАSynchronousQueueЁБЭЌВНЖгСаЁЃЙйЗНЖдгкЁАSynchronousQueueЁБЭЌВНЖгСаЕФЬиадНтЪЭЪЧЃКЁАЪЧетбљ
вЛжжзшШћЖгСаЃЌЦфжаУПИі put БиаыЕШД§вЛИі takeЃЌЗДжЎврШЛЁЃЭЌВНЖгСаУЛгаШЮКЮФкВПШнСПЃЌЩѕжССЌвЛИіЖгСаЕФШнСПЖМУЛгаЁЃЁБетИіЖгСавВдкБЪепвдЧАЕФЮФжаНщЩмЙ§ЃЌЫќЪЧвЛИіУЛгаШЮКЮДцДЂПеМфЕФЖгСаЃЌЕБФГвЛИіЯпГЬЪЙгУЁАSynchronousQueueЁБЭЌВНЖгСаЕФput()ЗНЗЈНјааЭЦШыВйзїЪБЃЌЛсвЛжБНјааЕШД§ЁЃвЛжБЕШД§ЕНСэвЛЯпГЬЪЙгУЁАSynchronousQueueЁБЭЌВНЖгСаЕФtake()ЗНЗЈЃЌЪдЭМШЁЕУвЛИіжЕЮЊжЙЁЃетбљБЃжЄСЫЖдApache
CamelНјааВйзїЕФжїЯпГЬФмЙЛвРДЮДІРэЦфЫќЯпГЬДЋРДЕФЖдApache CamelНјааЖЏЬЌRoutesМгдиЕФЧыЧѓЁЃ
4-3ЁЂESB-Broker ServerЦєЖЏЙ§ГЬ
ЭЈЙ§БОЮФЕк4-2аЁНкЕФНщЩмЃЌЖСепЪЕМЪЩЯгІИУПЩвдРэНтЕНвЛаЉЩцМАESB-Broker ServerНкЕуЦєЖЏЙ§ГЬЕФЙиМќаХЯЂЕуЁЃгЩгкApache
CamelЗўЮёФЃПщЖдServiceЕФМгдивРРЕгкApache CuratorзщМўЖдzookeeperЕФВйзїЃЌвђЮЊжїГЬађашвЊДгКѓепжаЖСШЁгаФФаЉДІРэЦїЁЂФФаЉТЗгЩЖЈвхашвЊМгдиЕНCamel
ContextЩЯЯТЮФжаЃЛСэвЛЗНУцИїжжServiceМгдизщМўгжБиаыЕШД§Camel ContextЩЯЯТЮФМгдизщМўЦєЖЏГЩЙІКѓВХФмНјааНјааЃЌЗёдђОЭУЛгаМгдиЕФФПЕФЕиЁЃ
ЫљвдећИіESB-Broker ServerНкЕуЕФЦєЖЏЙ§ГЬОЭашвЊЕЙзХНјааЃКЪзЯШЭЈЙ§CuratorСЌНгЕНzookeeperЗўЮёЦїЃЌВЂЭъГЩЪТМўМрЬ§ЕФзЂВсЁЃД§ЧАУцЫљгазМБИЙЄзїЭъГЩЃЌОЭашвЊДгzookeeperЗўЮёЖЫЖСШЁашвЊМгдиЕФДІРэЦїЁЂдзгЗўЮёКЭБрХХКУЕФТЗгЩХфжУЕФЪ§ОнаХЯЂЃЈУПжжвЕЮёЯЕЭГЖМашвЊЗжБ№НјааЖСШЁКЭДІРэЃЉЁЃзюКѓЦєЖЏCamel
ContextЩЯЯТЮФЃЌВЂвЛжБЪдЭМДгЁАSynchronousQueueЁБЭЌВНЖгСажаШЁГіЦфЫќЯпГЬДЋРДЕФЖдCamel
ContextЩЯЯТЮФНјааЖЏЬЌМгдиЕФЧыЧѓЁЃвдЩЯЮФзжУшЪіЕФЦєЖЏЫГађПЩвдГщЯѓЮЊвдЯТЪОвтЭМЃК
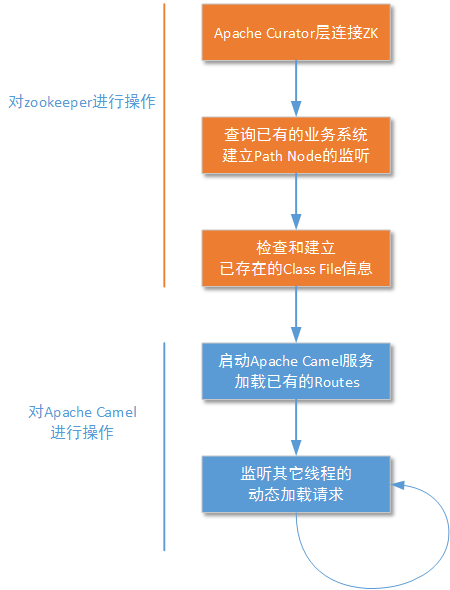
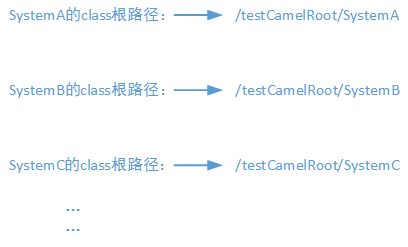
зЂвтЃЌЕБаТЦєЖЏЕФESB-Broker ServerНкЕуДгzookeeperЗўЮёЖЫВщбЏашвЊМгдиЕФИїжжServiceЪБЃЌВЂВЛДњБэетаЉServiceЕФclassаХЯЂЖМашвЊДгzookeeperЩЯЖСШЁPathжаЕФdataФкШнНјааМгдиЁЃжїГЬађЛсМьВщетаЉServiceЫљЖдгІЕФclassЪЧЗёвбОДцдкгкБОЕиЕФФГИіТЗОЖЩЯЃЌШчЙћвбОДцдкЃЌдђжБНгЪЙгУclassloaderНјааМгдиЁЃвдЯТЕФДњТыЦЌЖЮДѓжТЫЕУїСЫESB-Broker
ServerЕФЦєЖЏЙ§ГЬЃК
public class BootStartup {
......
/**
* етЪЧвЛИіЙЬЖЈЕФДцДЂclassЮФМўЕФИљТЗОЖ
* е§ЪНЯЕЭГжаЃЌетИіжЕПЩРДздгкЯЕЭГЕФХфжУЮФМў
*/
private static final String CLASSROOTPATH = "/testCamelRoot";
/**
* жїжДааКЏЪ§
* @param args
* @throws Exception
*/
public static void main( String[] args) throws Exception {
new BootStartup().start();
}
......
/**
* жївЊЕФЦєЖЏЙ§ГЬдкетРя
*/
protected void start() throws Exception {
/*
* ЦєЖЏЫГађЮЊЃК
*
* 1ЁЂЪзЯШЪЙгУApache CuratorзщМўНјааzookeeperЗўЮёЖЫСЌНгЃЌ
*
* 2ЁЂЭЈЙ§Apache CuratorзщМўВщбЏФПЧАвбгаЕФвЕЮёЯЕЭГIDаХЯЂЃЌ
* вдБувРОнетаЉвЕЮёЯЕЭГIDЃЌНЈСЂБОЕиClassLoaderЕФИљТЗОЖЃЈЕБШЛЃЌгЩОЭВЛашвЊДДНЈСЫЃЉ
* ВЂЧвзЂВсApache CuratorЗтзАВуЕФМрЬ§ЁЃ
*
* 3ЁЂМьВщЕк2ВНЕУЕНЕФвЕЮёЯЕЭГЯТЃЌвбОДцдкЕФprocessorДІРэЦїЖЈвхКЭвбгаЕФrouteЖЈвх
* вдБуЩњГЩclassаХЯЂЁЃ
*
* 4ЁЂЦєЖЏApache CamelЗўЮёЃЌНЋЕкШ§ВНФЧаЉrouteЖЈвхНјааЖЏЬЌМгди
*
* 5ЁЂОЙ§вдЩЯВНжшЃЌећИіЦєЖЏЙ§ГЬЭъГЩСЫЁЃЯждкжїЯпГЬашвЊвЛжБЕШД§ДгSynchronousQueueЖгСаЗЂРДЕФЖЏЬЌМгдиЧыЧѓСЫЁЃ
* */
// 1ЁЂ===============
// СЌНгЕНzookeeper
CuratorFramework zkClient = CuratorFrameworkFactory.newClient( "192.168.61.140:2181", 30000, 30000, new RetryNTimes(50, 3000));
zkClient.start();
BootStartup.LOGGER.info( "ЭъГЩzookeeperЗўЮёЖЫЕФСЌНгЙЄзїЃЁ");
// 2ЁЂ===============
// ШЁЕУвбДцдкЕФЯЕЭГ
List<String> systemNames = zkClient.getChildren().forPath("/");
// ПЊЪМЙЙдьclassLoaderТЗОЖЁЂНЈСЂеыЖдzookeeperТЗОЖЯТЕФМрЬ§ЁЂ
List<File> systemClassRootPaths = new ArrayList<File>();
List<RouteBuilder> alreadyRouteBuilders = new ArrayList<RouteBuilder>();
for ( String systemName : systemNames) {
// етЪЧsystemвЕЮёЯЕЭГдкБОЕиДцДЂclassЕФИљФПТМ
File systemClassRootPath = new File( CLASSROOTPATH + "/" + systemName);
if(!systemClassRootPath.exists()) {
systemClassRootPath.mkdirs();
}
Map<String, URL> systemRootPathMapping = SystemRootPathUtils. getSystemPathMapping();
// МЧТМЕНЙЄОпРржаЃЌвдБуЦфЫќЯпГЬашвЊЪБНјааШЁгУ
systemRootPathMapping.put( systemName, systemClassRootPath.toURI().toURL());
systemClassRootPaths.add( systemClassRootPath);
// НЈСЂZKФПТММрЬ§
PathChildrenCache watcherProcesses = null;
PathChildrenCache watcherRoutes = null;
try {
// НЈСЂSystemвЕЮёЯЕЭГЯТЕФprocessesФПТМКЭМрЬ§
if(zkClient.checkExists().forPath( "/" + systemName + "/processes") == null) {
zkClient.create(). creatingParentsIfNeeded().forPath( "/" + systemName + "/processes");
}
watcherProcesses = new PathChildrenCache( zkClient, "/" + systemName + "/processes", true);
watcherProcesses.getListenable( ).addListener( new ProcessesPathChildrenCacheListener());
watcherProcesses.start();
// НЈСЂSystemвЕЮёЯЕЭГЯТЕФroutesФПТМКЭМрЬ§
if(zkClient.checkExists().forPath( "/" + systemName + "/routes" ) == null) {
zkClient.create().creatingParentsIfNeeded( ).forPath("/" + systemName + "/routes");
}
watcherRoutes = new PathChildrenCache( zkClient, "/" + systemName + "/routes", true);
watcherRoutes.getListenable().addListener( new RoutesPathChildrenCacheListener());
watcherRoutes.start();
} catch(Exception e) {
if(watcherProcesses != null) {
watcherProcesses.close();
}
if(watcherRoutes != null) {
watcherRoutes.close();
}
}
// 3ЁЂ===============
// НЈСЂвбОДцдкЕФclassЮФМў
List<String> processesPaths = zkClient.getChildren( ).forPath("/" + systemName + "/processes");
List<String> routesPaths = zkClient.getChildren( ).forPath("/" + systemName + "/routes");
// ДДНЈprocessorЮФМў
for (String processesPath : processesPaths) {
String fullClassName = processesPath;
// ЛёЕУclassЕФАќУћКЭРрУћ
int lastIndex = fullClassName.lastIndexOf(".");
String className = fullClassName.substring( lastIndex + 1);
String packageName = fullClassName.substring(0 , lastIndex);
byte[] fileContexts = zkClient.getData( ).forPath("/" + systemName + "/processes" + "/" + processesPath);
// ДДНЈЮФМў
ClassFileUtils.createClassfile( systemClassRootPath.toURI().toURL(), packageName, className, fileContexts);
}
// ДДНЈrouteЮФМў
for (String routesPath : routesPaths) {
String fullClassName = routesPath;
// ЛёЕУclassЕФАќУћКЭРрУћ
int lastIndex = fullClassName.lastIndexOf(".");
String className = fullClassName.substring( lastIndex + 1);
String packageName = fullClassName.substring(0 , lastIndex);
byte[] fileContexts = zkClient.getData( ).forPath("/" + systemName + "/routes" + "/" + routesPath);
// ДДНЈЮФМў
ClassFileUtils.createClassfile( systemClassRootPath.toURI().toURL(), packageName, className, fileContexts);
RouteBuilder routeBuilder = (RouteBuilder)Class.forName(packageName + "." + className).newInstance();
alreadyRouteBuilders.add( routeBuilder);
}
}
// 4ЁЂ=============
// ЪзЯШЦєЖЏApache CamelЗўЮё
CamelContext camelContext = new DefaultCamelContext();
camelContext.start();
BootStartup.LOGGER.info("Apache Camel Context ЦєЖЏЭъГЩ......");
// МгдиКЭЩшжУClassLoader
List<URL> URLs = new ArrayList<URL>();
for (File systemClassRootPath : systemClassRootPaths) {
URLs.add(systemClassRootPath.toURI().toURL());
}
ClassLoader currentClassLoader = Thread.currentThread( ).getContextClassLoader();
ClassLoader camelESBClassLoader = new URLClassLoader(URLs.toArray(new URL[]{}) , currentClassLoader);
Thread.currentThread( ).setContextClassLoader( camelESBClassLoader);
camelContext.setApplicationContextClassLoader( camelESBClassLoader);
// ШЛКѓОЭПЩвдНјааRouteBuilderЕФМгди
for (RouteBuilder routeBuilder : alreadyRouteBuilders) {
try {
camelContext.addRoutes(routeBuilder);
} catch(Exception e) {
BootStartup.LOGGER.warn(e.getMessage() , e);
}
}
// 5ЁЂ=============
// ПЊЪММрПиCamelContextЖЏЬЌВйзїЖгСа
SynchronousQueue<String> camelContextOperateQueue = CamelContextOperateQueueUtils. getCamelContextOperateQueue();
String mustLoadedClassName = null;
// ШчЙћУЛгаЪеЕНЦфЫќЯпГЬЕФМгдиЧыЧѓЃЌжїЯпГЬНЋЭЃжЙдкетРя
while((mustLoadedClassName = camelContextOperateQueue.take()) != null) {
Class<RouteBuilder> routeBuilderClass = (Class<RouteBuilder>) camelESBClassLoader.loadClass( mustLoadedClassName);
if(routeBuilderClass != null) {
RouteBuilder routeBuilder = routeBuilderClass.newInstance();
camelContext.addRoutes( routeBuilder);
}
}
}
......
} |
вдЩЯДњТыЙигкЁАSynchronousQueueЁБЭЌВНЖгСаЕФЪЙгУжаЃЌжїЯпГЬНЋвЛжБЪдЭМЪЙгУЭЌВНЖгСаЕФtake()ЗНЗЈШЁЕУЪ§ОнЃЌШчЙћУЛгаЪ§ОнжїЯпГЬОЭНЋЛсЕШД§дкетРяЁЃетРяжївЊНјааRouteТЗгЩЖЈвхЕФЖЏЬЌМгдиЃЌЕЋЪЧдкЪЕМЪгІгУжаЃЌЛЙгІИУИљОнЁАSynchronousQueueЁБЭЌВНЖгСажаЪ§ОнЕФзДЬЌХаЖЯЪЧНјааRouteТЗгЩЖЈвхЕФМгдиЛЙЪЧаЖдиЁЃ
ЮвУЧЛЙашвЊЖддЫааBootStartupЪЕР§ЕФжїЯпГЬНјааClassLoaderЕФжиЩшжУЁЃетЪЧвђЮЊУПвЛИівЕЮёЯЕЭГдкБОЕиЖМгавЛИіЖРСЂЕФclassЮФМўЕФДцДЂЮЛжУЃЌЕЋЪЧетИіЮЛжУВЂВЛдкJVMФЌШЯЕФМгдиТЗОЖжаЁЃJVMЕФClassLoaderзщжЏВуДЮзюЖЅВуЕФBootstrap
LoaderЮЛжУКЭИїЩЯВуЕФExtension LoaderЖМВЛЛсМгдивдЩЯДњТыжаЕФЁА/testCamelRoot/XXXXXЁБетИіЮЛжУЁЃЫљвдЮвУЧашвЊБраДДњТыНјааИЩдЄЃЌШчЯТЭМЫљЪОЃК
|


