This article explains how to set up and work in a team
environment with Rational Software Architect and base ClearCase
by importing an existing project and practicing model-driven, team-oriented
development.
You must perform key software installation and configuration tasks
before you set up your environment.
Prerequisites
The following software must be installed on client workstations:
- Rational Software Architect 6.0
- ClearCase LT 6.0 Client
Setting up the ClearCase LT 6.0 environment
The ClearCase LT 6.0 environment should be set up as follows:
- Rational ClearCase LT Server is installed. This is the shared
server where your team stores the source code control repositories.
- All ClearCase LT Clients are configured to point to the ClearCase
LT Server.
- The ClearCase Getting Started wizard has been run on the ClearCase
LT Server to establish VOB storage locations.
Note: When you run the Getting Started wizard, do not perform
the Import Source Files optional task. This task imports source
files into a VOB named sources. In this exercise, you create your
own VOB to store all source files.
Using ClearCase 2003
You can also use ClearCase 2003 for this exercise. Some initial
steps are different, but the ClearCase setup environment, including
versioned object bases (VOBs), views, and so on, is the same.
Setting up the user community
ClearCase uses an integrated user identity based on the identity
of the user that is logged in. In this scenario, a special account,
called vob_admin, performs the administrative operations in the
source control system. You set this account to use a special group,
called development, as its primary group. The users dev1 and dev2
also set the group development as their primary group.
If you cannot arrange to set this group as the primary group for
users in the domain, you can do one of the following things instead:
- Use the default group Domain Users as the ClearCase group.
- Ensure that all users set their local user environment variable
CLEARCASE_PRIMARY_GROUP to development.
If you use the default domain group called Domain Users, it requires
less work and you do not need to use the environment variable; however,
all users in the domain can read and potentially modify the ClearCase
data. If you use a special group, you can hide information and restrict
access to the ClearCase repositories (VOBs) to users in this group.
Configuring ClearCase groups and environment variables
In this exercise, you configure your ClearCase group as development
and set the environment variable on your workstation.
If you use local accounts, create the local users and the group
and add the users to the group. Otherwise, arrange for your network
administrator to perform these tasks in the domain.
To configure your ClearCase group locally:
- Log in with the vob_admin account.
- Add vob_admin to the development group on your workstation.
To set a user environment variable on Windows XP:
- Click Start > Settings > Control Panel.
- In the Control Panel, double-click System.
- In the System Properties window, click the Advanced tab.
- On the Advanced page, click Environment Variables.
- Under User variables for user, click New.
- In the New User Variable window, in the Variable name
field, type
CLEARCASE_PRIMARY_GROUP.
- In the Variable value field, type
development.
- Click OK.
In this exercise, you set up your ClearCase environment by creating
a VOB and a view.
Planning VOBs
As the number of files and directories in your system increases,
you need to reduce the complexity of managing them. VOBs are the
ClearCase mechanism for simplifying the organization of your files
and directories. The elements that you group into a VOB typically
implement a reusable piece of your system architecture. By organizing
related files and directories into components, you can view your
system as a small number of identifiable components, instead of
as one large set of directories and files.
Creating a VOB
ClearCase stores file elements, directory elements, derived objects,
and metadata in a repository called a VOB.
To create a VOB:
- Click Start > Programs > Rational Software > Rational
ClearCase > Administration > Create VOB.
- In the VOB Creation wizard, on the Name and Major Parameters
page, in the What would you like the new VOB to be named
field, type
test_vob and click Next.
- On the Components page, click Create VOB as a single VOB-level
component and click Finish.
- In the Confirmation window, click OK.
Creating a view
While logged in as vob_admin, create the administrator’s view so
that you can create and populate the initial framework project and
file artifacts.
To create a view:
- Click Start > Programs > Rational Software > Rational
ClearCase > Create View.
- In the View Creation wizard, on the Choose a Project page, click
No to the question about working on a project in the ClearCase
project tree and click Next.
- On the Choose Location for a Snapshot View page, in the Where
would you like it located field, specify a view location (for
example C:\views\vob_admin_view) and click Finish.
- In the Confirm window, click OK. After the view is created,
you are prompted to load elements into your view (Figure 1). Snapshot
views work by copying files onto your disk. In the next step,
you select the sets of files to copy.
- In the Choose Elements to Load window, select test_vob
and click Add.
- Click OK.
Figure 1. Loading elements
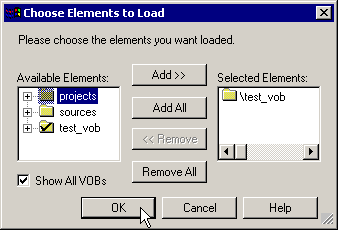
- In the View Creation Status window, click OK.
You share a modeling project, so that other team members can also
work on it. In this exercise, you log into Rational Software Architect
as vob_admin, import a modeling project and share it in ClearCase.
Starting Rational Software
Architect
Start Rational Software Architect and create an initial workspace.
To start Rational Software Architect and create an initial workspace:
- Click Start > Programs > IBM Rational > IBM Rational
Software Architect V6.0 > Rational Software Architect.
- In the Workspace Launcher window, in the Workspace field,
select a workspace and click OK.
- If you are prompted to change the auto launch configuration
to your workspace path, click Yes.
Note: Your snapshot view location and your workspace location
should always be separate.
Enabling the ClearCase SCM
adapter and starting ClearCase
Enable the ClearCase SCM adapter and start ClearCase.
To enable the ClearCase SCM adapter and start ClearCase:
- Click Window > Preferences.
- In the Preferences window, expand Workbench > Capabilities.
- In the right pane, click Team.
- Click OK.
- Click ClearCase > Connect to Rational ClearCase.
Set the preference to automatically connect to ClearCase when Rational
Software Architect start.
To automatically connect to ClearCase when Rational Software Architect
starts:
- Click Window > Preferences.
- In the Preferences window, expand Team and click ClearCase
SCM Adapter.
- Select the Automatically connect to ClearCase on startup
check box.
- Click OK.
Importing an existing
modeling project
In this exercise, you import an existing modeling project called
Piggy Bank. In accordance with the Rational Unified Process (RUP),
the Piggy Bank sample UML model is divided into three models that
each describes a different aspect of the system: the use-case model,
analysis model, and design model.
To import the Piggy Bank modeling project:
- Click Help > Samples Gallery.
- In the Contents pane, navigate to Application samples >
Piggy Bank Application > Piggy Bank Models.
- In the right pane, click Import the sample.
- In the Sample Banking Models wizard, on the Piggy Bank Models
page, accept the default project name and click Finish.
- Close the Samples Gallery.
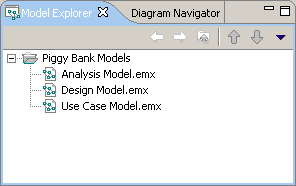
Figure 2 illustrates how the Piggy Bank modeling project is
displayed in the Model Explorer view.
Figure 2. Piggy Bank modeling project
Sharing a project
Share your project to allow other team members to access it.
To share a project:
- In the Model Explorer view, right-click Piggy Bank Models;
then click Team > Share Project.
- In the Share Project wizard, on the Share Project page, click
ClearCase SCM Adapter and click Next.
- On the Rational ClearCase page, browse to the VOB location in
your view (for example C:\views\vob_admin_view\test_vob) and click
Finish (Figure 3).
Figure 3. Sharing a project
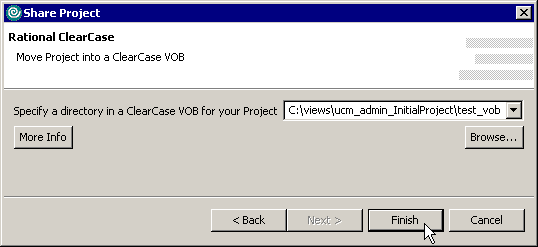
- In the Add Element(s) to Source Control window, click OK.
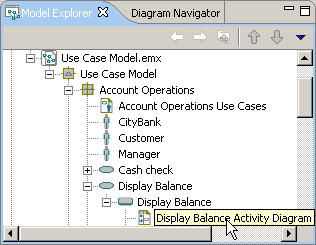
Figure 4 illustrates how a shared project is displayed in the
Model Explorer view.
Figure 4. Shared project

Adding to the modeling
project
Make changes to your models and store them in ClearCase, so that
other team members can view them. Open a diagram and update a use-case
diagram with an action.
To update a use-case diagram:
- In the Model Explorer view, double-click Use Case Model.emx.
- Navigate to Use Case Model > Account Operations > Display
Balance > Display Balance and double-click Display
Balance Activity Diagram (Figure 5).
Figure 5. Opening the Display Balance Activity
Diagram
- In the Palette, click Action.
- In the diagram editor, click above Display Accounts with
balance.
- In the Check Out Element(s) window, click OK.
- In the diagram editor, rename Action to
 Select
                Account
.
- In the Palette, click Control Flow.
- In the diagram editor, click Select Account and drag
the cursor to Display Accounts with balance.
- In the guard condition, type
[true].
- Click the end of the guard condition that points to Display
Accounts with balance and drag the cursor to Select Account.
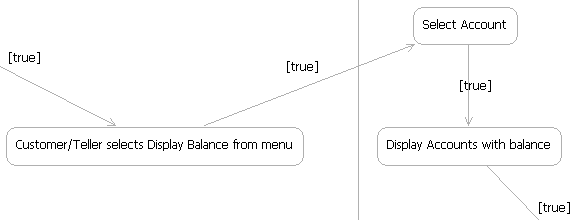
Figure 6 illustrates how a new action is displayed in the diagram
editor.
Figure 6. Creating an action
Saving your work and
checking it in
Save your work, and then check your changes into ClearCase.
To save and check in your files:
- Click File > Save All.
- In the Model Explorer view, right-click Use Case Model.emx;
then click Team > Check In.
- In the Check In Element(s) window, click OK.
At this point in the scenario, the administrator has finished setting
up the development environment. This exercise focuses on the development
process. There are two developers on your team: dev1 and dev2.
Before you start this exercise, ensure that you performed the initial
setup for each new user, as described in Before
you begin: installing and configuring software.
Setting up work areas
for the developers
In this exercise, you set up the individual work areas for dev1
and dev2 by creating views and importing projects.
To create a view and import the shared Piggy Bank modeling project:
- Log in as dev1 and start Rational Software Architect.
- When prompted, select your workspace or create a new one.
- Enable the ClearCase SCM adapter and start ClearCase. For more
information, see Enabling the ClearCase SCM adapter
and starting ClearCase.
- Click ClearCase > Create New View.
- In the View Creation wizard, on the Choose a Project page, click
No to the question about working on a project in the ClearCase
project tree and click Next.
- On the Choose Location for a Snapshot View page, in the Where
would you like it located field, specify a view location (for
example C:\views\dev1_view) and click Finish.
- On the Confirm page, click OK.
- In the Choose Elements to Load window, select test_vob
and click Add.
- Click OK.
- Click File > Import.
- In the Import wizard, click Existing Project into Workspace
and click Next.
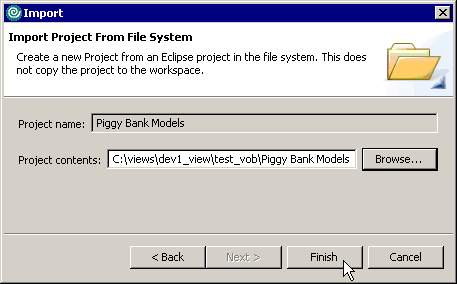
- On the Import Project From File System page, in the Project
contents field, specify the location of Piggy Bank model in
your view (for example C:\views\dev1_view\test_vob\Piggy Bank
Models)--Figure 7.
- Click Finish.
Figure 7. Importing a project
- Log off as dev1 and repeat steps 1 through 13 as dev2.
Tips for working in ClearCase
If you work in ClearCase outside of Rational Software Architect
when a Rational Software Architect workspace is open, your changes
are not automatically reflected in the workspace. If you do create
this situation, resolve it as follows:
- In the Model Explorer view, right-click a project; then click
Refresh.
- In the Model Explorer view, right-click a project; then click
Team > Refresh Status.
These actions synchronize the file system state on disk with the
in-memory state of the Model Explorer view and the source control
status.
Starting parallel development:
Comparing and merging models
In this exercise, you perform parallel development. The two users
on your team make different changes to the same model element. In
the next exercise, when the second user tries to check in, the user
must perform a merge to resolve the differences.
A merge typically starts when you check in a model to a configuration
management system and a newer version of the same model already
exists in the repository. At the start of the merge, all non-conflicting
differences and trivial conflicts are resolved automatically. You
must then manually resolve the remaining conflicts by selecting
a version of a model from which to accept changes. After you resolve
the remaining conflicts, you can save the merged model and close
the merge editor.
The following steps describe the work you do in this exercise:
- The user named dev2 checks out a file, makes changes and keeps
the file checked out.
- The user named dev1 checks out the same file, makes a conflicting
change, and keeps the file checked out.
- The user named dev2 checks in the file.
- The user named dev1 tries to check in the file but needs to
perform a merge before the changes are checked in.
Introducing conflicts to the model
In this exercise, dev2 introduces a change to a file and leaves
the file checked out until dev1 checks out the same file and makes
a conflicting change.
To make a change as dev2:
- As dev2, in the Model Explorer view, double-click Use Case
Model.emx.
- Navigate to Use Case Model > Account Operations and
double-click Account Operations Use Cases.
- In the diagram editor, rename Teller to
Auditor.
- In the Check Out Element(s) window, click OK.
- Click File > Save All.
- Log off as dev2. When prompted to check in your file, click
Cancel.
To make a conflicting change as dev1:
- Log in as dev1.
- In the Model Explorer view, double-click Use Case Model.emx.
- Navigate to Use Case Model > Account Operations and
double-click Account Operations Use Cases.
- In the diagram editor, rename Teller to
Manager.
- In the Check Out Element(s) window, click OK.
- To accept an unreserved checkout, in the Confirm Version to
Check Out window, click Yes.
- Click File > Save All.
- Log off as dev1. When prompted to check in your file, click
Cancel.
To check in as dev2:
- Log in as dev2.
- Right-click Use Case Model.emx; then click Team >
Check In.
- In the Check In Element(s) window, click OK.
- Log off as dev2.
Resolving the conflict
At this point, dev1 and dev2 have both made changes to the same
file. The dev2 user has checked in changes (dev2 had a reserved
checkout). The dev1 user has not yet checked in changes. When dev1
tries to check in changes, ClearCase prompts the user to perform
a merge, so that dev1 can resolve the conflicting change.
To resolve the conflict:
- Log in as dev1.
- Right-click Use Case Model.emx; then click Team >
Check In.
- In the Check In Element(s) window, click OK.
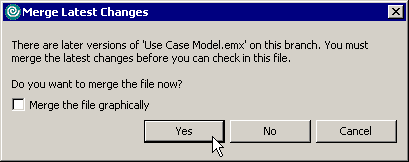
The Merge Latest Changes window opens. If you select the Merge
the file graphically check box, ClearCase starts a graphical
merge, even if the files you are merging do not contain conflicting
changes. In this exercise you made a conflicting change, so
ClearCase will automatically start a graphical merge, even if
you do not select the check box.
- In the Merge Latest Changes window, click Yes (Figure
8).
Figure 8. Starting a merge
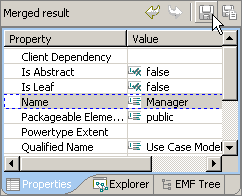
The Merge window opens. You can view the differences and conflicts
between contributor and ancestor files in the Left, Right, and
Ancestor views. You can also view details about each difference
and conflict in the Structural Differences view. The Merged
result view displays the merged model.
- To accept the change that dev1 made, in the Merge window, in
the Structural Differences view, right-click Conflicting changes;
then click Resolve with Left Contributor (Figure 9).
Figure 9. Resolving a conflict

- In the Merged result view, click Save (Figure 10).
Figure 10. Saving a merged model
- Close the Merge window.
The merge is now complete and the results are under ClearCase control.
Updating a view
As dev2, start Rational Software Architect and update your view,
so that you can see the latest changes that dev1 checked in.
To update a view:
- Log in as dev2 and start Rational Software Architect.
- Click ClearCase > Update View.
- In the Start Update window, click OK.
- In the ClearCase Snapshot View Update window, click File
> Exit.
The dev2 view now contains the latest changes that dev1 checked
into the ClearCase VOB.
This concludes the initial setup of a team development infrastructure.
The next team development scenario will cover the use of Rational
Software Architect and Unified Change Management (UCM). The final
scenario in this series will cover Rational Software Architect and
Concurrent Versions System (CVS).
Learn
Get products and technologies
Discuss
|