Migrating
to Struts 2 - Part II
In the first part of this series, we explained (for
Struts developers) the high level architecture, basic
request workflow, configuration semantics and differences
in the action framework in the new Struts 2 (formerly
WebWork) and Struts 1. Armed with this knowledge, migrating
an application of any size from Struts to Struts 2 should
be simplified.
在本系列文章的第一部分,我们为Struts的开发者介绍了
Struts框架的架构,基本的request工作流程,配置语义学(我的理解就是配置的方法),以及Struts和Struts2在action方面的不同。有了这些知识,将任何大小的项目从Struts迁移到Struts2都会变得简单
The Example Application
样例应用程序
To keep things simple we are going to choose an example
that most people should be familiar with - a weblog.
Although simple and perhaps somewhat overused (perhaps
not quite as much as the Sun Pet Store), it is an example
that doesn't require explaining.
To more concisely define the features, the use cases
we will be discussing are:
我们选择了一个大家都很熟悉的例子--weblog.尽管比较简单,而且可能有点泛滥了(可能不如Sun的宠物店完整),但是这就是一个例子,不需要解释。(译者:作者的这句话很有趣,让我想起另一句话“真男人,不解释”)
为了简明起见,我们将会讨论如下的用例:
- Add a new weblog entry
- View a weblog entry
- Edit a weblog entry
- Remove a weblog entry
- List all the weblog entries
1.添加一个新的weblog实体
2.查看一个webog实体
3.编辑一个weblog实体
4.删除一个weblog实体
5.列出所有的weblog实体
Breaking it down further, the features we want to implement
are those most common to web applications. They consist
of create, read, update and delete - more commonly referred
to as CRUD. Making these steps easy will greatly increase
productivity.
There will also be a common component between the Struts
and Struts2 applications, a back-end business service.
Here's what it looks like:
Breaking it down further,我们实现的都是web应用程序当中最普通的功能,包括create,read,update和delete--通常称之为CURD。保证这些步骤的简单可以大大的增加学习的效率。
我们也要实现一个通用的组件,在Struts和Struts2当中都可以使用-----一个后台的业务服务,如下:
public class BlogService {
private static List<Blog>
blogs = new ArrayList<Blog>();
public List<Blog>
list() { ... }
public Blog create(Blog
blog) { ... }
public void update(Blog
blog) { ... }
public void delete(int
id) { ... }
public Blog findById(int
id) { ... }
}
This object will support the use cases in our example.
To simplify implementation we will instantiate this
object in the action for both Struts and Struts2. This
would provide unnecessary coupling in a real application,
but for our example focusing on the web layer it is
sufficient.
SIDEBAR: In Part I we discussed the interface
injection style of dependency injection used in the
Struts2 actions. This is the primary style used for
the injection of object instances that are servlet
related (HttpServletRequest,
HttpServletResponse, PrincipalProxy,
etc.), but it is not the only style used.
Struts2 uses the Spring Framework as the default container,
and when doing so the setter method of dependency
injection is used. By adding a setter to the action
(as shown below), the Struts2 framework will retrieve
the correct service from the Spring Framework context
and apply it to the action via the setter.
public void setBlogService(BlogService service) {
this.blogService = service;
}
Similar to the interface injection style, we need
to include an interceptor - the ActionAutowiringInterceptor
interceptor - to the actions interceptor stack. Now,
business objects managed by the Spring Framework are
injected into Struts2 actions before the action is
invoked. Further configuration parameters allow you
to set how (by name, by type or automatically) the
match between the setter and business object is made.
这个对象在例子当中支持我们的用例。为了简化实现的过程,我们会在Struts和Struts2的Action当中初始化这个对象。这在真实的应用程序当中会引起不必要的耦合,但是由于我们的例子焦点集中在web层,所以这样也就够了。
工具条:在第一部分我们讨论了在Struts2的action当中使用接口注入的依赖注入方式。这种方式主要用来注入和Servlet相关的对象(如HttpServletRequest,
HttpServletResponse,
PrincipalProxy,等等)但是这并不是唯一的方法。
在Struts2当中使用Sett函数来实现依赖注入时,Struts2将会使用Spring框架作为默认的依赖注入容器。向Action当中添加一个setter方法(如下所示),Struts2框架会从Spring框架的上下文(context)当中查找到正确的service,然后将其通过setter方法注入到action当中。
public
void setBlogService(BlogService service) {
this.blogService
= service;
}
和接口注入方式类似的是,我们需要向action拦截器栈当中添加一个新的拦截器--ActionAutowiringInterceptor拦截器。现在业务对象被Spring框架管理,在Action被调用之前,Spring‘会把业务对象注入到Struts2的Actin当中。你还可以使用其他的配置参数来决定如何(通过name,type或自动)匹配Action当中的setter方法和业务对象。
The Struts Application Code
struts框架代码
The starting point is going to be a Struts implementation.
For each use case there will be an action class, as
well as a class for the action form that will be re-used
across all the actions that need it. This may not be
the most elegant solution for our application (other
solutions include using dynamic forms or using a request
dispatch action), but it is a solution that all Struts
developers should be familiar with. From the knowledge
of converting an uncomplicated implementation, you will
have the skills and the knowledge of the Struts2 framework
to migrate more advanced implementations.
In Part I we spoke about the differences between a
Struts and Struts2 action. Another way of looking at
the differences is via UML. Here's what the general
form of a Struts action looks like:
首先是Struts的实现。每个用例都需要有一个Action类,也需要一ActionForm类(这个ActionForm类供所有的Action使用)。我们的应用程序可能考起来不是很优雅(我们可以使用dynamic
form和request dispatch action来让我们的程序变得更好),但是这样的程序是所的Struts开发者最熟悉的。通过转换一个并不复杂的实现所获得的知识,你可以获得迁移更高级程序所需的技能和知识。
在第一部分我们讨论了Struts和Struts2当中Actionde区别。我们还可以通过UML来看看这两者的区别。如下图:
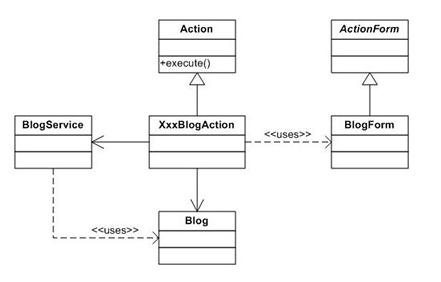
The action form will be used across multiple actions,
so let's take a look at it first.
action form可以再多个action之间使用,所以我们首先看看它是怎么实现的。
public class BlogForm extends ActionForm {
private String id;
private String title;
private String entry;
private String created;
// public setters and
getters for all properties
}
As shown in the UML, one restriction is that our form
extends the ActionForm class. The second restriction
is that the fields are String classes, and hence the
getters return String's and the setters accept String's.
The actions that use the action form are the view,
create and update actions.
如以上的UML图所示,有一个约束是我们的ActionForm必须继承ActionForm类。第二个约束是fileds是String类,getter方法返回String,setter方法接受String作为参数
The View Action:
public class
ViewBlogAction extends Action {
public ActionForward execute(ActionMapping
mapping,
ActionForm
form,
HttpServletRequest
request,
HttpServletResponse
response)
throws
Exception {
BlogService
service = new BlogService();
String
id = request.getParameter("id");
request.setAttribute("blog",service.findById(Integer.parseInt(id)));
return
(mapping.findForward("success"));
}
}
The Create Action:
public class
SaveBlogEntryAction extends Action {
public ActionForward
execute(ActionMapping mapping,
ActionForm
form,
HttpServletRequest
request,
HttpServletResponse
response)
throws
Exception {
BlogService
service = new BlogService();
BlogForm
blogForm = (BlogForm) form;
Blog
blog = new Blog();
BeanUtils.copyProperties(
blog, blogForm );
service.create(
blog );
return
(mapping.findForward("success"));
}
}
The Update Action:
public class
UpdateBlogEntryAction extends Action {
public ActionForward execute(ActionMapping
mapping,
ActionForm
form,
HttpServletRequest
request,
HttpServletResponse
response)
throws
Exception {
BlogService
service = new BlogService();
BlogForm
blogForm = (BlogForm) form;
Blog
blog = service.findById( Integer.parseInt(blogForm.getId()));
BeanUtils.copyProperties(
blog, blogForm );
service.update(
blog );
request.setAttribute("blog",blog);
return
(mapping.findForward("success"));
}
}
All three of these actions follow a pattern:
- The business object instance is created
- as mentioned earlier, we are taking the most direct
route to using the business object in the actions.
This means that a new instance will be created in
each action.
- Data is retrieved from the request - this
is in one of two forms. In the view action, the "id"
is retrieved from the HttpServletRequest
object directly. In the create and update action the
ActionForm is used. The
ActionForm is very similar to the
HttpServletRequest method, the only difference
being that the fields are grouped together within
an object.
- The business object is called - it is now
time for the business object to be used. If the parameter
(in the view action) is a simple object, it can be
used after converting to the correct type (from a
String to an Integer). If the object is a more complex
domain object, the ActionForm needs
to be converted using the BeanUtil
object.
- The return data is set - if there is data
that needs to be returned so that it can be displayed
to the user, it needs to be set as an attribute on
the HttpServletRequest object.
- An ActionForward is returned - the last
step in any Struts action is to find and return an
ActionForward object.
The last two actions, the remove and the list action,
are only slightly different. The remove action, as shown
below, doesn't use the BlogForm class.
By using a request attribute of "id" (similar
to the view action) it can perform the necessary work
using the business object. As we will see later in the
configuration, it doesn't return any data, as the success
result is mapped to execute the list action that will
retrieve the necessary information once the record has
been removed (thus keeping the concerns of the actions
separate).
以上的三个Action遵循如下的模式
1.business对象被创建--前面我们提到过,我们直接在Action当中生成业务对象。这意味着每个action当中都会创建一个新的业务对象。
2.数据从request当中得到--this
is in one of two forms.在view action当中,"id"直接从HttpServletRequest对象当中得到。在update
action和update action当中使用了ActionForm。ActionForm和HttpServletRequest方法非常的类似,唯一的区别是filed对象被击中在一个对象当中(我的理解是只要通过ActionForm对象就可以得到HttpServletRequest当中所带的数据)
3.业务对象被调用。现在时使用业务对象的时候了,如果参数(在view
Action当总)是一个简单对象,它可以被转换成为正确的类型(从String转型成为Integer),如果对象是一个复杂的域对象(domain
object),那么需要使用BeanUtil来转换ActionForm;
4.返回数据被设置--如果有需要显示给客户的数据,这些数据需要被设置为HttpservletRequest对象的属性;
5.返回一个ActionForward---在Struts的任何一个ActionForward当中的最后一步都是找到并返回一个ActionForward对象
<!--StartFragment-->最后的两个action--remove
和 list action,有一点不同。remove action,不需要使用BlogForm类。只要使用request的“id”这个属性(像view
action一样),就可以使用业务对象。我们待会就会看到,它不返回任何数据,success result映射到指定list
action ,记录被删除后,list action会得到必要的信息
public class
RemoveBlogEntryAction extends Action {
public ActionForward execute(ActionMapping
mapping,
ActionForm
form,
HttpServletRequest
request,
HttpServletResponse
response)
throws
Exception {
BlogService
service = new BlogService();
String
id = request.getParameter("id");
service.delete(Integer.parseInt(id));
return
(mapping.findForward("success"));
}
}
The list action is different because is uses no input
from the user. It simply calls the business service
with a no-argument method, and returns to the user the
list of domain objects that the service returns. Here
it is:
上面的这个Action和其他的Action有所不同,因为这个Action从用户那里接受数据。它仅仅调用业务服务的无参数构造方法,然后通过业务服务返回domain
object(域对象,就是blog对象)列表。
public class
ListBlogsAction extends Action {
public ActionForward execute(ActionMapping
mapping,
ActionForm
form,
HttpServletRequest
request,
HttpServletResponse
response)
throws
Exception {
BlogService
service = new BlogService();
request.setAttribute("bloglist",service.list());
return
(mapping.findForward("success"));
}
}
The Conversion to Struts2
转换为Struts2
In Struts2 there are many ways to implement the above
application. These vary from the same use-case-per-class
approach (as used in Struts) to creating a class hierarchy,
or even a single action class for all use cases. The
approach we are going to talk about is what I consider
to be the most optimized solution - a single class that
implements the CRUD functionality.
Additionally, we will keep the list use case separate.
This could be incorporated into the same class, but
there would be class attributes that are not used in
each use case (the Blog class in the
list use case, and the list of Blog
classes in all the other use cases) which could become
confusing.
For Struts2, we are able to show all the action classes
in a single UML model.
在Struts2当中,有很多的方法实现上述的应用程序。These
vary from the same use-case-per-class approach (as used
in Struts) to creating a class hierarchy, or even a
single action class for all use cases. 我们将要讨论的实现方法是我认为最优化的实现方法--使用一个类来实现CURD功能。
在Struts2当总和那个,我们可以在一个UMLmodel当中展示所有的Action
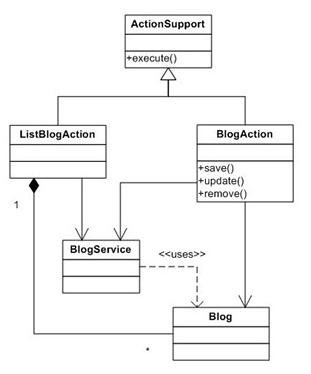
Each use case is realized with a method on the action.
From the UML diagram above, we see that on the
BlogAction we have a method for save, update
and remove. The view method is implemented using the
execute method, that is inherited from the
ActionSupport class. Similarly, on the ListBlogAction,
the list use case is implemented using the execute method.
For simplicity, three interfaces have been left off
of this diagram for the BlogAction.
These are the ServletRequestAware
interface, the Prepareable interface
and the ModelDriven interface.
The first interface is the ServletRequestAware,
which we covered in detail in Part I. Using this interceptor
provides access to the HttpServletRequest
object in the action, which will allow us to place objects
back in to the request to be rendered in the JSP's.
The Preparable interface is next,
and works in conjunction with the PrepareInterceptor.
When using these two pieces together, a prepare method
is provided which is called before the execute method.
This allows for setup, configuration or pre-population
code in the action.
In our case, the prepare method checks whether this
is a new blog or a pre-existing one by checking the
value of the blogId field. For a non-zero
value, the blog model is retrieved and set on the action.
Next is the ModelDriven interface.
In the previous article we saw that one of the most
profound differences is that in Struts the actions need
to be thread-safe, where in Struts2 there is no such
restriction. Each action is instantiated and invoked
on each request. Having this restriction removed in
Struts2 allows the action class to take advantage of
class-level attributes and methods (in particular getters
and setters). Combining this with interceptor functionality,
allows the attributes in the HttpServletRequest
to be set directly on the action.
每个用例使用Action当中的一个函数来实现。从上面的UML图我们可以看到在BlogAction当中有save,update和remove方法。view功能是在execute方法当中实现的,这个方法是从ActionSuppot类当中继承的。在ListBlogAction当中,列出用户的用例也是在execute方法当中实现的。
为了简单起见,BlogAction的三个接口都没有画出来,这三个接口是ServletRequestAware,Prepareable和ModelDriven。
第一个接口是ServletRequestAware,这个接口我们在上篇文章当中讨论过。使用这个拦截器可以为action提供访问HttpServletRequest对象的能力,这样就可以允许我们把数据放到request当中用于渲染JSP。
下一个是Preparable接口,是和PrepareInterceptor接口一起工作。当同时使用这两个接口时,一个prepare方法会在调用execute方法之前被调用,这个方法可以用作setup,configuration或者pre-population。t
在我们的用例当中,这个方法用于通过检查blogid域的值来确认这是一个新的blog还是已经存在的blog。如果blogid是一个非零的值,那么blog
model将会被得到,并设置到Action当中。
下一个是ModelDriven接口。在前面的文章当中,我们知道Struts和Struts2一个最大的区别就是Struts的Action需要时线程安全的,而Struts却没有这个约束。每个请求都会生成一个新的Action对象。Struts2没有这个约束之久,就可以在Action当中使用成员变量和成员函数(setter和getter)。结合这个接口和拦截器的功能,可以直接将HttpServletRequest当中的属性设置到action当中
It goes like this:
- The list of attribute names in the HTTP request
is iterated over
- A setter for the name of the current attribute is
searched for on the current action
- The value for the attribute name is retrieve from
the HttpServletRequest
- The value is converted to the correct type for the
setter in the action
- The converted value is then applied to the action
via the setter
The interceptor that provides this functionality is
the ParametersInterceptor interceptor.
TIP: When developing an action, if for some reason
the values are not being set correctly, a good first
step is to ensure that this interceptor is in the
stack applied to the action.
In fact, this is a good strategy to follow at all
times. When debugging an issue, if there seems to
be something out of place or not working the way that
is expected, there is a good chance that it is interceptor
related. Check the interceptors that are being applied,
and the order in which they are being applied. Interceptors
may interfere with each other in ways that you may
not expect.
Now that we have the string-based form or request attributes
being applied to the actions, the next step is to have
them applied to the fields of a domain object or value
/ transfer object. This is very easy. In fact, the only
things that you need to do different as a developer
is to implement the ModelDriven interface
(which has a single getModel() method)
and ensure that the ModelDrivenInterceptor
is applied to the action.
过程如下:
1.迭代HTTP request当中所有属性的名字;
2.在action当中查找有没有和当前属性名字匹配的setter方法;
3.从HttpServletRequest当中根据属性的名字获取属性的值;
4.将得到的值转换为正确的类型;
5.调用setter方法设置到action当中;
提供这些功能是的ParametersInterceptor拦截器。
TIP:当开发一个action当中,如果因为某些原因而导致属性的值并没有正确的设置,第一个要确认的步骤是保证拦截器在拦截器栈当中,并对action起作用。
实际上,有一个很好的策略。当需要调试一个问题是。如果发现某个东西不在位置或者不能工作,可能就会和interceptor有关。查看一下拦截器是否被应用,拦截器的顺序是够正确。拦截器可能会以一种你不期望的方式互相影响。
现在,我们有一个已经设置了基于String的fomr或者是request里面的参数的Action,下个步骤试讲这些数据设置到domain
object上,或者value/transfer object.这是非常简单了。事实上,我们作为开发者唯一要做的事是实现ModelDrivern接口(这个接口当中只有一个getModel()方法),并且要确实ModelDrivenInterceptor已经设置到这个action上。
Now, instead of finding a setter on the action, the
model is first retrieved and checked to see whether
it has a setter matching the attribute name. If there
is no such setter on the model object, but there is
on the action, then the value will be set on the action.
We see this flexibility in practice in the BlogAction
- as well as the fields for the Blog model object, there
is a setId() method on the action.
This allows the id of the blog to be set on the action
and used in the prepare method to pre-fetch the correct
Blog instance, before the values for the fields of the
object are set directly on the Blog instance retrieved.
With these two features in place, the implementation
of the methods that will be invoked on the action becomes
trivial - the specific business service is called, and
data to be rendered is placed in the HttpServletRequest.
现在,首先在model对象里面查找setter方法,看看这个setter方法和属性的名称是否匹配,然后将相应的属性设置到model当中,而不是在Action当中寻找setter方法。如果在model当中没有setter方法,而是在action当中,那么属性的值就会被设置到action。我们会在实现BlogAction的过程当中看到这种实现方法的灵活性,--就像在blog
model对象当中一样,在action当中也有一个setId()方法。这样就可以将blog的ID设置在action当中,并且在prepare方法(就是Preparable借口当中的方法)当中预取正确的blog对象,This
allows the id of the blog to be set on the action and
used in the prepare method to pre-fetch the correct
Blog instance, before the values for the fields of the
object are set directly on the Blog instance retrieved.
因为有了这两个特性,调用业务服务以及将需要渲染的数据设置到HttpServletRequest当中就变得没有意义了。
public class
BlogAction extends ActionSupport
implements
ModelDriven, Preparable, ServletRequestAware {
private int blogId;
private Blog blog;
private BlogService service
= new BlogService();
private HttpServletRequest
request;
public void setServletRequest(HttpServletRequest
httpServletRequest) {
this.request
= httpServletRequest;
}
public void setId(int
blogId) {
this.blogId
= blogId;
}
public void prepare()
throws Exception {
if(
blogId==0 ) {
blog
= new Blog();
}
else {
blog
= service.findById(blogId);
}
}
public Object getModel()
{
return
blog;
}
public String save()
{
service.create(blog);
return
SUCCESS;
}
public String update()
{
service.update(blog);
request.setAttribute("blog",blog);
return
SUCCESS;
}
public String remove()
{
service.delete(blogId);
return
SUCCESS;
}
public String execute()
{
request.setAttribute("blog",blog);
return
SUCCESS;
}
}
Last is the list action. It also requires access to
the HttpServletRequest object to provide data to render
and, hence, must implement the ServletRequestAware interface.
But, because it takes no input to perform the use case,
there is no need for the additional interfaces. Here
is the implementation:
在list action当中,也需要访问HttpServletRequest对象来提供需要渲染的数据,因此必须实现ServletRequestAware接口。但是在这个用例当中,并没有输入,所以就不需要实现其他的接口
public class
ListBlogsAction extends ActionSupport implements ServletRequestAware
{
private BlogService service
= new BlogService();
private HttpServletRequest
request;
public void setServletRequest(HttpServletRequest
httpServletRequest) {
this.request
= httpServletRequest;
}
public String execute()
{
request.setAttribute("bloglist",service.list());
return
SUCCESS;
}
}
This completes our implementation of the action code.
In the final part of the series we will be able to simplify
the action even further - when we combine it with a
new Struts2 user interface.
以上就是我们所有实现action的代码。在本系列文章的最后一部分,我们会使用struts2的新用户接口将action变得更加简单
Configuring the Actions
配置Actions
Before we can invoke any of the actions from a browser
we need to configure them. This is achieved via XML
configuration files.
For Struts, we use a file named "struts-config.xml"
in the WEB-INF directory, in which we will need to configure
two elements - the action form and the action itself.
The Struts2 configuration, using a file named "struts.xml'
in the classes directory, is a little more complex,
as we need to configure interceptors, as well as actions.
The Struts configurations' form-beans
node is easy, with attributes for a unique name (provided
by the developer) and a type, which is the package and
name of the ActionForm class.
在我们在浏览器当中调用action之前,我们必须首先进行配置。配置是通过XML文件进行的。
在Struts当中,我们使用在WEB-INF文件夹当中的"struts-config.xml"文件,需要配置这个文件的两个元素--action
form和action。在Struts2的配置当中,使用在classes目录当中的"struts.xml"文件,比struts稍微复杂一些的是我们需要配置拦截器。
在Struts当中配置"form-beans"节点是非常容易的,需要一个唯一的名字(由开发者提供)和一个类型,类型就是ActionForm的包名+类名
<struts-config>
<form-beans>
<form-bean
name="blogForm"
type="com.fdar.articles.infoq.conversion.struts.BlogForm"/>
</form-beans>
...
</struts-config>
There are three different ways that we are configuring
the actions in the example application.
1. Redirect Configuration
In this configuration no action class is used. Instead,
the request is forwarded onto a JSP with no backend
processing.
In the Struts configuration, each mapping provides
a path element that maps to the URL that will invoke
the action, i.e. the path "/struts/add" maps
to the URL "/struts/add.do". There is also
a forward attribute that provides
the URL to forward to - in this case, "/struts/add.jsp"
我们有三种方法来配置样例程序当中action
1.Redirect配置
在这种配置当中不适用action,并且没有后端处理,只是将请求发动到一个JSP。
在struts的配置当中,我们在action当中调用的每个mapping都会提供一个路径元素和一个URL之间的映射。i.e.路径"/struts/add"映射到"/struts/add.do"。还有一个forward元素提供跳转的URL--在这个用例当中是"/struts/add.jsp"
<struts-config>
...
<action-mappings>
<action
path="/struts/add" forward="/struts/add.jsp"/>
...
</action-mappings>
</struts-config>
The Struts2 configuration has more structure to it.
在Struts2当中,配置的结构多一些:
<struts>
<include file="struts-default.xml"/>
<package name="struts2"
extends="struts-default" namespace="/struts2">
<action
name="add" >
<result>/struts2/add.jsp</result>
</action>
...
</package>
</struts>
The first thing you have probably noticed is that instead
of an action-mappings node, there is an include
and package node. Struts2 modularizes
the configuration by allowing you to sub-divide the
configuration into an arbitrary number of files. Each
file has exactly the same structure, just different
names.
The include node, using the file attribute
for the name of the file, inserts the contents of an
external file into the current file. The package
node groups together actions, and must have a value
for the name attribute that is unique.
In the Struts action configuration, the path attribute
specified the entire URL. In Struts2, the URL is a concatenation
of the namespace attribute of the package, the
name attribute of the action
node, and the action extension (defaulting to ".action").
The action above would then be invoked by "/struts2/add.action".
The last attribute of the package node is the
extends attribute. As well as providing namespace
separation, packages also provide structure. By extending
another package you gain access to its configuration
- actions, results, interceptors, exceptions, etc. The
"struts2" package above extends the "struts-default"
package (defined in the included file "struts-default.xml")
- this is the master include file that should be the
first line of all configurations. It will save you typing
by providing all the default configurations for result
types, interceptors, and the more common interceptor
stacks that can be used.
Last is the result node, and is just
a value for the URL to forward to. What we have left
out are the name and type
attributes. Unless you are changing these from the default
values, you can leave them out, making the configuration
simpler. The default values render a JSP for a "success"
result being returned from the action.
我们首先注意到的不是action-mappings节点,而是include和package节点。sturts2模块化得配置允许你将配置细分到人一多的文件当中。每个文件的结构一样,不同的只是名字。
在include节点上,file属性的值是是一个文件的名字,将这个外部文件的内容插入到当前的文件当中。package节点将所有的action组织在一起,每个aciton的name属性值必须是唯一的。
在struts action的哦诶之当中,path属性制定了一个实体URL。在Struts2当中,URL是一个与以下属性相关的东西--package的namespace属性,action节点的name属性和action的扩展名(默认的是".action").上面的action应该使用"/sturts2/add.action"来调用。
package节点的最后一个属性是extends。package不但提供命名空间的分隔符,而且还提供组织结构。通过继承其他的配置文件,你可以访问它的action,resulet,interceptor和异常等等。在上面的配置文件当中,“struts2”包继承了"struts-default"(定义在包含文件"struts-default.xml"当中那个),这个包含文件应该在所有的配置文件的第一行就包含进去。它会为你提供所有默认的配置,包括result类型,拦截器,和常用的拦截器栈;
在result当中,配置的是跳转的目标URL。我们省略了这个标签的name和type属性。除非你想修改默认值,构造就可以省略他们,这样可以使配置简单。默认的,在action当中返回“success”就可以渲染JSP。
2. Action Configuration
action 配置
An action class is invoked to provide backend processing,
the result from processing is defined in the configuration
and the user redirected to the corresponding view.
This is the next step from a configuration that is
a redirect configuration. There are two additional attributes
on the action node. The type attribute
provides the package and name of the action class, and
the scope attribute ensures that any form beans (if
used) are placed in the request scope.
Instead of a forward attribute, the
action configuration uses a forward
node. There should be one node for each and every result
that the action can return.
调用action进行后台处理,返回一个在配置当中定义的result,然后用户就会重定向到相应的view。
这就是在配置文件当中的redirect的作用。在action节点当中有另外两个属性,type属性指定了action的包名+类名,scope属性指定了form
baen要放在request当中。
在action的配置当中使用forward节点,而不是使用forward属性。这样就可以为action的每个可能返回的结果配置一个forward
<struts-config>
...
<action-mappings>
<action
path="/struts/list" scope="request"
type="com.fdar.articles.infoq.conversion.struts.ListBlogsAction"
>
<forward
name="success" path="/struts/list.jsp"/>
</action>
...
</action-mappings>
</struts-config>
In the case of an action configuration, the XML for
the Struts2 configuration is similar to before. The
only difference being that the package and name of the
action to be invoked is provided via the class attribute
on the action node.
在这个action的案例当中,struts2的配置和前面类似。唯一的区别是action的包名和类名是通过action节点当中的class属性来设置的。
<struts>
...
<package name="struts2"
extends="struts-default" namespace="/struts2">
<default-interceptor-ref
name="defaultStack"/>
<action
name="list"
class="com.fdar.articles.infoq.conversion.struts2.ListBlogsAction">
<result>/struts2/list.jsp</result>
<interceptor-ref
name="basicStack"/>
</action>
...
</package>
</struts>
If a method other than the execute method is to be
invoked (which will be the case for most of the configurations
referencing the BlogAction class),
a method attribute provides the name of the method.
In the example below, the update method would be invoked.
如果想调用除execute方法之外的其他方法(which
will be the case for most of the configurations referencing
the BlogAction class),需要在action节点当中配置一个名为method的属性。就像下面的例子,将会调用update方法。
<action
name="update" method="update"
class="com.fdar.articles.infoq.conversion.struts2.BlogAction"
>
...
</action>
The difference comes from the default-interceptor-ref
and the interceptor-ref nodes. In
Part I, we saw how the request passes through a series
of interceptors before the action is invoked, these
nodes configure the interceptors. The default-interceptor-ref
node provides the name of the interceptor stack to use
as the default for the package. When the interceptor-ref
node is provided, it overrides the default interceptor
(the name attribute on the interceptor-ref
node can reference either a single interceptor or a
stack of interceptors that have been previously configured).
Additionally, multiple interceptor-ref
nodes can be provided, with processing occurring in
the order that they are listed.
下面让我们看看default-interceptor-ref和interceptor-ref节点之间的区别。在第一个部分当中,我们看到在调用action之前,reuqest会通过一系列的拦截器。default-interceptor-ref节点指明了这一个包中所要使用的默认拦截器栈。如果有interceptor-ref节点,它会覆盖默认的拦截器(interceptor-ref节点的name属性可以使用之前声明了任意一个拦截器或拦截器栈)。如果有多个interceptor-ref节点,那么它们执行的顺序就是它们排列的顺序。
3. Post-Redirect Configuration
3.Post-Redirect 配置
The final configuration we are using is for submitting
forms when there is an additional requirement that refreshing
the resulting page should not re-submit the form. This
is known as the "post-redirect pattern" or,
more recently, "flash scope."
As this is a form, we need to specify the
ActionForm that Struts will be using. This
is achieved by providing the name of
the form (configured above) in the name attribute of
the action node. The only other change
that is needed is setting the redirect attribute to
true in the forward node.
我们的最后一项配置是保证我们的程序不会出现重复提交问题。This
is known as the "post-redirect pattern" or,
more recently, "flash scope."
我们需要为这个表单指定一个ActionFOrm供Struts使用。我们需要为这个action节点的name属性提供表单的name值(我们在前面配置过)。另外我们还需要将forward节点的redirect属性的值改为true。
<struts-config>
...
<action-mappings>
<action
path="/struts/save"
type="com.fdar.articles.infoq.conversion.struts.SaveBlogEntryAction"
name="blogForm"
scope="request">
<forward
name="success" redirect="true" path="/struts/list.do"/>
</action>
...
</action-mappings>
</struts-config>
Rather than augmenting the existing configuration,
Struts2 provides the post-redirect functionality through
a new type of result. So far we have used the default
"dispatch" result type, but there are many
different result types available. The result used here
is the "redirect" type.
在Struts2当中通过使用一种新的result类型来实现post-redirect功能。迄今为止我们需要使用默认的"dispatch"result类型但是还有很多其他的类型可以使用,在这里我们使用"redirect"类型。
<struts>
...
<package name="struts2"
extends="struts-default" namespace="/struts2">
<action
name="save" method="save"
class="com.fdar.articles.infoq.conversion.struts2.BlogAction"
>
<result
type="redirect">list.action</result>
<interceptor-ref
name="defaultStack"/>
</action>
...
</package>
</struts>
Once again, we are using the default result of "success".
我们再次使用了默认的"succes"result类型
Wrap-Up
总结
We've been able to cover a lot in this article, but
there are some things that we didn't have time for.
For a better understanding of the framework and additional
implementation options, here is a short list of things
to take a look at:
- Configuring interceptors and interceptor stacks
- take a look at the "struts-default.xml"
file in the struts2-core JAR file for examples. Creating
your own interceptors for cross-cutting application
features can be a great time saver, and the examples
in "struts-default.xml" will show you how
to configure your own application-based interceptor
stacks that includes the new interceptor.
- Wildcard patterns in configuration files
- as well as typing everything out, there is an option
of using wildcard patterns in Struts2. This is a port
of the Struts implementation to Struts2.
- Utilize UI property maps using the ParameterAware
interface - instead of having a model / transfer
/ value object or specific attributes on a class,
you can configure Struts2 to place all the request
or form attributes into a map in the action. This
simulates the dynamic form feature of Struts.
Another question you might be asking yourself is "does
this really work with the same UI?" - and the answer
is yes. I have included the
full source code for the examples in this article,
and you will see from these that the only change necessary
is to modify the extension of the URL being called (from
".do" to ".action"). Additionally,
the Struts taglibs (for forms) could have been easily
used instead of JSTL. I will leave this as an exercise
for interested readers.
In the next and final article in the series we look
at the user interface. We will talk about the architecture;
look into themes and tags; talk about how validation
fits into the picture; and discuss ways to re-use code
using UI components. After which, we will have a fully
transformed application.
我们在这篇文章当中覆盖了很多内容,但是还有一些东西我们没有时间讲完。为了能够更好的理解框架和额外的实现选项,我们提供了一个清单:
1.配置拦截器和拦截器栈--看看struts2-core
JAR 文件中的"struts-default.xml"文件当中的例子。创建你自己的拦截器和
cross-cutting application,这样可以节省很多的时间。在"struts-default.xml"文件当中的例子会告诉你通过包含新的拦截器,来配置你自己的应用程序基础拦截器栈。
2.配置文件的通配符模式--as
well as typing everything out,在Struts2当中也可以使用通配符模式。This
is a port of the Struts implementation to Struts2.
3.通过ParameterAware接口来使用UI当中的属性--除了在类但中使用model/transfer/value对象之外,你可以配置Struts2将所有的request或者form参数放入action当中的一个map。这是模仿sturts当中的动态form特性。
你可能会有一个疑问-“如果UI是完全一样的也可以么”,答案是肯定的。我包含了这个例子所有的源代码,你可以通过这个代码来了解上述的这个特性,你所要做的只是修改一下所调用URL的扩展名(从".do"变为".action")。另外Struts标签可以很容易的被JSTL替代。,如果大家感兴趣,可以试试。
在本系列的最后一篇文章当中我们讨论用户接口。我们将会讨论体系结构,theme和tag,讨论验证图片以及如何能够通过UI组件来提高代码的复用性。到时,我们会得到一个完全转换好的应用程序。
| 

