| ±аәНЖәц: |
±ңОДҢІҢвБЛCucumberИэөуЧйіЙӘ¬Features
Уп·Ё№жФтӘ¬CucumberµДүҒ·ұ№эіМ,ПӘНыДЬ¶ФДъУРЛщ°пЦъҰӘ
±ңОДАөЧФУЪcsdnӘ¬УЙ»рБъ№ыИнәюDelores±аәҰұНЖәцҰӘ |
|
1.1 КІГөКЗBDDӘЁРРОҒЗэ¶ҮүҒ·ұӘ©
КЧПИБЛҢвТ»ёцёЕДоӘ¬BDDӘЁBehaviorDrivenDevelopmentӘғРРОҒЗэ¶ҮүҒ·ұӘ©ОҒУГ»§МṩБЛөУ үҒ·ұИЛФ±ғНүН»§µДРиЗуөөҢЁІвКФҢЕ±ңµД»ъ»бҰӘТтөЛӘ¬үҒКәК±Ә¬үҒ·ұИЛФ±Ә¬ПоДүңАнӘ¬ЦКБү±ӘЦ¤Ә¬УГ»§СйКХІвКФИЛФ±ғНІъЖ·ЛщУРХЯӘЁ№Й¶«Ә©¶әЖлңЫТ»МГӘ¬әҮЛә№гТжӘ¬МЦВЫУ¦ёГө«µЭДДР©ІвКФіҰң°Ә¬ТФ±гіЙ№¦µчУГөЛИнәю/У¦УГіМРтҰӘХвСщЛыГЗПліцБЛТ»ЧйІвКФіҰң°ҰӘЛщУРХвР©ІвКФҢЕ±ң¶әКЗәтµӨµДУпСФӘ¬ЛщТФЛьТІүЙТФ·юОсУЪОДµµҰӘ
1.2 Cucumber әтҢй
CucumberКЗТ»ёцІвКФүтәЬҰӘУРИЛЛµӘ¬ХвёцүтәЬ·ЗіӘККғПUIЧФ¶Ү»ҮІвКФӘ¬ЛыІ»
ҢцДЬ°СУГАэЦРµДІвКФІҢЦиТФ·ЗіӘУСғГµДРОКҢХ№ПЦіцАөӘ¬¶шЗТДЬ№»·ЗіӘБй»оµД№№ҢЁіҰң°ҰӘ
Cucumber КЗТ»ёцДЬ№»АнҢвУГЖХНЁУпСФ ГиКцµДІвКФУГАэµДРРОҒЗэ¶ҮүҒ·ұӘЁBDDӘ©µДЧФ¶Ү»ҮІвКФ№¤ңЯӘ¬УГRuby±аРөӘ¬Ц§іЦJavaғНҰ¤NetµИ¶аЦЦүҒ·ұУпСФҰӘ
CucumberүЙТФИГИЛГЗУГҢьЛЖЧФИ»µДУпСФИӨГиКцFeatureӘЁКІГөКЗFeatureФЪғуГжУРҢІКцӘ©ғНіҰң°Ә¬ёщңЭFeatureЗэ¶ҮүҒ·ұҰӘУГЧчИнәюәәКхИЛФ±ғН·ЗәәКхЦ®әдСйКХІвКФµДЗЕБғҰӘЛьКЗТ»ёцГьБоРР№¤ңЯҰӘФЛРРғуӘ¬»бЦөРРfeaturesЦРµДДЪИЭҰӘfeatureЦРµДstep»бµчУГstepdefinitionsӘЁRubyөъВлӘ©үЙТФУГ±кЗ©АөЧйЦҮіҰң°Ц§іЦ40¶аЦЦУпСФёЯЦКБүәҮіЙRubyҰӘ
УЕµгӘғ
CucumberЦ§іЦІ»Н¬µДУпСФӘ¬АэИзJavaҰұ.netҰұRuby
Льідµ±ТµОсУләәКхәдЗЕБғµДҢЗЙ«ҰӘүЙТФНЁ№эФЪөүУұОДОД±ңЦРөөҢЁТ»ёцІвКФУГАэАөКµПЦХвТ»µгҰӘ
ЛьФКРнФЪІ»ЦҒµАИОғОөъВлµДЗйүцПВ±аРөІвКФҢЕ±ңӘ¬ЛьФКРн·ЗіМРтФ±ІОУлҰӘ
ЛьТФ¶ЛµҢ¶ЛІвКФүтәЬОҒДүµД
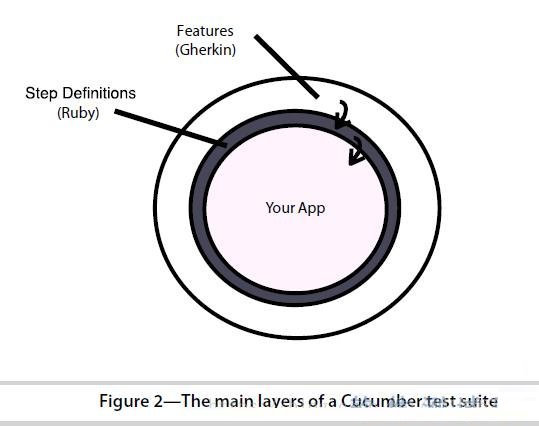
УЙУЪәтµӨµДІвКФҢЕ±ңәЬ№№Ә¬CucumberМṩБЛөъВлүЙЦШУГРФ
1.3 CucumberИэөуЧйіЙ
CucumberУРИэёцЦШТҒЧйіЙІү·ЦӘ¬FeaturesҰұStep_definitionsҰұCucumber command
ЧйәюЦ®әдµД№¤ЧчФАнИзНәӘғ
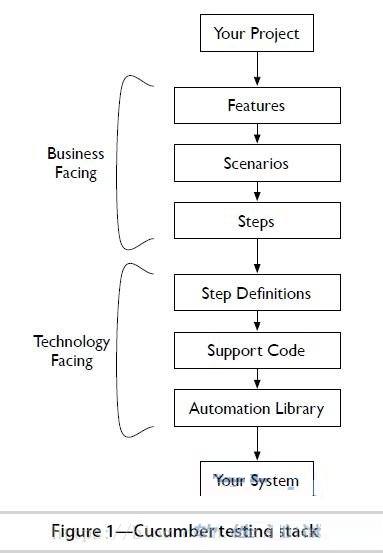
1.4 Features
Уп·Ё№жФтӘғ
»щУЪGherkinҰӘGherkinКЗТ»ЦЦәтµӨµДУұУпОД±ңУпСФӘ¬ЛьУРЦъУЪ№¤ңЯЁCCucumberҢвКНғНЦөРРІвКФҢЕ±ңҰӘЦ§іЦУпСФӘғ# language: en ӘЁzh-CNӘ©µИ
FeaturesОДәю±ШРлТФ.featuresГьГыҰӘ°ьғ¬titleӘ¬¶аёцscenariosӘ¬Гүёцscenario°ьғ¬¶аёцstepҰӘ
Step¶ЁТе±ШРлТФ№ШәьЧЦGivenӘ¬WhenӘ¬ThenӘ¬AndүҒКәҰӘ
1.5 Step_definitions
ёщңЭfeatureОДәюЦР¶ЁТеµДstep±аРө¶ФУ¦µДІвКФөъВл
1.6 Cucumber command
ФЛРРӘғ*.featureОДәюҰӘcucumber»б·ЦОцfeatureОДәюЦР¶ЁТеµДstepӘ¬И»ғуИӨstep - definitionsС°ХТПаЖӨЕдµДstepӘ¬ЦөРРstepЦРµДөъВлҰӘФЛРРҢб№ыТФhtmlµДРОКҢ±ӘөжӘ¬failµДЗйүцІйүө¶ФУ¦logИХЦңҰӘФЪIDEAЙПүЙТФЦ±ҢУµг»чІвКФАаҢшРРФЛРРӘ¬ңЯМе»бФЪғуГжµДАэЧУЦРҢшРРЛµГчҰӘ
1.7 CucumberµДүҒ·ұ№эіМ
өөҢЁfeatureОДәюӘ¬°ьАЁfeature,scenariosғНstepҰӘ
өөҢЁstep_definitionsҰӘIDEAЦРүЙУТ»чЧФ¶ҮөөҢЁҰӘ
cucumber ЁCformat progressҰӘёсКҢ»ҮКдіцҰӘүЙРЮёДОҒhtmlӘ¬xmlµИёсКҢКдіцҰӘ
МнәУ¶ПСФӘғ
Т»ёціҰң°К§°ЬӘ¬CucumberҢ«өЛіҰң°±кәЗК§°ЬӘ¬ЧҒИӨЦөРРПВТ»іҰң°ҰӘ
Т»ёцstepК§°ЬӘ¬»бМш№эХвёцscenarioµДЖдУаstepӘ¬өУ¶шЦХЦ№ХвёцscenarioҰӘ
1.8 Кµәщ
1.КЧПИөөҢЁТ»ёцMAVEN ПоДүҰӘ
Т»В·nextЦ±µҢөөҢЁНкіЙҰӘ
2. ФЪpom.xml ОДәюЦРМнәУЛщРиТҒµДТААµ
<dependencies>
<dependency>
<groupId>info.cukes
</groupId>
<artifactId>cucumber-
java</artifactId>
<scope>test</scope>
<version>1.2.4</version>
</dependency>
<dependency>
<groupId>info.cukes</groupId>
<artifactId>cucumber-
jvm</artifactId>
<version>1.2.4</version>
<type>pom</type>
</dependency>
<dependency>
<groupId>info.cukes</groupId>
<artifactId>cucumber-junit
</artifactId>
<version>1.2.4</version>
<exclusions>
<exclusion>
<groupId>junit</groupId>
<artifactId>junit</artifactId>
</exclusion>
</exclusions>
</dependency>
<dependency>
<groupId>junit</groupId>
<artifactId>junit</artifactId>
<version>4.12</version>
</dependency>
<dependency>
<groupId>org.seleniumhq.
selenium</groupId>
<artifactId>selenium-java
</artifactId>
<!--<version>2.9</version>-->
</dependency>
</dependencies> |
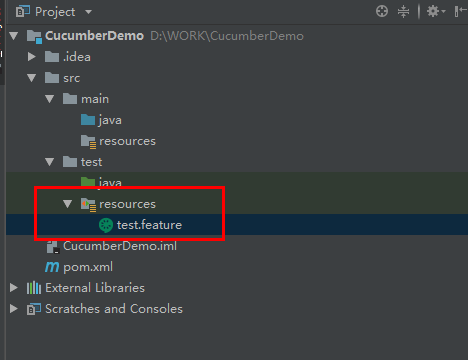
3.ФЪtestДүВәПВөөҢЁresourcesДүВәӘ¬Іұ±кәЗОҒtestResourceДүВәӘ¬ФЪЖдПВөөҢЁtest.featureОДәюӘ¬ІұҢшРР±аРөҰӘ
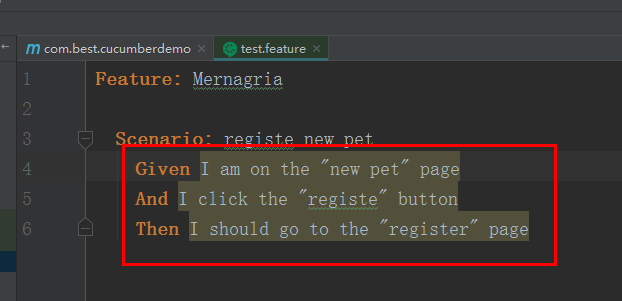
Feature: Mernagria
Scenario: registe new pet
Given I am on the "new pet" page
And I click the "registe" button
Then I should go to
the "register" page |
¶ФУ¦ө«НіІвКФ№¤ңЯӘғ
FeatureӘғөэІв№¦ДЬµДГыіЖҰӘ
DescriptionӘЁүЙСҰӘ©ӘғГиКцІвКФЦРµД№¦ДЬҰӘ
ScenarioӘғКІГөКЗІвКФіҰң°ҰӘ
WhenӘғОҒБЛЦөРРПВТ»ІҢЦиӘ¬У¦ёГЖӨЕдµДМШ¶ЁМхәюҰӘ
ThenӘғИз№ыВъЧгWHENЦРМбµҢµДМхәюӘ¬У¦ёГ»б·ұЙъКІГөҰӘ
өЛК±test.featureОДәюЦР»бУРМбКңӘ¬
4.өөҢЁfeatureОДәю¶ФУ¦µДstep¶ЁТеАаҰӘ
°өЧҰALT+EnterӘ¬өөҢЁ¶ФУ¦µДjavaАаӘ¬ТІңНКЗstep¶ЁТеАаОДәюӘ¬
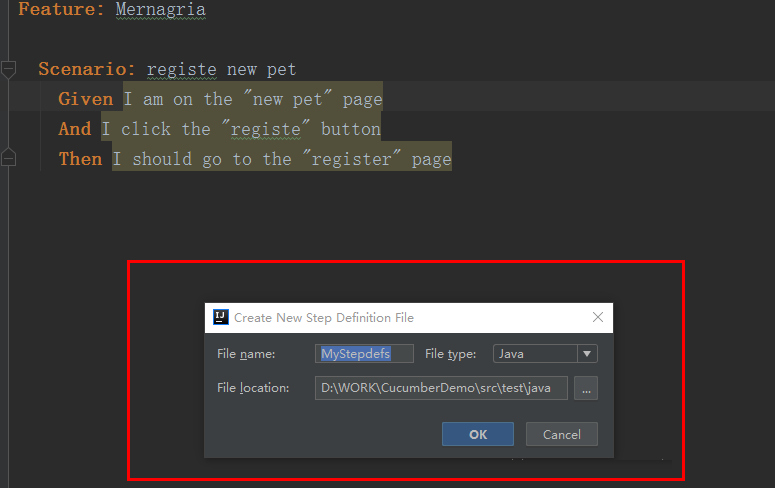
µГµҢТ»ёцРВµДАаТФә°¶ФУ¦µД·Ң·ЁМеҰӘ
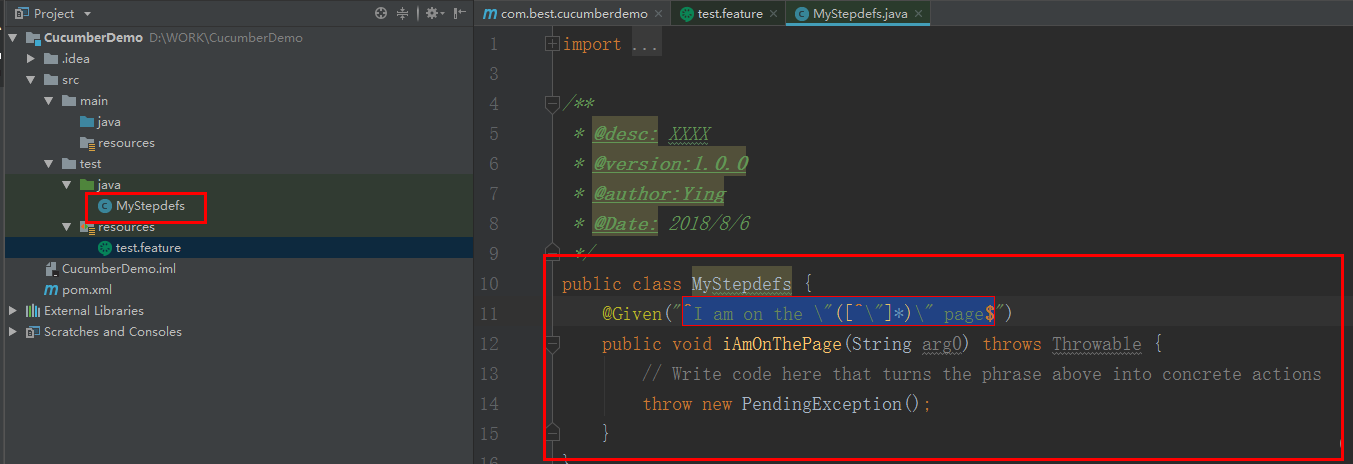
ЖдЦРMyStepdefsКЗЙПТ»ІҢЧФ¶ҮЙъіЙµДstep¶ЁТеАаӘ¬ЖдЦРµД·Ң·ЁМеФтКЗёщңЭЗ°Гжtest.featureОДәюЦРµДµЪТ»ңдЧФ¶ҮЙъіЙµДӘ¬ОТГЗТІүЙТФТ»өОРФЙъіЙЛщУРµД¶ФУ¦·Ң·ЁӘ¬»тХЯТ»ІҢТ»ІҢЙъіЙҰӘЧоЦХҢб№ыИзПВ MyStepdefs.java ҰӘ
import cucumber.api.
PendingException;
import cucumber.api.
java.en.And;
import cucumber.api.
java.en.Given;
import cucumber.api.
java.en.Then;
/**
* @desc: XXXX
* @version:1.0.0
* @author:Ying
* @Date: 2018/8/6
*/
public class MyStepdefs {
@Given("^I am on the \"
([^\"]*)\"
page$")
public void iAmOnThePage
(String arg0) throws Throwable{
// Write code here that
turns the phrase above
into
concrete actions
throw new PendingException();
}
@And("^I click the \"
([^\"]*)\"
button$")
public void iClickTheButton
(String arg0) throws Throwable{
// Write code here that turns
the phrase above
into concrete
actions
throw new PendingException();
}
@Then("^I should go to the
\"([^\"]*)\"
page$")
public void iShouldGoToThePage
(String arg0) throws Throwable{
// Write code here that turns
the phrase above
into concrete
actions
throw new PendingException();
}
} |
5.өөҢЁІвКФЖф¶ҮАаҰӘ
ФЪtest/javaВ·ң¶ПВ өөҢЁDemoRun javaАаӘ¬өъВлИзПВӘғ
import cucumber.api.
CucumberOptions;
import cucumber.api.
junit.Cucumber;
import org.junit.
runner.RunWith;
/**
* @desc: XXXX
* @version:1.0.0
* @author:Ying
* @Date: 2018/8/6
*/
@RunWith(Cucumber.class)
@CucumberOptions
(features = "src/test/resources")
public class DemoRun {
} |
ЖдЦР@RunWithЧұҢвңНКЗЦё¶ЁФЛРРµДКЗ»Ж№вІвКФүтәЬӘ¬@CucumberOptionsФтКЗЦё¶Ё¶ФУ¦µДfeatureОДәюЛщФЪµДО»ЦГӘ¬өЛө¦КЗsrcДүВәПВµДtestПВµДresourcesОДәюәРҰӘ
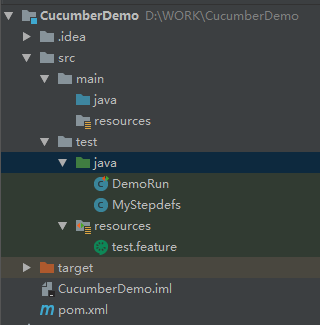
ЧоЦХµДОДәюҢб№№ИзПВӘғ
УТәьФЛРРDemoRunӘ¬µГµҢИзПВКдіцӘғ
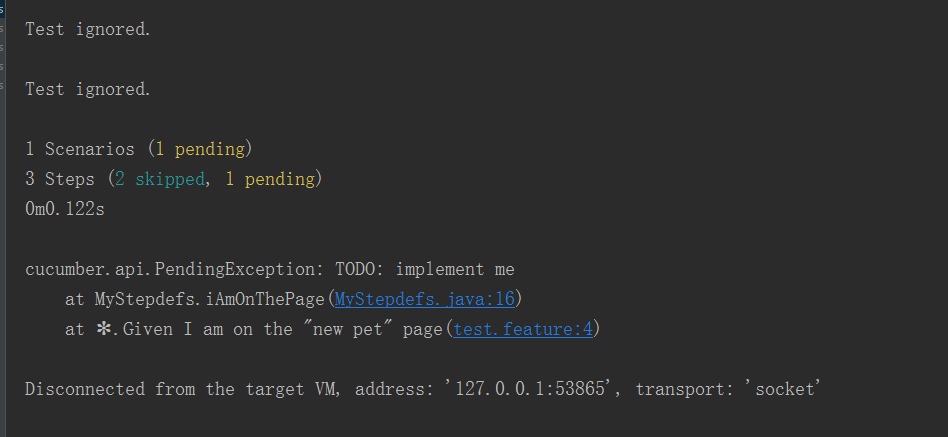
өУЦРүөңНКЗОТГЗµДІвКФӘ¬Т»ёцScenariosӘ¬ИэёцSteps Т»ёц№ТЖрӘ¬2ёцМш№эҰӘ
Из№ыОТГЗ°СµЪТ»ёцstepёДОҒ
@Given("^I
am on the
\"([^\"]*)\" page$")
public Boolean iAmOnThePage
(String arg0) throws Throwable{
// Write code here that
turns the phrase above
into
concrete actions
// throw new PendingException();
System.out.println("ХвКЗµЪТ»ІҢ");
return true;
} |
ФЩөОФЛРРӘ¬µГµҢИзПВҢб№ы
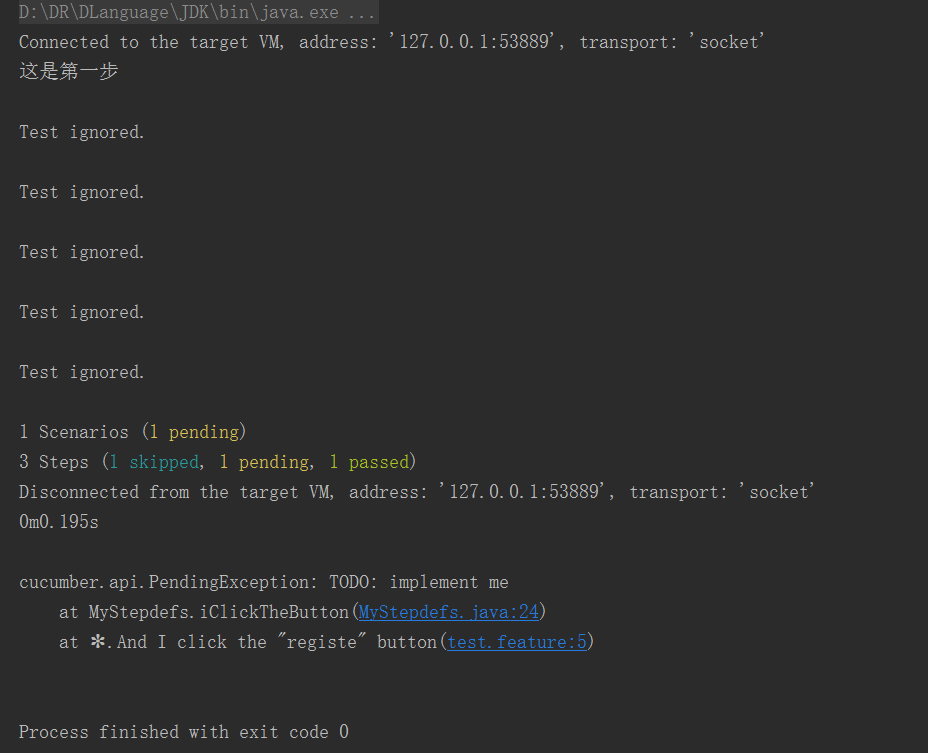
Иф3ёц¶әёДОҒ·µ»ШtureӘ¬ФтИ«ОҒpassҰӘ
Чоғу»№ТҒЛµТ»µгӘ¬іэБЛүЙТФЦ±ҢУµг»чDemoRun·Ң·ЁФЛРРІвКФТФНвӘ¬ОТГЗ»№үЙТФФЪtest/java В·ң¶ПВРВҢЁТ»ёцДүВәӘ¬±ИИзrunОДәюәРӘ¬И»ғуФЪЖдЦРөөҢЁғНЗ°ГжMyStepdefsДЪИЭТ»СщµДjavaАаҰӘөөҢЁНкіЙғуӘ¬УТ»чresourcesДүВәПВµДtest.featureОДәюӘ¬СҰФсҰ±Create featuer testҰ±,ИзПВНәЛщКң
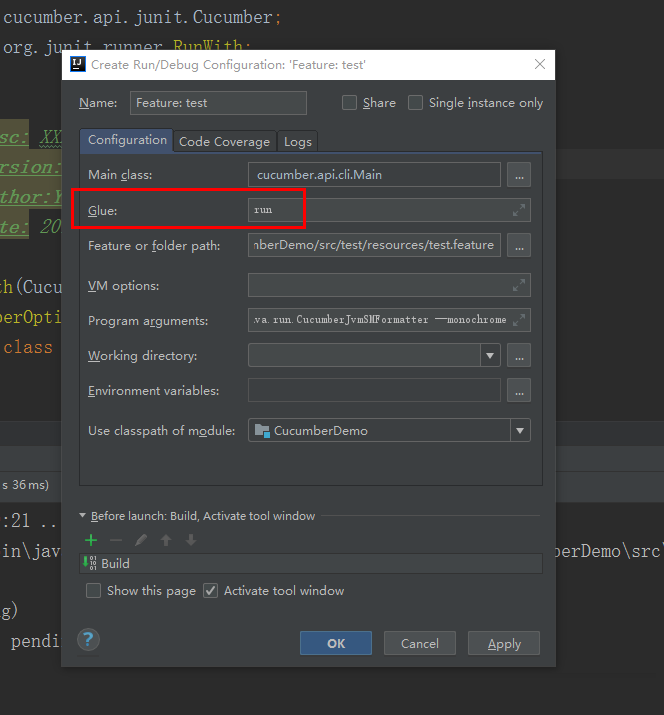
ЧұТвӘ¬ФЪGlueЦРМоРөStep¶ЁТеАаµДВ·ң¶Ә¬өЛө¦ОҒrunОДәюәРҰӘөөҢЁНкіЙғуµг»чФЛРР

Р§№ыУлЗ°ГжµДЦ±ҢУµг»чDemoRunТ»СщҰӘ
ЦБөЛӘ¬ОТГЗµДµЪТ»ёцРҰDemoТСңЕЬЖрАөБЛҰӘ
|