| package com.zzx.test;
import static org.testng.Assert.assertEquals;
import org.testng.annotations.Test;
import com.zzx.pageObject.LoginPage;
import com.zzx.util.BaseTest;
public class LoginTest extends BaseTest{
LoginPage loginPage = new LoginPage();
String LoginURL = "http://oneadmin.peersafe.cn/logout";
/**
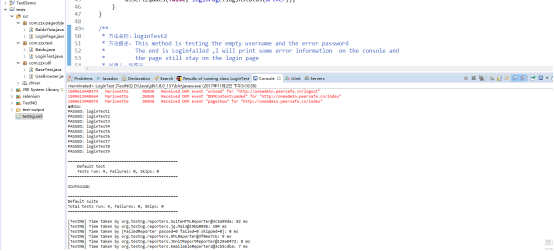
* ·Ң·ЁГыіЖӘғloginTest1
* ·Ң·ЁГиКцӘғ This method is testing the empty username
and the right password
* The end is Loginfailed ,I will print some
error information on the console and
* the page still stay on the login page
* өөҢЁИЛӘғzzx
* өөҢЁК±әдӘғ2017Дк9ФВ12ИХ ПВОз5:33:27
* РЮёДИЛӘғzzx
* РЮёДК±әдӘғ2017Дк9ФВ12ИХ ПВОз5:33:27
* РЮёД±ёЧұӘғ
* @version 1.0
* @throws Exception maybe some exception will
happen
*/
//үХµДУГ»§ГығНХэИ·µДГЬВлӘ¬µЗВәК§°ЬӘ¬үШЦЖМЁКдіцҰ°УГ»§ГыөнОуӘҰҰ±
@Test(priority=1)
public void loginTest1() throws Exception{
if(!loginPage.isLoginPage(driver)){
driver.get(LoginURL);
}
try {
loginPage.login(driver, "","$z58dSHE");
} catch (Exception e) {
System.out.println(e);
}
finally {
assertEquals(false, loginPage.loginStatus(driver));
}
}
/**
* ·Ң·ЁГыіЖӘғloginTest2
* ·Ң·ЁГиКцӘғ This method is testing the empty username
and the error password
* The end is Loginfailed ,I will print some
error information on the console and
* the page still stay on the login page
* өөҢЁИЛӘғzzx
* өөҢЁК±әдӘғ2017Дк9ФВ12ИХ ПВОз5:33:27
* РЮёДИЛӘғzzx
* РЮёДК±әдӘғ2017Дк9ФВ12ИХ ПВОз5:33:27
* РЮёД±ёЧұӘғ
* @version 1.0
* @throws Exception maybe some exception will
happen
*/
//үХµДУГ»§ГығНөнОуµДГЬВлӘ¬µЗВәК§°ЬӘ¬үШЦЖМЁКдіцҰ°УГ»§ГыөнОуӘҰҰ±
@Test(priority=2)
public void loginTest2() throws Exception{
if(!loginPage.isLoginPage(driver)){
driver.get(LoginURL);
}
try {
loginPage.login(driver, "","$z58dSH");
} catch (Exception e) {
System.out.println(e);
}
finally {
assertEquals(false, loginPage.loginStatus(driver));
}
}
/**
* ·Ң·ЁГыіЖӘғloginTest3
* ·Ң·ЁГиКцӘғ This method is testing the right username
and the empty password
* The end is Loginfailed ,I will print some
error information on the console and
* the page still stay on the login page
* өөҢЁИЛӘғzzx
* өөҢЁК±әдӘғ2017Дк9ФВ12ИХ ПВОз5:33:27
* РЮёДИЛӘғzzx
* РЮёДК±әдӘғ2017Дк9ФВ12ИХ ПВОз5:33:27
* РЮёД±ёЧұӘғ
* @version 1.0
* @throws Exception maybe some exception will
happen
*/
//ХэИ·УГ»§ГығНүХµДГЬВлӘ¬µЗВәК§°ЬӘ¬үШЦЖМЁКдіцҰ°ГЬВлІ»ХэИ·Ұ±
@Test(priority=3)
public void loginTest3() throws Exception{
if(!loginPage.isLoginPage(driver)){
driver.get(LoginURL);
}
try {
loginPage.login(driver, "admin","");
} catch (Exception e) {
System.out.println(e);
}
finally {
assertEquals(false, loginPage.loginStatus(driver));
}
}
/**
* ·Ң·ЁГыіЖӘғloginTest4
* ·Ң·ЁГиКцӘғ This method is testing the error username
and the empty password
* The end is Loginfailed ,I will print some
error information on the console and
* the page still stay on the login page
* өөҢЁИЛӘғzzx
* өөҢЁК±әдӘғ2017Дк9ФВ12ИХ ПВОз5:33:27
* РЮёДИЛӘғzzx
* РЮёДК±әдӘғ2017Дк9ФВ12ИХ ПВОз5:33:27
* РЮёД±ёЧұӘғ
* @version 1.0
* @throws Exception maybe some exception will
happen
*/
//өнОуУГ»§ГығНүХµДГЬВлӘ¬µЗВәК§°ЬӘ¬үШЦЖМЁКдіцҰ°УГ»§ГыөнОуӘҰҰ±
@Test(priority=4)
public void loginTest4() throws Exception{
if(!loginPage.isLoginPage(driver)){
driver.get(LoginURL);
}
try {
loginPage.login(driver, "admim","");
} catch (Exception e) {
System.out.println(e);
}
finally {
assertEquals(false, loginPage.loginStatus(driver));
}
}
/**
* ·Ң·ЁГыіЖӘғloginTest5
* ·Ң·ЁГиКцӘғ This method is testing the empty username
and the empty password
* The end is Loginfailed ,I will print some
error information on the console and
* the page still stay on the login page
* өөҢЁИЛӘғzzx
* өөҢЁК±әдӘғ2017Дк9ФВ12ИХ ПВОз5:33:27
* РЮёДИЛӘғzzx
* РЮёДК±әдӘғ2017Дк9ФВ12ИХ ПВОз5:33:27
* РЮёД±ёЧұӘғ
* @version 1.0
* @throws Exception maybe some exception will
happen
*/
//үХµДУГ»§ГығНүХµДГЬВлӘ¬µЗВәК§°ЬӘ¬үШЦЖМЁКдіцҰ°УГ»§ГыөнОуӘҰҰ±
@Test(priority=5)
public void loginTest5() throws Exception{
if(!loginPage.isLoginPage(driver)){
driver.get(LoginURL);
}
try {
loginPage.login(driver, "","");
} catch (Exception e) {
System.out.println(e);
}
finally {
assertEquals(false, loginPage.loginStatus(driver));
}
}
/**
* ·Ң·ЁГыіЖӘғloginTest6
* ·Ң·ЁГиКцӘғ This method is testing the error username
and the error password
* The end is Loginfailed ,I will print some
error information on the console and
* the page still stay on the login page
* өөҢЁИЛӘғzzx
* өөҢЁК±әдӘғ2017Дк9ФВ12ИХ ПВОз5:33:27
* РЮёДИЛӘғzzx
* РЮёДК±әдӘғ2017Дк9ФВ12ИХ ПВОз5:33:27
* РЮёД±ёЧұӘғ
* @version 1.0
* @throws Exception maybe some exception will
happen
*/
//өнОуУГ»§ГығНөнОуµДГЬВлӘ¬µЗВәК§°ЬӘ¬үШЦЖМЁКдіцҰ°УГ»§ГыөнОуӘҰҰ±
@Test(priority=6)
public void loginTest6() throws Exception{
if(!loginPage.isLoginPage(driver)){
driver.get(LoginURL);
}
try {
loginPage.login(driver, "admim","$z58dSH");
} catch (Exception e) {
System.out.println(e);
}
finally {
assertEquals(false, loginPage.loginStatus(driver));
}
}
/**
* ·Ң·ЁГыіЖӘғloginTest7
* ·Ң·ЁГиКцӘғ This method is testing the right username
and the error password
* The end is Loginfailed ,I will print some
error information on the console and
* the page still stay on the login page
* өөҢЁИЛӘғzzx
* өөҢЁК±әдӘғ2017Дк9ФВ12ИХ ПВОз5:33:27
* РЮёДИЛӘғzzx
* РЮёДК±әдӘғ2017Дк9ФВ12ИХ ПВОз5:33:27
* РЮёД±ёЧұӘғ
* @version 1.0
* @throws Exception maybe some exception will
happen
*/
//ХэИ·УГ»§ГығНөнОуµДГЬВлӘ¬µЗВәК§°ЬӘ¬үШЦЖМЁКдіцҰ°ГЬВлІ»ХэИ·Ұ±
@Test(priority=7)
public void loginTest7() throws Exception{
if(!loginPage.isLoginPage(driver)){
driver.get(LoginURL);
}
try {
loginPage.login(driver, "admin","$z58dSH");
} catch (Exception e) {
System.out.println(e);
}
finally {
assertEquals(false, loginPage.loginStatus(driver));
}
}
/**
* ·Ң·ЁГыіЖӘғloginTest8
* ·Ң·ЁГиКцӘғ This method is testing the error username
and the right password
* The end is Loginfailed ,I will print some
error information on the console and
* the page still stay on the login page
* өөҢЁИЛӘғzzx
* өөҢЁК±әдӘғ2017Дк9ФВ12ИХ ПВОз5:33:27
* РЮёДИЛӘғzzx
* РЮёДК±әдӘғ2017Дк9ФВ12ИХ ПВОз5:33:27
* РЮёД±ёЧұӘғ
* @version 1.0
* @throws Exception maybe some exception will
happen
*/
//өнОуУГ»§ГығНХэИ·ГЬВлӘ¬µЗВәК§°ЬӘ¬үШЦЖМЁКдіцҰ°УГ»§ГыөнОуӘҰҰ±
@Test(priority=8)
public void loginTest8() throws Exception{
if(!loginPage.isLoginPage(driver)){
driver.get(LoginURL);
}
try {
loginPage.login(driver, "admim","$z58dSHE");
} catch (Exception e) {
System.out.println(e);
}
finally {
assertEquals(false, loginPage.loginStatus(driver));
}
}
/**
* ·Ң·ЁГыіЖӘғloginTest9
* ·Ң·ЁГиКцӘғ This method is testing the right username
and the right password
* The end is successed ,I will print some
successed information on the console and
* the page will into the home page
* өөҢЁИЛӘғzzx
* өөҢЁК±әдӘғ2017Дк9ФВ12ИХ ПВОз5:33:27
* РЮёДИЛӘғzzx
* РЮёДК±әдӘғ2017Дк9ФВ12ИХ ПВОз5:33:27
* РЮёД±ёЧұӘғ
* @version 1.0
* @throws Exception maybe some exception will
happen
*/
//ХэИ·УГ»§ГығНХэИ·ГЬВлӘ¬µЗВәіЙ№¦Ә¬үШЦЖМЁКдіцҰ°µЗВәіЙ№¦ӘҰҰ±
@Test(priority=9)
public void loginTest9() throws Exception{
if(!loginPage.isLoginPage(driver)){
driver.get(LoginURL);
}
try {
loginPage.login(driver, "admin","$z58dSHE");
} catch (Exception e) {
System.out.println(e);
}
finally {
assertEquals(true, loginPage.loginStatus(driver));
}
}
} |