| 编辑推荐: |
| 本文来自csdn,本文介绍了如何使用开发工具IntellijIDEA来搭建Swagger应用的相关内容。 |
|
在开发中我们经常会碰到这种情况:后台开发人员在开发完接口之后给前台人员调用,前台人员对接口的作用以及接口中的参数往往不懂,这样前台不得不多次跟后台人员沟通交流,很浪费时间。但使用Swagger后,这种情况就几乎不存在了,因为后台开发人员在写接口的同时便把接口及参数的注释写好了,在Swagger页面可以非常清楚明了的看到各个接口以及各个参数的意思。
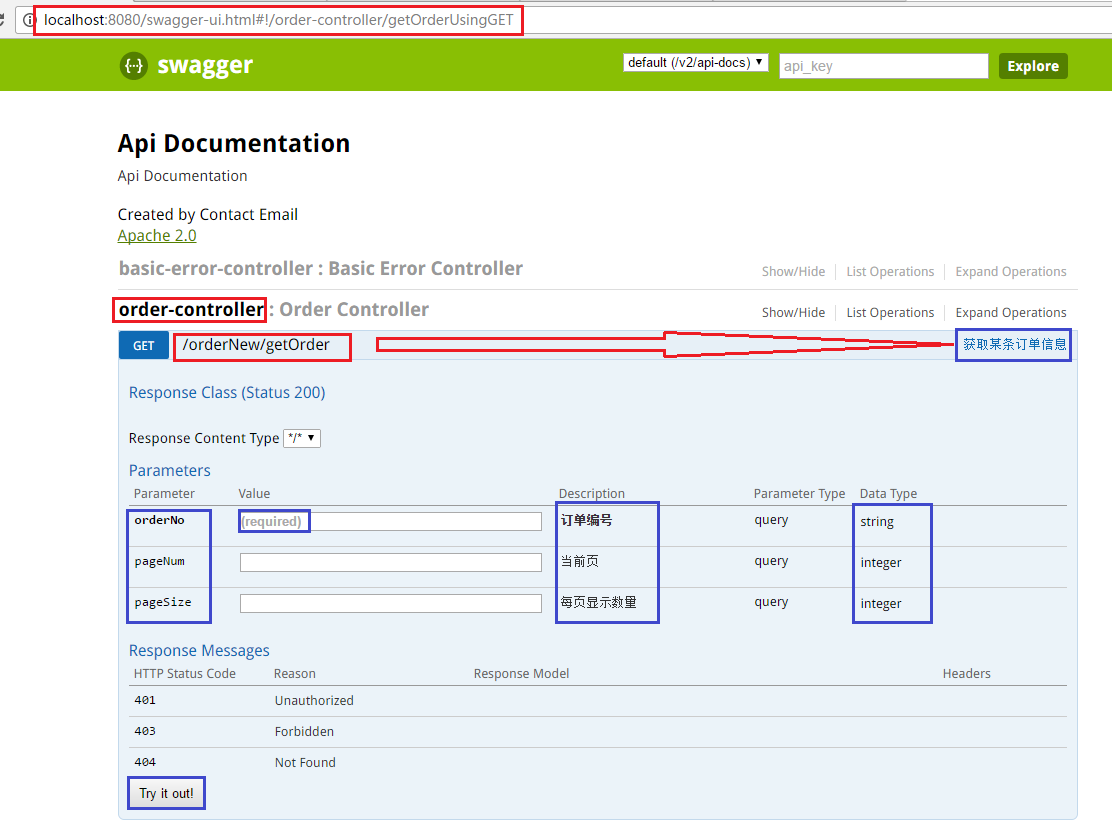
我们先看看效果图,下图中明确显示了当前访问的接口属于"order-controller",显示了请求url路径为"/orderNew/getOrder",显示了该接口的作用为"获取某条订单信息",显示了这个接口所用到的三个参数以及三个参数的名称以及类型。我们还可以点击下面的"Try
it out!"按钮来进行测试。有了它,后台人员不用讲解,前端人员自然能明白。
下面就说下如何使用开发工具IntellijIDEA来搭建Swagger应用。
第一步: 首先新建一个空的Maven工程
第二步:在pom.xml文件中添加如下依赖
<parent>
<groupId>org.springframework.boot</groupId>
<artifactId>spring-boot-starter-parent</artifactId>
<version>1.4.1.RELEASE</version>
<relativePath />
</parent>
<dependencies>
<dependency>
<groupId>org.springframework.boot</groupId>
<artifactId>spring-boot-starter-web</artifactId>
<version>1.4.1.RELEASE</version>
</dependency>
<dependency>
<groupId>org.springframework</groupId>
<artifactId>spring-web</artifactId>
<version>4.3.6.RELEASE</version>
</dependency>
<dependency>
<groupId>org.springframework</groupId>
<artifactId>spring-test</artifactId>
<version>4.3.3.RELEASE</version>
</dependency>
<dependency>
<groupId>org.springframework.boot</groupId>
<artifactId>spring-boot-starter-test</artifactId>
<version>1.4.1.RELEASE</version>
</dependency>
<dependency>
<groupId>io.springfox</groupId>
<artifactId>springfox-swagger2</artifactId>
<version>2.2.2</version>
<exclusions>
<exclusion>
<artifactId>spring-context</artifactId>
<groupId>org.springframework</groupId>
</exclusion>
<exclusion>
<artifactId>spring-aop</artifactId>
<groupId>org.springframework</groupId>
</exclusion>
<exclusion>
<artifactId>spring-beans</artifactId>
<groupId>org.springframework</groupId>
</exclusion>
<exclusion>
<artifactId>spring-web</artifactId>
<groupId>org.springframework</groupId>
</exclusion>
<exclusion>
<artifactId>spring-webmvc</artifactId>
<groupId>org.springframework</groupId>
</exclusion>
<exclusion>
<artifactId>spring-core</artifactId>
<groupId>org.springframework</groupId>
</exclusion>
<exclusion>
<artifactId>jackson-annotations</artifactId>
<groupId>com.fasterxml.jackson.core</groupId>
</exclusion>
<exclusion>
<artifactId>slf4j-api</artifactId>
<groupId>org.slf4j</groupId>
</exclusion>
</exclusions>
</dependency>
<dependency>
<groupId>io.springfox</groupId>
<artifactId>springfox-swagger-ui</artifactId>
<version>2.2.2</version>
</dependency>
</dependencies> |
第三步:在com目录或者其子目录下新建一个Application类,如下图所示。注意一定要在com或其子目录下,否则启动不了。

Application的代码如下
package com;
import org.springframework.boot.SpringApplication;
import org.springframework.boot.autoconfigure
.EnableAutoConfiguration;
import org.springframework.boot.autoconfigure
.SpringBootApplication;
import org.springframework.boot.builder
.SpringApplicationBuilder;
import org.springframework.boot.web.support
.SpringBootServletInitializer;
import springfox.documentation.swagger2
.annotations.EnableSwagger2;
/**
* test-sc
* Created by Grady on 2017/4/18.
*/
@EnableSwagger2
@SpringBootApplication
//@ImportResource("classpath:/META-INF/spring
/spring-dubbo-provider.xml")
@EnableAutoConfiguration//启用自动配置
//@ComponentScan("com.filter,com.controller,
com.manager,com.api.impl")
public class Application extends
SpringBootServletInitializer
{
@Override
protected SpringApplicationBuilder configure
(SpringApplicationBuilder
application) {
return application.sources(Application.class);
}
public static void main(String[] args) {
SpringApplication.run(Application.class);
}
} |
第四步:在Controller中写接口
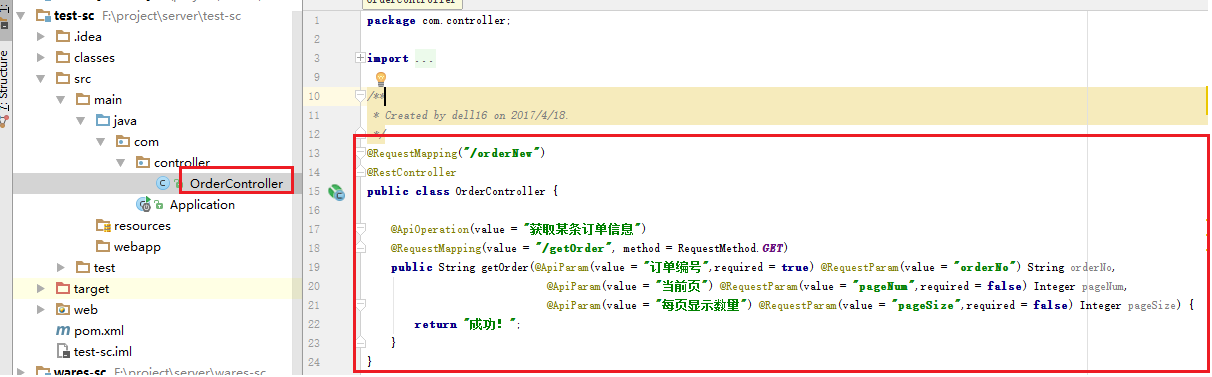
Controller类代码如下
package com.controller;
import io.swagger.annotations.ApiOperation;
import io.swagger.annotations.ApiParam;
import org.springframework.web.bind.annotation.RequestMapping;
import org.springframework.web.bind.annotation.RequestMethod;
import org.springframework.web.bind.annotation.RequestParam;
import org.springframework.web.bind.annotation.RestController;
/**
* Created by dell16 on 2017/4/18.
*/
@RequestMapping("/orderNew")
@RestController
public class OrderController {
@ApiOperation(value = "获取某条订单信息")
@RequestMapping(value = "/getOrder",
method = RequestMethod.GET)
public String getOrder(@ApiParam(value = "订单编号",required
= true) @RequestParam(value = "orderNo")
String orderNo,
@ApiParam(value = "当前页") @RequestParam(value
= "pageNum",required = false) Integer
pageNum,
@ApiParam(value = "每页显示数量") @RequestParam(value
= "pageSize",required = false) Integer
pageSize) {
return "成功!";
}
} |
有了上面这四步,启动这个工程,就可以输入http://localhost:8080/swagger-ui.html#!/order-controller/getOrderUsingGET来访问Swagger页面了。 |