| ±аәНЖәц: |
±ңОДАөЧФУЪcsdnӘ¬Robot
FrameworkКЗТ»ёц»щУЪPythonүЙА©Х№µШ№ШәьЧЦЗэ¶ҮµДІвКФЧФ¶Ү»ҮүтәЬ.
|
|
К№УГApache License 2.0Ә¬УЙRobot Framework
FoundationүҒ·ұғНФЮЦъҰӘRobot Framework±»№г·ғµШК№УГФЪ¶ЛµҢ¶ЛµШСйКХІвКФТФә°ATDDӘЁacceptance-test-driven
development Ә©ЦРӘ¬ЙъМ¬МеПµ·ЗіӘ·бё»Ә¬ёьПкПёµДРЕПұүЙТФІОүөhttp://robotframework.orgҰӘ±ңОДҢ«әтµӨҢйЙЬИзғО°ІЧ°Robot
FrameworkТФә°ФЛРРµЪТ»ёцHello WorldµДАэЧУҰӘ
ОҒЙхчбК№УГRobot Framework
УРғЬ¶аАнУЙК№µГRobot Framework·ЗіӘКЬ»¶УӘ¬±ИИзӘғ
Ц§іЦәтµӨТЧУГµД±нёсРНУп·ЁӘ¬К№µГүЙТФУГНіТ»·ҢКҢөөҢЁІвКФУГАэ
МṩүЙТФёөУГәИөжµД№ШәьЧЦµД№¦ДЬ
МṩHTMLµДәтµӨТЧ¶БµД±Ё±нғНИХЦңҢб№ыОДәю
ЖҢМЁғНУ¦УГПа»Ө¶АБұ
МṩәтµӨµДLibary APIӘ¬үЙТФК№УГPtyhon»тХЯjavaҢшРРКµПЦ
МṩГьБоРРҢУүЪТІXMLёсКҢµДКдіцОДәюӘ¬·ЗіӘИЭТЧҢшРРіЦРшәҮіЙ
Ц§іЦSeleniumӘ¬Java GuiІвКФӘ¬TelnetӘ¬SSHµИ
Ц§іЦөөҢЁКэңЭЗэ¶ҮµДІвКФУГАэ
±дБүµДДЪҢЁЦ§іЦӘ¬УИЖдКЗІ»Н¬ІвКФ»·ңіПВµДІвКФ
Мṩtest caseғНtest suiteә¶±рµДsetupғНteardown
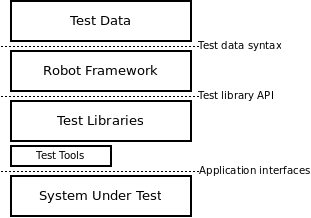
RobotәЬ№№
RobotКЗТ»ёцНЁУГµДІвКФүтәЬӘ¬ҢвсоЧцµДғЬғГӘ¬ЛдИ»ғЬәтµӨӘ¬ХыМеµДәЬ№№ИзПВЛщКңӘғ
°ІЧ°З°Мб
ТтОҒRobotКЗ»щУЪPythonҢшРРүҒ·ұµДӘ¬К№УГPython2»№КЗPython3КЗТ»ёцРиТҒСҰФсµДОКМвӘ¬python2КЗФЪ2010Дк·ұІәµДӘ¬ДүЗ°ОИ¶Ё°ж±ң2.7.5Ә¬python2»бЦ§іЦµҢ2020ДкӘ¬ЦБУЪёь¶аµДЗш±рӘ¬үЙТФІОүөИзПВОДХВТФңц¶ЁДгµДСҰФсҰӘ
ТтОҒГ»УРүәВЗµҢ»бУГµҢ±ИҢПРВµДpythonµД№¦ДЬӘ¬±ңОДµД°ІЧ°ІЙУГДүЗ°ОИ¶ЁµДPython2ҰӘ
[root@liumiaocn
~]# python --version
Python 2.7.5
[root@liumiaocn ~]# |
°ІЧ°PIP
robotµД°ІЧ°УРғЬ¶а·ҢКҢӘ¬ОҒБЛ±ЬГвµЪТ»ёцHelloWorld»Ё·СМ«¶аК±әдӘ¬№ы¶ПІЙИҰPIPЦ±ҢУ°ІЧ°µД·ҢКҢҰӘ
[root@liumiaocn
~]# yum install epel-release
Loaded plugins: fastestmirror
...
Installed:
epel-release.noarch 0:7-9
Complete!
[root@liumiaocn ~]#
[root@liumiaocn ~]# yum -y install python-pip
Loaded plugins: fastestmirror
...
Installed:
python2-pip.noarch 0:8.1.2-5.el7
Dependency Installed:
python-backports.x86_64 0:1.0-8.el7 python-backports-ssl_match_hostname.noarch
0:3.4.0.2-4.el7
python-setuptools.noarch 0:0.9.8-4.el7
Complete!
[root@liumiaocn ~]# |
И·ИПPIP°ж±ң
[root@liumiaocn
~]# pip --version
pip 8.1.2 from /usr/lib/python2.7/site-packages
(python 2.7)
[root@liumiaocn ~]# |
°ІЧ°Robot Framework
[root@liumiaocn
~]# pip install robotframework
Collecting robotframework
Downloading robotframework-3.0.2.tar.gz (440kB)
100% |ЁЂЁЂЁЂЁЂЁЂЁЂЁЂЁЂЁЂЁЂЁЂЁЂЁЂЁЂЁЂЁЂ ЁЂЁЂЁЂЁЂЁЂЁЂЁЂЁЂЁЂЁЂЁЂЁЂЁЂЁЂЁЂЁЂ| 450kB
344kB/s
Installing collected packages: robotframework
Running setup.py install for robotframework ...
done
Successfully installed robotframework-3.0.2
You are using pip version 8.1.2, however version
9.0.1 is available.
You should consider upgrading via the 'pip install
--upgrade pip' command.
[root@liumiaocn ~]# |
И·ИПRobot°ж±ң
[root@liumiaocn
~]# robot --version
Robot Framework 3.0.2 (Python 2.7.5 on linux2)
[root@liumiaocn ~]#
[root@liumiaocn ~]# rebot --version
Rebot 3.0.2 (Python 2.7.5 on linux2)
[root@liumiaocn ~]#
[root@liumiaocn ~]# pybot --version
Robot Framework 3.0.2 (Python 2.7.5 on linux2)
[root@liumiaocn ~]# |
RobotІвКФҢЕ±ң
Чә±ёңНРчӘ¬үЙТФүҒКәөөҢЁµЪТ»ёцІвКФҢЕ±ңБЛҰӘµЪТ»ёцHelloworldµДІвКФҢЕ±ңИзПВЛщКңӘғ
[root@liumiaocn
robot]# ls
helloworld.robot
[root@liumiaocn robot]# cat helloworld.robot
*** Settings ***
*** Variables ***
*** Test Cases ***
First test case
Begin web test
Second test case
End web test
*** Keywords ***
Begin web test
Log This is first test case
End web test
Log HelloWorld
[root@liumiaocn robot]# |
КмП¤№ШәьЧЦЗэ¶ҮІвКФµД¶әғЬИЭТЧµШүөµҢХвКЗЧцБЛБҢёц№ШәьЧЦғНБҢёцІвКФУГАэҰӘ
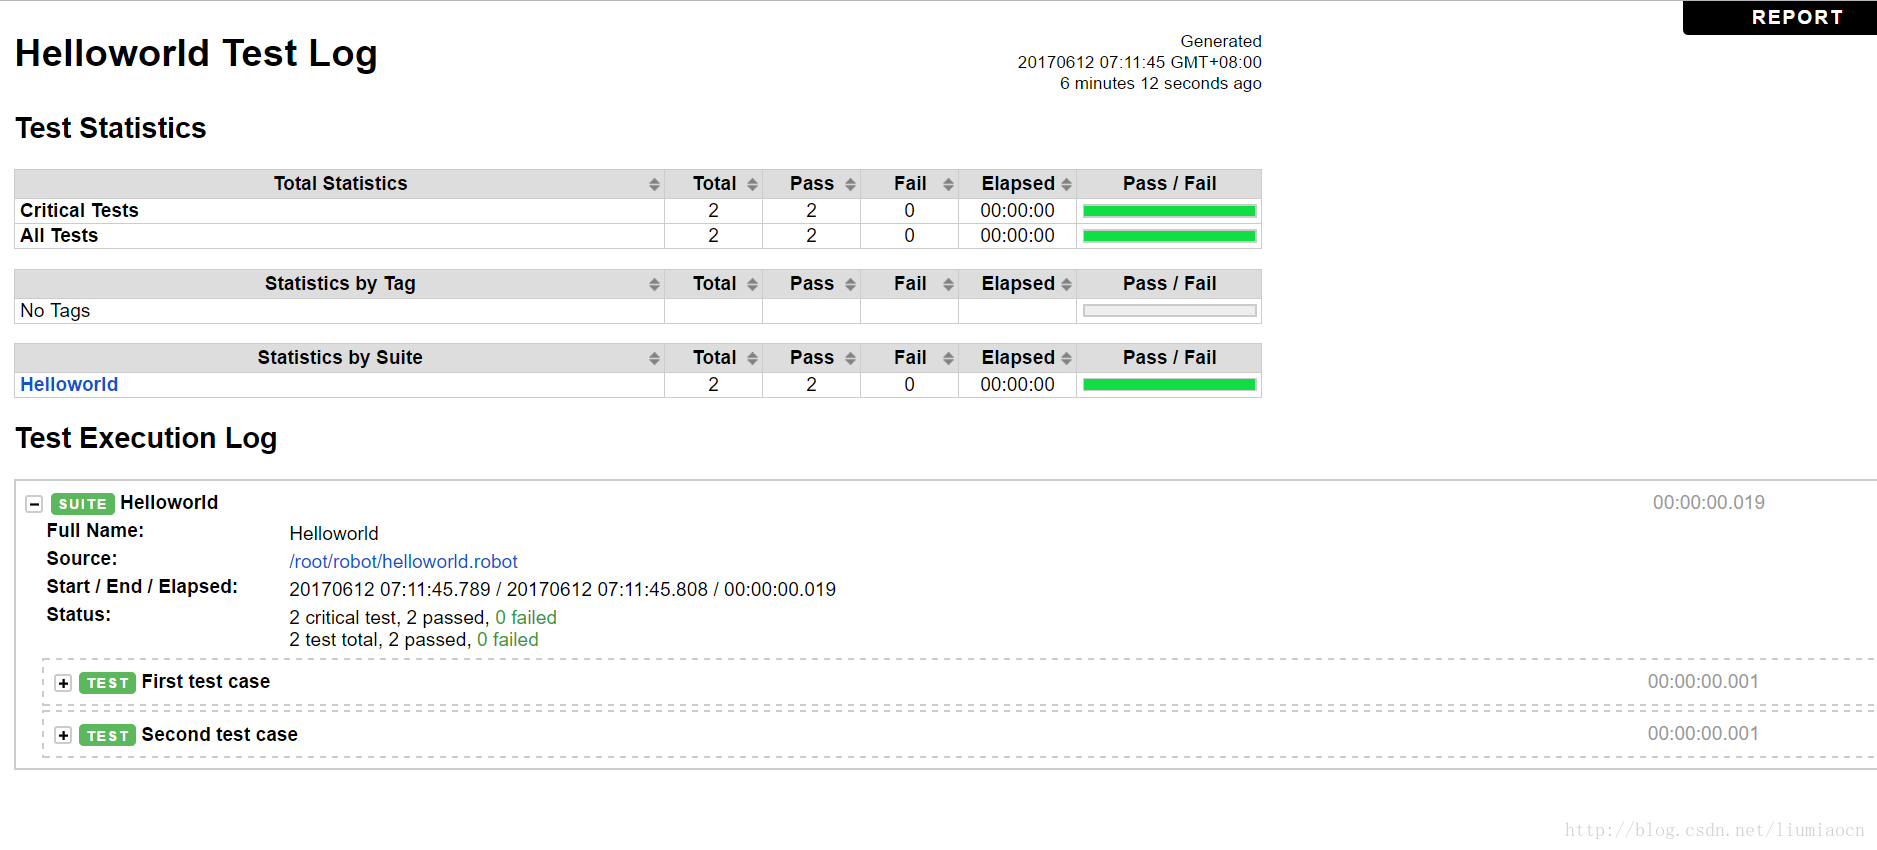
ЦөРРҢЕ±ң
К№УГrobot helloworld.robotәөүЙүҒКәЦөРРҰӘ

үЙТФЗеіюµШүөµҢІвКФУГАэµШЦөРРЗйүцТФә°ЛьµДКдіцҰӘ
ЦөРРҢб№ы
ЦөРРЦ®ғуІъЙъБЛИэёцҢб№ыОДәюӘғ
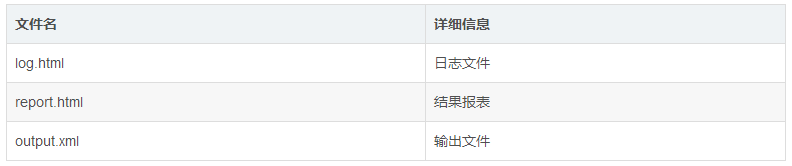
ИХЦңОДәю
Ңб№ы±Ё±н
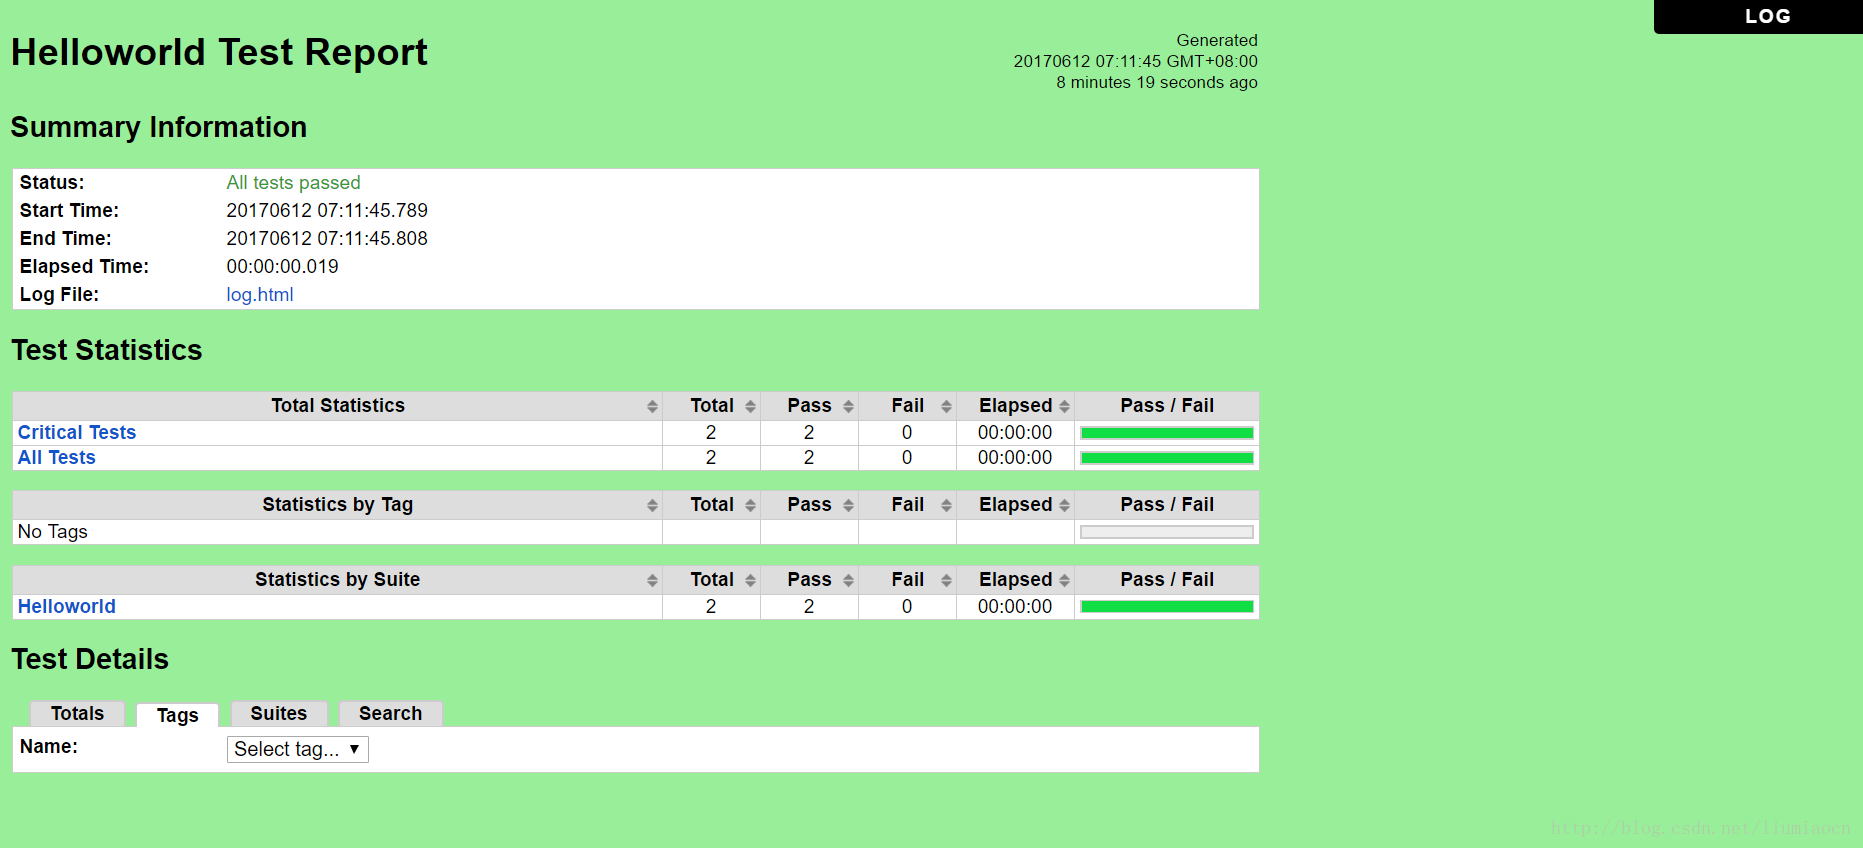
ЧұТвИХЦңОДәюғН±Ё±нОДәю¶әКЗЧФ¶ҮБ¬ҢУЖрАөµШӘ¬І»ТҒИЛОҒЛжТвёД±дЖдПа¶ФДүВәҰӘ
КдіцОДәю
ПкПёµДКдіцРЕПұӘ¬үЙТФК№УГЖдҢшРРёь·Ң±гµДіЦРшәҮіЙҰӘ
<?xml version="1.0"
encoding="UTF-8"?>
<robot generated="20170611 19:11:45.787"
generator="Robot 3.0.2 (Python 2.7.5 on linux2)">
<suite source="/root/robot/helloworld.robot"
id="s1" name="Helloworld">
<test id="s1-t1" name="First
test case">
<kw name="Begin web test">
<kw name="Log" library="BuiltIn">
<doc>Logs the given message with the given
level.</doc>
<arguments>
<arg>This is first test case</arg>
</arguments>
<msg timestamp="20170611 19:11:45.807"
level="INFO">This is first test case</msg>
<status status="PASS" endtime="20170611
19:11:45.807" starttime="20170611 19:11:45.806"></status>
</kw>
<status status="PASS" endtime="20170611
19:11:45.807" starttime="20170611 19:11:45.806"></status>
</kw>
<status status="PASS" endtime="20170611
19:11:45.807" critical="yes" starttime="20170611
19:11:45.806"></status>
</test>
<test id="s1-t2" name="Second
test case">
<kw name="End web test">
<kw name="Log" library="BuiltIn">
<doc>Logs the given message with the given
level.</doc>
<arguments>
<arg>HelloWorld</arg>
</arguments>
<msg timestamp="20170611 19:11:45.808"
level="INFO">HelloWorld</msg>
<status status="PASS" endtime="20170611
19:11:45.808" starttime="20170611 19:11:45.808"></status>
</kw>
<status status="PASS" endtime="20170611
19:11:45.808" starttime="20170611 19:11:45.807"></status>
</kw>
<status status="PASS" endtime="20170611
19:11:45.808" critical="yes" starttime="20170611
19:11:45.807"></status>
</test>
<status status="PASS" endtime="20170611
19:11:45.808" starttime="20170611 19:11:45.789"></status>
</suite>
<statistics>
<total>
<stat fail="0" pass="2">Critical
Tests</stat>
<stat fail="0" pass="2">All
Tests</stat>
</total>
<tag>
</tag>
<suite>
<stat fail="0" id="s1"
name="Helloworld" pass="2">Helloworld</stat>
</suite>
</statistics>
<errors>
</errors>
</robot> |
ЧЬҢб
±ңОДәтµӨҢйЙЬБЛRobot FrameworkµДёЕТҒРЕПұТФә°ИзғО°ІЧ°ғНЦөРРµЪТ»ёцRobotµДHelloworldµДІвКФҢЕ±ңӘ¬Н¬К±И·ИПБЛЖдКдіцµДҢб№ыҰӘRobotµДЗүөуФЪХвёцІвКФҢЕ±ңЦРНкИ«ОЮ·ЁµГµҢМеПЦӘ¬ғуРш»бВэВэХ№үҒRobot
FrameworkµДёчЦЦК№УГ·Ң·ЁҰӘ
|