| БрМЭЦМі: |
ЮФеТНщЩмСЫSpring
BootЕФгХШБЕуЃЌЯожЦЃЌАВзАНщЩмМАвЛаЉЪЕР§ЃЌЯЃЭћЖдДѓМвЕФбЇЯАгаЫљАяжњЁЃ
БОЮФРДздгкМђЪщЃЌгЩЛ№СњЙћШэМўDeloresБрМЁЂЭЦМіЁЃ |
|
1. Spring Boot
1). МђНщ
Spring Boot ЪЧгЩ Pivotal ЭХЖгЬсЙЉЕФШЋаТПђМмЃЌЦфЩшМЦФПЕФЪЧгУРДМђЛЏаТ Spring гІгУЕФГѕЪМДюНЈвдМАПЊЗЂЙ§ГЬЁЃИУПђМмЪЙгУСЫЬиЖЈЕФЗНЪНРДНјааХфжУЃЌДгЖјЪЙПЊЗЂШЫдБВЛдйашвЊЖЈвхбљАхЛЏЕФХфжУЁЃ
2). КУДІ
ЃЈ1ЃЉЫќЪЧSpringЕФЩ§МЖАцЃЌSpringШнЦїФмзіЕНЕФЪТЧщЃЌЫќЖМФмзіЕНЃЌЖјЧвИќМђБуЃЌДгХфжУаЮЪНЩЯРДЫЕЃЌSpringBootЭъШЋХзЦњСЫЗБЫіЕФXMLЮФМўХфжУЗНЪНЃЌЖјЪЧЬцДњадЕигУзЂНтЗНЪНРДЪЕЯжЃЌЫфШЛБОжЪРДЫЕЃЌЪЧВюВЛЖрЕФЃЈРрЫЦАќЩЈУшЃЌзЂНтЩЈУшЃЌРрМгдижЎРрЃЉЁЃ
ЃЈ2ЃЉSpringBootМЏГЩЕФВхМўИќЖрЃЌДгЖјЪЙгУКмЖрЗўЮёЃЌЖМжЛЪЧв§ШывЛИівРРЕЃЌМИИізЂНтКЭJavaРрОЭПЩвдгУСЫЃЌОпЬхЕФВЮПМЯрЙиЪжВсЁЃ
ЃЈ3ЃЉдкWebгІгУПЊЗЂетвЛПщЃЌжЎЧАЕФгІгУвЛАуРДЫЕЪЧДђАќГЩwarАќЃЌдйЗЂВМЕНЯрЙиЗўЮёЦїШнЦїЯТЃЈР§ШчTomcatЃЉЃЌЫфШЛSpringBootвВПЩвдетУДзіЃЌЕЋдкSpringBootЯТИќГЃМћЕФаЮЪНЪЧНЋSpringBootгІгУДђАќГЩПЩжДааjarАќЮФМўЁЃжЎЫљвдетУДзіЃЌдДгкФуПЩвджБНгНЋSpringBootгІгУПДГЩЪЧвЛИіJava ApplicationЃЌЦфWebгІгУПЩвдУЛгаwebappФПТМЃЈИќВЛгУЫЕweb.xmlСЫЃЉЃЌЫќЭЦМіЪЙгУhtmlвГУцЃЌВЂНЋЦфзїЮЊОВЬЌзЪдДЪЙгУЁЃ
3). Spring BootЪЧЪВУД
Spring BootВЛЪЧвЛИіПђМмЃЌЫќЪЧвЛжжгУРДЧсЫЩДДНЈОпгазюаЁЛђСуХфжУЕФЖРСЂгІгУГЬађЕФЗНЪНЁЃетЪЧЗНЗЈгУРДПЊЗЂЛљгкSpringЕФгІгУЃЌЕЋжЛашЗЧГЃЩйЕФХфжУЁЃЫќЬсЙЉСЫФЌШЯЕФДњТыКЭзЂЪЭХфжУЃЌПьЫйЦєЖЏаТЕФSpringЯюФПЖјВЛашвЊЬЋЖрЪБМфЁЃЫќРћгУЯжгаЕФSpringЯюФПвдМАЕкШ§ЗНЯюФПРДПЊЗЂЩњВњОЭаї(ЭЖШыЩњВњ)ЕФгІгУГЬађЁЃЫќЬсЙЉСЫвЛзщpomЛђgradleЙЙНЈЮФМўЃЌПЩвдЪЙгУЫќУЧЬэМгЫљашЕФвРРЕЯюЃЌВЂЧвЛЙБугкздЖЏХфжУЁЃ
Spring BootИљОнЦфРрТЗОЖЩЯЕФПтздЖЏХфжУЫљашЕФРрЁЃМйЩшгІгУГЬађЯывЊгыЪ§ОнПтНЛЛЅЃЌШчЙћдкРрТЗОЖЩЯгаSpringЪ§ОнПтЃЌФЧУДЫќЛсздЖЏНЈСЂгыЪ§ОндДРрЕФСЌНгЁЃ
4). жївЊФПБъ
ЮЊЫљгаSpringПЊЗЂЬсЙЉвЛИіЛљБОЕФЃЌИќПьЃЌИќЙуЗКЕФШыУХЬхбщЁЃ
ПЊЯфМДгУЃЌЕЋЫцзХашЧѓПЊЪМЦЋРыФЌШЯжЕЃЌПьЫйЦєЖЏЁЃ
ЬсЙЉДѓаЭЯюФП(Р§ШчЧЖШыЪНЗўЮёЦїЃЌАВШЋадЃЌЖШСПЃЌдЫаазДПіМьВщЃЌЭтВПЛЏХфжУ)ГЃМћЕФвЛЯЕСаЗЧЙІФмЬиадЁЃ
ОјЖдУЛгаДњТыЩњГЩвдМАВЛашвЊXMLХфжУЃЌЭъШЋБмУтXMLХфжУЁЃ
ЮЊСЫБмУтЖЈвхИќЖрЕФзЂЪЭХфжУ(ЫќНЋвЛаЉЯжгаЕФ Spring Framework зЂЪЭзщКЯГЩвЛИіМђЕЅЕФЕЅвЛзЂЪЭ)
БмУтБраДДѓСПimportгяОфЁЃ
ЬсЙЉвЛаЉФЌШЯжЕЃЌвдБудкЖЬЪБМфФкПьЫйЦєЖЏаТЯюФПЁЃ
5). аТЯюФПЪЙгУSpring Boot
МђЛЏЛљгкJavaЕФгІгУГЬађПЊЗЂЃЌЕЅдЊВтЪдКЭМЏГЩВтЪдЙ§ГЬЁЃ
ЭЈЙ§ЬсЙЉвЛаЉФЌШЯжЕРДМѕЩйПЊЗЂЃЌЕЅдЊВтЪдКЭМЏГЩВтЪдЪБМфЁЃ
ЬсИпЩњВњСІЁЃ
ЕБЪЙгУФЌШЯжЕЪБЃЌSpring BootгаздМКЕФПДЗЈЁЃШчЙћВЛжИЖЈЯъЯИаХЯЂЃЌЫќНЋЪЙгУЦфздМКЕФФЌШЯХфжУЁЃШчЙћЯывЊГжОУЛЏЃЌЕЋЪЧУЛгадкPOMЮФМўжажИЖЈШЮКЮЖЋЮїЃЌФЧУДSpring BootЛс- НЋHibernateДјгаHSQLDBЪ§ОнПтЕФХфжУзїЮЊJPAЬсЙЉепЁЃ
ЮЊДѓаЭЯюФП(Р§ШчЧЖШыЪНЗўЮёЦїЃЌАВШЋадЃЌЖШСПЃЌНЁПЕМьВщЃЌЭтВПЛЏХфжУ)ЬсЙЉаэЖрЗЧГЃГЃМћЕФЗЧЙІФмЬиад/НтОіЗНАИЁЃ
6). гХШБЕу
Spring BootЕФгХЕуЃК
ЪЙгУJavaЛђGroovyПЊЗЂЛљгкSpringЕФгІгУГЬађЗЧГЃШнвзЁЃ
ЫќМѕЩйСЫДѓСПЕФПЊЗЂЪБМфВЂЬсИпСЫЩњВњСІЁЃ
ЫќБмУтСЫБраДДѓСПЕФбљАхДњТыЃЌзЂЪЭКЭXMLХфжУЁЃ
Spring BootгІгУГЬађгыЦфSpringЩњЬЌЯЕЭГ(ШчSpring JDBCЃЌSpring ORMЃЌSpring DataЃЌSpring SecurityЕШ)МЏГЩЗЧГЃШнвзЁЃ
ЫќзёбЁАздгУФЌШЯХфжУЁБЗНЗЈЃЌвдМѕЩйПЊЗЂЙЄзїСПЁЃ
ЫќЬсЙЉЧЖШыЪНHTTPЗўЮёЦїЃЌШчTomcatЃЌJettyЕШЃЌвдПЊЗЂКЭВтЪдWebгІгУГЬађЗЧГЃШнвзЁЃ
ЫќЬсЙЉCLI(УќСюааНчУц)ЙЄОпДгУќСюЬсЪОЗћЃЌЗЧГЃШнвзКЭПьЫйЕиПЊЗЂКЭВтЪдSpring Boot(JavaЛђGroovy)гІгУГЬађЁЃ
ЫќЬсЙЉСЫаэЖрВхМўРДПЊЗЂКЭВтЪдSpringЦєЖЏгІгУГЬађЗЧГЃШнвзЪЙгУЙЙНЈЙЄОпЃЌШчMavenКЭGradleЁЃ
ЫќЬсЙЉСЫаэЖрВхМўЃЌвдБугыЧЖШыЪНКЭФкДцЪ§ОнПтЙЄзїЗЧГЃШнвзЁЃ
Spring BootЕФЯожЦ:
НЋЯжгаЛђДЋЭГЕФSpring FrameworkЯюФПзЊЛЛЮЊSpring BootгІгУГЬађЪЧвЛИіЗЧГЃРЇФбКЭКФЪБЕФЙ§ГЬЁЃЫќНіЪЪгУгкШЋаТSpringЯюФПЁЃ
2. Spring Boot
1). ШыУХ
Spring BootЯюФПЙщИљжЛЪЧвЛИіГЃЙцЕФSpringЯюФПЃЌжЛЪЧРћгУСЫSpring BootЦєЖЏГЬађКЭздЖЏХфжУЁЃвЊДДНЈSpring BootгІгУГЬађЕФЗНЗЈЃЌSpringЭХЖг(The Pivotal Team)ЬсЙЉСЫвдЯТШ§жжЗНЗЈЁЃ
ЪЙгУSpring Boot CLIЙЄОп
ЪЙгУSpring STS IDE
ЪЙгУSpring Initializr
ПЩвдЪЙгУSpring BootПЊЗЂСНжжЛљгкSpringЕФгІгУГЬађЃК
ЛљгкJavaЕФгІгУГЬађ
ЛљгкGroovyЕФгІгУГЬађ
2). Spring Boot CLI
I. ЯТдиВЂНтбЙ
дкWindowsЯЕЭГжаУќСюЬсЪОЗћжаЩшжУSpring Boot CLIЛЗОГБфСПЃК
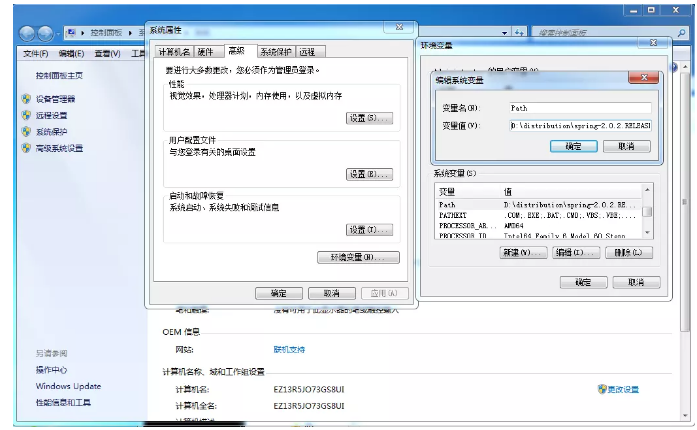
гвМќЁАЮвЕФЕчФдЁБ->ЁБИпМЖЯЕЭГЩшжУЁБ->ЁБИпМЖЁБ->ЁБЛЗОГБфСПЁБ->бЁдёЁБPATHЁБВЂаТНЈВЂМгЩЯУцЕФТЗОЖ D:\distribution\spring-2.0.2.RELEASE\bin;
бщжЄЃК
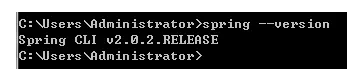
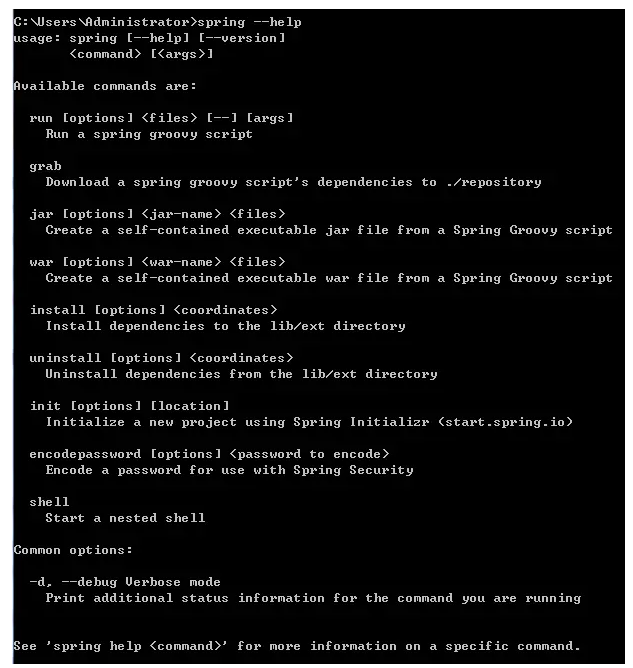
II. spring УќСюгяЗЈВщПДspring --help
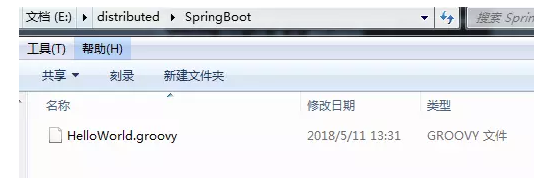
III. ДДНЈHelloWorld.groovyЮФМў
@RestController
class HelloWorld {
@RequestMapping("/")
String hello() {
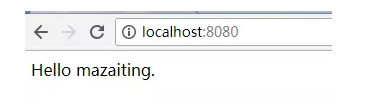
"Hello mazaiting."
}
} |
IV. дЫаа
| spring run HelloWorld.groovy |
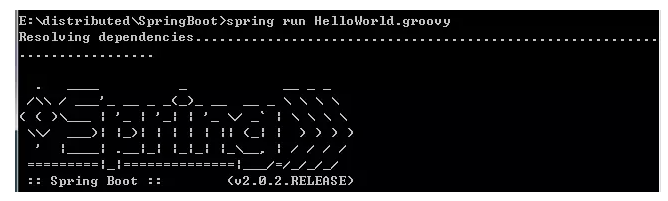
V. ВтЪд
дкфЏРРЦїЪфШыhttp://localhost:8080/МДПЩЗУЮЪ
3). Maven АВзАSpring Boot
<!-- Inherit
defaults from
Spring Boot -->
<parent>
<groupId>org.springframework.boot
</groupId>
<artifactId>spring-boot-starter-parent
</artifactId>
<version>2.0.2.RELEASE</version>
</parent>
<!-- Add typical dependencies
for a web
application -->
<dependencies>
<dependency>
<groupId>org.springframework.boot
</groupId>
<artifactId>spring-boot-starter-web
</artifactId>
</dependency>
</dependencies> |
4). Eclipse ЪЙгУ Spring Boot
I. дкpom.xmlЮФМўжаЬэМгSpringBootЕФвРРЕ
<project
xmlns="http://maven.apache.org
/POM/4.0.0"
xmlns:xsi="http://
www.w3.org/2001/XMLSchema-instance"
xsi:schemaLocation="http://
maven.apache.org/POM/4.0.0
http://
maven.apache.org/
xsd/maven-4.0.0.xsd">
<modelVersion>4.0.0</modelVersion>
<groupId>com.mazaiting</groupId>
<artifactId>SpringBootTest</artifactId>
<version>0.0.1-SNAPSHOT</version>
<packaging>jar</packaging>
<name>SpringBootTest</name>
<url>http://maven.apache.org</url>
<properties>
<project.build.sourceEncoding>UTF-8</project.build.sourceEncoding>
</properties>
<!-- Spring-Boot -->
<parent>
<groupId>org.springframework.boot
</groupId>
<artifactId>spring-boot-starter-parent
</artifactId>
<version>2.0.2.RELEASE</version>
</parent>
<dependencies>
<dependency>
<groupId>junit</groupId>
<artifactId>junit</artifactId>
<scope>test</scope>
</dependency>
<!-- Spring-Boot -->
<dependency>
<groupId>org.springframework.boot
</groupId>
<artifactId>spring-boot-starter-web
</artifactId>
</dependency>
</dependencies>
</project> |
II. ДДНЈHelloWorldРр
@RestController
@EnableAutoConfiguration
public class HelloWorld {
@RequestMapping("/")
String home() {
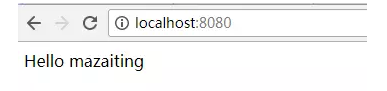
return "Hello mazaiting";
}
public static void main
(String[] args) {
SpringApplication.run
(HelloWorld.class, args);
}
} |
III. жДааНсЙћ
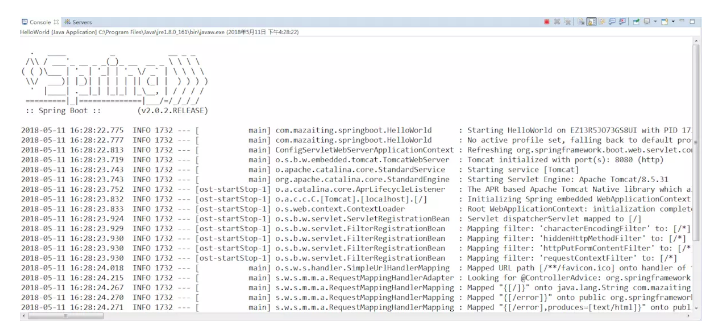
дкфЏРРЦїЪфШыhttp://localhost:8080/
IV. зЂНтНтЪЭ
@RestController: ЙЙдьаЭзЂЪЭ, жИЖЈПижЦЦїЃЌSpringЛсдкДІРэДЋШыЕФWebЧыЧѓЪБПМТЧЫќ.
@RequestMappingЃКзЂНтЬсЙЉСЫЁАТЗгЩЁБаХЯЂЁЃЫќИцЫпSpringШЮКЮДјгаТЗОЖЁА/ЁБЕФHTTPЧыЧѓгІИУгГЩфЕНhomeЗНЗЈЁЃ[@RestController](https://github.com/RestController "@RestController")зЂНтИцЫпSpringНЋЩњГЩЕФзжЗћДЎжБНгЗЕЛиИјЕїгУепЁЃ
@EnableAutoConfiguration: дЪаэздЖЏХфжУ
V. ДДНЈПЩжДааЕФjarАќ
дкpom.xmlЕФprojectНкЕуЯТЬэМг
<build>
<plugins>
<!-- гУгкДДНЈПЩжДааjar -->
<plugin>
<groupId>org.springframework.
boot</groupId>
<artifactId>spring-boot-
maven-plugin</artifactId>
</plugin>
</plugins>
</build> |
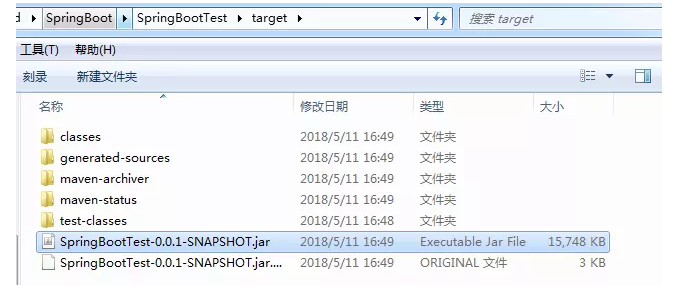
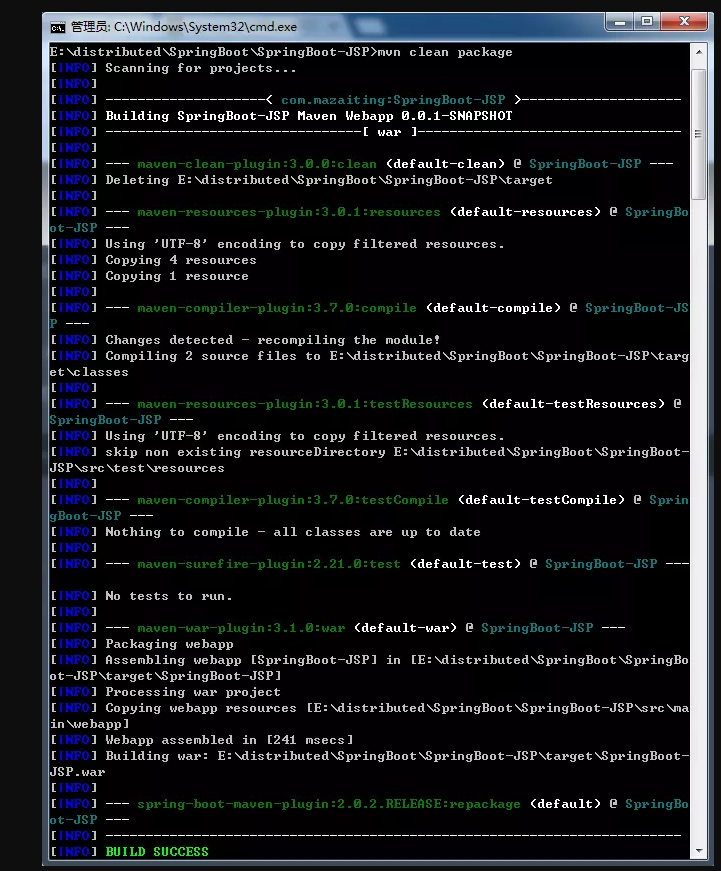
дкЯюФПЕФИљФПТМЯТжДааdosУќСюmvn package
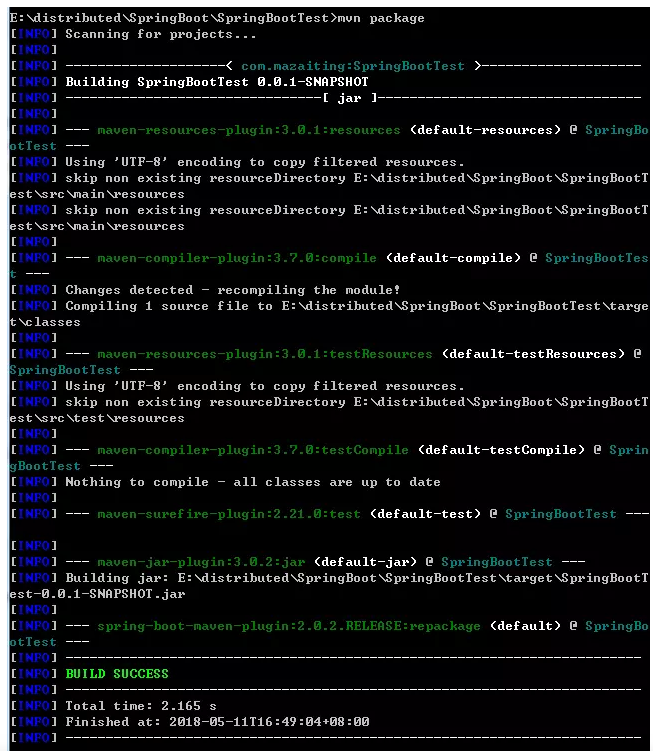
жДааЭъГЩКѓ\SpringBootTest\target\ФПТМЯТЩњГЩSpringBootTest-0.0.1-SNAPSHOT.jarЮФМў
жДааjava -jar target/SpringBootTest-0.0.1-SNAPSHOT.jarУќСюдЫааЃЌВЂдкфЏРРЦїЪфШыhttp://localhost:8080/ЃЌЭЌбљПЩПДЕНжДаааЇЙћ.
5). Spring Boot JSP ЪЕР§
I. ДДНЈMaven WebЯюФП
II. дкpomЮФМўжаЬэМгвРРЕ
<project
xmlns="http://
maven.apache.org/POM/4.0.0"
xmlns:xsi="http://www.w3.org
/2001/XMLSchema-instance"
xsi:schemaLocation="http://
maven.apache.org/POM/4.0.0
http://maven.apache.org/
maven-v4_0_0.xsd">
<modelVersion>4.0.0</modelVersion>
<groupId>com.mazaiting</groupId>
<artifactId>SpringBoot-JSP
</artifactId>
<packaging>war</packaging>
<version>0.0.1-SNAPSHOT</version>
<name>SpringBoot-JSP Maven
Webapp</name>
<url>http://maven.apache.org</url>
<!-- Spring-Boot -->
<parent>
<groupId>org.springframework.
boot</groupId>
<artifactId>spring-boot-
starter-parent</artifactId>
<version>2.0.2.RELEASE</version>
</parent>
<!-- ХфжУJavaАцБО -->
<properties>
<java.version>1.8</java.version>
</properties>
<dependencies>
<dependency>
<groupId>junit</groupId>
<artifactId>junit</artifactId>
<scope>test</scope>
</dependency>
<!-- Spring-BootЃК
This is a web application
-->
<dependency>
<groupId>org.springframework.
boot</groupId>
<artifactId>spring-boot-
starter-web</artifactId>
</dependency>
<!-- Tomcat embedded
container-->
<dependency>
<groupId>org.springframework.
boot</groupId>
<artifactId>spring-boot-
starter-tomcat</artifactId>
<scope>provided</scope>
</dependency>
<!-- Need this to compile JSP -->
<dependency>
<groupId>org.apache.tomcat.embed
</groupId>
<artifactId>tomcat-embed-jasper
</artifactId>
<scope>provided</scope>
</dependency>
<!-- JSTL for JSP -->
<!-- https://mvnrepository.com
/artifact/javax.servlet/jstl
-->
<dependency>
<groupId>javax.servlet</groupId>
<artifactId>jstl</artifactId>
</dependency>
<!-- https://mvnrepository.com/
artifact/taglibs/standard
-->
<dependency>
<groupId>taglibs</groupId>
<artifactId>standard</artifactId>
<version>1.1.2</version>
</dependency>
<!-- Optional, test for static
content,
bootstrap CSS-->
<dependency>
<groupId>org.webjars</groupId>
<artifactId>bootstrap</artifactId>
<version>3.3.7</version>
</dependency>
</dependencies>
<build>
<finalName>SpringBoot-JSP
</finalName>
<plugins>
<!-- Package as an executable
jar/war -->
<plugin>
<groupId>org.springframework
.boot</groupId>
<artifactId>spring-boot-
maven-plugin</artifactId>
</plugin>
</plugins>
</build>
</project> |
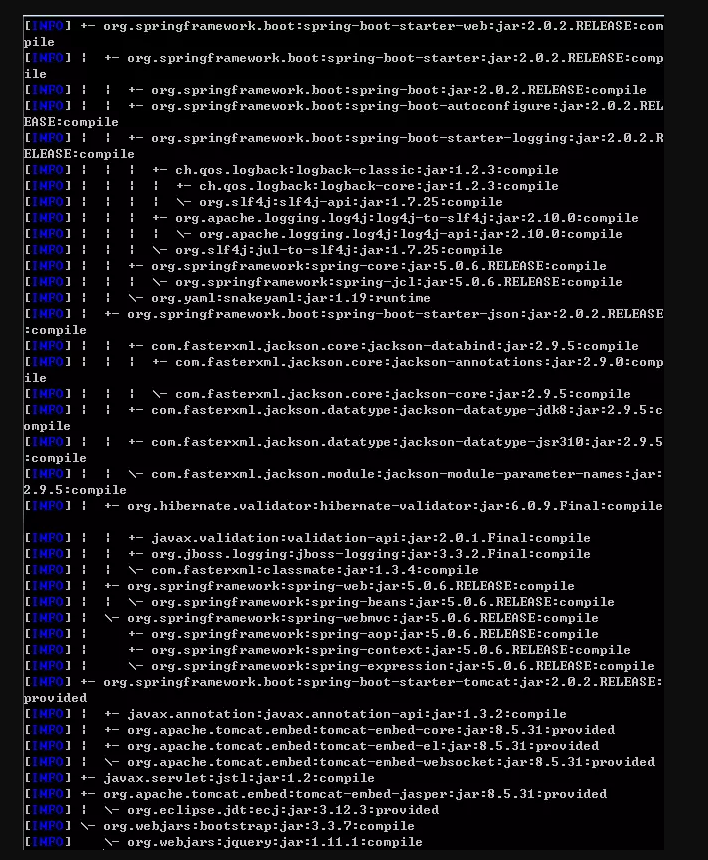
ЪЕЯжвРРЕЙиЯЕЃКmvn dependency:tree
III. SpringBootServletInitializerжДааДЋЭГЕФWARВПЪ№дЫааSpringApplication
// зЂНтЮЊSpringBootгІгУ
@SpringBootApplication
public class SpringBoot
WebApplication extends
SpringBootServletInitializer{
@Override
protected SpringApplication
Builder configure
(SpringApplicationBuilder
builder) {
return builder.sources
(SpringBootWebApplication.class);
}
public static void main
(String[] args) {
SpringApplication.run
(SpringBootWebApplication.class,
args);
}
} |
IV. ДДНЈПижЦЦї
@Controller
public class WelcomeController {
// зЂШыгІгУХфжУ application.
properties
@Value("${welcome.message}")
private String message =
"Hello World";
@RequestMapping("/")
public String welcome
(Map<String, Object>
model) {
model.put("message", this.message);
return "welcome";
}
} |
V. welcome.jspвГУц
<%@ page
language="java"
contentType="text/html;
charset=UTF-8"
pageEncoding="UTF-8" isELIgnored="false"%>
<%@ taglib prefix="spring" uri="http://www.springframework.org/tags"%>
<%@ taglib prefix="c" uri="http://
java.sun.com/jsp/jstl/core"%>
<!DOCTYPE html>
<html lang="en">
<head>
<meta http-equiv="Content-Type"
content="text/html;
charset=UTF-8">
<!-- СДНгbootstrap
-->
<!--
hrefжаЕФФкШнаДЮЊЃКwebjars/
bootstrap/3.3.7/css/bootstrap.css
МгдиЕижЗЮЊЃКhttp://localhost:8080/SpringBoot-JSP/webjars/bootstrap/3.3.7/css/bootstrap.css
hrefжаЕФФкШнаДЮЊЃК/webjars/
bootstrap/3.3.7/css/bootstrap.css
МгдиЕижЗЮЊЃКhttp://localhost:8080/webjars/
bootstrap/3.3.7/css/bootstrap.css
ЪЙгУжаНЈвщаДЮЊwebjars/bootstrap/
3.3.7/css/bootstrap.css
-->
<link rel="stylesheet"
type="text/css" href="webjars/bootstrap/3.3.7/
css/bootstrap.css"/>
<%-- <spring:url value="/css/
main.css"
var="springCss"/>
<link href="${springCss}"
rel="stylesheet"/> --%>
<script
type="text/javascript"
src="webjars/jquery/1.11.1/
jquery.min.js"></script>
<c:url value="/css/main.
css" var="jstlCss"></c:url>
<link href="${jstlCss }"
rel="stylesheet"/>
<title>SpringBootTest</title>
</head>
<body>
<nav class="navbar
navbar-inverse">
<div class="container">
<div class="navbar-header">
<a class="navbar-brand" href="#">
Spring
Boot</a>
</div>
</div>
<div id="navbar" class=
"collapse
navbar-collapse">
<ul class="nav
nav-bar-nav">
<li class="active">
<a
href="#">Home</a></li>
<li><a href="#about">About</a></li>
</ul>
</div>
</nav>
<div class="container">
<div
class="starter-template">
<h1>Spring
Boot Web JSP Example</h1>
<h2>Message:
${message }</h2>
</div>
</div>
<script type="text/javascript"
src="webjars/bootstrap/3.3.7/
js/bootstrap.min.js"></script>
</body>
</html> |
зЂ
hrefжаЕФФкШнаДЮЊЃКwebjars/bootstrap/
3.3.7/css/bootstrap.css
МгдиЕижЗЮЊЃКhttp://localhost:
8080/SpringBoot-JSP/webjars/
bootstrap/3.3.7/css/bootstrap.css
hrefжаЕФФкШнаДЮЊЃК/webjars/bootstrap
/3.3.7/css/bootstrap.css
МгдиЕижЗЮЊЃКhttp://localhost:
8080/webjars/
bootstrap/3.3.7/css/bootstrap.css
ЪЙгУжаНЈвщаДЮЊwebjars/bootstrap/3.3.7
/css/bootstrap.css |
main.css
h1 {
color: #00F;
}
h2 {
color: #F00;
} |
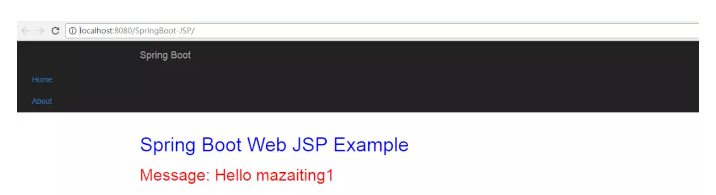
VI. дк/src/main/resources/ФПТМЯТДДНЈapplication.propertiesМАapplication-dev.propertiesЁЂ application-prod.propertiesЁЂapplication-test.propertiesЁЃ
application-dev.propertiesЃКгУгкПЊЗЂЛЗОГ
application-test.propertiesЃКгУгкВтЪдЛЗОГ
application-prod.propertiesЃКгУгкЩњВњЛЗОГ
дкapplication.propertiesЮФМўжаХфжУЪЙгУФФвЛРраЭЕФХфжУЮФМў, prefixКЭsuffixХфжУЪгЭМВуЕФЧАКѓзКЁЃ
spring.mvc.view.prefix:
/jsp/
spring.mvc.view.suffix: .jsp
spring.profiles.active= dev |
application-dev.properties
| welcome.message:
Hello mazaiting1 |
application-test.properties
| welcome.message:
Hello mazaiting2 |
application-prod.properties
| welcome.message:
Hello mazaiting3 |
VII. ДњТыНсЙЙ

VIII. дЫааВтЪдвЛЃКдкSpringBootWebApplicationРрЩЯгвМќRun As -> Java Application, дкфЏРРЦїжаЪфШыhttp://localhost:8080/
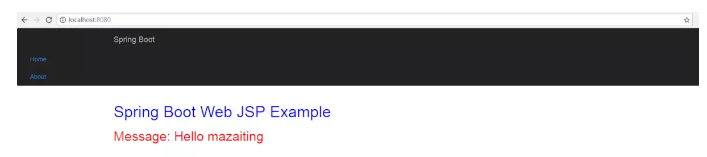
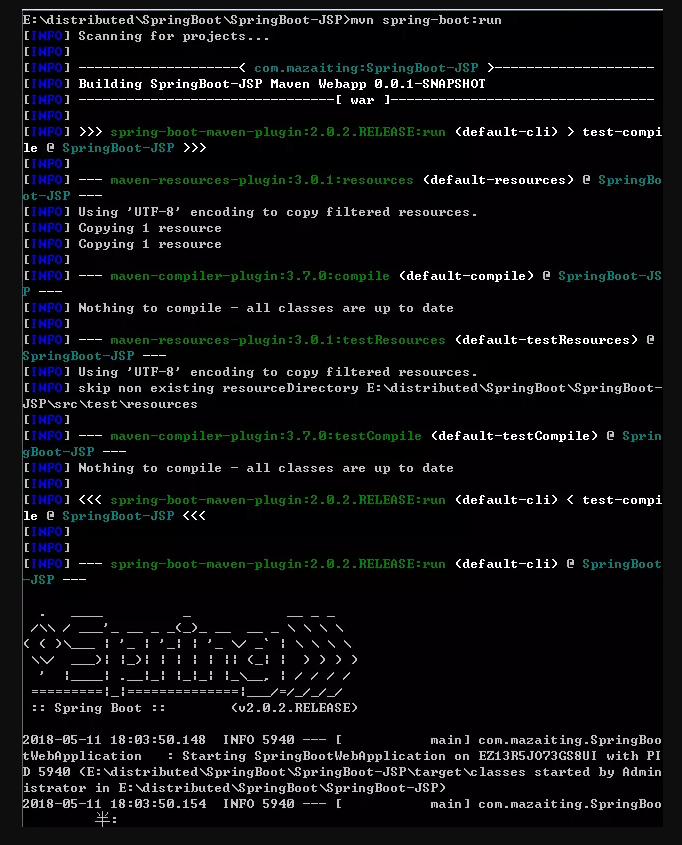
IX.. дЫааВтЪдЖўЃКдкЯюФПЕФИљФПТМЯТЃЌдкУќСюЬсЪОЗћЪфШыmvn spring-boot:runЃЌШЛКѓдкфЏРРЦїЪфШыhttp://localhost:8080/вВПЩГЪЯжаЇЙћ
X. дЫааВтЪдШ§ЃКдкЙЄГЬгвМќ-> Run As -> Run on ServerВПЪ№дкTomcatШнЦїжа, ШЛКѓдйфЏРРЦїжаЪфШыhttp://localhost:8080/SpringBoot-JSP/МДПЩЗУЮЪ
XI. JSPЯожЦ
ВЛФмДДНЈПЩжДааjarРДдЫааетИіЧЖШыЪНTomcat + JSP WebЪОР§ЃЌвђЮЊTomcatжагавЛИігВБрТыЮФМўФЃЪНЁЃ
6). Spring BootДДНЈwarАќЃЌВЂВПЪ№дкTomcat
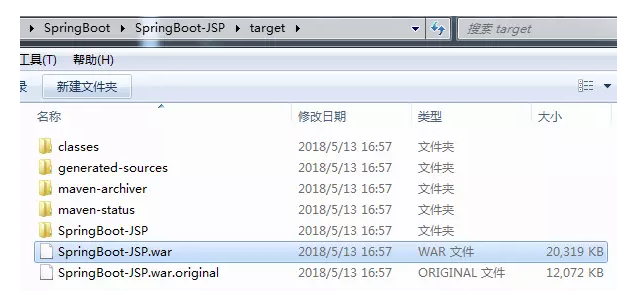
I. ЪЙгУУќСюЬсЪОЗћНјШыЯюФПИљФПТМ
II. жДааГЩЙІКѓЃЌЯюФПЕФ\SpringBoot-JSP\target\ФПТМЯТГіЯжSpringBoot-JSP.war
7). Spring Boot + Thymeleaf ФЃАхв§Чц -- ПЩжДааJARЮФМў
I. в§ШывРРЕ
<project
xmlns="http://
maven.apache.org/POM/4.0.0"
xmlns:xsi="http://www.w3.org/
2001/XMLSchema-instance"
xsi:schemaLocation="http://
maven.apache.org/POM/4.0.0
http://maven.apache.org/
maven-v4_0_0.xsd">
<modelVersion>4.0.0</modelVersion>
<groupId>com.mazaiting</groupId>
<artifactId>SpringBoot-Thymeleaf
</artifactId>
<version>0.0.1-SNAPSHOT</version>
<name>SpringBoot-Thymeleaf Maven
Webapp</name>
<url>http://maven.apache.org</url>
<parent>
<groupId>org.springframework.
boot</groupId>
<artifactId>spring-boot-
starter-parent</artifactId>
<version>1.4.2.RELEASE</version>
</parent>
<!-- JavaАцБО -->
<properties>
<java.version>1.8</java.version>
</properties>
<dependencies>
<dependency>
<groupId>junit</groupId>
<artifactId>junit</artifactId>
<scope>test</scope>
</dependency>
<dependency>
<groupId>org.springframework.
boot</groupId>
<artifactId>spring-boot-starter
-thymeleaf</artifactId>
</dependency>
<!-- hot swapping, disable cache
for template,
enable live reload -->
<dependency>
<groupId>org.springframework.boot
</groupId>
<artifactId>spring-boot-devtools
</artifactId>
<optional>true</optional>
</dependency>
<!-- Optional, for bootstrap -->
<dependency>
<groupId>org.webjars</groupId>
<artifactId>bootstrap</artifactId>
<version>3.3.7</version>
</dependency>
</dependencies>
<build>
<finalName>SpringBoot-Thymeleaf
</finalName>
<plugins>
<!-- Package as an executable
jar/war -->
<plugin>
<groupId>org.springframework.
boot</groupId>
<artifactId>spring-boot-
maven-plugin</artifactId>
</plugin>
</plugins>
</build>
</project> |
spring-boot-devtoolsгажњгкНћгУЛКДцВЂЦєгУШШВхАЮЃЌвдБуПЊЗЂШЫдБзмЪЧПДЕНзюКѓЕФИќИФЁЃГЂЪдаоИФThymeleafФЃАхЛђЪєадЮФМўЃЌЫЂаТфЏРРЦївдВщПДИќИФСЂМДЩњаЇЁЃ
II. ДДНЈSpringBootWebApplication
@SpringBootApplication
public class SpringBoot
WebApplication {
public static void main
(String[] args) {
SpringApplication.run
(SpringBootWebApplication.
class,
args);
}
} |
III. ДДНЈWelcomeController
@Controller
public class WelcomeController {
@Value("${welcome.message}")
private String message=
"Hello World";
@RequestMapping("/")
public String welcome
(Map<String, Object>
model){
model.put("message", this.message);
return "welcome";
}
} |
IV. Thymeleaf +зЪдД+ОВЬЌЮФМў
welcome.html
<!DOCTYPE
html>
<html xmlns:th=
"http://www.thymeleaf.org">
<head>
<meta http-equiv=
"Content-Type"
content=
"text/html; charset=UTF-8"/>
<title>Spring Boot Thymeleaf
Hello World
ЪОР§</title>
<link rel="stylesheet"
type="text/css" href=
"webjars/bootstrap/3.3.7
/css/bootstrap.css"/>
<link rel="stylesheet"
th:href="@{/css/main.css}"
href="../../css/main.css"/>
<script
type="text/javascript"
src="webjars/jquery/1.11.1/
jquery.min.js"></script>
</head>
<body>
<nav class="navbar
navbar-inverse">
<div class="container">
<div class="navbar-header">
<a class="navbar-brand" href="#">
Spring
Boot</a>
</div>
<div id="navbar"
class="collapse navbar-collapse">
<ul class="nav navbar-nav">
<li class="avtive">
<a href="#">ЪзвГ</a></li>
<li><a href="#about">Йигк</a></li>
</ul>
</div>
</div>
</nav>
<div class="container">
<div class="starter-template">
<h1>Spring Boot Web
Thymeleaf ЪОР§</h1>
<h2>
<span th:text="'Message:
'
+ ${message}"></span>
</h2>
</div>
</div>
<script type="text/javascript"
src="webjars/bootstrap/3.3.7/
js/bootstrap.min.js"></script>
</body>
</html> |
main.css
h1 {
font-size: 20pt;
}
h2 {
font-size: 16pt;
} |
application.properties
| welcome.message:
Hello, mazaiting |
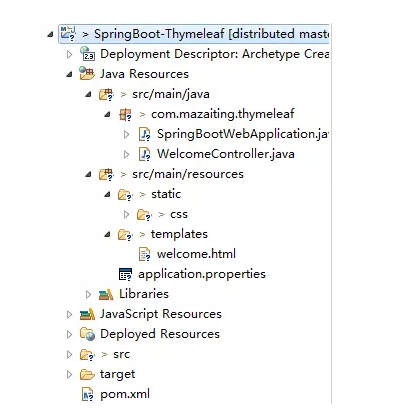
ФПТМНсЙЙ
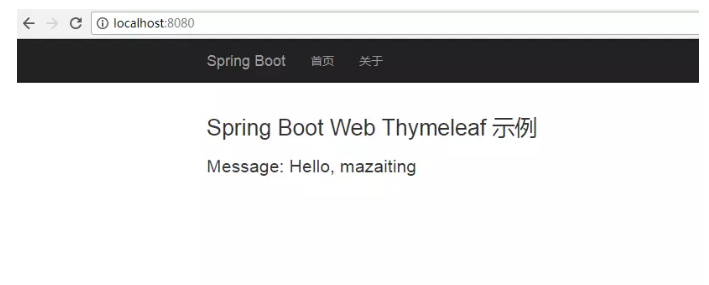
V. дЫааЗНЪНвЛЃКдЫааSpringBootWebApplicationЃЌфЏРРЦїЪфШыhttp://localhost:8080/
VI. дЫааЗНЪНЖўЃКдкУќСюЬсЪОЗћЕФЯюФПИљФПТМЯТжДааmvn spring-boot:runЃЌфЏРРЦїЪфШыhttp://localhost:8080/МДПЩЯдЪОаЇЙћ
VII. дЫааЗНЪНШ§ЃКдкУќСюЬсЪОЗћЕФЯюФПИљФПТМЯТжДааmvn clean packageЃЌДДНЈПЩжДааjarАќЃЌдЫааjarАќЃЌфЏРРЦїЪфШыhttp://localhost:8080/МДПЩЯдЪОаЇЙћЁЃЯывЊЩњГЩjarАќЃЌдкpom.xmlЮФМўжаЃЌвЛЖЈгаДЫаа< packaging>war< /packaging >
8). Spring Boot ЗЧWebгІгУ--УќСюаагІгУ
I. ДДНЈMavenЕФЦеЭЈJavaЙЄГЬЃЌВЂдкpom.xmlЮФМўжаЬэМгвРРЕ
<project
xmlns="http://
maven.apache.org/POM/4.0.0"
xmlns:xsi="http://www.w3.org
/2001/XMLSchema-instance"
xsi:schemaLocation="http://
maven.apache.org/POM/4.0.0
http://maven.apache.org/xsd
/maven-4.0.0.xsd">
<modelVersion>4.0.0</modelVersion>
<groupId>com.mazaiting</groupId>
<artifactId>SpringBoot-Console
</artifactId>
<version>0.0.1-SNAPSHOT</version>
<packaging>jar</packaging>
<name>SpringBoot-Console</name>
<url>http://maven.apache.org</url>
<!-- Spring-Boot -->
<parent>
<groupId>org.springframework.boot
</groupId>
<artifactId>spring-boot-starter-parent
</artifactId>
<version>2.0.2.RELEASE</version>
</parent>
<properties>
<project.build.sourceEncoding>UTF-8</project.build.sourceEncoding>
</properties>
<dependencies>
<dependency>
<groupId>junit</groupId>
<artifactId>junit</artifactId>
<scope>test</scope>
</dependency>
<dependency>
<groupId>org.springframework.boot
</groupId>
<artifactId>spring-boot-starter
</artifactId>
</dependency>
</dependencies>
<build>
<plugins>
<!-- Package as an executable
jar/war -->
<plugin>
<groupId>org.springframework.
boot</groupId>
<artifactId>spring-boot-
maven-plugin</artifactId>
</plugin>
</plugins>
</build>
</project> |
II. ДДНЈHelloServiceЗўЮё
@Service
public class HelloMessage
Service {
@Value("${name}")
private String name;
public String getMessage() {
return getMessage(name);
}
public String getMessage
(String name) {
return "Hello " + name;
}
} |
III. application.propertiesФкШн
IV. SpringBootConsoleApplicationгІгУ
@SpringBootApplication
public class SpringBoot
ConsoleApplication implements
CommandLineRunner{
@Autowired
private HelloMessageService
helloService;
public static void main
(String[] args) {
SpringApplication application =
new SpringApplication
(SpringBootConsoleApplication.class);
application.setBannerMode
(Banner.Mode.OFF);
application.run(args);
}
@Override
public void run(String... args)
throws Exception
{
if (args.length > 0) {
System.out.println(helloService.
getMessage(args[0].toString()));
} else {
System.out.println
(helloService.getMessage());
}
}
} |
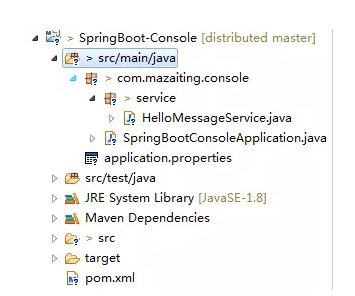
V. ФПТМНсЙЙ
VI. дЫаа
ЩњГЩjarАќ
дЫаа1
java -jar target/SpringBoot-
Console-0.0.1-SNAPSHOT.jar |
НсЙћЃКHello mazaiting
дЫаа2
java -jar target/SpringBoot-
Console-0.0.1-SNAPSHOT.
jar
spring-boot |
НсЙћЃКHello spring-boot
9). Spring Boot ЪєадХфжУ
I. pom.xmlЮФМў
<project
xmlns="http://
maven.apache.org/POM/4.0.0"
xmlns:xsi="http://www.w3.org
/2001/XMLSchema-instance"
xsi:schemaLocation="http://
maven.apache.org/POM/4.0.0
http://maven.apache.org/xsd/
maven-4.0.0.xsd">
<modelVersion>4.0.0</modelVersion>
<groupId>com.mazaiting</groupId>
<artifactId>SpringBoot-Config
</artifactId>
<version>0.0.1-SNAPSHOT</version>
<packaging>jar</packaging>
<name>SpringBoot-Config</name>
<url>http://maven.apache.org</url>
<!-- Spring-Boot -->
<parent>
<groupId>org.springframework.boot
</groupId>
<artifactId>spring-boot-starter-parent
</artifactId>
<version>2.0.2.RELEASE</version>
</parent>
<properties>
<project.build.sourceEncoding>UTF-8</project.build.sourceEncoding>
</properties>
<dependencies>
<dependency>
<groupId>junit</groupId>
<artifactId>junit</artifactId>
<scope>test</scope>
</dependency>
<dependency>
<groupId>org.springframework.boot
</groupId>
<artifactId>spring-boot-starter
</artifactId>
</dependency>
<!-- Spring-BootЃК
This is a web application
-->
<dependency>
<groupId>org.springframework.boot
</groupId>
<artifactId>spring-boot-starter-web
</artifactId>
</dependency>
</dependencies>
<build>
<plugins>
<!-- Package as an executable
jar/war -->
<plugin>
<groupId>org.springframework.
boot</groupId>
<artifactId>spring-boot-
maven-plugin</artifactId>
</plugin>
</plugins>
</build>
</project> |
II. @ValueЪЙгУ
@Component
@PropertySource
("classpath:global.properties")
public class GlobalProperties {
@Value("${thread-pool}")
private int threadPool;
@Value("${email}")
private String email;
//getters and setters
} |
III. ConfigurationProperties
@Component
@PropertySource
("classpath:global.properties")
@ConfigurationProperties
public class GlobalProperties {
private int threadPool;
private String email;
//getters and setters
} |
IV. ХфжУЮФМў
global.propertiesЮФМў
email=zaitingma@foxmail.com
thread-pool=12 |
application.propertiesЮФМў
#Logging
logging.level.org.
springframework.web=ERROR
logging.level.com.mazaiting=DEBUG
#Global
email=1425941077@qq.com
thread-pool=10
#App
app.menus[0].title=Home
app.menus[0].name=Home
app.menus[0].path=/
app.menus[1].title=Login
app.menus[1].name=Login
app.menus[1].path=/login
app.compiler.timeout=5
app.compiler.output-folder=/temp/
app.error=/error/ |
зЂЃК ШчЙћдкapplication.propertiesЮФМўжагагыglobal.propertiesжагаЯрЭЌЕФЪєадЃЌШЁжЕЪБдђШЁapplication.propertiesжаЕФХфжУ
V. ЖдгІЕФjavaЮФМў
AppProperties.java
@Component
//prefix app, find app.* values
@ConfigurationProperties("app")
public class AppProperties {
private String error;
private List<Menu> menus
= new ArrayList<>();
private Compiler compiler
= new Compiler();
public String getError() {
return error;
}
public void setError
(String error) {
this.error = error;
}
public List<Menu> getMenus() {
return menus;
}
public void setMenus
(List<Menu> menus)
{
this.menus = menus;
}
public Compiler getCompiler() {
return compiler;
}
public void setCompiler
(Compiler compiler)
{
this.compiler = compiler;
}
public static class Menu {
private String name;
private String path;
private String title;
public String getName() {
return name;
}
public void setName
(String name) {
this.name = name;
}
public String getPath() {
return path;
}
public void setPath
(String path) {
this.path = path;
}
public String getTitle() {
return title;
}
public void setTitle
(String title) {
this.title = title;
}
@Override
public String toString() {
return "Menu [name=" + name + ",
path=" + path + ", title=" +
title + "]";
}
}
public static class Compiler {
private String timeout;
private String outputFolder;
public String getTimeout() {
return timeout;
}
public void setTimeout
(String timeout) {
this.timeout = timeout;
}
public String getOutputFolder() {
return outputFolder;
}
public void setOutputFolder
(String outputFolder)
{
this.outputFolder = outputFolder;
}
@Override
public String toString() {
return "Compiler [timeout=" +
timeout
+ ", outputFolder=" +
outputFolder
+ "]";
}
}
@Override
public String toString() {
return "AppProperties
[error=" + error
+ ", menus="
+ menus + ", compiler=
"
+ compiler + "]";
}
} |
GlobalProperties.java
@Component
@PropertySource
("classpath:global.properties")
public class GlobalProperties {
@Value("${thread-pool}")
private int threadPool;
@Value("${email}")
private String email;
public int getThreadPool() {
return threadPool;
}
public void setThreadPool
(int threadPool) {
this.threadPool = threadPool;
}
public String getEmail() {
return email;
}
public void setEmail
(String email) {
this.email = email;
}
@Override
public String toString() {
return "GlobalProperties
[threadPool="
+ threadPool + ",
email=" + email +
"]";
}
} |
VI. гІгУШыПкSpringBootWebApplication
@SpringBootApplication
public class SpringBoot
WebApplication {
public static void main
(String[] args) {
SpringApplication.run
(SpringBootWebApplication.class,
args);
}
} |
VII. ПижЦЦї
@Controller
public class WelcomeController {
private static final
Logger LOGGER =
LoggerFactory.getLogger
(WelcomeController.class);
private GlobalProperties global;
private AppProperties app;
@Autowired
public void setApp
(AppProperties app) {
this.app = app;
}
@Autowired
public void setGlobalProperties
(GlobalProperties
global) {
this.global = global;
}
@RequestMapping("/")
public String welcome
(Map<String, Object>
model) {
String globalProperties
= global.toString();
String appProperties
= app.toString();
LOGGER.debug
("Welcome {}, {}", app,
global);
model.put("message",
appProperties +
globalProperties);
return "welcome";
}
} |
VIII. дЫааSpringBootWebApplicationЃЌфЏРРЦїЪфШыhttp://localhost:8080/ЃЌВщПДПижЦЬЈ
2018-05-14 13:07:22.056
DEBUG 4228 --- [nio-8080-exec-3]
com.mazaiting.config.
WelcomeController
:
Welcome AppProperties
[error=/error/, menus=
[Menu
[name=Home, path=/, title=Home],
Menu [name=Login,
path=/login, title=Login]],
compiler=Compiler
[timeout=5, outputFolder=/temp/]],
GlobalProperties
[threadPool=10, email=1425941077@qq.com] |
IX. бщжЄ
@Component
@ConfigurationProperties
public class
GlobalProperties {
@Max(5)
@Min(0)
private int threadPool;
@NotEmpty
private String email;
//getters and setters
} |
10). ХфжУЮФМўжаХфжУlogging
#Logging
# log level ШежОЕШМЖ
logging.level.org.
springframework.web=ERROR
logging.level.com.mazaiting=DEBUG
# log file ШежОЮФМўДцЗХТЗОЖ
#logging.file=$
{java.io.tmpdir}/application.log
# output to a file ДцЗХТЗОЖ
logging.file=C:/Users/
Administrator/Desktop/mylog.log
# pattern ИёЪНЛЏЮФМўФкШн
logging.pattern.file="%d
{yyyy-MM-dd HH:mm:ss}
[%thread] %-5level
%logger{36} - %msg%n" |
|