NAME
cvs - Concurrent Versions System
SYNOPSIS
cvs [ cvs_options ]
cvs_command [ command_options ] [ command_args ]
NOTE
This manpage is a summary of some of the features of cvs
but for more in-depth documentation, consult the Ced?
erqvist manual (as described in the SEE ALSO section of
this manpage).
DESCRIPTION
CVS is a version control system, which allows you to keep
old versions of files (usually source code), keep a log of
who, when, and why changes occurred, etc., like RCS or
SCCS. Unlike the simpler systems, CVS does not just oper?
ate on one file at a time or one directory at a time, but
operates on hierarchical collections of directories con?
sisting of version controlled files. CVS helps to manage
releases and to control the concurrent editing of source
files among multiple authors. CVS allows triggers to
enable/log/control various operations and works well over
a wide area network.
cvs keeps a single copy of the master sources. This copy
is called the source ``repository''; it contains all the
information to permit extracting previous software
releases at any time based on either a symbolic revision
tag, or a date in the past.
ESSENTIAL COMMANDS
cvs provides a rich variety of commands (cvs_command in
the Synopsis), each of which often has a wealth of
options, to satisfy the many needs of source management in
distributed environments. However, you don't have to mas?
ter every detail to do useful work with cvs; in fact, five
commands are sufficient to use (and contribute to) the
source repository.
cvs checkout modules...
A necessary preliminary for most cvs work: creates
your private copy of the source for modules (named
collections of source; you can also use a path rel?
ative to the source repository here). You can work
with this copy without interfering with others'
work. At least one subdirectory level is always
created.
cvs update
Execute this command from within your private
source directory when you wish to update your
copies of source files from changes that other
developers have made to the source in the reposi?
tory.
cvs add file...
Use this command to enroll new files in cvs records
of your working directory. The files will be added
to the repository the next time you run `cvs
commit'. Note: You should use the `cvs import'
command to bootstrap new sources into the source
repository. `cvs add' is only used for new files
to an already checked-out module.
cvs remove file...
Use this command (after erasing any files listed)
to declare that you wish to eliminate files from
the repository. The removal does not affect others
until you run `cvs commit'.
cvs commit file...
Use this command when you wish to ``publish'' your
changes to other developers, by incorporating them
in the source repository.
OPTIONS
The cvs command line can include cvs_options, which apply
to the overall cvs program; a cvs_command, which specifies
a particular action on the source repository; and com?
mand_options and command_arguments to fully specify what
the cvs_command will do.
Warning: you must be careful of precisely where you place
options relative to the cvs_command. The same option can
mean different things depending on whether it is in the
cvs_options position (to the left of a cvs command) or in
the command_options position (to the right of a cvs com?
mand).
There are only two situations where you may omit cvs_com?
mand: `cvs -H' or `cvs --help' elicits a list of available
commands, and `cvs -v' or `cvs --version' displays version
information on cvs itself.
CVS OPTIONS
As of release 1.6, cvs supports GNU style long options as
well as short options. Only a few long options are cur?
rently supported, these are listed in brackets after the
short options whose functions they duplicate.
Use these options to control the overall cvs program:
-H [ --help ]
Display usage information about the specified
cvs_command (but do not actually execute the com?
mand). If you don't specify a command name, `cvs
-H' displays a summary of all the commands avail?
able.
-Q Causes the command to be really quiet; the command
will generate output only for serious problems.
-q Causes the command to be somewhat quiet; informa?
tional messages, such as reports of recursion
through subdirectories, are suppressed.
-b bindir
Use bindir as the directory where RCS programs are
located (CVS 1.9 and older). Overrides the setting
of the RCSBIN environment variable. This value
should be specified as an absolute pathname.
-d CVS_root_directory
Use CVS_root_directory as the root directory path?
name of the master source repository. Overrides
the setting of the CVSROOT environment variable.
This value should be specified as an absolute path?
name.
-e editor
Use editor to enter revision log information.
Overrides the setting of the CVSEDITOR, VISUAL, and
EDITOR environment variables.
-f Do not read the cvs startup file (~/.cvsrc).
-l Do not log the cvs_command in the command history
(but execute it anyway). See the description of
the history command for information on command his?
tory.
-n Do not change any files. Attempt to execute the
cvs_command, but only to issue reports; do not
remove, update, or merge any existing files, or
create any new files.
-t Trace program execution; display messages showing
the steps of cvs activity. Particularly useful
with -n to explore the potential impact of an unfa?
miliar command.
-r Makes new working files read-only. Same effect as
if the CVSREAD environment variable is set.
-v [ --version ]
Displays version and copyright information for cvs.
-w Makes new working files read-write (default).
Overrides the setting of the CVSREAD environment
variable.
-x Encrypt all communication between the client and
the server. As of this writing, this is only
implemented when using a Kerberos connection.
-z compression-level
When transferring files across the network use gzip
with compression level compression-level to com?
press and de-compress data as it is transferred.
Requires the presence of the GNU gzip program in
the current search path at both ends of the link.
USAGE
Except when requesting general help with `cvs -H', you
must specify a cvs_command to cvs to select a specific
release control function to perform. Each cvs command
accepts its own collection of options and arguments. How?
ever, many options are available across several commands.
You can display a usage summary for each command by speci?
fying the -H option with the command.
CVS STARTUP FILE
Normally, when CVS starts up, it reads the .cvsrc file
from the home directory of the user reading it. This
startup procedure can be turned off with the -f flag.
The .cvsrc file lists CVS commands with a list of argu?
ments, one command per line. For example, the following
line in .cvsrc:
diff -c
will mean that the `cvs diff' command will always be
passed the -c option in addition to any other options that
are specified in the command line (in this case it will
have the effect of producing context sensitive diffs for
all executions of `cvs diff' ).
CVS COMMAND SUMMARY
Here are brief descriptions of all the cvs commands:
add Add a new file or directory to the repository,
pending a `cvs commit' on the same file. Can only
be done from within sources created by a previous
`cvs checkout' invocation. Use `cvs import' to
place whole new hierarchies of sources under cvs
control. (Does not directly affect repository;
changes working directory.)
admin Execute control functions on the source repository.
(Changes repository directly; uses working direc?
tory without changing it.)
checkout
Make a working directory of source files for edit?
ing. (Creates or changes working directory.)
commit Apply to the source repository changes, additions,
and deletions from your working directory.
(Changes repository.)
diff Show differences between files in working directory
and source repository, or between two revisions in
source repository. (Does not change either reposi?
tory or working directory.)
export Prepare copies of a set of source files for ship?
ment off site. Differs from `cvs checkout' in that
no cvs administrative directories are created (and
therefore `cvs commit' cannot be executed from a
directory prepared with `cvs export'), and a sym?
bolic tag must be specified. (Does not change
repository; creates directory similar to working
directories).
history
Show reports on cvs commands that you or others
have executed on a particular file or directory in
the source repository. (Does not change repository
or working directory.) History logs are kept only
if enabled by creation of the
`$CVSROOT/CVSROOT/history' file; see cvs(5).
import Incorporate a set of updates from off-site into the
source repository, as a ``vendor branch''.
(Changes repository.)
init Initialize a repository by adding the CVSROOT sub?
directory and some default control files. You must
use this command or initialize the repository in
some other way before you can use it.
log Display log information. (Does not change reposi?
tory or working directory.)
rdiff Prepare a collection of diffs as a patch file
between two releases in the repository. (Does not
change repository or working directory.)
release
Cancel a `cvs checkout', abandoning any changes.
(Can delete working directory; no effect on reposi?
tory.)
remove Remove files from the source repository, pending
a
`cvs commit' on the same files. (Does not directly
affect repository; changes working directory.)
rtag Explicitly specify a symbolic tag for particular
revisions of files in the source repository. See
also `cvs tag'. (Changes repository directly; does
not require or affect working directory.)
status Show current status of files: latest version, ver?
sion in working directory, whether working version
has been edited and, optionally, symbolic tags in
the RCS file. (Does not change repository or work?
ing directory.)
tag Specify a symbolic tag for files in the repository.
By default, tags the revisions that were last syn?
chronized with your working directory. (Changes
repository directly; uses working directory without
changing it.)
update Bring your working directory up to date with
changes from the repository. Merges are performed
automatically when possible; a warning is issued if
manual resolution is required for conflicting
changes. (Changes working directory; does not
change repository.)
COMMON COMMAND OPTIONS
This section describes the command_options that are avail?
able across several cvs commands. Not all commands sup?
port all of these options; each option is only supported
for commands where it makes sense. However, when a com?
mand has one of these options you can count on the same
meaning for the option as in other commands. (Other com?
mand options, which are listed with the individual com?
mands, may have different meanings from one cvs command to
another.) Warning: the history command is an exception;
it supports many options that conflict even with these
standard options.
-D date_spec
Use the most recent revision no later than
date_spec (a single argument, date description
specifying a date in the past). A wide variety of
date formats are supported, in particular ISO
("1972-09-24 20:05") or Internet ("24 Sep 1972
20:05"). The date_spec is interpreted as being in
the local timezone, unless a specific timezone is
specified. The specification is ``sticky'' when
you use it to make a private copy of a source file;
that is, when you get a working file using -D, cvs
records the date you specified, so that further
updates in the same directory will use the same
date (unless you explicitly override it; see the
description of the update command). -D is
available with the checkout, diff, history, export,
rdiff, rtag, and update commands. Examples of
valid date specifications include:
1 month ago
2 hours ago
400000 seconds ago
last year
last Monday
yesterday
a fortnight ago
3/31/92 10:00:07 PST
January 23, 1987 10:05pm
22:00 GMT
-f When you specify a particular date or tag to cvs
commands, they normally ignore files that do not
contain the tag (or did not exist on the date) that
you specified. Use the -f option if you want files
retrieved even when there is no match for the tag
or date. (The most recent version is used in this
situation.) -f is available with these commands:
checkout, export, rdiff, rtag, and update.
-k kflag
Alter the default processing of keywords. The -k
option is available with the add, checkout, diff,
export, rdiff, and update commands. Your kflag
specification is ``sticky'' when you use it to cre?
ate a private copy of a source file; that is, when
you use this option with the checkout or update
commands, cvs associates your selected kflag with
the file, and continues to use it with future
update commands on the same file until you specify
otherwise.
Some of the more useful kflags are -ko and -kb (for
binary files), and -kv which is useful for an
export where you wish to retain keyword information
after an import at some other site.
-l Local; run only in current working directory,
rather than recurring through subdirectories.
Available with the following commands: checkout,
commit, diff, export, remove, rdiff, rtag, status,
tag, and update. Warning: this is not the same as
the overall `cvs -l' option, which you can specify
to the left of a cvs command!
-n Do not run any checkout/commit/tag/update program.
(A program can be specified to run on each of these
activities, in the modules database; this option
bypasses it.) Available with the checkout, commit,
export, and rtag commands. Warning: this is not
the same as the overall `cvs -n' option, which you
can specify to the left of a cvs command!
-P Prune (remove) directories that are empty after
being updated, on checkout, or update. Normally,
an empty directory (one that is void of revision-
controlled files) is left alone. Specifying -P
will cause these directories to be silently removed
from your checked-out sources. This does not
remove the directory from the repository, only from
your checked out copy. Note that this option is
implied by the -r or -D options of checkout and
export.
-p Pipe the files retrieved from the repository to
standard output, rather than writing them in the
current directory. Available with the checkout and
update commands.
-r tag Use the revision specified by the tag argument
instead of the default ``head'' revision. As well
as arbitrary tags defined with the tag or rtag com?
mand, two special tags are always available: `HEAD'
refers to the most recent version available in the
repository, and `BASE' refers to the revision you
last checked out into the current working direc?
tory.
The tag specification is ``sticky'' when you use
this option with `cvs checkout' or `cvs update' to
make your own copy of a file: cvs remembers the tag
and continues to use it on future update commands,
until you specify otherwise. tag can be either a
symbolic or numeric tag. Specifying the -q global
option along with the -r command option is often
useful, to suppress the warning messages when the
RCS file does not contain the specified tag. -r is
available with the checkout, commit, diff, history,
export, rdiff, rtag, and update commands. Warning:
this is not the same as the overall `cvs -r'
option, which you can specify to the left of a cvs
command!
CVS COMMANDS
Here (finally) are details on all the cvs commands and the
options each accepts. The summary lines at the top of
each command's description highlight three kinds of
things:
Command Options and Arguments
Special options are described in detail below;
common command options may appear only in the
summary line.
Working Directory, or Repository?
Some cvs commands require a working directory to
operate; some require a repository. Also, some
commands change the repository, some change the
working directory, and some change nothing.
Synonyms
Many commands have synonyms, which you may find
easier to remember (or type) than the principal
name.
add [-k kflag] [-m 'message'] files...
Requires: repository, working directory.
Changes: working directory.
Synonym: new
Use the add command to create a new file or direc?
tory in the source repository. The files or direc?
tories specified with add must already exist in the
current directory (which must have been created
with the checkout command). To add a whole new
directory hierarchy to the source repository (for
example, files received from a third-party vendor),
use the `cvs import' command instead.
If the argument to `cvs add' refers to an immediate
sub-directory, the directory is created at the cor?
rect place in the source repository, and the neces?
sary cvs administration files are created in your
working directory. If the directory already exists
in the source repository, `cvs add' still creates
the administration files in your version of the
directory. This allows you to use `cvs add' to add
a particular directory to your private sources even
if someone else created that directory after your
checkout of the sources. You can do the following:
example% mkdir new_directory
example% cvs add new_directory
example% cvs update new_directory
An alternate approach using `cvs update' might be:
example% cvs update -d new_directory
(To add any available new directories to your work?
ing directory, it's probably simpler to use `cvs
checkout' or `cvs update -d'.)
The added files are not placed in the source repos?
itory until you use `cvs commit' to make the change
permanent. Doing a `cvs add' on a file that was
removed with the `cvs remove' command will resur?
rect the file, if no `cvs commit' command inter?
vened.
You will have the opportunity to specify a logging
message, as usual, when you use `cvs commit' to
make the new file permanent. If you'd like to have
another logging message associated with just cre?
ation of the file (for example, to describe the
file's purpose), you can specify it with the `-m
message' option to the add command.
The `-k kflag' option specifies the default way
that this file will be checked out. The `kflag'
argument is stored in the RCS file and can be
changed with `cvs admin'. Specifying `-ko' is use?
ful for checking in binaries that shouldn't have
keywords expanded.
admin [rcs-options] files...
Requires: repository, working directory.
Changes: repository.
Synonym: rcs
This is the cvs interface to assorted administra?
tive facilities, similar to rcs(1). This command
works recursively, so extreme care should be used.
checkout [options] modules...
Requires: repository.
Changes: working directory.
Synonyms: co, get
Make a working directory containing copies of the
source files specified by modules. You must exe?
cute `cvs checkout' before using most of the other
cvs commands, since most of them operate on your
working directory.
modules are either symbolic names (themselves
defined as the module `modules' in the source
repository; see cvs(5)) for some collection of
source directories and files, or paths to directo?
ries or files in the repository.
Depending on the modules you specify, checkout may
recursively create directories and populate them
with the appropriate source files. You can then
edit these source files at any time (regardless of
whether other software developers are editing their
own copies of the sources); update them to include
new changes applied by others to the source reposi?
tory; or commit your work as a permanent change to
the repository.
Note that checkout is used to create directories.
The top-level directory created is always added to
the directory where checkout is invoked, and usu?
ally has the same name as the specified module. In
the case of a module alias, the created sub-direc?
tory may have a different name, but you can be sure
that it will be a sub-directory, and that checkout
will show the relative path leading to each file as
it is extracted into your private work area (unless
you specify the -Q global option).
Running `cvs checkout' on a directory that was
already built by a prior checkout is also permit?
ted, and has the same effect as specifying the -d
option to the update command described below.
The options permitted with `cvs checkout' include
the standard command options -P, -f, -k kflag , -l,
-n, -p, -r tag, and -D date.
In addition to those, you can use these special
command options with checkout:
Use the -A option to reset any sticky tags, dates,
or -k options. (If you get a working file using
one of the -r, -D, or -k options, cvs remembers the
corresponding tag, date, or kflag and continues
using it on future updates; use the -A option to
make cvs forget these specifications, and retrieve
the ``head'' version of the file).
The -j branch option merges the changes made
between the resulting revision and the revision
that it is based on (e.g., if the tag refers to a
branch, cvs will merge all changes made in that
branch into your working file).
With two -j options, cvs will merge in the changes
between the two respective revisions. This can be
used to ``remove'' a certain delta from your work?
ing file.
In addition, each -j option can contain on optional
date specification which, when used with branches,
can limit the chosen revision to one within a spe?
cific date. An optional date is specified by
adding a colon (:) to the tag. An example might be
what `cvs import' tells you to do when you have
just imported sources that have conflicts with
local changes:
example% cvs checkout -jTAG:yesterday -jTAG module
Use the -N option with `-d dir' to avoid shortening
module paths in your working directory. (Nor?
mally, cvs shortens paths as much as possible when
you specify an explicit target directory.)
Use the -c option to copy the module file, sorted,
to the standard output, instead of creating or mod?
ifying any files or directories in your working
directory.
Use the -d dir option to create a directory called
dir for the working files, instead of using the
module name. Unless you also use -N, the paths
created under dir will be as short as possible.
Use the -s option to display per-module status
information stored with the -s option within the
modules file.
commit [-lnR] [-m 'log_message' | -f file] [-r
revision] [files...]
Requires: working directory, repository.
Changes: repository.
Synonym: ci
Use `cvs commit' when you want to incorporate
changes from your working source files into the
general source repository.
If you don't specify particular files to commit,
all of the files in your working current directory
are examined. commit is careful to change in the
repository only those files that you have really
changed. By default (or if you explicitly specify
the -R option), files in subdirectories are also
examined and committed if they have changed; you
can use the -l option to limit commit to the cur?
rent directory only. Sometimes you may want to
force a file to be committed even though it is
unchanged; this is achieved with the -f flag, which
also has the effect of disabling recursion (you can
turn it back on with -R of course).
commit verifies that the selected files are up to
date with the current revisions in the source
repository; it will notify you, and exit without
committing, if any of the specified files must be
made current first with `cvs update'. commit does
not call the update command for you, but rather
leaves that for you to do when the time is right.
When all is well, an editor is invoked to allow you
to enter a log message that will be written to one
or more logging programs and placed in the source
repository file. You can instead specify the log
message on the command line with the -m option,
thus suppressing the editor invocation, or use the
-F option to specify that the argument file con?
tains the log message.
The -r option can be used to commit to a particular
symbolic or numeric revision. For example, to
bring all your files up to the revision ``3.0''
(including those that haven't changed), you might
do:
example% cvs commit -r3.0
cvs will only allow you to commit to a revision
that is on the main trunk (a revision with a single
dot). However, you can also commit to a branch
revision (one that has an even number of dots) with
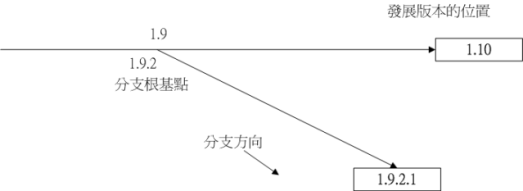
the -r option. To create a branch revision, one
typically use the -b option of the rtag or tag com?
mands. Then, either checkout or update can be used
to base your sources on the newly created branch.
From that point on, all commit changes made within
these working sources will be automatically added
to a branch revision, thereby not perturbing main-
line development in any way. For example, if you
had to create a patch to the 1.2 version of the
product, even though the 2.0 version is already
under development, you might do:
example% cvs rtag -b -rFCS1_2 FCS1_2_Patch product_module
example% cvs checkout -rFCS1_2_Patch product_module
example% cd product_module
[[ hack away ]]
example% cvs commit
Say you have been working on some extremely experi?
mental software, based on whatever revision you
happened to checkout last week. If others in your
group would like to work on this software with you,
but without disturbing main-line development, you
could commit your change to a new branch. Others
can then checkout your experimental stuff and uti?
lize the full benefit of cvs conflict resolution.
The scenario might look like:
example% cvs tag -b EXPR1
example% cvs update -rEXPR1
[[ hack away ]]
example% cvs commit
Others would simply do `cvs checkout -rEXPR1
whatever_module' to work with you on the experimen?
tal change.
diff [-kl] [rcsdiff_options] [[-r rev1 | -D date1] [-r
rev2 | -D date2]] [files...]
Requires: working directory, repository.
Changes: nothing.
You can compare your working files with revisions
in the source repository, with the `cvs diff' com?
mand. If you don't specify a particular revision,
your files are compared with the revisions they
were based on. You can also use the standard cvs
command option -r to specify a particular revision
to compare your files with. Finally, if you use -r
twice, you can see differences between two revi?
sions in the repository. You can also specify -D
options to diff against a revision in the past.
The -r and -D options can be mixed together with at
most two options ever specified.
See rcsdiff(1) for a list of other accepted
options.
If you don't specify any files, diff will display
differences for all those files in the current
directory (and its subdirectories, unless you use
the standard option -l) that differ from the corre?
sponding revision in the source repository (i.e.
files that you have changed), or that differ from
the revision specified.
export [-flNnQq] -r rev|-D date [-d dir] [-k kflag]
module...
Requires: repository.
Changes: current directory.
This command is a variant of `cvs checkout'; use it
when you want a copy of the source for module with?
out the cvs administrative directories. For exam?
ple, you might use `cvs export' to prepare source
for shipment off-site. This command requires that
you specify a date or tag (with -D or -r), so that
you can count on reproducing the source you ship to
others.
The only non-standard options are `-d dir' (write
the source into directory dir) and `-N' (don't
shorten module paths). These have the same mean?
ings as the same options in `cvs checkout'.
The -kv option is useful when export is used. This
causes any keywords to be expanded such that an
import done at some other site will not lose the
keyword revision information. Other kflags may be
used with `cvs export' and are described in co(1).
history [-report] [-flags] [-options args] [files...]
Requires: the file `$CVSROOT/CVSROOT/history'
Changes: nothing.
cvs keeps a history file that tracks each use of
the checkout, commit, rtag, update, and release
commands. You can use `cvs history' to display
this information in various formats.
Warning: `cvs history' uses `-f', `-l', `-n', and
`-p' in ways that conflict with the descriptions in
COMMON COMMAND OPTIONS.
Several options (shown above as -report) control
what kind of report is generated:
-c Report on each time commit was used (i.e., each
time the repository was modified).
-m module
Report on a particular module. (You can mean?
ingfully use -m more than once on the command
line.)
-o Report on checked-out modules.
-T Report on all tags.
-x type
Extract a particular set of record types X from
the cvs history. The types are indicated by
single letters, which you may specify in combi?
nation. Certain commands have a single record
type: checkout (type `O'), release (type `F'),
and rtag (type `T'). One of four record types
may result from an update: `W', when the working
copy of a file is deleted during update (because
it was gone from the repository); `U', when a
working file was copied from the repository;
`G', when a merge was necessary and it suc?
ceeded; and 'C', when a merge was necessary but
collisions were detected (requiring manual merg?
ing). Finally, one of three record types
results from commit: `M', when a file was modi?
fied; `A', when a file is first added; and `R',
when a file is removed.
-e Everything (all record types); equivalent to
specifying `-xMACFROGWUT'.
-z zone
Use time zone zone when outputting history
records. The zone name LT stands for local
time; numeric offsets stand for hours and min?
utes ahead of UTC. For example, +0530 stands
for 5 hours and 30 minutes ahead of (i.e. east
of) UTC.
The options shown as -flags constrain the report
without requiring option arguments:
-a Show data for all users (the default is to show
data only for the user executing `cvs history').
-l Show last modification only.
-w Show only the records for modifications done
from the same working directory where `cvs
history' is executing.
The options shown as -options args constrain the
report based on an argument:
-b str
Show data back to a record containing the string
str in either the module name, the file name, or
the repository path.
-D date
Show data since date.
-p repository
Show data for a particular source repository
(you can specify several -p options on the same
command line).
-r rev
Show records referring to revisions since the
revision or tag named rev appears in individual
RCS files. Each RCS file is searched for the
revision or tag.
-t tag
Show records since tag tag was last added to the
history file. This differs from the -r flag
above in that it reads only the history file,
not the RCS files, and is much faster.
-u name
Show records for user name.
import [-options] repository vendortag releasetag...
Requires: Repository, source distribution
directory.
Changes: repository.
Use `cvs import' to incorporate an entire source
distribution from an outside source (e.g., a source
vendor) into your source repository directory. You
can use this command both for initial creation of a
repository, and for wholesale updates to the module
form the outside source.
The repository argument gives a directory name (or
a path to a directory) under the CVS root directory
for repositories; if the directory did not exist,
import creates it.
When you use import for updates to source that has
been modified in your source repository (since a
prior import), it will notify you of any files that
conflict in the two branches of development; use
`cvs checkout -j' to reconcile the differences, as
import instructs you to do.
By default, certain file names are ignored during
`cvs import': names associated with CVS administra?
tion, or with other common source control systems;
common names for patch files, object files, archive
files, and editor backup files; and other names
that are usually artifacts of assorted utilities.
For an up to date list of ignored file names, see
the Cederqvist manual (as described in the SEE ALSO
section of this manpage).
The outside source is saved in a first-level
branch, by default `1.1.1'. Updates are leaves of
this branch; for example, files from the first
imported collection of source will be revision
`1.1.1.1', then files from the first imported
update will be revision `1.1.1.2', and so on.
At least three arguments are required. repository
is needed to identify the collection of source.
vendortag is a tag for the entire branch (e.g., for
`1.1.1'). You must also specify at least one
releasetag to identify the files at the leaves cre?
ated each time you execute `cvs import'.
One of the standard cvs command options is avail?
able: -m message. If you do not specify a logging
message with -m, your editor is invoked (as with
commit) to allow you to enter one.
There are three additional special options.
Use `-d' to specify that each file's time of last
modification should be used for the checkin date
and time.
Use `-b branch' to specify a first-level branch
other than `1.1.1'.
Use `-I name' to specify file names that should be
ignored during import. You can use this option
repeatedly. To avoid ignoring any files at all
(even those ignored by default), specify `-I !'.
log [-l] rlog-options [files...]
Requires: repository, working directory.
Changes: nothing.
Synonym: rlog
Display log information for files. Among the more
useful options are -h to display only the header
(including tag definitions, but omitting most of
the full log); -r to select logs on particular
revisions or ranges of revisions; and -d to select
particular dates or date ranges. See rlog(1) for
full explanations. This command is recursive by
default, unless the -l option is specified.
rdiff [-flags] [-V vn] [-r t|-D d [-r t2|-D d2]]
modules...
Requires: repository.
Changes: nothing.
Synonym: patch
Builds a Larry Wall format patch(1) file between
two releases, that can be fed directly into the
patch program to bring an old release up-to-date
with the new release. (This is one of the few cvs
commands that operates directly from the reposi?
tory, and doesn't require a prior checkout.) The
diff output is sent to the standard output device.
You can specify (using the standard -r and -D
options) any combination of one or two revisions or
dates. If only one revision or date is specified,
the patch file reflects differences between that
revision or date and the current ``head'' revisions
in the RCS file.
Note that if the software release affected is con?
tained in more than one directory, then it may be
necessary to specify the -p option to the patch
command when patching the old sources, so that
patch is able to find the files that are located in
other directories.
The standard option flags -f, and -l are available
with this command. There are also several special
options flags:
If you use the -s option, no patch output is pro?
duced. Instead, a summary of the changed or added
files between the two releases is sent to the stan?
dard output device. This is useful for finding
out, for example, which files have changed between
two dates or revisions.
If you use the -t option, a diff of the top two
revisions is sent to the standard output device.
This is most useful for seeing what the last change
to a file was.
If you use the -u option, the patch output uses the
newer ``unidiff'' format for context diffs.
You can use -c to explicitly specify the `diff -c'
form of context diffs (which is the default), if
you like.
release [-dQq] modules...
Requires: Working directory.
Changes: Working directory, history log.
This command is meant to safely cancel the effect
of `cvs checkout'.' Since cvs doesn't lock files,
it isn't strictly necessary to use this command.
You can always simply delete your working direc?
tory, if you like; but you risk losing changes you
may have forgotten, and you leave no trace in the
cvs history file that you've abandoned your check?
out.
Use `cvs release' to avoid these problems. This
command checks that no un-committed changes are
present; that you are executing it from immediately
above, or inside, a cvs working directory; and that
the repository recorded for your files is the same
as the repository defined in the module database.
If all these conditions are true, `cvs release'
leaves a record of its execution (attesting to your
intentionally abandoning your checkout) in the cvs
history log.
You can use the -d flag to request that your work?
ing copies of the source files be deleted if the
release succeeds.
remove [-lR] [files...]
Requires: Working directory.
Changes: Working directory.
Synonyms: rm, delete
Use this command to declare that you wish to remove
files from the source repository. Like most cvs
commands, `cvs remove' works on files in your work?
ing directory, not directly on the repository. As
a safeguard, it also requires that you first erase
the specified files from your working directory.
The files are not actually removed until you apply
your changes to the repository with commit; at that
point, the corresponding RCS files in the source
repository are moved into the `Attic' directory
(also within the source repository).
This command is recursive by default, scheduling
all physically removed files that it finds for
removal by the next commit. Use the -l option to
avoid this recursion, or just specify that actual
files that you wish remove to consider.
rtag [-falnRQq] [-b] [-d] [-r tag | -D date] sym?
bolic_tag modules...
Requires: repository.
Changes: repository.
Synonym: rfreeze
You can use this command to assign symbolic tags to
particular, explicitly specified source versions in
the repository. `cvs rtag' works directly on the
repository contents (and requires no prior check?
out). Use `cvs tag' instead, to base the selection
of versions to tag on the contents of your working
directory.
In general, tags (often the symbolic names of soft?
ware distributions) should not be removed, but the
-d option is available as a means to remove com?
pletely obsolete symbolic names if necessary (as
might be the case for an Alpha release, say).
`cvs rtag' will not move a tag that already exists.
With the -F option, however, `cvs rtag' will re-
locate any instance of symbolic_tag that already
exists on that file to the new repository versions.
Without the -F option, attempting to use `cvs rtag'
to apply a tag that already exists on that file
will produce an error message.
The -b option makes the tag a ``branch'' tag,
allowing concurrent, isolated development. This is
most useful for creating a patch to a previously
released software distribution.
You can use the standard -r and -D options to tag
only those files that already contain a certain
tag. This method would be used to rename a tag:
tag only the files identified by the old tag, then
delete the old tag, leaving the new tag on exactly
the same files as the old tag.
rtag executes recursively by default, tagging all
subdirectories of modules you specify in the argu?
ment. You can restrict its operation to top-level
directories with the standard -l option; or you can
explicitly request recursion with -R.
The modules database can specify a program to exe?
cute whenever a tag is specified; a typical use is
to send electronic mail to a group of interested
parties. If you want to bypass that program, use
the standard -n option.
Use the -a option to have rtag look in the `Attic'
for removed files that contain the specified tag.
The tag is removed from these files, which makes it
convenient to re-use a symbolic tag as development
continues (and files get removed from the up-coming
distribution).
status [-lRqQ] [-v] [files...]
Requires: working directory, repository.
Changes: nothing.
Display a brief report on the current status of
files with respect to the source repository,
including any ``sticky'' tags, dates, or -k
options. (``Sticky'' options will restrict how
`cvs update' operates until you reset them; see the
description of `cvs update -A...'.)
You can also use this command to anticipate the
potential impact of a `cvs update' on your working
source directory. If you do not specify any files
explicitly, reports are shown for all files that
cvs has placed in your working directory. You can
limit the scope of this search to the current
directory itself (not its subdirectories) with the
standard -l option flag; or you can explicitly
request recursive status reports with the -R
option.
The -v option causes the symbolic tags for the RCS
file to be displayed as well.
tag [-lQqR] [-F] [-b] [-d] [-r tag | -D date] [-f] sym?
bolic_tag [files...]
Requires: working directory, repository.
Changes: repository.
Synonym: freeze
Use this command to assign symbolic tags to the
nearest repository versions to your working
sources. The tags are applied immediately to the
repository, as with rtag.
One use for tags is to record a ``snapshot'' of the
current sources when the software freeze date of a
project arrives. As bugs are fixed after the
freeze date, only those changed sources that are to
be part of the release need be re-tagged.
The symbolic tags are meant to permanently record
which revisions of which files were used in creat?
ing a software distribution. The checkout, export
and update commands allow you to extract an exact
copy of a tagged release at any time in the future,
regardless of whether files have been changed,
added, or removed since the release was tagged.
You can use the standard -r and -D options to tag
only those files that already contain a certain
tag. This method would be used to rename a tag:
tag only the files identified by the old tag, then
delete the old tag, leaving the new tag on exactly
the same files as the old tag.
Specifying the -f flag in addition to the -r or -D
flags will tag those files named on the command
line even if they do not contain the old tag or did
not exist on the specified date.
By default (without a -r or -D flag) the versions
to be tagged are supplied implicitly by the cvs
records of your working files' history rather than
applied explicitly.
If you use `cvs tag -d symbolic_tag...', the sym?
bolic tag you specify is deleted instead of being
added. Warning: Be very certain of your ground
before you delete a tag; doing this effectively
discards some historical information, which may
later turn out to have been valuable.
`cvs tag' will not move a tag that already exists.
With the -F option, however, `cvs tag' will re-
locate any instance of symbolic_tag that already
exists on that file to the new repository versions.
Without the -F option, attempting to use `cvs tag'
to apply a tag that already exists on that file
will produce an error message.
The -b option makes the tag a ``branch'' tag,
allowing concurrent, isolated development. This is
most useful for creating a patch to a previously
released software distribution.
Normally, tag executes recursively through subdi?
rectories; you can prevent this by using the stan?
dard -l option, or specify the recursion explicitly
by using -R.
update [-ACdflPpQqR] [-d] [-r tag|-D date] files...
Requires: repository, working directory.
Changes: working directory.
After you've run checkout to create your private
copy of source from the common repository, other
developers will continue changing the central
source. From time to time, when it is convenient
in your development process, you can use the update
command from within your working directory to rec?
oncile your work with any revisions applied to the
source repository since your last checkout or
update.
update keeps you informed of its progress by print?
ing a line for each file, prefaced with one of the
characters `U A R M C ?' to indicate the status of
the file:
U file The file was brought up to date with respect to
the repository. This is done for any file that
exists in the repository but not in your source,
and for files that you haven't changed but are
not the most recent versions available in the
repository.
A file The file has been added to your private copy of
the sources, and will be added to the source
repository when you run `cvs commit' on the
file. This is a reminder to you that the file
needs to be committed.
R file The file has been removed from your private copy
of the sources, and will be removed from the
source repository when you run `cvs commit' on
the file. This is a reminder to you that the
file needs to be committed.
M file The file is modified in your working directory.
`M' can indicate one of two states for a file
you're working on: either there were no modifi?
cations to the same file in the repository, so
that your file remains as you last saw it; or
there were modifications in the repository as
well as in your copy, but they were merged suc?
cessfully, without conflict, in your working
directory.
C file A conflict was detected while trying to merge
your changes to file with changes from the
source repository. file (the copy in your work?
ing directory) is now the result of merging the
two versions; an unmodified copy of your file is
also in your working directory, with the name
`.#file.version', where version is the revision
that your modified file started from. (Note
that some systems automatically purge files that
begin with `.#' if they have not been accessed
for a few days. If you intend to keep a copy of
your original file, it is a very good idea to
rename it.)
? file file is in your working directory, but does not
correspond to anything in the source repository,
and is not in the list of files for cvs to
ignore (see the description of the -I option).
Use the -A option to reset any sticky tags, dates, or
-k options. (If you get a working copy of a file by
using one of the -r, -D, or -k options, cvs remembers
the corresponding tag, date, or kflag and continues
using it on future updates; use the -A option to make
cvs forget these specifications, and retrieve the
``head'' version of the file).
The -jbranch option merges the changes made between
the resulting revision and the revision that it is
based on (e.g., if the tag refers to a branch, cvs
will merge all changes made in that branch into your
working file).
With two -j options, cvs will merge in the changes
between the two respective revisions. This can be
used to ``remove'' a certain delta from your working
file. E.g., If the file foo.c is based on revision
1.6 and I want to remove the changes made between 1.3
and 1.5, I might do:
example% cvs update -j1.5 -j1.3 foo.c # note the order...
In addition, each -j option can contain on optional
date specification which, when used with branches,
can limit the chosen revision to one within a spe?
cific date. An optional date is specified by adding
a colon (:) to the tag.
-jSymbolic_Tag:Date_Specifier
Use the -d option to create any directories that
exist in the repository if they're missing from the
working directory. (Normally, update acts only on
directories and files that were already enrolled in
your working directory.) This is useful for updating
directories that were created in the repository since
the initial checkout; but it has an unfortunate side
effect. If you deliberately avoided certain directo?
ries in the repository when you created your working
directory (either through use of a module name or by
listing explicitly the files and directories you
wanted on the command line), then updating with -d
will create those directories, which may not be what
you want.
Use -I name to ignore files whose names match name
(in your working directory) during the update. You
can specify -I more than once on the command line to
specify several files to ignore. By default, update
ignores files whose names match certain patterns; for
an up to date list of ignored file names, see the
Cederqvist manual (as described in the SEE ALSO sec?
tion of this manpage).
Use `-I !' to avoid ignoring any files at all.
Use the `-C' option to overwrite locally modified
files with clean copies from the repository (the mod?
ified file is saved in `.#file.revision', however).
The standard cvs command options -f, -k, -l, -P, -p,
and -r are also available with update.
FILES
For more detailed information on cvs supporting files, see
cvs(5).
Files in home directories:
.cvsrc The cvs initialisation file. Lines in this file
can be used to specify default options for each cvs
command. For example the line `diff -c' will
ensure that `cvs diff' is always passed the -c
option in addition to any other options passed on
the command line.
.cvswrappers
Specifies wrappers to be used in addition to those
specified in the CVSROOT/cvswrappers file in the
repository.
Files in working directories:
CVS A directory of cvs administrative files. Do not
delete.
CVS/Entries
List and status of files in your working directory.
CVS/Entries.Backup
A backup of `CVS/Entries'.
CVS/Entries.Static
Flag: do not add more entries on `cvs update'.
CVS/Root
Pathname to the repository ( CVSROOT ) location at
the time of checkout. This file is used instead of
the CVSROOT environment variable if the environment
variable is not set. A warning message will be
issued when the contents of this file and the CVS?
ROOT environment variable differ. The file may be
over-ridden by the presence of the
CVS_IGNORE_REMOTE_ROOT environment variable.
CVS/Repository
Pathname to the corresponding directory in the
source repository.
CVS/Tag
Contains the per-directory ``sticky'' tag or date
information. This file is created/updated when you
specify -r or -D to the checkout or update com?
mands, and no files are specified.
CVS/Checkin.prog
Name of program to run on `cvs commit'.
CVS/Update.prog
Name of program to run on `cvs update'.
Files in source repositories:
$CVSROOT/CVSROOT
Directory of global administrative files for repos?
itory.
CVSROOT/commitinfo,v
Records programs for filtering `cvs commit'
requests.
CVSROOT/cvswrappers,v
Records cvs wrapper commands to be used when check?
ing files into and out of the repository. Wrappers
allow the file or directory to be processed on the
way in and out of CVS. The intended uses are many,
one possible use would be to reformat a C file
before the file is checked in, so all of the code
in the repository looks the same.
CVSROOT/editinfo,v
Records programs for editing/validating `cvs
commit' log entries.
CVSROOT/history
Log file of cvs transactions.
CVSROOT/loginfo,v
Records programs for piping `cvs commit' log
entries.
CVSROOT/modules,v
Definitions for modules in this repository.
CVSROOT/rcsinfo,v
Records pathnames to templates used during a `cvs
commit' operation.
CVSROOT/taginfo,v
Records programs for validating/logging `cvs tag'
and `cvs rtag' operations.
MODULE/Attic
Directory for removed source files.
#cvs.lock
A lock directory created by cvs when doing sensi?
tive changes to the source repository.
#cvs.tfl.pid
Temporary lock file for repository.
#cvs.rfl.pid
A read lock.
#cvs.wfl.pid
A write lock.
ENVIRONMENT VARIABLES
CVSROOT
Should contain the full pathname to the root of the
cvs source repository (where the RCS files are
kept). This information must be available to cvs
for most commands to execute; if CVSROOT is not
set, or if you wish to override it for one invoca?
tion, you can supply it on the command line: `cvs
-d cvsroot cvs_command...' You may not need to set
CVSROOT if your cvs binary has the right path com?
piled in; use `cvs -v' to display all compiled-in
paths.
CVSREAD
If this is set, checkout and update will try hard
to make the files in your working directory read-
only. When this is not set, the default behavior
is to permit modification of your working files.
RCSBIN Specifies the full pathname where to find RCS pro?
grams, such as co(1) and ci(1) (CVS 1.9 and older).
CVSEDITOR
Specifies the program to use for recording log mes?
sages during commit. If not set, the VISUAL and
EDITOR environment variables are tried (in that
order). If neither is set, a system-dependent
default editor (e.g., vi) is used.
CVS_IGNORE_REMOTE_ROOT
If this variable is set then cvs will ignore all
references to remote repositories in the CVS/Root
file.
CVS_RSH
cvs uses the contents of this variable to determine
the name of the remote shell command to use when
starting a cvs server. If this variable is not set
then `rsh' is used.
CVS_SERVER
cvs uses the contents of this variable to determine
the name of the cvs server command. If this vari?
able is not set then `cvs' is used.
CVSWRAPPERS
This variable is used by the `cvswrappers' script
to determine the name of the wrapper file, in addi?
tion to the wrappers defaults contained in the
repository (CVSROOT/cvswrappers) and the user's
home directory (~/.cvswrappers).
AUTHORS
Dick Grune
Original author of the cvs shell script version
posted to comp.sources.unix in the volume6 release
of December, 1986. Credited with much of the cvs
conflict resolution algorithms.
Brian Berliner
Coder and designer of the cvs program itself in
April, 1989, based on the original work done by
Dick.
Jeff Polk
Helped Brian with the design of the cvs module and
vendor branch support and author of the checkin(1)
shell script (the ancestor of `cvs import').
And many others too numerous to mention here.
SEE ALSO
The most comprehensive manual for CVS is Version Manage?
ment with CVS by Per Cederqvist et al. Depending on your
system, you may be able to get it with the info cvs com?
mand or it may be available as cvs.ps (postscript),
cvs.texinfo (texinfo source), or cvs.html.
For CVS updates, more information on documentation, soft?
ware related to CVS, development of CVS, and more, see:
http://www.cyclic.com
http://www.loria.fr/~molli/cvs-index.html
ci(1), co(1), cvs(5), cvsbug(8), diff(1), grep(1),
patch(1), rcs(1), rcsdiff(1), rcsmerge(1), rlog(1).
|