摘要:最近几天有时间看了一下Castle,原来它的功能是如此的强大,从数据访问框架到IOC容器,再到WEB框架,基本包括了整个开发过程中的所有东西,看来得好好学习研究一下了,并且打算把自己学习过程的一些东西记录下来。先从ActiveRecord开始吧,ActiveRecord提供的简洁的O/R映射给我留下了很深的印象,本文将通过一个简单对象的CRUD操作来带你快速走进Castle
ActiveRecord。
主要内容
1.概述
2.准备相关的数据表
3.编写User实体类
4.构建配置信息
5.开始CRUD操作
6.使用ActiveRecord Generator生成实体类代码
一.概述
如果你用过NHibernate,一定会对在NHibernate中编写.hbm.xml文件印象深刻,我也是。而在Castle
ActiveRecord中,我们不用再为编写繁冗复杂的映射文件而头疼,ActiveRecord是Castle中提供的一个数据访问框架,它在底层封装了NHibernate的操作,使用特性来代替映射文件,它提供的简洁的O/R映射会让你惊叹原来实现持久化数据层是那么简单。下面我们通过一个简单对象的CRUD操作来快速进入Castle
ActiveRecord。
二.准备相关的数据表
假定数据库中有这样一张用户表,用来保存用户的信息,如下
CREATE TABLE [dbo].[Users]
(
[LogonID] [int] IDENTITY (1, 1) NOT NULL ,
[LogonName] [varchar] (40) COLLATE Chinese_PRC_CI_AS NULL ,
[Password] [varchar] (20) COLLATE Chinese_PRC_CI_AS NULL ,
[EmailAddress] [varchar] (40) COLLATE Chinese_PRC_CI_AS NULL
,
[LastLogon] [datetime] NULL
) ON [PRIMARY]
GO |
三.编写User实体类
首先我们新建一个User类并让它继承于ActiveRecordBase类
public
class User : ActiveRecordBase
{
//
} |
为User类添加特性,其实就是告诉ActiveRecord,User类所对应的数据库中的数据表名为Users
[ActiveRecord("Users")]
public class User : ActiveRecordBase
{
//
} |
下面我们的工作就是为实体类添加属性
[ActiveRecord("Users")]
public class User : ActiveRecordBase
{
private int _id;
private string _name;
private string _password;
private string _emailAddress;
private DateTime _lastLogon;
[PrimaryKey(PrimaryKeyType.Identity, "LogonID")]
public int Id
{
get { return _id; }
set { _id = value; }
}
[Property("LogonName")]
public string Name
{
get { return _name; }
set { _name = value; }
}
[Property("Password")]
public string Password
{
get { return _password; }
set { _password = value; }
}
[Property("EmailAddress")]
public string Address
{
get { return _emailAddress; }
set { _emailAddress = value; }
}
[Property("LastLogon")]
public DateTime LastLogon
{
get { return _lastLogon; }
set {_lastLogon = value; }
}
} |
大家可能注意到了,每一个属性上面都加上了特性[Property()]。简单的说明一下,这里用[PrimaryKey]特性指定Id作为主键,并且说明了主键的类型为自增型的,用PrimaryKeyType.Identity来说明,在后续文章中我会详细说明的。如果属性名和字段名一致,[Property()]中可以为空,也可以写上字段的名字。
下一步我们为实体类根据需要加上静态的操作方法,至于Create(),Update(),Delete(),Save()等方法则会直接从ActiveRecordBase基类中继承
|
[ActiveRecord("Users")]
public class User : ActiveRecordBase
{
//……
public static void DeleteAll()
{
DeleteAll( typeof(User) );
}
public static IList FindAll()
{
return (IList) FindAll( typeof(User) );
}
public static User Find(int id)
{
return (User) FindByPrimaryKey( typeof(User), id );
}
} |
整个完成后的实体类代码
using
System;
using System.Collections;
using Castle.ActiveRecord;
namespace ARDemo
{
/**//// <summary>
/// User 的摘要说明。
/// </summary>
[ActiveRecord("Users")]
public class User : ActiveRecordBase
{
private int _id;
private string _name;
private string _password;
private string _emailAddress;
private DateTime _lastLogon;
[PrimaryKey(PrimaryKeyType.Identity, "LogonID")]
public int Id
{
get { return _id; }
set { _id = value; }
}
[Property("LogonName")]
public string Name
{
get { return _name; }
set { _name = value; }
}
[Property("Password")]
public string Password
{
get { return _password; }
set { _password = value; }
}
[Property("EmailAddress")]
public string Address
{
get { return _emailAddress; }
set { _emailAddress = value; }
}
[Property("LastLogon")]
public DateTime LastLogon
{
get { return _lastLogon; }
set {_lastLogon = value; }
}
public static void DeleteAll()
{
DeleteAll( typeof(User) );
}
public static IList FindAll()
{
return (IList) FindAll( typeof(User) );
}
public static User Find(int id)
{
return (User) FindByPrimaryKey( typeof(User), id );
}
}
}
|
四.构建配置信息
现在我们要告诉ActiveRecord相关的数据库、数据驱动等信息,最简单的就是使用配置文件
<?xml version="1.0"
encoding="utf-8" ?>
<configuration>
<configSections>
<section name="activerecord"
type="Castle.ActiveRecord.Framework.Config.ActiveRecordSectionHandler,
Castle.ActiveRecord" />
</configSections>
<activerecord>
<config>
<add key="hibernate.connection.driver_class"
value="NHibernate.Driver.SqlClientDriver" />
<add key="hibernate.dialect" value="NHibernate.Dialect.MsSql2000Dialect"
/>
<add key="hibernate.connection.provider"
value="NHibernate.Connection.DriverConnectionProvider"
/>
<add key="hibernate.connection.connection_string"
value="UID=sa;Password=sa;Initial Catalog=ARDemo;Data Source=."
/>
</config>
</activerecord>
</configuration> |
用过NHibernate的朋友一定会对这段配置代码很熟悉,没错,因为ActiveRecord在底层封装了NHibernate,所以这里的配置跟使用NHibernate时的配置一样,同样是指定了数据源驱动,连接字符串等信息。如果使用了配置文件在代码中只要这样去初始化就可以了
IConfigurationSource source
= System.Configuration.ConfigurationSettings.GetConfig("activerecord")
as IConfigurationSource;
ActiveRecordStarter.Initialize( source, typeof(User) ); |
我们也可以不使用配置文件,而使用代码指定的方式,但是由于这种方式相当于硬编码了,不大推荐大家使用这种方式:
InPlaceConfigurationSource
source = new InPlaceConfigurationSource();
Hashtable properties = new Hashtable();
properties.Add("hibernate.connection.driver_class",
"NHibernate.Driver.SqlClientDriver");
properties.Add("hibernate.dialect", "NHibernate.Dialect.MsSql2000Dialect");
properties.Add("hibernate.connection.provider",
"NHibernate.Connection.DriverConnectionProvider");
properties.Add("hibernate.connection.connection_string",
"UID=sa;Password=19811218;Initial Catalog=ARDemo;Data
Source=.");
source.Add( typeof(ActiveRecordBase), properties
);
ActiveRecordStarter.Initialize( source, typeof(User)
);
|
五.开始CRUD操作
好了,经过了前面的步骤之后,就可以正式开始我们的对象CRUD操作了。
1.增加User对象
[Test]
public void AddUser()
{
User user = new User();
user.Name = "Terrylee";
user.Password = "aaa";
user.Address = "lhj_cauc@163.com";
user.LastLogon = DateTime.Now;
user.Create();
} |
是不是非常简单?我们甚至都没有写过Create()方法,它直接从ActiveRecordBase类继承。我们所做的只是创建这样一个User对象,然后调用它的方法就可以了。
2.查询所有的User对象
[Test]
public void FildAll()
{
IList list = User.FindAll();
Assert.IsNotNull(list);
int actual = list.Count;
int expected = 2;
Assert.AreEqual(expected,actual);
} |
3.查询某一个指定Id的User对象
[Test]
public void Fild()
{
int id = 5;
User actual = User.Find(id);
Assert.IsNotNull(actual);
Assert.AreEqual("Terrylee",actual.Name);
Assert.AreEqual("aaa",actual.Password);
} |
4.修改User对象
[Test]
public void UpdateUser()
{
User user = new User();
user.Id = 5;
user.Name = "Aero";
user.Password = "aaa";
user.Address = "chwkai@163.com";
user.LastLogon = DateTime.Now;
user.Update();
} |
5.删除User对象
[Test]
public void DeleteUser()
{
User user = new User();
user.Id = 7;
user.Delete();
} |
6.删除所有的User对象
[Test]
public void DeleteAll()
{
User.DeleteAll();
} |
可以看到,整个过程非常的简洁简单,没有一点多余复杂的代码,相信你已经开始体会到了ActiveRecord的魅力了。唯一有一点你会感到不舒服的是已经有了数据库表还需要手工编写实体类代码,这个不用担心,ActiveRecord已经为我们提供了代码生成工具ActiveRecord
Generator。
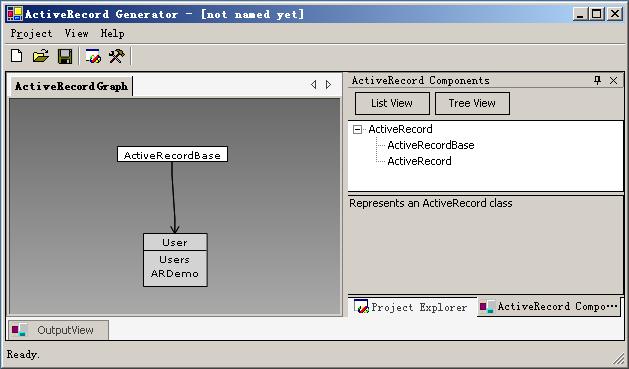
六.使用ActiveRecord Generator生成实体类代码
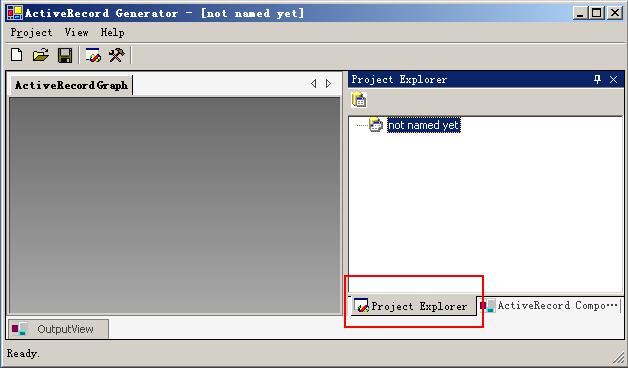
1.执行Castle.ActiveRecord.Generator.exe,位于目录C:\Program
Files\Castle\Bin\net-1.1\下面,可以看到如下界面,选择Project Explorer面板
2.点击“Add DataBase Connection”图标,如下图中红色方框所示,弹出设置连接字符串对话框,我们首先要为数据库起一个别名,这个名字可以跟数据库名不一样,在后面我们会用到
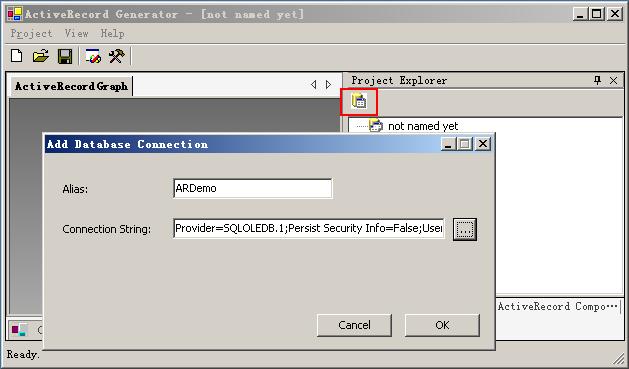
注意:如果连接数据库为SQL Server2000数据库,必须在弹出的对话框中选中允许保存密码选项,否则点击OK按钮时会报登录失败的错误!这点不知道是不是我机器的设置问题,如果有朋友遇到这样的错误,不妨一试。
3.点击OK后,选择ActiveRecord Components面板
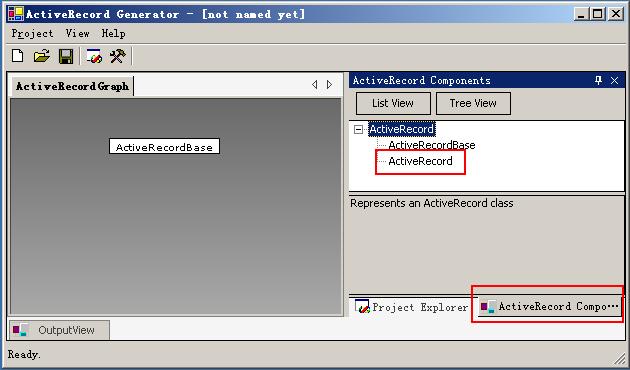
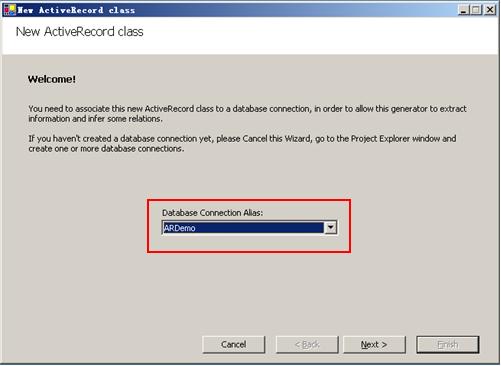
4.拖动ActiveRecord到左边的空白区域,会出现如下界面,选择我们刚才设置的数据库别名
5.此后操作有选择子段,设置类名等,全部完成后界面如下:
6.选择Project菜单下的Generate Code,输入命名空间,文件设置路径,并选择所要生成代码语言
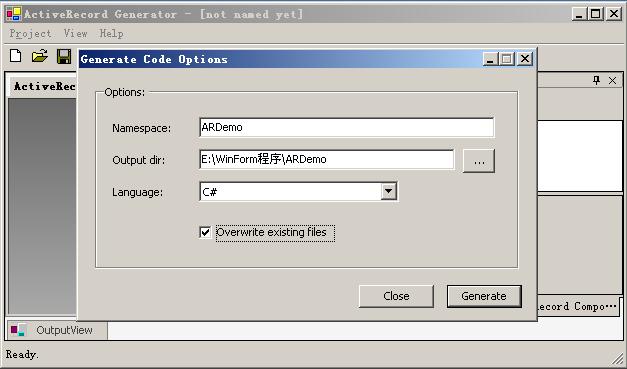
注意:有一个选项是否覆盖已经存在的文件,可以根据自己的实际情况选择
7.最后生成的完整实体类代码如下
//
// Generated by ActiveRecord Generator
//
//
namespace ARDemo
{
using Castle.ActiveRecord;
[ActiveRecord("Users")]
public class User : ActiveRecordBase
{
private int _logonID;
private string _logonName;
private string _password;
private string _emailAddress;
private System.DateTime _lastLogon;
[PrimaryKey(PrimaryKeyType.Native)]
public int LogonID
{
get
{
return this._logonID;
}
set
{
this._logonID = value;
}
}
[Property()]
public string LogonName
{
get
{
return this._logonName;
}
set
{
this._logonName = value;
}
}
[Property()]
public string Password
{
get
{
return this._password;
}
set
{
this._password = value;
}
}
[Property()]
public string EmailAddress
{
get
{
return this._emailAddress;
}
set
{
this._emailAddress = value;
}
}
[Property()]
public System.DateTime LastLogon
{
get
{
return this._lastLogon;
}
set
{
this._lastLogon = value;
}
}
public static void DeleteAll()
{
ActiveRecordBase.DeleteAll(typeof(User));
}
public static User[] FindAll()
{
return ((User[])(ActiveRecordBase.FindAll(typeof(User))));
}
}
} |
大家还应该注意的一点是生成One-Many/Many-One等关系的实体类文件时可能会出现一些问题,需要对生成的代码手工改动。最后希望和研究Castle的朋友能够多多交流!
参考资料
Castle的官方网站http://www.castleproject.org.
|