The Razor Framework :: Part 1 :: Plugins/Extensibility
This is the first article in a multipart
series I plan on writing. I have so much to present, and
so little space in one article I feel it warrants separating
it into more. Below are some topics that will all have their
own articles, but if you are interested in more, dig into
the code or drop me comment and I��ll help explain as much
as I can, or work with you personally to help you get things
working. Now on with the intro.
What is an application framework? That
may mean different things to different people, but let me
attempt to define what it means to me. An application framework
is a library or set of libraries upon which many applications
can be built or built upon. It should help speed development
time by providing a common architecture for accomplishing
common programming tasks that occur every time an application
gets developed. My goal when designing Razor was to tackle
the many areas that I continually encounter in my day to day
programming tasks and help to make them transparent or as
painless as I could. In my experiences
there are a few areas that have to be addressed in almost
every single application. These areas include the following
topics.
- Extensibility (Plugins)
- Configuration (Options and how they
are stored)
- Logging (Log files and diagnostic information)
- Instance Management (Single instance
or multiple instance)
- AutoUpdate (Intranet or Internet based
updates)
Extensibility encompasses how the
application provides an extensible object model to allow
future improvements or bug fixes to be built on top of or
along side existing functionality without creating development
nightmares or support issues.
Configuration encompasses how the
application manages configuration files and controls options
that may be manipulated by the user.
Logging encompasses how the application
logs information for diagnostic information that the developer
might need for troubleshooting.
Instance management encompasses
how the application handles multiple instances of itself.
It may be necessary to force the application to be implemented
as a single instance application, like Windows Media Player,
or may need multiple instance functionality like Notepad.
AutoUpdate encompasses being able
to update your program and provide your users with new features
and bug fixes easily. These areas seem to rear their ugly
heads with every new project and warrant a carefully designed
approach before the applications lifetime grows and adds
complexity by allowing multiple solutions to each of these
problems.
I will attempt to show you how a design
like Razor can help you tackle all of these chores, and
make your daily programming work less of a nightmare and
more of an outlined walkthrough. With a carefully designed
application framework in hand you can be free of these decisions
and get down to the real programming challenges of developing
your programs and not redeveloping and redesigning the same
things over and over again.
In this article I will be showing you how
to setup a Razor based application, and create some simple
plugins to run inside it. I will only cover plugins in this
article, for sake of time and space. More articles will
follow to help you cover the remaining topics and how they
are handled in Razor. The sample applications do include
all of the above, except AutoUpdate which will require a
lengthy article because that is a semi-complicated and in-depth
topic! So read on to find out about plugins for now! This
is more than you��ll need to get your appetite wet and to
get started. I promise, Razor will intrigue you, and leave
you wishing you had seen it before! Trust me, Razor should
help you understand how you can build your own plugin framework,
even if you don��t use mine. I just want to give something
back.
What is the Razor Framework?
I��ve been developing for about 5 years
now, professionally, and I��ve worked on both small and large
projects. These topics I referred to above, have all been
dealt with on various levels no matter what project and
team I worked on. And painfully I��ve watched as multiple
teams and developers designed different systems each time.
Each new system added new complexities and complications
that I felt it was necessary to design an easy to use application
framework to bring all of these areas together.
The Razor Framework is the culmination
of about a years worth of work professionally, and I have
been deploying several applications based on it, for about
a year now. This collection of classes is designed to provide
you the developer with a robust and thoroughly test plugin
architecture. The architecture was designed from the ground
up to provide the most extensibility I could manage, without
making things impossible to understand or work with. After
all it's supposed to help you, not make your head explode.
In addition to allowing you to develop
your programs entirely of plugins, the Razor Framework provides
a robust and rich suite of classes to make configuring your
application's options a breeze. Using Xml and encryption
the Framework provides automatic configuration files, and
an easy to use object model to allow you to create a heirarchical
view of your options. The object model was built upon existing
.NET technologies and sports an interface similar to that
of the options available in Visual Studio.NET. It's not
strictly a look and feel either, the framework consists
of objects that work similarly to a dataset providing you
with edit modes and events that allow you to be notified
when options are changed, both by code or by the user interface,
easily allowing your application to reconfigure itself when
your options change.
Additional work and design was implemented
to allow you to create single instance or multiple instance
applications. Providing you with a simple event model to
receive the command line arguments from secondary instances
of your application. The framework seamlessly integrates
the instance management for you into every Razor based program.
In addition, no framework should be without
an extensible AutoUpdate architecture. The object model
allows you to extend the updating mechanisms to allow different
means of providing updates to your application. It currently
supports Http downloads from a web service, and via file
shares.
I feel that
if any of these areas intrest you, that reading through
this series will either provide you with a design model
upon which you can learn to roll your own framework, or
spark some creative ideas for you to contribute to the project.
Hopefully this article will generate enough interest for
you to enjoy the design, as well as inspire you to help
me turn this into a well known and widely used framework.
Getting Started
Let��s get started. First things first,
let me explain the elements that you will need to create
to get up and running on Razor.
- The Filesystem Folder Structure
- The Bootstrap Executable
- The Hosting Engine Executable
- SnapIns (Plugins are called SnapIns
in Razor)
When you deploy an application based on
Razor, your filesystem should look like this.
- ��Company Name��
- ��AppName��
- AppName.exe �C This is the
bootstrap executable
- ��Version�� ie ��1.0.0��
- AppName.exe �C This is the hosting
engine
- PluginA.dll
- PluginB.dll
- ��
- PluginN.dll
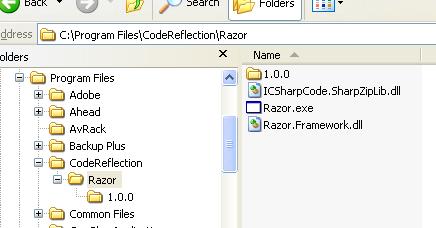
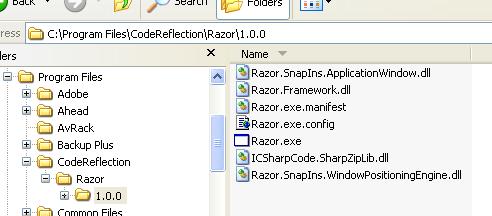
Here��s some shots of my file system
showing the contents of the bootstrap and hosting engine folders.
This may not be clear just yet, as a bulleted list is far
from descriptive. :P Patrick Murphy, a developer I had to
pleasure to work with, stated recently that he felt understanding
the folder structure was more complicated than writing plugins.
I lol��lerred after hearing that. Pat��s a smart guy, so if
he says I should include the screenshots, I��ll listen. :P
The bootstrap folder��
And the hosting engine folder��
You should always install your applications
in a folder with your company name, but this is rather a
recommendation than a must. Inside this folder you will
create a folder with the name of your application, and place
the bootstrap executable inside this folder. All shortcuts
to the app should point to this exe. When it is started
it will scan the directories below it, and attempt to figure
out which directory contains the latest version of your
hosting engine. Once it finds the version it calculates
as the latest version it will start the exe with the same
name as itself, and pass it any command line arguments that
were passed to the bootstrap exe. This way if you had shortcut
containing command line arguments they will be passed on
to the hosting engine executable transparently. When you
send out updates and add a new version of your program,
the shortcuts won��t have to change on the users system,
and will continue to work as normal. Each new version of
your app simply gets placed inside the bootstrap��s folder
with a folder name that parses out to a .NET Version. Pretty
simple, and it��s design was based after looking at the Microsoft
Application Updater Block.
The first project you will need to create
is called the bootstrap executable. The bootstrap executable
is a small executable residing in a root folder that will
find and start the latest version of the hosting engine.
This is necessary for implementing AutoUpdate and will be
covered in more detail when I discuss the AutoUpdate features
in Razor. I have provided a sample bootstrap executable
in the source of the project. Here��s the full and complete
code for a Razor bootstrap executable. It��s pretty simple.
Start a new project, type will be a Windows Application.
Add a reference to the Razor Framework (Razor.Framework.dll),
and add the following code to the project. Of course you��ll
want to delete out the stock form that gets added by VS.NET
and add a class called Startup to the project. Just follow
along. :P
using System;
using Razor;


namespace BootStrapping
{
    /// <summary>
    /// This is the bootstrap for the Razor hosting engine.
    /// </summary>
    public class Startup
    {
      [STAThread]
      static void Main(string[] args)
      {
          VersioningBootStrap bootStrap = new VersioningBootStrap();
          bootStrap.Run(args,
                      System.Reflection.Assembly.GetExecutingAssembly());
      }
   }
}
Once you have created the bootstrap folder
and executable, the next step is to create the hosting engine
executable. Think of this as the real application. Give
it the same name as your bootstrap executable so the bootstrap
can find the exe and can start it up when the program is
launched. The hosting engine executable will contain a very
simple startup class relying on code from Razor to create
and run a hosting engine. The hosting engine will scan its
folder for .DLLs and load any SnapIns it finds and get them
running. This may sound complicated, but I assure you its
all quite trivial. Again I have provided a sample hosting
engine for you in the source code of this article. If you
are following along, now is the time to add a new project
to your solution, a new Windows Application project. Again
add a reference to the Razor Framework, and delete out all
the stock code. Add another class called Startup to the
project, and insert code like the following.
There is one key point here that you do
not want to miss. Remember I discussed configuration, well
they will first come into play here when you create the
hosting engine. Take a look at the code in the sample or
just below here. Find the subPath variable, and change the
value accordingly. This will define the path where the common
and local user configuration files will be stored in on
disk. Don��t worry I��ll cover this more later. You should
just change this to be something like your companyName\appName
so that it��s a little more personalized. Feel free to use
mine, but for every app these should be unique so that each
app can keep it��s configuration files separate.
A quick word on configuration files, because
I��m sure you��re curiosity peaked when I mentioned them.
Every Razor based application has two separate directories
and sets of configuration files. One stored in the All users
data path, and another in the Local users data path. There
is a common configuration file for storing application global
options like database connections, and a local user configuration
file for storing things like window positions and options
specific to each user. If these files aren��t there, don��t
worry they will be created by the hosting engine when it
runs. Again, I��ll cover this more later! For now concentrate
on the hosting engine code!
using System;
using System.Windows.Forms;
using Razor.SnapIns;

namespace Razor
{
    /// <summary>
    /// The Startup class contains a single static method called Main
    /// which should be used as the applications main entry point.
    /// </summary>
    public class Startup
    {
       /// <summary>
       /// The main application entry point, thru which command
       /// line arguments will be passed
       /// </summary>
       /// <param name="args">An array of strings representing any
       /// command line arguments that were passed at startup
       /// </param>
       [STAThread()]
       public static void Main(string[] args)
       {
           bool tracedExceptionThrown = false;
           try
           {
              // define the data paths
              string subPath = @"CodeReflection\Razor";

              // safely use a hosting engine configured with an additional
              // common data path and additional local user data path
              using(SnapInHostingEngine host
                                = new SnapInHostingEngine(subPath, subPath))
              {
                 try
                 {
                    // run the hosting engine using the command line and the
                    // currently executing assembly (aka. the exe for the
                    // process)
                    host.Run(args,
                          System.Reflection.Assembly.GetExecutingAssembly());
                 }
                 catch(System.Exception systemException)
                 {
                    // flag the fact that we are going to trace this exception
                    // and rethrow it
                    tracedExceptionThrown = true;

                    // give the loggers a chance to catch it if they have
                    // been successfully loaded before the host is disposed
                    // of and the logging sub system detached from the Trace
                    // and Debug output
                    System.Diagnostics.Trace.WriteLine(systemException);

                    // rethrow the exception so that it may be displayed for
                    // the user
                    throw systemException;
                 }
              }
           }
           catch(System.Exception systemException)
           {
              // if the exception hasn't already been traced
              if (!tracedExceptionThrown)
              {
                 tracedExceptionThrown = true;
                 // trace it now
                 System.Diagnostics.Trace.WriteLine(systemException);
              }

              // also, since it's more likely we'll not have a debugger
              // attached, display the exception to the user
              string info = string.Format(
                  "The following exception was thrown by '{0}'.\n\n" +
            "Please refer to the log files for further information.\n\n{1}",
                  Application.ProductName, systemException.ToString());

              System.Windows.Forms.MessageBox.Show(null, info,
                     "Application Exception");
              // exit the current thread to force safe application shutdown
              Application.ExitThread();
           }
           finally
           {
             // one final trace to let everyone know we have shutdown
             // completely
             System.Diagnostics.Trace.WriteLine("'" + Application.ProductName
                 + "' has " +  (tracedExceptionThrown ?
               "terminated because of an exception." : "exited gracefully."));
           }
       }
    }
}
After you have create the hosting engine
executable, it��s time to get busy creating the plugins,
or SnapIns as they are called in Razor.
In a nutshell, a SnapIn is what I call
plugins in Razor. A SnapIn is a class that is exported from
a managed assembly and loaded at runtime by the SnapInHostingEngine
class. The hosting engine will notify the SnapIn
that it should take a particular action through interface
methods which are manifested in the SnapIn base classes
using Events. You will respond to these events and provide
your own functionality.
Plugins, now that��s a concept that seems
so complicated at first glance, most folks just shy away
from it. But if they are so complicated, why does virtually
every program you run yourself on a daily basis seem to
be capable of using them? That��s because they really aren��t
all that complicated. They are only as complicated as the
framework upon which they were built. Razor SnapIns are
easy to design, easy to deply, and easy to debug.
It seems that over the years I��ve seen
some of the best and worst designs for plugins. Everything
from being forced to define a plugin in external files like
Ini files or Xml files to COM like registry entries which
are even more complicated because most folks should never
even think about getting into the Registry for any reason!
Using a file to define what plugins are available to the
application is a bad idea in my opinion because if you are
trying to add plugins or remove plugins you have to edit
some stupid file. This just ends up being a bigger nightmare
the minute you have a user on the phone that doesn��t even
know his/her mouse has two buttons. Imagine the headaches
you��ll end up with trying to instruct them in editing some
proprietary plugin format in some file just to get a new
plugin installed or uninstalled. That sucks. Registry entries,
well they are old, and twice as bad because if you mess
up, you could seriously screw up other aspects of your system.
There��s a lot of important stuff in the Windows Registry
besides whatever strange keys and values you��ve made, no
sense in adding that to the mix.
When I set about to design a plugin system
for Razor, I decided that it must not force the user or
developer to edit files to get a plugin running in the application.
That��s just one more step that can go wrong, and it��s really
pretty dumb when you think about it. Why can��t the program
be smart enough to find the plugins on it��s own? Well, Razor
is. Here��s how. When you create a SnapIn for any Razor based
application, you will simply add an attribute to the assembly
that exports the SnapIn. When the hosting engine starts
up, it��ll scan all the DLLs and find the SnapIns automatically.
If you want to add a SnapIn, simply build the assembly and
drop it into the hosting engine��s folder. If you want to
remove a SnapIn, stop the application and delete or move
the assembly containing the SnapIn from the hosting engine��s
folder. That��s about as easy as you can get.
When the hosting engine starts up, it scans
its folder for all of the DLLs. Using reflection it will
read a pre-determined assembly level attribute from each
assembly that contains the Type of the SnapIn that the assembly
is exporting. You can export as many SnapIns from a single
assembly as you want, there��s really no limit other than
those you design into the system. If the attribute wasn��t
in place, then the hosting engine would have to enumerate
every single Type in the assembly to try and figure out
if it is a SnapIn or not. And even then, you may need further
control over whether the Type is really supposed to be a
plugin at that moment in time or not! What if you put a
SnapIn Type, or class, into a dll and then another SnapIn
needs to reference that dll. By the .NET copy local design
all of the referenced DLLs will be placed in the same directory.
Now you could be facing a problem of controlling which SnapIns
are loaded.
I usually place the attribute into the
AssemblyInfo.cs file along with the other assembly level
attributes. This just makes it easy to find out which if
any SnapIns a particular assembly is exporting. For all
you C guys, think of this as the exports definition file
(*.def) that contained all of the exported functions. Instead
of exporting functions, you are exporting SnapIns, or plugins.
Let��s take a look at the attribute I��ve been talking about
now. Here is the contents of the entire AssemblyInfo.cs
file from one of the included SnapIns in the sample project
I have provided.
using System.Reflection;
using System.Runtime.CompilerServices;
using Razor.Attributes;
[assembly: AssemblyTitle("")]
[assembly: AssemblyDescription("")]
[assembly: AssemblyConfiguration("")]
[assembly: AssemblyCompany("CodeReflection")]
[assembly: AssemblyProduct("")]
[assembly: AssemblyCopyright("Copyright © CodeReflection 2004")]
[assembly: AssemblyTrademark("Trademark ™ CodeReflection 2004")]
[assembly: AssemblyCulture("")]
[assembly: AssemblyVersion("1.0.0.0")]
[assembly: AssemblyDelaySign(false)]
[assembly: AssemblyKeyFile("")]
[assembly: AssemblyKeyName("")]
[assembly: SnapInExportedFromAssembly(typeof(
                Razor.SnapIns.ApplicationWindow.ApplicationWindowSnapIn))]
The last line contains the SnapInExportedFromAssembly
attribute that specifies the fully qualified name
of the SnapIn that you want to export from the assembly.
The hosting engine will use this attribute to load the Type
using Reflection and create an instance of it at runtime.
You may add as many export attributes as you wish, but it��s
generally a good idea to limit your assemblies to one SnapIn
per assembly. This will help simplify debugging and deployment.
Notice that I have also added a using statement to include
the Razor.Attributes namespace to allow the
compiler to find the attribute.
Ok, so now the fun starts. Creating a SnapIn
for your new hosting engine. In every Razor based application,
every bit of functionality you create will be created as
a SnapIn. Everything is a plugin. The exe��s are completely
generic save the few lines of code to change up configuration
paths. If you create a SnapIn, it��ll work in any Razor based
app. Assuming of course it��s dependencies and references
are intact.
Dependencies? What the heck is that?
Well, for anyone that writes code, a dependency is just another
dll or file that your app has to have to run. SnapIns are
no different and I��ve gone to great lengths to make this work
to your benefit. If everything is a plugin, and plugins are
loaded at runtime, how do you control when your plugin loads
in regards to another plugin. And what do you do if you are
referencing a separate plugin to add functionality to it?
If your dependencies aren��t there or aren't loaded when your
plugin starts, it could be a serious problem. I��ve
seen a lot of different approaches, and I��ve tried most
of them. Everything from having a property that defines
a load level, like Low, Medium, or High, to defining and
hard-coding a loading order in some external config file.
Those ways all have limlitations and are just a pain in
the butt. I just want to write a plugin, and know that when
it gets loaded and started, that everything I need to run
is going to be loaded and started so that I don��t have to
worry about it. That��s what Razor does. Razor determines
at runtime which SnapIns are dependencies of other SnapIns
and then loads them in order of the least dependent to the
most dependent. This loading algorithm allows you to specify
which other SnapIns if any you need to run, and then makes
sure that they are loaded and running before your SnapIn
gets the nod. Think back to Windows Services, there��s a
tab that shows which services a service requires to run,
and if one of them isn��t available that service won��t start.
Same concept applies. If one of the dependencies stops,
your SnapIn in turn will stop. This all happens automatically,
after you define your dependencies.
How do you define your dependencies? Using
attributes of course! Metadata is a wonderful thing, and
it��s used generously in Razor. Every SnapIn that you create
will have one or more attributes added to the SnapIn class.
These attributes will contain information about you, your
company, the SnapIn itself, and its dependencies. Take a
look at this code snippet from one of the sample SnapIns
included with this article.
using System;
using System.Diagnostics;
using System.Drawing;
using System.Collections;
using System.ComponentModel;
using System.IO;
using System.Reflection;
using System.Windows.Forms;
using Razor;
using Razor.Attributes;
using Razor.Configuration;
using Razor.Features;
using Razor.SnapIns;
using Razor.SnapIns.WindowPositioningEngine;

namespace Razor.SnapIns.ApplicationWindow
{
    /// <summary>
    /// Provides a generic window plugin that other plugins can modify as
    ///  their main window
    /// </summary>
    [SnapInTitle("Application Window")]
    [SnapInDescription("Provides a generic window to be used as the main
window for an application.")]
    [SnapInCompany("CodeReflection")]
    [SnapInDevelopers("Mark Belles")]
    [SnapInVersion("1.0.0.0")]
    [SnapInImage(typeof(ApplicationWindowSnapIn))]
    [SnapInDependency(typeof(
                    WindowPositioningEngine.WindowPositioningEngineSnapIn))]
    public class ApplicationWindowSnapIn : SnapInWindow,
                                           IWindowPositioningEngineFeaturable
    {
Taking a look at the code snippet above,
you��ll see some new attributes being applied to a class.
The class contains the code specific to your SnapIn, and
has been omitted here for lack of room. These are pretty
simple, and shouldn��t require any great intellect to figure
out what��s going on. You��ll see that there are attributes
for setting information about the SnapIn such as title,
description, company, developer, version (SnapIns are versioned),
a toolbox like image, and dependencies.
You should note the last attribute in the
code above. It is the SnapInDependency attribute
that I��ve been discussing. Notice that it takes the Type
of another SnapIn class. The hosting engine will ensure
that every SnapIn you specify as a dependency is loaded
and started before your SnapIn gets created and started.
It��s that easy. If you know there is one or more SnapIns
that you rely on, and cannot function properly without,
then simply mark those SnapIns as dependencies.
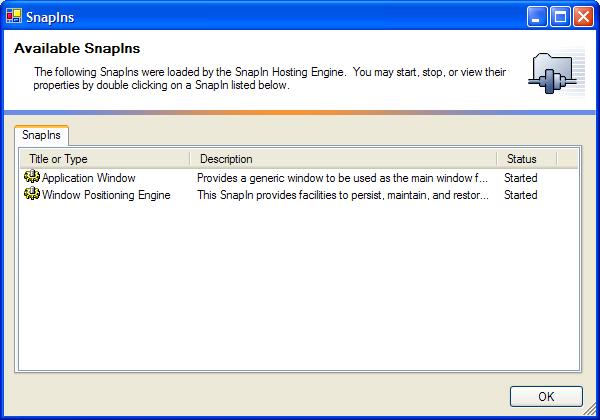
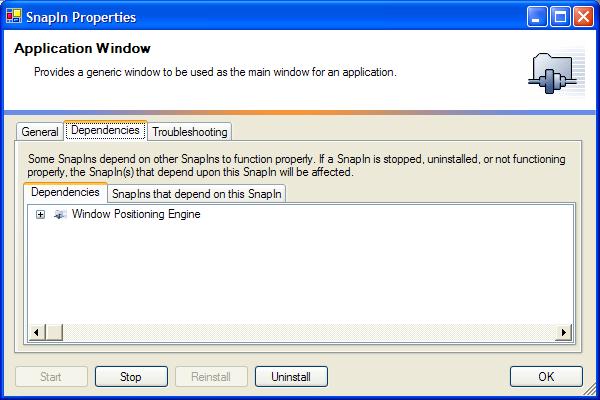
The framework provides some means of viewing
all of the SnapIns installed in the current hosting engine,
as well as viewing the SnapIn metadata, SnapIn dependencies,
and provides some common troubleshooting hints when you
have a SnapIn that isn��t working like it should. Here��s
a quick glance at a few of those dialogs that are provided
for every Razor based application.
The SnapIns window for viewing the SnapIns
that are loaded
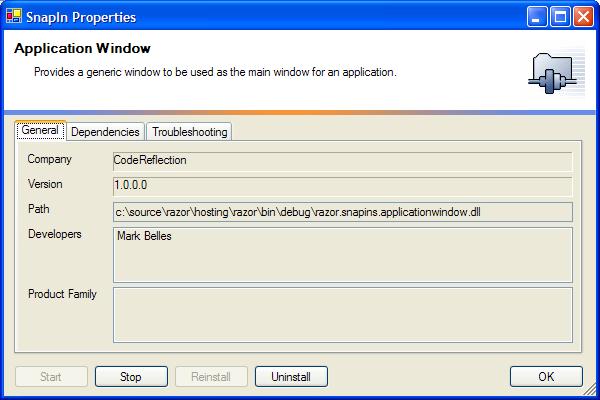
Their general properties...
Viewing their dependency links, what they
depend on, and who depends on them...
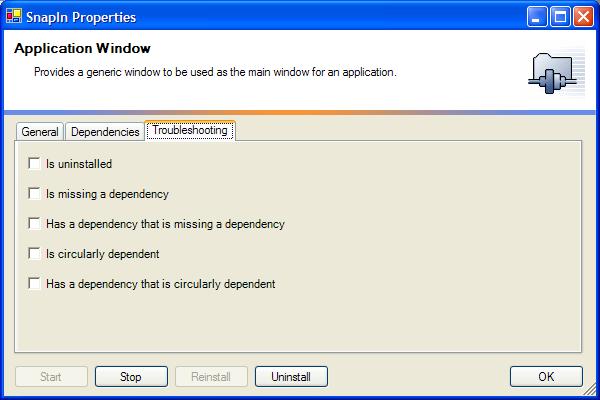
And some troubleshooting flags that the
engine will determine after it loads the SnapIn...
Once you're added the metadata to your
SnapIn class, and added an export attribute to the assembly
to allow the hosting engine to find your SnapIn, you��re
ready to get started writing the actual SnapIn code. So
let��s get started on that, okay? You are probably wondering
how your SnapIn will interact with the hosting engine. How
will it start, how does it stop? There are 3 classes of
interest here. They are SnapIn, SnapInControl,
and SnapInWindow. Each of these classes provides
events and virtual methods to allow you override and implement
your own custom functionality. By providing events and virtual
methods, you will be responding to the same events in every
SnapIn, and hopefully use the virtual methods as a starting
point to keep a consistent design throughout your suite
of SnapIns.
At the core of the hosting engine lies
the IsnapIn interface. Here��s a look at the
interface, which is how the hosting engine communicates
with every single plugin loaded into the system at runtime.
using System;
namespace Razor.SnapIns
{
    /// <summary>
    /// Defines the methods and events of a SnapIn class used by the
    /// SnapInHostingEngine class
    /// </summary>
    public interface ISnapIn
    {
       event EventHandler InstallCommonOptions;
       event EventHandler InstallLocalUserOptions;
       event EventHandler UpgradeCommonOptions;
       event EventHandler UpgradeLocalUserOptions;
       event EventHandler ReadCommonOptions;
       event EventHandler ReadLocalUserOptions;
       event EventHandler WriteCommonOptions;
       event EventHandler WriteLocalUserOptions;
       event EventHandler UninstallCommonOptions;
       event EventHandler UninstallLocalUserOptions;
       event EventHandler Start;
       event EventHandler Stop;

       void OnInstallCommonOptions(object sender, System.EventArgs e);
       void OnInstallLocalUserOptions(object sender, System.EventArgs e);
       void OnUpgradeCommonOptions(object sender, System.EventArgs e);
       void OnUpgradeLocalUserOptions(object sender, System.EventArgs e);
       void OnReadCommonOptions(object sender, System.EventArgs e);
       void OnReadLocalUserOptions(object sender, System.EventArgs e);
       void OnWriteCommonOptions(object sender, System.EventArgs e);
       void OnWriteLocalUserOptions(object sender, System.EventArgs e);
       void OnUninstallCommonOptions(object sender, System.EventArgs e);
       void OnUninstallLocalUserOptions(object sender, System.EventArgs e);
       void OnStart(object sender, System.EventArgs e);
       void OnStop(object sender, System.EventArgs e);
    }
}
Once you are ready to write a SnapIn for
a Razor based application. Simply decide which base class
you will inherit. I��ve provided the 3 main classes that
should fulfill every situation you will need. And trust
me, I��ve handled a ton of different ones, all of which have
fallen into my predefined usage categories. Choose from
one of the following base classes.
- SnapIn
- SnapInControl
- SnapInWindow
If you need to create a plugin that has
designer support, then inherit from either the SnapInControl
class or the SnapInWindow class, otherwise
choose the SnapIn class. Once you have inherited from the
appropriate class, jump to your constructor and add some
event handlers to the base classes�� events. These events
are triggered when the hosting engine calls the methods
of the base classes IsnapIn interface. Take the following
code as an example. It wires up to the Start and Stop events.
These are triggered when your SnapIn starts, and when it
Stops. Once per session, unless you are triggering them
manually using the SnapIns dialog.
/// <summary>
/// Initializes a new instance of the ApplicationWindowSnapIn class
/// </summary>
public ApplicationWindowSnapIn() : base()
{
    _theInstance = this;
        this.InitializeComponent();

    base.Start += new EventHandler(OnSnapInStart);
        base.Stop += new EventHandler(OnSnapInStop);
        this.FileMenuItem.Popup += new EventHandler(OnFileMenuItemPopup);
        this.ToolsMenuItem.Popup += new EventHandler(OnToolsMenuItemPopup);
        this.HelpMenuItem.Popup += new EventHandler(OnHelpMenuItemPopup);
}
Here��s the event handlers for these
events. Notice that I like to pass these events on to the
overridden methods in my SnapIn class, just so that there��s
no confusion. I know that for a given event every SnapIn is
going to follow the same rules and I can know to look for
the same set of methods in every SnapIn. Trust me when you
have developed more than a hundred plugins, you��ll appreciate
having some standards to rely upon. #region My SnapIn Events
/// <summary>
/// Occurs when the snapin starts
/// </summary>
/// <param name="sender"></param>
/// <param name="e"></param>
private void OnSnapInStart(object sender, EventArgs e)
{
this.StartMyServices();
}
/// <summary>
/// Occurs when the snapin stops
/// </summary>
/// <param name="sender"></param>
/// <param name="e"></param>
private void OnSnapInStop(object sender, EventArgs e)
{
this.StopMyServices();
}
#endregion
Notice that I also called the methods
using the this notation. It is good practice to specify whether
the method implementation is found in your class or the base
class by specifying the this or base qualifiers in front of
your method names. Every SnapIn has virtual methods that you
can override and put your specific code into, just to give
you a predefined mechanism for consolidation��s sake. These
virtual methods are not called automatically by the hosting
engine, but rather are there to help you keep things constant.
Override the methods and then call them from the event handlers.
Here��s what some overrides might look like, this snippet is
taken from one of the sample SnapIns. #region My Overrides
/// <summary>
/// Provides startup services
/// </summary>
protected override void StartMyServices()
{
base.StartMyServices ();
try
{
// assimilate the proprties of the starting executable
this.MorphAttributesToReflectStartingExecutable();
// use the window positioning engine to manage our state
WindowPositioningEngine.WindowPositioningEngineSnapIn.Instance.Manage(
this, WindowPositioningEngineKey);
// wire up to previous instance events
SnapInHostingEngine.GetExecutingInstance().InstanceManager.
CommandLineReceivedFromAnotherInstance +=
new ApplicationInstanceManagerEventHandler(
OnCommandLineReceivedFromAnotherInstance);
// add ourself as a top level window to the hosting engine's
// application context
SnapInHostingEngine.Instance.ApplicationContext.AddTopLevelWindow(this);
// show ourself
this.Show();
}
catch(Exception ex)
{
Trace.WriteLine(ex);
}
}
}
/// <summary>
/// Provides shutdown services
/// </summary>
protected override void StopMyServices()
{
base.StopMyServices ();
// wire up to previous instance events
SnapInHostingEngine.GetExecutingInstance().InstanceManager.
CommandLineReceivedFromAnotherInstance -=
new ApplicationInstanceManagerEventHandler(
OnCommandLineReceivedFromAnotherInstance);
// close ourself
this.Close();
}
#endregion
One detail I left out, but is critical,
is that when you make your interface, you��ll generally have
one or more windows that you want to act like a main window.
In other words, you��ll want the program to stop when you
close those windows. Check out the StartMyServices
method above, and you��ll notice that the window adds
itself to the hosting engine��s application context as a
top level window. The hosting engine runs the application
context, and exits when all of the top level windows added
to it are closed. If you never add your window to the hosting
engine��s application context, it won��t know when it��s time
to close, unless you close it manually. Which is past the
scope of this article.
Take a look at the sample SnapIns. I��ve
provide you with two, one to create a main window, that
when closed will exit the Application Context and close
the hosting engine, and another SnapIn that the main window
SnapIn depends upon for storing it��s window positions. I��ve
mentioned configuration in the paragraphs above, and trust
me I��ve not forgotten about it. In the next article I��ll
come back and explain more about that. Trust me when I say
you will love it.
So now you��ve seen how you get your code
running in Razor as a SnapIn. Let��s talk a bit about design.
If everything is a plugin, that means there is nothing there
by default. No windows, nothing. I��ve created a SnapIn upon
which every application starts, and depends. It��s a simple
SnapIn that displays a window, and adds common functionality.
Things like displaying a menu with items for accessing the
Options, SnapIns, and Features dialogs. All of which are
provided by the framework, you just need a place to access
them.
Throughout this article you heard me repeatedly
refer to this little guy, and I haven��t explained it in
any great detail. This is the main class responsible for
everything that happens behind the scenes. The SnapInHostingEngine
class is responsible for loading all of the SnapIns from
the file system, as well as every other detail like starting
and stopping the SnapIns. Keeping the configuration files
and log files going, pretty much this class rules all in
a Razor world. Without it, you got a whole lotta nothing.
The class is responsible for keeping track
of which plugins are installed and uninstalled, which ones
are started and stopped, and therefore knows pretty much
everything there is to know about the SnapIns in your program.
It also has many other handy properties, too numerous to
discuss at once, but I��ll throw a few at you. If you want
to access the configuration files, they are properties of
the hosting engine class. If you want to find another SnapIn
there are methods and properties to help you look it up
by its Type. If you want to programmatically start, stop,
install, or uninstall another SnapIn, this guy has the methods.
It wakes you up in the morning, and tucks you in bed at
night�� if you are a SnapIn.
At all times you may access the running
hosting engine by one of two ways.
SnapInHostingEngine.GetExecutingInstance();

// Or

SnapInHostingEngine.Instance
When you want to use the hosting engine,
just grab the current executing instance using either the
method or the property listed above. Feel free to browse
it��s properties. There��s a lot there, and I��ll cover them
more as we need to.
One item of interest, is the manner in
which the SnapInHostingEngine loads the SnapIns.
At runtime, it will scan the Application's folder, for all
assemblies (*.dll). Once the hosting engine has located
the assemblies, it will load each of them using their full
path. Once the assembly is loaded into memory, the hosting
engine will attempt to read the SnapInExportedFromAssembly
attribute from the assembly to determine if any SnapIns
are being exported from the assembly.
In the event that a SnapIn is not being
exported from the assembly, the hosting engine is now faced
with a problem. How to unload the assembly from memory.
Unfortunately the assembly cannot be unloaded from memory,
in the same manner it was loaded. However, if the AppDomain
that loaded the assembly is unloaded, then all of the assemblies
loaded by the AppDomain will be unloaded.
Based upon an article by Eric Gunnerson,
found
here, I created the SnapInProvider class
which is responsible for loading a separate AppDomain into
which all of the assemblies are loaded during the SnapIn
loading phase. Once the Type information has been extracted
from the assemblies, the provider unloads the AppDomain
and thereby unloads all of the unused assemblies.
If you are curious of what the code looks
like, check out the snippet below taken from the SnapInProvider
class. On a side note, if I were to rewrite this,
I'd use a strongly typed collection instead of an ArrayList.
public static ArrayList FindSnapIns(Search search,
                                    IProgressViewer progressViewer)
{
    try
     {
        // create a new appdomain
        AppDomain domain = AppDomain.CreateDomain(Guid.NewGuid().ToString());

        // create an instance of the provider inside the new app domain

        SnapInProvider provider =
                   (SnapInProvider)domain.CreateInstanceFromAndUnwrap(
                  System.Reflection.Assembly.GetExecutingAssembly().Location,
                  typeof(SnapInProvider).FullName);

        // use it to search for the snapin types we need to load
        ArrayList array = provider.SearchForTypes(search, typeof(ISnapIn),
                                                  progressViewer);

        // unload the appdomain and any assemblies that we won't create a
        // snapin from
        AppDomain.Unload(domain);

        return array;
     }
     catch(System.Exception systemException)
     {
        System.Diagnostics.Trace.WriteLine(systemException);
     }
     return new ArrayList();
}
What if you want to grab a hold of another
running SnapIn? Since everything is a SnapIn, virtually
everything that is running besides the hosting engine itself
is going to be loaded at runtime. There are two ways to
do accomplish this, and believe me this is a very common
question.
The first way is the uber complicated and
elite way, the second is the easy way, which I prefer because
it saves me time. :P The first is to grab the hosting engine
and ask it for a SnapInDescriptor for the SnapIn
of the particular Type that you are after. I prefer not
to have to do this, so I opt for the second method. Which
is to simply make a static variable in your SnapIn of itself,
and then set it in the SnapIn��s constructor. Since you will
only ever have one instance of each SnapIn created and running,
you just have to refer to that static method or property
to get access to the SnapIn��s instance that is loaded and
running.
The code snippet above demonstrates how
I used the second method to gain access to the hosting engine
itself, and the application window SnapIn. Just some basic
stuff really.
The first method would require you to call
upon the following method found in the SnapInHostingEngine.
public SnapInDescriptor FindDescriptorByType(Type type)
{
    foreach(SnapInDescriptor descriptor in _descriptors)
       if (Type.Equals(descriptor.Type, type))
       return descriptor;
       return null;
}
The SnapInDescriptor class
is a wrapper class that contains dependency linkage information
about each SnapIn. As well as the SnapIn's meta data, retrieved
from the attributes that may be applied to the SnapIn's
class. And finally a pointer to the ISnapIn interface implemented
by each SnapIn.
Using the descriptor class you can programmatically
determine what other SnapIns a particular SnapIn depends
upon, as well as cast the ISnapIn pointer to whatever Type
you know the SnapIn is. For example, if you were looking
for SnapInA, you would use the FindDescriptorByType
method passing it typeof(SnapInA). Once
the descriptor is returned, you simply cast the descriptor.
SnapIn an instance of the SnapInA class. Your code might
look something like this.
private SnapInA FindMyDependencies()
{
    SnapInDescriptor descriptor =
        SnapInHostingEngine.Instance.FindDescriptorByType(typeof(SnapInA));


     if (descriptor != null)
     return (SnapInA)descriptor.SnapIn;
     return null;
}
Once you've got your object back, you'd
continue to use it just like it was a reference to a class
instance as you would any other object instance. You would
be free to call the methods and properties that the class
provides. The fact that it is a SnapIn does not affect how
you use it. The fact that it is a SnapIn just means that
it loads dynamically so you will need to make it a dependency
to ensure that you load after it does. If you do not, then
you could end up trying to use a class that isn't ready
to be used. Think carefully on your designs in this area.
Make sure to get your dependencies right in larger projects!
What about log files you say? Yep, that��s
covered too. The SnapInHostingEngine class
installs a custom TraceListener that writes
Trace output to a log file. I put some reflection and diagnostic
information into the log file traces to include things like
the class that made the call, the source code filename,
the line number where the call originated. The hosting engine
will rotate through a series of 10 log files. Pushing the
most recent towards the bottom. The most current file is
always ��Log.txt��, extending down from ��Log2.txt�� to ��Log9.txt��.
To access the log files simply browse to the current user��s
documents and settings data path, and into the folders you
had the hosting engine create. Remember the sub path that
I explained would tell the engine where to create certain
folders? Well, this is where it comes in.
As an example, if you created a hosting
engine with a sub path of ��CodeProject\MyApp��, you��d want
to head for a folder named ��C:\Documents and Settings\<YourCurrentUsername>\Local
Settings\Application Data\CodeProject\MyApp��. Inside that
folder resides the log file folder where all of the log
files are stored, and some other configuration files. The
configuration files are encrypted, it��s not all that secure,
but I��m not going to focus on it, I��ve simply hard coded
some things as far as salt values and keys to make those
encrypt and decrypt automatically for you. If you want to
have them stored without encryption, simply close down the
hosting engine, and then edit the hosting engine��s config
file. There��s a setting, I believe it��s ��NoEncrypt��, set
that to false, and re-run the hosting engine. You��ll want
to delete both the common and local user config files, so
keep that in mind if you start screwing with things too
much before you know how it all works.
There are two paths where configuration
files and log files are stored. As I said earlier, it��s
necessary to separate items that are specific to individual
windows users, and items that are common to all users. Here��s
the paths you need to learn.
- ��..\Documents and Settings\All Users\Application
Data\<YourCompany>\<YourApp>�� for the common
files
- ��..\Documents and Settings\<CurrentUsername>\Local
Settings\Application Data\<YourCompany>\<YourApp>��
for the local user files
If you find all of this too complicated,
just run my sample, and using the menu items under ��Tools->Explore��
open the folders from within the program. That��ll open those
folders up for you so you don��t have to browse for them!
Use the tools provided, lol, they are there to help make
your life easier.
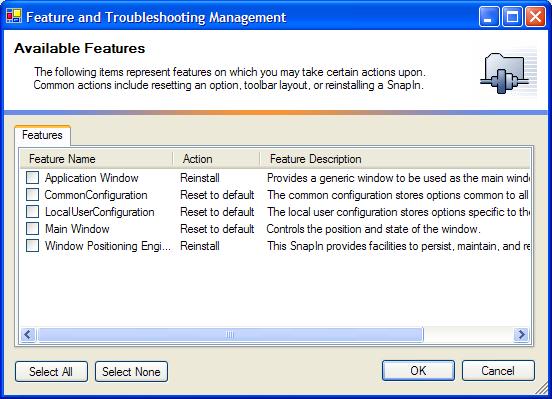
As with any program, it��s only a matter
of time before you or your users mess something up. Not
if, simply when. :P With that in mind I decided that I would
include a handy means displaying key features and things
that might need special attention. Things like configuration
files becoming corrupt, or toolbars being saved in a funky
state, or windows that are off the desktop at startup. For
this purpose I create a FeatureEngine and some
simple interfaces to allow you to respond and display some
custom features when the time calls for it.
If you hold down the ��Control�� key, either
one left or right as the program loads, it��ll show the Features
and Troubleshooting window automatically. By default you
get some features for resetting the Main Window, usefull
when and if it ever decides to hide itself off-screen. Not
that it ever happens, because the code is sooo good, :P
but there more for demo purposes. Also you can reset the
configuration files, which will force all the plugins to
reinstall their options and hopefully fix whatever problem
you��re faced with. And finally you have a re-install feature
for every SnapIn. Handy if you want to test out the Installation
and Uninstallation events that a SnapIn can use. I��ll be
covering those more when I discuss the configuration files
so don��t sweat it too much now. Here��s what the feature
window looks like.
I won��t get into how to work with the
features just yet, from code I mean. That��s another bowl of
soup to deal with once we hit configuration. But know that
we have some other interesting things yet to show you!
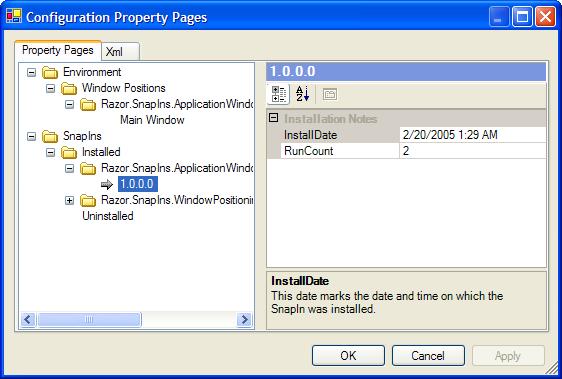
Ok, and just a quick peek at the options
and configuration topic. I am going to devote an entire
article to the configuration topic. There��s a lot of juicy
goodness to deal with in a short amount of time. By now
you are probably going, shut up already I want to go run
this.
Like I said earlier every application is
going to have options that you want to store, and then allow
them to be changed in some manner or another. I personally
like how Visual Studio��s Options look and feel, so I recreated
them. Here��s what the Options look like, this is how every
Razor based app by default can change and view options.
The configuration files are loaded by the
hosting engine and are accessible as instance properties
from the SnapInHostingEngine class. There are
two different ones, by default, but there could be more
if you wanted to add them. Check out the WindowPositioningEngineSnapIn
if you want a glimpse at reading and writing options.
Or wait and read my configuration article when I finish
it.
The options are stored using hierarchical
categories, whose categories will be merged together when
displayed. If you had two options, in separate configuration
files, and they both happened to fall into the same path,
say ��General��, then you would see both options displayed
under the ��General�� category. The users really don��t need
to know where or how the options are stored, just how to
get to them.
This was written way back, before anyone
else ever posted any article on using the PropertyGrid,
and I��m supremely confident you��ll like it. And yes there
are other articles on how to make options using the property
grid, so I admit I��m not the only one to be struck with
this idea. I just think this way is worth checking out if
you are interested in that type of thing, I really have
put a ton of work into it. Hence the need for another article.
Just a flame prevention statement incase someone goes, ��oh
I wrote something like that already, why is yours so special?
:P Gotta egg you boys on you know? A little creative competition
is what fuels the fires right?
With each new program, you may find
it necessary to hide functionality from the user, or create
an entirely new UI, so all you really have to do is swap out
your interface SnapIn for a new one, and you��re off to the
races. One thing to note, is that you need to copy each SnapIn��s
assembly into your hosting engine��s folder before it will
be loaded by the hosting executable. By default there aren��t
any plugins, and no interface, so if you tried to run the
hosting engine without any plugins, you wouldn��t have anything.
It��d just run and then die, or depending on some hidden options
stay running with a bare message loop. Every app is different,
and I can make no assumptions on what each and every future
app will need for an interface, so there��s simply not any
by default. You have to create one. I��ve given one to you,
and in future articles I��ll come back and add to this one
with a game of Tetris, written as a SnapIn. I��ve just gotta
add scoring and a few last minute tweaks, oh and then there��s
the small task of writing the article! So
dig in, run the hosting executable in the sample project,
and check out some of the dialogs that handle viewing and
controlling SnapIns and Options. And I��ll get busy working
on the configuration article. That��s the next logical step
I think, storing options and letting your users change them.
In case you are wondering, I��ve developed a nifty means
of doing just that too.
One last note, the Razor Framework class
library is filled with numerous classes. So numerous that
I cannot even begin to do it justice here in one article.
Everything from command line parsing, icon extraction, threading,
networking, and custom controls. There are some classes
that I have based my work upon, from the CodeProject. I��ve
given due notice to those guys that I based my code on.
However, there may be classes that resemble other authors
works. One that comes to mind is the CommandLineParsing
engine, I know for a fact I based that class upon
an article I saw here on the code project several years
ago, but I��ve been unable to find the original article to
give credit. Please don��t hate me for this, and if you know
of or are that guy, I��m sure you��ll notice design similarities
if you are and look at the code, please give me a shout
so I can credit you! I spent the better part of an afternoon
trying to find articles that I found ideas on which I based
my code. The Code Project has been my home for several years,
and I��ve gleamed so much knowledge from this place, I thank
you all very much for every article that has inspired this
effort. I do not believe that I would be where I am today
if it were not from learning many of the great articles
here on the code project, and scouring the source code of
so many excellent developers. To you all thanks, and you
have my respect more than you will ever know!
Thanks for reading, and if you enjoy the
article, please give me some feedback and help me improve
on this design! I��ll be posting more later, so enjoy this
for now! |