决定将上星期安装BUGZILLA的经验告诉大家,希望能对那些正在为装BUGZILLA的朋友们有所帮助
网上有很多关于bugzilla 在windows环境下安装的资料,但是也有部分不适合自已,走到某一步总会出现一些错误提示,我整整花了一周的时间才配置好,现将我的安装步骤写下来,希望对大家有些启发。
我的配置清单如下:Mysql 5.0 + ActivePerl 5.8.8 + IIS + Bugzilla-2.20.2
具体安装步骤如下:
一、装mysql 5.0,安装的时候很简单,默认方式下安装,一直按下一步就行了记住安装路径和设置的password,如果有问题可以到MySQL官方网站(http://dev.mysql.com/doc/)上查看在线手册。
接下来要配置MySQL。有些文章里写道需要手工修改root用户的密码,其实这一步在MySQL安装程序里就已经完成了,因此不用再去设置。我们要新建一个Bug数据库和一个Bugzilla访问这个数据库的用户。操作如下:
C:\mysql\bin>mysql
--user=root -p mysql
Enter password: ********
Welcome to the MySQL monitor. Commands
end with ; or \g.
Your MySQL connection id is 15 to server
version: 4.0.20a-debug
Type 'help;' or '\h' for help. Type
'\c' to clear the buffer.
mysql> create database ;
Query OK, 1 row affected (0.11 sec)
mysql> grant all privileges on
.* to ''@'' identified by '';
Query OK, 0 rows affected (0.03 sec)
mysql> flush privileges;
Query OK, 0 rows affected (0.00 sec)
mysql> quit
Bye
C:\mysql\bin>
|
退出,再次进入修改刚建的数据库密码:
C:\mysql\bin>mysql
--user=root -p mysql
Enter password: ********
Welcome to the MySQL monitor. Commands
end with ; or \g.
Your MySQL connection id is 15 to server
version: 4.1.11-nt
Type 'help;' or '\h' for help. Type
'\c' to clear the buffer.
mysql> set password for ''@'' =
OLD_PASSWORD ('');
Query OK, 0 rows affected (0.00 sec)
mysql> quit
Bye
C:\mysql\bin>
|
OK!到此MYSQL已经安装配置完毕。这此为止才安装了四分之一。
一、 装ActivePerl
1、 安装Perl也很容易,按照安装程序提示一步一步装就可以了。稍微复杂一点的是安装它的模块。不过有了Bugzilla汉化项目提供的批处理程序,这个步骤也非常简单了。只要双击Setup.bat文件就OK了
2、 如果没有批处理程序并且安装的机器不能上网,那只能自已手工安装了,首先到网站 http://landfill.bugzilla.org/ppm/
下载Modules到本机,然后在DOS环境下运行以下命令:
c:\ppm ,会出现一个perl pack manager,在这里设置存入modules的路径。
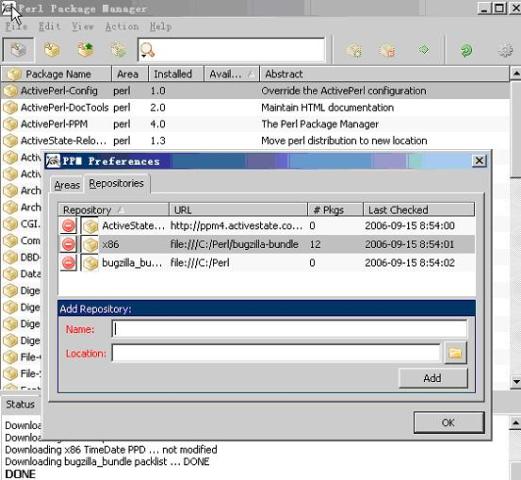
设置完以后再输入:c:\ppm install <包名> 另:在输入install命令之前需要到记着,别偷懒,一个一个装
完。
3、 如果将要安装bugzilla的机器能上网,不用下载那些Modules按以下操作将会更省事(蓝色字体需要手工输入的),这种方法我没试,但应该能成功。
C:\>ppm
PPM - Programmer's Package Manager version 3.1
.Copyright (c) 2001 ActiveState Corp.
All Rights Reserved.ActiveState is a devision of Sophos.
Entering interactive shell.
Using Term::ReadLine::Stub as readline library.
Type 'help' to get started.
ppm> rep add Bugzilla http://landfill.bugzilla.org/ppmRepositories:[1]
ActiveState PPM2 Repository[2] ActiveState Package Repository[3]
Bugzillappm> install AppConfig
====================
Install 'AppConfig' version 1.52 in ActivePerl 5.8.7.813.
====================
Downloaded 50508 bytes....Successfully installed AppConfig version
1.52 in ActivePerl 5.8.7.813.ppm> install TimeDate
====================
Install 'TimeDate' version 1.16 in ActivePerl 5.8.7.813.
====================
Downloaded 19235 bytes....Successfully installed TimeDate version
1.16 in ActivePerl 5.8.7.813.ppm> install DBI
====================
Install 'DBI' version 1.43 in ActivePerl 5.8.7.813.
====================
Downloaded 508164 bytes....Successfully installed DBI version
1.43 in ActivePerl 5.8.7.813.ppm> install DBD-mysql
====================
Install 'DBD-mysql' version 2.9002 in ActivePerl 5.8.7.813.
====================
Downloaded 178803 bytes....Successfully installed DBD-mysql
version 2.9002 in ActivePerl 5.8.7.813.ppm> install Template-Toolkit
====================
Install 'Template-Toolkit' version 2.13 in ActivePerl 5.8.7.813
.
====================
Downloaded 530770 bytes....Successfully installed Template-Toolkit
version 2.13 in ActivePerl 5.8.7.813.ppm> install MailTools
====================
Install 'MailTools' version 1.67 in ActivePerl 5.8.7.813.
====================
Downloaded 46881 bytes....Successfully installed MailTools version
1.67 in ActivePerl 5.8.7.813.ppm> install GD
====================
Install 'GD' version 2.07 in ActivePerl 5.8.7.813.
====================
Downloaded 363039 bytes....Successfully installed GD version
2.07 in ActivePerl 5.8.7.813.ppm> install Chart
====================
Install 'Chart' version 2.3 in ActivePerl 5.8.7.813.
====================
Downloaded 58641 bytes....Successfully installed Chart version
2.3 in ActivePerl 5.8.7.813.ppm> install GDGraph
====================
Install 'GDTextUtil' version 0.86 in ActivePerl 5.8.7.813.
====================
Downloaded 19178 bytes....Successfully installed GDTextUtil
version 0.86 in ActivePerl 5.8.7.813.
====================
Install 'GDGraph' version 1.43 in ActivePerl 5.8.7.813.
====================
Downloaded 71764 bytes....Successfully installed GDGraph version
1.43 in ActivePerl 5.8.7.813.ppm> install PatchReader
====================
Install 'PatchReader' version 0.9.4 in ActivePerl 5.8.7.813.
====================
Downloaded 9558 bytes....Successfully installed PatchReader
version 0.9.4 in ActivePerl 5.8.7.813.ppm> install Net::LDAP
====================
Install 'Convert-ASN1' version 0.19 in ActivePerl 5.8.7.813.
====================
Downloaded 26326 bytes....Successfully installed Convert-ASN1
version 0.19 in ActivePerl 5.8.7.813.
====================
Install 'perl-ldap' version 0.33 in ActivePerl 5.8.7.813.
====================
Downloaded 188548 bytes....Successfully installed perl-ldap
version 0.33 in ActivePerl 5.8.7.813.
====================
Install 'Net-LDAP-Express' version 0.11 in ActivePerl 5.8.7.813.
====================
Downloaded 7693 bytes....Successfully installed Net-LDAP-Express
version 0.11 in ActivePerl 5.8.7.813.ppm> |
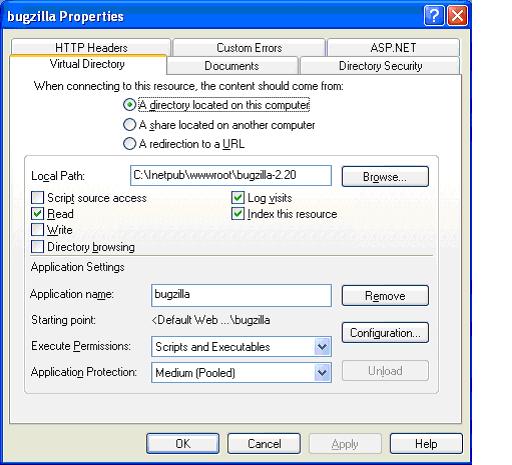
三、配置IIS
1、打开IIS管理界面。新建一个虚拟路径,指向Bugzilla所在文件夹
2、然后按应用程序设置按钮。增加一个映射,将.cgi文件映射到perl.exe。
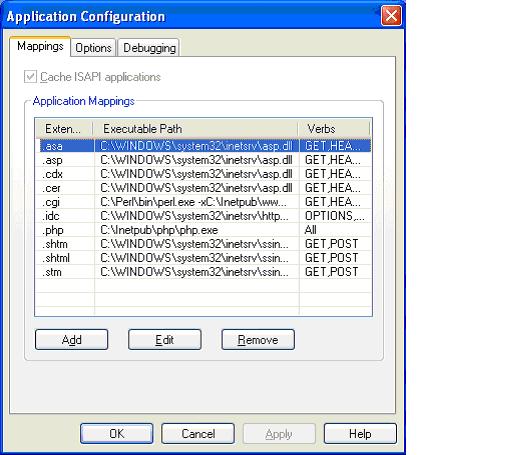
点ADD
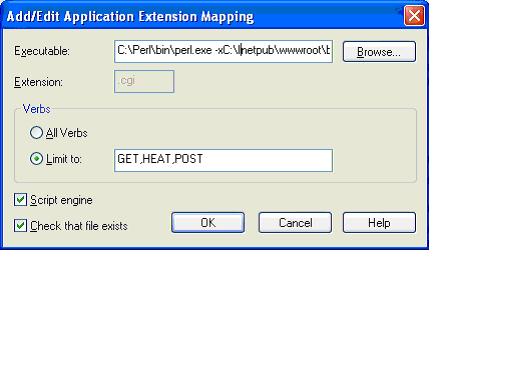
这里特别注意,有些文档里写成:perl.exe “%s” %s(全角下的双引号),这样不正确,在运行时出错(又花去一个小时)。正确的配置应该如下:
\perl.exe -x -wT "%s" %s例如:c:\perl\bin\perl.exe -xc:\bugzilla
-wT "%s" %s
3、最后,将index.cgi加入到默认文档列表中。最好移到最前面,这样可以加快查询速度。如果不希望/不能把index.cgi加入到默认文档列表中,也可以在安装Bugzilla的时候,将localconfig文件中$index_html的值改为1。这样运行checksetup.pl时,就会生成一个index.html,自动重定向到index.cgi。
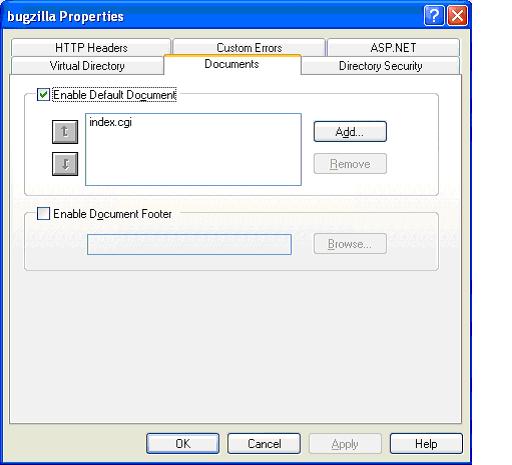
4、OK! 到此IIS已配置完成,接下来才开始安装bugzilla了。
四、安装bugzilla
其实这一步不叫安装的,将你下的bugzilla解压缩到一个文件夹里,我放到了c:\根目录下。进入到DOS环境,运行命令:perl
checksetup.pl 它会检查你有没有将所有的Modules安装成功,安装不成功的Modules会提示no found.。出现以下界面证明已安装成功:
C:\>cd
bugzilla
C:\bugzilla>perl checksetup.pl
Checking perl modules ...
Checking for AppConfig (v1.52) ok: found v1.55
Checking for CGI (v2.93) ok: found v3.10
Checking for Data::Dumper (any) ok: found v2.121_04
Checking for Date::Format (v2.21) ok: found v2.22
Checking for DBI (v1.38) ok: found v1.48
Checking for File::Spec (v0.84) ok: found v3.05
Checking for File::Temp (any) ok: found v0.16
Checking for Template (v2.08) ok: found v2.13
Checking for Text::Wrap (v2001.0131) ok: found v2001.09293
Checking for Mail::Mailer (v1.65) ok: found v1.67
Checking for Storable (any) ok: found v2.13The following Perl
modules are optional:
Checking for GD (v1.20) ok: found v2.16
Checking for Chart::Base (v1.0) ok: found v2.3
Checking for XML::Parser (any) ok: found v2.34
Checking for GD::Graph (any) ok: found v1.43
Checking for GD::Text::Align (any) ok: found v1.18
Checking for PatchReader (v0.9.4) ok: found v0.9.5
Most ActivePerl modules are available at Apache's ppm repository.A
list of mirrors is available at http://www.apache.org/dyn/closer.cgi/perl/win32-bin/ppms/
You can add the repository with the following command:
ppm rep add apache http://www.apache.org/dist/perl/win32-bin/ppms/Checking
user setup ...
This version of Bugzilla contains some variables that you may
wantto change and adapt to your local settings.
Please edit the file'./localconfig' and rerun checksetup.
plThe following variables are new to localconfig since you last
ranchecksetup.
pl: index_html cvsbin interdiffbin diffpath create_htaccesswebservergroup
db_driver db_host db_pass db_sock db_check
C:\bugzilla> |
2、接下来,在bugzilla的目录下打开localconfig文件,找到以下几行并修改蓝色字体的内:
##
How to access the SQL database:#$db_host = "localhost";
# where is the database?$db_port = 3306;
# which port to use$db_name = "bugs";
# name of the MySQL database$db_user = "bugs";
# user to attach to the MySQL database
## Enter your database password here. It's normally advisable
to specify
# a password for your bugzilla database user.
# If you use apostrophe (') or a backslash (\) in your password,
you'll
# need to escape it by preceding it with a \ character. (\')
or (\\)
#$db_pass = 'sockmonkey'; |
3、保存以后再次运行checksetup.pl。出现以下内容:别忘了记下输入的管理员的帐号和密码做为第一次登陆的用户和密码。
C:\bugzilla>perl
checksetup.plChecking perl modules ...
Checking for AppConfig (v1.52) ok: found v1.55
Checking for CGI (v2.93) ok: found v3.10
Checking for Data::Dumper (any) ok: found v2.121_04
Checking for Date::Format (v2.21) ok: found v2.22
Checking for DBI (v1.38) ok: found v1.48
Checking for File::Spec (v0.84) ok: found v3.05
Checking for File::Temp (any) ok: found v0.16
Checking for Template (v2.08) ok: found v2.13
Checking for Text::Wrap (v2001.0131) ok: found v2001.09293
Checking for Mail::Mailer (v1.65) ok: found v1.67
Checking for Storable (any) ok: found v2.13The following Perl
modules are optional:
Checking for GD (v1.20) ok: found v2.16Checking for Chart::Base
(v1.0) ok: found v2.3
Checking for XML::Parser (any) ok: found v2.34
Checking for GD::Graph (any) ok: found v1.43
Checking for GD::Text::Align (any) ok: found v1.18
Checking for PatchReader (v0.9.4) ok: found v0.9.5
Most ActivePerl modules are available at Apache's ppm repository.
A list of mirrors is available at http://www.apache.org/dyn/closer.cgi/perl/win32-bin/ppms/You
can add the repository with the following command: ppm rep
add apache http://www.apache.org/dist/perl/win32-bin/ppms/Checking
user setup ...
Creating data directory (./data) ...
Creating graphs directory...
Creating .htaccess...
Creating Bugzilla/.htaccess...
Creating ./data/.htaccess...
Creating ./template/.htaccess...
Creating ./data/webdot/.htaccess...
Precompiling templates ...
Checking for MySQL Server (v3.23.41) ok: found v4.0.20a-debugCreating
table user_group_map ...
Creating table series_data ...
Creating table longdescs ...
Creating table dependencies ...
Creating table components ...
Creating table keywords ...
Creating table cc ...
Creating table duplicates ...
Creating table groups ...
Creating table flagtypes ...
Creating table profiles ...
Creating table products ...
Creating table bugs_activity ...
Creating table series_categories ...
Creating table keyworddefs ...
Creating table fielddefs ...
Creating table group_control_map ...
Creating table profiles_activity ...
Creating table group_group_map ...
Creating table user_series_map ...
Creating table bugs ...
Creating table series ...
Creating table versions ...
Creating table flagexclusions ...
Creating table logincookies ...
Creating table watch ...
Creating table bug_group_map ...
Creating table votes ...
Creating table attachments ...
Creating table flags ...
Creating table milestones ...
Creating table tokens ...
Creating table flaginclusions ...
Creating table quips ...
Creating table namedqueries ...
Creating initial dummy product 'TestProduct' ...
Populating duplicates table...
Creating duplicates directory...
Migrating old chart data into database ...
Adding group tweakparams ...
Adding group editusers ...
Adding group creategroups ...
Adding group editcomponents ...
Adding group editkeywords ...
Adding group admin ...
Adding group editbugs ...
Adding group canconfirm ...
Looks like we don't have an administrator set up yet.
Either this is yourfirst time using Bugzilla, or your administrator's
privileges might haveaccidently been deleted.Enter the e-mail
address of the administrator: byron@example.com (此将是默认超级用户)You
entered 'byron@example.com'.
Is this correct? [Y/n] yEnter the real name of the administrator:
Byron JonesEnter a password for the administrator account:
beefPlease retype the password to verify: beef'byron@example.com'
is now set up as an administrator account.
C:\bugzilla>OK
|
到此,bugzilla已安装完毕,接下来最后一步是配置邮箱了。
五、配置邮箱。
由于bugzilla已经提供了内置的SMTP支持,如果是局域网内用的话只要安装一个windows 下的sendmail.exe,文件,将此文件放到和你的bugzilla同一目录下即可。如果发到其它邮件服务器中,可能还需要设置bugmail里的内容,(由于我是在局域网下配置的,这种方法没有试,请见谅)具体请参见bugzila的官方网站:http://www.bugzilla.org
六、登陆bugzilla 到这里,Bugzilla的安装就基本上搞定了。
在IE浏览器地址栏里输入:http://localhost/ 登陆bugzilla,至此你就能使用等待以久的bugzill缺陷跟踪体系统了。
经过漫长的安装过程,如果能和你共同分享成功的喜悦,可以给我留言哦,我的blog是:http://blog.51testing.com/chorry/
打开登陆界面后,使用你输入的邮箱和密码就可以登陆了
七、最后就是汉化bugzilla不过你不想汉化也没有问题。
将汉化包解压解压到cn文件夹,将整个文件目录 cn 拷贝至 Bugzilla 的子目录 template下;然后以管理员身份登录Bugzilla,点击页脚的
Parameters(系统参数设置)链接,将 languages 一项的值改为 cn,保存,则以后见到的Bugzilla页面就是汉语页面了。如果想返回英文界面,将
cn 改回 en 即可。为保证向后兼容,汉化的文件全部存为 UTF-8 格式。但不管你是否汉化Bugzilla,为强迫Bugzilla采用UTF-8来处理字符串,避免Bugzilla偶然出现的乱码,强烈建议大家将文件
安装目录>\Bugzilla\CGI.pm 的第55行改为 $self->charset('UTF-8')。汉化包的具体下载你可以在http://bugzilla.org/download.html
里找到相应的bugzilla汉化包。
八、一些bugzilla的参考网站Bugzilla官方网站
http://www.bugzilla.orgBugzilla汉化项目
http://sourceforge.net/projects/bugzilla-cnhttp://cosoft.org.cn/projects/bugzillchinese/Perl官方网站
http://www.perl.comActivePerl官方网站
http://www.activestate.com/Products/ActivePerlMySQL官方网站
http://www.mysql.comFake Sendmait for Windows
http://www.glob.com.au/sendmail/Installing Bugzilla on Microsoft
Windows
http://www.bugzilla.org/docs/win32install.html The Bugzilla Guide
http://www.bugzilla.org/docs/2.20/html Bugzilla windows安装红宝书
http://blog.fz0132.com/trackback.asp?tbID=654
|